BackPacker Air - Stativ MeFOTO - Kostenlose Bedienungsanleitung
Finden Sie kostenlos die Bedienungsanleitung des Geräts BackPacker Air MeFOTO als PDF.


Benutzerfragen zu BackPacker Air MeFOTO
0 Frage zu diesem Gerät. Beantworten Sie die, die Sie kennen, oder stellen Sie Ihre eigene.
Eine neue Frage zu diesem Gerät stellen
Laden Sie die Anleitung für Ihr Stativ kostenlos im PDF-Format! Finden Sie Ihr Handbuch BackPacker Air - MeFOTO und nehmen Sie Ihr elektronisches Gerät wieder in die Hand. Auf dieser Seite sind alle Dokumente veröffentlicht, die für die Verwendung Ihres Geräts notwendig sind. BackPacker Air von der Marke MeFOTO.
BEDIENUNGSANLEITUNG BackPacker Air MeFOTO
USER NOTICE

Do not exceed the maximum specified load capacity
(see specifications on the package label or visit www.mefoto.com).

Always ensure that Leg and Head Locks are tightly engaged before mounting any gear on your Tripod.

Do not use any Tripod below temperatures of -4^ or above +158^ (-20^ / +70^) .

Always clean and dry any Tripod after it has been exposed to wet, dusty, sandy or salty conditions. Your Tripod is not recommended for use in salt water. If required, clean tripod using a mild soap solution applied with a soft cloth, rinse with fresh water and dry with soft towel. Remove any dust, dirt or sand from all Leg Locks, Leg Sections and all moving parts.

Do not leave any Tripod in the sun for prolonged periods and avoid high temperature exposure.

Avoid leaving any Tripod unattended in areas where people could trip over the gear and get hurt.

Remove camera, lens, and all gear from any Tripod when transporting.

For your safety, don't let your MeFOTO gear come in contact with any electrical power source.
LIMITED WARRANTY COVERAGE
Your MeFOTO product has been carefully manufactured, has passed many quality assurance checks and has been thoroughly tested before shipment. It is warranted in the country from which you purchased it based on the date of purchase to the original owner, against defects in materials and workmanship. Please contact your local MeFOTO dealer for further information and details about your Warranty. The Warranty does not apply to damages caused by mishandling, dropping, or leaking batteries, nor modification or servicing performed by others.
保修范围
您所使用的美孚产品是经过精密加工,多项严密质量检测,所有功能严格测试才完整包装出厂的。所有材料或者工艺方面的瑕疵,可以在您所购买的区域免费维修或者更换。详细的质量保修可以联系您所在地的经销商。所有人为原因所造成的产品损坏不在保修范围内,例如:错误操作,严重摔落,或者电池漏电液体损坏。
MeFOTO®
TRAVEL TRIPOD KITS
Operating Instructions
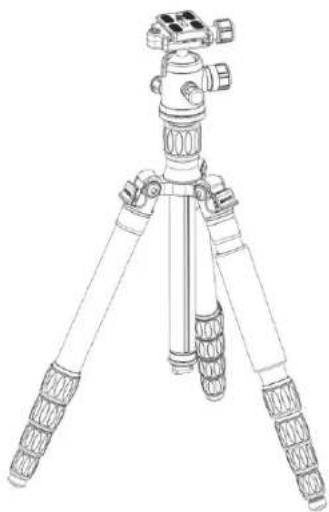
Thank you for making MeFOTO your choice for professional photographic equipment. Your MeFOTO gear is manufactured to provide years of dependable service. In order to obtain optimum satisfaction and performance, we suggest that you carefully read these instructions.
natural_image
Line drawing of a tripod-mounted camera with adjustable legs and head (no text or symbols)绚彩系列脚架套装 使用方法
感谢您选用美孚专业摄影器材,美孚产品提供值得您信赖的售后服务。为了让您对美孚产品的使用更加满意,我们建议您仔细阅读下面的使用说明。
MeFOTO®
text_image
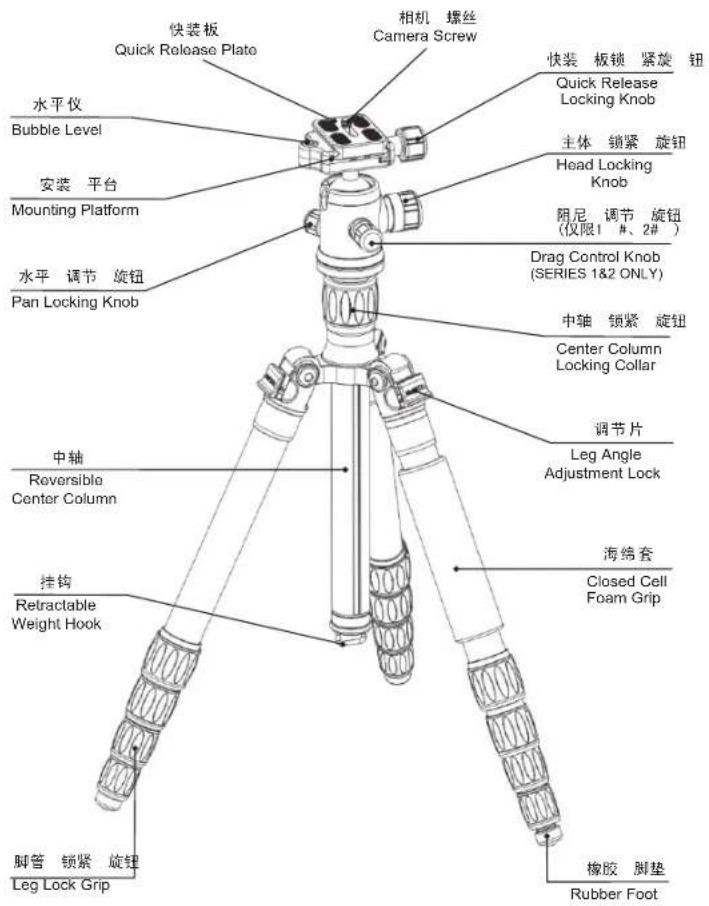
快装板 Quick Release Plate 相机 螺丝 Camera Screw 快装 板锁 紧旋 钮 Quick Release Locking Knob 水平仪 Bubble Level 安装 平台 Mounting Platform 水平 调节 旋钮 Pan Locking Knob 主体 锁紧 旋钮 Head Locking Knob 阻尼 调节 旋钮 (仅限1 #、2#) Drag Control Knob (SERIES 1&2 ONLY) 中轴 锁紧 旋钮 Center Column Locking Collar 调节片 Leg Angle Adjustment Lock 中轴 Reversible Center Column 挂钩 Retractable Weight Hook 海绵套 Closed Cell Foam Grip 脚管 锁紧 旋钮 Leg Lock Grip 橡胶 脚垫 Rubber Foot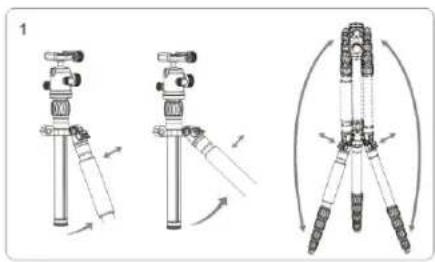
natural_image
Technical illustration of a tripod-mounted camera with motion arrows indicating rotation (no text or symbols)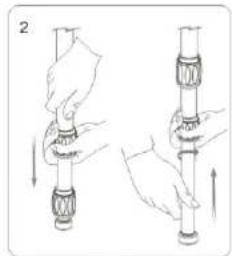
natural_image
Illustration of two hands holding a cylindrical object with a handle, showing motion and assembly (no text or symbols)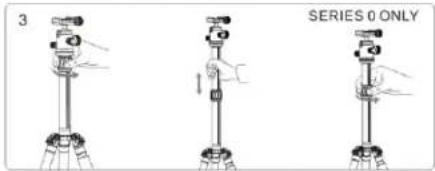
text_image
3 SERIES 0 ONLY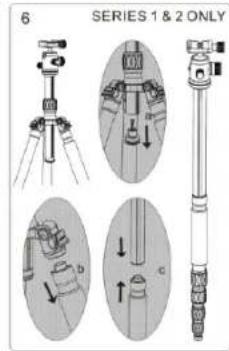
text_image
6 SERIES 1 & 2 ONLY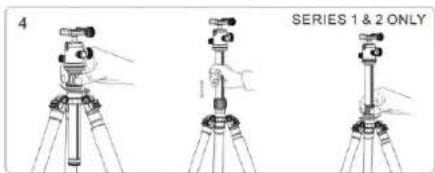
text_image
4 SERIES 1 & 2 ONLY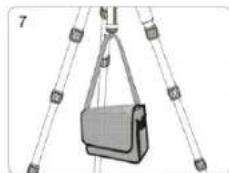
natural_image
Diagram of a suspended object with hanging weights and ropes, no text or symbols present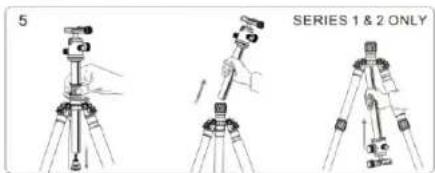
text_image
5 SERIES 1 & 2 ONLY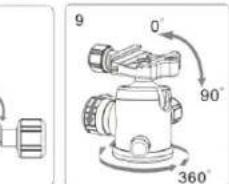
text_image
9 0° 90° 360°TRIPOD OPERATION
Before using your Tripod, adjust each Leg Section to the desired height and Leg Angle Setting. Make sure that the Tripod is firmly resting on a level surface and mount your came rasecurely on the Tripod Head. Always sengage any safety locks on the Tripod Head to prevent any accidental dismounting.
FOR BEST RESULTS: Do not raise the Tripod higher than necessary and extend the largest diameter Leg Sections first. Only extend the Center Column if required to reach maximum height or to fine-tune the vertical position.
FOR EXTRA STABILITY: Carefully hang your camera bag or other weight on the Retractable Spring-Loaded Weight Hook at the bottom of the Center Column.
NOTE: Never carry your Tripod with camera gear attached.
Leg Angle Adjustment (FIGURE 1)
To accommodate uneven terrain, awkward shooting situations or for low angle shooting, your MeFoto Tripod includes a 2-position Leg Angle Adjustment Sliding Lock. Each Leg can be adjusted by pulling the Leg Angle Lock out and selecting one of the two positions. Please make sure that the Leg Angle Lock is securely pushed back into the lock position after you have selected the desired Leg Angle. After use, the Leg Angle Adjustment Sliding Lock releases the unique Tripod Logs so they can be folded up 180°making it extremely compact for easy carrying and packing.
Leg Section Adjustment (FIGURE 2)
Each Leg section can be adjusted to the desired length by turning the Leg Lock grip 1/2 turn (180°) clockwise until the Leg is free to slide in or out. Once the desired length is achieved, turn the Leg Lock Grip counter-clockwise until the Leg Section is securely locked. Repeat this step for each Leg until the Tripod is set to the desired height.
NOTE: To prevent any accidental damage to your gear, always remove any mounted equipment (camera, etc.) from the Tripod before adjusting the Leg Sections.
Raising and Lowering the Telescoping Center Column – Series 0 (FIGURE 3)
To raise or lower the Telescoping Center Column, turn the Center Column Locking Knob counter-clockwise and set the Column to the desired position. While holding the Column in position, turn the Center Column Locking Knob clockwise to secure the Column in place. Don't over-tighten the Center Column Lock, as this could damage the threads.
Raising and Lowering the Center Column- (FIGURE 4)Series 1 & 2
To raise or lower the Center Column, turn the Center Column Locking Collar counter-clockwise and set the Column to the desired position. While holding the Column in position, turn the Center Column Locking Knob clockwise to secure the Column in place. Don't over-tighten the Center Column Lock, as this could damage the threads.
NOTE: Take special care when raising or lowering the Center Column, if a camera or equipment is mounted on the Tripod. Never loosen the Center Column Locking Knob without holding the Center Column. Failure to follow these instructions could result in damaged equipment.
Reversible Center Column (FIGURE 5)-Series 1 & 2
Your Tripod has the ability to reverse the Center Column for close-up photography, copy work and for difficult to reach objects. To reverse the Center Column, unscrew the Retractable Weight Hook located on the bottom of the Center Column. Loosen the Center Column Locking Collar and pull the Center Column out. Insert the Center Column through the bottom with the Mounting Plate upside-down and retighten the Center Column Locking Collar securely.
NOTE: Do not reverse the Center Column when a camera or equipment is mounted.
Transfunctional Feature - Converting to a Monopod - Series 1 & 2 (FIGURE 6)
To assemble as a monopod first unscrew the Retractable Weight Hook and pull the Center Column (with Head) out. Unscrew the Single tripod leg (the one with the foam grip). Screw the entire Center Column (with Head) onto the top of the Single Leg.
Retractable Weight Hook (FIGURE 7)
To help stabilize the tripod during windy conditions, hang a camera bag, sandbag or other similar item from the retractable weight hook.
NOTE: Take care not to overload the tripod with extra weight as this could have a reverse effect on increasing the stability of the tripod.
HEAD OPERATION
The MeFoto Double-Action Ball heads feature three operating Knobs. Drag control is manually adjusted and locked, along with independent Panning. Plus a Universal Quick Release Clamp with secondary Safety Lock System is incorporated.
Universal Quick Release Plate System
The Double-Action Ball heads feature a Universal Quick Release Plate system. It offers a quick method of mounting or releasing a Camera or Equipment from the Head. It's important that the correct Quick Release Plate be used along with the proper mounting screw (1/4–20 is included as the standard size but spare 1/4–20 and 3/8 plates of various lengths are available as accessories). Extra Plates are recommended as you can screw one to each Camera or Lens for even greater convenience when rapidly mounting and dismounting gear. And because of compatibility with the Universal system, most plates and special brackets from other manufacturers can be used as well.
Quick Release Lock (FIGURE 8)
When used properly, the Quick Release Lock offers two levels of security for your gear. To remove the Quick Release Plate, turn the Quick Release Locking Knob counter-clockwise. A partial opening of the clamping mechanism allows the Quick Release Plate to slide on the Mounting Platform for proper balance and positioning. Two Stop Screws (removable) on the bottom of the Quick Release Plate provide this first level of security. An additional counterclockwise turn of the Quick Release Locking Knob opens the clamp fully so that the Quick Release Plate can be tilted out to be removed. Reverse the process and tighten the Quick Release Locking Knob to secure the Quick Release Plate.
Ballhead Controls (FIGURE 9)
A large Head Locking Knob locks the Ballhead in place. Once the Knob is turned counter-clockwise and loosened, the Ballhead can move freely allowing the Mounting Platform to be positioned anywhere within a 0–90° vertical orientation. This movement is expanded by the use of the Pan Locking Knob which adds a 360° Panning range. The Pan control is fully independent and positioning can be adjusted easily and accurately by using the Graduated Panning Scale and Pointer on the Base of the Ballhead. When the Head Locking Knob is released, it is possible to move the Ballhead with some resistance or Drag. To achieve the proper degree of Drag, mount the intended camera or equipment onto the Ballhead. While holding the camerallens loosen the Head Locking Knob until it is released. Turn the Drag Control Knob clockwise to increase Drag, and counter-clockwise to decrease it.
FOR OPTIMUM RESULTS: Adjust the Drag under the weight capacity, temperature and conditions under which the Ballhead will be used.
NOTE: Do not over tighten any Locking Knobs as this could damage the Ball head locking mechanism.
操作步骤(简体中文)
在使用三脚架前,把脚架的高度和角度调整到合适的位置,以确保三脚架能平稳地放置在一个水平面上,然后把相机固定在三脚架云台上面,确保脚架和云台完全锁紧,防止照相机意外滑落。
三脚架角度调节:(如图1所示)
为了适应凹凸地面或者低角度拍摄,美孚脚架外拔式角度调节片,更容易调节高低两个角度。调整好角度后,请确保把角度调节片推到锁紧的位置。使用完脚架后,拔出脚管角度调节片,美孚独特的脚管可进行反向180°折叠,以便减少占用空间,利于携带。
三脚架高度调节:(如图2所示)
顺时针180°旋转脚管锁紧旋钮,直到每节脚管都可以自由伸缩,调节三脚架的每支脚管到要求的长度,然后逆时针旋转脚管锁紧旋钮,直到脚管完全锁紧。重复以上操作,调节三脚架到您所需要的高度。
注意:在调节脚管时,务必取下相机等设备,避免意外损坏。
可伸缩二级中轴-仅限0#:(如图3所示)
逆时针拧开中心管锁紧旋钮,拉伸中轴调到合适位置,然后顺时针旋转中心管锁紧旋钮锁紧中轴,记住不要过度锁紧中心管锁紧旋钮,这样会毁损坏螺纹。
注意:装有相机等设备时,小心调节中轴,松开中心管锁紧旋钮时务必握紧中心管,请遵照说明书进行操作。
可伸缩中轴-仅限1#、2#:(如图4所示)
逆时针拧开中轴锁紧旋钮,把中轴调到合适位置,然后顺时针旋转中轴锁紧圈锁紧中轴,记住不要过度锁紧中轴,这样会毁损坏螺纹。
中轴倒置-仅限1#、2#:(如图5所示)
倒置中轴可以拍摄特写镜头、复制图片和拍摄难接近的物体。将往钩座组件拧开,拧松中轴锁紧圈将中轴取出,将中轴倒置然后锁紧,中轴有防转槽,反转安装中轴时注意要将防转槽对齐切口注意:倒置中轴时,请务必卸下安装在中轴上相机或其他器材。
三脚架转换为独脚架-仅限1#、2#:(如图6所示)
a、将弹簧挂钩从中轴旋出,拿出中轴;
b. 将带海绵套的脚管从脚管接头旋出;
c、中轴云台组件与脚管组件装配;
完成三脚架到独脚架的转换
可伸缩挂钩(如图7所示)
在刮风时,需要挂上重物增加三脚架的稳定性,可在挂钩上挂上沙袋,照相机袋或类似的物品。注意不要超重,否则反而会影响三脚架的稳定性
云台使用说明
美孚双重保险球型云台带有三个旋钮,通过阻尼进行调节与锁紧,有独立的水平调节功能,并且通用快装夹带有二代安全锁紧装置。
通用快装板
带有通用快装板的双重保险球型云台,可以快速取下相机以及摄影设备。快装板上使用的是1/4-20的标准螺丝,且带有3/8的相机螺丝便于使用不同长度的摄影配件,附带的快装板与其他快装板兼容,并方便快速安装与释放相机和镜头。
快速锁紧装置:(如图8所示)
快速锁紧装置提供摄影设备双重保险。取下快装板,逆时针松开锁紧旋钮,快装板可在快装夹上滑动,进行平衡定位,快装板上的两颗可拆螺丝达到首要安全保险效果,逆时针松开旋钮,即可取出快装板,反之,即可锁紧快装板。
云台操作:(如图9所示)
逆时针松开大旋钮,云台可在垂直方向90度自由定位,位于云台底座的水平调节旋钮可进行360度水平调节。松开锁紧旋钮,可带阻尼调节云台。取下相机等摄影设备时,应握住摄影设备,再松开主体锁紧旋钮。100时针调节阻尼旋钮增加阻尼,反之,则减少阻尼。
最佳状态:在适当的承重范围、温度等条件下调节和使用云台。
注意事项:

使用此产品时,请不要超过规定的最大承重(详细参数请参考产品吊卡或者关字官网。)

使用此产品时,为了避免意外损坏相机,在安装相机之前,请务必确认产品的各个锁紧系统处于安全状态。

请勿在零下20度或高于零上70度的温度下使用木产品。

在潮湿、泥沙、风尘等环境中使用过后,一定要用干布将琐紧螺牙,和可能被有泥沙的部分清除干净,可使用无水酒精、消毒酒精、清洁剂等擦洗。不推荐在海水中使用本产品。

请勿长时间将产品放置在太阳下,避免长时间将产品放置在高温下,例如靠近汽车玻璃数小时。

在公共场所使用本产品时,请勿离人,避免小孩靠近,造成意外伤害。在危险的地方使用时,请谨慎操作。

禁止搭载设备(相机)等一起携带移动

为了人身安全,使用本产品时,请勿靠近高电压区域,或与强效化学接触。
操作步骤(繁體中文)
在使用三脚架前,把脚架的高度和角度调整到合适的位置,以确保三脚架能平稳地放置在一個水平面上,然後把相機固定在三脚架雲臺上面,確保脚架和雲臺完全鎖緊,防止照相機意外滑落。
三腳架角度調節:(如圖1所示)
為了適應凹凸地面或者低角度拍攝,美孚腳架外拔式角度調節片,更容易調節高低兩個角度。調整好角度後,請確保把角度調節片推到鎖緊的位置。使用完腳架後,拔出腳管角度調節片,美孚獨特的腳管可進行反向180°折疊,以便減少占用空間,利于攜帶。
三腳架高度調節:(如圖2所示)
順時針180°旋轉腳管鎖緊旋钮,直到每節腳管都可以自由伸縮。調節三腳架的每支腳管到要求的長度,然後逆時針旋轉腳管鎖緊旋钮,直到腳管完全鎖緊。重復以上操作,調節三腳架到您所需要的高度。
注意:在調節腳管時,務必取下相機等設備,避免意外損壞。
可伸縮二級中轆-僅限0#:(如圖3所示)
逆時針揮開中心管鎖緊旋鈕,拉伸中軸測到合適位置,然後順時針旋轉中心管鎖緊旋鈕鎖緊中軸,記住不要過度鎖緊中心管鎖緊旋鈕,這樣會毀損壞螺紋。
注意:裝有相機等設備時,小心調節中抽,緊開中心管鎖緊旋鈕時務必握緊中心管,請遵照說明書進行操作。
可伸缩中轴-偏限1#、2#:(如图4所示)
逆時針擰開中軸鎖緊旋鈕,把中軸調到合適位置,然後順時針旋轉中軸鎖緊圈鎖緊中軸,記作不要過度鎖緊中軸,這樣會毀損壞螺紋。
中軸倒置-僅限1#、2#:(如圖5所示)
倒置中轴可以拍攝特寫錢頭、復制圖片和拍攝難接近的物體。將抹钩座組件挿閥,挿緊中噴鎖緊圈將中軸取出,將中軸倒置然後鎖緊,中噴有防轉槽,反轉安裝中軸時注意要將防轉槽對齊切口注意:倒置中軸時,請務必卸下安裝在中噴上相機或其他器材。
三腳架轉換為獨腳架-僅限1#、2#:(如圖6所示)
a、將彈簧掛鉤從中軸旋出,拿出中軸;
b、將帶海綿套的腳管從腳管接頭旋出;
c. 中轴云套组件与脚管组件装配;
完成三脚架到掏脚架的转换
可伸缩挂钩(如图7所示)
在刮風時,需要挂上重物增加三腳架的穩定性,可在掛鉤上挂上沙袋,照相機袋或類似的物品注意不要超重,否則反面會影響三腳架的稳定性。
雲臺使用說明
关孚雙重保險球型雲臺帶有三個旋钮,通過阻尼進行調節與鎖緊,有獨立的水平調節功能,並且通用快裝夾帶有二代安全鎖緊裝置。
通用快装板
带有通用快装板的雙重保險球型雲臺,可以快速取下相機以及攝影設備。快裝板上使用的是1/4-20的標準螺絲,且帶有3/8的相機螺絲便于使用不同長度的攝影配件,附帶的快裝板與其他快裝板兼容,并方便快速安裝與释放相機和鏡頭。
快速鎖聚装置:(如图8所示)
快速鎖緊裝置提供攝影設備雙重保險。取下快裝板,逆時針鬆開鎖緊旋鈕,快裝板可在快裝夾上滑動,進行平衡定位,快裝板上的兩顆可拆螺絲達到首要安全保險效果,逆時針鬆開旋鈕,即可取出快裝板,反之,即可鎖緊快裝板。
雲臺操作:(如圖9所示)
逆時針鬆開大旋鈕,雲臺可在垂直方向90度自由定位,位于雲臺底座的水平調節旋鈕可進行360度水平調節。松間鎖緊旋鈕,可帶阻尼調節雲臺。取下相機等攝影設備時,應握住攝影設備,再鬆開主體鎖緊旋鈕,順時針調節阻尼旋鈕增加阻尼,反之,則減少阻尼。
最佳狀態:在適當的承重範圍、溫度等條件下調節和使用雲臺。
注意事項:

使用此產品時,請不要超過規定的最大承重(詳細參數請參考產品吊卡或者美孚官網。)

使用此產品時,為了避免意外損壞相機,在安裝相機之前,請務必確認產品的各個鎖緊系統處于安全狀態。

請勿在零下20度或高于零上70度的溫度下使用本產品。

在潮濕,泥沙,風塵等環境中使用過後,一定要用幹布將頃緊螺牙,和可能藏有泥沙的部分清除幹淨,可使用無水酒精,消毒酒精,清潔劑等擦洗。不推薦在海水中使用本產品。

請勿長時間將產品放置在太陽下,避免長時間將產品放置在高溫下,例如靠近汽車玻璃數小時。

在公共場所使用本產品時,請勿離人,避免小孩靠近,造成意外傷害。在危險的地方使用時,請謹慎操作。

禁止搭載設備(相機)等一起攜帶移動。

為了人身安全,使用本產品時,請勿靠近高電壓區域,或與強效化學接觸。