Protege 9.0 Wireless - Fahrradcomputer Planet Bike - Kostenlose Bedienungsanleitung
Finden Sie kostenlos die Bedienungsanleitung des Geräts Protege 9.0 Wireless Planet Bike als PDF.


Benutzerfragen zu Protege 9.0 Wireless Planet Bike
0 Frage zu diesem Gerät. Beantworten Sie die, die Sie kennen, oder stellen Sie Ihre eigene.
Eine neue Frage zu diesem Gerät stellen
Laden Sie die Anleitung für Ihr Fahrradcomputer kostenlos im PDF-Format! Finden Sie Ihr Handbuch Protege 9.0 Wireless - Planet Bike und nehmen Sie Ihr elektronisches Gerät wieder in die Hand. Auf dieser Seite sind alle Dokumente veröffentlicht, die für die Verwendung Ihres Geräts notwendig sind. Protege 9.0 Wireless von der Marke Planet Bike.
BEDIENUNGSANLEITUNG Protege 9.0 Wireless Planet Bike

protegé 9.0
WIRELESS
instructions
Thank you for purchasing the Planet Bike Protegé 9.0 Wireless bicycle computer. Planet Bike will donate 25% of our profits from this purchase and any other Planet Bike products you buy to grassroots bicycle advocacy groups that work to improve conditions for cyclists. Enjoy your
new Protegé bicycle computer and thank you for making a difference!

text_image
25% of profits donated to bike advocacy1. Parts List
- 31.8 mm Mounting Bracket 3. Camp Where Sensor
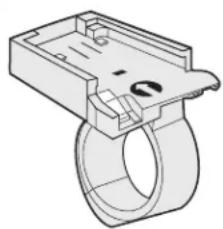
natural_image
Technical line drawing of a mechanical clamp or bracket component (no text or symbols)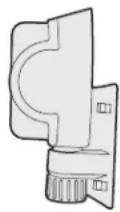
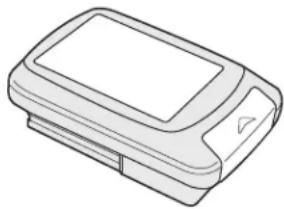
natural_image
Line drawing of a rectangular electronic device with a screen and buttons (no text or symbols)- Battery

- Wheel Magnet
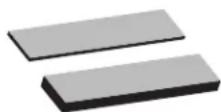
- Quick Ties6. Rubber Shims
2. Mounting Instructions
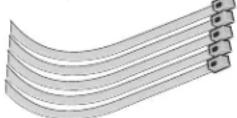
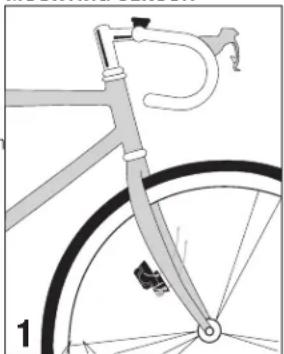
STEP 1: Thread the quick ties through the slots in the wheel sensor and attach to the right or left fork arm so that it is on the same side as the mounting bracket, making sure that the battery cover is facing the wheel (diagram #1).
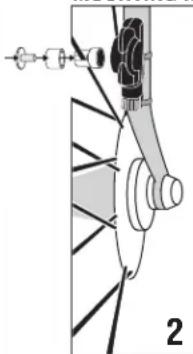
STEP 2: Attach magnet to spoke using a screwdriver (diagram #2) so that the magnet lines up with the top or bottom glossy line on the wheel sensor. Do not over-tighten magnet screw.
STEP 3: Unthread sensor knob until sensor can swivel freely and rotate the sensor until it is within 2mm of the magnet (diagram 3). Tighten the knob to fix sensor position.
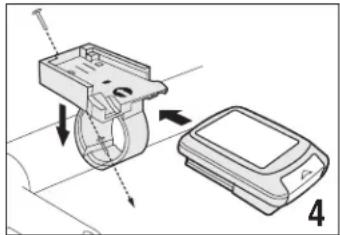
STEP 4: Attach the computer bracket to the handlebars near the stem (diagram #4). For 31.8 handlebars, no rubber shim is needed. For smaller diameter handlebars, use the large shim to achieve a snug fit. Tighten the screw so the bracket will not rotate on the handlebars. Slide the computer head into the bracket until it 'snaps' into place.
STEP 5: Test for proper alignment of the magnet and sensor. First, push the computer towards the front of the bike to activate. Now, spin the front wheel. Speed will begin to register if the magnet and sensor are properly aligned.
TO REMOVE COMPUTER FROM BRACKET: Push the computer in the opposite direction of when you snapped it into the bracket (diagram 5). The computer head will "snap" out. Note that you may need to push hard. Don't be afraid of breaking anything, the computer will pop out.
MOUNTING SENSOR
natural_image
Side view of a bicycle wheel with handle and seat (no text or symbols)MOUNTING BRACKET
natural_image
Mechanical assembly diagram showing a motor housing and a rectangular component with directional arrows (no text or symbols)MOUNTING MAGNET (Front Wheel)
natural_image
Mechanical assembly diagram showing a gear and shaft assembly (no text or labels)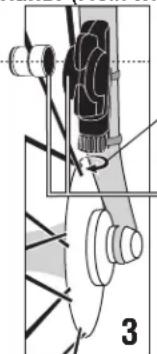
natural_image
Mechanical assembly diagram showing gear and shaft components (no text or labels)TURN KNOB COUNTER CLOCKWISE TO ADJUST ANGLE
Line up Sensor and Magnet at same level
* Less than 2 mm apart
* DO NOT line up Magnet between GLOSSY LINES on Sensor.
COMPUTER HEAD REMOVAL
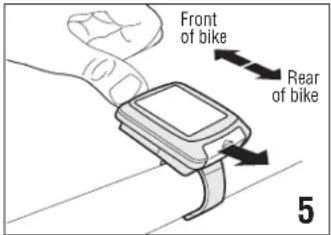
text_image
Front of bike Rear of bike 53. Functions & Specifications
SEE TOP OF NEXT PAGE.
SCREEN:
1234
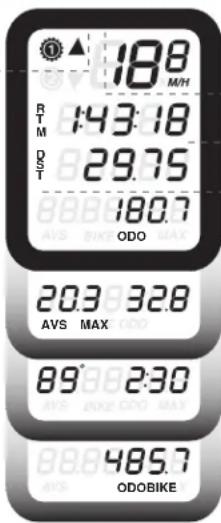
text_image
188 R TM 143:18 D E T 29.75 180.7 ODO 203 328 AVS MAX ODO 89° 230 AVS JOKE ODO MAX 88.8 485.7 AVS ODOBIKELINE: LCD Specification: Line 1, 2 and 3 modes do not change
1 CURRENT SPEED • Miles or Kilometers per hour • 0-99.9 mph/Kph • Increments of 0.1 mph/Kph
2 RIDE TIME, "RTM" • Up to 9:59:59 • Increments of 1 second
3 RIDE DISTANCE, "DST" • Up to 999.99 M or K • Increments of 0.01 M or K
4 ODOMETER, "ODO" • Up to 999.99 M or K • Increments of 0.01 M or K (ODO= Cumulative distance for BIKE 1 and BIKE 2)
OR CHANGE MODE TO SCREEN 2-4 BY PUSHING COMPUTER FORWARD IN BRACKET TO ACCESS:
OR AVERAGE SPEED, "AVS" • 0-99.9 mph/Kph • Increments of 0.1 mph/Kph MAXIMUM SPEED, "MAX" • 0-99.9 mph/Kph • Increments of 0.1 mph/Kph
OR TEMPERATURE • -19° to 120°F/ -19° to 50°C CLOCK • 12 Hr format • Indicated by flashing colon ":"
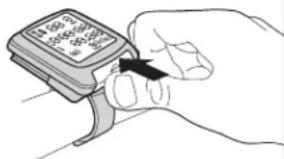
natural_image
Hand holding a smartwatch with a black arrow pointing to the grip (no text or symbols visible)BIKE ODOMETER, "BIKE ODO" • Up to 99,999 M or K • Increments of 0.1 M or K
This is the distance for the wheel size currently being used, it only appears when distance is registered on both BIKE 1 and BIKE 2.
PUSH AND RELEASE FOR
MODE CHANGE
CAUTION:
LESS THAN ONE SECOND
OR YOU WILL RESET ALL
OF THE RIDE DATA
4. Additional Features

natural_image
Abstract geometric shapes including a gear and triangles with numbered labels (1, 2) on a gradient backgroundSPEED COMPARATOR: Indicated by “▲” and “▼.”
“▲” indicates your current speed is faster than your current average speed. “▼” indicates your current speed is slower than your current average speed.
DUAL WHEEL SIZE SETTINGS: Indicated by “①” or “②.” Allows user to program two separate wheel sizes so the computer can be used for two separate bikes with purchase of second handlebar bracket harness (part #8000-6).
“①” represents an ATB or Hybrid tire.
“②” represents a Road or smooth tire.
This allows you to know which wheel size corresponds with which bike you are riding.
ADDED FEATURES:
- Auto LCD Off - LCD automatically shuts off to conserve power after 5 minutes of non-use. Clock will still be displayed.
- MacroMonitor™ LCD display displays up to 5 functions at once, allowing for fewer mode changes.
- "Buttonless" design for ease of use - push computer forward in bracket to change modes.
- Weather proof construction for all-weather use.
5. Computer Setup and Programming
BATTERY INSTALLATION: To install the battery, turn the computer over and remove the battery cover using a coin (diagram #6). Install the battery (model CR2032 3V Lithium) with the "+" side facing up. Replace the battery case, making sure that the rubber gasket is in place and the batter cover is flush with the battery case. Refer to the text below to setup computer. The battery should last for 6 months with normal use.
1) ENTER THE PROGRAMMING MODE by clicking the mode button (diagram 6) until "ODO" is displayed on line 4. Using a pen or the end of a bent paper-clip, depress and hold the set button for 3-4 seconds. Upon release, "M/H" or "KM/H" will flash in the upper right of the screen.
2) TO SELECT MILES/HOUR (M/H) OR KILOMETERS/HOUR (KM/H,) press the mode button. Press the set button to lock in your selection and the screen will display "2154" with the "4" flashing.
3) DETERMINING THE WHEEL SIZE SETTING (WSS) can be done in two ways. Please note that for WSS less than 1000mm, you must input your WSS in WSS 2 “②”. WSS 1 “①” does not allow a size less than 1000mm.
METHOD 1: Read the tire size on the side wall of your tire and input the number that corresponds to your tire size on the wheel size chart to the right. Since there are many tire manufacturers and designs, tires listed as the same size from different manufacturers can actually vary significantly in their actual circumference. Therefore, we recommend using method 2 for maximum accuracy in you computer readings.
METHOD 2: Wheel Roll Out: For best results, find a flat smooth surface to perform the wheel roll out and inflate your tires to riding pressure.
1) Place a piece of masking tape or draw a line on the surface to determine a starting position.
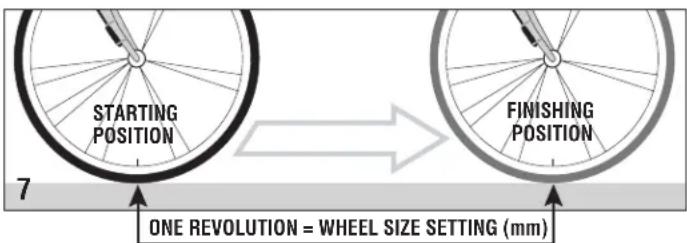
2) Position the front tire valve at the 6:00 position (diagram #7) directly above the starting position.
3) Roll the bicycle forward one revolution of the wheel on a straight line until the valve stem is again at the 6:00 position. (Note: Putting pressure on the handle bars to simulate body weight on the tire will give more accurate results.) Mark the finishing position with masking tape or a line. Repeat the procedure if necessary and average the results. Measure the distance between the starting and finishing positions in mm, this is your WSS. (Note: If you use an inch measuring tape, multiply inches by 25.4 to achieve mm.) This is your WSS in mm.
4) INPUTING WHEEL SIZE SETTING ① (WSS)
A) Press "mode" button to change "flashing" first digit to desired selection.
B) Press "set" button to lock in your selection and advance to the next flashing digit.
C) Repeat steps A-B until all four digits are set. After the forth digit is set, it will advance the screen to Odometer setting.
text_image
STARTING POSITION 7 FINISHING POSITION ONE REVOLUTION = WHEEL SIZE SETTING (mm)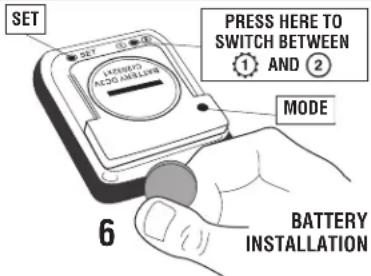
text_image
SET PRESS HERE TO SWITCH BETWEEN ① AND ② MODE 6 BATTERY INSTALLATION| TIRE SIZE | WSS | TIRE SIZE | WSS |
| 20 x 1.75 | 1502 | 700 x 18c | 2072 |
| 24 x 1.0 | 1750 | 700 x 20c | 2091 |
| 24 x 1.75 | 1894 | 700 x 23c | 2105 |
| 24 x 2.0 | 1925 | 700 x 28c | 2143 |
| 26 x 1.25 | 1950 | 700 x 32c | 2160 |
| 26 x 1.5 | 1996 | 700 x 38c | 2184 |
| 26 x 1.95 | 2055 | FOR FUTURE REFERENCE,WRITE YOUR WSS HERE: | |
| 26 x 2.0 | 2066 | ||
| 26 x 2.1 | 2070 | ||
| 26 x 1 (559mm) | 1925 | ||
| 26 x 1 (650c) | 1925 | ||
5) ODOMETER SETTING ①: The digit on the far right will be flashing. (If you don't need to set the Odometer, repeatedly press "set" to advance to WSS ②.) Repeat steps A-B again to set the Odometer.
6) WHEEL SIZE SETTING ② (WSS): The screen will now display ② default WSS '0000' with the first '0' flashing. Repeat steps to set WSS ①.
7) ODOMETER SETTING ②: Repeat steps to set Odometer ①.
8) CLOCK SETTING: The hour digit on the far left will be flashing. Repeat steps A-B again to set the time. To reset the clock only, press mode button until clock function is displayed on line four. Press "set" button to initiate clock reset. Follow steps A-B above to set the time. When you are done, the computer will enter normal operating mode. Replace the computer in its bracket and you are ready to ride!
6. Computer Operation
PRECAUTION: When using the Protegé Bicycle Computer, you should ride safely and pay primary attention to the road, traffic or trail conditions at all times.
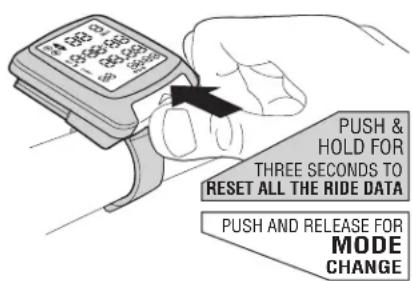
MODE CHANGE: Push the computer forward in the bracket as far as it will go and release. The forth line will change functions. It is recommended that the thumb be positioned in the center of the computer when activating mode changes. Note: Do not hold the computer forward in the bracket for more than one second or Ride Data will be reset to '0'.
RESETTING RIDE DATA: After your ride or before your next ride, you can reset 'ride' data (Ride Time, Ride Distance) to '0' by pushing the computer forward in the bracket and holding for three seconds until ride data clears to '0'. Release computer immediately when ride data clears to '0'.
CHANGING WHEEL SIZES:
Press 1/2 button on backside of computer. (Diagram 6)
text_image
PUSH & HOLD FOR THREE SECONDS TO RESET ALL THE RIDE DATA PUSH AND RELEASE FOR MODE CHANGE©2006. Planet Bike. All Rights Reserved.
7. Trouble Shooting
1) DISPLAY IS BLANK OR SHOWS PARTIAL DIGITS
Remove and reinsert battery. If problem persists, a new battery may be required.
2) LCD DISPLAYS NUMBERS BUT DOES NOT RECORD DATA WHEN RIDING.
Check for proper wheel sensor/magnet alignment (See Section #2, Step 2). Check and clean contacts on bracket and computer. Use mild detergent and water and dry completely. DO NOT use alcohol or any kind of solvent.
3) LCD SCREEN IS DARK
This is normally caused by overheating when computer is left sitting in the sun. Allow the computer to cool and it will return to normal.
4) THE MODE BUTTON WILL NOT WORK DURING SETUP.
This is usually caused by the set button being slightly stuck inside the computer. Try bending a paper clip and use the end to wiggle the set button around until it pops and is flush with the computer case. This will unlock the mode button and make it possible to set up the computer.
5) THE LCD SCREEN GOES BLANK AND COMPUTER RESETS.
Take out the battery and bend the two metal contacts towards the battery to help establish better contact. Re-insert the battery.
If you experience any other problems, Contact your Planet Bike dealer or Planet Bike.
Planet Bike.
2402 Vondron Rd
Madison, WI 53718