
TX-25CK1 - Fernseher PANASONIC - Kostenlose Bedienungsanleitung
Finden Sie kostenlos die Bedienungsanleitung des Geräts TX-25CK1 PANASONIC als PDF.


| Produkttyp | Farbfernseher |
| Marke | Panasonic |
| Modell | TX-25CK1 |
| Bildschirmdiagonale | 59 cm (25 Zoll) |
| Abmessungen (B x H x T) | 580 mm x 538 mm x 442,5 mm |
| Gewicht | 27 kg |
| Stromversorgung | 220-240 V, 50 Hz AC |
| Leistungsaufnahme (Betrieb) | 76 W |
| Leistungsaufnahme (Standby) | ca. 1 W |
| Audio-Ausgangsleistung | 2 x 10 W (Musikleistung), 8 Ω |
| Empfangssysteme | PAL I, PAL 525/60 M.NTSC, NTSC (nur AV-Eingang) |
| Empfangsbereich | UHF Kanäle 21–68 |
| Programmspeicherplätze | 99 + VCR (Programmplatz 0) |
| Anschlüsse (Rückseite) | 21-polige SCART-Buchse (Audio/Video Ein-/Ausgang, RGB-Eingang) |
| Anschlüsse (Vorderseite) | RCA Audio/Video-Eingang, 3,5-mm-Kopfhöreranschluss |
| Besondere Funktionen | CATS (Kontrastanpassung), NICAM-Stereo, Teletext (FLOF, TOP, LIST), Kindersicherung, Owner ID, Automatischer Sendersuchlauf, Manuelle Senderprogrammierung, Programmplatz-Tausch |
| Bildverbesserung | Kontrast, Helligkeit, Farbe, Schärfe, Farbton (nur NTSC), CATS (C-A-T-S) |
| Klangregelung | Bass, Höhen, Balance, Lautstärke, Modus (Musik/Sprache), NICAM |
| Reinigung und Pflege | Gehäuse und Bildschirm mit weichem, leicht feuchtem Tuch und milder Seifenlauge reinigen; keine benzol- oder petroleumhaltigen Lösungen verwenden |
| Sicherheitshinweise | Netzstecker ziehen vor Reinigung; Belüftungsabstand von mindestens 5 cm rundum; keine eigenständigen Reparaturen durchführen; nur zugelassene Sicherungen verwenden |
| Zubehör (im Lieferumfang) | Fernbedienung (EUR511300), 2 x R6 (UM3) Batterien, Bedienungsanleitung TQB8E2751U-1 |
| Garantie | CRT-Garantie und TV-Garantie (Details in der Bedienungsanleitung) |
Häufig gestellte Fragen - TX-25CK1 PANASONIC
Benutzerfragen zu TX-25CK1 PANASONIC
0 Frage zu diesem Gerät. Beantworten Sie die, die Sie kennen, oder stellen Sie Ihre eigene.
Eine neue Frage zu diesem Gerät stellen
Laden Sie die Anleitung für Ihr Fernseher kostenlos im PDF-Format! Finden Sie Ihr Handbuch TX-25CK1 - PANASONIC und nehmen Sie Ihr elektronisches Gerät wieder in die Hand. Auf dieser Seite sind alle Dokumente veröffentlicht, die für die Verwendung Ihres Geräts notwendig sind. TX-25CK1 von der Marke PANASONIC.
BEDIENUNGSANLEITUNG TX-25CK1 PANASONIC
Panasonic
natural_image
Black-and-white photo of a flat-screen monitor with no visible text or symbols on its cover or frame.Colour Television
TX-28CK1 TX-25CK1 TX-21CK1
Quintrix
CATS

Operating Instructions
TQB8E2751U-1
English
WELCOME
Dear Panasonic Customer
Welcome to the Panasonic family of customers. We hope that you have many years of enjoyment from your new colour television. This is a very advanced television; however, the Quick Start Guide will allow you to use the TV as quickly as possible. You can then read the instructions completely and retain them for future reference.
TABLE OF CONTENTS
- Warnings and Precautions .... 3
- Accessories 4
- Inserting the Remote Control Batteries .... 4
- Basic Controls 5
- Quick Start Guide 6
- Main Menu Flow Chart 8
- On Screen Displays 8
• Main menu 9
• Sound menu 10
- Setup menu 11
- Tuning menu 12
- Tuning – Auto Setup 13
- Tuning – Manual Tuning 14
- Tuning – Shipping Condition 15
● Tuning – Owner ID 16
- Swap – Programme swapping .... 17
- Other Features
- AV selection – AV mode 17
• VCR Controls 18
VCR and Satellite Receiver installation 19 -
Teletext function 20
-
External audio/video connections 21
- Troubleshooting 22
- User Information 23
- Specifications 23
WARNINGS AND PRECAUTIONS
This TV set is designed to operate on 220–240V, 50Hz A.C.
To avoid damage that may result in electric shock or fire, do not expose the unit to rain or excessive moisture.
○ WARNING: HIGH VOLTAGE!!!
Do not remove the rear cover as live parts are accessible when it is removed. There are no user serviceable parts inside.
○ Avoid exposing the TV set to direct sunlight and other sources of heat.
The On/Off switch on this model does not fully disconnect the TV from the mains supply. Remove the mains plug from the wall socket when the TV set is not used for a prolonged period of time.
CABINET AND PICTURE TUBE CARE
Remove the mains plug from the wall socket. The cabinet and picture tube can be cleaned with a soft cloth moistened with mild detergent and water. Do not use solutions containing benzol or petroleum. TV sets can produce static electricity, care must be taken whenever touching the TV screen.
☐ Adequate ventilation is essential to prevent failure of electrical components; we recommend that a gap of at least 5cm is left around this TV even when it is placed inside a cabinet or between shelves.
WASTE DISPOSAL
The used packaging and batteries should be disposed of in appropriate recycle bins.
FOR YOUR SAFETY PLEASE READ THE FOLLOWING TEXT CAREFULLY
This appliance is supplied with a fitted three pin mains plug for your safety and convenience. A 5 amp fuse is fitted in this plug. If the fuse is replaced then the replacement fuse must be 5 amp rated and should be approved by ASTA or BSI to BS1362.
Check for the ASTA mark

or the BSI mark

on the body of the fuse.
If the fitted plug has a removable fuse cover you must ensure that it is refitted when the fuse is replaced. If you lose the fuse cover the plug must not be used until a replacement cover is obtained. Replacement fuse covers can be purchased through your local Panasonic dealer.
The plug fitted to this appliance incorporates a mains filter circuit. If this is removed or replaced with a non-filtered plug this television will no longer meet the European standards for Electromagnetic Compatibility (EMC). If the fitted plug is unsuitable for the socket outlet in your home an appropriate adapter should be used.
Nonetheless, if the fitted plug is replaced, the fuse should be taken out and the cut-off plug disposed of safely. There is danger of severe electrical shock if the cut off plug is inserted into any 13 amp. socket.
If a new plug is to be fitted please observe the wiring code as shown below. If in any doubt please consult a qualified electrician.
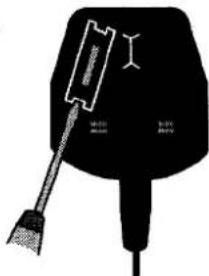
How to replace the fuse (for plug type shown in example 1):
Lift out the removable fuse compartment with a screwdriver and replace the fuse, then refit securely into the mains plug (see example 1).
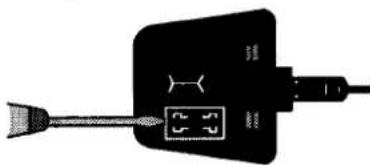
How to replace the fuse (for plug type shown in example 2):
Lift open the fuse compartment, in the mains plug, with a screwdriver, and replace the fuse, then press the fuse cover down securely (see example 2).
Example 1.
text_image
hairdryer 100ml 500ml 500mlExample 2.
natural_image
Pure electrical circuit lines without any symbolsIMPORTANT: The wires in the mains lead of this appliance are coloured in accordance with the following code:
BLUE : NEUTRAL BROWN : LIVE
As the colours of the wires in the mains lead of this appliance may not correspond to the markings identifying the terminals in your plug, proceed as follows :-
- The BLUE wire must be connected to the terminal marked 'N' or coloured black.
- The BROWN wire must be connected to the terminal marked 'L' or coloured red.
IMPORTANT NOTE: Under no circumstances should either of these wires be connected to the Earth terminal of the three pin plug, marked with the letter 'E' or the earth symbol.
Check that you have the accessories and items shown


Operating Instruction book TQB8E2751U-1

Remote Control Transmitter EUR511300

Batteries for the Remote Control Transmitter. (2 x R6 (UM3) size)
text_image
Panasonic TX-26CK1 TX-25CK1 TX-21CK1 Optimics ECLN 总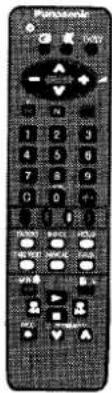
text_image
Piagetower + - VOUT 1 2 3 4 5 6 7 8 9 0 0 PICKER PICKER PICKER TWO VOUT NOVEL FLOW MINI + - RISK NoVEL MINI

CRT Guarantee

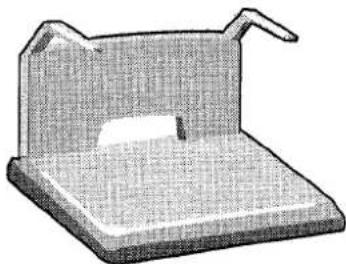
TV Stand TS-2800 (Assembly Instructions are included in stand packaging)


TV Guarantee
natural_image
3D rendered image of a mechanical component with a rectangular base and two protruding arms (no text or symbols visible)
Questionnaire
INSERTING THE REMOTE CONTROL BATTERIES
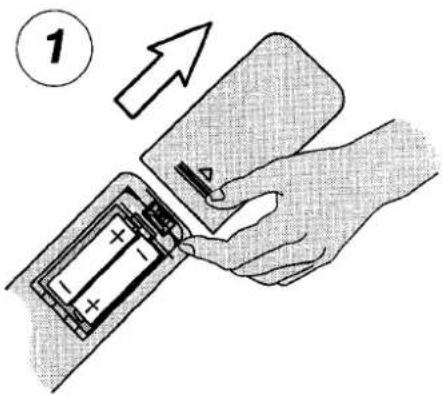
text_image
①Slide off the battery cover
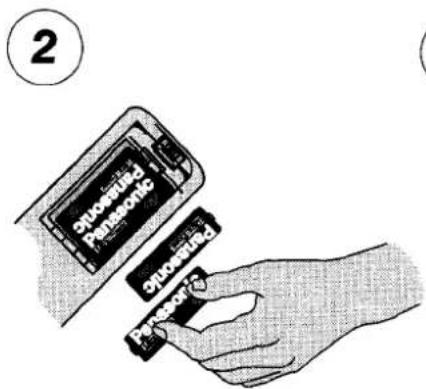
text_image
2 Onseated Panasonic Onseated PanasonicInsert batteries – note correct polarity (+ and -)
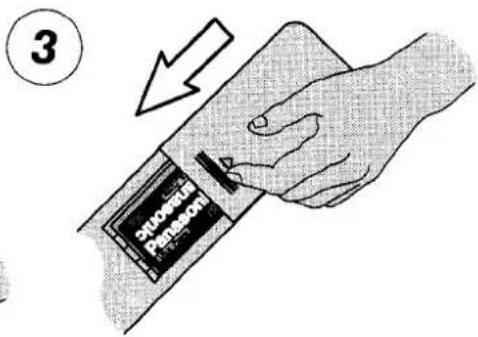
text_image
3 Svcsel PensionsReplace the cover
Notes:
• Make sure that the batteries are fitted the correct way round.
- Do not mix old batteries with new batteries. Remove old, exhausted batteries immediately.
- Do not mix different battery types, i.e. Alkaline and Manganese. Do not use rechargeable (Ni-Cad) batteries.
BASIC CONTROLS
Front Panel
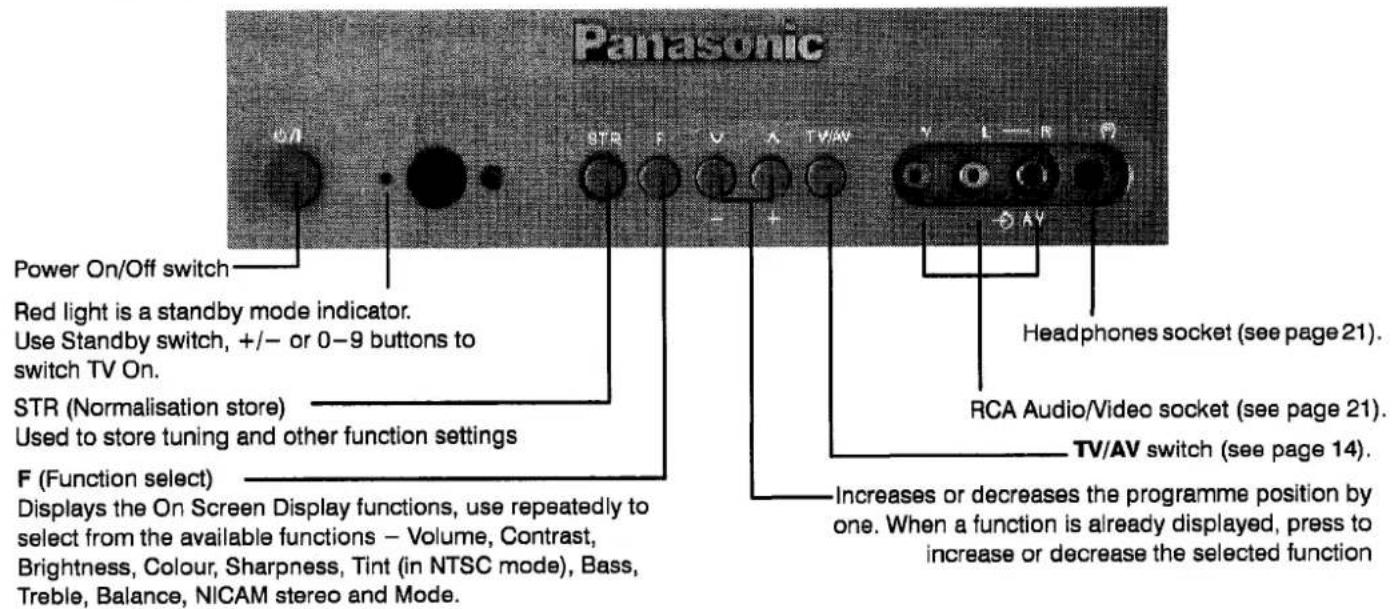
text_image
Panasonic Power On/Off switch Red light is a standby mode indicator. Use Standby switch, +/- or 0-9 buttons to switch TV On. STR (Normalisation store) Used to store tuning and other function settings F (Function select) Displays the On Screen Display functions, use repeatedly to select from the available functions – Volume, Contrast, Brightness, Colour, Sharpness, Tint (in NTSC mode), Bass, Treble, Balance, NICAM stereo and Mode. Headphones socket (see page 21). RCA Audio/Video socket (see page 21). TV/AV switch (see page 14). Increases or decreases the programme position by one. When a function is already displayed, press to increase or decrease the selected functionRemote Control Unit
text_image
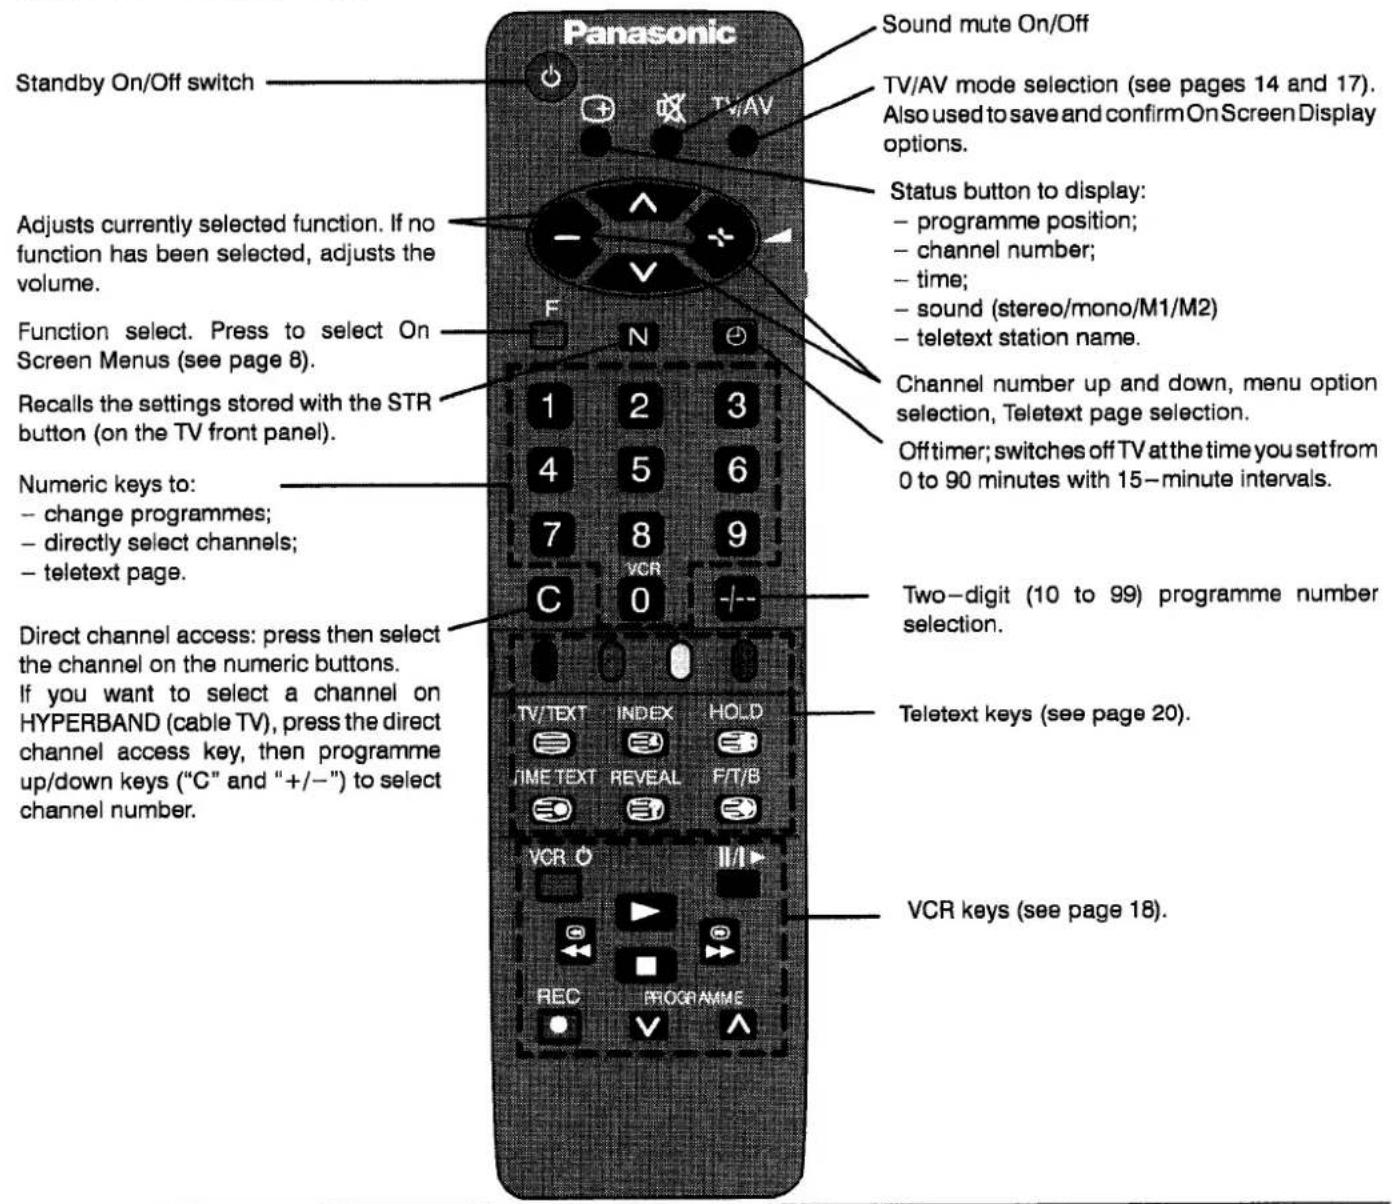
Panasonic Standby On/Off switch Adjusts currently selected function. If no function has been selected, adjusts the volume. Function select. Press to select On Screen Menus (see page 8). Recalls the settings stored with the STR button (on the TV front panel). Numeric keys to: - change programmes; - directly select channels; - teletext page. Direct channel access: press then select the channel on the numeric buttons. If you want to select a channel on HYPERBAND (cable TV), press the direct channel access key, then programme up/down keys ("C" and "+/-") to select channel number. Sound mute On/Off TV/AV mode selection (see pages 14 and 17). Also used to save and confirmOn Screen Display options. Status button to display: - programme position; - channel number; - time; - sound (stereo/mono/M1/M2) - teletext station name. Channel number up and down, menu option selection, Teletext page selection. Offtimer; switches off TV at the time you set from 0 to 90 minutes with 15-minute intervals. Two-digit (10 to 99) programme number selection. Teletext keys (see page 20). VCR keys (see page 18)QUICK START GUIDE
- If connecting the TV using an RF cable only, proceed to option 1.
-
If connecting the TV to VCR or Satellite Receiver using Scart and RF cables, proceed to option 2.
3 If connecting the TV both to Satellite Receiver and VCR using Scart and RF cables, proceed to option 3. -
Connection of TV using an RF cable only
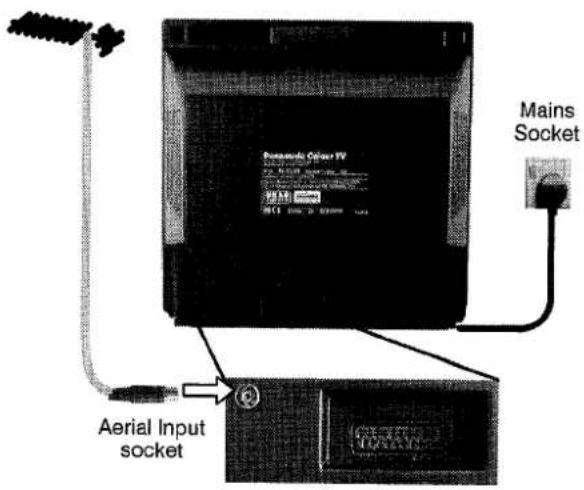
text_image
Panasonic Optera TV Mains Socket Aerial Input socket- Connection of TV to VCR or Satellite receiver using Scart and RF cables
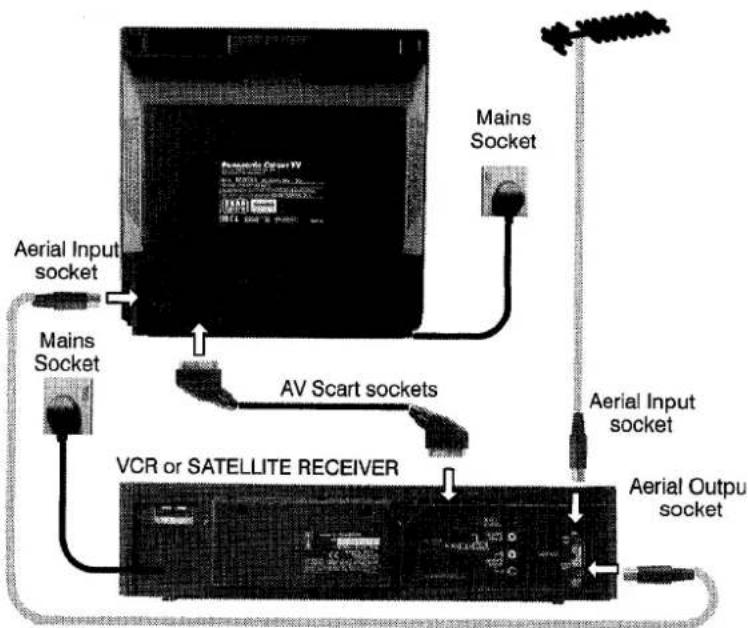
text_image
Aerial Input socket Mains Socket AV Scart sockets VCR or SATELLITE RECEIVER Aerial Input socket Aerial Output socket- Connection of TV to VCR and Satellite receiver using Scart and RF cables
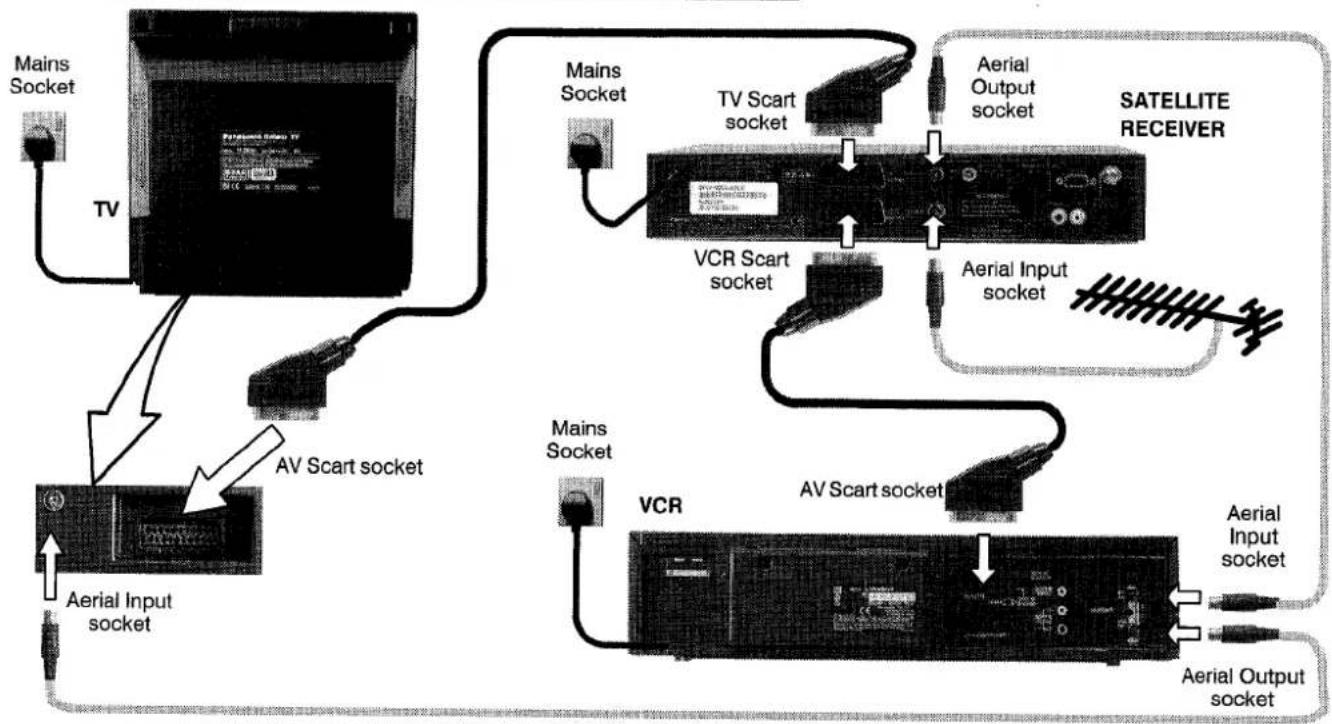
flowchart
graph TD
    A["TV"] --> B["Aerial Input socket"]
    B --> C["AV Scart socket"]
    C --> D["Mains Socket"]
    D --> E["TV Scart socket"]
    E --> F["Aerial Output socket"]
    F --> G["SATELLITE RECEIVER"]
    G --> H["Aerial Input socket"]
    H --> I["VCR"]
    I --> J["Aerial Output socket"]
    J --> K["Aerial Input socket"]
    K --> L["AV Scart socket"]
    L --> M["Mains Socket"]
    M --> N["TV Scart socket"]
    N --> O["Aerial Output socket"]
    O --> P["SATELLITE RECEIVER"]
RF Connections
Connect an RF cable to the Aerial In socket of the Satellite Receiver.
Connect an RF cable from the RF socket of the Satellite Receiver to the RF In socket of the VCR.
Connect an RF cable from the RF Out socket of the VCR to the TV Aerial In socket.
Notes :
Additional equipment and cables are not supplied.
Further details of Audio/Video connections can be found on page 21.
Further information for VCR and Satellite Receiver installation with this TV can be found on page 19.
QUICK START GUIDE

Ensure that the VCR is In Standby mode.
Switch ON your Satellite Receiver; to ensure reliable tuning select either SKY ONE or SKY NEWS.
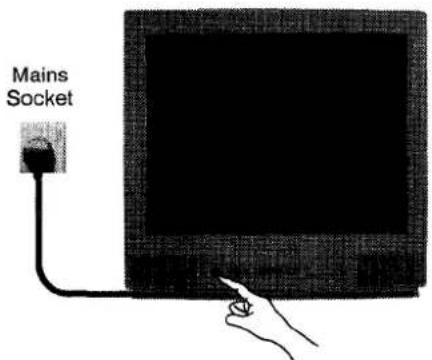
Plug the TV into mains socket and switch ON.
text_image
Mains Socket
Programmes will appear immediately if your dealer has programmed the TV for you.
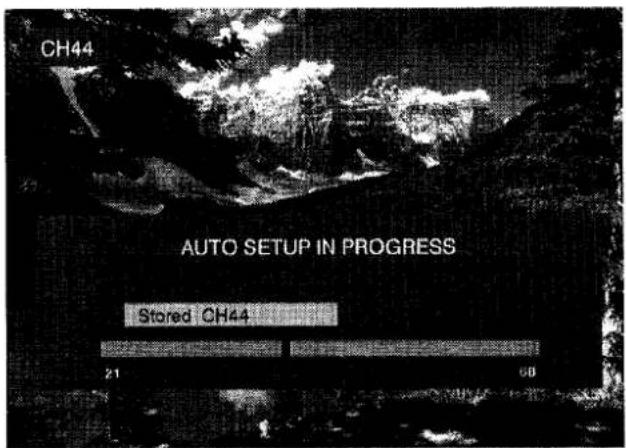
If the TV has not been programmed for you then Auto setup will begin. TV stations will be located, sorted into order and stored ready for use. (See order in the table on page 13.)
text_image
CH44 AUTO SETUP IN PROGRESS Stored CH44 21 60
Owner ID
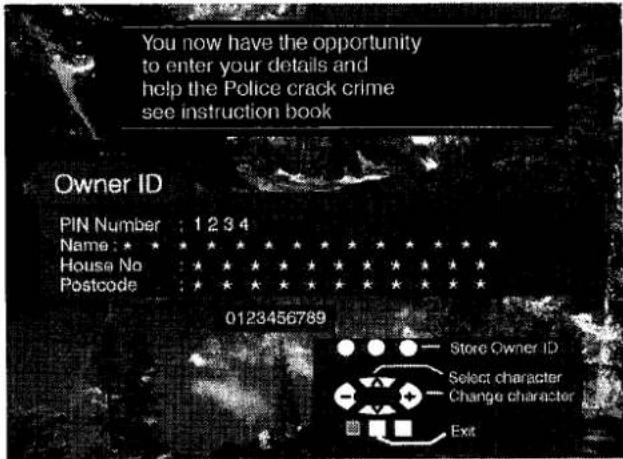
As an added feature, this TV has the option of adding a security code (Owner ID) and personal details into its memory, so that in the unfortunate event of theft it will help the Police to trace the owner.
Enter required 4 digit Owner ID PIN NUMBER.
(using 0 to 9 on the remote control).
text_image
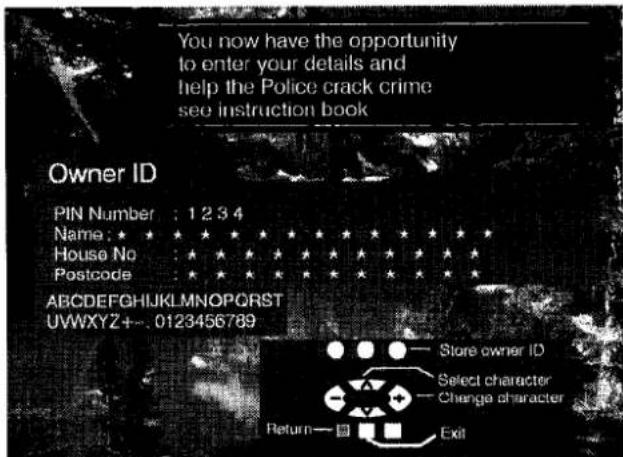
You now have the opportunity to enter your details and help the Police crack crime see instruction book Owner ID PIN Number : 1 2 3 4 Name : ★ ★ ★ ★ ★ ★ ★ ★ ★ ★ ★ ★ House No : ★ ★ ★ ★ ★ ★ ★ ★ ★ ★ ★ ★ ★ Postcode : ★ ★ ★ ★ ★ ★ ★ ★ ★ ★ ★ ★ 0123456789 Store Owner ID Select character Change character Exit
Enter NAME, HOUSE NUMBER and POSTCODE.
If a 4 digit PIN NUMBER was entered above, you will be taken automatically to the NAME line.
If not, move to the NAME line.
Change character.
Select character position.
Repeat above until NAME, HOUSE NUMBER and POSTCODE are entered.
Press "TV/AV" to store the details.
Press "TV/AV" again, when you are asked "Are you sure?"


text_image
You now have the opportunity to enter your details and help the Police crack crime see instruction book Owner ID PIN Number : 1 2 3 4 Name : ★ ★ ★ ★ ★ ★ ★ ★ ★ ★ ★ ★ ★ ★ ★ ★ ★ ★ ★ ★ ★ ★ ★ ★ ★ ★ ★ ★ ★ ★ ★ ★ ★ ★ ★ ★ ★ ★ ★ ★ ★ ★ ★ ★ ★ ★ ★ ★ ★ ★ ★ ★ ★ ★ ★ ★ ★ ★ ★ ★ ★ ★ ★ ★ ★ ★ ★ ★ ★ ★ ★ ★ ★ ★ ★ ★ ★ ★ ★ ★ ★ ★ ★ ★ ★ ★ ★ ★ ★ ★ ★ ★ ★ ★ ★ ★ ★ ★ ★ ★ House No : ★ ★ ★ ★ ★ ★ ★ ★ ★ ★ ★ ★ ★ ★ ★ ★ ★ ★ ★ ★ ★ ★ ★ ★ ★ ★ ★ ★ ★ ★ ★ ★ ★ ★ ★ ★ ★ ★ ★ ★ ★ ★ ★ ★ ★ ★ ★ ★ ★ ★ ★ ★ ★ ★ ★ ★ ★ Postcode : ★★★★★★★★★★★★★★★★★★★★★★★★★★★★★★★★★★★★★★★★★★★★★★★★★★★★★★★★★★★★★★★★★★★★★★★★★★★★★★★★★★★★★★★★★★★★★★★★★★★★★★★★★★★★★★★★★★★★★★★★★★★★★★★★★★★★★★★★★★★★★★★★★★★★★★★★★★★★★★★★★★★★★★★★★★★★★★★★★★★★★★★★★★★★★★★★★★★★★★★★★★★ ABCDEFGHIJKLMNOPQRSTUVWXYZ+ - 0123456789 Store owner ID Select character Change character Return — □ □ □ ExitFor further information on Owner ID, see page 16.
A space is provided on page 16 to write down the PIN NUMBER for future reference.
MAIN MENU FLOW CHART
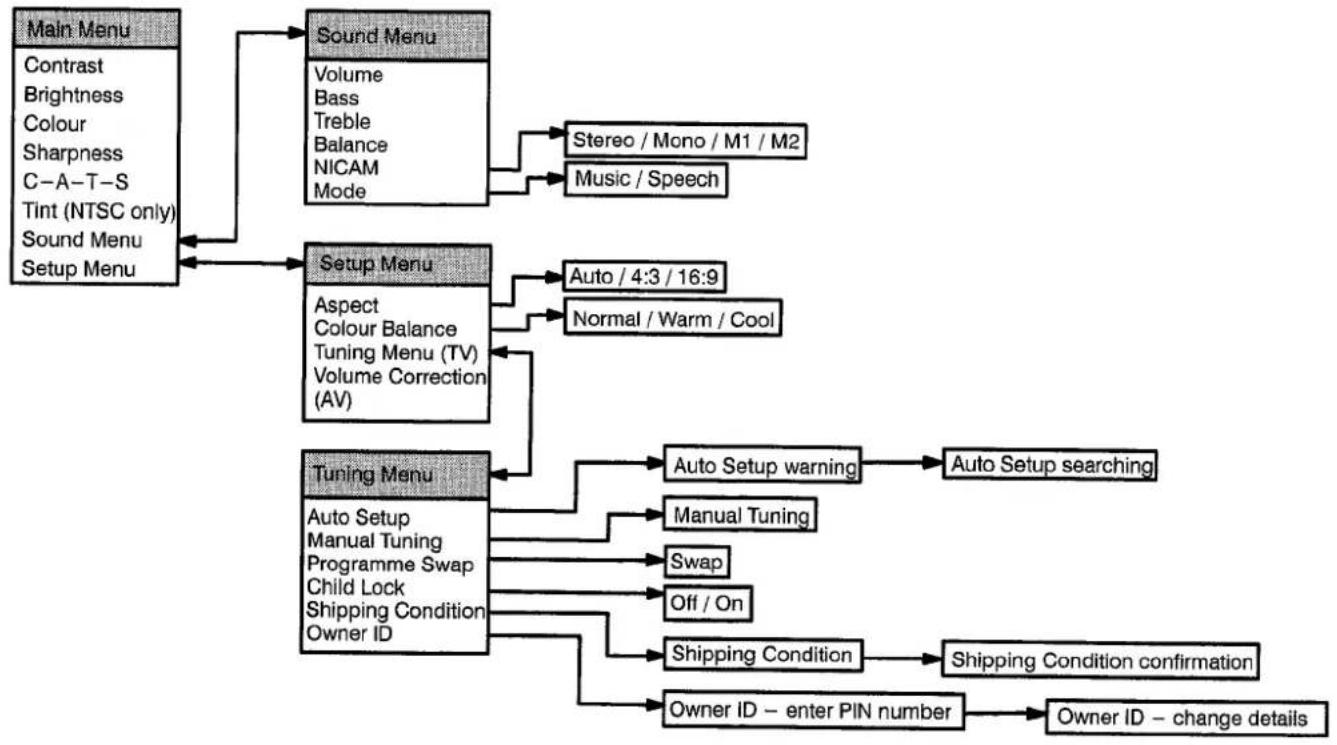
flowchart
graph TD
    A["Main Menu"] --> B["Sound Menu"]
    B --> C["Stereo / Mono / M1 / M2"]
    B --> D["Music / Speech"]
    A --> E["Setup Menu"]
    E --> F["Aspect Colour Balance Tuning Menu (TV) Volume Correction (AV)"]
    E --> G["Tuning Menu"]
    G --> H["Auto Setup warning"]
    H --> I["Auto Setup searching"]
    G --> J["Manual Tuning"]
    G --> K["Swap"]
    G --> L["Off / On"]
    G --> M["Shipping Condition"]
    G --> N["Shipping Condition confirmation"]
    G --> O["Owner ID – enter PIN number"]
    O --> P["Owner ID – change details"]
    A --> Q["Contrast"]
    A --> R["Brightness"]
    A --> S["Colour"]
    A --> T["Sharpness"]
    A --> U["C-A-T-S"]
    A --> V["Tint (NTSC only)"]
    A --> W["Sound Menu"]
    A --> X["Setup Menu"]
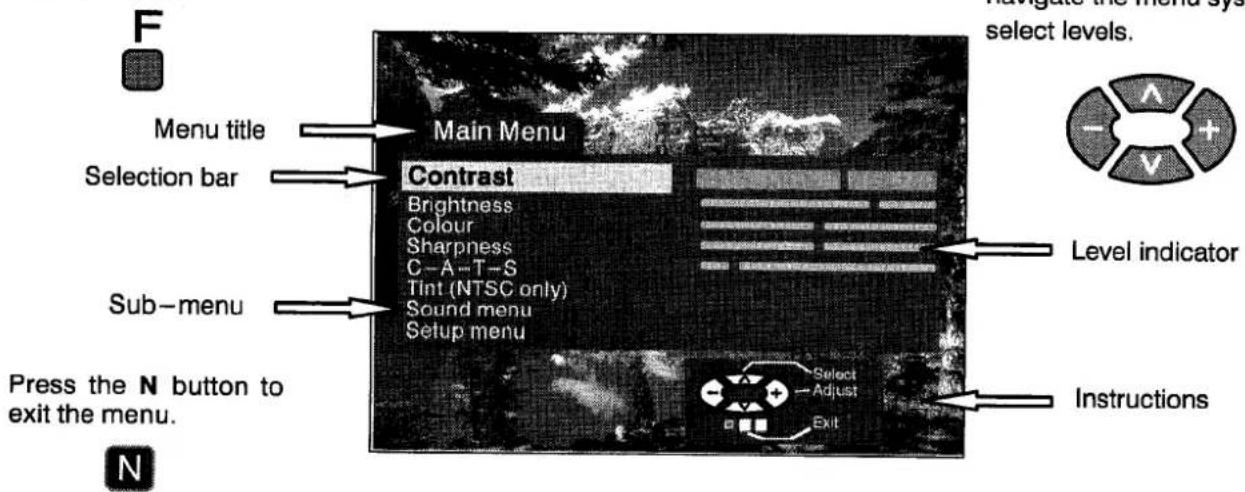
ON SCREEN DISPLAYS
Your TV is equipped with a comprehensive menu system for tuning and selection of levels.
Press the F button to enter the menu.
text_image
F Menu title Selection bar Main Menu Contrast Brightness Colour Sharpness C-A-T-S Tint (NTSC only) Sound menu Setup menu Sub-menu Press the N button to exit the menu. N Select Adjust Exit Level indicator Instructions Navigate the menu system select levels.The cursor buttons are used to navigate the menu system and to select levels.
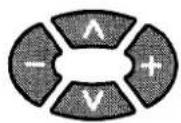
Some selections, such as Contrast, Brightness, Colour and Sharpness will allow you to increase or decrease their level.
Some selections, for example, Mode, allow a change of setting to be made.
Some selections, such as Setup menu, will lead to another menu.
The F button is used to open the main menu and also to return to the previous menu.
The N button is used to exit an open menu completely.
The TV/AV button is used to confirm a selection.
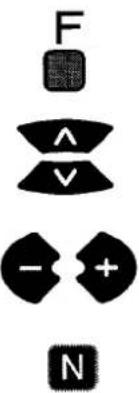
Main menu
This menu allows adjustment of picture quality and gives access to various other features.
Press the F button.
Move to your choice.
Increase or decrease levels, set option or access further menus.
Press the N button to exit the menu.
text_image
F ∧ ∨ - + N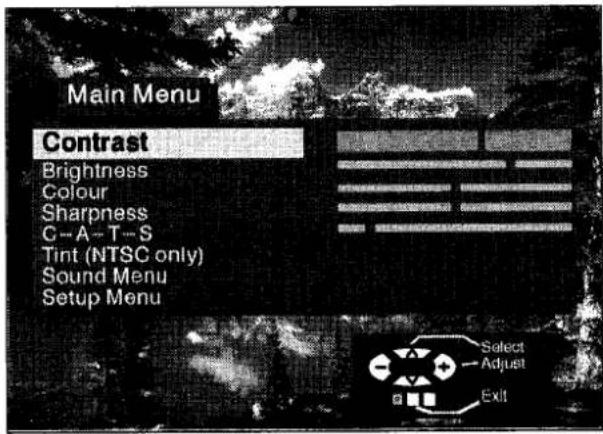
text_image
Main Menu Contrast Brightness Colour Sharpness C-A-T-S Tint (NTSC only) Sound Menu Setup Menu Select Adjust Exit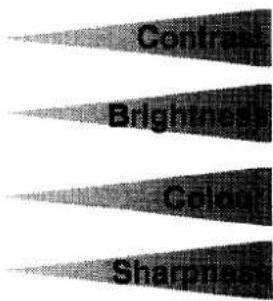
text_image
Centric Bright Colour ShannonThe Contrast, Brightness, Colour and Sharpness levels can be adjusted to suit your own preferences. You can revert to the factory set levels at any time by pressing the N button.
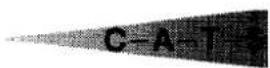
Contrast System Automatic Tuning
Automatically adjusts the contrast to match any changes in the ambient lighting of the room.
To get best results first set Contrast to maximum and then select any of the three positions:

text_image
Contrast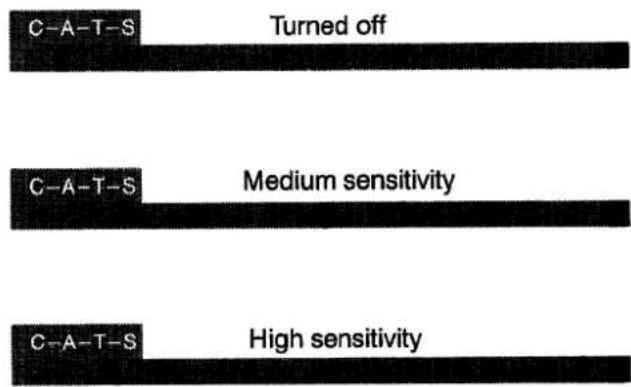
text_image
C-A-T-S Turned off C-A-T-S Medium sensitivity C-A-T-S High sensitivity
The Tint adjustment will only appear as a menu item if you have an NTSC signal source connected to the TV and will allow adjustment of the hue.
Sound menu
This menu allows you to adjust the sound settings.
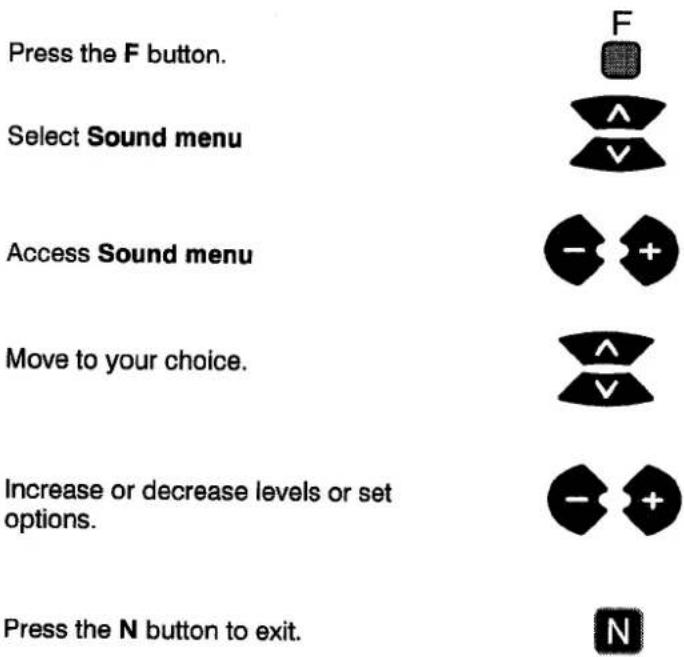
text_image
Press the F button. Select Sound menu Access Sound menu Move to your choice. Increase or decrease levels or set options. Press the N button to exit.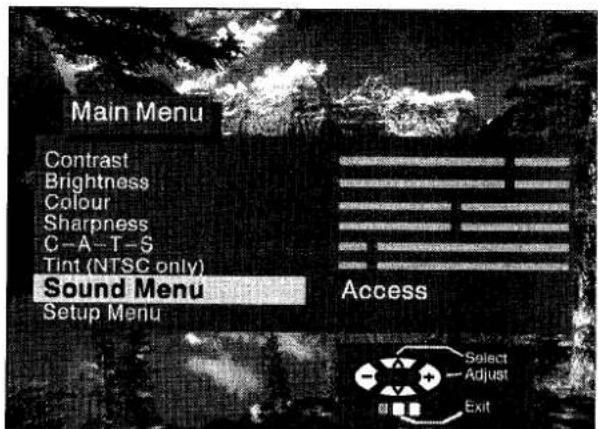
text_image
Main Menu Contrast Brightness Colour Sharpness C-A-T-S Tint (NTSC only) Sound Menu Setup Menu Access Select Adjust Exit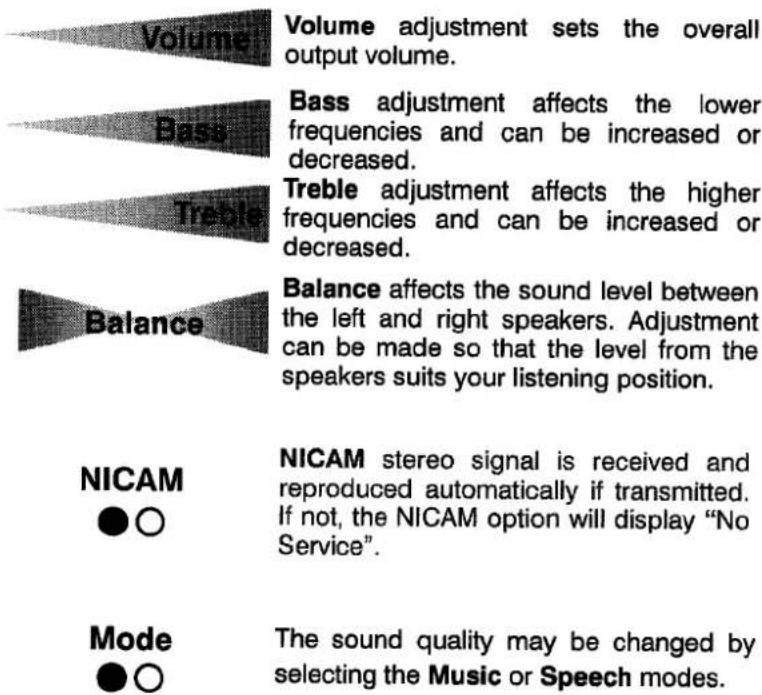
text_image
Volume Volume adjustment sets the overall output volume. Bass Bass adjustment affects the lower frequencies and can be increased or decreased. Treble Treble adjustment affects the higher frequencies and can be increased or decreased. Balance Balance affects the sound level between the left and right speakers. Adjustment can be made so that the level from the speakers suits your listening position. NICAM NICAM stereo signal is received and reproduced automatically if transmitted. If not, the NICAM option will display "No Service". Mode The sound quality may be changed by selecting the Music or Speech modes.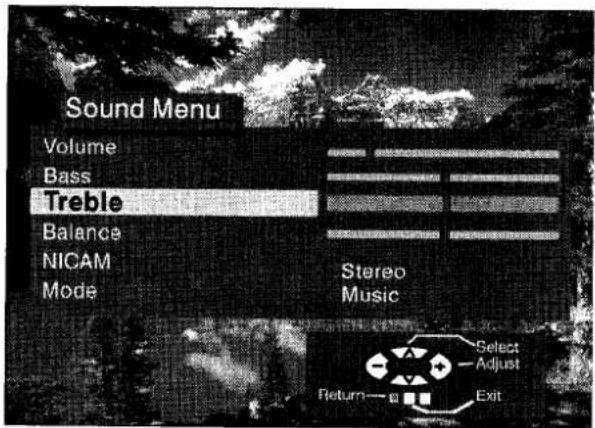
text_image
Sound Menu Volume Bass Treble Balance NICAM Mode Stereo Music Select Adjust Exit ReturnSetup menu
This menu gives access to various advanced features and the Tuning menu.
text_image
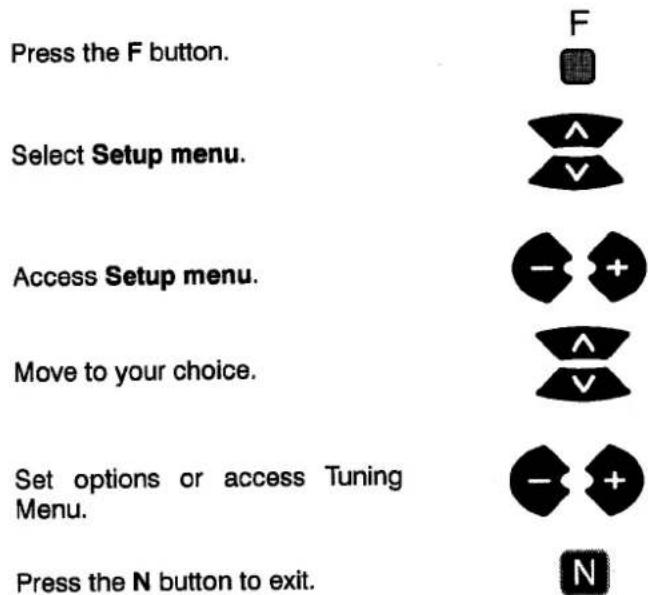
Press the F button. Select Setup menu. Access Setup menu. Move to your choice. Set options or access Tuning Menu. Press the N button to exit.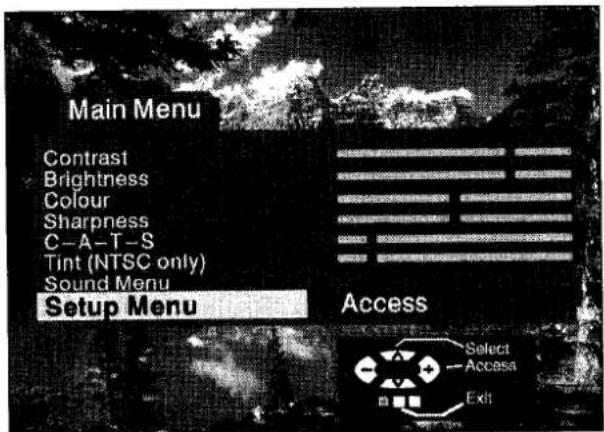
text_image
Main Menu Contrast Brightness Colour Sharpness C-A-T-S Tint (NTSC only) Sound Menu Setup Menu Access Select Accessa ExitAspect Aspect allows you to view wide screen programme material with the correct aspect ratio (16:9).
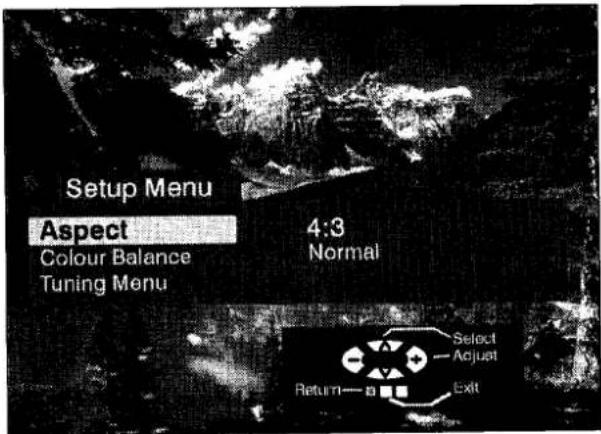
Colour Balance Colour Balance allows you to set the overall colour tone of the picture.
The Tuning Menu provides access to many other features including Auto Setup and Programme swap. See page 12.
Volume Correction The line Volume Correction will appear as a menu line only in the AV mode. It allows you to adjust the volume level of individual AV sources.
text_image
Setup Menu Aspect Colour Balance Tuning Menu 4:3 Normal Select Adjust Return—a ExitTuning menu
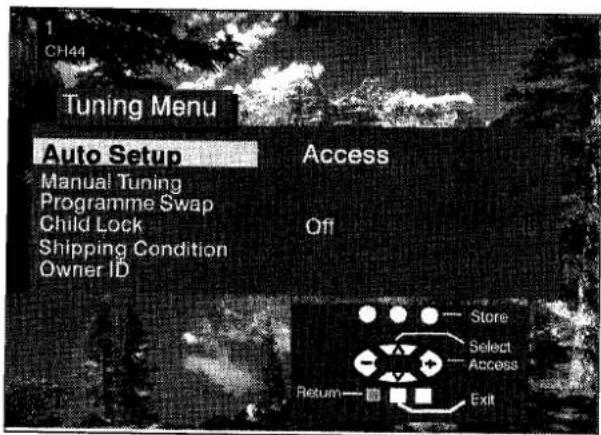
This menu provides access to Auto Setup, Manual Tuning and various other features.
Press the F button.
Select Setup menu.
Access Setup menu.
Select Tuning menu.
Access Tuning menu.
Move to your choice.
Set or access options.
Press the N button to exit.

text_image
F ^ V - + ^ V - + ^ V - + N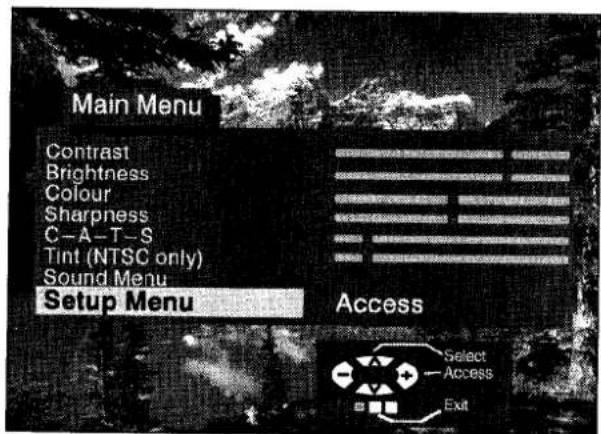
text_image
Main Menu Contrast Brightness Colour Sharpness C-A-T-S Tint (NTSC only) Sound Menu Setup Menu Access Select Access Exit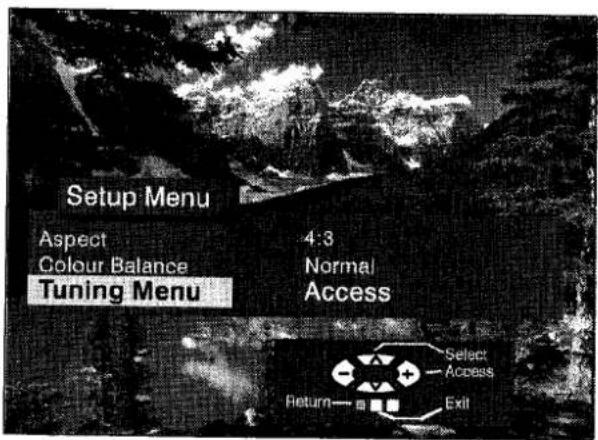
text_image
Setup Menu Aspect 4:3 Colour Balance Normal Tuning Menu Access Select Access Return——a——□ ExitAuto Setup
The Auto Setup menu allows you to automatically retune the TV. See page 13.
Manual Tuning
Allows manual tuning of individual channels. See page 14.
Programme Swap
Allows you to swap programme positions. See page 17.
Child Lock
Locks the programme position to prevent access.
Shipping Condition
Allows you to clear all tuning information and reset all control levels back to factory settings. See page15.
Owner ID
Allows you to enter a security code and address information. See page 16.
text_image
1 CH44 Tuning Menu Auto Setup Access Manual Tuning Programme Swap Child Lock Off Shipping Condition Owner ID Store Select Access ExitTuning - Auto Setup
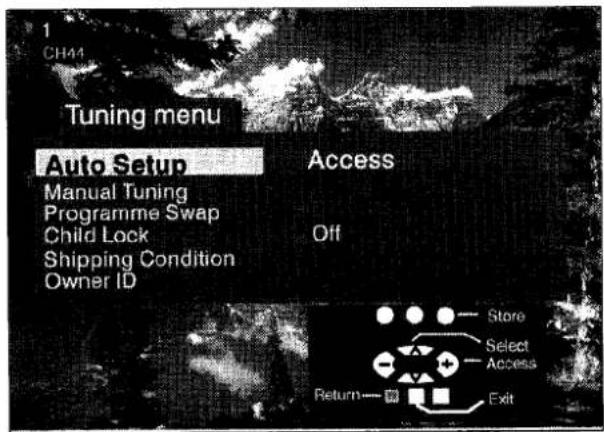
Automatic tuning will allow you to automatically tune your TV to your local stations. It is useful if you move to a different region.
Press the F button.
Select Setup menu.
Access Setup menu.
Select Tuning menu.
Access Tuning menu.
Select Auto Setup.
Access Auto Setup.
Press the TV/AV button to start Auto Setup.
The television will search for, locate and sort into order your local stations.
As soon as this operation is completed programme position 1 will be displayed on the screen.
Press the F button to return to the Tuning Menu and the N button to exit. TV stations will be located, sorted into order and stored ready for use according to the table below.

text_image
F ^ V - + + ^ V - + + ^ V - + TV/AV
text_image
1 CH44 Tuning menu Auto Setup Manual Tuning Programme Swap Child Lock Shipping Condition Owner ID Access Off Store Select Access Return—端 Exit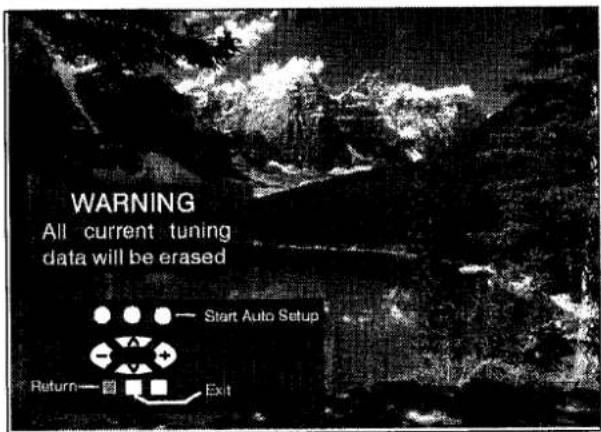
text_image
WARNING All current tuning data will be erased Start Auto Setup Return—窗—Exit
text_image
AUTO SETUP IN PROGRESS Stored CH58 BBC1 02 99:21 68 I Return N ExitAutosort:
- The sorted programme order depends upon the TV signal, the broadcasting system, and reception conditions. If the order is not to your preference it can be rearranged. Refer to the Programme Swap menu – see page 17 for details.
| Prog. Position | All channels | No CH5 | No CH5 / S4C | No CH4 / CH5 | No S4C | No CH4 / S4C | No CH4 / S4C / CH5 |
| 1 | BBC1 | BBC1 | BBC1 | BBC1 | BBC1 | BBC1 | BBC1 |
| 2 | BBC2 | BBC2 | BBC2 | BBC2 | BBC2 | BBC2 | BBC2 |
| 3 | ITV | ITV | ITV | ITV | ITV | ITV | ITV |
| 4 | CH4 | CH4 | CH4 | S4C | CH4 | CH5 | SAT |
| 5 | S4C | S4C | SAT | SAT | CH5 | SAT | ○ |
| 6 | CH5 | SAT | ○ | ○ | SAT | ○ | ○ |
| 7 | SAT | ○ | ○ | ○ | ○ | ○ | ○ |
| Note:○ The next available channel will appear, if no other stations are available then the Programme position will remain unused. | |||||||
Tuning - Manual Tuning
The programme positions may be tuned manually either via the on screen menu or via the buttons on the TV front panel.
Press the F button.
Select Setup menu.
Access Setup menu.
Select Tuning menu.
Access Tuning menu.
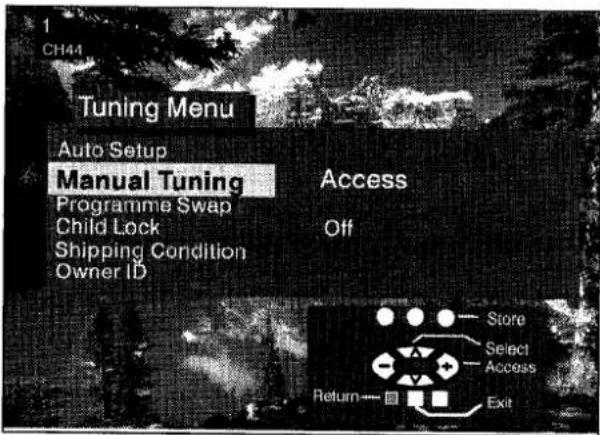
Select Manual tuning.
Access Manual tuning.
Select the programme position to be tuned.
Start tuning.
When the required programme is found save it by pressing either the TV/AV or STR (on the front panel) button.
Press the N button to exit.
Manual tuning (front panel)
Press the F button until "Manual tuning" is displayed.
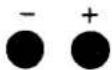
Press the “−” or “+” button to access “Manual tuning”.
Press the TV/AV button to move between "Programme" or "Search".
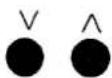
By pressing buttons ∨ or ∧ change the programme position or start the search.
When the required station is found press button STR to save the changes.
Repeat the above procedure to tune in additional programmes, or finish the tuning by pressing the F button.

text_image
F ^ V - + + ^ V - + + ^ V - + + ^ V - + + TV/AV STR




text_image
1 CH44 Tuning Menu Auto Setup Manual Tuning Programme Swap Child Lock Shipping Condition Owner ID Access Off Store Select Access Return—□ □ Exit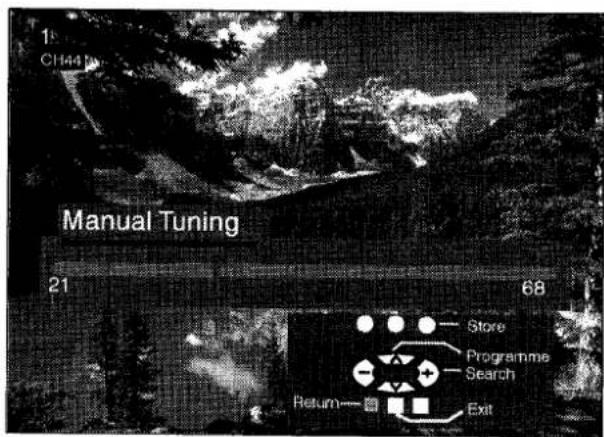
text_image
1st CH44 Manual Tuning 21 68 Store Programme Search Return— ExitNotes:
If you know the channel numbers of your broadcasting stations you may use direct channel selection by using button "C" on the remote control unit to save the channels quickly:
- enter Manual Tuning menu;
- set the programme number;
- press the C button;
- set the channel number with the numeric buttons;
- save with the TV/AV button;
- leave the menu by pressing N button.
If you want to use direct channel selection in the "Hyperband" (cable TV), push the direct channel selection button and programme position button ("C" and "+"/-") one after the other and set the number with the numbered buttons. "CH--" will first appear in the left top corner of the screen, and then "H:--". For saving see above.
Tuning - Shipping Condition
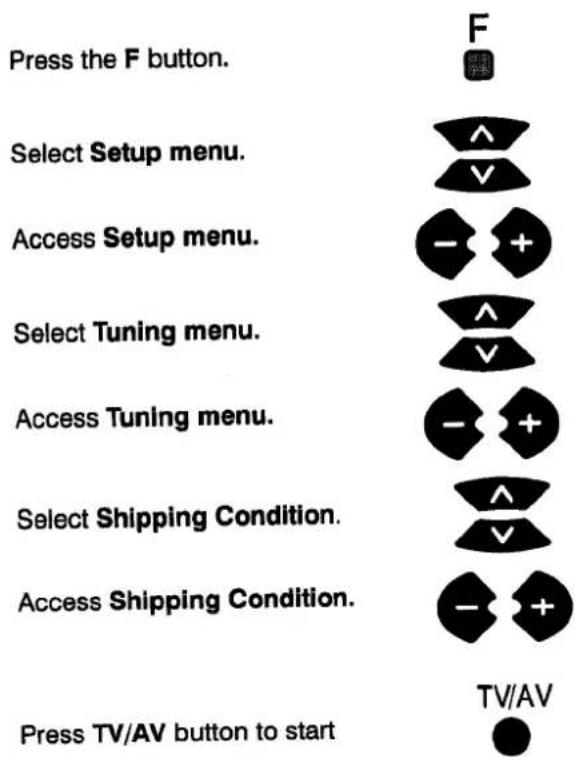
Shipping condition allows you to reset the TV to its original condition, i.e. no channels tuned in. This is useful, for example, if you move to a different area when you will probably want the TV to tune itself to your new local stations.
This can be done either through the Shipping Condition menu or through the Auto setup menu. The Shipping Condition menu will reset all data, clearing all tuning information and resetting all control levels back to factory settings.
You may need to adjust your VCR or programme position '0' VCR after operating the Shipping Condition menu – refer to page 19.
text_image
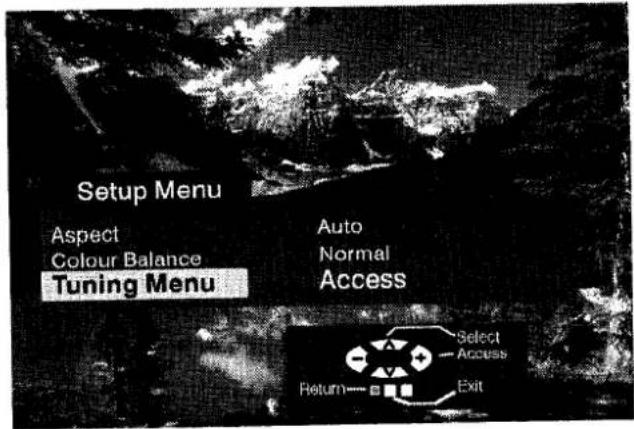
Press the F button. Select Setup menu. Access Setup menu. Select Tuning menu. Access Tuning menu. Select Shipping Condition. Access Shipping Condition. Press TV/AV button to start F TV/AVSwitch TV off and wait for a few seconds.
Switch TV on again.
Auto setup will begin, stations will be located, sorted and stored ready for use.
See page 13.
text_image
Setup Menu Aspect Colour Balance Tuning Menu Auto Normal Access Select Access Return Exit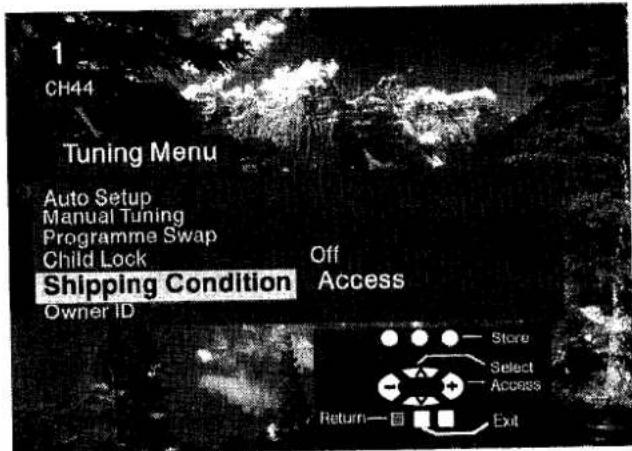
text_image
1 CH44 Tuning Menu Auto Setup Manual Tuning Programme Swap Child Lock Shipping Condition Owner ID Off Access Store Select Access Return—□ □ Exit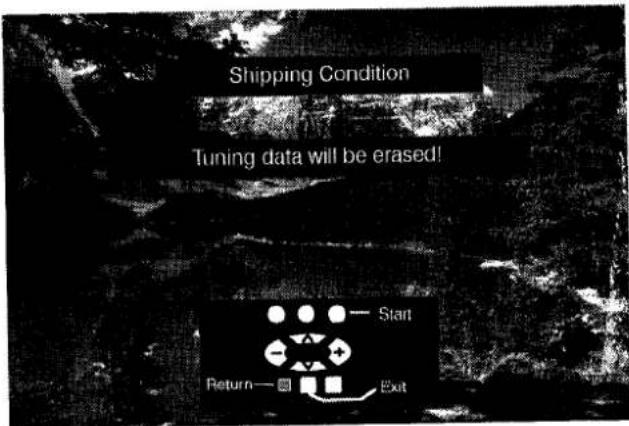
text_image
Shipping Condition Tuning data will be erased! Start Return—□ □ □ ExitTuning - Owner ID
Owner ID allows you to enter a security code and address information so that in the unfortunate event of theft it will help the Police to determine the owner.
If the Owner ID information was not entered after Auto setup or it is necessary to alter some of the ID information it can be re-accessed via the Tuning menu.
| Press the F button. | F |
| Select Setup menu. | ^ |
| V | |
| Access Setup menu. | - + |
| Select Tuning menu. | ^ |
| V | |
| Access Tuning menu. | - + |
| Select Owner ID. | ^ |
| V | |
| Access Owner ID. | - + |
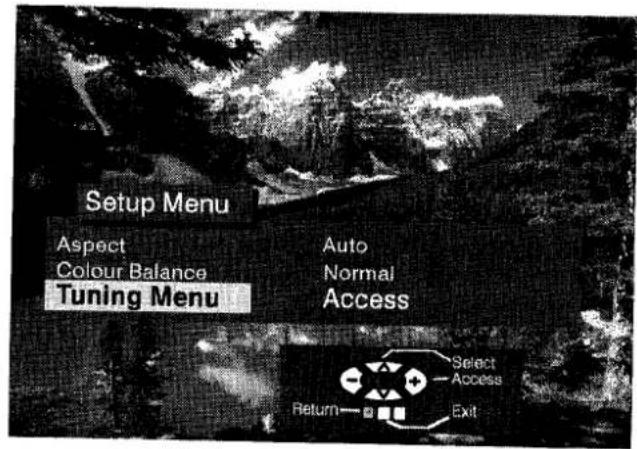
text_image
Setup Menu Aspect Colour Balance Tuning Menu Auto Normal Access Select Access Return Exit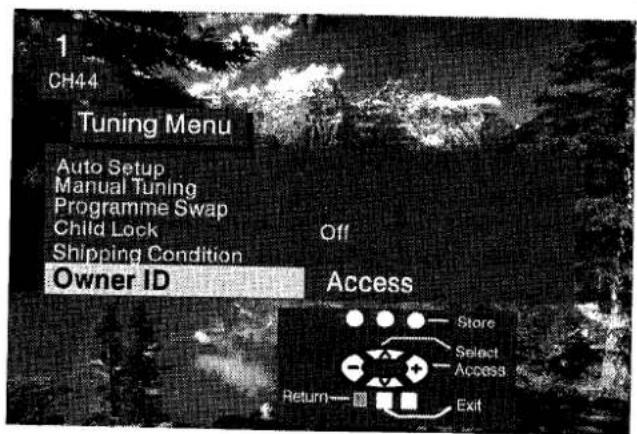
text_image
1 CH44 Tuning Menu Auto Setup Manual Tuning Programme Swap Child Lock Shipping Condition Owner ID Off Access Store Select Access Return— Exit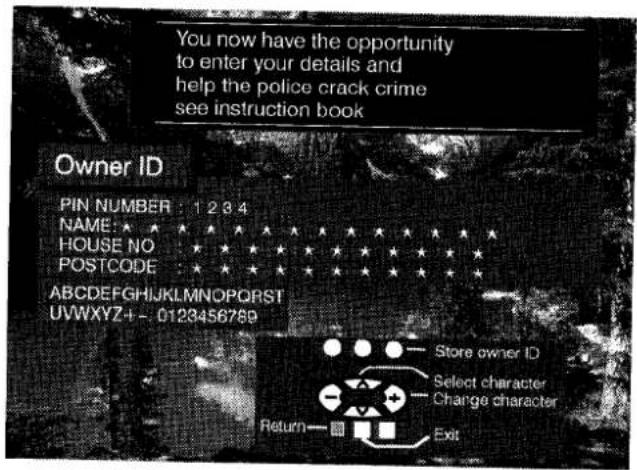
text_image
You now have the opportunity to enter your details and help the police crack crime see instruction book Owner ID PIN NUMBER : 1 2 3 4 NAME: ★ ★ ★ ★ ★ ★ ★ ★ ★ ★ ★ ★ ★ ★ ★ ★ ★ ★ ★ ★ ★ ★ ★ ★ ★ ★ ★ ★ ★ ★ ★ ★ ★ ★ ★ ★ ★ ★ ★ ★ ★ ★ ★ ★ ★ ★ ★ ★ ★ ★ ★ ★ ★ ★ ★ ★ ★ ★ ★ ★ ★ ★ ★ ★ ★ ★ ★ ★ ★ ★ ★ ★ ★ ★ ★ ★ ★ ★ ★ ★ ★ ★ ★ ★ ★ ★ ★ ★ ★ ★ ★ ★ ★ ★ ★ ★ ★ ★ ★ ★ HOUSE NO : ★ ★ ★ ★ ★ ★ ★ ★ ★ ★ ★ ★ ★ ★ ★ ★ ★ ★ ★ ★ ★ ★ ★ ★ ★ ★ ★ ★ ★ ★ ★ ★ ★ ★ ★ ★ ★ ★ ★ ★ ★ ★ ★ ★ ★ ★ POSTCODE : ★ ★ ★ ★ ★ ★ ★ ★ ★ ★ ★ ★ ★ ★ ★ ★ ★ ★ ★ ★ ★ ★ ★ ★ ★ ★ ★ ★★★★ ABCDEFGHIJKLMNOPQRSTUVWXYZ+ - 0123456789 Store owner ID Select character Change character Return — □ □ □ □ □ □ □ □ □ □ □ □ □ □ □ □ □ □ □ □ □ □ □ □ □ □ □ □ □ □ □ □ □ □ □ □ □ □ □ □ □ □ □ □ □ □ □ □ □ □ ▢ Exit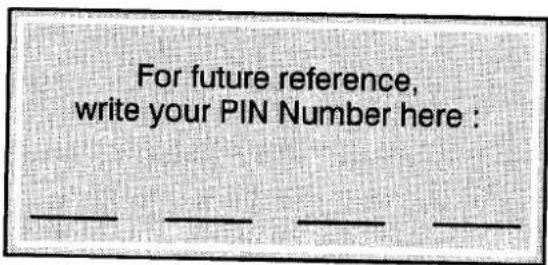
text_image
For future reference, write your PIN Number here :Swap - Programme swapping
The Swap option allows you to swap two programme positions.
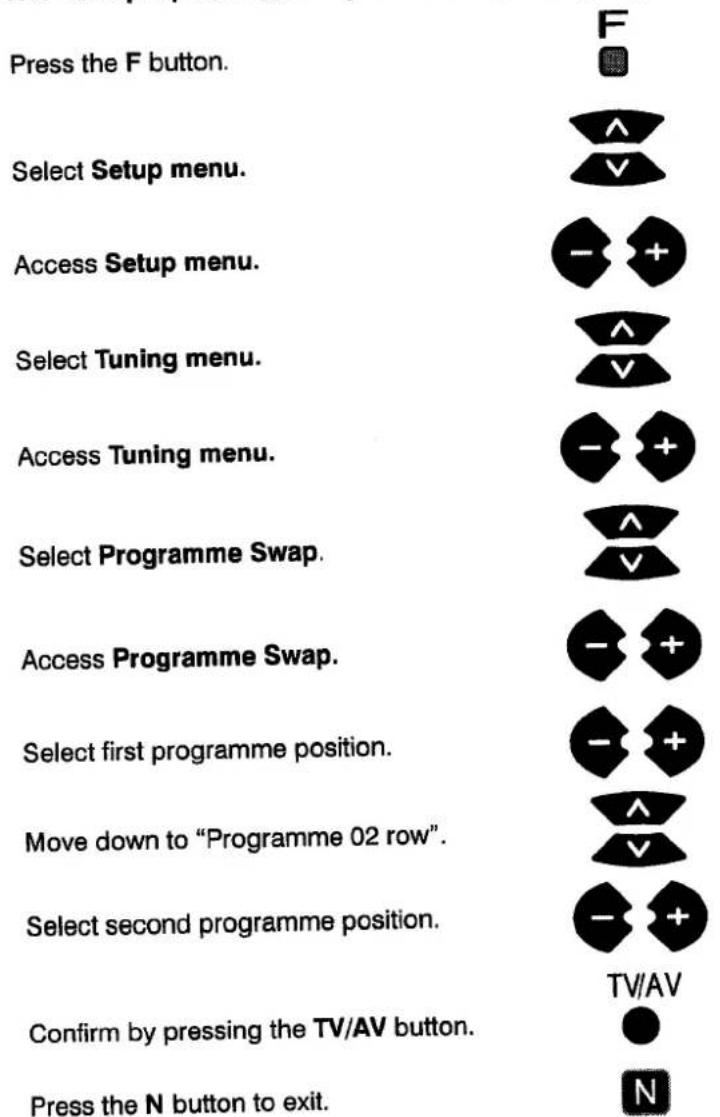
text_image
Press the F button. Select Setup menu. Access Setup menu. Select Tuning menu. Access Tuning menu. Select Programme Swap. Access Programme Swap. Select first programme position. Move down to "Programme 02 row". Select second programme position. Confirm by pressing the TV/AV button. Press the N button to exit.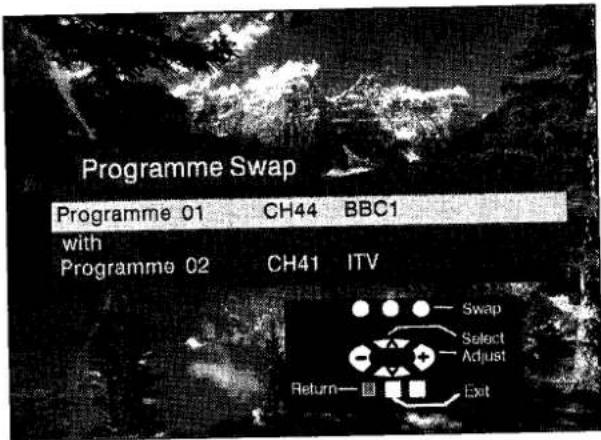
text_image
Programme Swap Programme 01 CH44 BBC1 with Programme 02 CH41 ITV Swap Select Adjust Return—■ □ ExitAV selection - AV mode
To select AV mode press the TV/AV button. If another receiver is connected to the AV connectors (VCR, Satellite Receiver, camera, etc. see page 21) and if it is in operation, its signal will be displayed and AV will appear in the top left corner of the TV screen regardless of the selected programme position (TV tuner is ignored).
This TV may automatically switch over to the AV mode if the connected device sends a switch signal to the SCART cable connector. In this case a signal from the connected audio/video device will be displayed and "EC1" will appear in the upper left corner of the screen. The output displayed will not change if you change the TV channel.
You may switch back to the television by pressing the TV/AV button or by disconnecting the AV device.
Do not connect two AV devices to the TV simultaneously, as their signals will overlap.
In the AV mode the Setup Menu OSD is extended to include Volume Correction.
If an NTSC signal is connected via the AV input the TV will automatically detect the signal and switch over to the NTSC standard. The Main Menu OSD is extended to include Tint, which may be adjusted with buttons "+" and "-"
VCR Controls
The Remote Control is capable of operating some functions of selected Panasonic VCRs. Other VCR equipment may have different functions, so to ensure compatibility please refer to the equipment's instruction book or consult your dealer for details.
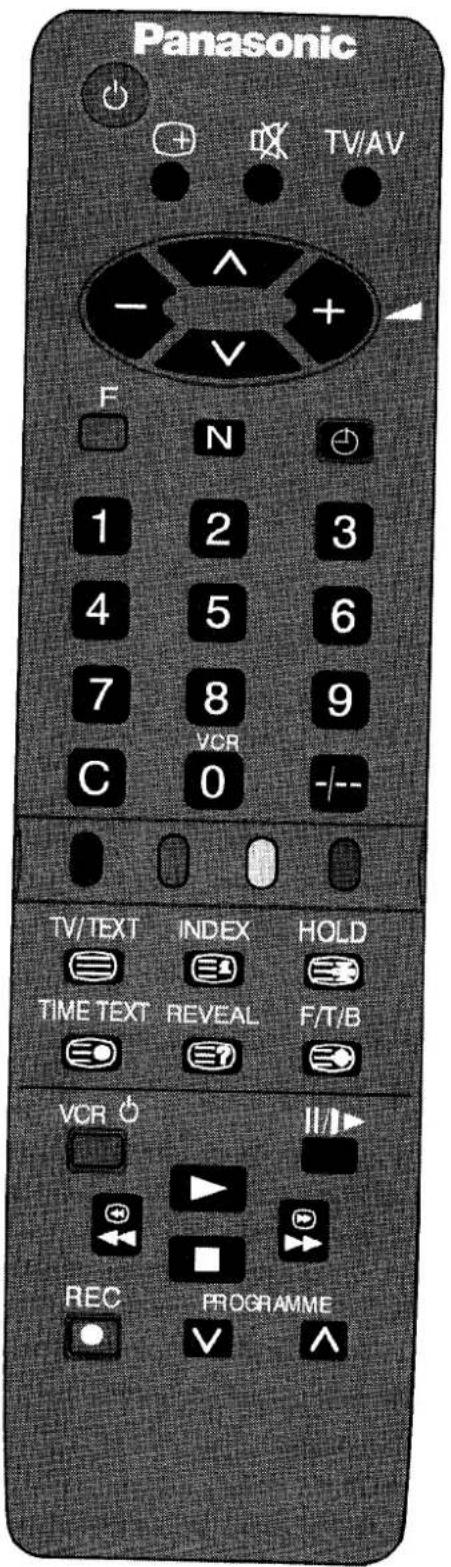
text_image
Panasonic TV/AV F N 1 2 3 4 5 6 7 8 9 C 0 -/-- TV/TEXT INDEX HOLD TIME TEXT REVEAL F/T/B VCR ||► REC PROGRAMME  | VCR StandbyPress to switch the VCR to standby mode. Press again to switch back on. |
 | PlayPress to playback the tape. |
 | StopPress to stop the tape. |
 | Fast Forward/CuePress to fast forward the tape. In Play mode, press to view the picture rapidly forward (Cue). |
 | Rewind/ReviewPress to rewind the tape. In Play mode, press to view the picture rapidly in reverse (Review). |
 | Pause/StillPress in playback mode, the picture will pause. Press again to restart play. |
  | Programme Number Up And DownPress to increase or decrease the VCR programme position by one. |
 | RecordPress this button to start recording. |
VCR and Satellite Receiver installation
Your new TV is supplied with programme position '0' set to receive an RF signal from your VCR, although a Scart connection is preferable if the VCR is so equipped.
preferable if the VCR is so equipped. However, if for some reason your VCR is tuned to a different RF channel then you will not receive any picture or sound from your VCR on programme position '0' of the TV. It will be necessary to either adjust the RF channel of your VCR (some VCR's allow adjustment of their RF channel via their remote control unit) or to adjust the tuning of the TV's programme position '0' or both until it receives the RF output channel of your VCR.
It is intended that this advice is used in conjunction with the instruction books for your ancillary equipment.
Use the AV Scart terminal for a VCR.
To tune your TV to the VCR
Switch on the VCR, insert and play a pre-recorded tape with known content.
Press the F button.
Select Setup menu
Access Setup menu
Select Tuning menu.
Access Tuning menu.
Select Manual tuning
Access Manual tuning
Select programme position "0" VCR.
Start searching for the VCR playback of the known content tape.
When the VCR playback is found, press TV/AV to store.
Press the N button to exit.
See below for installation of VCR and Satellite Receiver.
Notes :
If picture patterning occurs on programme position '0' it may be necessary to adjust the RF output channel of the VCR, refer to the VCR instruction book.
If a Satellite Receiver and a VCR are going to be used with RF cable connections it is important to avoid both units being set on the same channel.
Refer to the Satellite Receiver and VCR instruction books for precise tuning information.
natural_image
Illustration of a hand inserting into a CD into a device (no text or symbols visible)
text_image
F ^ V - + + ^ V - + + ^ V - + + ^ V - + + TV/AV N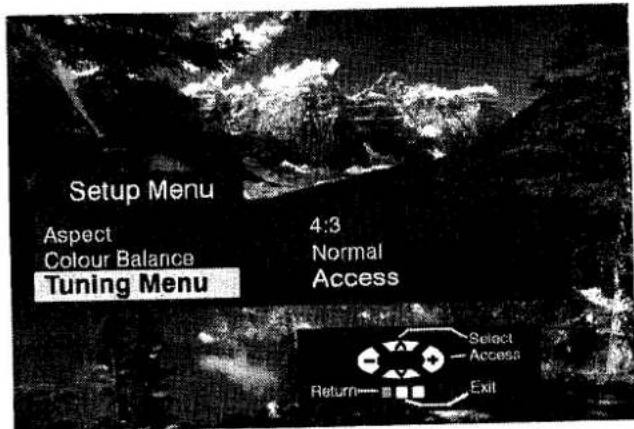
text_image
Setup Menu Aspect 4:3 Colour Balance Normal Tuning Menu Access Select Access Return Exit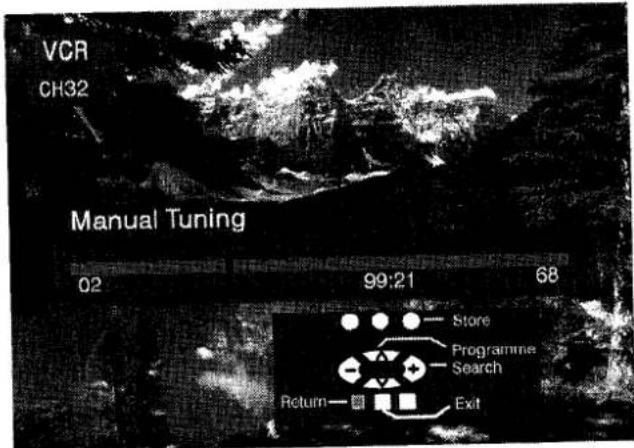
text_image
VCR CH32 Manual Tuning 02 99:21 68 Store Programme Search Return Exit
text_image
VCRTeletext function
- Teletext features may vary depending on the Broadcasting Companies and are only available if the selected channel is transmitting Teletext.
- If the F button is pressed in Teletext mode the cyan contrast scale will appear; press buttons "+" and "-" to change the settings.
- When in Teletext mode, the volume may still be adjusted by pressing buttons "+" or "-"
What is LIST mode?
In LIST mode four differently coloured page numbers are situated at the bottom of the screen. To select the required Teletext page push the appropriately coloured button.
What is FLOF (FASTEXT)?
In FASTEXT mode four differently coloured subjects are shown at the bottom of the screen. To access more information about one of these subjects, push the appropriately coloured button. This function allows fast access to information on the subjects shown.
How does it work?
TOP uses four differently coloured buttons – red, green, yellow and blue – to select required information.
• To select the subject (e.g. Sports) use the blue button. Within Sports, different groups may be selected, such as tennis, football, baseball, etc., by pushing the yellow button. When the last group of the subject is reached, you can move to the next block using the yellow button.
- The Green button will select the next available page UP.
- The Red button will select the next available page DOWN.
What are the advantages?
• Page selection at the touch of a single button.
- Easy to use step-by-step selection of the topical subjects.
• Reduction of waiting time.
- If a non-existent page number is entered, a question mark will appear at the bottom of the screen.
- Page status line at the bottom of the
• Page status line at the bottom of the screen so you always know which button will take you to the information required.
| TV/TEXT | TV/Teletext ModePress the TV/TEXT button. The screen will display the Teletext page. Press again when you wish to return to TV mode. | |
| INDEX | IndexPress this button to return to the main index page. Depending on the way information is transmitted you may have to press a few times to return to the main index page. | |
| HOLD | HoldPress to hold the current page. Press again to cancel the hold. | |
| TIME TEXT | Time/TextIn Teletext mode, press to select the required page. | |
| REVEAL | RevealPress to reveal hidden words, e.g. crossword or quiz page answers, can also display VPS/PDC codes. | |
| F/T/B | Full/Top/BottomTeletext information viewing on the screen. | Press to expand the top half of the page.Press again to expand the bottom half.Press again to return to normal (full) size. |
| Page SelectionPages can be selected in two ways:a) press the Up/Down buttons to increase or decrease the page number by one;b) enter the page number using 0 - 9 on the remote control. | ||
| Red/Green/Yellow/Blue ButtonsIn FASTEXT mode, these correspond to the differently coloured subjects.In LIST mode the buttons correspond to the differently coloured page numbers. | ||
| NormalisationPress the N button to return to TV mode. | ||
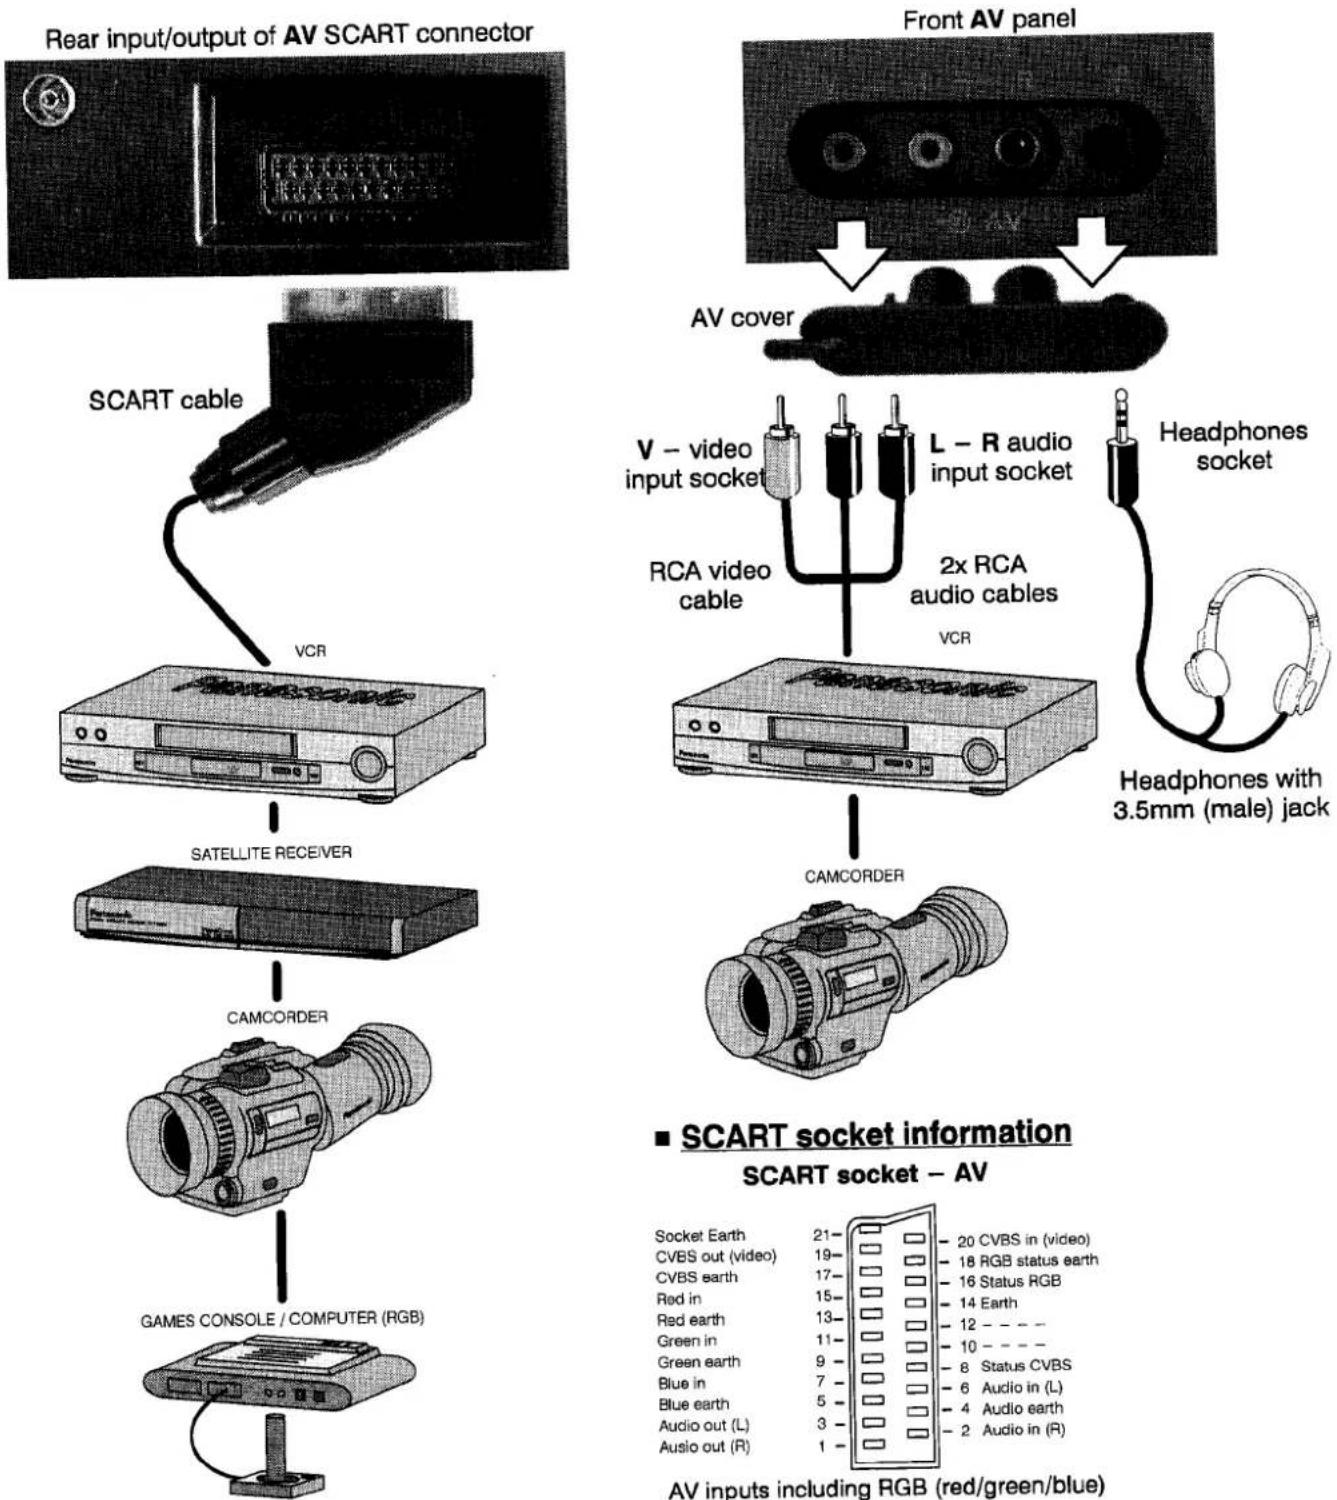
Rear AV SCART 21-pin Terminal and front RCA Socket
Audio/video (AV) inputs are designed to connect a VCR, a Satellite Receiver and other compatible audio/video equipment.
Notes
Additional equipment and cables shown above are not supplied with this TV set.
Do not connect computers with TTL (5V) output to this TV set.
When the headphones are connected, the speakers will be automatically disconnected.
Do not connect signals to both front and rear AV terminals simultaneously as this will
cause the audio signals and the video signals from both sources to mix together.
| Symptoms | Check | |
| Picture | Sound | |
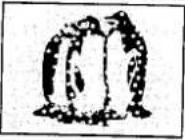 Snowy picture Snowy picture | 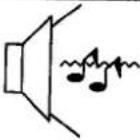 Noisy sound Noisy sound | Aerial location, direction or connection |
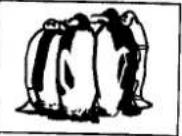 Multiple images Multiple images |  Normal sound Normal sound | Aerial location, direction or connection |
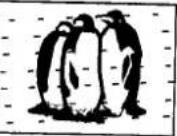 Interference Interference | 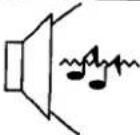 Noisy sound Noisy sound | Electrical appliancesCars/motorcyclesFluorescent lights |
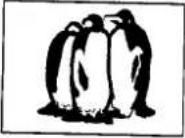 Normal picture Normal picture |  No sound No sound | Volume levelCheck whether the Mute function has been activated on Remote Control. |
 No picture No picture | 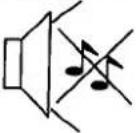 No sound No sound | TV set to AV modeNot plugged into A.C. outletNot switched onPicture / Sound controls set at minimum levelsCheck if in standby mode |
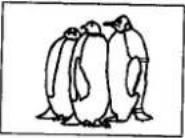 No colour No colour |  Normal sound Normal sound | Colour controls set at minimum levels |
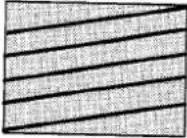 Poor or Distorted Picture Poor or Distorted Picture | 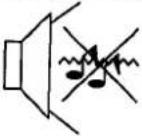 Weak or no sound Weak or no sound | Retune channel(s) |
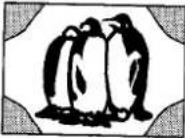 Coloured patches Coloured patches |  Normal sound Normal sound | Magnetic interference from unshielded equipmentReceiver moved while switched ON, switch TV off for 30 minutes. |
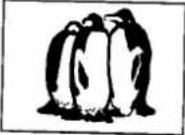 Normal picture Normal picture |  Weak or distorted sound Weak or distorted sound | Receiving conditions are bad (e.g. atmospheric conditions)Switch NICAM (Sound menu) to Mono and wait for better conditions |
USER INFORMATION
■ Service
Before requesting service, please refer to the trouble-shooting guide on previous page to determine the symptoms. To obtain service please contact your local Panasonic dealer quoting the model number and serial number (both are located at the rear of the TV).
■ TV games/Home computers
Frequent use of the games console or computer may cause "shadows" on the screen. This can be avoided if you meet the following requirements:
○ Reduce brightness and contrast to a minimum. viewing level;
Do not operate the TV set for a continuous period of time while using TV games or home computers.
This type of picture tube damage, is not an operating defect, and such as is not covered by the Panasonic warranty.
■ Last position memory
Certain functions have a last position memory, i. e. the setting at the time of switch-off will be the setting used when the receiver is switched on again:
| Programme positions | Tint |
| Last programme position | C-A-T-S |
| Volume correction (+AV) | Contrast |
| Volume | Sharpness |
| Sound type: music/speech | Brightness |
| Bass | Colour |
| Treble | L/R balance |
| Standby mode | Status |
■ Sleep feature
If the set is not switched off when the TV station stops transmitting, it will automatically go to standby mode after 30 minutes. This function will not operate when the TV is in AV mode.
SPECIFICATIONS
| Model | TX-28CK1 | TX-25CK1 | TX-21CK1 | |
| Power source | 220 - 240 V 50Hz A.C. | |||
| Power consumption | 76W | 76W | 60W | |
| Standby consumption | 0,9W | 1W | ||
| Picture tubeVisible Diagonal | 66 cm | 59 cm | 51 cm | |
| Audio output (Music Power) | 2 x 10W, impedance 8Ω | |||
| Dimensions | H | 580 mm | 538 mm | 476 mm |
| W | 646 mm | 580 mm | 512 mm | |
| D | 471 mm | 442,5 mm | 470 mm | |
| Weight (kg) | 33 kg | 27 kg | 20,6 kg | |
| Receiving Systems/Band name | PAL I PAL 525/60 M.NTSC NTSC (AV input only) | UHF E21-68Playback of NTSC tape from some PAL Video recorders (VCR)Playback from M.NTSC Videorecorders (VCR)Playback from NTSC Videorecorders (VCR) | ||
| Number of programme positions | 99 + VCR | |||
| Aerial - Rear | UHF | |||
| Headphones - Front | 3.5 mm, impedance 8Ω | |||
| AV - Rear | AV-21-pin terminal - Audio/Video in/out, RGB in | |||
| AV - Front | Front AV - RCA Audio/Video in | |||
Specifications are subject to change without notice. Weight and dimensions are approximate.