Milk Expresso ME2005-01 - Flaschenwärmer Babywell - Kostenlose Bedienungsanleitung
Finden Sie kostenlos die Bedienungsanleitung des Geräts Milk Expresso ME2005-01 Babywell als PDF.


Benutzerfragen zu Milk Expresso ME2005-01 Babywell
0 Frage zu diesem Gerät. Beantworten Sie die, die Sie kennen, oder stellen Sie Ihre eigene.
Eine neue Frage zu diesem Gerät stellen
Laden Sie die Anleitung für Ihr Flaschenwärmer kostenlos im PDF-Format! Finden Sie Ihr Handbuch Milk Expresso ME2005-01 - Babywell und nehmen Sie Ihr elektronisches Gerät wieder in die Hand. Auf dieser Seite sind alle Dokumente veröffentlicht, die für die Verwendung Ihres Geräts notwendig sind. Milk Expresso ME2005-01 von der Marke Babywell.
BEDIENUNGSANLEITUNG Milk Expresso ME2005-01 Babywell
babywell®
User guide
natural_image
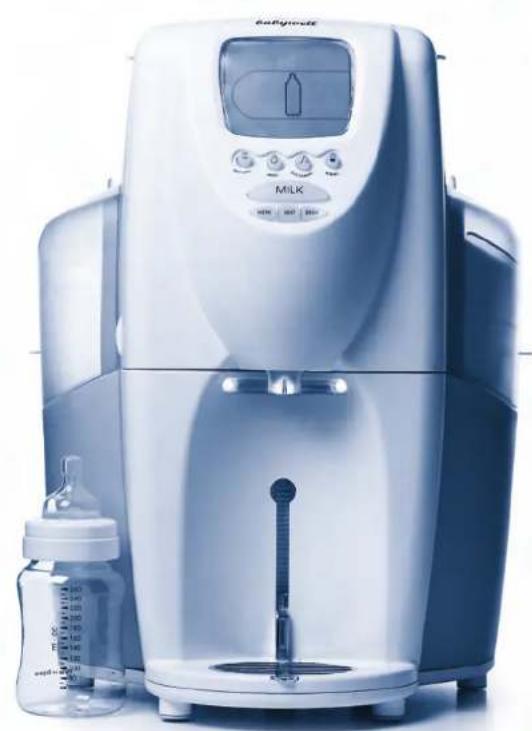
Modern milk and baby cleaning device with digital display and bottle (no visible text or symbols)V2
Singapore Patent No.:117408
User guide
babywell®
Contents
A. Knowing your Apparatus 1
B. LCD / Operation of Buttons 4
C. Important Instructions / Precaution / Warning 8
D. Quick Start 9
E. Settings
1) Set Feeding Temperature 12
2) On/Off Express Cooling 13
3) Select Powder Group 13
4) Vary Concentration of Milk Formula 14
F. Product Functions and Parts Handling
- Boiling Water (& Self Cleaning) 15
- Sterilizing 16
- Making Milk Formula 16
- Dispense only Water 17
- Urgent need for water or milk dispense 17
- Proper Maintenance 17
- Descaling the Airport and the Sterilizer 20
G. Troubleshooting 21
H. Technical Specifications 22
L Appendix (Powder Groupings) 23
User guide
babywell®
Congratulations on acquiring your new Babywell Milk Expresso! To enjoy it's features, proper use and maintenance is important. Please read through this user guide carefully for optimal use of the apparatus.
A. Knowing your apparatus
text_image
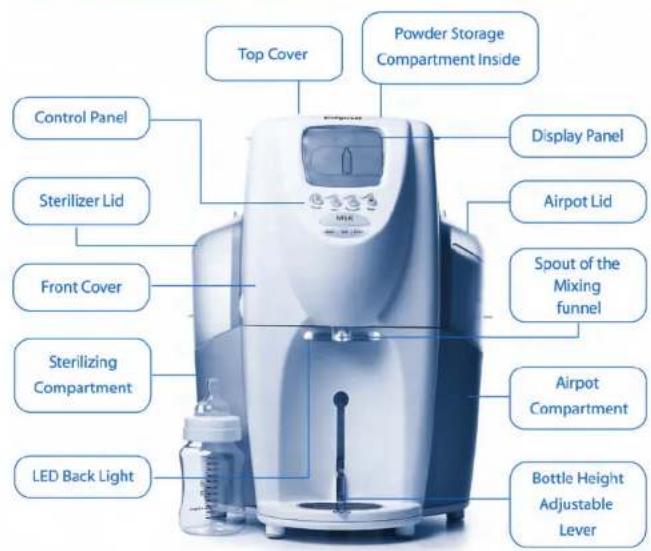
Top Cover Powder Storage Compartment Inside Control Panel Sterilizer Lid Front Cover Sterilizing Compartment LED Back Light Display Panel Airport Lid Spout of the Mixing funnel Airport Compartment Bottle Height Adjustable Lever1
Figure 1 - Front View
text_image
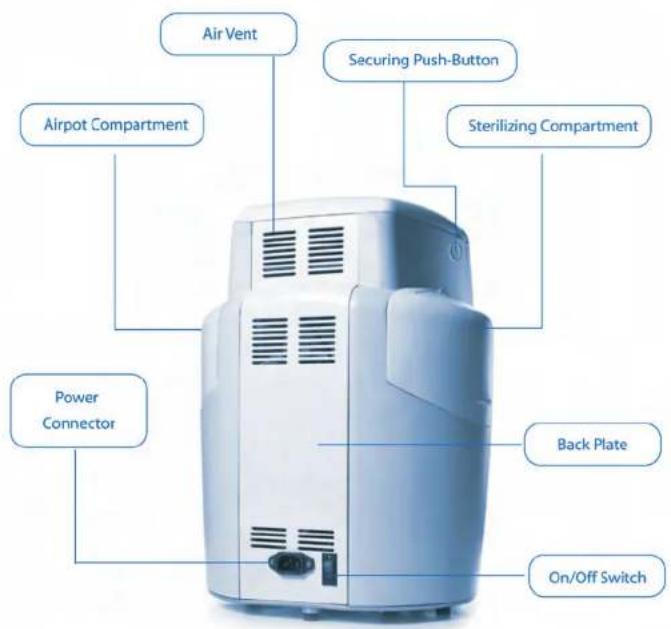
Air Vent Airpot Compartment Securing Push-Button Sterilizing Compartment Power Connector Back Plate On/Off SwitchFigure 2 - Rear View
2
User guide
babywell®
text_image
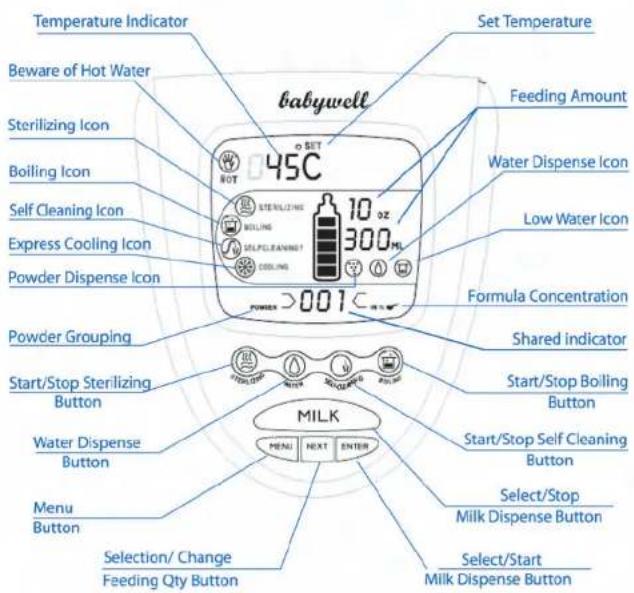
Temperature Indicator Beware of Hot Water Sterilizing Icon Boiling Icon Self Cleaning Icon Express Cooling Icon Powder Dispense Icon Powder Grouping Start/Stop Sterilizing Button Water Dispense Button Menu Button Selection/ Change Feeding Qty Button Set Temperature 45°C 300 mL 10 oz SISTELIZING BEILING SELF CLEANING COOLING MILK MENU NEXT ENTER Formula Concentration Shared indicator Start/Stop Boiling Button Start/Stop Self Cleaning Button Select/Stop Milk Dispense Button Select/Start Milk Dispense ButtonFig 3 - LCD & Control Panel
B. LCD / Operation of the Buttons
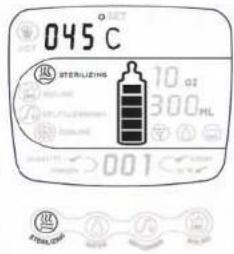
1) Sterilizing button
Press this button once to start/ stop the sterilizing process. The "Sterilizing" icon will lit to activate the process and disappear once the process is completed. When activated, some amount of water from the water reservoir will be channelled to the sterilizing compartment for heating. Steam is then emitted for sterilizing...This whole process will take about 8 minutes.

Do not open the cover anytime during Sterilizing. Sterilizing cannot be activated when the "Low Water Indicator" icon is lit.
2) Water button
Press and hold this button to allow continuous flow of water to be dispensed. Release when desired amount is reached.
Note that Water can be dispensed at any temperature below 95 degree celsius.
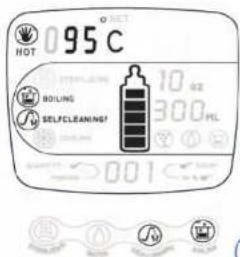
3) Self Cleaning Button
This button allows the user to sterilize the internal channels as well as the mixing funnel with hot water. The "Self-Cleaning" process can be activated when the water temperature reaches above or falls below 95 degree Celsius during "Boiling", "Cooling". Both the "Self Cleaning" and "Beware of Hot Water" icon will lit and blink with a beeping sound to prompt user to activate the process.
text_image
045°C 10 GZ 300 mL 001
text_image
095°C HOT 10 oz BOILING 300 mL SELFLEANING 001℃User guide
babywell®

Remember to place a water container at the adjustable lever. Upon pressing the "Self-Cleaning" button, about 2 ozs of hot water will be dispensed. This 2 ozs of water must be discarded.
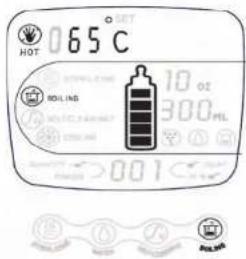
4) Boiling button
text_image
65°C HOT 10 oz 300 mL ROLLING 001 ROLLSNote : LCD Backlight will turn red when higher than user set temperature.
Press this button once to start/ stop the boiling process. The "Boiling" icon will lit to activate process and disappear when process is completed. When the water temperature goes above the user set temperature, the "Beware of Hot Water" icon will appear and the LCD Backlight will turn red. For safety reasons the system automatically cuts off the milk dispensing function. Water can still be dispensed by depressing the "Water" button. This temperature of the water will be the same as reflected on the LCD.

Do not open the cover anytime during boiling to avoid scalding. Boiling cannot be activated when the "Low Water Indicator" icon is lit.
Cooling Process
text_image
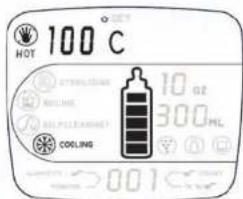
HOT 100°C COOLING 10 oz 300 mL 001When the temperature of the water reaches 100 degree Celsius, the boiling process will stop and the cooling process takes over automatically. The "Cooling" icon lights up and disappears when the water is cooled to the user set temperature. This whole process takes about 25 minutes.
Depending on the user's requirement, the water temperature can be set within a range of 35 to 60 degree Celsius. This temperature will be maintained (+/- 4 degree Celsius).

This machine does not decide for you the right feeding temperature. However, for infants below the age of 3, it is advisable not to set the feeding temperature above 45 degree Celsius.
5) Milk button
Press this button once to illuminate the LCD screen and the buttons. Both the "Powder" and "Water" icon will appear at the same time. The "Powder Group" and the "Concentration" icons will flash 5 times on the LCD screen. This reminds the user to confirm that they are using the right powder grouping and concentration. When these four icons are lit and the backlight is blue, the apparatus is ready for formula milk dispensing.
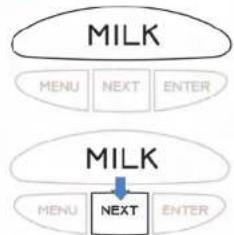
The user determines the amount of feed to be dispersed (e.g. 10 oz, 300 ml). By pressing "Milk" "Next" button, the user gets to select the amount of milk from 2 ozs up to 12 ozs. Pressing the "Enter" button next, the selected amount of milk will be dispersed instantly. This dispensing process can be stopped at anytime by pressing the "Milk" button again.
flowchart
graph TD
    A["MILK"] --> B["MENU"]
    A --> C["NEXT"]
    A --> D["ENTER"]
    E["MILK"] --> F["MENU"]
    E --> G["NEXT"]
    E --> H["ENTER"]
Note : Press "Milk" then "Next" to select the desired dispense amount.
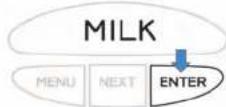
Note: If you have previously selected the desired amount, it will remained unchanged. Simply press "Milk" then "Enter" to dispense that amount.
User guide
babywell®
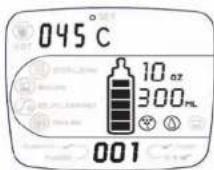

User should take note of the following 4 indications when dispensing milk:
1) The temperature to dispense milk
2) The dispensing amount/quantity
3) The presence of both powder and water icon
4) The powder group
5) The concentration
When the water in the Airpot compartment is less than 12 ozs or 360ml, the "Low Water Indicator" icon will light up. When this happens, user cannot dispense milk, sterilise milk bottles or boil water. The warming and cooling process will also be cut off. Proceed to refill the airport with water.

C. Important Instructions / Precautions / Warnings (Read before using apparatus)
- Do not immerse the apparatus in water or pour water into the powder reservoir. Always keep the apparatus in a cool dry place.
- Always check temperature on LCD before dispensing; To be safe, feel bottle in your palm again to check if the water temperature is acceptable.
- Always remember to put a receptacle below the funnel before any dispensing or self-cleaning;
- Always keep covers (for Powder, Water and Sterilizer) tightly closed to prevent spillage, dirt, dust, insects and unwanted particles to come into contact with powder or water.
- Never fill water above the maximum level indication at the water reservoir. Otherwise there is a risk that the hot water will spill out during boiling.
- Avoid touching the outer surface of the sterilizer and airport when these functions are activated. Always allow unit to be cool before handling.
- Never consume powder (in the powder reservoir), which has been kept for more than 3 days without a single dispense. It is recommended to have the entire appliance emptied and switched off. Always ensure fresh powder and water are used.
- Not for outdoor use. This appliance is for domestic use only.
- Never attempt to repair the machine yourself in the event the following occur: Cord damage, Plug damage, malfunction, damage. Please send it to the customer service centre for rectification.
- Always put the machine on a sturdy flat table away from hot objects, children and babies. The table top should be heat resistant as hot exhaust air will be emitted below the appliance during express cooling. If possible, place a protective surface mat on the table.
- This is not a toy. Do not let infants or children meddle or play with it. Warranty will be void if machine is misused or tampered with on its outer casing. Do not attempt to overturn the machine to clear water from Airpot or Steriliser.
- Water at the airport should be drawn out by the water dispensing button and a clean soft cloth be used to absorb the excess water.
- Never put less than 0.1 litre of water to prevent airport from boiling dry.
User guide
babywell®
D. Quick Start
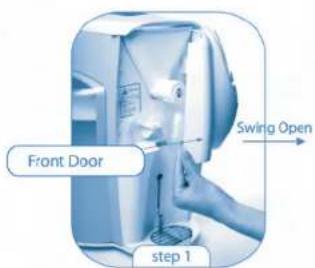
text_image
Front Door swing Open step 1Open Front Door
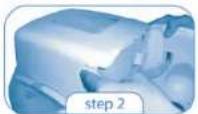
Push Side Indicating Buttons
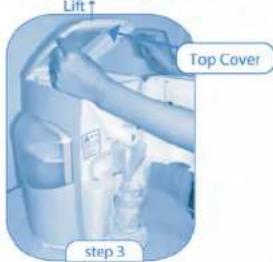
text_image
Lift Top Cover step 3Open Top Cover
-
Place the appliance on a flat table surface.
-
Clean the machine once before use. This will involve a one-time boiling and sterilizing process. For cleaning of powder reservoir, pls refer to pg 17 under proper maintenance.
-
To access to the powder reservoir, please follow illustrated steps 1 to 3.
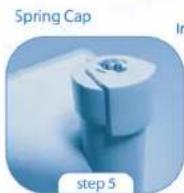
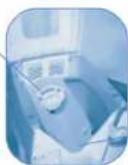
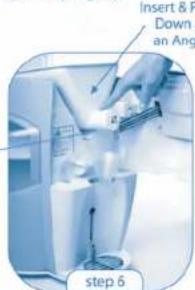
First, open the Front Cover. Then press both the side indicating buttons at the same time to release the catchments of the Top Cover. Lift up the Top Cover. Remove lid of the powder reservoir. Fill powder reservoir. The user has the option of pouring a maximum capacity of 700g of milk powder or any amount they desire. The powder reservoir is the one sitting on the V-shaped recess that is engaged to the rear indexing plate. Before doing so, make sure all the parts of the powder reservoir are in place and the metal tip of the spiral is flush with the surface of the spring cap. Further instructions can be seen on page 18. Lastly press down to close the top cover. You will hear a "click" sound for the latch-on. Proceed to close the front cover.
-
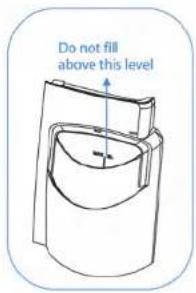
Lift to detach the side cover from the water reservoir. Pour water into the water reservoir till the maximum level indicated. Never fill above this level mark. Otherwise hot water will overflow when boiling. Close the cover after filling.
-
Turn on the power of the appliance by plugging it into the wall socket and switch on to "I" at the back of machine. After initialization, the apparatus enters into a normal mode where the water will adjust itself automatically to the default temperature of 45 degree Celsius (with +/-4 degree Celsius accuracy). The LCD backlight will be Blue.
-
If the water is not sterile, press the "Boil" button to start boiling the water. When the temperature reaches 95 degree Celsius, it will prompt you to "Self Clean". Remember to put a receptacle below the funnel to collect the hot water.
The express cooling function will activate automatically once the temperature of the water reaches 100 degree celsius thereby bringing the water temperature down to about 45 degree Celsius (factory preset temperature).
Optionally, the user can choose to use previously "Boiled" water for almost immediate dispensing. Always remember to wait for the LCD backlight to turn blue before you dispense.
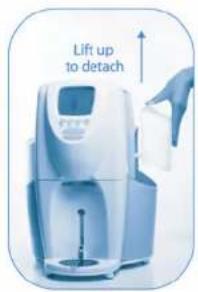
text_image
Lift up to detach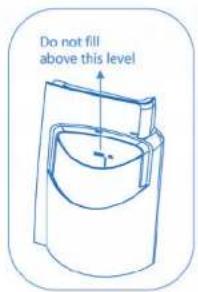
text_image
Do not fill above this levelUser guide
babywell®
natural_image
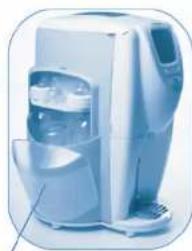
Exterior view of a modern medical device with glass and control panel (no visible text or symbols)A good hygiene practice is to hang the cover by the side
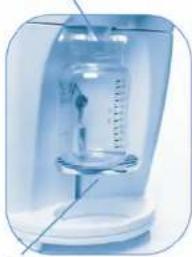
Mouth of Bottle slightly above spout of funnel
natural_image
Close-up of a laboratory glassware device with a central spring and a scale, no visible text or symbolsBottle Lever
- To sterilize the milk bottles, place the washed milk bottles and silicon teats into the sterilizer compartment. Close the cover and press "Sterilize" button once. Hot steam will be produced shortly. This process will automatically cut off once completed (Takes about 8 minutes). To stop the sterilization process at any point of time (not advisable), press the "Sterilize" button once again.
- Adjust the height of the bottle lever to suit your bottle. Make sure the mouth of the milk bottle is slightly higher than the spout of the mixing funnel.
- Before dispensing milk formula, make sure the correct milk powder group has been selected. See page 13 for more information.
E. Settings
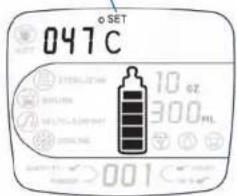
When "SET" appears, the temperature shown is the set temperature.
text_image
047°C 10 Ω 300 mL 001 11. Set Feeding Temperature.
The water temperature is factory set at 45 Degree Celsius. User should set the temperature they think is most suitable for their child. When combined with powder, the temperature of the milk formula will fall by about 3 degree Celsius – which is ideal for immediate feeding. Unless the formula milk is for adults, is not advisable to set a temperature above 45 degree Celsius. However if you wish to change or set this temperature, please perform the following steps:
a) Press "Menu" once. The word "SET" appears on top of the temperature reading.
b) Press "Enter" once to confirm The temperature reading will blink.
c) Press "Next" until the desired temperature is reached. From 35 degree celsius to 60 degree celsius
d) Press "Enter" once to confirm the new temperature settings.
e) Press "Menu" button to exit or "Next" to continue.
User guide
babywell®
text_image
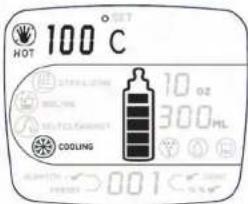
100°C NOT COOLING 10 oz 300 mL 0012. On/Off Express Cooling
Note: The default mode is "On". By turning it off, the cooling process is slowed down considerably from the usual 45mins to 2-3hrs. Note that no milk can be dispensed until set temperature is reached. If you wish to turn it off, please follow steps:
a) Press "Menu" once.
b) Press "Next" once. The word "Cooling" will blink.
c) Press "Enter" once. The word "ON" will blink.
d) Press "Next" once. The word "OFF" will appear.
e) Press "Enter" once to confirm the change and cooling is off.
f) Press "Menu" to exit or "Next" button to continue.
3. Select the Powder Group
text_image
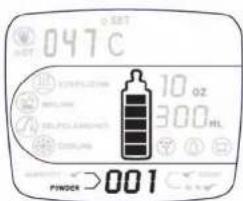
047°C 10 oz 300 mL FINDOR >001First check the Appendix Section I to see which Group (001 to 025) of powder you are using. Likewise you can visit our website at: www.babywell.com for an updated powder listing. If not available, please call our customer support center or e-mail to support@babywell.com.
To select powder group, please follow steps:
a) Press "Menu" once.
b) Press "Next" button twice. The word "Powder" will blink.
c) Press "Enter" once. The word "005" indicating the powder group will blink
f) Press "Next" until the desired group is selected.
g) Press "Enter" once to confirm the selection
h) Press "Menu" to exit or "Next" to continue.
4. Vary the Concentration of milk formula
N.B Do not vary the concentration of your milk dispensed unless advised by your pediatricians or doctor. Concentration can be reduced by 50% or Increased by 20%. Please follow steps:
- Press "Menu" once
- Press "Next" thrice.
The percentage "%" symbol will blink.
- Press "Enter" once to change concentration
The digit "100" (representing a percentage value) will blink. - Press "Next" until the desired concentration is reached.
- Press "Enter" to confirm the change and the new concentration is set.
- Press "Menu" to exit or "Next" button to continue.
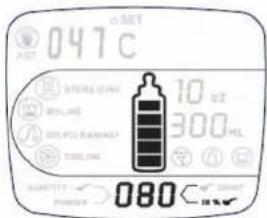
Setting "120" indicates 20% more concentrate than the manufacturer's recommendation. While "80" indicates 20% less concentrated. "100" is default and is equal to the powder manufacturer's recommendation.
text_image
047°C 10 Ω 300 mL 080°CSetting 80 indicates 20% less concentrate than manufacturer's recommendation.
User guide
babywell®
F. Product Functions and Parts Handling
text_image
Do not fill above this level1. Boiling Water (& Self Cleaning)
a. Never overfill – only fill up to the "max" indicator mark shown.
b. Close cover & press "Boil" button.

c. When the temperature reaches 95 degree Celsius, the LCD will prompt you to "Self Clean". Place a receptacle at the dispensing area and then press the "Self Cleaning" button. Caution: Very hot water will be dispensed to sterilize the internal water pipe and the mixing funnel.

d. Never dispense any formula when the LCD backlight is red. The water is above the desired set temperature for feeding. This is a safety precaution to prevent milk from being dispensed. Caution: User must always feel the external surface of the bottle to ensure it is acceptable before feeding the child.
e. When temperature is within desired range, the backlight will turn blue for 20 seconds before going off automatically. At this stage, you can dispense milk.
N.B. To stop boiling at any time, just press "Boil" again. The boiling icon will disappear and cooling will begin. Ensure water is boiled before feeding.
2. Sterilizing
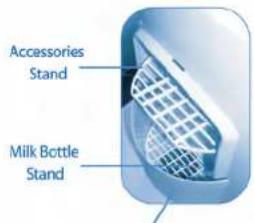
a. Always put both the Milk Bottle Stand and the Accessories Stand in the sterilizing compartment. A maximum of 3 to 4 bottles can be sterilized at a time.
b. Close cover & press "Sterilize".
c. Do not remove bottle/s until the sterilizing icon disappear. During this process, hot steam will be produced (takes about 8 minutes).
d. Never use milk bottles or silicon teats which has been previously sterilized for more than 4 hours. Ensure clean bottles/teats.
Note: To stop sterilizing at any time, press "Sterilize" again. The icon will disappear.
3. Making Milk Formula
a. Place milk bottle or cup at dispensing area.
b. Press "Milk" once. Ensure both "Water" and "Powder" icons are present. If not, press it once again.
c. If the feeding quantity is not correct, press "Next" until the desired quantity is reached
d. Press "Enter" and milk will be dispensed.
Note: To stop dispensing at any time (e.g. failure to place bottle at funnel, just press "Milk" again.
text_image
Accessories Stand Milk Bottle StandSterilizing Compartment

Powder icon


Both icons must be present before you can dispense milk.
User guide
babywell®
4. Dispense only Water

a. Place bottle or cup at dispensing area.
b. Check if water temperature is suitable. Caution: Do not feed baby/infant with water of temperature more than 45 degree Celsius.
c. Depress "Water" until the desired amount of water is obtained.
5. Urgent need for Water or Milk dispensing
Press "Milk" once to light up the buttons and the LCD screen. If the LCD backlight is red, do not attempt to dispense milk as the water is hot and above desired set temperature. However, if you need to dispense urgently, you may alternatively add previously boiled water from kettle into the water reservoir. This will help to speedily cool the water to the desired temperature.
6. Proper Maintenance (Ensure appliance is switched off before cleaning)
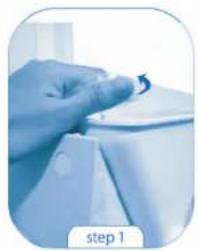
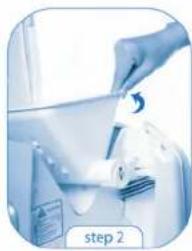
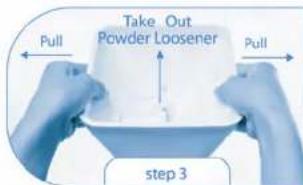
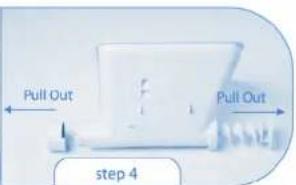
a. Cleaning the powder reservoir. The following illustrates the removal of the components and re-installing the powder reservoir for washing and drying purposes. It is recommended to wash and dry the powder reservoir at regular intervals. See page 19 as well for further instructions.
natural_image
Close-up of a hand holding a small object, possibly a tool or device, with no visible text or symbols.Peel off enclosed lid
natural_image
Close-up of a hand using a tool to clean or prepare a white object, labeled 'step 2' (no other text or symbols visible)Remove Powder Reservoir
Powder Loosener
text_image
Take Out Powder Loosener Pull Pull step 3Remove Powder Lossener
text_image
Pull Out Pull Out step 4Remove Spiral & Spring Cap
Spring Cap to be in Close position before re-installing
V channel
(Powder Reservoir
Support)
text_image
Insert & P Down a an Ang step 6Re-Install Powder Reservoir
User guide
babywell®
Spring Cap
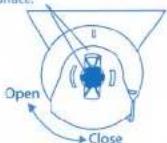
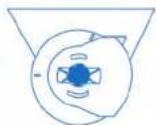
Metal tip surface should be flushed or slightly protruded to the spring cap surface.
√ Right Cap Positioning
× Wrong Cap Positioning
text_image
Step 6 PullRemove Funnel
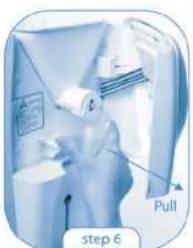
Prior to step 4. Use your index finger to press down the metal tip at the spring cap to release the spiral rod. Remove rod from the rear end of the powder reservoir. Turn the spring cap to the open position. Put your index finger into the opening to pull out the spring cap. Re-installing of reservoir should be done in reverse of these steps.
b. Cleaning the airport – Drain out all unused water by depressing "Water". Clean the interior with a soft clean cloth. Refill compartment with fresh tap water or boiled water.
c. Cleaning the Sterilizer- Use a soft cloth to absorb the condensed water. Use a dry cloth to clean.
d. Cleaning the mixing funnel – Open the front door daily to see if the mixing funnel is clean. If not, pull to remove the funnel horizontally for cleaning. Make sure that the funnel is fully inserted after cleaning. Note: The front door cannot be closed properly if funnel is not fully inserted.
e. Always check condition of the powder in the powder reservoir. Ensure powder is not coagulated, or mouldy.
7. Descaling the Airport and the Sterilizer
Depending on the hardness of the water, scale built up on the heating element inside the Airpot/ Sterilizer is normal. The harder the water the faster the built up. Therefore, regular descaling is required to prolong the life of the Airpot and the Sterilizer. It is recommended to descale once every one to three months.
a. Fill 720ml of water into the Airport and 300ml of water into the Steriliser.
b. Add 2 teaspoon of citric acid or 1 sachets (if it is in powder form) to each compartment.
c. Press "Boiling" and "Sterilizing" buttons once to start the descaling process.
d. Wait for water to cool down (about 20 minutes). Empty the water from both compartment.
e. Complete another cycle using only water.
Note: Do not use any abrasive objects to scrub the heating pans. Warranty will be immediately void if this has been done.
G. Troubleshooting
| Problem | Possible Cause | Solution |
| LCD screen flicker/does not switch "On" | The connector behind the front door not properly attached | Firmly insert the connector |
| Machine cannot be switched "On" | Power Plug not properly attached | Firmly insert the power plug |
| Front door cannot be closed | Funnel not fully inserted | Fully insert the funnel into the machine body |
| Milk dispensed inaccurate | This is normal for the first milk dispense after the milk powder top-up | Subsequent dispensing will be fine |
| Plastic smell/ taste from water in the Airpot compartment | The smell may be present and will diminish over time | Fill Airpot with water. Squeeze 1/4 of the lemon/lime juice. Do a 1 time Boiling. Empty & rinse out with clean water again |
| Low water indicator does not appear/does not go off | Float stuck along the sensor track | Send machine back to service centre for repair |
H. Technical Specifications
| Name: | Babywell Milk Expresso |
| Model: | ME2005-01 |
| Voltage: | 220-240V~ |
| Wattage: | Sterilizer 300W, Water Heater 1250W |
| Frequency: | 50Hz/60Hz |
| Control Type: | Program Controlled |
| Water Capacity: | 2 Litre |
| Powder Capacity: | 700g |
| Sterilizing Capacity: | 3 Standard milk bottles |
| Measurement: | 295mm x 315mm x 440mm |
| Weight: | 7.0KG (Excluding box) |


Designed by PSB for
babywell ^

Certified by


Guarantee
In addition to the legal warranty provided for by law on hidden defects, in an event, Babywell guarantees this product exclusively domestic usage against manufacturing fault or material defect.
The warranty period is one year from the date of purchase. During this period, the product will be either be repaired or replaced free of charge.
The guarantee is only valid if proof of purchase is produced with the product. It does not cover damage resulting from any use of the product not described in the instructions or of the product is knocked or dropped.
Babywell will not held responsible for material damage or personal accidents resulting from any installation that does not comply with legal or statutory provisions.
Calling a guarantee does not give right to damages or interest.
We reserve the right to implement any modifications to the technical, design or colour specifications that we were fit to do.
This document has no contractual value apart from its guarantee clauses.
I. Appendix
Powder Groupings
| Group | Brand | Manufacturer | Age | |
| From (Months) | To (Months) | |||
| A) Infant Formula | ||||
| 011 | Isomil - Soy Protein | Abbott | 0 | 6 |
| 011 | Isomil - Follow Up | Abbott | 6 | above |
| 012 | Similac Infant | Abbott | 0 | 6 |
| 007 | Similac Follow On | Abbott | 6 | above |
| 012 | Similac Neosure | Abbott | 0 | 12 |
| 012 | Gain IQ - Growing Up | Abbott | 12 | 36 |
| 014 | Abbott Grow | Abbott | 36 | 72 |
| 020 | Pediasure Complete | Abbott | 12 | 120 |
| 012 | Dulac Infant (Step 1) | Dumex | 0 | 12 |
| 008 | Dupro Follow Up (Step 2) | Dumex | 6 | above |
| 012 | Mamex LF | Dumex | 0 | 12 |
| 007 | Mamex Gold Infant (Step 1) | Dumex | 0 | 12 |
| 013 | Mamil Follow Up (Step 2) | Dumex | 6 | above |
| 012 | Mamil Night | Dumex | 6 | above |
| 014 | Mamil Gold (Step 3) | Dumex | 24 | 72 |
| 011 | Mamil Gold (Step 4) | Dumex | 36 | above |
| 014 | Dugro 1+ | Dumex | 12 | 36 |
| 017 | Dugro 3+ | Dumex | 36 | 72 |
| 014 | Dugro 6+ | Dumex | 72 | 108 |
| 008 | Friso 1 Gold | Friso | 0 | 6 |
| 010 | Friso 2 Gold | Friso | 6 | 12 |
| 010 | Friso 3 Gold | Friso | 12 | 36 |
| 017 | Friso 4 Gold | Friso | 36 | 72 |
| 010 | Friso 1 Soy | Friso | 0 | above |
| 008 | Friso 1 Comfort | Friso | 0 | above |
| 010 | Enfala c H.A. | Mead Johnson | 0 | 6 |
| 010 | Enfala c A+ | Mead Johnson | 0 | 12 |
| 012 | Enfapro A+ | Mead Johnson | 6 | 18 |
| 012 | Enfalar AC | Mead Johnson | 0 | above |
| 010 | Enfala c LF - Infant | Mead Johnson | 0 | 12 |
| 011 | Enfapro LF - Follow Up | Mead Johnson | 6 | 18 |
| 012 | Enfagrow A+ | Mead Johnson | 12 | 36 |
| 012 | Enfakid A+ | Mead Johnson | 36 | 72 |
| Group | Brand | Manufacturer | Age | |
| From (Months) | To (Months) | |||
| 012 | Nan 1 | Nestle | 0 | 6 |
| 013 | Nan 2 | Nestle | 6 | 12 |
| 012 | Nan H.A. 1 | Nestle | 0 | 6 |
| 0 | Nan H.A. 2 | Nestle | 0 | 6 |
| 012 | Lactogen 1 | Nestle | 1 | 12 |
| 012 | Lactogen 2 | Nesite | 6 | 36 |
| 009 | Nestlac 1+ Prebio 1 | Nestle | 12 | above |
| 011 | Nestlac 3+ Prebio 3 | Nestle | 36 | above |
| 010 | S26/ S26 Gold 1 | Wyeth | 0 | 6 |
| 012 | Promil 2/ Promil Gold 2 | Wyeth | 6 | 12 |
| 025 | Progress 3/ Progress Gold 3 | Wyeth | 12 | 36 |
| 017 | Promise 4/ Promise Gold 4 | Wyeth | 36 | 84 |
| 010 | Nursoy Infant Formula | Wyeth | 0 | 6 |
| 012 | Novalac Infant | United Pharma. | 0 | above |
| 011 | Novalac Follow-Up | United Pharma. | 6 | above |
| 011 | Karihome Follow-On | Dairy Goat (NZ) | 6 | above |
| 012 | Karihome A3 | Dairy Goat (NZ) | 12 | above |
| 012 | Femleaf 1 | Femleaf | 12 | above |
| 013 | Femleaf 3 | Femleaf | 36 | above |
| B) Mother's Formula | ||||
| 023 | Enfamama | Mead Johnson | ||
| 013 | Anmum 1 (pregnant) | New Zealand | ||
| 013 | Anmum 2 (breastfeeding) | New Zealand | ||
| 016 | Mamil Mama | Dumex | ||
| 017 | Friso mum | Friso | ||
| C) Adult's Formula | ||||
| 011 | Anlene Active | |||
| 011 | Anlene Gold & Hi Cal | Anlene | ||
| 013 | Dumilk | Dumex | ||
| 013 | Fernleaf | Fernleaf | ||
| 011 | Omega Plus | Nestle | ||
| 010 | Nesvita | Nestle | ||
| 012 | Nespray Full Cream | Nesite | ||
N.B. Please select the corresponding brand to powder grouping. Eg Group 10 to S26 Powder. Then go to the menu settings to set the powder grouping e.g. 10 so that the machine will be programmed to recognize the right mixing proportions.