
IF 250EU - Staubsauger SHARK - Kostenlose Bedienungsanleitung
Finden Sie kostenlos die Bedienungsanleitung des Geräts IF 250EU SHARK als PDF.


| Produkttyp | Akku-Staubsauger |
| Modell | IF 250EU |
| Marke | Shark |
| Spannung | 25,2 V |
| Leistung | 300 W |
| Akkutyp | Lithium-Ionen-Akku |
| Ladezeit | ca. 3,5 Stunden |
| Laufzeit (Extended Runtime) | bis zu 22 Minuten |
| Laufzeit (Max Power) | bis zu 10 Minuten |
| Bodendüse | DuoClean mit zwei Bürstenwalzen |
| Flexology-Stab | Ja, verstellbar für Reinigung unter Möbeln |
| Smart Response Technologie | Ja, Auswahl von Teppich- und Bodenmodus sowie Saugkraftstufen |
| LED-Scheinwerfer | Ja, in der Bodendüse |
| Staubbehälter | Transparent, mit Entleerungsknopf |
| Filtersystem | Zwei waschbare Filter (Schaumstoff und Filz) |
| Zubehör | Fugendüse, Polsterdüse, weitere |
| Garantie (Gerät) | 5 Jahre nach Registrierung |
| Garantie (Akku) | 2 Jahre nach Registrierung |
Häufig gestellte Fragen - IF 250EU SHARK
Benutzerfragen zu IF 250EU SHARK
0 Frage zu diesem Gerät. Beantworten Sie die, die Sie kennen, oder stellen Sie Ihre eigene.
Eine neue Frage zu diesem Gerät stellen
Laden Sie die Anleitung für Ihr Staubsauger kostenlos im PDF-Format! Finden Sie Ihr Handbuch IF 250EU - SHARK und nehmen Sie Ihr elektronisches Gerät wieder in die Hand. Auf dieser Seite sind alle Dokumente veröffentlicht, die für die Verwendung Ihres Geräts notwendig sind. IF 250EU von der Marke SHARK.
BEDIENUNGSANLEITUNG IF 250EU SHARK
Shark.
DuoClean™ Cord-Free Vacuum
IF200UK IF250UK
Series
INSTRUCTIONS
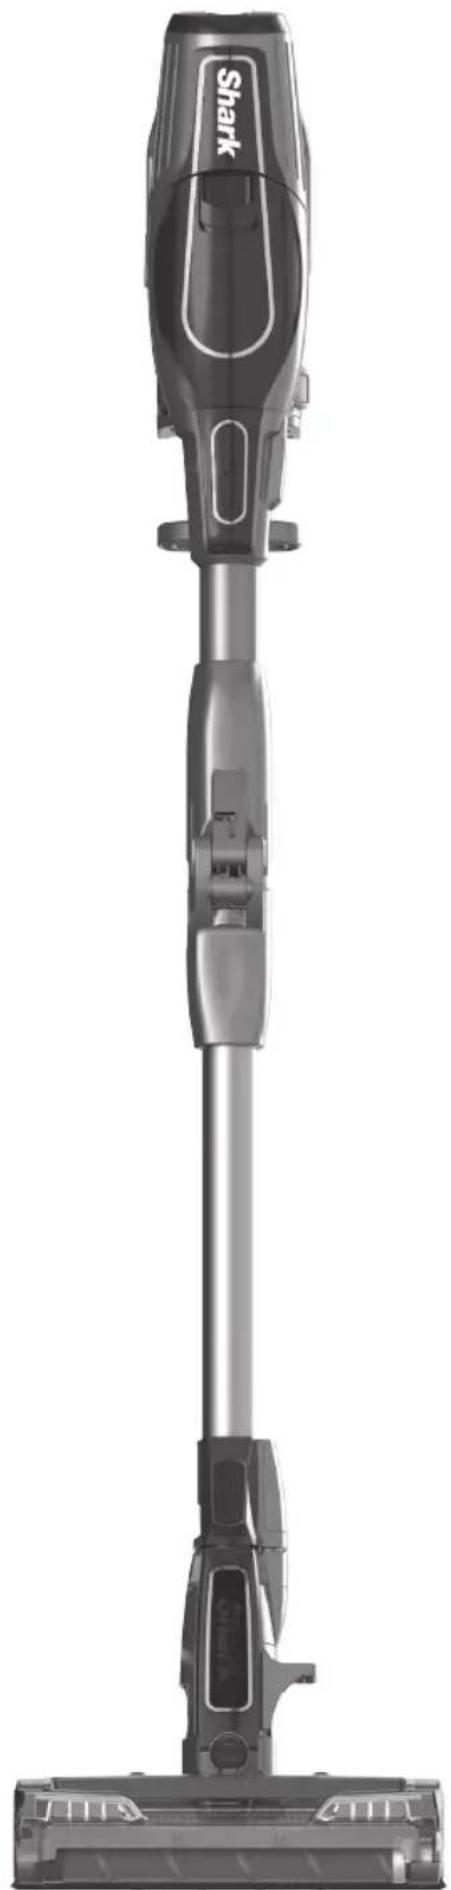
natural_image
Front view of a black Shark vacuum cleaner with extended handle and control panel (no visible text or symbols)THANK YOU
for purchasing the Shark® DuoClean™ Cord-Free Vacuum


TIP: You can find the model and serial numbers on the QR code label which is located on the bottom of the dust cup.
REGISTER YOUR PURCHASE

registermyshark.co.uk

0800 862 0453

Scan QR code using mobile device
RECORD THIS INFORMATION
Model Number: ____
Date of Purchase (Keep receipt): ____
Store of Purchase:
TECHNICAL SPECIFICATIONS
Voltage: 25.2V---
Watts: 300W
Amps: 11.9A
PLEASE READ CAREFULLY AND KEEP FOR FUTURE REFERENCE.
This instruction manual is designed to help you get a complete understanding of your new Shark DuoClean Cord-Free Vacuum.
If you have any questions, please call the Customer Service line at 0800 862 0453.
CONTENTS
Important Safety Instructions....3
Getting To Know Your Shark® DuoClean™ Cord-Free Vacuum ....6
Using Your Lithium ION Power Pack Battery 7
Installing Your Lithium ION Power Pack Battery 7
Charging Your Lithium ION Power Pack Battery 7
Using the Lithium ION Power Pack Battery 7
Using the Lithium ION Power Pack Battery Charging Dock....7
LED Battery Power Meter 7
Recycling Your Lithium ION Power Pack Battery 7
Assembling Your Vacuum 8
Using the Flexology™ wand 9
Flexology Storage....9
Using Smart Response™ Technology....10
Choosing a Surface Setting 10
Choosing a Suction Setting 10
Using Your Vacuum in Above-Floor Mode 11
Accessories....13
Maintaining Your Vacuum 15
Emptying the Dust Cup....15
Cleaning the Filters....16
Maintaining the Brushroll 17
Maintaining the Soft Roller 18
Checking for Blockages....18
Troubleshooting Guide....19
Warranty 21
Battery Warranty....22
IMPORTANT SAFETY INSTRUCTIONS
FOR HOUSEHOLD USE ONLY
WARNING
To reduce the risk of injury, fire, electric shock, and property damage resulting from improper use of the appliance, carefully observe the following instructions. This unit contains electrical connections and moving parts that potentially present risk to the user. The appliance is not to be used by persons (including children) with reduced physical, sensory or mental capacity or lack of experience and knowledge, unless they have been given supervision or instruction.
THE DUOCLEAN™ FLOOR NOZZLE, WAND, AND HANDHELD VACUUM CONTAIN ELECTRICAL CONNECTIONS:
• These are NOT serviceable parts.
• DO NOT use to vacuum any liquids.
• DO NOT immerse in water when cleaning.
- If handheld vacuum/wand is damaged, discontinue use.
1 To avoid fire, explosion, or injury, inspect Lithium ION Power Pack and chargers for any damage before use. DO NOT use vacuum cleaner with a damaged power pack or charger.
2 DO NOT use outdoors or on wet surfaces. Use only on dry surfaces.
3 If vacuum cleaner is not working as it should, or has been dropped, damaged, left outdoors, or immersed in water, return it to Euro-Pro Europe Limited for examination, repair, or adjustment.
4 DO NOT handle charger or vacuum cleaner with wet hands.
5 DO NOT leave vacuum cleaner unattended.
6 Keep power pack away from heated surfaces.
7 Always turn off this appliance before connecting or disconnecting floor nozzle.
8 Use only Shark chargers and batteries. Other types of batteries may burst, causing injury and damage.
9 Use Lithium-ION Power Pack Charging Dock on flat, stable surfaces only.
10 DO NOT incinerate appliance, even if it is severely damaged, as power pack may explode in a fire.
GENERAL USE
11 DO NOT hang vacuum cleaner from wall mount when Flexology™ Wand is in storage mode.
12 Use only as described in this manual.
13 Keep your work area well lit.
14 Keep the vacuum cleaner moving over the carpet surface at all times to avoid damaging the carpet fibres.
15 DO NOT place vacuum cleaner on unstable surfaces such as chairs or tables.
16 DO NOT put any objects into openings. DO NOT use with any opening blocked; keep free of dust, lint, hair, and anything that may reduce airflow.
17 DO NOT allow young children to operate the appliance or use as a toy. Close supervision is necessary when any appliance is used near children.
18 DO NOT use without Soft Roller, dust cup door, and all filters in place.
SAVE THESE INSTRUCTIONS
PLEASE READ CAREFULLY BEFORE USE
19 DO NOT use if airflow is restricted; if the air paths or the floor nozzle become blocked, turn off the vacuum cleaner and remove battery. Clear all obstructions before returning battery to vacuum and powering on again.
20 Keep floor nozzle away from hair, face, fingers, uncovered feet, or loose clothing.
21 Only use manufacturer's recommended attachments.
22 DO NOT charge power pack at temperatures below 50°F (10°C) or above 104°F (40°C).
23 Store the appliance indoors. DO NOT use or store it below 37.4^ F ( 3^ C). Ensure the appliance is at room temperature before operating.
DUST CUP/FILTERS/ACCESSORIES
Before turning on the vacuum:
24 Make sure that all filters are thoroughly dry after routine cleaning.
25 Make sure brushroll, Soft Roller, dust cup door, and all filters are in place after routine maintenance.
26 Make sure accessories are free of blockages and keep openings away from face and body.
27 Use only Shark® brand filters and accessories. Using other brands will void warranty.
GENERAL CLEANING
28 DO NOT vacuum up hard or sharp objects such as glass, nails, screws, or coins that could damage the vacuum cleaner.
29 DO NOT vacuum up drywall dust, fireplace ash, or embers. DO NOT use as an attachment to power tools for dust collection.
30 DO NOT vacuum up smoking or burning objects such as hot coals, cigarette butts, or matches.
31 DO NOT vacuum up flammable or combustible materials (e.g., lighter fluid, gasoline, or kerosene) or use vacuum in areas where they may be present.
32 DO NOT vacuum up toxic solutions (e.g., chlorine bleach, ammonia, or drain cleaner).
33 DO NOT use in an enclosed space where vapors are present from paint, paint thinner, moth-proofing substances, flammable dust, or other explosive or toxic materials.
34 DO NOT vacuum up any liquids.
35 DO NOT immerse vacuum cleaner in water or other liquids.
36 Use extra care when cleaning on stairs.
CONTINUED ON PAGE 5
IMPORTANT SAFETY INSTRUCTIONS
FOR HOUSEHOLD USE ONLY
WARNING
To reduce the risk of injury, fire, electric shock, and property damage resulting from improper use of the appliance, carefully observe the following instructions. This unit contains electrical connections and moving parts that potentially present risk to the user.
LITHIUM ION POWER PACK BATTERY
37 The Lithium ION Power Pack Battery is the power source for the appliance. When the Lithium ION Power Pack Battery is connected to the appliance, DO NOT carry the appliance with your finger on the power button. DO NOT charge appliance with the power on.
38 Disconnect the Lithium ION Power Pack Battery from the appliance before making any adjustments or troubleshooting.
39 Use only Shark chargers YLS0243A-U288080 / YLS0483A-U2880802 to charge. Use of incorrect charger may create a risk of fire when used with Lithium ION Power Pack Battery.
40 Use appliance only with specifically designated Lithium ION Power Pack Batteries. Use of any other battery packs may create a risk of injury and fire.
41 When Lithium ION Power Pack Battery is not in use, keep it away from all metal objects, such as paper clips, coins, keys, nails, or screws. Shorting the battery terminals together increases the risk of fire or burns.
42 Under abusive conditions, liquid may be ejected from the power pack. Avoid contact with liquid, as it may cause irritation or burns. If contact occurs, flush with water. If liquid contacts eyes, seek medical help.
43 DO NOT expose power pack or appliance to fire or temperature above 266°F (130°C) as it may cause explosion.
44 Follow all charging instructions and DO NOT charge the power pack or appliance outside of the temperature range specified in the instructions (see #22). Charging improperly or at temperatures outside of the specified range may damage the Lithium ION Power Pack Battery and increase the risk of fire.
45 Appliance should only be serviced by a qualified repair person using only identical replacement parts. To ensure safety, DO NOT modify or attempt to repair the appliance or the power pack yourself, except as indicated in the instructions for use and care.
46 Lithium ION Power Pack Battery should not be stored at temperatures below 37.4°F (3°C) or above 104°F (40°C) to maintain long-term battery life.
47 Lithium ION Power Pack Battery should not be exposed to or submerged in any water, salt water, or other liquids.
SAVE THESE INSTRUCTIONS
PLEASE READ CAREFULLY BEFORE USE
GETTING TO KNOW YOUR SHARK® DUOCLEAN™ CORD-FREE VACUUM
WELCOME!
Congratulations on your purchase. Use this instruction manual to learn about your new vacuum's great features. From assembly to use to maintenance, you will find it all in here.
NOTE: Your Lithium ION Power Pack Battery does not come fully charged. Prior to first use, fully charge. During first use, discharge fully to condition your Lithium ION Power Pack Battery. Failure to do so may cause LED indications to work incorrectly. Always store Lithium ION Power Pack Battery with a partial charge.
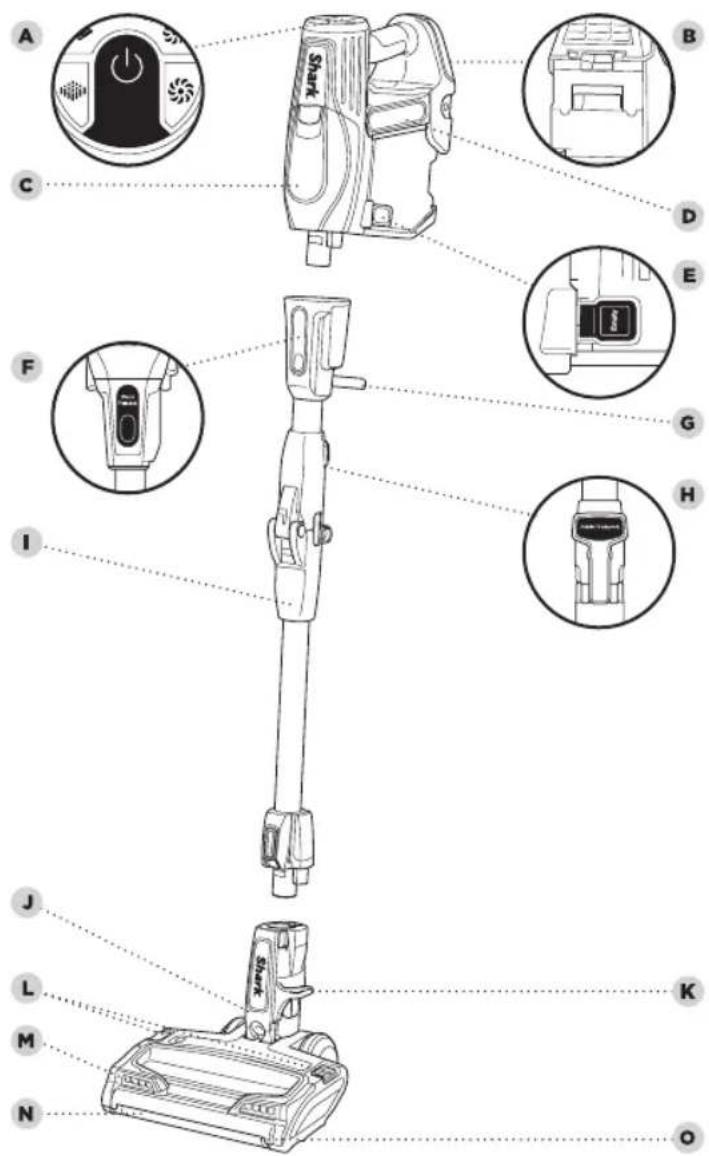
A Power Switch
B Battery Release
c Handheld Vacuum
D Lithium ION Power Pack Battery
E Dust Cup Release
F Flexology™ Wand Release
G Flexology Storage Carry Handle
H Flexology Wand Button
Flexology Wand
J DuoClean Floor Nozzle
K Lower Wand Release Pedal
L Brushroll Garage Release Buttons
M Headlights
N Soft Roller
- Soft Roller Access Tab
USING YOUR LITHIUM ION POWER PACK BATTERY
NOTE: Some charging options may not be included with your vacuum.
To purchase additional or replacement Lithium ION Power Pack Batteries, chargers, and charging docks, visit sharkclean.eu
DID YOU KNOW?
The DuoClean™ floor nozzle has LED headlights that turn on automatically to illuminate the floor surface.
RECYCLING YOUR LITHIUM ION POWER PACK BATTERY
When your Lithium ION Power Pack Battery needs to be replaced, dispose of it or recycle it in accordance with local regulations. In some areas, it is illegal to place spent lithium-ion batteries in the bin or in a municipal solid waste stream. Return spent power packs to an authorised recycling center or to retailer for recycling. Contact your local recycling center for information on where to drop off the spent power pack.
NOTE: Lithium-ION Power Pack takes approximately 3.5 hours for full charge.
NOTE: When used in handvac mode, the Lithium ION power Pack provides up to 22 minutes of runtime in EXTENDED RUNTIME setting and up to 10 minutes in MAX POWER setting.
INSTALLING YOUR LITHIUM ION Power Pack BATTERY
Slide the Lithium ION Power Pack Battery into the slot on the back of the handheld vacuum.
To remove, pinch the release tab and slide the Lithium ION Power Pack Battery out of the handheld vacuum.
CHARGING YOUR LITHIUM ION Power Pack BATTERY Using the LITHIUM ION Power Pack Battery Charger
Connect the Lithium ION Power Pack Battery Charger to the port on the side of the Lithium ION Power Pack Battery, then plug the charger into a wall outlet. The ION Power Pack Battery can be charged whether it is inside or outside the handheld vacuum.
Using the Lithium ION Power Pack Battery Charging Dock
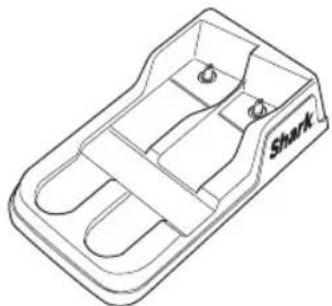
Connect Lithium ION Power Pack Battery Charger to the Charging Dock. Place power pack onto dock, then connect charger to wall outlet.
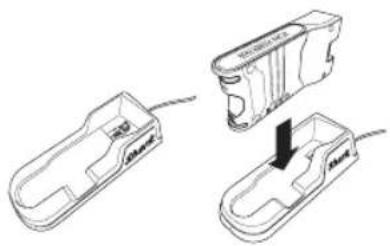
natural_image
Three technical line drawings of a mechanical component with no visible text or symbolsLED BATTERY POWER METER In Use
As the Lithium ION Power Pack discharges, its 3 LED lights will gradually turn off in sequential order. When less than 5% of charge remains, the bottom LED light will flash, indicating a charge is needed.

Charging
As the Lithium ION Power Pack Battery charges, the lights will first blink and then illuminate steadily, in sequential order. All 3 lights will glow steadily upon receiving a full charge, and then turn off after a short period. This preserves long-term battery life and allows the battery to remain connected to the charger even after reaching full charge.

ASSEMBLING YOUR VACUUM
STEP 1
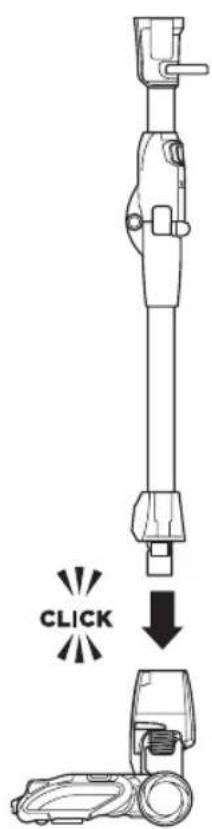
STEP 2
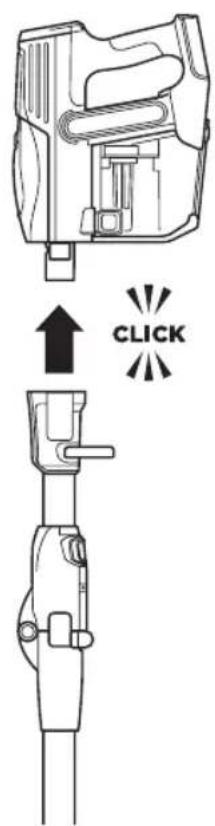
1 Insert the wand into the DuoClean™ floor nozzle, pressing it in until it clicks securely into place.
2 Insert the handheld vacuum into the top of the wand, pressing it in until it clicks securely into place.
USING THE FLEXOLOGY™ WAND

WARNING: This
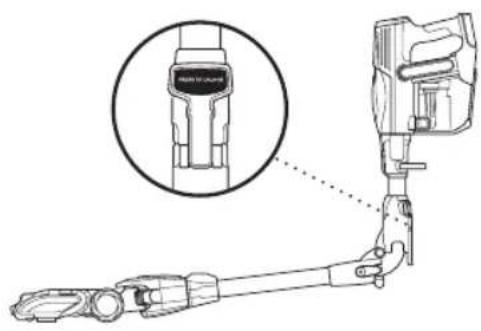
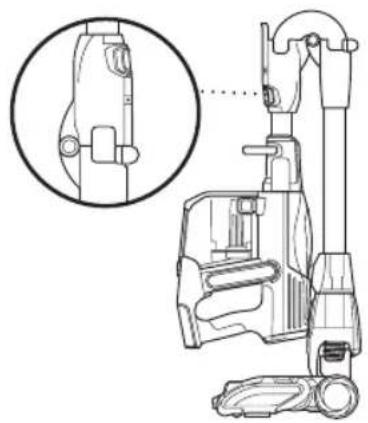
vacuum does not stand up on its own. Using the unit when it lacks stability may result in personal injury. To place in Flexology Storage mode, press the Flexology Wand button and gently fold the handheld vacuum down toward the floor nozzle.

TIP: The carry handle located below the handheld vacuum can also be used to assist in taking the vacuum in and out of Flexology Storage mode.
NOTE: Before vacuuming your delicate rugs or carpet, refer to the rug manufacturer's recommended cleaning instructions.
WHAT DOES THE BRUSHROLL INDICATOR LIGHT MEAN?
Solid Green
The brushrolls are on and working as they should.
Solid Red
There is a jam in the brushroll area. Turn your vacuum off and remove the blockage.
No Light
The brushrolls are off because the vacuum is off, or the nozzle is not correctly connected to the wand or handheld vacuum.
USAGE
natural_image
Technical line drawing of a mechanical device with a close-up inset showing a component detail (no text or symbols)STORAGE
natural_image
Technical line drawing of a vacuum cleaner with an inset close-up view (no text or symbols)1 To start vacuuming, press the Power button, then recline the wand to start the brushrolls.
USING THE FLEXOLOGY WAND
To easily access hard-to-reach areas under furniture without having to bend down, press the Flexology Wand button to position the wand to a lower angle.
FLEXOLOGY STORAGE
1 Press the Flexology Wand Lock Release button and gently fold the handheld vacuum forward toward the floor nozzle until it locks in storage mode. Use the handle to carry the vacuum to its storage location.
To take the vacuum out of storage mode, press the Flexology Wand Lock Release button while lifting up the handheld vacuum. When straightened, the wand will lock in place.
USING SMART RESPONSE™ TECHNOLOGY
natural_image
Technical line drawing of a mechanical component with two circular inset views showing internal features (no text or symbols)SMART RESPONSE TECHNOLOGY
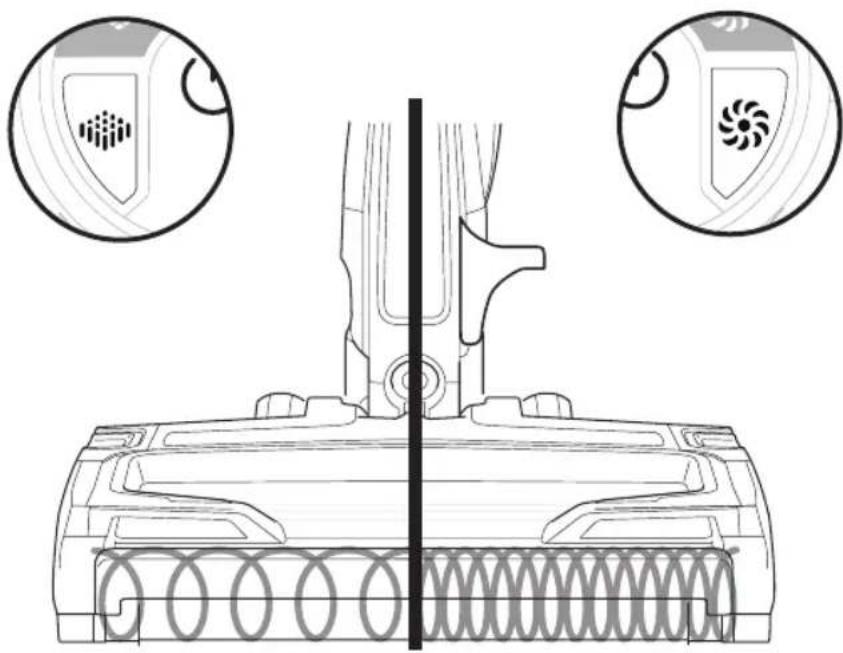
The Smart Response Technology lets you select the ideal power setting and brushroll speed for each cleaning job.
CHOOSING A SURFACE SETTING

Carpet setting – For cleaning thick pile carpets. Both brushrolls spin faster, working together to pick up debris below the surface of your carpets.

Floor setting – For cleaning hard floors and short pile carpets. The brushroll and the Soft Roller both spin together slowly to gently clean hard floors and short pile carpets. The Soft Roller traps fine dust and large particles, while the brushroll directs that debris to the suction channel.
CHOOSING A SUCTION SETTING
There are 2 suction settings:

EXTENDED RUNTIME – For everyday cleaning.

MAX POWER – Maximum power for heavy-duty cleaning. (The MAX POWER setting drains the Lithium ION Power Pack Batteries faster than EXTEND RUNTIME setting.)
USING YOUR VACUUM IN ABOVE-FLOOR MODE

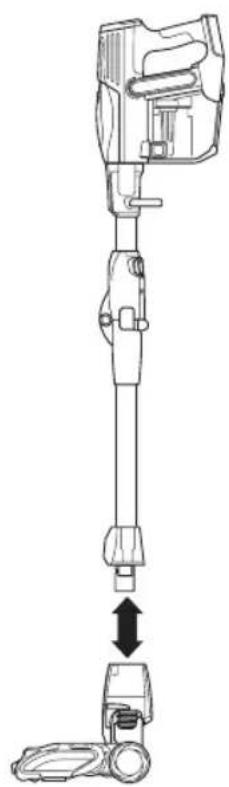
TIP: To conveniently clean stairs, attach the handheld vacuum directly to the DuoClean™ floor nozzle.
STEP 1
natural_image
Technical line drawing of a handheld device with a vertical shaft and base, showing internal components and directional arrows (no text or symbols)STEP 2
natural_image
Technical line drawing of a mechanical device with three views (top, front, side), no text or symbols present.FOR LONG-REACH CLEANING:
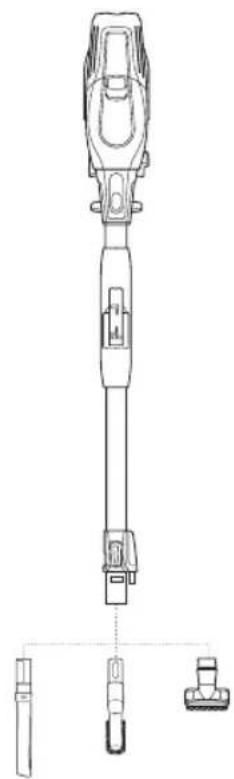
1 Stand the vacuum upright. Step on the foot pedal and pull the wand up to disconnect it from the DuoClean floor nozzle. Press the Flexology™ Wand button to vacuum with the wand at a lower angle.
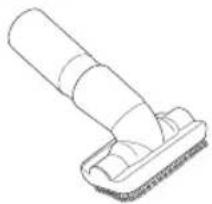
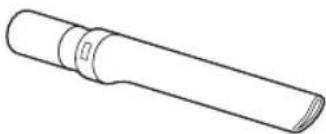
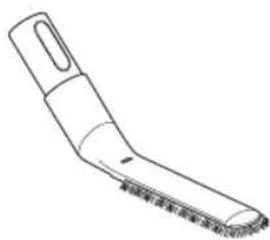
2 Attach desired cleaning accessory to the wand.
natural_image
Technical line drawing of a mechanical device with an upward arrow indicating assembly or transformation (no text or symbols present)STEP 1
natural_image
Technical line drawing of a mechanical component with three parts (no text or symbols)STEP 2
FOR SHORT-REACH CLEANING:
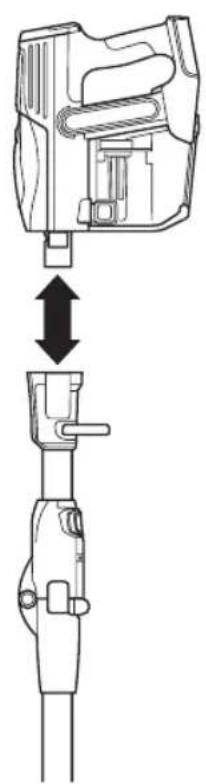
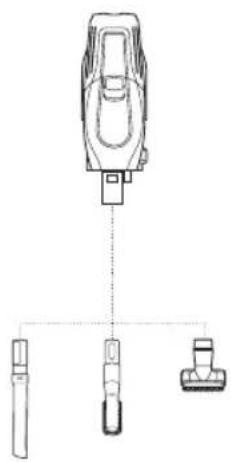
1 Press the Flexology™ Wand Release button on the top of the wand to disconnect it from the handheld vacuum.
2 Attach desired cleaning accessory to the handheld vacuum.
A
natural_image
Simple line drawing of a mechanical component with a cylindrical shaft and base (no text or symbols)B
natural_image
Simple line drawing of a cylindrical object with a flanged end (no text or symbols)C
natural_image
Line drawing of a cleaning tool with a handle and lever (no text or symbols)D
natural_image
Line drawing of a 3D model of a rectangular container with internal compartments and two small holes, labeled 'Shark' on the side (no other text or symbols)E
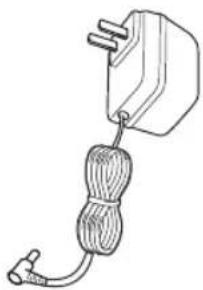
natural_image
Simple line drawing of a power plug connected to a coiled cable (no text or symbols)F
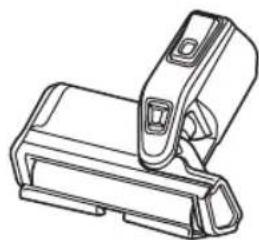
natural_image
Technical line drawing of a mechanical clamp or bracket component (no text or symbols)G
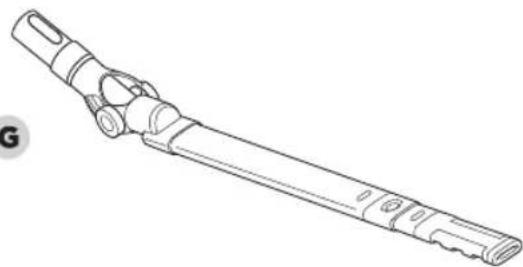
natural_image
Line drawing of a mechanical tool or device with no visible text, numbers, or symbolsH
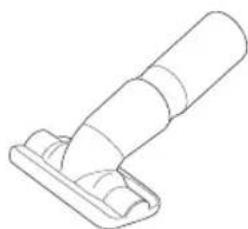
natural_image
Technical line drawing of a mechanical component with a cylindrical shaft and flange (no text or symbols)MAINTAINING YOUR VACUUM

WARNING: Hand wash filters only with water to prevent damage from cleaning chemicals. Allow ALL filters to air-dry completely before replacing them in the vacuum to prevent liquid from being drawn into electric parts.

CAUTION: Turn off power and remove power pack before servicing.

IMPORTANT: Clean the dust screen inside the dust cup as required.
NOTE: Empty dust cup when debris reaches the MAX fill line.
RECOMMENDED FILTER CLEANING SCHEDULE:
Pre-Motor Filter Kit
(Foam & Felt)
Clean once a month.
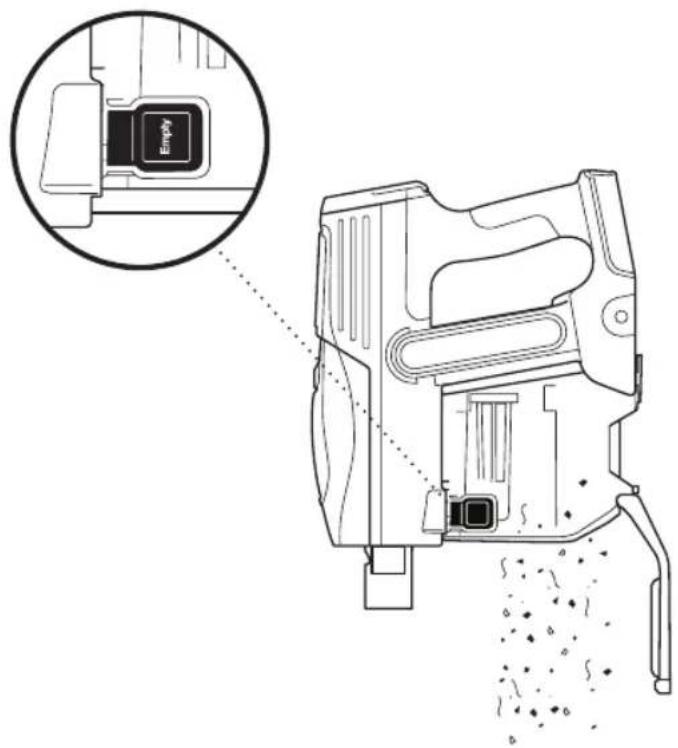
EMPTYING THE DUST CUP
1 To empty dust cup, first remove the handheld vacuum from the wand by pressing the Wand Release button and pulling up on the handheld vacuum. Position dust cup over a bin, then open the bottom of the dust cup by pressing the Dust Cup release button on the side.
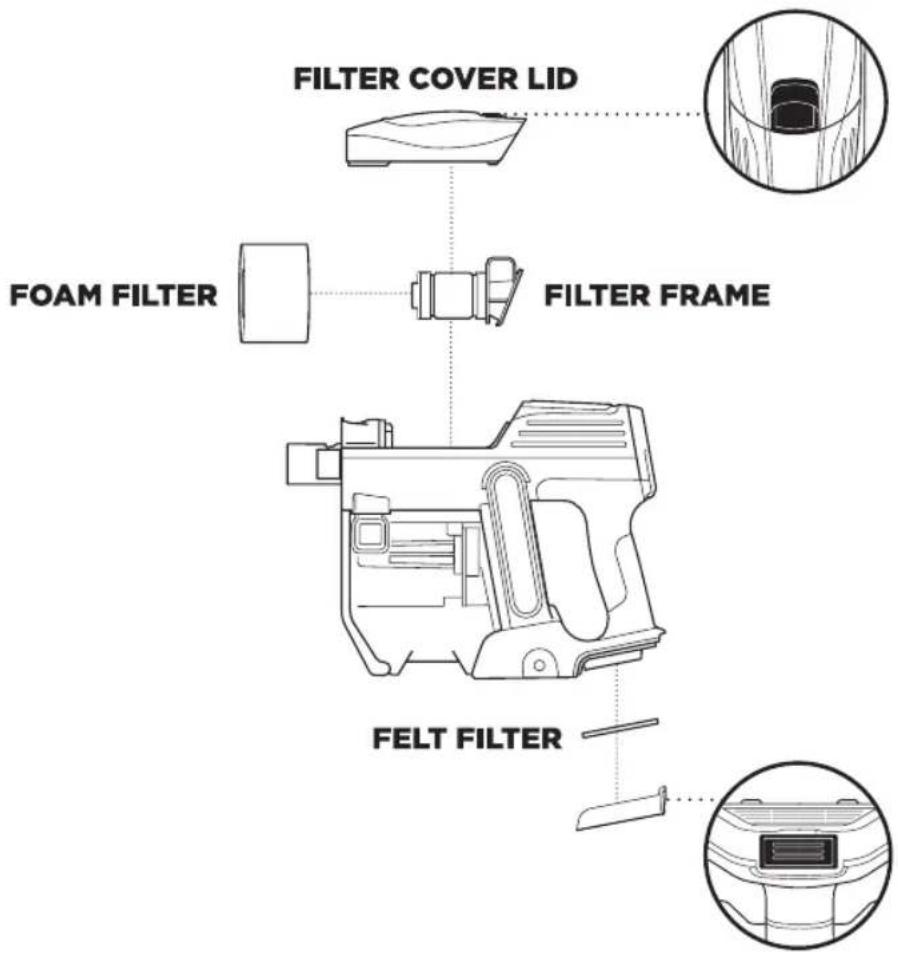
CLEANING THE FILTERS
1 To clean the foam filter, remove the filter cover lid on the top of the handheld vacuum and slide off the foam filter. Rinse foam filter and filter frame with water. Tap loose dirt off filter between washes as needed. Once foam filter is completely dry, return it to the filter frame, then replace the filter frame and the filter cover.
2 To clean the felt filter, remove the cover on the bottom of the handheld vacuum by pressing the release button. Remove felt filter. Rinse with water. Once completely dry, reinsert the felt filter and close the filter cover lid.
MAINTAINING YOUR VACUUM - CONT.

WARNING: When
cleaning brushroll, be sure to not cut anything other than hair, string, fibres, or other debris.

TIP: Ensure the brushroll garage is completely sealed and closed before using.
NOTE: Heavy usage over time may require minimal upkeep in order to maintain your vacuum's appearance.
STEP 1
STEP 2
natural_image
Technical diagram of a device with labeled parts and directional arrows indicating assembly or connection (no text or symbols present)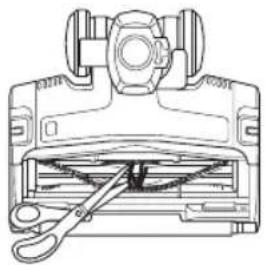
natural_image
Technical line drawing of a mechanical clamp or bracket assembly with a coiled tool inserted (no text or symbols)MAINTAINING THE BRUSHROLL
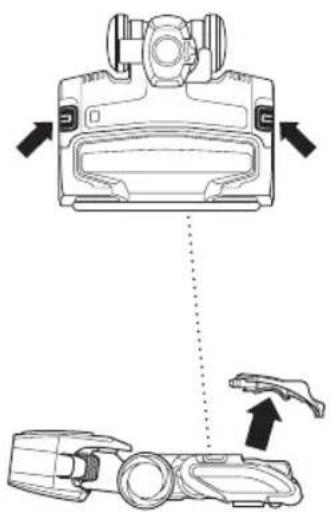
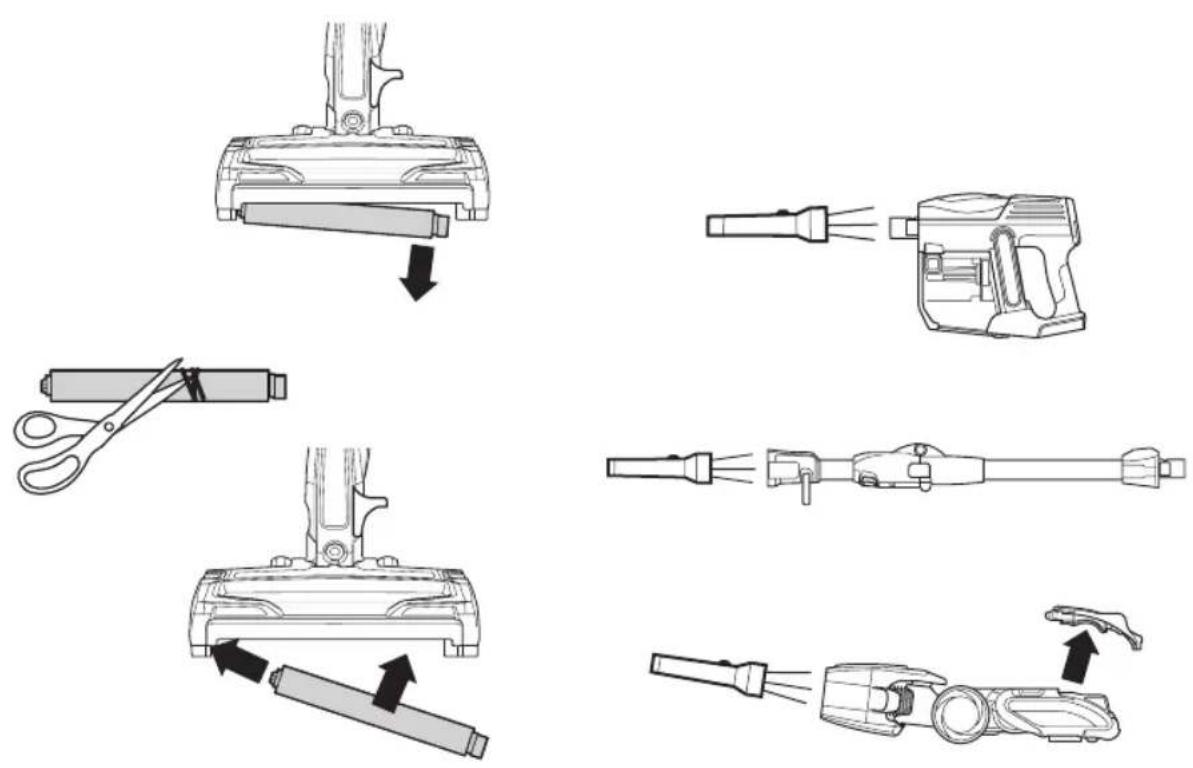
1 Open the brushroll lid by sliding both release buttons away from you, toward the back of the floor nozzle, then lifting off the garage. Remove any string, hair, or debris that may be wrapped around the brushroll by running scissors along the guide on the brushroll.
2 Close the brushroll lid by inserting the tabs on the lid into the slots on the floor nozzle, then pressing down on the lid, above the headlights, until both sides click into place.
MAINTAINING THE SOFT ROLLER
1 Open the brushroll garage by sliding both release buttons away from you, toward the back of the floor nozzle, then lifting off the garage. Lift out the Soft Roller by the tab on the right side. Clean off any string, carpet fibres, or hair that may be wrapped around the Soft Roller, and remove debris from the roller housing.
2 Wash the Soft Roller as needed, using only water. Air-dry completely for at least 24 hours before returning it to the brushroll garage.
3 Reinsert the Soft Roller by sliding it into the front of the floor nozzle until it clicks into place. Close the brushroll garage by inserting the tabs on the lid into the slots on the floor nozzle, then pressing down on the lid, above the headlights, until both sides click into place.
CHECKING FOR BLOCKAGES: Handheld, Wand, and Floor Nozzle
1 Turn off vacuum and remove Lithium ION Power Pack.
2 Remove the wand from the handheld vacuum and check all intake openings to the dust cup.
3 Remove the floor nozzle from the wand and check the wand for blockages.
4 Tilt neck of floor nozzle back to straighten the airway to remove blockages.

WARNING: To reduce the risk of shock and unintended operation, turn off power and remove power pack before servicing.
Vacuum is not picking up debris, no suction or light suction. (Refer to Maintenance section for more information.)
- Check filters to see if they need cleaning. Follow instructions for rinsing and completely air-drying the filters before reinserting in the vacuum.
• Dust cup may be full; empty dust cup. - Check floor nozzle for blockages; clear blockages if required.
- Remove any string, carpet fibres, or hair that may be wrapped around the brushroll and Soft Roller or trapped behind the Soft Roller.
- Check connection between handvac and wand for blockages; clear blockages if required. If the issue persists, please contact Customer Service at 0800 862 0453
Vacuum lifts rugs.
- Check that vacuum is in EXTENDED RUNTIME mode. Take care when vacuuming rugs with delicately sewn edges.
- Turn off the unit to disengage the brushroll and restart with the Power button.
Brushroll/Soft Roller does not spin.
- If Brushroll Indicator Light on the floor nozzle turns red, the brushroll and/or Soft Roller have stopped spinning. Immediately turn off and remove Lithium ION Power Pack from handheld vacuum and remove blockage before reconnecting and turning vacuum back on. If light turns green, the blockage has been successfully cleared. If it remains red, please contact Customer Service at 0800 862 0453.
- If headlights are not illuminated, there is a connection issue between the handheld vacuum, wand, and nozzle. Try disconnecting and reattaching the pieces. If the headlights still do not illuminate, please contact Customer Service at 0800 862 0453.
Vacuum turns off on its own.
There are several possible reasons for the vacuum turning off on its own, including blockages, Lithium ION Power Pack issues, and overheating. If vacuum turns off on its own, perform the following steps:
- Check LED lights on Lithium ION Power Pack to see if it needs to be recharged. If power pack does not need charging, turn off vacuum and remove power pack.
- Empty dust cup and clean filters (see Maintenance section).
- Check wand, accessories, and inlet openings and remove any blockages.
- Allow unit and Lithium ION Power Pack to cool for at least 45 minutes, until it returns to room temperature.
- Return power pack to vacuum and press Power button.
Note: If vacuum still does not operate properly, contact Customer Service at 0800 862 0453.
LED lights on ION Power Pack are flashing.
- If top 2 or bottom 2 LED lights are flashing (Fig. A, Fig. B), call Customer Service at 0800 862 0453.
• Bottom LED light is flashing (Fig. C): Lithium ION Power Pack needs to be charged. - Top and bottom LED lights are flashing (Fig. D): Lithium ION Power Pack temperature is not optimal, so charging is temporarily paused. Leave power pack plugged in and charging will resume soon.
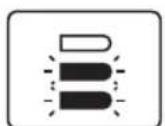
Fig. A
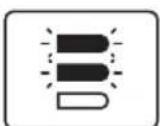
Fig. B
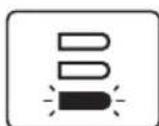
Fig. C
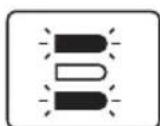
Fig. D
| LIGHT INDICATOR | WHAT IT MEANS | |
 | “FLOOR” and “CARPET” LEDs alternate illuminating | Unit temperature is high. Turn off vacuum. While unit is cooling, look for blockages and remove any that are found. Filters may also need to be cleaned. |
 | ||
 | “EXTENDED” and “MAX POWER” LEDS are flashing together | Blockage detected. Turn off unit and remove blockage. |
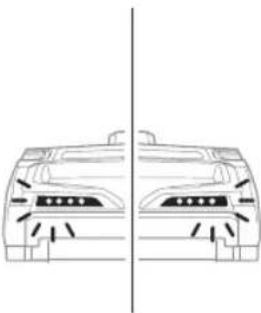 | Headlights aren’t illuminating | Brushroll garage is not properly closed. Close the door by inserting the tabs on the lid into the slots in the floor nozzle, then pressing down on the lid, above the headlights, until both sides click into place. |
For all other issues, please call Customer Service 0800 862 0453.
Shark | NINJA
FIVE (5) YEAR LIMITED WARRANTY
When a consumer buys a product in the UK, they get the benefit of legal rights relating to the quality of the product (your "statutory rights"). You can enforce these rights against your retailer. However, at Shark we are so confident about the quality of our products that we give you an additional manufacturer's warranty of up to five years. (1 year as standard plus 4 years when you register) These terms and conditions relate to our manufacturer's warranty only – your statutory rights are unaffected. Please note that the 5 year guarantee is available in all EU countries and in the UK if it stops being an EU country during the guarantee term.
The conditions below describe the prerequisites and scope of our warranty. They do not affect your statutory rights or the obligations of your retailer and your contract with them.
The lithium ion power pack is not covered by the 5 year guarantee (see battery warranty on next page)
Shark® Guarantees
A household appliance like a vacuum cleaner constitutes a sizeable investment. Your new machine needs to work properly for as long as possible. The guarantee it comes with is an important consideration - and reflects how much confidence the manufacturer has in its product and manufacturing quality.
Every Shark machine comes with a free parts and labour guarantee. Our customer service helpline (0800 862 0453) is open from 9.00am to 6.00pm Monday - Friday. It's free to call, and you'll be put straight through to a Shark representative. You'll also find online support at www.sharkclean.eu/uk.
How do I register my extended Shark® guarantee?
You can register your guarantee online within 28 days of purchase. To save time, you'll need the following information about your machine:
• Date you purchased the machine (receipt or delivery note)
• To register online, please visit www.sharkclean.eu/uk/register-guarantee
IMPORTANT
• Both the 12 months and the extended 4 years guarantee will only cover your product from the date of purchase.
- Please keep your receipt at all times. Should you need to use your extended guarantee we will need your receipt to verify the information you have supplied to us is correct. The inability to produce a valid receipt may invalidate your guarantee.
What are the benefits of registering my free Shark guarantee?
When you register your guarantee we'll have your details to hand if we ever need to get in touch. You can also receive tips and advice on how to get the best out of your Shark vacuum and hear the latest news about new Shark technology and launches.
If you register your guarantee online, you'll get instant confirmation that we've received your details.
How long are new Shark machines guaranteed for?
Our confidence in our design and quality control means that your new Shark vacuum cleaner is guaranteed for a total of five years. (12 months plus an extended warranty of 4 years).
What is covered by the free Shark guarantee?
Repair or replacement of your Shark machine (at Shark's discretion), including all parts and labour. A Shark guarantee is in addition to your legal rights as a consumer.
What is not covered by the free Shark guarantee?
- Blockages – For details of how to unblock your vacuum cleaner, please refer to the Operating Manual.
- Normal wear and tear such as brush bar, fuse, belt, batteries, hose etc.
- Accidental damage, faults caused by negligent use or care, misuse, neglect, careless operation or handling of the vacuum cleaner which is not in accordance with the Shark Operating Manual supplied with your machine.
- Use of the vacuum cleaner for anything other than normal domestic household purposes.
- Use of parts not assembled or installed in accordance with the operating instructions.
- Use of parts and accessories which are not Shark Genuine Components.
- Faulty installation (except where installed by Shark).
- Repairs or alterations carried out by parties other than Shark or its agents.
- The Lithium ION power pack battery. Please see page 22 for battery warranty.
What happens when my guarantee runs out?
Shark does not design products to last for a limited time. We do appreciate that there may be a desire for our customers to want to repair their vacuum cleaners after the warranty has elapsed. In this case please contact our free phone customer service help line and ask about our out warranty program, on 0800 862 0453.
Where can I buy genuine Shark spares and accessories?
Shark spares and accessories are developed by the same engineers who developed your Shark vacuum. You'll find a full range of Shark spares, replacement parts and accessories for all Shark machines at www.sharkclean.eu.
Please remember that using non-Shark spares invalidates your guarantee.
Shark | NINJA
TWO (2) YEAR LIMITED BATTERY WARRANTY
When a consumer buys a product in the UK, they get the benefit of legal rights relating to the quality of the product (your "statutory rights"). You can enforce these rights against your retailer. However, at Shark we are so confident about the quality of our products that we give you an additional manufacturer's battery warranty of up to two years. (1 year as standard plus 1 year when you register) These terms and conditions relate to our manufacturer's battery warranty only – your statutory rights are unaffected. Please note that the 2 year guarantee is available in all EU countries and in the UK if it stops being an EU country during the guarantee term.
The conditions below describe the prerequisites and scope of our warranty. They do not affect your statutory rights or the obligations of your retailer and your contract with them.
Shark® Guarantees
Our customer service helpline (0800 862 0453) is open from 9.00am to 6.00pm Monday - Friday. It's free to call, and you'll be put straight through to a Shark representative. You'll also find online support at www.sharkclean.eu/uk.
How do I register my extended Shark\* guarantee?
You can register your guarantee online within 28 days of purchase. To save time, you'll need the following information about your machine:
• Date you purchased the machine (receipt or delivery note)
• To register online, please visit www.sharkclean.eu/uk/register-guarantee
IMPORTANT
• Both the 12 months and the extended 1 years guarantee will only cover your battery from the date of purchase.
- Please keep your receipt at all times. Should you need to use your extended guarantee we will need your receipt to verify the information you have supplied to us is correct. The inability to produce a valid receipt may invalidate your guarantee.
What are the benefits of registering my free Shark guarantee?
When you register your guarantee we'll have your details to hand if we ever need to get in touch. You can also receive tips and advice on how to get the best out of your Shark vacuum and hear the latest news about new Shark technology and launches.
If you register your guarantee online, you'll get instant confirmation that we've received your details.
How long are new Shark power pack batteries guaranteed for?
Our confidence in our design and quality control means that the battery in your new Shark vacuum cleaner is guaranteed for a total of 2 years. (12 months plus an extended warranty of 1 year)
What is covered in my warranty?
- The original Lithium-ION Power Pack, deemed defective, in Shark's sole discretion, will be replaced for up to 2 years from the original purchase date.
- In the rare event that a replacement battery is issued, the warranty coverage for the replacement battery ends six months following the receipt date of the replacement battery or the remainder of the existing warranty, whichever is greater.
What is not covered by the free Shark guarantee?
- Normal wear and tear of Lithium-ION Power Pack, within the temperature range set out under the safety instructions section, is not covered by this warranty.
- Any battery that has been tampered with or used for commercial purposes.
- Damage caused by misuse, abuse, or negligent handling, or damage due to mishandling in transit.
- Consequential and incidental damages.
- Defects caused by or resulting from damages from shipping or from repairs, services or alteration to the product or any of its parts which have been performed by a repair person not authorised by SharkNinja.
Problems with your battery
If your Lithium-ION power pack battery fails to operate properly while in use under normal household conditions within the warranty period, please call our freephone customer service helpline on 0800 862 0453 for product help and support.
Where can I buy genuine Shark spares and accessories?
Shark spares and accessories are developed by the same engineers who developed your Shark vacuum. You'll find a full range of Shark spares, replacement parts and accessories for all Shark machines at www.sharkclean.eu.
Please remember that using non-Shark spares invalidates your guarantee.
Euro-Pro Europe Limited
15 Mariner Court
Calder Park
Wakefield
WF4 3FL
Freephone 0800 862 0453
sharkclean.eu
Illustrations may differ from actual product. We are constantly striving to improve our products; therefore the specifications contained herein are subject to change without notice.
SHARK is a registered trademark of Euro-Pro Europe Ltd.
DUOCLEAN and FLEXOLOGY are trademarks of Euro-Pro Europe Ltd.
© 2017 Euro-Pro Europe Ltd
IF200UK_IF250UK_Series_IB_170629
PRINTED IN CHINA
f @sharkcleanuk
@sharkcleaninguk
@sharkcleaninguk


- Shark.
- DuoClean™ Cord-Free Vacuum
- IF200UK IF250UK
- THANK YOU
- for purchasing the Shark® DuoClean™ Cord-Free Vacuum
- REGISTER YOUR PURCHASE
- RECORD THIS INFORMATION
- TECHNICAL SPECIFICATIONS
- PLEASE READ CAREFULLY AND KEEP FOR FUTURE REFERENCE.
- CONTENTS
- IMPORTANT SAFETY INSTRUCTIONS
- WARNING
- THE DUOCLEAN™ FLOOR NOZZLE, WAND, AND HANDHELD VACUUM CONTAIN ELECTRICAL CONNECTIONS:
- GENERAL USE
- SAVE THESE INSTRUCTIONS
- PLEASE READ CAREFULLY BEFORE USE
- DUST CUP/FILTERS/ACCESSORIES
- GENERAL CLEANING
- CONTINUED ON PAGE 5
- LITHIUM ION POWER PACK BATTERY
- GETTING TO KNOW YOUR SHARK® DUOCLEAN™ CORD-FREE VACUUM
- WELCOME!
- USING YOUR LITHIUM ION POWER PACK BATTERY
- NOTE: Some charging options may not be included with your vacuum.
- DID YOU KNOW?
- RECYCLING YOUR LITHIUM ION POWER PACK BATTERY
- INSTALLING YOUR LITHIUM ION Power Pack BATTERY
- CHARGING YOUR LITHIUM ION Power Pack BATTERY Using the LITHIUM ION Power Pack Battery Charger
- Using the Lithium ION Power Pack Battery Charging Dock
- LED BATTERY POWER METER In Use
- Charging
- ASSEMBLING YOUR VACUUM
- USING THE FLEXOLOGY™ WAND
- WARNING: This
- WHAT DOES THE BRUSHROLL INDICATOR LIGHT MEAN?
- Solid Green
- Solid Red
- No Light
- USING THE FLEXOLOGY WAND
- FLEXOLOGY STORAGE
- USING SMART RESPONSE™ TECHNOLOGY
- SMART RESPONSE TECHNOLOGY
- CHOOSING A SURFACE SETTING
- CHOOSING A SUCTION SETTING
- USING YOUR VACUUM IN ABOVE-FLOOR MODE
- FOR LONG-REACH CLEANING:
- FOR SHORT-REACH CLEANING:
- MAINTAINING YOUR VACUUM
- RECOMMENDED FILTER CLEANING SCHEDULE:
- Pre-Motor Filter Kit
- EMPTYING THE DUST CUP
- CLEANING THE FILTERS
- MAINTAINING YOUR VACUUM - CONT.
- WARNING: When
- STEP 1
- STEP 2
- MAINTAINING THE BRUSHROLL
- MAINTAINING THE SOFT ROLLER
- CHECKING FOR BLOCKAGES: Handheld, Wand, and Floor Nozzle
- WARNING: To reduce the risk of shock and unintended operation, turn off power and remove power pack before servicing.
- Vacuum is not picking up debris, no suction or light suction. (Refer to Maintenance section for more information.)
- Vacuum lifts rugs.
- Brushroll/Soft Roller does not spin.
- Vacuum turns off on its own.
- LED lights on ION Power Pack are flashing.
- Shark | NINJA
- FIVE (5) YEAR LIMITED WARRANTY
- Shark® Guarantees
- How do I register my extended Shark® guarantee?
- IMPORTANT
- What are the benefits of registering my free Shark guarantee?
- How long are new Shark machines guaranteed for?
- What is covered by the free Shark guarantee?
- What is not covered by the free Shark guarantee?
- What happens when my guarantee runs out?
- Where can I buy genuine Shark spares and accessories?
- TWO (2) YEAR LIMITED BATTERY WARRANTY
- How do I register my extended Shark\* guarantee?
- How long are new Shark power pack batteries guaranteed for?
- What is covered in my warranty?
- Problems with your battery
Marke : SHARK
Modell : IF 250EU
Kategorie : Staubsauger