SR52UT Intimidator - Taschenlampe Olight - Kostenlose Bedienungsanleitung
Finden Sie kostenlos die Bedienungsanleitung des Geräts SR52UT Intimidator Olight als PDF.


Benutzerfragen zu SR52UT Intimidator Olight
0 Frage zu diesem Gerät. Beantworten Sie die, die Sie kennen, oder stellen Sie Ihre eigene.
Eine neue Frage zu diesem Gerät stellen
Laden Sie die Anleitung für Ihr Taschenlampe kostenlos im PDF-Format! Finden Sie Ihr Handbuch SR52UT Intimidator - Olight und nehmen Sie Ihr elektronisches Gerät wieder in die Hand. Auf dieser Seite sind alle Dokumente veröffentlicht, die für die Verwendung Ihres Geräts notwendig sind. SR52UT Intimidator von der Marke Olight.
BEDIENUNGSANLEITUNG SR52UT Intimidator Olight
WARRANTY
Within 30 days of purchase: Return to retailer from which you purchased for repair or replacement.
Within 5 years of purchase: Return to Oight for repair or replacement.
This warranty does not cover normal wear and tear, modifications, misuse, disintegrations, negligence, accidents, improper maintenance, or repair by anyone other than an Authorized retailer or Olight itself.
Technical Support Inquiries
techsupport@lightworld.com
Customer Service
cs@olightworld.com
Visit www.olightworld.com to see our complete product line of portable illumination tools.

Olight Technology Co., Limited 2/F, Building A, B3 Block, Fuhai Industrial Park, Fuyong, Bao'an District, Shenzhen, China 518103
V1. AUG 4, 2015
Made in China

SR52UT INTIMIDATOR
EXTENDED-RANCE RECHARCEABLE LED FLASHLIGHT
USER MANUAL
Thank you for purchasing the Olight SR52UT Intimidator flashlight! Please read this manual carefully before using this product.
INSIDE THE BOX
SR52U1 Intimicator. Micro-USB cable, manual, holster, USB vehicle power adapter, 3X18650(optional)
BATTERY INSTALLATION
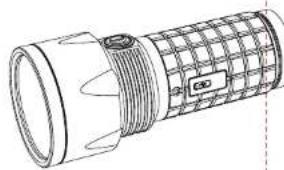
Ensure batteries are inserted with the positive (+) end pointing to the head.
SUPPORTED BATTERIES
- 3 x 18650 (Please ensure that all the 18650 batteries used in the SR52UT have a button top configuration or they will not make contact with terminals in the battery compartment.)
natural_image
Technical line drawing of a cylindrical device with mesh pattern and labeled component (no text or symbols)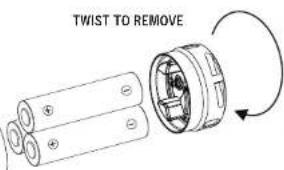
text_image
TWIST TO REMOVEWARNING:
- Do not use unsupported batteries with this flashlight.
- Cannot use flat 18650 batteries.
- Do not mix rechargeable and non-rechargeable batteries.
- Use caution on high outputs or long runtimes as flashlight may get hot.
- Do not charge the light when use the non-rechargeable batteries.
- Do not mix batteries of different types/brands.
- Do not use the batteries without protective boards
HOW TO OPERATE
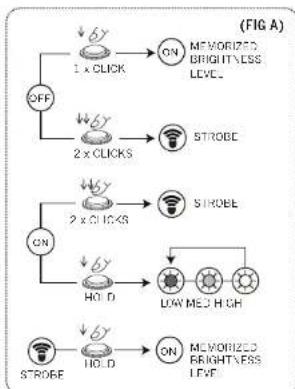
ON/OFF: Click the side switch to turn ON/OFF the flashlight. The brightness level will return to last output level (except stroke mode) when the flashlight is turned on.
CHANGE BRIGHTNESS LEVEL (FIG A)
With the light already on, press and hold the side switch to cycle through the brightness level from low - medium high until the desired brightness level selected by releasing the side switch.
STROBE (FIG A) Double-click the side switch will activate the strobe mode. Hold down the side switch for 1 second to quit strobe mode, the flashlight will return to memorized output level.
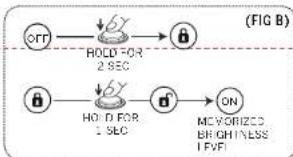
LOCKING: (FIG B) When the light is off, press and hold the side switch, the light will be turned on temporarily two seconds then shut off automatically. That indicates the side switch operation has been disabled already for preventing accidental operation.
UNLOCKING: (FIG B) With the light off press and hold the side switch approximately one second to enable the side switch operation.
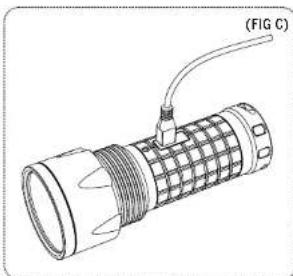
CHARGING THE FLASHLIGHT(FIG C)
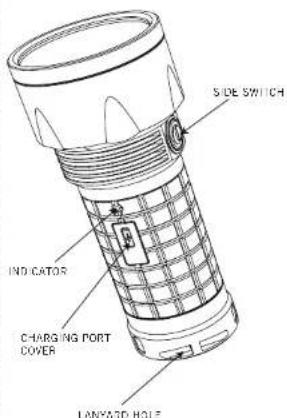
Push the cover above the USB socket aside, plug in the Micro-USB cable into the Micro-USB charging port on the body of the flashlight. Connect the Micro-USB cable with a USB power supply or computer USB port or a vehicle charging adapter to charge. The LED indicator will light up in red to show the charging is in processing. Fully charging three depleted 16650 batteries will take more than 10 hours. When the flashlight is fully charged the LED indicator will turn green.
LOW BATTERY WARNING
When the battery power is low, the power indicator will start to blink for one minute; If the indicator turns red, the flashlight will shut off at any time.
flowchart
graph TD
    A["OFF"] --> B["1 x CLICK"]
    B --> C["ON MEMORIZED BRIGHTLESS LEVEL"]
    A --> D["2 x CLICKS"]
    D --> E["STROBE"]
    A --> F["2 x CLICKS"]
    F --> G["STROBE"]
    A --> H["2 x HOLD"]
    H --> I["LOW MED HIGH"]
    I --> J["STROBE"]
    H --> K["2 x HOLD"]
    K --> L["ON MEMORIZED BRIGHTLESS LEVEL"]
SPECIFICATIONS
| LIGHT OUTPUT | 1,100 lumens / 4 hrs |
| AND RUNTIME | 500 lumens / 7.5 hrs80 lumens / 43 hrs |
| STROBE | 10Hz |
| LED | CREF XP I HIGH |
| VOLTAGE | 3V to 3V |
| CANDELA | 160 JUTC cd |
| BEAM DISTANCE | 800 m2 2,625 ft |
| BATTERY TYPE | 3 x 18050 |
| BODY TYPE | Type III hard anodized aluminum |
| WATERPROOF | IFX8 to 5 to 2 ml |
| IMPACT RESISTANCE | 1 m |
| DIMENSIONS | 1.161.5mm x 0.63mm/ 6.3 in x 2.5in |
| WEIGHT | 40s g / 14.3 oz (excluding batteries) |
flowchart
graph LR
    A["OR"] --> B["ROCK FOR 2 SEC"]
    B --> C["OK"]
    D["OK"] --> E["ROCK FOR 1 SEC"]
    E --> F["ON"]
    G["KEYORIZED BRIGHTLESS LEVEL"] -.-> F
Note: testing done with 3 x 18650 batteries (3.6V, 3400mN) All performance claims to ANSI/NEMA FL1-2009 Standard.
natural_image
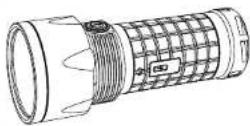
Technical line drawing of a flashlight with coiled cable and labeled component (FIG C), no text or symbols present.