
AWG 288S - Wäschetrockner WHIRLPOOL - Kostenlose Bedienungsanleitung
Finden Sie kostenlos die Bedienungsanleitung des Geräts AWG 288S WHIRLPOOL als PDF.


Benutzerfragen zu AWG 288S WHIRLPOOL
0 Frage zu diesem Gerät. Beantworten Sie die, die Sie kennen, oder stellen Sie Ihre eigene.
Eine neue Frage zu diesem Gerät stellen
Laden Sie die Anleitung für Ihr Wäschetrockner kostenlos im PDF-Format! Finden Sie Ihr Handbuch AWG 288S - WHIRLPOOL und nehmen Sie Ihr elektronisches Gerät wieder in die Hand. Auf dieser Seite sind alle Dokumente veröffentlicht, die für die Verwendung Ihres Geräts notwendig sind. AWG 288S von der Marke WHIRLPOOL.
BEDIENUNGSANLEITUNG AWG 288S WHIRLPOOL
20.7 × 29.7 cm
natural_image
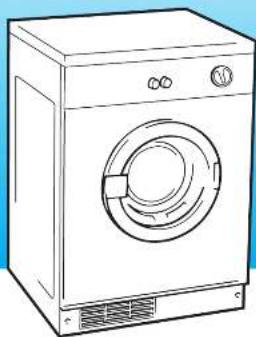
Line drawing of a front-loading washing machine with control panel and fan (no text or symbols)Whirlpool AWG 288 Hong Kong

惠而浦
AWG 288S
規格
體積:高85厘米
関59.5厘米
深53厘米
棉消及麻膏乾衣量:6千克
有關電力規格,請參看機背的數據銘牌。
本產品符合82/499/EEC無線電干體的規定。此乾衣機乃家庭電器用品,並不適合商業用途。
附加配件
閣下的銷售商/零售商提供銷售各種適合不同安裝需要的配件:機背通風裝置AWF 790。
選放式裝置AWF 696:此裝置可使乾衣機放在惠而浦前置式洗衣機的上面,節省地方。
安裝 (不用拿走門鉸蓋)
- 将乾衣機裝近窗戶,滾漏氣容易散發。
2 最好採用獨立式的通氣壓,以防漏氣凝聚水滙。
3 切勿阻塞乾衣機機背的空氣入口位置。勿讓毛屑在乾衣機風面積點。
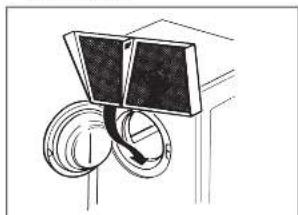
依照下图安装过滤网
natural_image
Diagram of a solar panel mounted on a circular base, showing internal components and wiring (no text or symbols)乾衣機門可以從左面或右面打開,續依圖一至三的指示更改開門的方向:
text_image
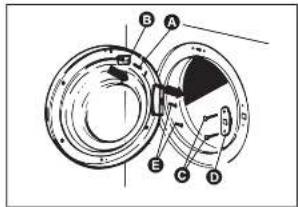
Technical diagram of a mechanical component with labeled parts A, B, C, D, E圖一:先打開機門,擰出螺絲 A,取下機門觸通板 B,再擰出門螺絲。然後擰出螺絲 C 及門鎖板 D,再擰出門釵上的螺絲 E,並移開機門。
text_image
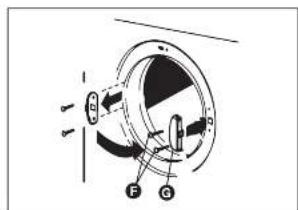
Diagram of a mechanical device with labeled components F and G, showing directional arrows and a central circular component.图二:先撑出円鉸螺絲⑤,拿走円鉸⑥,再装上對面位置。
text_image
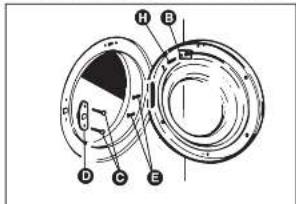
Technical diagram of a mechanical component with labeled parts A through H图三:先用螺絲①装上門頭板②,再排出門頂的螺絲③及西裝上機門角通板④,最後裝上螺絲⑤以類點門紋上蓋。
20.7 × 29.7 cm
Programme chart
| FABRIC | MAXIMUM WEIGHT OF DRY LAUNDRY | HEAT | TIME SETTING (Minutes) | |
| IRON DRY ≈ | CUPBOARD DRY ≈ | |||
| Cotton, Linen | 6kg | 70-110 | 100-140 | |
| Cotton, Linen | 3kg | 60-80 | 80-100 | |
| Synthetics | 3kg | 50-80 | 70-80 | |
NOTE: Drying times depend on the weight and size of the articles, the type of fabric, how damp they are and how dry you need them. Higher spin speeds on your washer require less drying time. To reduce creasing never overload.
Fabric care
If in any doubt of the type of fabric from which the garment is made, check the care label inside the garment.
The vast majority of textile articles can safely be tumble dried. However, we do not recommend you tumble dry woolen or wool mixture articles unless the article is labelled as being suitable.
Points to remember
Do
Sort the clothes into groups of different fabrics. Check that all fastenings are closed and pockets are empty.
Tum sweaters inside out. Dry large and small articles in the same load if possible. Check the programme chart for the correct heater setting. Clean the filter after removing the dried clothes.
Don't
Overload the dryer. Place dripping wet articles in the dryer. Dry articles that have been treated with a dry cleaning fluid. Dry articles containing foam rubber or rubber like materials in the dryer. Dry large articles alone as they tend to roll up and so increase drying time. Switch the dryer off and leave a hot load in the drum-risk of fire.
TIPS:
— To reduce static electricity in fabrics, use a fabric conditioner during the final rinse of your washing. — Dry delicate articles, e.g. tights, in a pillow case. — Take synthetics out of dryer as soon as programme has finished to prevent creasing.
Any problems
IF THE CLOTHES ARE NOT DRY AFTER NORMAL DRYING TIME:
- Check that the filter is clean. - Check that you used the correct heater setting. - Check that the venting hose is not blocked (sometimes a strong wind may cause a back pressure). - Check that you have not set the timer within a cool down period. - Check that the heater cut-out has not operated. Simply press the red button on the right hand side at the back of your drop, and it has operated then a sharp "click" will be heard. This cut-out only operates if the airflow is severely restricted so make sure the filter is clean and that all other restrictions are removed before re-starting.
IF YOUR MACHINE DOES NOT WORK, CHECK THE FOLLOWING POINTS BEFORE CALLING A SERVICE ENGINEER:
— Check that there is a supply of electricity. — Check that the machine is switched on and the door properly closed. — Check the plug internal connections and fuse, if applicable.
| CARE LABELS YOU MAY FIND ON YOUR FABRICS: | |
| Tumble drying beneficial | |
| Do not tumble dry | |
| Dry flat | |
Control panel
text_image
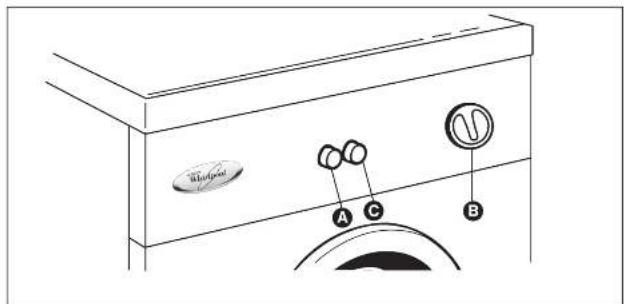
Washing A C BA The heat selector switch
= Low Heat
= High Heat
C Start button
The timer can be set for up to 140 minutes.
Turn the knob clockwise to the time required.
There is an automatic cool down period of approximately 10 minutes at the end of each setting.
B
Operating procedure
| 1 | A. Sort out clothes into groups of similar fabricsB. Check all tastenings are closed and pockets emptyC. Roll dripping wet clothes in a towel to remove excess waterD. Turn sweaters inside out |
| 2 | A. Open the doorB. Load clothes loosely into the drum, load sheets first starting with one cornerC. Remember it is best to dry small and large articles together |
| 3 | A. C case the doorB. Dry your handsC. Check that the timer is in the 'O' positionD. P ug in the machine |
| 4 | A. Select correct heater position (see programme chart)B. To start the cycle, set the timer (see programme chart) then press "Siant" button, the drum will begin to rotate at this point and stop when the timer reaches the 'O' position. |
| 5 | A. To stop the machine in the middle of a programme, simply open the door and the drum will stop moving B. To re-start close the door, press "Start" button again.C. To lengthen or shorten the drying time at any time during the programme, turn the timer knob. |
| 6 | We recommend you to stop your dryer and redistribute large items such as sheets several times during the programme. |
| 7 | A. After removing the dried clothes clean the filter as follows:• Pull the filter upwards• Remove any thread or full by hand or with a soft brush• Slide the filter back• Wash the filter occasionally in detergent solution and with a soft brush to remove small particlesB. Disconnect from the electricity supply |
20.7 × 29.7 cm
控制板

text_image
Blue开门 A C BA 温度選擇率 y = 低選舉
太阳 = 高温军
B 時間可調校至140分鐘
將旋鈕按順時針方向旋轉,直至所需的乾衣時間。
乾衣程序最後10分鐘為自動冷卻時間。
C 敢勤型
操作程序
| 1 | A. 根據資料將衣物分類。B. 檢查短扣,拉觸是否上好、口袋裡的物件是否已拿出來。C. 不要將黑在滿水的衣物放進桶內,擦先用毛巾機服衣物,除去過多水分。D. 墙毛衣向外翻出。 |
| 2 | A. 啟敞機門。B. 招衣放入乾衣鼓,但不要塞得大鬆。若有床單,應先把床單一角放入。C. 最好將大件及小件衣物同時敲動。 |
| 3 | A. 開開機門。B. 技狀雙手。C. 燒金時間製是否指示在"0"位置。D. 握好電黎。 |
| 4 | A. 篮擇正確的乾衣溫度(請參看程序表)。B. 調疫時間變後,按"啟動"單,即可啟動吃衣程序(請參看序表)。乾衣鼓會開始旋轉,直至時間擊轉至"0"位置便停止。 |
| 5. | 如夏中除停止操作,只需将機門打開,乾衣被即停止制動。 |
| 6. | 關門後再按“啟動”掣,乾衣機便再繼續操作。 |
| 7. | 如只要長或縮短乾衣時間,只需在操作進行時,調收時期製。 |
| 8. | 若有大件衣物如床單,最好能在乾衣過程中停機,將衣物重新排放均用。 |
| 9. | 如出處理好的衣服後,應依下列程序清潔過濾網:• 將過濾網向上拉• 用手或軟毛刷清除絲線及毛頭• 將過濾網推回原位• 有需要時,用漢衣剤添流過濾網,或用軟毛刷除去整包。 |
乾衣程序表
| 時間(分鐘) | ||||
| 衣裳質料 | 乾衣量 | 溫度 | 半乾(需製乾) | 全乾 |
| 棉質、麻質 | 6千克 | 70-110 | 100-140 | |
| 棉質、麻質 | 3千克 | 60-80 | 80-100 | |
| 合成礦粧 | 3千克 | 50-80 | 70-80 | |
注意:乾衣所需時間,要視乎衣物的重量、大小、原料、濕濕和需乾衣程度而定。 洗衣時採用較高的乾衣轉速,可縮短乾衣時間。切勿同時處理大多衣物,以避免衣物超壓。
衣物護理
若不肯定衣物質料的類別,請查看衣物上的標籤。大部份衣物都可用機器乾。不過,除非特別註明,否則不要用機器乾羊毛及沒有羊毛的衣物。
乾衣要點
| 切配 | 按照衣物资料分录。检查翻扣、拉缝是否上好、口袋缠的杂物是否已拿出来。将毛衣向外刨出。若可以的话,嵌入件及小件的衣物同缝放脱。按照黏衣程序表,凑校底盖温度。 | 衣物上之贴衣指示横裁 | |
| ○ | 可放乾 | ||
| × | 不可放乾 | ||
| □ | 需平放收乾 | ||
切勿同一時間處理過多衣物。
切勿清仍在滴水的衣物放入乾衣楼内,
切勿用乾衣機處理已用乾衣液清潔過的衣嘴。
切勿用乾衣機處理含塑料或類似塑料質料的衣物。
切勿用乾衣搬單獲處理大型的衣物,因為衣物曾容易送給,參加乾衣間。
将乾衣程序突然终止後,切勿滑過給衣情留在乾衣
数内,避免引起火警
乾衣要诀
一 最後一次沖洗時使用柔顯劑,可減少靜電出現。
一 高級機等運搬送衣物,先放入洗衣袋,再放入乾衣櫃內。
一 處理合成纖維衣物時,應在程序完畢後,盡快取出衣物,以避免摺煙。
一 最後一次沖洗時使用柔動劑,可減少靜電出氣。
一 高冬夜等通宵送衣物,先放入洗衣袋,再放入乾衣橱内。
一 處理合成纖維衣物時,應在程序完畢後,盡快取出衣物,以避免摺煙。


衣架上之乾衣指示標籤
| 可放乾 | |
| 不可放乾 | |
| 需导放吹乾 |


假若乾衣機不能操作,請在聯絡修理人員前,先檢查以下各

一 電線供應
一 私衣機是否已啟動,槍門是否關上
一 電源插頭內部連接及保險條(如情況許可)
20.7 × 29.7 cm
English
Technical data
Overall dimensions: Height 85 cm
Width 59.5 cm
Depth 53 cm
Maximum dry weight of cotton, linen: 6kg
For electrical ratings see plate on rear of machine
This product is manufactured to comply with the radio interference requirements of the council directive 82/499/EEC. It is intended for domestic use and not for commercial applications such as hairdressers.
For the Republic of Ireland
Your dryer is supplied with a 2-pin side earth type of plug which should be connected to a socket protected by a 16 Amp fuse. If this plug is not suitable for your socket outlet, it should be cut off and disposed of, and a suitable alternative plug fitted.
Optional accessories
Comprehensive range of accessories are available for purchase from your dealer/retailer to cater for varying installations, they are:
Stacking Kit AWF 696 to enable your dryer to be secured onto the top of front loading washing machines to save floor space.
Installation (DRYERS FITTED WITHOUT HINGE COVER)
1 Install your dryer near a window so that the warm damp air can escape.
2 We strongly recommend you to use a separate venting hose to avoid condensation.
3 Never block the air inlets at the back of your dryer. Do not allow fluff to accumulate around your dryer.
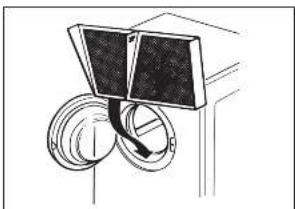
Put the filter in its operating position as below.
natural_image
Diagram of a solar panel mounted on a wall-mounted ring, showing electrical connections (no text or symbols)Wipe the drum and door with a damp cloth to remove any dust. Any initial smell from the heater should disappear after the first period of heating.
Your dryer is fitted with a reversible door. To change the direction of opening proceed as follows:
text_image
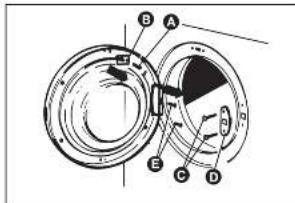
Technical diagram of a mechanical assembly with labeled parts A, B, C, D, EOpen the door. Undo screw Ⓐ remove switch strike Ⓑ and replace screw.
Remove screws Ⓐ and latch plate Ⓓ. Remove hinge block screws Ⓔ. Remove door from hinge blocks.
text_image
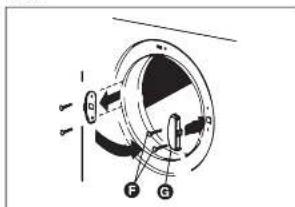
Diagram of a mechanical device with labeled components F and G, showing directional arrows and circular motion.Remove hinge screws (F) and hinge (G) and refit to opposite sides as shown.
text_image
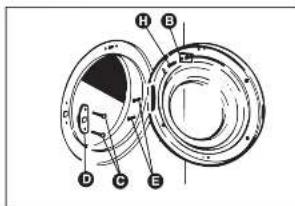
Technical diagram of a mechanical component with labeled parts A through HRefit latch plate ① with screws ② Remove screw ③ at top of door and refit switch strike ④ as shown. Fit door to hinge blocks and secure with screws ⑤.