49DLE468 - Fernseher FOX electronics - Kostenlose Bedienungsanleitung
Finden Sie kostenlos die Bedienungsanleitung des Geräts 49DLE468 FOX electronics als PDF.


Benutzerfragen zu 49DLE468 FOX electronics
0 Frage zu diesem Gerät. Beantworten Sie die, die Sie kennen, oder stellen Sie Ihre eigene.
Eine neue Frage zu diesem Gerät stellen
Laden Sie die Anleitung für Ihr Fernseher kostenlos im PDF-Format! Finden Sie Ihr Handbuch 49DLE468 - FOX electronics und nehmen Sie Ihr elektronisches Gerät wieder in die Hand. Auf dieser Seite sind alle Dokumente veröffentlicht, die für die Verwendung Ihres Geräts notwendig sind. 49DLE468 von der Marke FOX electronics.
BEDIENUNGSANLEITUNG 49DLE468 FOX electronics

FOX
Electronics Corporation Limited
MODEL:
LED TELEVIZORI
natural_image
Silhouette of a person in a globe with white lines indicating direction (no text or symbols)
natural_image
Abstract gray silhouette of a leaf with a circular element, no text or symbols present
natural_image
Silhouette of a person in motion, possibly running or performing a martial arts pose (no text or symbols visible)
natural_image
Abstract grayscale vertical pattern with curved white lines on gray background (no text or symbols)HDMI®
HIGH-DEFINITION MULTIMEDIA INTERFACE
UPUTSTVO ZA UPOTREBU
Molimo Vas da detaljno proučite ovo uputstvo pre upotrebe televizora i da ga čuvate radi kasnije upotrebe
CONTENTS
Safety Instruction....2-4
Overview (Controls and Connections)....5-6
Remote Control....7-8
Battery Replacement....9
Automatic Preset Channel....10
Power on/off....11
Channel 12-13
Picture....13
SCREEN....14
SOUND....14
TIME....15
LOCK....16
SETUP....17
USB 18-20
Menu Operation 21
Troubleshooting 22
Specifications....23
SAFETY INSTRUCTION
IMPORTANT SAFETY INSTRUCTIONS
WARNING
• TO PREVENT FIRE OR SHOCK HAZARD, DO NOT USE AN EXTENSION CORD, RECEPTACLE OR OTHER OUTLET UNLESS THE BLADES CAN BE TO PREVENT BLADE EXPOSURE.
• TO PREVENT FIRE OR SHOCK HAZARD, DO NOT EXPOSE THIS APPLIANCE TO RAIN OR MOISTURE.

This lightning flash with arrowhead symbol in an equilateral triangle alerts users to the presence of uninsulated dangerous voltage within the products enclosure that may be of sufficient magnitude to constitute a risk of electric shock to persons.
CAUTION
RISK OF ELECTRIC SHOCK DO NOT OPEN
Warning: To reduce the risk of electric shock, do not remove cover(or bark). No user serviceable parts inside. Refer servicing to qualified service personnel.

The exclamation mark within an equilateral triangle alerts users to the presence of important operating and maintenance (servicing) instructions in the literature accompanying the appliance.
This appliance should not be exposed to water and no object filled with liquid such as a vase should be placed on the unit.
CAUTION
- Danger of explosion if batteries are incorrectly replaced.
- Replace with only equivalent type of battery.
- Do not expose battery to direct sunlight or any other source of heat.
- Ensure proper disposal of used batteries.
- Where the MAINS plug or an appliance coupler is used as the disconnect device, the disconnect device shall remain readily operable.
- To reduce the risk of electric shock, do not perform any servicing other than what is mentioned in the operating manual.
- There are no user-serviceable parts inside the TV; do not open the TV casing.
IMPORTANT INFORMATION
If a television is not positioned in a sufficiently stable location, it can be potentially hazardous due to falling. Many injuries, particularly to children, can be avoided by taking simple precautions such as:
• Using cabinets or stands recommended by the manufacturer of the television.
- Only using furniture that can safely support the television.
- Ensuring the television is not overhanging the edge of the supporting furniture.
- Not placing the television on tall furniture (for example, cupboards or bookcases) without anchoring both the furniture and the television to a suitable support.
- Not standing the televisions on cloth or other materials placed between the television and supporting furniture.
• Educating children about the dangers of climbing on furniture to reach the television or its controls.
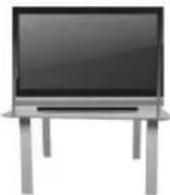
Safe installation
Use the belt fixing the television to facilitate restraining the television from topping forward.


SAFETY INSTRUCTION
- Read Instructions-All the safety and operating instructions should be read before the appliance is operated.
- Retain Instructions-The safety and operating instructions should be retained for future reference.
- Heed Warnings-All warnings on the appliance and in the operating instructions should be adhered to.
- Follow Instructions-All operating instructions should be followed.

- Water and Moisture-The appliance should not be used near water.
- Cart and Stands-The appliance should only be used with a cart or stand that is recommended by the manufacturer.
- Wall or Ceiling Mounting-The appliance should be mounted to a wall or ceiling only as recommended by the manufacturer.
- Ventilation-The appliance should be well situated so that its location or position does not interfere with its proper ventilation.
- Heat-This appliance should be placed away from heat sources such as radiators, heat registers and stoves.
-
Power Sources-The appliance should only be connected to a power supply as described in the operating instructions or as marked on the appliance.
-
Grounding or Polarization-Precautions should be taken.
-
Power Cord Protection-Power supply cord should be routed so that it is not likely to be walked on, pinched by items placed upon it against the cord and its end.
-
Cleaning-The appliance should be cleaned only as recommended by the manufacturer.
-
Power Lines-An outdoor antenna should be located away from power lines.
-
Outdoor Antenna Grounding-If an outside antenna is connected to the receiver, the antenna system must be grounded so as to provide against voltages and built-up static charges.
-
Non-use Periods-The power cord of the appliance should be unplugged from the outlet when left unused for a long period of time.
-
Object and Liquid Entry-Care should be taken so that objects do not fall, and liquids are not spilled into the enclosure through openings.
-
Conditions Requiring Service-The appliance should be serviced by qualified service personnel when:
• The power-supply cord or the plug has been damaged.
- Objects have fallen on or liquid has been spilled into the appliance.
• The appliance has been exposed to rain.
- The appliance does not appear to operate normally or exhibits a marked change in performance.
- The ventilation should not be impeded by covering the ventilation opening with items, such as newspapers, table-cloths, curtains, etc.
No naked flame sources, such as lighted candles, should be placed on the apparatus. The apparatus shall be connected to mains socket outlet with a protective earthing connection. The appliance coupler regard as disconnection device, the disconnect device shall remain readily operable.
SAFETY INSTRUCTION
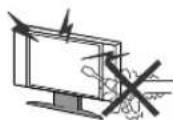
Warning
High voltages are used in the operation of this product. Do not remove the back cover of the cabinet. Refer servicing to qualified service personnel.

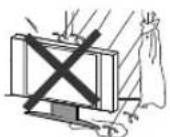
Warning
To prevent fire or electrical shock hazard, do not expose the main unit to rain or moisture.

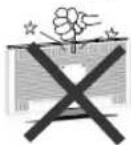
Warning
Do not drop or push objects into the television cabinet slots or openings. Never spill any kind of liquid on the television receiver.

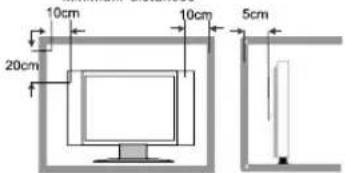
Minimum distances

text_image
10cm 20cm 10cm 5cmCaution
If the television is to be built into a compartment or similarly enclosed, the minimum distances must be maintained.

Heat build up can reduce the service life of your television, and can also be dangerous.
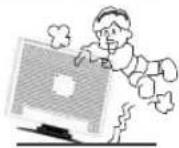
Caution
Never stand on, lean on, push suddenly the product or its stand.

You should pay special attention to children.
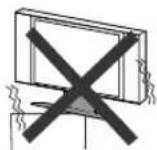
Caution
Do not place the main unit on an unstable cart stand, shelf or table.

Serious injury to an individual, and damage to the television, may result should it fall.
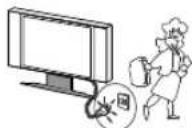
Caution
When the product is not used for an extended period of time, it is advisable to disconnect the AC power cord from the AC outlet.

Caution
Avoid exposing the main unit to direct sunlight and other sources of heat. Do not position television receiver directly on other products which give off heat. E.g. video cassette players, audio amplifiers. Do not block the ventilation holes in the back cover. Ventilation is essential to prevent electrical failure. Do not squash power supply cord under the main unit.

Caution
The panel used in this product is made of glass. It can break when the product is dropped or applied with force. Individuals should execute caution when dealing with broken glass should the panel break.

CONTROL BUTTON AND TERMINAL
SIDE PANEL
natural_image
Line drawing of a flat-screen computer monitor with no text or symbols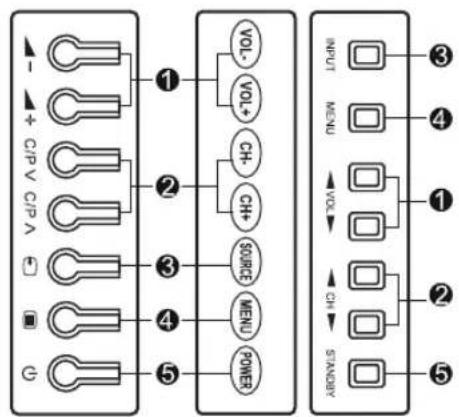
flowchart
graph TD
    A["Component 1"] --> B["GPIO"]
    A --> C["GPIO +"]
    D["Component 2"] --> E["C+"]
    D --> F["C+"]
    G["Component 3"] --> H["SOURCE"]
    G --> I["MENU"]
    G --> J["POWER"]
    K["Component 4"] --> L["MENU"]
    K --> M["POWER"]
    N["Component 5"] --> O["SOURCES"]
    N --> P["INPUT"]
    Q["Component 6"] --> R["INPUT"]
    S["Component 7"] --> T["INPUT"]
    U["Component 8"] --> V["INPUT"]

flowchart
graph LR
    A["VOL- VOL+ CH- CH+ MENU POWER"] --> B["①"]
    B --> C["②"]
    C --> D["③"]
    D --> E["④"]
    E --> F["⑤"]
    G["SOURCE"] --> H["⑥"]
    G --> I["⑦"]
    G --> J["⑦"]
    G --> K["⑥"]
| Item | Button Name | Description |
| 1 | VOL- VOL+ | Turn up and down the volume.Adjust the volume of the selected menu item in the OSD menu. |
| 2 | CH- CH+ | Press these buttons to select channel in ascending or descending order. Select the upper or lower menu item in the OSD menu. |
| 3 | SOURCE | Press to select the input source. |
| 4 | MENU | Enter or exit from the menu. |
| 5 | POWER | Switch on/off the TV when at standby mode. |
| 6 | Power Indicator | Illuminates red in standby mode. |
| 7 | Remote Sensor | Infrared sensor for the remote control. |
Note:
If there is no signal input from PC for 5 minutes, or no signal input from other video source (the blue background should be set to On) for over 15 minutes, the TV will switch to standby automatically. (USB not auto-standby) The power indicator will light up in red.
The user manual which relative to the TV pictures not instead of the actual pictures, pls refer to the actual pictures.
REAR AV TERMINAL CONNECTION
The TV has Large Multimedia function, it can be connected with many kinds of equipments. The following paragraph shows how it connect with other Audio and Video devices.

text_image
VGA 8 VGA AUDIO IN 7 SCART 10 RF 9 HDMI1 3
text_image
HDMI2 COAXIAL PCMCIA AV IN YPbPr USB2 USB1 RJ45 Recovery Key USB1/USB2 3 1 5 6 11 2 4 12 13I. COAXIAL (Coaxial output port)
2. USB1 / USB2 (USB signal input port)
3. HDMI1 / HDMI2 / HDMI3 (HDMI signal input port)
4. EARPHONE OUT (Earphone output port)
5. AVIN (AV input port)
6. COMPONENT IN (YPbPr signal input port)
7. VGAAUDIO IN (VGA audio input port)
8.VGA (RGB signal input port)
9.TERMINAL ANTENNA (75 OHM)TV signal input port.
10. SCART (SCART signal input port)
II. PCMCIA (PCMCIA input port)
12. RJ45 IN(RJ45 input port)
13. USB1 / USB2 IN(USB input port for SMARTTV)
Attentions when turn on the TV:
To match some TV designs, we set the A/C power button close to USB or HDMI interface in back cover terminal board. The first time to open the TV, need to turn on the power and the indicator will light red. And then press the "POWER" button or "①" in front of side cover to turn on the TV.
Note: pls refer to the sample about the user manual which relative to TV back tailgate
REMOTE CONTROLLER
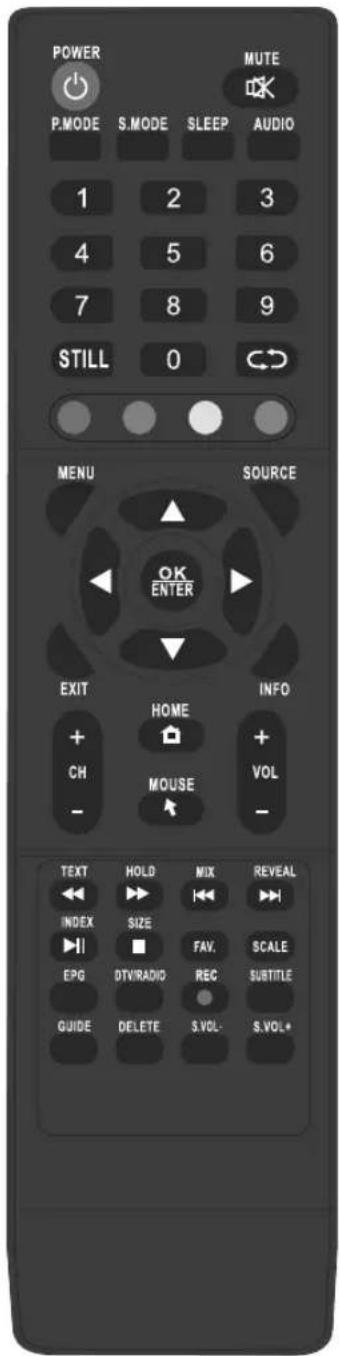
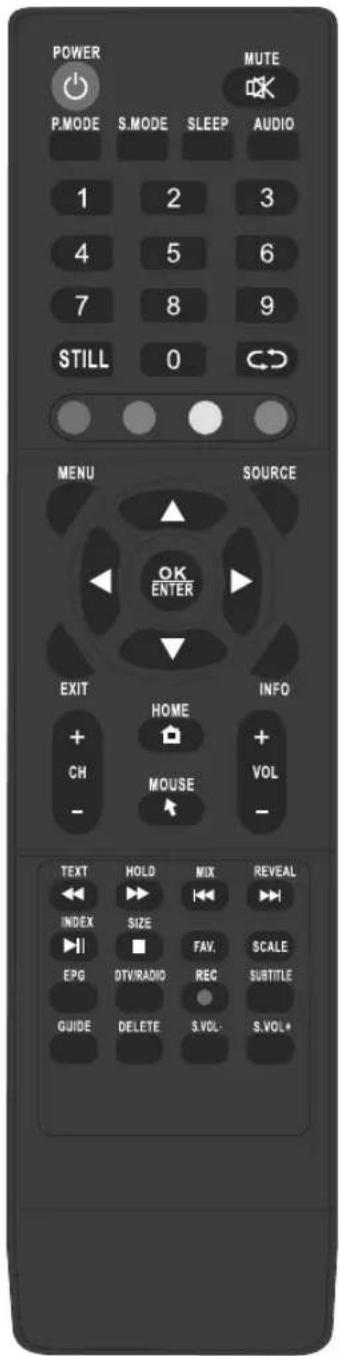
The remote controller cannot be used unless it is within the receivable range. Before you use the remote control, please make sure there's no obstacle between the remote control and the receiver.
text_image
POWER MUTE P.MODE S.MODE SLEEP AUDIO 1 2 3 4 5 6 7 8 9 STILL 0 MENU SOURCE OK ENTER EXIT INFO + HOME + CH MOUSE + VOL - TEXT HOLD MIX REVEAL INDEX SIZE FAV SCALE EPG DTV/RADIO REC SUBTITLE GUIDE DELETE S.VOL- S.VOL+ S.VOL+| Button | Description |
| Power [IMAGE] | Switch on / off the LCD TV when at standby mode. |
| Mute [IMAGE] | Press this button to turn off the volume. Press it again to turn on the volume. |
| P.MODE | Picture effect selection. |
| S.MODE | Sound mode selection. |
| SCALE | Press this button to display and select available aspect modes. |
| AUDIO | Press this button to display and select different TV Audio systems or Language. |
| FAV. | Display favourite of program list. |
| SLEEP | Press this button to set up the TV auto turn off time. |
| SUBTITLE | In ATV/DTV mode open/close caption. |
| Number | Press to select the TV program you want to enter or input password. |
| STILL | Freeze picture. |
| SWAP [IMAGE] | Press this button to toggle between the current and the previous program you were viewing. |
| MENU | Press this button to display the main menu for adjusting the image, sound and functions. Press this button again to remove the main display. |
| SOURCE | Available source selection. |
| ▲▼ ◀▶ | Press this button to select or adjust the desired item on the TV menu. |
| OK (ENTER) | Press enter button to confirm or enter sub menus. |
| EXIT | Press this button to exit. |
| INFO | Display the source and channel information. |
| VOL+/VOL- | Press the volume button directly to turn up or turn down the sound volume level. |
| CH+/CH- | Press these two buttons directly to adjust the TV program. |
| Red Green Yellow Blue [IMAGE] | Use this colored buttons to operate the Teletext screen, and it depends on the local Teletext signal. |
| EPG | Open/close Electronic program guide. |
| DTV/RADIO | Switch DTV program and radio program |
| REC | Hotkey of PVR. |
Notice: EPG, DTV/RADIO, REC MENU, REC are only effective in DTV mode.
REMOTE CONTROLLER
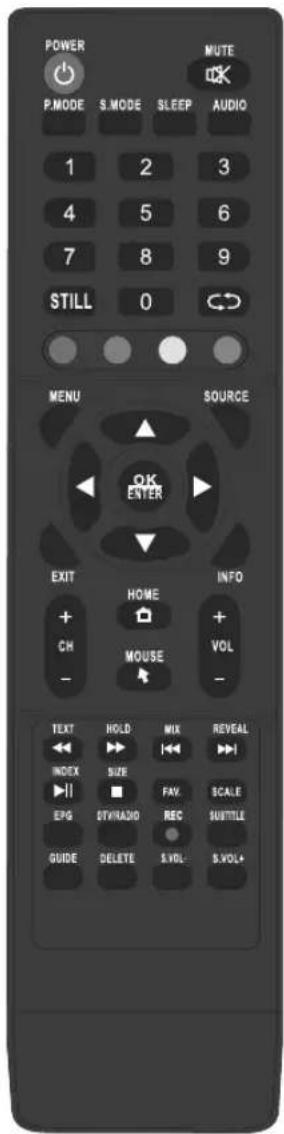
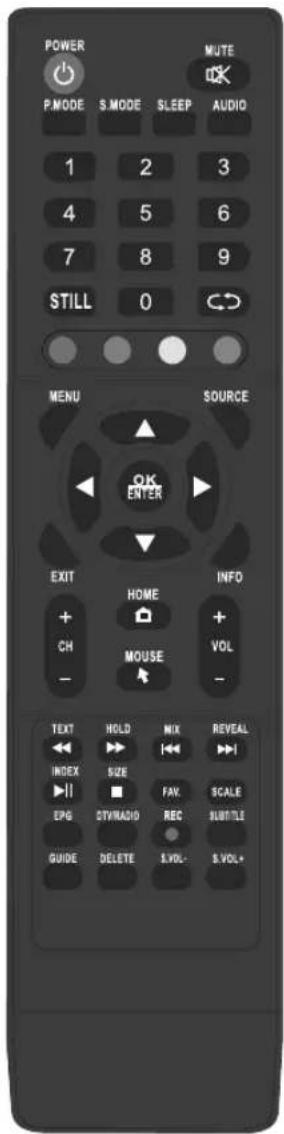
The remote controller cannot be used unless it is within the receivable range. Before you use the remote control, please make sure there's no obstacle between the remote control and the receiver.
text_image
POWER P.MODE S.MODE SLEEP AUDIO 1 2 3 4 5 6 7 8 9 STILL 0 MENU SOURCE OK ENTER EXIT HOME INFO + + CH MOUSE + + VOL - TEXT HOLD MIX REVEAL INDEX SIZE FAX SCALE EPG STVRADIO REC SUBTITLE GUIDE DELETE S.VOL S.VOLA| Button | Description |
| Skip a scene or music. | |
| Go back to the previous or skip to the next. | |
| Play/Pause | |
| Stop playback |
Remark: Following buttons will only work when Teletext is on (press TXT button), they will work on TV mode.
| TEXT | Turn Teletext On, Press this button to display Teletext information. |
| HOLD | Press to freeze the the current teletext page, but the signal will continue to be broadcasted. |
| TIME | Press to display time informati on of Teletext. |
| INDEX | Press to display Teletext index. |
| SIZE | Teletext Size selection. |
| REVEAL | Press to reveal hidden Teletext index. |
Different area, the key of the remote control have different function. PIs take the remote control as the actual one.
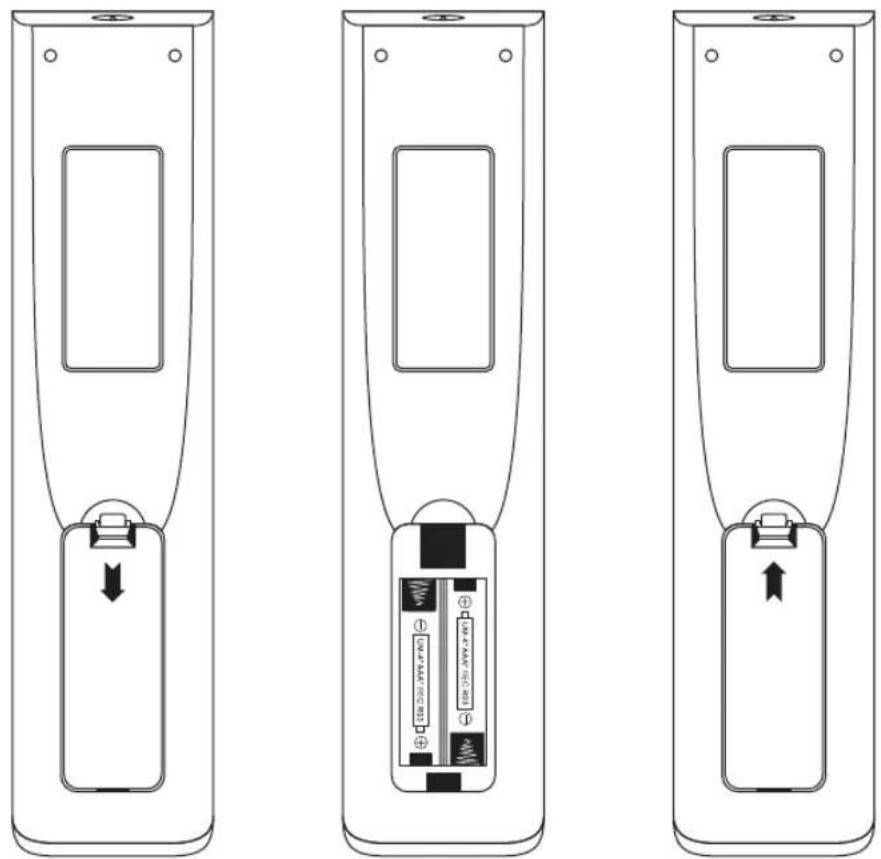
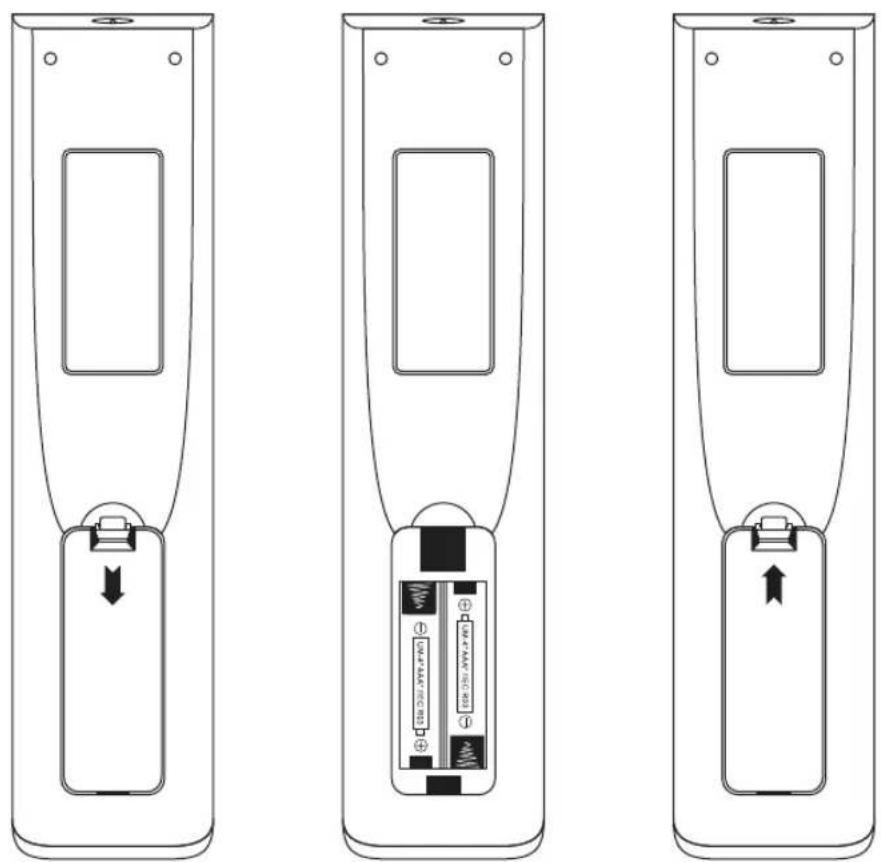
Battery replacement
BATTERY INSTALLATION OF REMOTE CONTROL UNIT
-
Open the battery compartment cover.
-
Insert two “AAA” (pencil size) 1.5V batteries. Make sure the polarity (+ or -) of the batteries matches the polarity marks inside the unit.
-
Close the battery compartment cover.
NOTE:
- The life time of the batteries may last up to one year, depending on how often the remote control is used. For the best performance, the batteries should be replaced on a yearly basis, or when remote operation becomes erratic.
- Be sure to place the batteries in the correct direction, as shown left.
- Do not mix old and new batteries, or different types.
- Old batteries may leak chemical and damage the remote control. Always remove batteries as soon as they become weak.
natural_image
Three identical line drawings of a remote control device with battery and indicator lights, shown from different angles (no text or symbols)AUTOMATIC PRESET CHANNEL
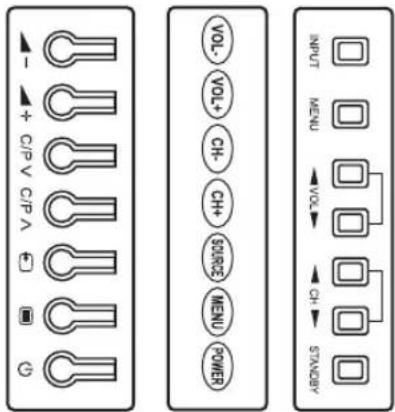
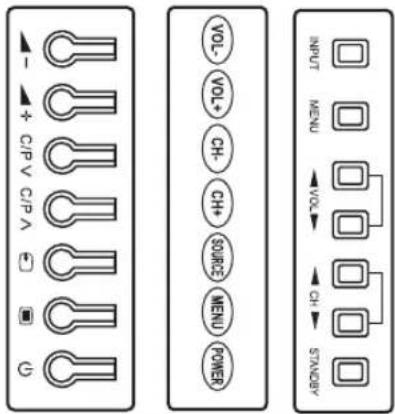
SIDE PANEL
text_image
- + C/PV C/PV + VOLT VOLT+ CH- CH+ SOURCE MENU POWER INPUT MENU VOLT CH- STANDYVOL- VOL+ CH- CH+ MENU POWER
SOURCE
REMOTE CONTROL PANEL
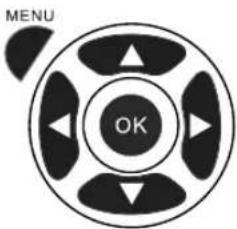
text_image
MENU OK- Connect your cable or Antenna to the Terminal Antenna Jack.
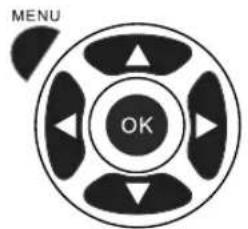
- Press the menu button on the TV set or on the remote control until you see the 'CHANNEL' menu.
- Press the ▲ / ▼ button on the remote control to select Auto Tuning item.
- Press the OK or ▶ button on the remote control to display submenu, press the ▲/▼/◀/▶ button on the remote control to select items, then press the OK button to begin searching and the TV will find all available channels. In the course of the auto tuning, press 'MENU' button to display 'Do you want to exit tuning ◀ Yes No ▶', and press the ◄ button to exit auto tuning.
Note:
- Please be patient as it will take a few minutes to find all channels.
Now You're Ready to Watch TV
natural_image
Line drawing of a family watching television on a couch (no text or symbols present)Power On/Off
- Connect the TV to power source using power cord.
- When the power indicator is red, the TV is in standby mode. Now press the "POWER" button on remote Control or "POWER" button on front panel to turn on the TV.
- To switch the TV back to standby mode, just press "POWER" button on the remote control or the "POWER" button on front panel. Now the indicator will be red.
- If unused for a long time in standby mode, please disconnect the power cord from the wall outlet.
CHANNEL
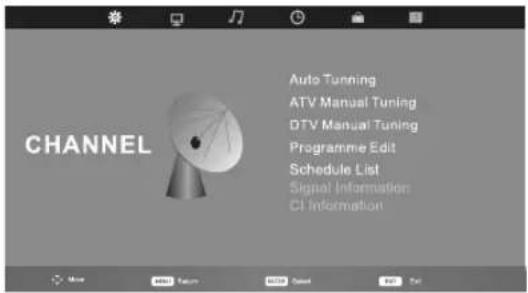
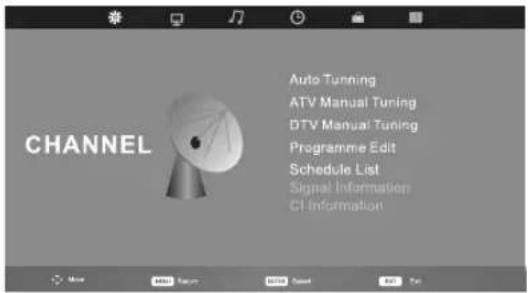
CHANNEL menu
Press "MENU" and "◀/▶" buttons to select the CHANNEL menu.
Press "▼/▲" button to select the items.
Press OK button to enter the submenu.
text_image
CHANNEL Auto Tuning ATV Manual Tuning DTV Manual Tuning Programme Edit Schedule List Signal Information CI InformationAuto Tuing: Press [▶] or [OK] to start auto tuning of both ATV and DTV channels.
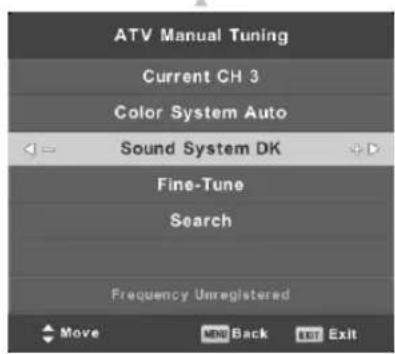
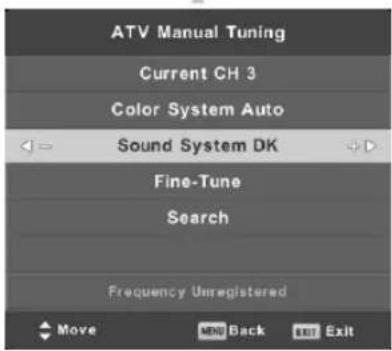
ATV Manual Tuning: Press [▶] or [OK] to enter "ATV Manual Tuning" submenu.
Current CH: Press [◀/▶] to select the channel number you want to store.
Color System: Press [◀/▶] to change the color system as Auto, SECAM, PAL.
Sound System: Press [◀▶] to change the sound system as DK, I, BG, L.
Fine-Tune: Press [◀/▶] to scan current program within a frequency range accurately and store the result manually.
AFC: Set the Automatic Frequency Control to "On" or "Off".
Search: Press [◀/▶] to start search.
text_image
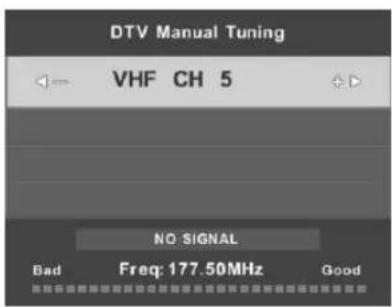
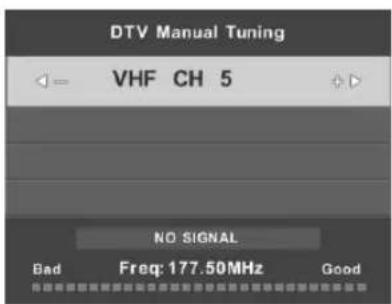
ATV Manual Tuning Current CH 3 Color System Auto Sound System DK Fine-Tune Search Frequency Unregistered Move MENU Back EXIT ExitDTV Manual Tuning: Press [▶] or [OK] to enter "DTV Manual Tuning" submenu.
Press [◀▶] to select channel, then press [OK] to search programs.
Note: Only channels with sufficient signal strength will be tuned in; check your antenna if channels are missing after Auto Tuning.
text_image
DTV Manual Tuning VHF CH 5 NO SIGNAL Bad Freq: 177.50MHz GoodCHANNEL
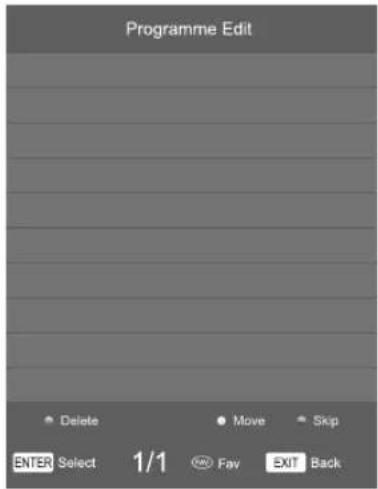
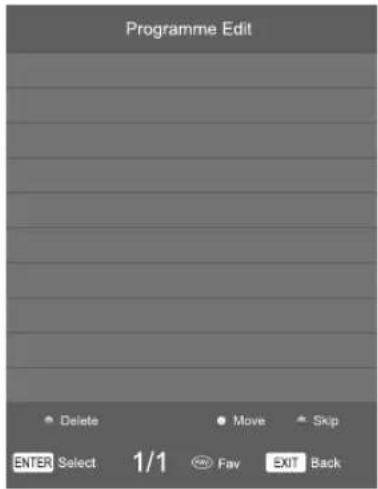
Programme Edit: Press [▶] or [OK] to enter "Programme Edit" submenu.
This option has five functions:
- Press Red button to delete the current channel.
- Press Yellow button and [▲▼] to move the current channel.
- Press Blue button to skip the current channel.
- Press [FAV] to set the current channel to your favorite channel, there will be a red heart at the behind of the channel selected. If the current channel is already be one of your favorite channel, press it again will set it to a normal one.
Schedule List
Display Schedule List and Recorded List.
Signal Information:
Display the signal information in DTV mode.
CI Information:
Please contact your "pay perniew" provider who can supply a viewing card and cam unit with instructions for their use.
text_image
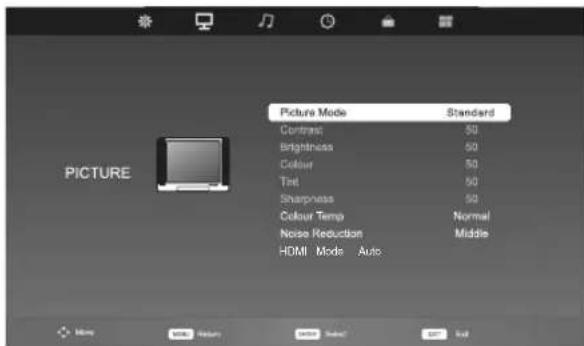
Programme Edit Delete Move Skip ENTER Select 1/1 Fav EXIT BackPICTURE
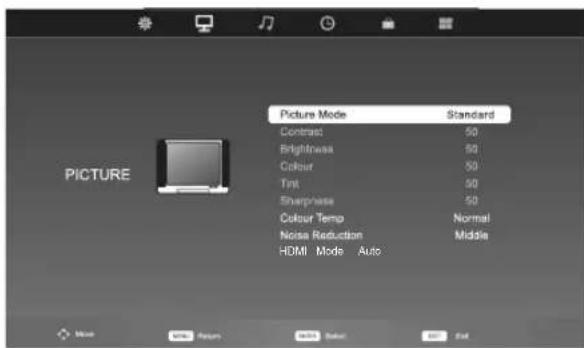
PICTURE menu
Press [MENU] to display the main menu.
Press [◀/▶] to select "PICTURE" in the main menu, then press [▼] or [OK] to enter.
text_image
Picture Mode Contrast Brightness Colour Tint Sharpness Colour Temp Noise Reduction HDMI Mode Auto Standard 50 50 50 50 Normal Middle Main Auto Auto Color EditPicture Mode: Press [◀/▶] or [OK] to enter "Picture Mode" submenu. Press [▲/▼] to change the picture mode in sequence: Dynamic→Standard→Mild→Personal.
You can press [P.MODE] repeatedly on the remote control to change the picture mode directly.
Contrast: Press [◀▶] or [OK] to enter submenu. Press [◀▶] to set the picture's contrast intensity.
Brightness: Press [◀▶] or [OK] to enter submenu. Press [◀▶] to set the picture's brightness.
Colour: Press [◀▶] or [OK] to enter submenu. Press [◀▶] to set the picture's colour intensity.
Tint: Press [◀▶] or [OK] to enter submenu. Press [◀▶] to set the picture's tint. (Available for NTSC video signal only)
Sharpness: Press [◀/▶] or [OK] to enter submenu. Press [◀/▶] to set the picture's sharpness.
Colour Temp: Press [◀▶] or [OK] to enter "Colour Temp" submenu. Press [▲▼] to change the colour temperature in sequence: Cold → Normal → Warm.
Noise Reduction: Press [◀/▶] or [OK] to enter "Noise Reduction" submenu. Press [▲/▼] to change the noise reduction in sequence: Off→ Low → Middle → High → Default.
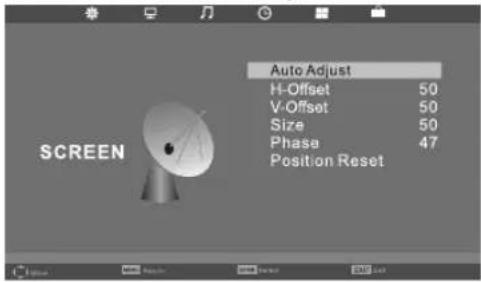
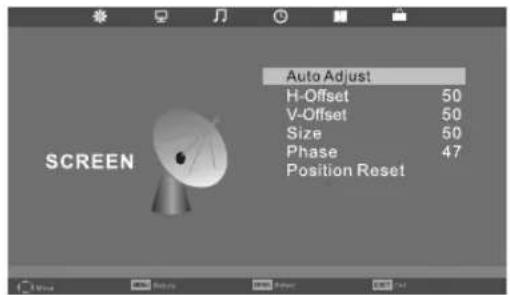
SCREEN
Press the "SOURCE" button on the remote control to enter the OSD menu, then press "▲/▼" button to select "SCREEN" item. Press "OK" button to enter "SCREEN" mode.
SCREEN (Only available when connected via SCREEN to a PC)
Automatic adjust the picture of the right size.
Press "▲/▼" button to select "Auto Adjust" or "Position Reset" item.
Press [▶] or [OK] button to Adjust.
Press "▲/▼" button to select "H-Offset"、"V-Offset"、"Size" or "Phase" of the project.
Press "◀/▶" button to adjust.
text_image
Auto Adjust H-Offset 50 V-Offset 50 Size 50 Phase 47 Position ResetSOUND
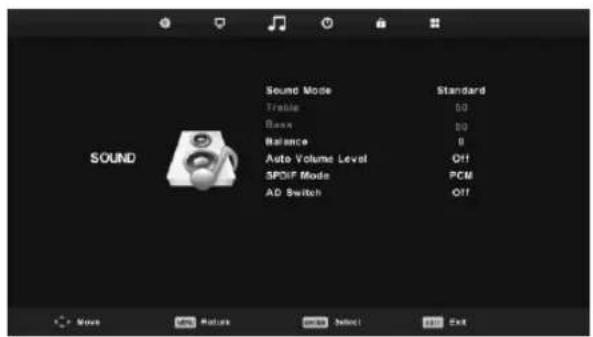
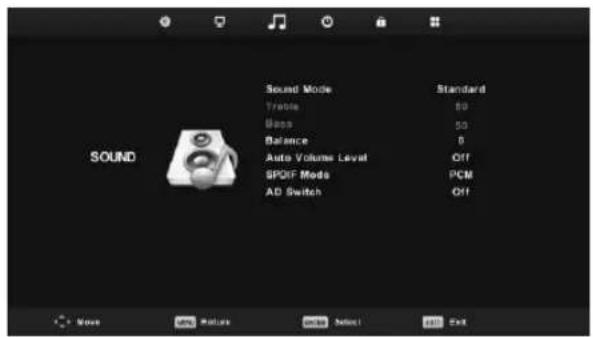
SOUND menu
Press [MENU] to display the main menu.
Press [◀/▶] to select "SOUND" in the main menu, then press [▼] or [OK] to enter.
text_image
Sound Sound Mode Standard Tremble 50 Base 50 Balance 0 Auto Volume Level Off SPDIF Mode PCM AD Switch OffSound Mode: Press [◀▶] or [OK] to enter "Sound Mode" submenu. Press [▲/▼] to change the sound mode in sequence: Standard→ Music→ Movie→ Sports→ Personal. You can press [S.MODE] repeatedly Treble: Pree [◀▶] or [OK] to enter submenu. Press [◀▶] button to adjust. Balance: Press [◀▶] or [OK] to enter Bass: Pree [◀▶] or [OK] to enter submenu. Press [◀▶] button to adjust. speaker's balance.
Auto Volume Level: Press [◀▶] or [OK] to set the automatic volume level to "On" or "Off".
SPDIF Mode: Press [◀▶] or [OK] to set the SPDIF mode to "Auto", "Off" or "PCM".
AD Switch (For DTV only): Press [▶] or [OK] to enter submenu. Press [◀/▶] to select the audio descriptor to "On" or "Off" as well as adjust the volume of the AD.
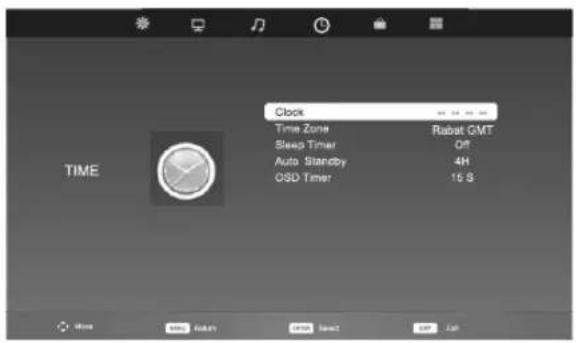
TIME
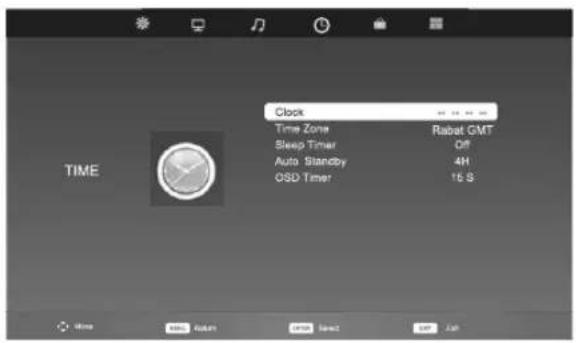
TIME menu
Press [MENU] to display the main menu.
Press [◀] to select "TIME" in the main menu, then press [▼] or [OK] to enter.
text_image
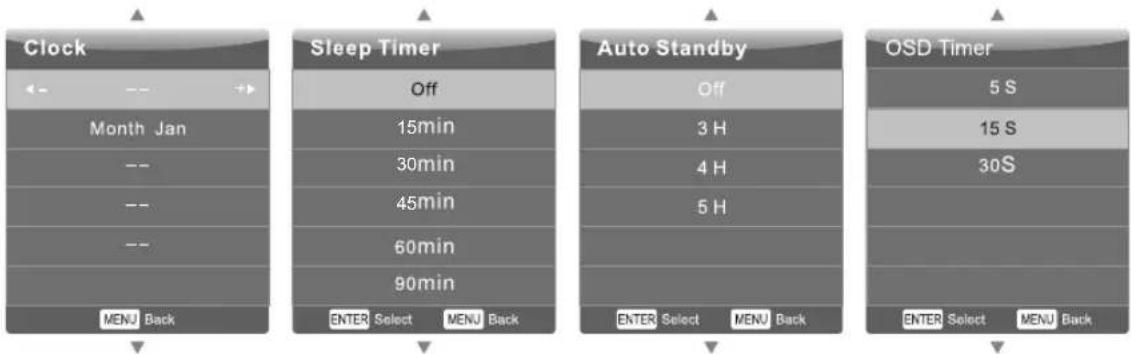
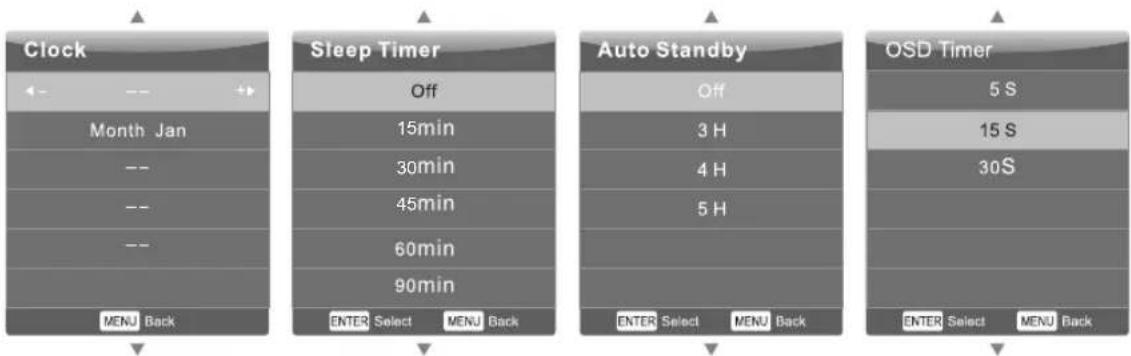
Clock Time Zone Sleep Timer Auto Standby OSD Timer Rabat GMT Off 4H 10 SClock: Use the ◀/▶ buttons to select the position, and use the ▲/▼ buttons to set the time.
Note: User can not change time manually during DTV mode, for time is from signal source directly.
Time Zone: Press [OK] to enter submenu. Press [▲▼◀▶] to select items, press [OK] to confirm.
Sleep Timer: Press [▶] or [OK] to enter "Sleep Timer" submenu. Press [▲/▼] to change the sleep timer as Off, 15Min, 30Min, 45Min, 60Min, 90Min, 120Min, 240Min.
You can press [SLEEP] repeatedly on the remote control to change the sleep timer directly.
Auto Standby: Press [OK] to enter submenu. Press [▲▼] to select Off, 3 H, 4 H, 5 H, press [OK] to confirm.
OSD Timer: Press [▶] or [OK] to enter submenu. Press [A/V] to change the OSD timer as 5 Seconds, 15 Seconds, 30 Seconds.
text_image
Clock ← -- → Month Jan -- -- -- MENU Back Sleep Timer Off 15min 30min 45min 60min 90min ENTER Select MENU Back Auto Standby Off 3 H 4 H 5 H ENTER Select MENU Back OSD Timer 5 S 15 S 30S ENTER Select MENU BackLOCK
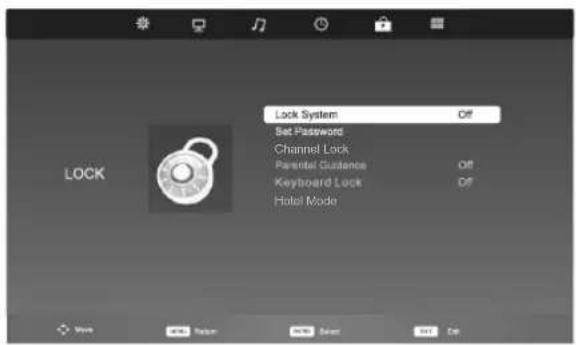
LOCK menu
Press [MENU] to display the main menu.
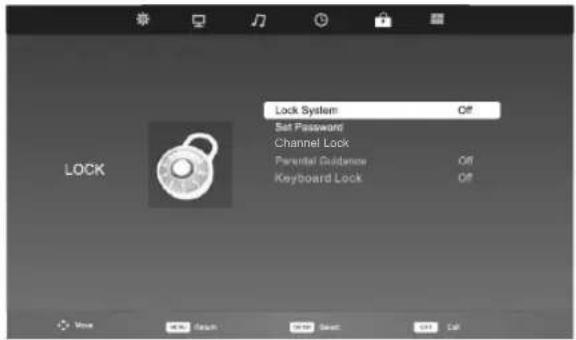
Press [◀▶] to select "LOCK" in the main menu, then press [▼] or [OK] to enter.
text_image
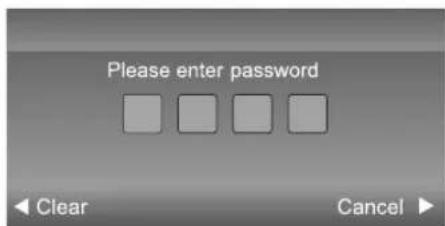
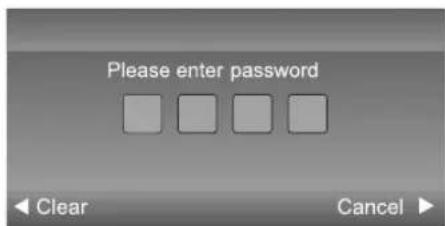
Lock System Set Password Channel Lock Parental Guidance Keyboard Lock Hotel Mode LockPassword: Enter the default password "0000" to go to the LOCK function menu if you have set "Lock System" to "On".
Lock System: Set the lock system to "On" or "Off" which enables or disables below lock functions.
text_image
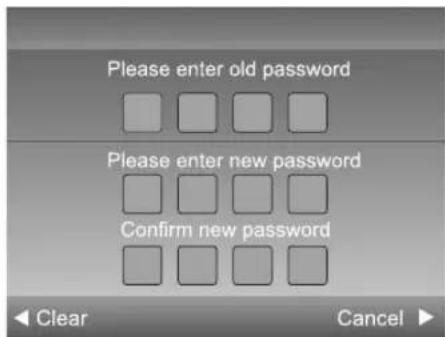
Please enter password Clear CancelSet Password: Press [▶] or [OK] to enter submenu to set new password.
text_image
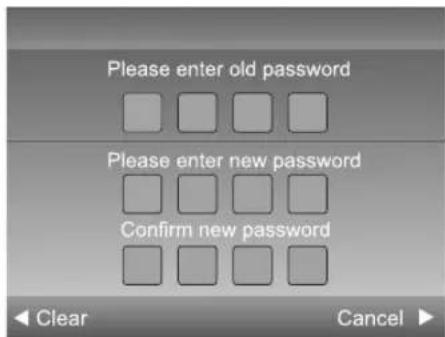
Please enter old password Please enter new password Confirm new password Clear Cancel ▶You can change the password by entering the old and a new password and then re-entering it to confirm the new one.
Channel Lock : Press [OK] to display Channel Lock menu.
Parental Guidance: Press [OK] to display submenu, press [▲/▼] to select Off, 3, 4, 5, 6, 7, 8, 9, 10, 11, 12, 13, 14, 15, 16, 17, 18. Press [OK] to confirm.
Keyboard Lock: Press [OK] to select Off or On.
SETUP
SETUP menu
Press [MENU] to display the main menu.
Press [◀▶] to select "SETUP" in the main menu, then press [▼] or [OK] to enter.
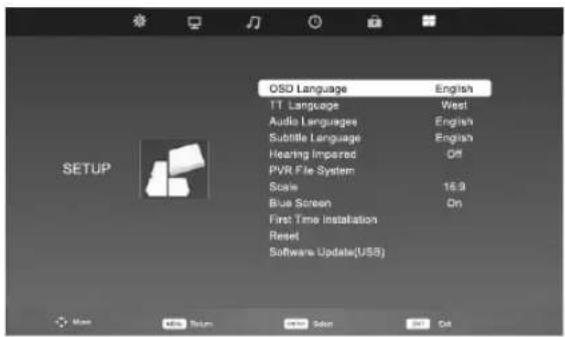
text_image
OSO Language English TT Language West Audio Languages English Subtitle Language English Hearing Impaired Off PVR File System Scale 16.9 Blue Screen On First Time Installation Reset Software Update(US$)OSD Language
Press OK button to enter and ◀/▶, ▼/▲ button to select OSD language.
Press "MENU" button to return to the previous menu.
TT Language: Press [OK] to enter submenu, press [▼/▲] to select items. Press [OK] to confirm.
Audio Languages / Subtitle Language: Press [OK] to enter submenu, press [◀▶▼▲] to select items.
Press [OK] to confirm.
Hearing Impaired (For DTV only):
Press [◀/▶] or [OK] to set the hearing impaired to "On" or "Off".
PVR File System (For DTV only):
Press [▶] or [OK] to enter the submenu to check the USB connected and provide with the recording function.
Scale: Press [OK] to enter submenu, press [▼/▲] to select the aspect ratio mode. Press [OK] to confirm.
Blue Screen
Press OK button to select On or Off.
First Time Installation: Press [▶] or [OK] to enter relevant options including OSD Language and Country.
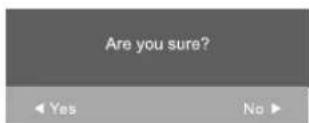
Reset
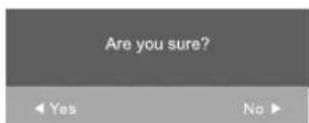
This will reset all settings to default. Press OK button
to start - you will be asked to confirm (see screenshot right).
Press "◀/▶" button to select Yes or No.
Press "MENU" or "EXIT" button to return.
Software Update(USB) : Press [▼/▲] to select Software Update item. Press [OK] to confirm.
Note: User only on advice from Customer Support.
USB
Press "SOURCE" button to POP-UP the input source menu.
Press "▲/▼" button to select "Media" and press "OK" button to enter the interface, as shown below:
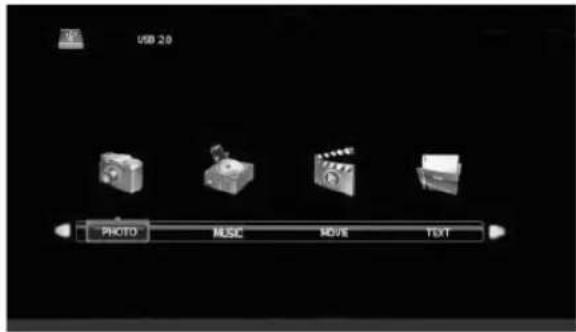
text_image
USB 20 PHOTO MUSIC MOVIE TEXTPress "◀/▶" button to select among the "PHOTO", "MUSIC", "MOVIE" and "TEXT" icons.
Press "OK" button to confirm and enter the next menu, as shown below:
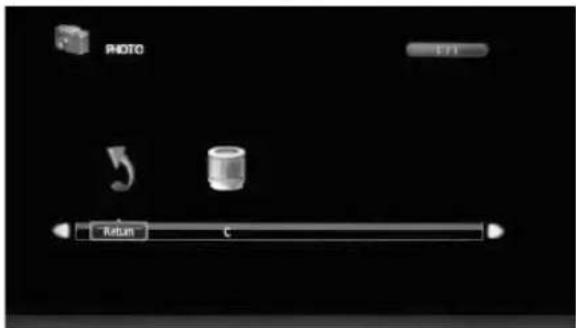
text_image
PHOTO Edit ReturnPHOTO
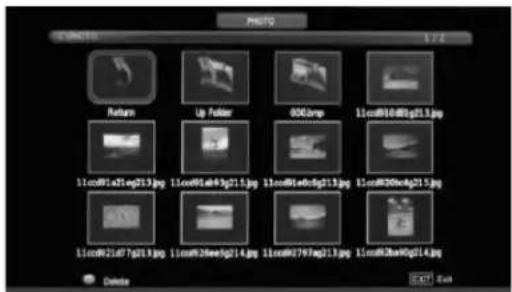
Press OK to select files(indicated with a checkmark) for selective playback(see 6 below).
- Press "◀/▶" button to select "PHOTO".
- Press "OK" button to enter the disk selection menu.
- Press "◀/▶" button to select disk to enter the submenu.
Select 5 item to return to the previous menu.
-
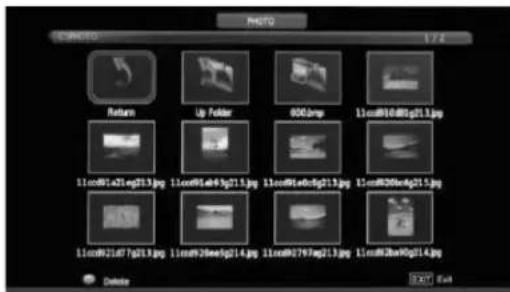
Press "▲▼◀▶" button to select the image file you want to play. Press OK to select files (indicated with a checkmark) for selective playback. Press red button, you will enter the submenu to delete the file.
-
Press "PLAY" button to play photo slideshow (of checkmarked files;
if no files are ticked, all pictures will play), press "OK" button to display menu.
text_image
TITLE 1.72 Return Up Folder 000bmp 11cox#10480g011.jpg 11cox#1a21eg013.jpg 11cox#1a46kg015.jpg 11cox#1a46deg013.jpg 11cox#206wg015.jpg 11cox#21d7g013.jpg 11cox#20ew0g014.jpg 11cox#2797wg013.jpg 11cox#2ba90g014.jpg Delete EXIT Exit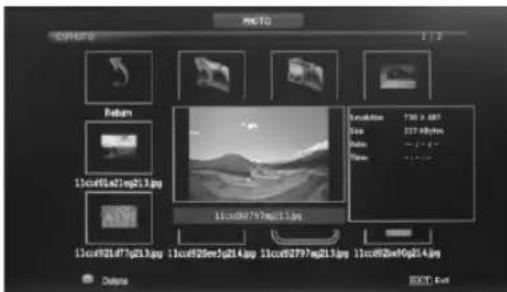
text_image
MOLOG 11x045a21mg21.jpg 11x045a21mg21.jpg 11x045a21mg21.jpg 11x045a21mg21.jpg 11x045a21mg21.jpg 11x045a21mg21.jpg 11x045a21mg21.jpg 11x045a21mg21.jpg Random: 736 X 487 Size: 337.8Kbps Duration: -7.9.0-7.9.0 Time: 0.00:0.00:0.00:0.00:0.00:0.00:0.00:0.00:0.00:0.00:0.00:0.00:0.00:0.00:0.00:0.00:0.00:0.00:0.00:0.00:0.00 Delete EXIT: ExitUSB
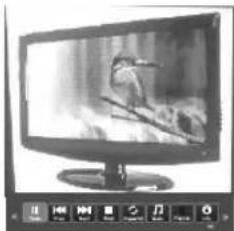
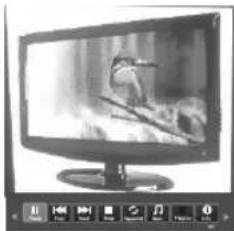
Pause
Press "PAUSE" button to pause the slideshow.
Play
Press "PLAY" button to play the selected photo.
Stop
Press "STOP" button to stop and return.
Next/Prev.
natural_image
Black-and-white photo of a flat-screen monitor displaying a bird perched on a branch (no visible text or symbols)Press "NEXT" or "PREV." button to skip to view the photo which are selected the photo.
Exit
Press "EXIT" button to exit.
MUSIC
-
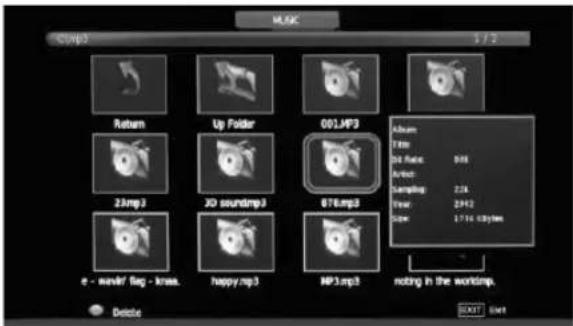
Press "◀/▶" button to select "MUSIC."
-
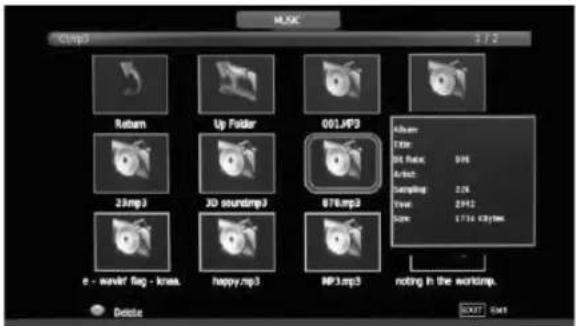
Enter the music interface, press "▲▼◀▶" button to preview the music, as shown below:
text_image
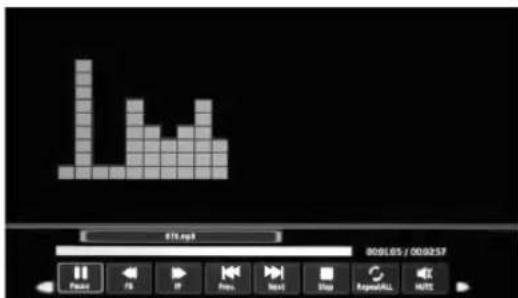
MOSK Clamp3 2 / 5 Return Up Folder 001.MP3 23.mp3 3D soundimp3 876.mp3 e - wander flag - knas. happy.mp3 MP3.mp3 noting in the workmp. Delete Alive: Enter: Bit Back: 0.0% Artist: Compling: 2.0% View: 2.0% Size: 1756 bytes- Press"PLAY" button into music player and playing the selected music, as shown below:
text_image
618.0p3 800L05 / 009257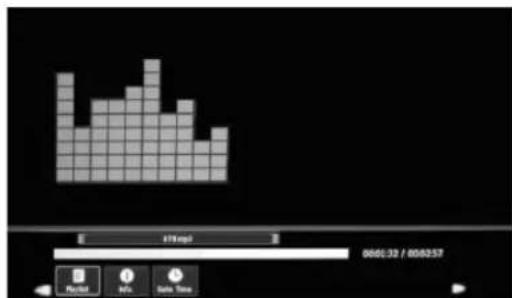
bar
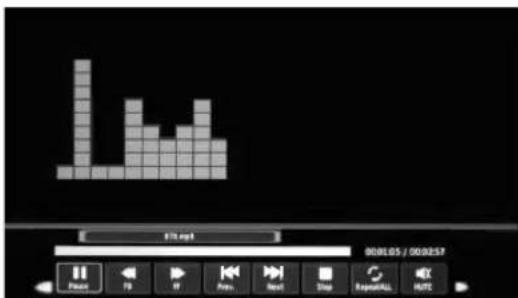
| Category | Value | |---|---| | Bar 1 | 378mp0 | | Bar 2 | 1500 | | Bar 3 | 2500 | | Bar 4 | 3000 | | Bar 5 | 2800 | | Bar 6 | 2200 | | Bar 7 | 2000 | | Bar 8 | 1800 | | Bar 9 | 1600 | | Bar 10 | 1400 | | Bar 11 | 1200 | | Bar 12 | 1000 | | Bar 13 | 800 | | Bar 14 | 600 | | Bar 15 | 400 | | Bar 16 | 200 | | Bar 17 | 100 | | Bar 18 | 50 | | Bar 19 | 25 | | Bar 20 | 15 | | Bar 21 | 10 | | Bar 22 | 5 | | Bar 23 | 2 | | Bar 24 | 1 | | Bar 25 | 0.5 | | Bar 26 | 0.25 | | Bar 27 | 0.15 | | Bar 28 | 0.1 | | Bar 29 | 0.05 | | Bar 30 | 0.025 | | Bar 31 | 0.015 | | Bar 32 | 0.01 | | Bar 33 | 0.005 | | Bar 34 | 0.0025 | | Bar 35 | 0.0015 | | Bar 36 | 0.001 |PAUSE Select "PAUSE" to pause the playing music.
PLAY Select "PLAY" to play the music.
FB Select "FB" to fast reverse among 2X, 4X, 8X and 16X modes.
FF Select "FF" to fast forward among 2X, 4X, 8X and 16X modes.
PREV. Select "PREV." to skip to previous track.
NEXT Select "NEXT" to skip to next track.
STOP Select "STOP" to stop and return.
RepeatALL Select "☐" to repeat play music (☐ Repeat 1, ☐ Repeat All, ☐ Repeat None).
MUTE Select "MUTE" to turn off the sound.
USB
Playlist Select "Playlist" to display play list.
Info. Select "Info" to display the music information.
Goto Time Select "Goto Time" to setup play time.
MOVIE
- Press "◀/▶" button to select "MOVIE"
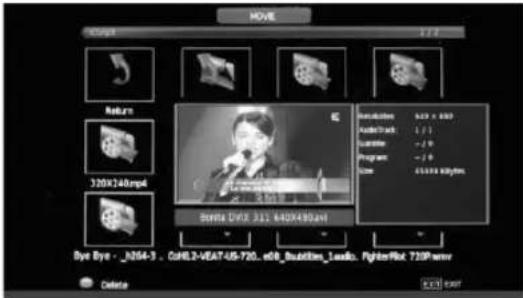
- Enter the movie interface, Press "▲▼◀▶" button to preview the files, as shown below.:
text_image
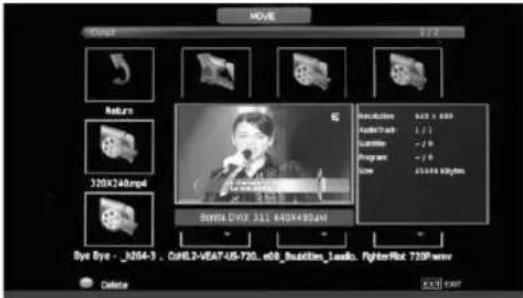
MOVE Circuit 117 Random 320X240mpd AudioTrack: 1 / 1 Lampfer: - / 9 Program: - / 8 Size: 25000 kV/Hz Bore Drive - J364-3 - CxHL3-VEAT-US-720. x68_Busitlons_Laddo. FighterRut. 720Paser Delete Add User- Press "PLAY" button to play the movie. Press OK button to display menu.
Press the "PLAY" button once more to play the movie full-screen.
Press the "PAUSE" button to pause the playing movie.
Press "PREV." or "NEXT" button to skip the backward or forward. Press "FB" OR "FF"
button to fast reverse or fast forward, press "STOP" or "EXIT" button to return.
TEXT
- Press "◀/▶" button to select "TEXT" (to view text documents stored on USB).
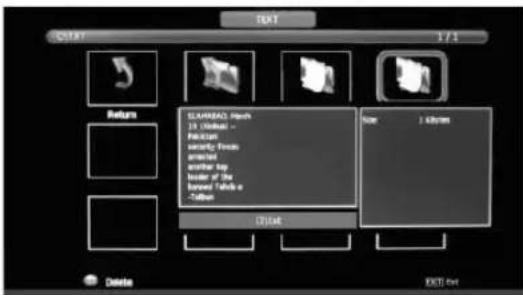
- Enter the text interface, Press "▲▼◀▶" button to preview the files, as shown below.:
text_image
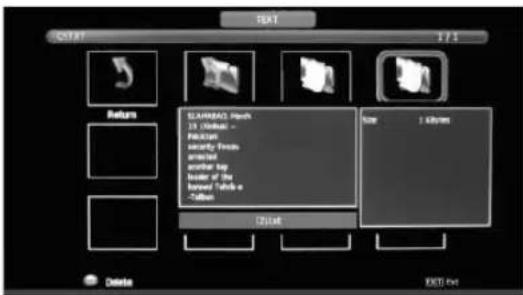
TEXT START 1 / 3 Return SLAMREAD March 12 months -- Forward searly from earrest water key border of the forward table o -Button Number 1 Options Delete EXIT here- Press "PLAY" button to open and play the file, press OK button to display menu. as shown below.:
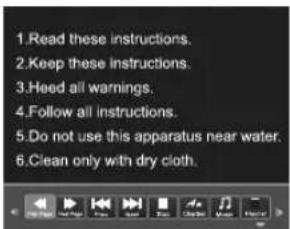
Select "Prev Page" to view a next page.
Select "Next Page" to view a previous page.
Select "STOP" to return.
Select "Music" to listen to music while reading.
text_image
1.Read these instructions. 2.Keep these instructions. 3.Heed all warnings. 4.Follow all instructions. 5.Do not use this apparatus near water. 6.Clean only with dry cloth.MENU OPERATION
MULTIMEDIA
Key function list
| Stop Plackback | |
| ↑↓←→ | direction key (record program detailed information) |
| INFO | show details |
| Play | |
| Pause | |
| fast reverse | |
| fast forward | |
| Previous | |
| Next | |
| RED | Delete |
| OK | Confirm |
| EXIT | Exit |
| SUBTITLE | When playing the movies, turn on or off the SUBTITLE function need the support of the movies' source. |
Note: Please use high-speed mobile disk
The following are the function interfaces of the PHOTO, MUSIC, MOVIE and TEXT. About their functions described please refer to the Key function list in page 19.
PHOTO

text_image
Pause Prev. Next Stop RepeatAll Music Playlist Info. Rotate Rotate Zoom In Zoom Out Move ViewMUSIC

text_image
Pause FB FF Prev. Next Stop RepeatAll MUTE Playlist Info. Goto TimeMOVIE

text_image
Pause FB FF Prev. Next Stop Aa CharSet RepeatAll Set A Playlist Info. Slow Step
TEXT

text_image
Prev.Page Next Page Prev. Next Stop Aa CharSet Music PlaylistNOTE: In the USB playback multimedia, according to the "INFO" rid device info popup menu button above.
TROUBLE SHOOTING GUIDE
Before contrast the service technician, perform the following simple checks. If any problem still persists, unplug the LCD TV and calling for serving.
| Problem | Possible Solution |
| No sound or picture | Check that the main plug has been connected to a wall let.Check that you have pressed the button on the front of the TV.Check the picture contrast and brightness settings.Check the volume. |
| Normal picture but no sound | Check the volume.Check whether the MUTE button was pressed on the remote control. |
| Sound is too low | Check the volume.If the volume is still too low after setting the volume level to its maximum, check the volume control on computer sound card or software program. |
| No picture or black and white picture | Adjust the colour settings .Check whether the broadcast system selected is correct. |
| "Unknown" message | Make sure that the power cord is firmly connected to the PC or the video sources.Make sure that the PC or video sources are switched on. |
| Sound and picture interference | Try to identify the electrical appliance that is affecting the set and move it further away. |
| Blurred or snowy picture, distorted sound | Check the direction, location and connections of your aerial. |
| Remote control does not work | The battery in the remote control may be exhausted.The battery may be improperly installed.Check that there is no obstacle between the remote control and the remote (infrared) sensor.Ensure that there is no strong light shining on the remote control's infrared sensor. |
| The LCD TV does not turn on | Be sure the power cord is plugged on. |
| The image is too light or too dark | Adjust the brightness and Contrast. |
| On PC mode, horizontal bars appear to flicker, jitter or shimmer on the image | Adjust the Phase. |
| On PC mode, vertical bars appear to flicker, jitter or shimmer on the image | Adjust the Clock. |
| On PC mode, image is not stable and may appear to vibrate | Check the display resolution and frequency from your PC or video board is a valid mode for your LED TV.Control Panel→ Display→ Settings.If the setting is not correct, use your computer utility program to change the display settings.Your monitor supports multi display function within the following frequency domain: |
| On PC mode, image is not centred on the screen. | Adjust the horizontal and vertical position. |
SPECIFICATIONS
| Aspect Ratio | 16 : 9 |
| System | PAL/SECAM BG/DK/I, DVB-T/T2+C, NTSC Playback |
| Base impedance | 75 Ω (Unbalance) |
| Receiving TV Band | All Channels Receiveable |
| AC Supply Voltage | 100-240V~ 50/60Hz |
Note: Part of the design and the specification may be changed without prior notice.
INFRA-RED REMOTE CONTROL
Features: Full function remote control
Effective Distance Power: 8 metres
Power Supply: DC 3V (Two batteries, size AAA, recommend use alkaline type batteries)
SMART TV
User manual for TK7
Introduction:
The built-in TV android smart system uses Google's operating system Android 4.4 and can fluently run Android applications. With massive web information, super-hot music videos, famous Android games, the latest and fastest friends dynamic, turning on TV and pressing remote control, you can enjoy the smart life, with only one step!
Chapter I Basic Instruction
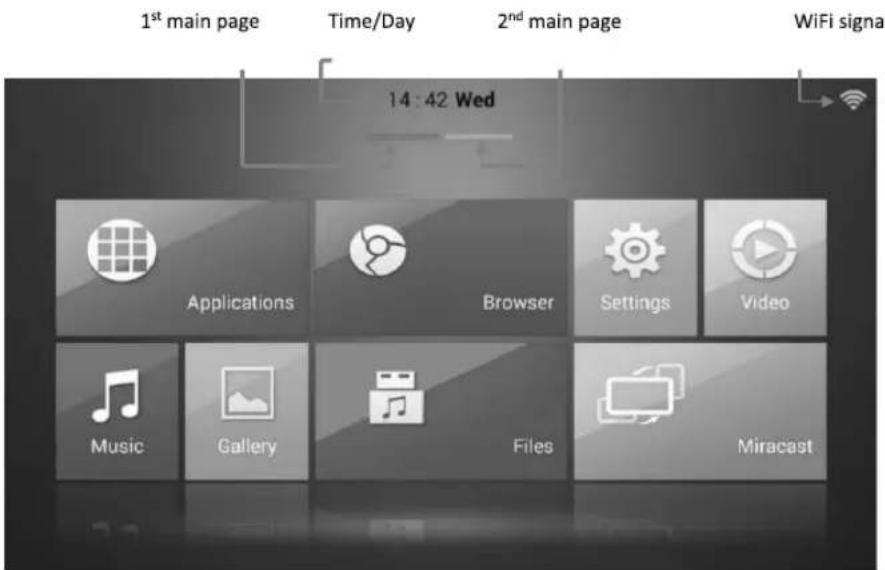
1) Press the button "source" on remote control, chose "smart TV", enter Android smart system, as shown below:
Desktop is similar to your Android smart phone and divided into three main pages: press left and right keys on remote control can switch between main page 1, 2,
text_image
1st main page Time/Day 2nd main page WiFi signal 14:42 Wed Applications Browser Settings Video Music Gallery Files MiracastAll icons on the main pages
1 ^st main page: press four arrow keys to select icons on the desktop, the icon selected will appear raised.
Applications: store all the Apps installed in the system.
Browser: web browser, click to enter the URL you want to enter to browse the web.
Settings: can set up the system, such as network connecting and language settings, etc.
Video / Music / Gallery: Open local video / music / picture files.
Files: manage files in smart TV or USB device.
Miracast: Android device and smart TV display same on the screen. Simultaneously display images on the screen of these mobile Android devices with micracast function such as tablet PC and phone on the TV screen.
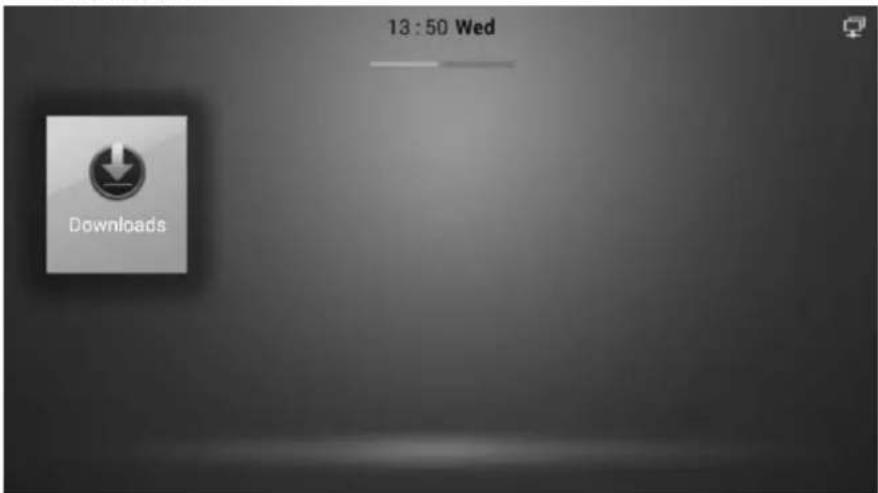
2 ^nd main page: press button "right" on remote control, slide from the 1 ^st to 2 ^nd main page. The selected icon appears raised. This is desk area for user. User can move app icons from "Applications" to this desk. Downloads is default icon in desk.
As shown below.
text_image
13:50 Wed DownloadsDownload: storage downloaded files. open this item, user can click file to install APK or clean down history.
2) How to connect WiFi and Ethernet:
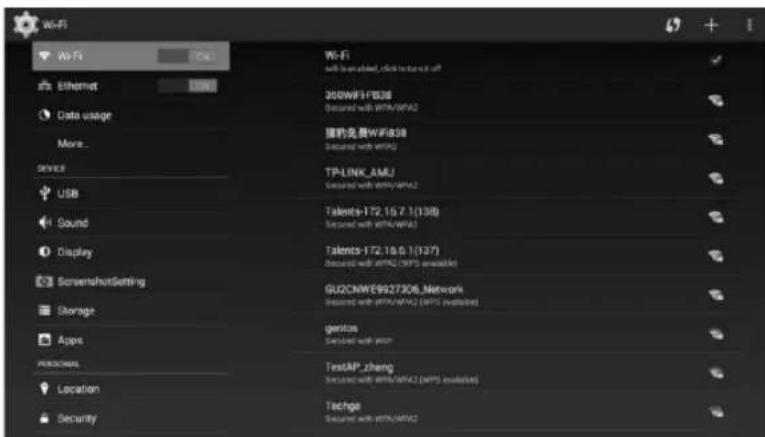
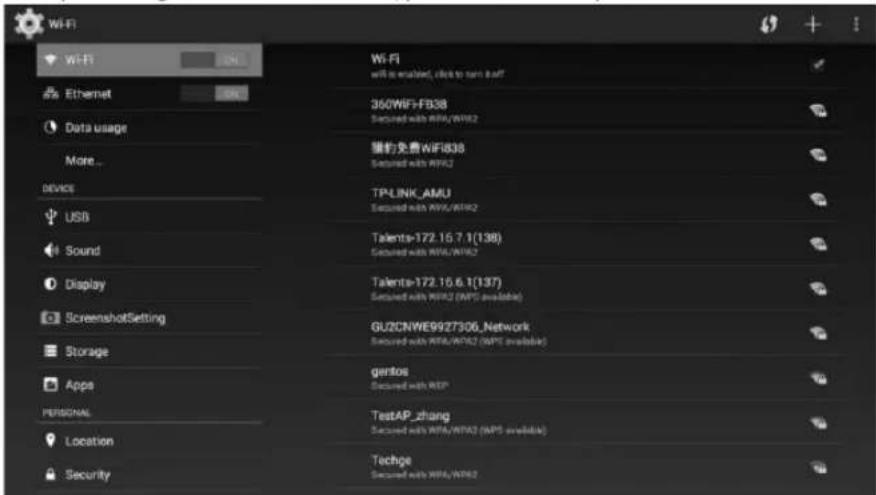
Select Setting in 1 ^st main page and click to open it, you can see Wi-Fi and Ethernet item as picture below.
Wi-Fi: select Wi-Fi and press OK button, right window is "wifi is enabled, click to turn it off". Press right button to select and press OK button, you can turn on Wi-Fi. After several second, you can see Wi-Fi signals in this window, list with signals strong from top to bottom.
Press up/down button, to select your Wi-Fi signal. Press OK button and password window display as picture shows below.
text_image
Wi-Fi WiFi Ethernet Data usage More... Service USB Sound Display ScreenshotSetting Storage Apps PERSONAL Location Security WiFi with been labeled, clicking up via off 300WiFi1838 Secured with WiFi/WPA2 我的免费WiFi838 Secured with WiFi2 TP-LINK_AMU Secured with WiFi/WPA2 Talents-172.15.7.1(138) Secured with WiFi/WPA2 Talents-172.15.9.1(137) Secured with WiFi2.CRP3 available GUQCNWE9927306_Network Secured with WiFi/WPA2 (WPS available) genics Secured with WiFi TestAP_zhang Secured with WiFi/WPA2 (WPS available) Techge Secured with WiFi/WPA2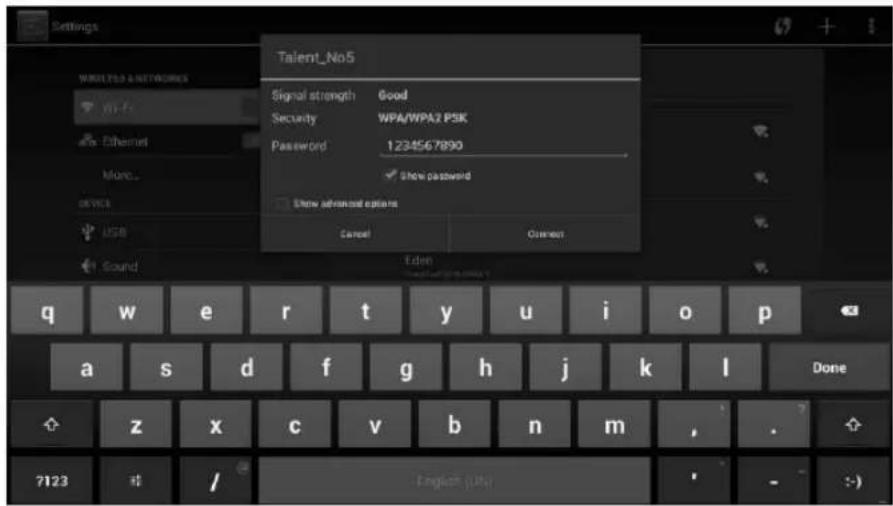
text_image
Settings Talent_No5 Signal strength Good Security WPA/WPA2 PSK Password 1234567890 Show password Show advanced options Cancel Connect Sound q w e r t y u i o p a s d f g h j k l Done z x c v b n m , . 7123 / English (p)Please enter Wi-Fi passwords here. You can press up/down/right/left button to select character in the keyboard window, press OK button to input character or number. After input right password, press Exit button. Click "show password", to double check if the password right or not. If password is right, select "connect" item and press OK button to connect Wi-Fi signal. If success, this Wi-Fi signal will mark as "connected", and show signal strength at its right side.
Ethernet: select Ethernet and press OK button, right side window will show Ethernet Options. First, plug netting twin into RJ45 socket of smart TV. Second, select "Ethernet is disabled" item, click to turn it on. Wait for a moment, then smart TV is connected to Ethernet.
Notice: generally you have routers, netting twin is connected with router and smart TV. If you're using modem instead of router, please click "more" option below "Ethernet".
text_image
WiFi WiFi 360WIFI-FB38 Secured with WPA/WFA2 猎豹免费WiFi838 Secured with WPA2 TPLINK_AMU Secured with WPA/WFA2 Talents-172.15.7.1(138) Secured with WPA/WFA2 Talents-172.15.6.1(137) Secured with WPA2 (WPS available) GUZCNWE9927306_Network Secured with WPA/WFA2 (WPS available) gentos Secured with RDP TestAP_zhang Secured with WPA/WFA2 (WPS available) Techge Secured with WPA/WFA2Connect to internet, enjoy and have fun!
For more setting, please keep reading below.
Chapter II Advanced Instruction
1) Browser
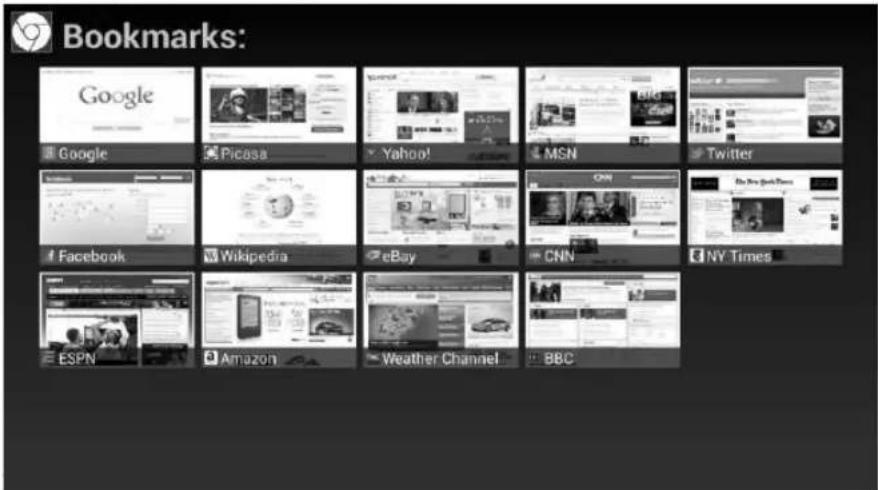
Open "Browser", you can find Bookmark window, with useful websites collection. Select one and press OK button to open this website.
text_image
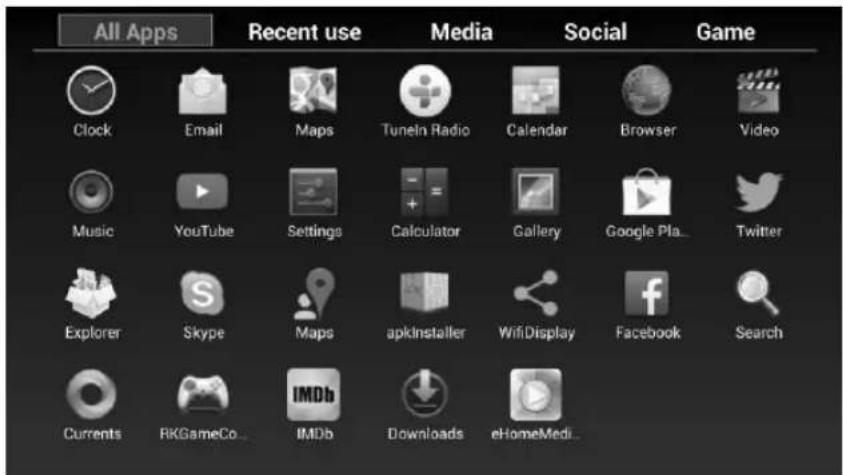
Bookmarks: Google Google Picasa Yahoo! MSN Twitter Facebook Wikipedia eBay CNN NY Times ESPN Amazon Weather Channel BBCThis is a commonly used setting. On the 1 ^st main page, you select "Applications" to enter window as below:
text_image
All Apps Recent use Media Social Game Clock Email Maps Tuneln Radio Calendar Browser Video Music YouTube Settings Calculator Gallery Google Pla... Twitter Explorer Skype Maps apkInstaller WifiDisplay Facebook Search Currents RKGameCo... IMDb Downloads eHomeMedi...A: All Apps: All applications. You can find all APKs installed in this smart system.
And at right side, classifications of all APKs is placed one by one. They are: Recent use / Media / Social / Game.
Commonly operations: press up/down/right/left button, press OK button to open APKs.
Press menu button, shows small window as below. You can select six option like : uninstall / information / move applications...
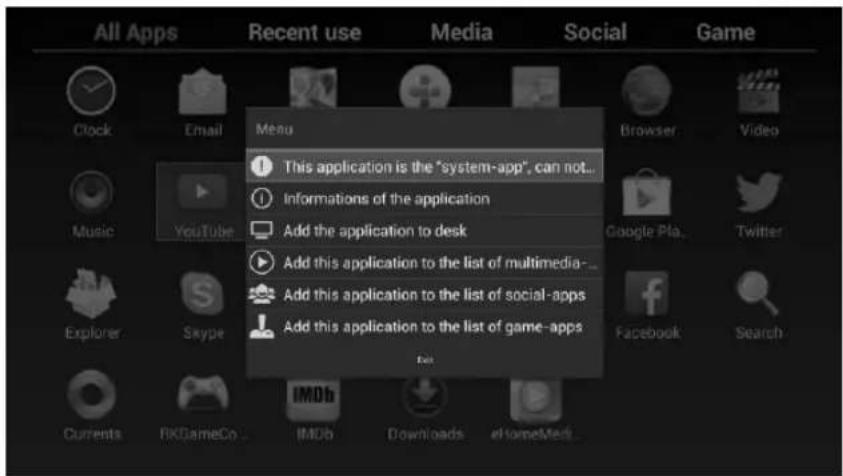
text_image
All Apps Recent use Media Social Game Clock Email Menu This application is the "system-app", can not... Informations of the application Add the application to desk Add this application to the list of multimedia-- Add this application to the list of social-apps Add this application to the list of game-apps Times Music YouTube Google Play... Twitter Explorer Skype Facebook Search Currents fikGameCo... IMDb Downloads eHomeMed...B: except "All Apps", in other classifications at right side, select one icon, press "menu" button, you just delete this icon, but not uninstall.
Notice: this is "delete", not "uninstall". To uninstall icon, please select one icon and press "menu" button in the All Apps classification.
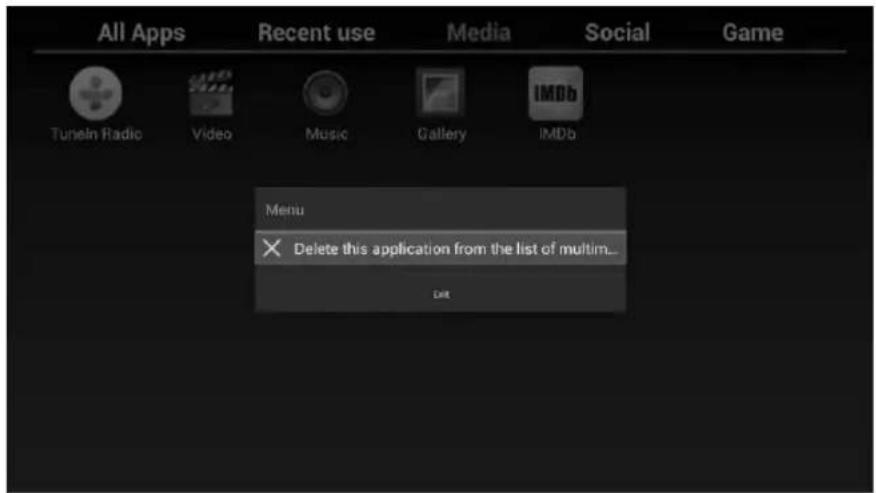
text_image
All Apps Recent use Media Social Game Tunein Radio Video Music Gallery IMDb Menu Delete this application from the list of multim... Edit2) Micracast function
Select "Micracast" on 1^st main page and press "OK" button. Window shows as below:
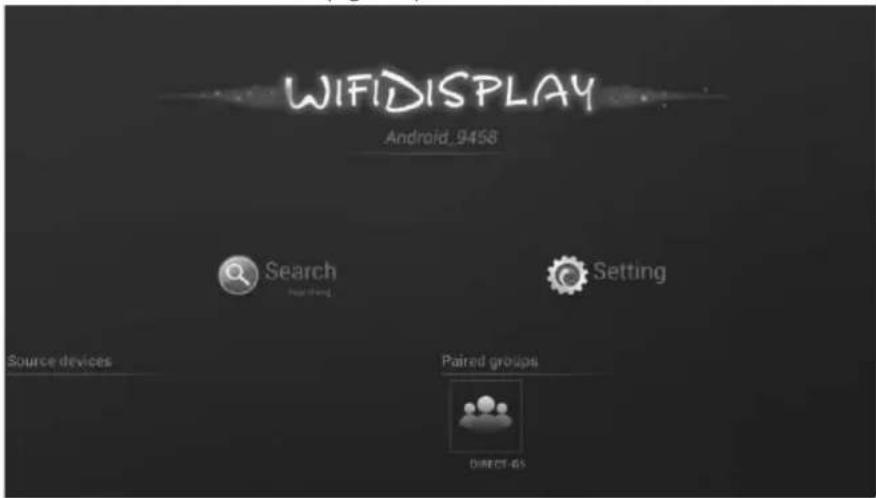
text_image
WIFI DISPLAY Android_9458 Search Setting Source devices Paired groups DIRECT-03Micracast also is called wifidisplay. it is a mirror technology. You can make smartTV display same pictures displayed on android device in the same local network.
STEPS
A. First, click and open Micracast function on 1 ^st main page, smartTV will show wifidisplay window.
B. Second, system running in you android device, must be latest as android 4.2 version, with "Screen share" option. Usually you can find this option here: setting » display » Screen share
C. Open "Screen share" in your phone or pad, search ID of this smartTV. For example "Android_9458" in the picture above.
If successfully find the smartTV ID, click it and connect it. Then click "accept" on smartTV screen.
D. Successfully connected, screen of TV will display exactly the same pictures of android device.
Tips: both smartTV and android device should open Wi-Fi.
3) Files=FileExplorer
Click Files on 1 ^st page, user can open files in internal flash or USB device.
Internal flash: this is smart TV internal flash, please do not move/delete files in this flash. Move/delete files in this flash may cause unexpected result.
USB device: connect USB devices to smart TV USB port, user can open files in the connected USB devices.
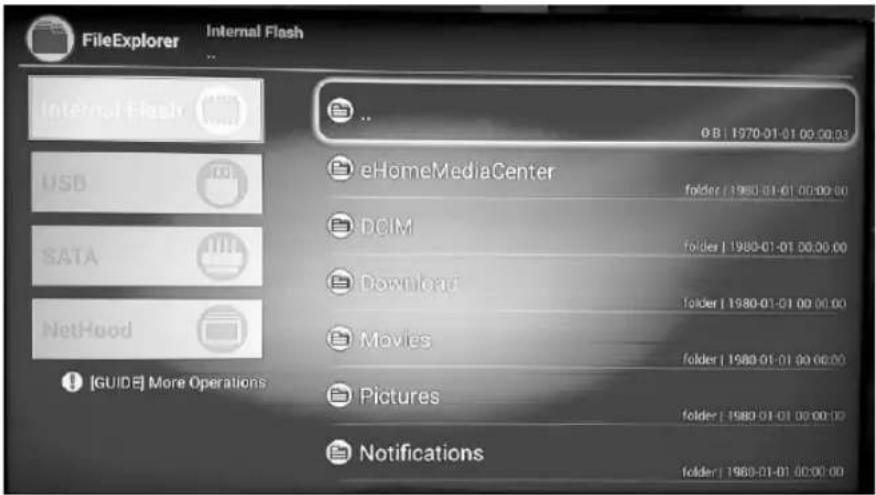
text_image
FileExplorer Internal Flash Internal Flash USB SATA NetHood [GUIDE] More Operations eHomeMediaCenter DCIM Download Movies Pictures Notifications 0 B | 1970-01-01 00:00:03 folder | 1980-01-01 00:00:00 folder | 1980-01-01 00:00:00 folder | 1980-01-01 00:00:00 folder | 1980-01-01 00:00:00 folder | 1980-01-01 00:00:00 folder | 1982-01-01 00:00:00 folder | 1982-01-01 00:00:00 folder | 1982-01-01 00:00:00 folder | 1982-01-01 00:00:00 folder | 1982-01-01 15:34:35 folder | 1982-01-01 15:34:35 folder | 1982-01-01 15:34:35 folder | 1982-01-01 15:34:35 folder | 1982-01-01 15:34:35 folder | 1983-01-01 15:34:35 folder | 1983-01-01 15:34:35 folder | 1983-01-01 15:34:35 folder | 1983-01-01 15:34:35 folder | 1983-01-01 26:34:35 folder | 1983-01-01 26:34:35 folder | 1983-01-01 26:34:35 folder | 1983-01-01 26:34:35 folder | 1983-01-01 26:34:35 kidney NotificationsEnd.

FOX
Electronics Corporation Limited
MODEL:
LED TELEVIZORI
natural_image
Silhouette of a person in a globe with white lines indicating direction (no text or symbols)
natural_image
Silhouette of a leaf with a circular element, no text or symbols present
natural_image
Silhouette of a person in motion, possibly running or performing a martial arts pose (no text or symbols visible)
natural_image
Abstract grayscale vertical pattern with curved white lines on gray background (no text or symbols)HDMI®
HIGH-DEFINITION MULTIMEDIA INTERFACE
UPUTSTVO ZA UPOTREBU
Molimo Vas da detaljno proučite ovo uputstvo pre upotrebe televizora i da ga čuvate radi kasnije upotrebe
SADRŽAJ
Bezbedosna uputstva 2-4
Pregled (komandi i priključaka)....5-da
Daljinski upravljač....7-8
Zamena Baterije....9
Automatsko memorisanje kanala....10
Paljenje i gašenje 11
Kanal 12-13
Slika 13
EKRAN....14
Zvuk 14
VREME....15
ZAKLJUČAVANJE....16
Podešavanje 17
USB 19-20
Meni operacije 21
Problemi 22
Specifikacija....23
BEZBEDONOSNA UPUTSTVA
VATNA BEZBEDONOSNA UPUTSTVA
UPOZORENJE
KAKO BISTE SPREČILI POTAR ILI ELEKTRIČNI UDAR NEMOJTE KORISTITI PRODUȚNI KABAL, DUPLI UTIKAČ ILI DRUGE DODATKE NA UTIČNICI OSIM ONIH KOJI BI MOGLI DA SPREČE IZAZIVANJE STRUJNOG UDARA
- KAKO BISTE SPREČILI POTAR ILI ELEKTRIČNI UDAR NE IZLATITE OVAJ UREĐAJ VLAGI ILI KIŠI..

Ovaj simbol munje u jednakostranom trouglu upozorava korisnike na prisustvo opasnog i neizolovanog napona unutar kućišta proizvoda koji mođe biti dovoljan da stvori rizik STRUJNOG UDARA
CAUTION
RISK OF ELECTRIC SHOCK DO NOT OPEN
Upozorenje: Da biste smanjili rizik od strujnog udara, nemojte skidati poklopac (ili zadnju stranu). Unutra nema delova koje korisnik mođe sam da zameni. Za obavljanje servisa zatrađite pomoc kvalifikovanog osoblja

Znak uzvika unutar jednakostranog trougla u ovom uputstvu upozorava korisnika na prisustvo vatnih instrukcija za rad i odrtavanje (servisiranje) uređaja.
Ovaj aparat ne treba izlagati void, a predmete ispunjene tečnosću poput vaza ne treba da budu postavljeni na i
oko uređaja.
OPREZ
* Postoji opasnost od eksplozije ako se baterija nepropisno zameni.
* Zamenite postojeću sa samo odgovarajućom vrstom baterija.
* Nemojte izlagati bateriju direktnoj sunčevoj svetlosti ili bilo kojem drugom izvoru toplote.
* Obezbedite pravilno odlaganje istrošenih baterija.
* Ostavite lako dostupnim mesto gde je utikač ili nastavak za prekid napajanja.
* Da biste smanjili rizik od strujnog udara, ne obavljajte bilo kakvo servisiranje osim onih koja se pominju u
VATNE INFORMACIJE
Ako televizor nije postavljen na dovoljno stabilnom mestu, mođe postojati potencijalna opasnost od pada. Mnoge povrede, posebno na deci, mogu se izbeći primenom jednostavnih mera opreza kao što su:
* Korišćenje elemenata ili stalaka koje je preporučio proizvođač televizora.
* Korišćenje samo onog nameštaja koji mođe da sigurno podrđe uređaj.
* Obezbeđivanje uređaja tako da ne prelazi ivicu nameštaja.
* Nepostavljanje TV-a na visok nameštaj (na primer, ormare ili police) bez prethodnog pričvršćivanja kako nameštaja tako i uređaja na odgovarajuću površinu.
* Ne pokrivanje televizora krpom i nestavljanje drugih materijala između televizora i nameštaja na kom stoji.
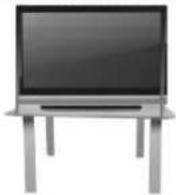
• Sigurna instalacija
* Koristite pojas za fiksiranje televizora kako
* bi sprečili uređaj od pada unapred..


Sigurnosne napomene
- Pročitajte uputstva - Sve napomene o sigurnosti i operativni treba pročitati pre aparat radi.
- Sačuvajte uputstva - Uputstva za sigurnost i uputstvo za upotrebu treba da se sačuvaju za buduće potrebe.
- Imajte u vidu Upozorenja - Svih upozorenja na aparatu i u uputstvu za upotrebu treba se pridrțavati.
- Pratite uputstva - Treba pratiti sva uputstva..

- Voda i vlatnost - Aparat ne treba koristiti u blizini vode.
- Nosač i postolja - Aparat treba koristiti samo sa nosačem ili postoljem koji preporučuje proizvođač.
- Montața na zid ili plafon - Aparat treba da se montira na zid ili plafon samo po preporuci proizvođača
- Ventilacija - Aparat treba da bude dobro postavljen, tako da njegova lokacija ili pozicija ne ometaju njegovo dobro provetravanje.
- Toplota - Ovaj aparat treba postaviti dalje od izvora toplote kao što su radijatori i peći.
- Napajanje - Aparat treba povezati samo na napajanje kao što je opisano u uputstvima za upotrebu ili onako kako je naznačeno na uređaju.
- Uzemljenje ili polarizacija - Treba preduzeti mere predostrotnosti.
- Zaštita kabla za napajanje - Naponski kabl treba da bude usmeren tako da je malo verovatno da se mođe gaziti, priklešiti stvarima na njemu ili njegovom kraju.
- Čišćenje - Aparat bi trebalo čistiti samo po preporuci proizvođača:
- Napajanje spoljne antene treba da se nalazi daleko od dalekovoda.
- Uzemljenje spoljne antene - Ako je spoljna antena povezana na prijemnik, antenski sistem mora biti uzemljen kako bi se obezbedila zaštita od naponskog i izvornog statičkog elektriciteta.
- Kada ga dugo ne koristite - napajanje uređaja trebalo bi da bude isključeno iz utičnice kada se ne koristi duți vremenski period.
- Upad predmeta i tečnosti - Treba paziti da se predmeti ne upadnu, a tečnost ne prospe u kućište kroz otvore.
- Kada je potreban servis - Aparat treba da servisira kvalifikovano servisno osoblje kada su:
- kabl za struju ili utikač oštećeni.
- kada predmeti upadnu ili kada je tečnost prolivena u uređaj.
- kada je aparat izloten kiši.
- kada aparat ne radi normalno ili pokazuje značajnu promenu u radu.
- Ventilacioni otvori ne bi trebalo da budu pokriveni predmetima, kao što su novine, tkanine, zavese, itd.
- Izvore otvorenog plamena, kao što su upaljene sveće, ne bi trebalo da stoje na aparatu.
- Aparat će biti povezan sa mretnom utičnicom sa zaštitnim uzemljenjem. Utičnica ili nastavak za prekid napajanja trebaju da budu lako dostupni.
SAFETY INSTRUCTION
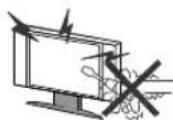
Upozorenje
Visok napon se koristi u funkcionisanju ovog proizvoda. Ne uklanjajte zadnji poklopac. Obratite se se kvalifikovanoj osobi za obavljanje servisa.

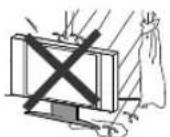
Upozorenje
ja biste sprečili poțar ili strujni udar, nemojte izlagati uređaj kiši ili vlazi.


Upozorenje
Nemojte ispuštati i gurati predmete u kućiste TV-a ili u otvore. Nikada nemojte prosipati tečnost na TV prijemnik

Minimum distances
text_image
10cm 20cm 10cm 5cmOPREZ
Ako televizor trba da se ugradi u zatvoreni odeljak ili na slčan način, morate se pridržavati dela uputstva o minimalnim udaljenostima. Toplota može smanjit životni vek televizora, a takodje može biti opasno.

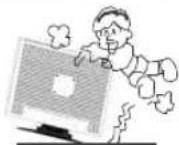
Oprez
Nikad nemojte da stanete ili se oslonite ili gurnete uređaj ili stalak. Treba obratiti posebnu pažnju na decu.

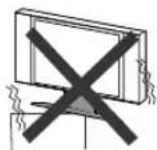
Oprez
Ne stavljajte glavnu jedinicu na nestabilno postolje, policu ili sto.

Usled pada mođe doći do ozbiljne povrede lica ili štete na na televizoru.

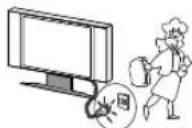
Oprez
Kada se proizvod ne koristi za duți vremenski period, preporučljivoje da isključite mretni kabl iz utičnice.

Oprez
Izbegavajte izlaganje glavne jedinice direktnom suncu i drugim izvorima toplote. Ne postavljajte televizor na druge proizvode koji emituju toplotu. Na primer: Video uređaji, audio pojačala. Ne blokirajte otvore za ventilaciju u zadnjem poklopcu. Ventilacija je od suštinskog značaja za sprečavanje električnih kvarova. Ne savijajte kabl za napajanje ispod glavne jedinice.

Oprez
Panel (ekran) koji se koristi u ovom proizvodu je napravljen od stakla. Mođe se slomiti padom uređaja ili nasilnim udarom. Pojedinci treba oprezno da rade arazbijenim staklom ekrana
OPIS KONTROLA I KONEKTORA
PANEL SA STRANE
natural_image
Line drawing of a flat-screen computer monitor with no text or symbols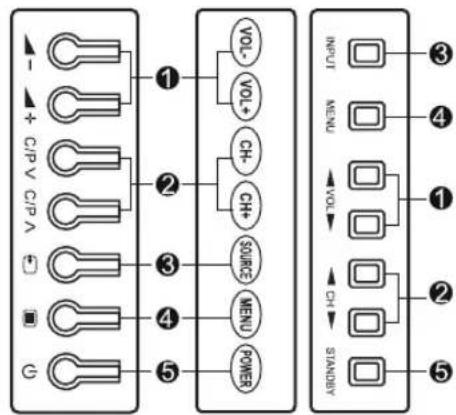
flowchart
graph TD
    subgraph Left_Circuit_1
        A["Capacitor"] --> B["Resistor"]
        C["Capacitor + Capacitor"] --> D["Resistor"]
        E["Capacitor"] --> F["Resistor"]
        G["Capacitor"] --> H["Resistor"]
        I["Capacitor"] --> J["Resistor"]
        K["Capacitor"] --> L["Resistor"]
    end
    subgraph Right_Circuit_2
        M["Switch"] --> N["Resistor"]
        O["Resistor"] --> P["Resistor"]
        Q["Resistor"] --> R["Resistor"]
        S["Resistor"] --> T["Resistor"]
        U["Resistor"] --> V["Resistor"]
    end
    style Left_Circuit_1 fill:#f9f,stroke:#333
    style Right_Circuit_2 fill:#bbf,stroke:#333

text_image
VOL- VOL+ CH- CH+ MENU POWER SOURCE ① ② ③ ④ ⑤ ⑥ ⑦ ⑦ ⑥| naziv | opis | |
| 1 | VOL- VOL+ | Pojačavanje I smanjivanje zvuka.. |
| 2 | CH- CH+ | Pritiskom na ove tastere vršte promenu kanala na više i na niže. |
| 3 | SOURCE | Pritisnite da izaberete izvor signala |
| 4 | MENU | Ulaz ili izlaz iz MENI-ja |
| 5 | POWER | Upaliti / Ugasiti TV kada je u Stand By modu. |
| 6 | Indikatr napona | Svetli crveno kada je u stand by modu. |
| 7 | Senzor daljinskog upravljača | Infracrveni senzor za daljinski upravljač. |
Note:
Ako nema signala sa PC 5 sekundi ili nema signala sa drugih video izvora(palvi ekran će biti upaljen) preko 15 minuta, vaš TV uređaj će se ugasiti automatski. I Indikator napona će svetleti crveno.
KONEKCIJE POZADI
Tv ima veliki izbor multimedijalnih funkcija, i može biti povezan sa puno vrsta različitih uređaja. Sledeći paragraf kako se povezije sa drugim Audio i Video urđajima.

text_image
VGA 8 VGA AUDIO IN 7 SCART 10 RF 9 HDMI1 3
text_image
HDMI2 COAXIAL PCMCIA AV IN YPbPr USB2 USB1 RJ45 Recovery Key USB1/USB2 3 1 5 6 11 2 4 12 13- COAXIAL (Coaxial izlazni port)
- USBI / USB2 (USB signal ulazni port)
- HDMII / HDMI2 / HDMI3 (HDMI ulazni port)
- EARPHONE OUT (Izlazni port za slušalice)
- AyiN (AV ulaz)
- COMPONENT IN (YPbPr signal ulazni port)
- VGAAUDIO IN (VGAaudio ulazni port)
- VGA (RGB ulazni port)
- TERMINAL ANTENNA (75 OHM)TV ulazni port.
- SCART (SCART ulazni port)
- PCMCIA(PCMCIA ulazni port)
- RJ45 IN(RJ45 input port)
- USB1 / USB2 IN(USB input port for SMARTTV)
Pažnja, kada je uključen TV:
Da bi postigli dizajn TV-a mi smo prekidač A/C postavili blizu USB i HDMI na zadnjoj tabli. Prvi put kada raspakujete TV, potrebno je da upalite TV na prekidač i indikator će zasvetleti. AZatim pritisnite POWER na daljinskom da bu upalali TV..
DALJINSKI UPRAVLJAĆ
Daljinski upravljač se ne može koristiti ukoliko nije u spektru prijemnika TVa. Pre nego što koristite daljinski upravljač, uverite se da nema fizičkih prepreka između TV i daljinskog upravljača.
text_image
POWER P.MODE S.MODE SLEEP AUDIO 1 2 3 4 5 6 7 8 9 STILL 0 MENU SOURCE OK ENTER EXIT HOME INFO + + CH MOUSE + VOL - TEXT HOLD MIX REVEAL INDEX SIZE FAV SCALE EPG DTV/RADIO REC SUBTITLE GUIDE DELETE S.VOL- S.VOL+ S.VOL+| Button | OPIS |
| Power [IMAGE] | Pali se i gasi TV kada je u Stand by modu.. |
| Mute [IMAGE] | Pritisnite ovaj taster da bi ste isključili zvuk. Pritisnite opet ovaj taster da bi ste uključili zvuk.. |
| P.MODE | Izbor efekata slike |
| S.MODE | Izbor moda zvuka.. |
| SCALE | Oritisnite ovaj taster i izaberite ASPECT slike |
| AUDIO | Pritisnete ovaj taster da izaberete druge TV Audio sisteme i jezike. |
| FAV. | Prikas omiljenih programa. |
| SLEEP | Pritisnite ovaj taster da izabereta vreme za koliko će se TV sam ugasiti |
| SUBTITLE | U DTV modu otvara i zatvara Titlove |
| Number | Pritisnite da izaberete TV program koji želite, ili da unesete šifru. |
| STILL | Zalediti sliku(ekran). |
| SWAP [IMAGE] | Pritisnite ovaj taste da promenite između trenutnog i prethdnog kanal koji ste gledali |
| MENU | Pritisnite ovaj taster da prikažete glavni MENI za podešavanje slike, zvuka i funkcija.Pritisnite ponovo ovaj taster da isključite glavni MENI |
| SOURCE | Izbor dostupnih izvora |
| ▲▼ ◀▶ | ZA izbor ili podešavanje željenih stavri u MENI-u TV-a |
| OK (ENTER) | Pritisnite da potvrdite ili uđete u pod meni. |
| EXIT | Pritisnite da izadete. |
| INFO | Prikaz izvora i inforamcija kanala |
| VOL+/VOL- | Za pojačivanje i smanjenje nivoa zvuka. |
| CH+/CH- | Za promenu TV programa. |
| Red Green Yellow Blue[IMAGE] | Koristite za kontrolu Teletecta. |
| EPG | Otvara i zatvara EPG (Elektronski programski vodič) |
| DTV/RADIO | Menja DTV program i radio program |
| REC | Prčica za PVR. |
Napomena: EPG, DTV/FIADIO, REC MENU, REC imaju funkciju samo u DTV mode.
DALJINSKI UPRAVLJAĆ
Daljinski upravljač se ne može koristiti ukoliko nije u u spektru prijemnika TVa. Pre nego što koristite daljinski upravljač, uverite se da nema fizičkih prepreka između TV i daljinskog upravljača.
text_image
POWER P MODE S MODE SLEEP AUDIO 1 2 3 4 5 6 7 8 9 STILL 0 MENU SOURCE OK ENTER EXIT HOME INFO + + CH MOUSE + VOL - TEXT HOLD MIX REVEAL INDEX SIZE FAX SCALE EPG CTVRADIO REC SUBTLE GUIDE DELETE VOL-VOL+| Button | Opis |
| Preskoči scenu ili pesmu. | |
| Idi nazad na prethodnu ili na sledeću | |
| Play/Pause | |
| Stop playback |
Napomen: Sledeći tasteri će raditi samo kada je uključen Teletekst(pritsinte TXT taster),radiće u TV modu.
| TEXT | Uključuje Teletext, pritisnite ovaj taster da prikaže informacije o Teletekstu. |
| HOLD | Pritisinte da zanrznete teletekst stranicu, ali signal će da nastavi prijem.. |
| MIX | Pritisnite ovaj taster da izaberete prikaz Teleteksta izmedju samo teleteks ili pomešan teletekst i slika. |
| INDEX | Pritisnite da dobijete informacije o indexu |
| SIZE | Izbor fveličine texta |
| REVEAL | Pritisnite da oslobodite teletext posle HOLD funkcije |
Different area, the key of the remote control have different function. PIs take the remote control as the actual one.
Zamena baterije
Instalacija baterije
-
Otvorite poklopac.
-
Ubacite dve“ AAA ” 1.5V baterije. Uverite se da polaritet (+ or -) baterija se poklapa sa polaritetom obeleženim na na daljinskom.
3.Zatvorite poklopac.
NAPOMENA:
- Životni vek baterija je do godinu dana, u zavisnosti koliko se koristi daljinski. ZA najbolje performanse baterije se trebaju menjati na godišnjem nivou, ili kada daljinski počne da slabije šalje signal.
- Uverite se da se baterije postave u ravom smeru.
- Ne mešajte stare i nove baterije.
- Stare baterije mogu da iscure i oštete daljinski upravljač. Uvek zamenite baterije što pre je moguće kada oslabe.
AUTOMATIC PRESET CHANNEL
SIDE PANEL
text_image
- + C/P V C/P A VOLT VOLT CH- CH+ SOURCE MENU POWER INPUT MENU VOLT CH- START/OUTPUTVOL- VOL+ CH- CH+ MENU POWER
SOURCE
PANEL DALJINSKOG UPRAVLJAČA
text_image
MENU OK- Povežite vašu kablovsku ili Antenu na Antenski priključak.
- Pritisnite MENU taster na TV ili na daljinskom dok ne vidite 'CHANNEL' meni.
- Pritisnite ▲ / ▼ tastere na daljinskom da izaberete AUTO Memorisanje.
- Pritisnite OK ili ▶ taster na daljinskom da vam prikaže podMENI
- Pritisnite ▲ / ▼ tastere na daljinskom da izaberete opcije, zatim pritisnite OK taster da počne pretraga i TV će pronaći sve dostupne kanale. U toku automatske pretrage pritiskom na MENU taster izaći će vam poruka na displeju „Sa li želite da prekinete pretragu “tuning Da NE ►', i pritisnite OK taster da napustite auto memorisanje.
Sada ste spremni da gledate TV
natural_image
Line drawing of a family watching television on a couch (no text or symbols)Paljenje i gašenje
- Povezite TV sa izvor struje pomoću kabla.
- Kada je indikator crven, TV je u stand by modu. Sada pritisnite POWER taster na daljinskom ili na TV da uključite TV..
- Da isključite TV u stand by mode samo pritisnite POWER taster na daljinskom ili na TV da isključite TV..
KANALI
Kanal menu
Pritisnite "MENU" i "◀/▶" tastere da izaberete KANAL menu. Prutisnite
"T/A" taster da izeberete stavke taster da se izabere the items.
Pritisnite OK taster da udjete u pod meni.
text_image
CHANNEL Auto Tuning ATV Manual Tuning DTV Manual Tuning Programme Edit Schedule List Signal Information CI InformationAuto Tuning: Pritisnite [▶] ili [OK] da započne auto pretrafa za oba ATV i DTV kanala.
ATV Manual Tuning: Pritisnite [▶] ili [OK] da započne "ATV Manual Tuning" podmeni.
TRENUTNI CH: pritisnite [◀/▶] da izaberete broj kanala koji želite da memorišete.
Color System: Pritisnite [◀/▶] da promenite color sistem na Auto, SECAM, PAL.
Sound System: Pritisnite [◀/▶] da promenite zvučni system na DK, I, BG,L.
Fine-Tune: pritisnite [◀/▶] da skenirate trenutni program na trenutnoj frkvenciji i da snimite rezltat ručno.
AFC: Podesite Automatsku Kontrolu Frekvencije na "On" ili "Off".
Pretraga: pritisnite [◀/▶] da započnete pretragu.
text_image
ATV Manual Tuning Current CH 3 Color System Auto Sound System DK Fine-Tune Search Frequency Unregistered Move MEND Back Exit ExitDTV manualno podešavanje: Pritisnite [▶] ili [OK] da udjete "DTV Manualna pretraga" podmeni.
Pritisnite [◀/▶] da izaberete kanal, zatim pritisnite OK da pretražite programe.
Napomena: Samo kanali sa dovoljno jakim signalom biće pronađeni, Preverite svoju antenu ako nedostaju kanali posle auto pretrage.
text_image
DTV Manual Tuning VHF CH 5 NO SIGNAL Bad Freq: 177.50MHz GoodKANAL
Ova opcija ima 5 funkcija
- Pritisnite Crveni taster da obrišete trenutni kanal.
- Pritisnite Žuti taster i ▲ /▼ da pomerite trenutni kanal.
- Pritisnite Plavi tasterda preskočite trenutni kanal.
- Pritisnite [FAV] da označite trenutni kanal kao omiljeni, biće crveno srce u pozadini izabranog kanala. Ako je trenutni kanal izabran ceć kao omiljeni, pritisnite još jednom i biće podešen kao normalan.
Lista rasporeda
Prikaz liste rasporeda i liste snimaka.
Signal Informacije:
Prikaz informaciej o signalu u DTV modu.
CI Informacije:
Molim kontaktirajte vašeg provajdera da vam obezbedi karticu i modul.
text_image
Programme Edit Delete Move Skip ENTER Select 1/1 Fav EXIT BackSLIKA
SLIKA
Pritisnite [MENU] za prikaz glavnog menija.
Pritisnite [◀/▶] da izaberete "SLIKA" u glavnom meniju, zatim [OK] da potvrdite.
text_image
Picture Mode Contrast Brightness Colour Text Sharpness Colour Temp Noise Reduction HOMI Mode Standard 50 50 50 50 Normal Middle AutoMod slike: Pritisnite [◀/▶] ili [OK] da udete u "Picture Mode" podmeni. Pritisnite ▲ /▼da promenite mod slike:
Dynamic— Standard— Mild — Personal.
Pritisnite [P.MODE] ponajvljajući da promeni mod Slike direktno.
Contrast: Pritisnite [◀▶] ili [OK] da uđete u podmemni. Pritisnite [◀/▶] to set the picture's contrast intensity.
Brightness: Pritisnite [◀/▶] or [OK] da uđete u podmeni. Pritisnite [◀/▶] da podesite svetlinu slike.
Colour: Pritisnite [◀/▶] ili [OK] da uđete u podmeni. Pritisnite [◀/▶] da podesite jačinu slike.
Tint: Pritisnite [◀/▶] ili [OK] da uđete u podmeni. Pritisnite [◀/▶] da podesite tintu.
Sharpness: Pritisnite [◀/▶] ili [OK] da uđete u podmeni. Pritisnite [◀/▶] da podesite oštrinu slike.
Colour Temp: Pritisnite [◀/▶] ili [OK] da uđete "Colour Temp" podmeni. Pritisnite [▲ /▼]da promenite toplinu boje Cold — Normal— Warm.
Redukcija šuma: Pritisnite [◀/▶] ili [OK] da uđete u"Noise Reduction" podmeni. Pritisnite ▲ /▼ da promenite redukciju šuma: Off— Low — Middle — High —Default.
SCREEN
Pritisnite "SOURCE" taster na daljinskom upravljaču da uđete u OSD meni, zatim Pritisnite "▲/▼" taster da izaberete "EKRAN". Pritisnite "OK" taster da uđete "EKRAN" mod.
EKRAN (dostupno samo kada je povezan preko SCREEN Only available when connected via EKRAN sa PC) Automatsko podešavanje veličine slike.
Pritisnite " ▲ /▼ " taster da izaberete podešavanje slike horizontalno
Pritisnite "OK" taster da uđete u podešavanje slike vertikalno.
Pritisnite " ▲ /▼ " da izaberete stavke.
Pritisnite "◀ /▶" taster da podesite.
text_image
Auto Adjust H-Offset 50 V-Offset 50 Size 50 Phase 47 Position ResetSOUND
Mei ZVUKA
Pritisnite [MENU] da prikaže glavni meni.
Pritisnite [◀/▶] da izaberete "zvuk" u glavnom meniju, zatim Pritisnite [OK].
text_image
Sound Mode Trade Bass Balance Auto Volume Level SPDRF Mods AD Switch Standard 50 55 0 OFF PCM OFFSound Mode: Pritisnite [◀/▶] ili [OK] da udete "mod zvuka" podmeni. Pritisnite [▲ /▼] da promenite mod zvuka: Standard—Music—Movie—Sports—Personal.
Možete da pritisnite [S.MODE] ponajvlajući na daljinskom upravljaču da promenite mod zvuka direktno.
Balanse: Pritisnite [◀/▶] ili [OK] da uđete u podmeni. Pritisnite [◀/▶] da postavite odgovarajuću vrednist levog i desnog zvučnika.
Auto jačina: Pritisnite [◀/▶] ili [OK] da podesite automasku jačinu na "On" ili "Off".
SPDIF Mode: Pritisnite [◀/▶] ili [OK] da podesite SPDIF mod na "Auto", "Off" ili "PCM".
AD promena (Za DTV samo): Pritisnite [▶] ili [OK] da uđete u podmeni. Pritisnite [◀/▶] audio opis na "On" or "Off" kao i podešavanje nivoa jačine za AD.
TIME
VREME meni
Pritisnite [MENU] da se prikaže glavni meni.
Pritisnite [◀/▶-] da se izabere "VREME" U glavnom meniju, zatim pritisnite [OK].
text_image
Clock Time Zone Sleep Timer Auto Standby OSD Timer Rabat GMT Off 4H 15 SSat: koristite ◀ /▶ tastere da se izabere pozicija, i koristite ▲ /▼ da podesite vreme.
Vremenska Zona: Pritisnite [OK] da uđete u podmeni. Pritisnite [▲▼◀▶] da se izabere, Pritisnite [OK]
Sleep Timer: Pritisnite [▶] ili [OK] da uđete u "Sleep Timer" podmeni. Pritisnite [▲/▼] da promenite sleep tajmer sa/na Off, 10Min, 20 Min, 30 Min, 60 Min, 90 Min, 120 Min, 180 Min, 240 Min.
Možete pritisnite [SLEEP] više puta na daljinskom upravljaču da promenite direktno.
Auto Standby: Pritisnite [OK] da uđete u podmeni. Pritisnite [▲/▼] da se izabere Off, 3 H, 4 H, 5 H, Pritisnite [OK]
OSD tajmer: Pritisnite [▶] ili [OK] da uđete u podmeni. Pritisnite [▲/▼] da proeminte OSD tajmer za 5 sekundi, 10 Sekundi, 15 Sekundi, 20 Sekundi, 25 Sekundi, 30 Sekundi.
text_image
Clock Month Jan -- -- -- MENU Back Sleep Timer Off 15min 30min 45min 60min 90min ENTER Select MENU Back Auto Standby Off 3 H 4 H 5 H ENTER Select MENU Back OSD Timer 5 S 15 S 30 S ENTER Select MENU BackZAKLJUĆAVANJE
ZAKLJUČAVANJE
Pritisnite [MENU] da se prikaže glavni meni.
Pritisnite [▲/▼] da se izabere "LOCK" U glavnom meniju, zatim pritisnite [OK].
text_image
Lock System Set Password Channel Lock Parental Guidance Keyboard Lock Off Off OffŠifra: Unesite početnu šifru "0000" da uđete u MENI funkciju ako hoćeš da promeniš "Lock System" u "On".
Sistem zaključavanja: podesi sistem na "On" ili "Off" koji vam omogućava ili onemogućava dole funkcije.
text_image
Please enter password Clear CancelPodesite šifru: Pritisnite [▶] ili [OK] da uđete u podmeni da podesite novu šifru.
text_image
Please enter old password Please enter new password Confirm new password Clear Cancel ▶Možete da promenite šifru tako što unesete staru, zatim novu šifru i ponovite novu šivfru.
Blokirati program: Pritisnite [OK] da prikaže Blokiraj program meni.
Parental Guidance: Pritisnite [OK] za podmeni, Pritisnite [▲/▼] da se izabere Off, 4,5, 6,7,8,9,10,11,12,13,14, 15,16,17,18. Pritisnite [OK].
Zaključavanje tastature: Pritisnite [OK] da se izabere Off ili On.
PODEŠAVANJE
SETUP menu
Pritisnite [MENU] da se prikaže glavni meni.
Pritisnite [◀/▶] da se izabere "SETUP" U glavnom meniju, zatim pritisnite [OK].
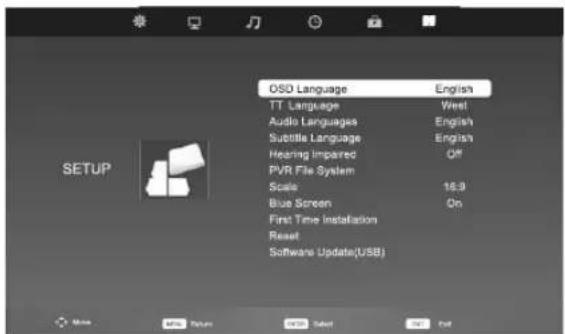
text_image
OSD Language English TT Language West Audio Languages English Subtitle Language English Hearing Impaired Off PVR File System Scale 16.9 Blue Screen On First Time installation Reset Software Update(USB)OSD Jezik
Pritisnite OK da izaberete ◀ / ▶, ▼/▲ zatim taster da se izabere OSD jezik. Pritisnite "MENU" za povratak na prethodni meni.
TTX Jezik: Pritisnite [OK] da uđete u podmeni, Pritisnite [▼/▲] da se izabere items. Pritisnite [OK] to oonfirm.
Audio Jezik / Jezik titla: Pritisnite [OK] da uđete u podmeni, Pritisnite [◀▶▼▲]da se izabere stavka Pritisnite [OK].
Za oštećeni sluh (za DTV samo):
Pritisnite [◀/▶] ili [OK] da se podesi za oštećeni sluh "On"ili "Off".
PVR sistm datoteka(za DTV samo):
Pritisnite [▶] ili [OK] da uđete u podmeni, proverite da li je USB povezan.
skala: Pritisnite [OK] da uđete u podmeni, Pritisnite [▼/▲] da se izabere 4:3,16:9, Zooml, Zoom2, Pritisnite [OK]
Plavi ekran
Pritisnite OK taster da se izabere On or Off.
Prva instalacija: Pritisnite [▶] ili [OK] da pokrenete odgovarajuće opcije kao i OSD Jezik i zemlju.
Reset
Ovo će da resetuje sva podešavanja na fabričko. Pritisnite OK taster za početak – bićete pitani da potvrdite za početak (vidite sliku desno).
Pritisnite "◀ / ▶" taster da se izabere Yes or No.
Pritisnite "MENU" ili "EXIT" taster za izlazak
Software Update(USB): Pritisnite [▼/▲] da se izabere Software Update. Pritisnite [OK]

USB
Pritisnite "SOURCE" tasterdao izade SOURCE meni.
Pritisnite "[▲/▼]" taster da se izabere "Media" i Pritisnite "OK" da uđete u sledeći meni:
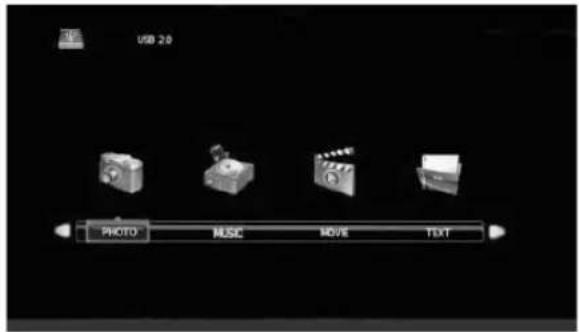
text_image
USB 2.0 PHOTO MUSE MOVE TEXTPritisnite “◀ / ▶” taster da se izabere između “PHOTO”, “MUSIC”, “MOVIE” i “TEXT” ikone. Pritisnite “OK” tster da potvrditei aktivirate sledeći meni:
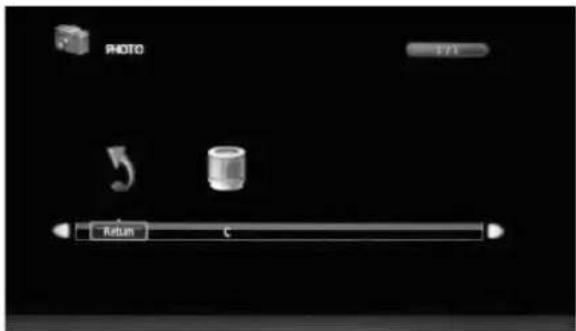
text_image
PHOTO 1/1 5 ReturnPHOTO
- Pritisnite "◀ / ▶" Taster da se izabere "PHOTO".
- Pritisnite "OK"taster da uđete u disk meni.
- Pritisnite "◀ / ▶" taster da se izabere disk uđete u podmeni.
- Pritisnite taster da obeležite fajlove. Pritisnite OK da se izabere fajlove (označeno kvačicom) za selektivnu reprodukciju (vidite6 ispod). Pritisnite crveni taster, ući ćete u podmeni da izbrišetevfajl.
- Pritisnite OK taster da da pregledate fajl kao na slici ispod:
- Pritisnite "PLAY" taster da pustite slajd show(od izabranih fajlova);
Ako ni jedan fajl nije izabran reprodukavće se svi fajlovi), Pritisnite "OK" da se aktivira meni..
text_image
PHOTO 1 / 2 Return Up Folder 0003mp 11cm#10@1p213.jpg 11cc#01a27eg213.jpg 11cc#01a43g215.jpg 11cc#01a63g215.jpg 11cc#020w4215.jpg 11cc#021d7g213.jpg 11cc#020w4214.jpg 11cc#02797eg213.jpg 11cc#03w40g214.jpg Delete OK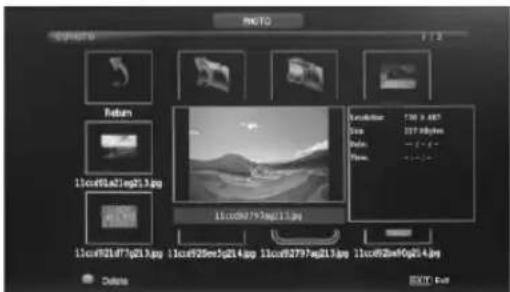
text_image
REC10 Return 11ccf01A21eg213.jpg 11ccf01A7fg213.jpg 11ccf025emfg214.jpg 11ccf0279eg213.jpg 11ccf028ef0g214.jpg 确定 取消 名称: TCN 2.487 Size: 157 kBytes Position: -1.6 Flow: -1.6 11ccf01A7fg213.jpg 11ccf025emfg214.jpg 11ccf0279eg213.jpg 11ccf028ef0g214.jpg ESC-ExtUSB
Pauza
Pritisnite "PAUSE" taster da pauzirate slideshovv.
Plav
Pritisnite "PLAY" taster reprudukujete izabrane fajlove.
Stop
Pritisnite "STOP" taster za zaustavljanje i repordukciju.
Next/Prev.
Pritisnite "NEXT" ili "PREV." taster da preskočite pregled izabranog fajla.
Exit
Pritisnite "EXIT" taster za exit.
natural_image
Black-and-white photo of a flat-screen monitor displaying a bird perched on its surface, with no visible text or symbols.MUZIKA
-
Pritisnite ◀ / ▶" taster da se izabere "MUZIKA".
-
Udite u interfejs MIZIKA, Pritisnite ►" taster to za pregled muzike kao što je prikazano ispod:
text_image
MUSIC C:\MP3 5 / 7 Return Up Folder 001MP3 23mp3 3D soundmp3 876mp3 e - sound/ flag - kras. happy/mp3 MP3.mp3 Album: Title: Dot size: 0.08 Artext: Sampling: 2.0 View: 2942 Size: 3736 bytes noting in the workmp. Delete EXIT Start- Press"PLAY" button into music player and playing the selected music, as shown below:
text_image
178.mp3 000L05 / 00257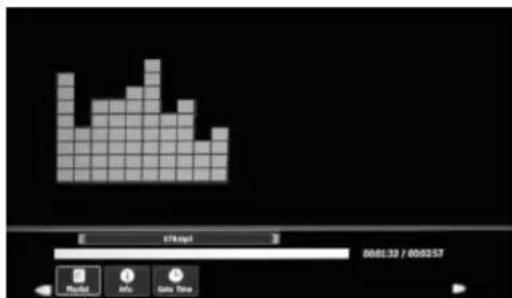
bar
| Category | Value | |---|---| | Bar 1 | 578 mg/d | | Bar 2 | 300 mg/d | | Bar 3 | 400 mg/d | | Bar 4 | 500 mg/d | | Bar 5 | 600 mg/d | | Bar 6 | 400 mg/d | | Bar 7 | 300 mg/d | | Bar 8 | 200 mg/d | | Bar 9 | 100 mg/d | | Bar 10 | 50 mg/d | | Bar 11 | 30 mg/d | | Bar 12 | 20 mg/d | | Bar 13 | 10 mg/d | | Bar 14 | 5 mg/d | | Bar 15 | 3 mg/d | | Bar 16 | 2 mg/d | | Bar 17 | 1 mg/d | | Bar 18 | 0.5 mg/d | | Bar 19 | 0.3 mg/d | | Bar 20 | 0.2 mg/d | | Bar 21 | 0.1 mg/d | | Bar 22 | 0.05 mg/d | | Bar 23 | 0.03 mg/d | | Bar 24 | 0.02 mg/d | | Bar 25 | 0.01 mg/d | | Bar 26 | 0.005 mg/d | | Bar 27 | 0.003 mg/d | | Bar 28 | 0.002 mg/d | | Bar 29 | 0.001 mg/d | | Bar 30 | 0.0005 mg/d | | Bar 31 | 0.0003 mg/d | | Bar 32 | 0.0002 mg/d | | Bar 33 | 0.0001 mg/d | | Bar 34 | 0.00005 mg/d | | Bar 35 | 0.00003 mg/d | | Bar 36 | 0.00002 mg/d | | Bar 37 | 0.00001 mg/d | | Bar 38 | 0.000005 mg/d | | Bar 39 | 0.000003 mg/d | | Bar 40 | 0.000002 mg/d | | Bar 41 | 0.000001 mg/d | | Bar 42 | 0.0000005 mg/d | | Bar 43 | 0.0000003 mg/d | | Bar 44 | 0.0000002 mg/d | | Bar 45 | 0.0000001 mg/d | | Bar 46 | 0.00000005 mg/d | | Bar 47 | 0.00000003 mg/d | | Bar 48 | 0.00000002 mg/d | | Bar 49 | 0.00000001 mg/d | | Bar 50 | 0.00000001 mg/d | | Bar 51 | 0.00000001 mg/d | | Bar 52 | 0.00000001 mg/d | | Bar 53 | 0.00000001 mg/d | | Bar 54 | 0.00000001 mg/d | | Bar 55 | 0.00000001 mg/d | | Bar 56 | 0.00000001 mg/d | | Bar 57 | 0.00000001 mg/d | | Bar 58 | 0.00000001 mg/d | | Bar 59 | 0.00000001 mg/d | | Bar 6PAUSE Izaberite "PAUSE" da pauzirate muziku.
PLAY Izaberite "PLAY" da pustite muziku.
FB Izaberite "FB" da vratite 2X, 4X, 8X and 16X mod.
FF Izaberite "FF" da ubrzate 2X, 4X, 8X and 16X mod.
PREV. Izaberite "PREV." Da vratite na prethodni fajl.
NEXT Izaberite "NEXT" da pređete ne sledeći fajl.
Izaberite "STOP"da zaustavite i vratite se.
Izaberite 'O" da se ponovi reprodukcija (O ponoviti 1, Oponovite sve, O ništa ne
RepeatALL MUTE ponovite). I
zaberite "MUTE" da ugasite zvuk.
USB
Plavlist Izaberite "Playlist" da se prikaže playlista.
Info- Izaberite "Info" da se prikažu informacije o fajlu.
Goto Time Izaberite "Goto Time" da podesite vreme
MOVIE
- Pritisnite "◀ / ▶" taster da se izabere "MOVIE"
- Udite u movie interfejs. Pritisnite "▲▼◀▶" taster pregled fajlova kao na slici ispod.:
text_image
MOVE Cock4 1:7 Return 320X240mpd SATA-DVD 331 640X430AM AudioTrack ( / / ) Lampitter - / 0 Program - / 0 View 25.000 kbps Eye Bye - _J804-3 , C#NEL3-VEAT-US-720, e68_Buselines_Laddo, RightNet 720P mm Delete Next user- Pritisnite "PLAY" taster reprodukujete film. Pritisnite OK taster za prikaz menija.
Pritisnite "PLAY" taster još jedno za prikaz u punom ekranu.
Pritisnite "PAUSE" taster pauzirate film.
Pritisnite "PREV." ili "NEXT" taster preskočite unapred ili unazad fajl. Pritisnite "FB" ili
"FF" taster da premotate nazad ili napred Pritisnite "STOP" ili "EXIT" taster da izdete.
TEXT
- Pritisnite "◀ / ▶" taster da se izabere "TEXT"(za pregled tekstualnih dokumenata na USB-u).
- Udite u Text interfejs, Pritisnite"▲▼◀▶"taster za pregled fajlova kao što je prikazano na slici:
text_image
TEXT START 1 / 5 Return SLAMRAG March 12 October -- Password security from arranged master key border of the border table -Callout Delete Name: 1 English EXIT text- Pritisnite "PLAY" taster da otvorite fajl, Pritisnite OK taster da prikažete meni. Kao na slici.:
Izaberite "Prev Page" za pregle prethodne stranice.
Izaberite "Next Page" za pregled sledeće stranice.
Izaberite "STOP"za povratak.
Izaberite "Music" da slušate muziku dok čitate.
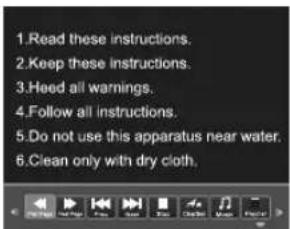
text_image
1.Read these instructions. 2.Keep these instructions. 3.Heed all warnings. 4.Follow all instructions. 5.Do not use this apparatus near water. 6.Clean only with dry cloth.MENU OPERATION
MULTIMEDIA
Lista
| Stop Plackback | |
| ↑↓←→ | Smeme strelice |
| INFO Ⓞ | Prikaži detalje |
| Reprodukcija | |
| II | Pauza |
| Brzo premotavanje unazad | |
| Brzo premotavanje unapred | |
| Prethodni | |
| Sledeči | |
| RED | Briši |
| OK | Potvrdi |
| EXIT | Izlaz |
| SUBTITLE | Kada gledate film da uključite ili isključite titl |
Sledći su funkcijski interfejsi za PHOTO, MUSIC, MOVIE i TEXT. Za njihove funkcije detaljnije pogledajte na 19 stranici
PHOTO

text_image
Pause Prev. Next Stop RepeatAll Music Playlist Info. Rotate Rotate Zoom In Zoom Out Move ViewMUSIC

text_image
Pause FB FF Prev. Next Stop RepeatAll MUTE Playlist Info. Goto TimeMOVIE

text_image
Pause FB FF Prev. Next Stop Aa CharSet RepeatAll AS Set A Playlist Info.. Slow Step Goto Time Zoom In Zoom Out Scale Move ViewTEXT

Problčemi
VODIČ ZA REŠAVANJE PROBLEMA
Mnogi prividni kvarovi su prouzrokovani nesporazumima prilikom redovne upotrebe i uglavnom su jednostavni za otkloniti. Ukoliko imate poteškoća sa rukovanjem, prvo pogledajte sledeću listu uobičajenih grešaka i njihovih rešenja.
Ako problem ne rešite, isključite uređaj i pozovite svog servisera.
SYMPTOM METHODS OF CHECKING OR ADJUSTING
Nema slike ili zvuka No picture or sound Proverite da li je naponski kabal ispravno priključen u utičnicu.
Slika je normalna ali bez zvuka
Proverite da nije slučajno zvuk podešen na nečujno (MUTE) Ukoliko jeste pojačajte zvuk.
Daljinski upravljač ne radi
Proverite da li je TV uključen.
Proverite da li su baterije ispravno postavljene.
Uverite se da infracrveni odašiljač na daljinskom ili TV nije izloten jakoj svetlosti ili
da nije blokiran na bilo koji način.
Ne primate nikakav any TV signal
Proverite da li je SOURCE prekišač postavljen na TV. Proverite i podešavanje za lokaciju
i povezanost. Pokušajte da ponovno skenirate kanale i proverite metod pretrage.
Bez signala programa sa spoljašnjeg izvora Proverite da li je taster SOURCE podešen na ispravnu poziciju za prijem signala.
Problem sa kontrastom i osvetljenjem. Napravite potrebene i teljene izmene.
Slab contrast i blede boje na svim kanalima Proverite podešavanje za lokaciju prijema signala.
Linije ili tačke po celom ekranu Drugi električni uređaji mogu da izazovu smetnje. Sklonite ih od televizora.
Sneg na ekranu Proverite lokacijska podešavanja, kratak spoj, prekinuta konekcija ili bilo koja vidljiva oštećenja.
Dupla slika ili zamagljenost
Proverite podešavanja za lokaciju i uopšte pološtaj antene ili uređaja. Jak vetar može da izazove takve problem. Visoke zgrade ili planine takođe. Malo podešavanje antene može u mnogo čemu da popravi sliku..
Napomena: spoljna ili krovna antena treba da bude postavljena od strane ovlašćenog osoblja.
SPECIFIKACIJA
| Aspect Ratio | 16 : 9 |
| System | PAL/SECAM BG/DK/I, DVB-T/T2+C, NTSC Playback |
| Imendansa | 75 Ω (Unbalance) |
| PRIJEM TV Band | All Channels Receiveable |
| Napon | 100-240V~ 50/60Hz |
Daljinski upravljač
Karakteristike: Daljinski uprvljač sa svim funkcijama radiju rada: 8 metara
Napajanje: DC 3V (dve baterije, veličine AAA, preporuka da koristite alkalne)
SMART TV
Korisnicko uputstvo za TK7
Uvod:
Ugradjeni TV android smart sistem koristi Google-ov andorid 4.4 operativni sistem koji moze tecno da koristi sve android aplikacije. Sa velikom kolicinom web informacija, super-hot muzickim spotovima, preporznatljivim Andorid igricama, najnovijim i najbrzim drustvenim mrezama, ukljucivanjem TV-a i pritiskom daljinksog upravljaca, mozete uzivati u smart zivotu, sa samo jednim korakom.
Poglavlje 1 Osnovna uputstva
1) Pritiskom na dugme „sourse“ vaseg daljinskog upravljaca, izaberite „smart TV“, unesite Android samrt sistem, kao sto je prikazano dole:
Desktop je slican vasem Android smart telefonu i podeljen u 3 stranice: pritiskom na strelicu levo i desno na vasem daljinskom upravljacu, mozete menjati izmedju glavne 1 i 2 stranice-menija.
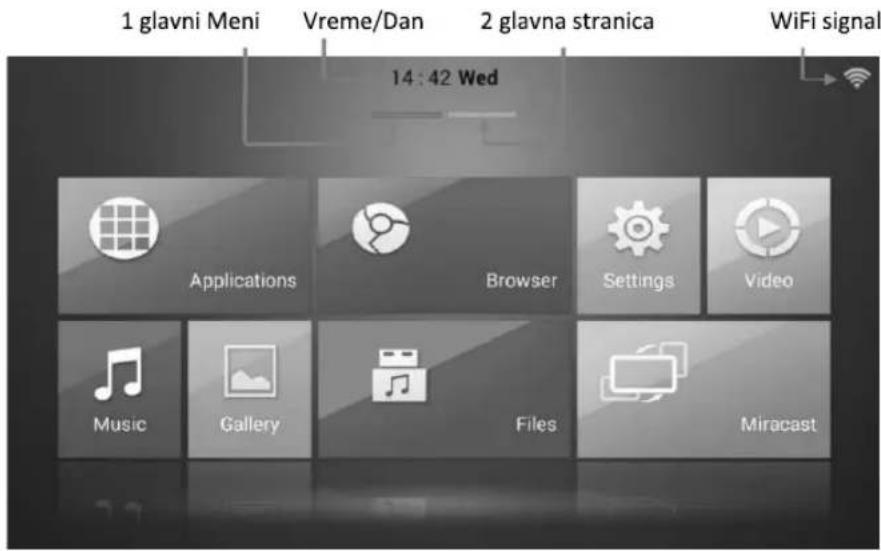
text_image
1 glavni Meni Vreme/Dan 2 glavna stranica WiFi signal 14:42 Wed Applications Browser Settings Video Music Gallery Files MiracastSve ikone na glavnim stranicama
1 galvna stranica: pritiskom na jednu od 4 strelice mozete izabrati ikone na desktopu, izabrana ikona ce se pojaviti uvecana.
Aplikacije: sacuvati sve aplikacije instalirane u sistemu.
Pretrazivac: web pretrazivac, kliknite za unos URL koji zelite kako biste pretrazili web
Podesavanja: moze se podesiti sistem, kao mrezno podesavanje i izbor jezika, itd..
Video/Muzika/Galerija: Otvorite lokalni video / muziku / datoteka slika.
Datoteke: upravljajte datotekom u Smart TV ili USB uredjaj.
Miracast: Android uredjaj i Smart TV displej, isto kao na ekranu. Sa Microcast funkijom mozete istovremeno na ekranu TV prikazivati slike sa Android mobilnih uredjaja, kao sto su tablet PC i mobilni telefon.
2nd glavna stranica: pritiskom na dugme "right" na vasem daljinskom upravljacu, predjite sa 1-ve na 2-gu stranicu. Odabrana ikona je se uvecati. Ovo je radna povrsina za korisnika. Korisnik moze pomerati ikone aplikacija iz "Applications" na ovu radnu povrsinu. "Downloads" je podrazumevana ikona na radnoj povrsini.
Kao sto je prikazano dole.
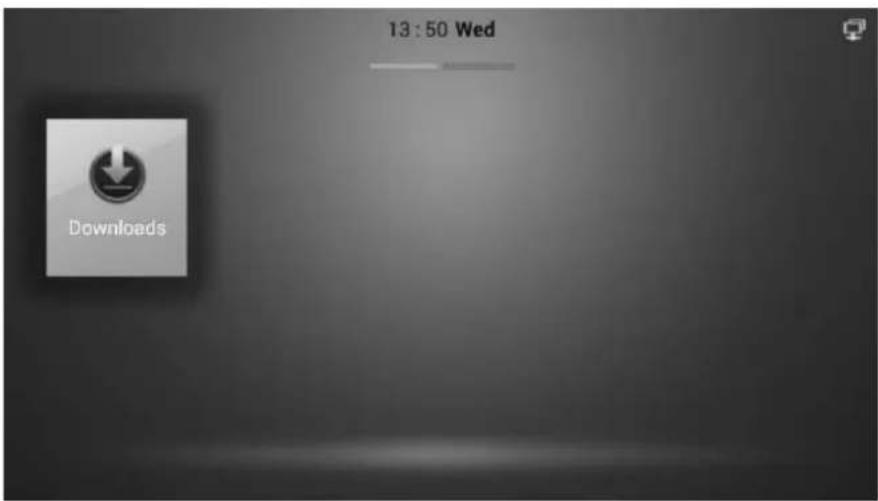
text_image
13:50 Wed DownloadsDownload: arhivirati preuzete datoteke. Otvaranjem datoteke, korisnik moze kliknuti na fajl da instalira APK ili obrise istoriju.
2) Kako povezati WiFi i Ethernet:
odabirom podesavanja na 1-oj stranici, kliknite kako biste otvorili isto, mozete videti WiFi i Ethernet opcije kao sto su prikazane dole:
Wi Fi: odabirom WiFi i pritiskom na dugme "OK", desni prozor je "wifi je ukljucen, kliknite kako biste isti iskljucili". Pritiskom na desno dugme da odaberete i potvrdom na dugme "OK", mozete pokrenuti Wi-Fi. Nakon nekoliko sekundi mogu se videti, dostupni Wi-Fi signali u ovom prozoru, lista signala prema jacini, od najjaceg odozgo do najslabijeg prema dole.
Pritiskom na dugme up/down, odaberite vas Wi-Fi signal. Potvrdom na "OK" dugme pokazace se prozor sa korisnickom lozinkom, kao sto je prikazano na slici dole:
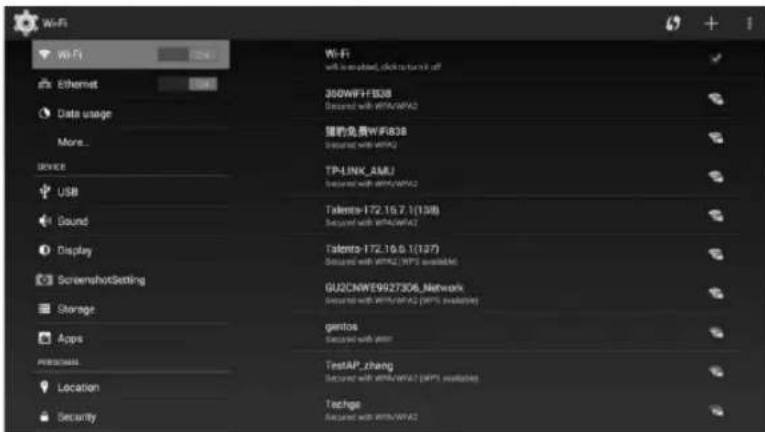
text_image
WiFi Ethernet Data usage More... Device USB Sound Display ScreenshotSetting Storage Apps PERSONAL Location Security WiFi with wireless, wireless network off 350WFF83B Connected with WiFi/WFAC 我的免费WiFi83B Connected with WiFiA2 TP-LINK_AMU Connected with WiFi/WFAC Talents-172.15.7.1(139) Connected with WiFi/A2 Talents-172.19.0.1(137) Connected with WiFi2 (WiFi available) GU2CKWE9927306_Network Connected with WiFi/WFAC (WiFi available) gentos Connected with WiFi TestAP_zhang Connected with WiFi/WFAC (WiFi available) Techge Connected with WiFi/WFAC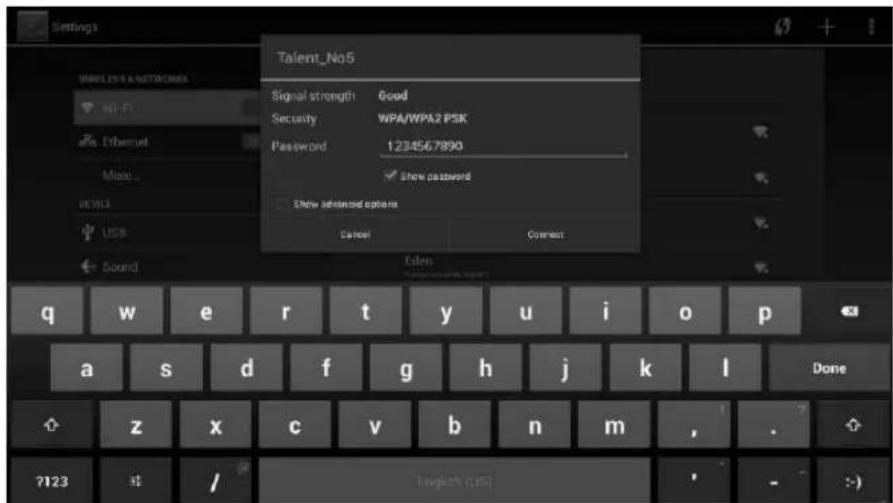
text_image
Settings Talent_No5 Signal strength Good Security WPA/WPA2 PSK Password 1234567890 Show password Show preferred options Cancel Connect Sound q w e r t y u i o p a s d f g h j k l Done z x c v b n m , . ?123 / English (US)Molimo unesite Wi-Fi lozinku ovde. Mozete izabrati dore/dole/desno/levo dugme da odaberete karaktere u prozoru sa tastaturom, potvrdom na dugme "OK" odabrano slovo ili broj ce biti uneti. Nakon unosa tacne lozinke, pritisnite dugme "Exit". Klikom na "Show password", proverite da li je lozinka tacna ili ne. Ukoliko je Izinka tacna, odaberite "connect" i potvrdite na "OK" dugme kako biste povezali Wi-Fi signal. Ukoliko je uspesno povezano, ovaj Wi-Fi signal ce pokazati "connected" i pokazati jacinu signala na desnoj strani.
Ethernet: Odabirom Ethernet i pritiskom na "OK" dugme na desnoj strani prozora ce se prikazati Ethernet opcije. Prvo, povezati mrezni prikljucak na ulaz RJ45 na smart TV-u. Drugo, odabrati "Ethernet is disabled", kliknuti kako biste ukljucili isti. Sacekajte koji minut, nakon cega ce smart TV biti povezan sa Ethernet. Obavestenje: generalno imate rutere, mrezni prikljucak je povezan sa ruterom i smart TV-om. Ukoliko koristite modem umesto rutera, molimo kliknite na opciju "more" ispod "Ethernet".

text_image
Wi-Fi Wi-Fi 360WiFi-FB38 Secured with WiFi/WF82 接收免费WiFi838 Secured with WiFi2 TPLINK_AMU Secured with WiFi/WF82 Talents-172.16.7.1(138) Secured with WiFi/WF82 Talents-172.16.6.1(137) Secured with WiFi2 (WPS available) GU2CNWE9927306_Network Secured with WiFi/WF82 (WPS available) gentos Secured with WiFi1 TestAP_zhang Secured with WiFi/WF82 (WPS available) Techpe Secured with WiFi/WF82Povezite se na internet, uzivajte i zabavite se! Za vise podesavanja, molimo nastavite da citate dole.
poglavlje II Napredna uputstva
1) Pretrazivac
Otvorite "Browser", mozete naci Bookmark prozor, sa korisnom kolekcijom website-a. Odaberite jedan i pritisnite "OK" dugme kako biste otvorili odabranu stranicu.

text_image
Bookmarks: Google Picasa Yahoo! MSN Twitter Facebook Wikipedia eBay CNN NY Times ESPN Amazon Weather Channel BBCOvo je opste poznato podesavanje. Na prvoj stranici menija, odabrali ste "applications" kako bi se otvorio prozor dole:
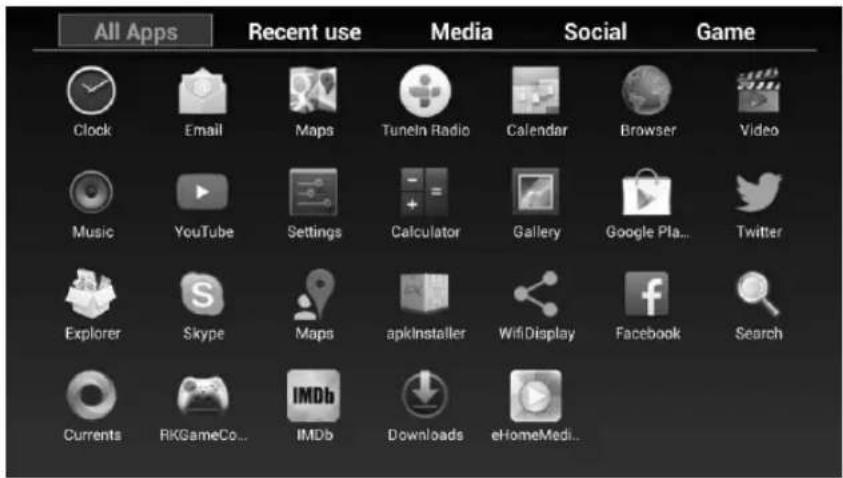
text_image
All Apps Recent use Media Social Game Clock Email Maps Tuneln Radio Calendar Browser Video Music YouTube Settings Calculator Gallery Google Play... Twitter Explorer Skype Maps apkInstaller WifiDisplay Facebook Search Currents RKGameCo... IMDb Downloads eHomeMedi...A: All Apps: Sve aplikacije. Mozete naci sve aplikacije instalirane u ovom smart sistemu. Na desnoj strani, kategorije svih aplikacija su poredjane jedna do druge. One su: Recent use/ Media / Social / Game.
Opste delovanje: pritiskom na up/down/right/ left dugme, potvrdom na "OK" dugme otvarate Aplikacije.
Pritiskom na dugme meni, prikazace se mali prozor ispod. Mozete odabrati 6 opcija kao, deinstalirati / informacije / pomeranje aplikacija....
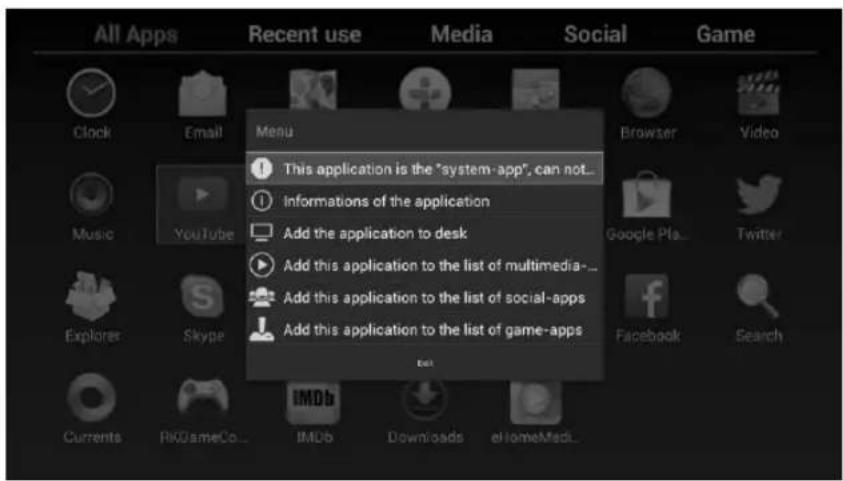
text_image
All Apps Recent use Media Social Game Clock Email Menu This application is the "system-app", can not... Informations of the application Add the application to desk Add this application to the list of multimedia-... Add this application to the list of social-apps Add this application to the list of game-apps EditB: osim "All Apps", u drugim kategorijama na desnoj strani, odaberite jednu ikonu i pritisnite "menu" dugme u kategoriji "All Apps".
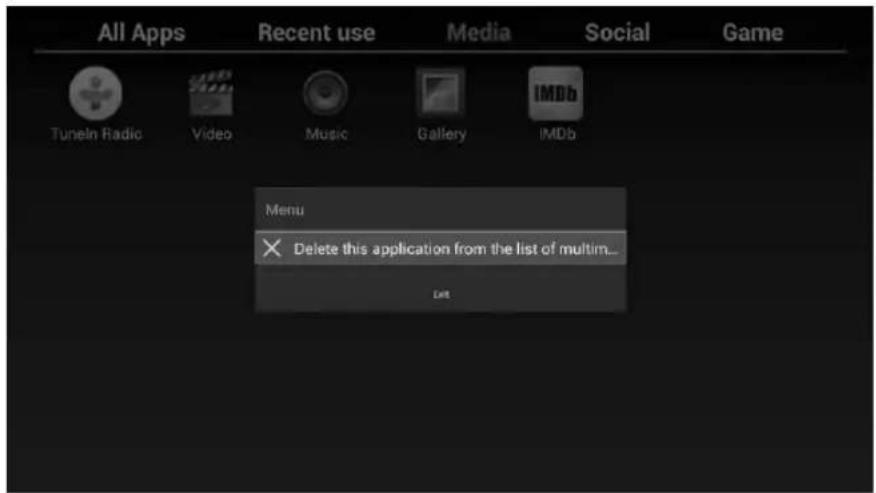
text_image
All Apps Recent use Media Social Game Tuneln Radio Video Music Gallery IMDb Menu × Delete this application from the list of multim... Edit2) Micracast funckija
Odabirom "micracast" na 1-oj strani menija i pritiskom "OK" dugme. Pokazace se prozor dole:
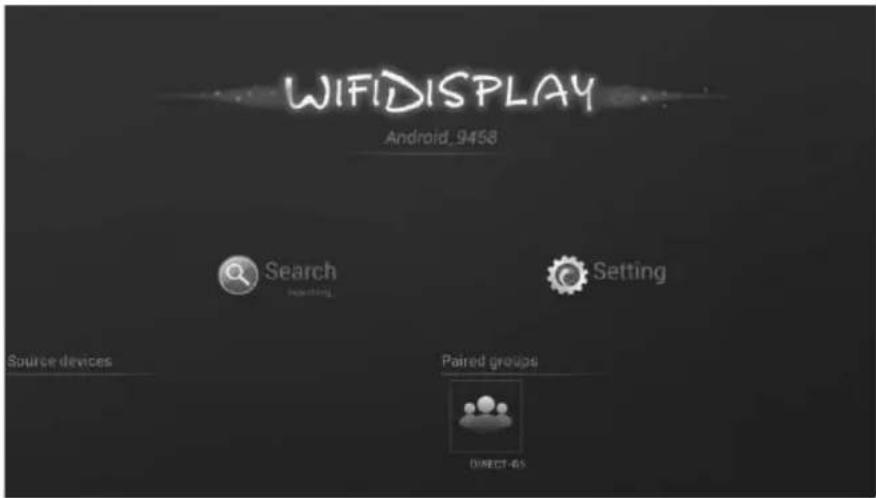
text_image
WIFI DISPLAY Android_9458 Search Setting Source devices Paired groups DIRECT-65Micracast je takodje nazvana wifidisplej. To je mirror tehnologija. Mozete emitovati na smart TV-u isti sadrzaj sa vaseg android uredjaja na istoj lokalnoj mrezi.
Koraci
A. Prvo, kliknite i otvorite funkciju Micracast na 1-oj glavnoj strani menija, smart TV ce prikazati wifidisplej prozor.
B. Drugo, sistem rada na vasem android uredjaju, mora biti najnovija android 4.2 verzija, sa "screen share" opcijom. Obicno mozete naci ovu opsciju ovde:
setting / displej / Screen share
C. Otvorite "Screen share" na vasem telefonu ili pad, trazite ID svog smart TV-a. Na primer "Android_9458" na slici gore.
Ukoliko ste uspesno pronasli smart TV ID, kliknite i povezite se. Nakog toga pritisnite "accept" dugme na vasem smart TV-u kako biste potvrdili povezivanje.
D. Uspesno povezani, na ekranu ce se pojaviti identican sadrzaj sa vaseg android uredjaja.
Nagovestaj: oba uredjaja, smart TV i andorid bi trebali da otvore Wi-Fi.
3) Datoteka – Pretrazivanje datoteka
Kliknite na Files, na 1-oj stranici menija, korisnik moze otvoriti datoteke na internoj memoriji ili USB uredjaju.
Internal flash: ovo je interna memorija Smart TV-a, molimo vas da ne premestate ili brisete sadrzaj iz ove memorije.
Move/Delete sadrzaja iz interne memorije moze prouzrokovati neocekivane rezultate.
USB memorija: povezivanjem USB-a sa smart TV-om preko USB prikljucka, korisnik moze otvoriti sadrzaj sa povezanog USB uredjaja.
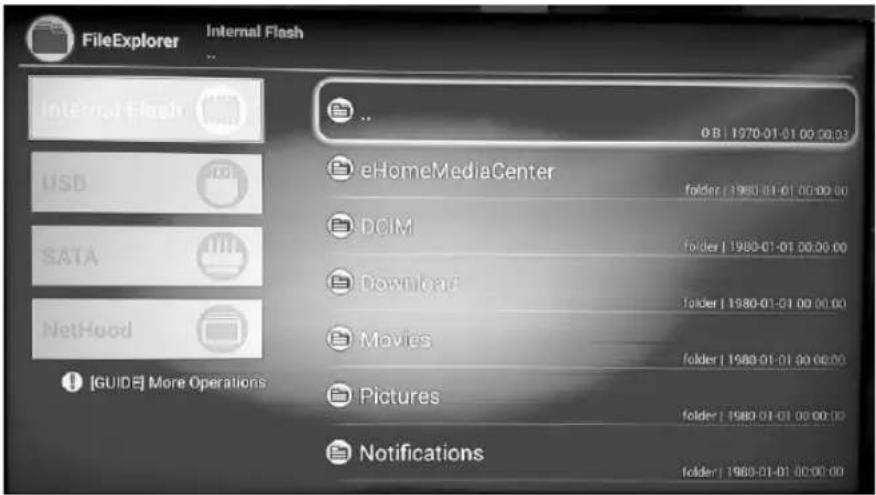
text_image
FileExplorer Internal Flash Internal Flash USB SATA NetHood [GUIDE] More Operations eHomeMediaCenter DCIM Download Movies Pictures Notifications 0 B | 1970-01-01 00:00:03 folder | 1980-01-01 00:00:00 folder | 1980-01-01 00:00:00 folder | 1980-01-01 00:00:00 folder | 1980-01-01 00:00:00 folder | 1980-01-01 00:00:00 folder | 1982-01-01 00:00:00 folder | 1982-01-01 00:00:00 folder | 1982-01-01 00:00:00 folder | 1982-01-01 00:00:00 folder | 1982-01-01 15:34:35 folder | 1982-01-01 15:34:35 folder | 1982-01-01 15:34:35 folder | 1982-01-01 15:34:35 folder | 1982-01-01 15:34:35 folder | 1983-01-01 15:34:35 folder | 1983-01-01 15:34:35 folder | 1983-01-01 15:34:35 folder | 1983-01-01 15:34:35 folder | 1983-01-01 26:34:35 folder | 1983-01-01 26:34:35 folder | 1983-01-01 26:34:35 folder | 1983-01-01 26:34:35 folder | 1983-01-01 26:34:35 kidney NotificationsKraj