
4 Burner Gas Grill - Grill Ambiano - Kostenlose Bedienungsanleitung
Finden Sie kostenlos die Bedienungsanleitung des Geräts 4 Burner Gas Grill Ambiano als PDF.


| Produkttyp | Gasgrill mit 4 Hauptbrennern und Seitenbrenner |
| Marke | Ambiano |
| Modell | DGB495ADP (4-Burner LP Gas Grill With Side Burner) |
| Anzahl der Hauptbrenner | 4 |
| Seitenbrenner | Ja, 1 Seitenbrenner (12.000 BTU/h) |
| Gesamt-BTU | 60.000 BTU/h (Hauptbrenner 48.000 + Seitenbrenner 12.000) |
| Zündung | Piezo-Zündung (für Hauptbrenner und Seitenbrenner) sowie Streichholz-Zündung |
| Temperaturanzeige | Ja, im Deckel integriert |
| Kochfläche | 3 Edelstahl-Kochroste, 1 Warmhalterost, 4 Hitzeschilde |
| Gehäuse und Rahmen | Stahl mit Pulverbeschichtung, schwarz |
| Seitentische | Linker Seitentisch (klappbar?), rechter Seitentisch mit Seitenbrenner |
| Räder | 2 große Räder mit Achse, 2 Standfüße |
| Gewicht | ca. 50 kg (Schätzung, da Montage zu zweit empfohlen) |
| Abmessungen (ca.) | 152 cm Breite × 76 cm Tiefe × 114 cm Höhe (mit geschlossenem Deckel) |
| Gasart | Nur Propan (Propangasflasche nicht im Lieferumfang) |
| Gaszufuhr | Standard 20-Pfund-Propanflasche (Höhe 46 cm, Durchmesser 25 cm) |
| Wartung und Reinigung | Regelmäßige Reinigung der Brenner, Hitzeschilde und Fettauffangschale; Brenner nach jedem Gebrauch abbrennen |
| Sicherheitsmerkmale | Druckregler, Lecksuchtest empfohlen, Sicherheitsabstand 91 cm zu brennbaren Materialien, Deckel vor Zündung öffnen |
| Garantie | 1 Jahr (5 Jahre auf Edelstahlbrenner) bei Material- oder Verarbeitungsfehlern |
| Ersatzteile | Verfügbar über Kundendienst (Telefon: 1-877-447-4768) |
Häufig gestellte Fragen - 4 Burner Gas Grill Ambiano
Benutzerfragen zu 4 Burner Gas Grill Ambiano
0 Frage zu diesem Gerät. Beantworten Sie die, die Sie kennen, oder stellen Sie Ihre eigene.
Eine neue Frage zu diesem Gerät stellen
Laden Sie die Anleitung für Ihr Grill kostenlos im PDF-Format! Finden Sie Ihr Handbuch 4 Burner Gas Grill - Ambiano und nehmen Sie Ihr elektronisches Gerät wieder in die Hand. Auf dieser Seite sind alle Dokumente veröffentlicht, die für die Verwendung Ihres Geräts notwendig sind. 4 Burner Gas Grill von der Marke Ambiano.
BEDIENUNGSANLEITUNG 4 Burner Gas Grill Ambiano
User Manual Manual del usuario
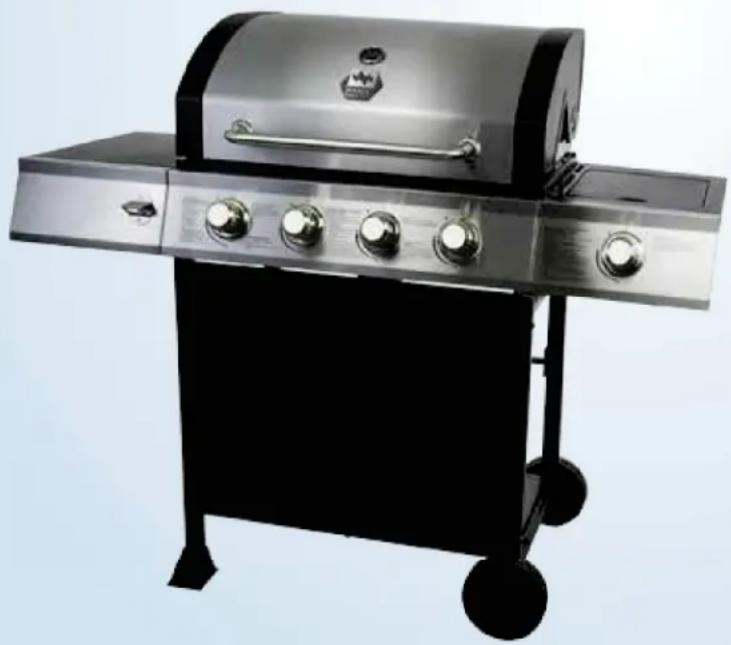
4-BURNER GAS GRILL WITH SIDE BURNER
PARILLA DE GAS CON 4 QUEMADORES Y QUEMADOR LATERAL
English ..... 1
Español ..... 35

ANS Z21.58- 2015
CSA 1.6-2015
Outdoor Cooking
Gas Appliances
Contents
Safety Information ....3
Package Contents 5
Hardware Contents 6
Preparation 6
Assembly Instructions 7
Operation Instructions 17
Care and Maintenance....22
Troubleshooting 25
Warranty....27
Replacement Parts List 28
Assembler/Installer: This manual contains important information necessary for the proper assembly and safe use of this appliance. Read and follow all warnings and instruct before assembling and using this appliance. Leave these instructions with the consumer.
Consumer/User: Follow all warnings and instructions when using this appliance. Retain these instructions for future reference.

DANGER
If you smell gas:
-
Shut off gas to the appliance.
-
Extinguish any open flame.
-
Open lid.
-
If odor continues, keep away from the appliance and immediately call your local fire department.

WARNING
-
Do not store or use gasoline or other flammable liquids or vapors in the vicinity of this or any other appliance.
-
An LP (liquid propane) cylinder not connected for use shall not be stored in the vicinity of this or any other appliance.
-
This grill is for outdoor use only and shall not be used in a building, garage, under overhangs or any other enclosed area.
-
Do not leave a lit grill unattended. Keep children and pets away from the grill at all times.
Please read and understand this entire manual before attempting to assemble, operate or install the product. If you have any questions regarding the product, please call customer service at: 1-877-447-4768, 9:00 am - 6:00 pm EST, Monday – Friday.
⚠️ DANGER
- Do not use in an explosive atmosphere. Keep grill area clear and free from combustible materials, gasoline and other flammable vapors and liquids.
CALIFORNIA PROPOSITION 65
Fuels used in gas or oil fired appliances and the products of combustion of such fuels contain chemicals, including Benzene, known to the State of California to cause cancer, birth defects or other reproductive harm. This product contains chemicals, including lead and lead compounds, known to the State of California to cause cancer, birth defects or other reproductive harm. Wash hands after handling.
CAUTION
- Never use charcoal or lighter fluid with the grill.
- Do not use gasoline, kerosene or alcohol for lighting.
- The LP gas cylinder used with this appliance must be:
(a) Constructed and marked in accordance with the Specifications for LP-Gas Cylinders of the U.S. Department of Transportation (D.O.T.) or the National Standard of Canada, CAN/CSA-B339, Cylinders, Spheres and Tubes for Transportation of Dangerous Goods; and Commission, as applicable; and
(b) Provided with a listed overfilling prevention device.
(c) Provided with a cylinder connection device compatible with the connector for outdoor cooking appliances. This grill is not intended to be used in or installed on recreational vehicles and/or boats.
- Never keep a filled container in a hot car or car trunk. Heat will cause the gas pressure to increase, which may open the relief valve and allow gas to escape.
• Always open grill lid slowly and carefully as heat and steam trapped within the grill can burn you severely.
WARNING
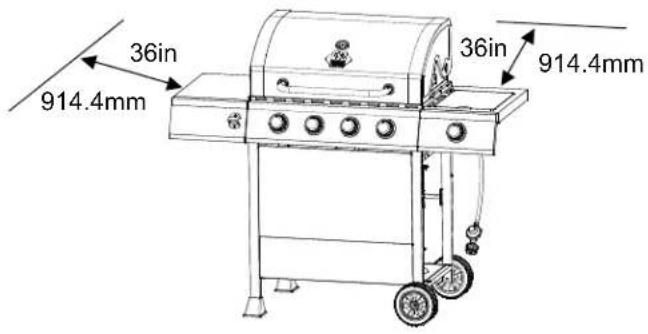
- Do not place the grill under overhead combustible construction or awnings. Minimum clearance from sides and back of unit to combustible construction, 36 inches (914.4mm) from sides and back.
NOTE: The installation must conform with local codes or, in the absence of local codes, with either the National Fuel Gas Code, ANSI Z223.1/NFPA 54, Natural Gas and Propane Installation Code, CSA B149.1, or Propane Storage and Handling Code, B149.2.
CAUTION
- Do not store or use gasoline or other flammable liquids or vapors in the vicinity of this or any other appliance.
- An LP cylinder not connected for use shall not be stored in the vicinity of this or any other appliance.
- This grill is for use with propane gas only (propane cylinder not included).
- Never attempt to attach this grill to the self-contained propane system of a boat, camper trailer, motor home or house.
- Do not attempt to move the grill while it is lit or when it is hot. The casters should be locked when not moving the grill.
- Do not use the grill unless it is completely assembled and all parts are securely fastened and tightened.
- Keep all combustible items and surfaces at least 36 inches (91.44 cm) away from the grill at all times.
- Do not touch metal parts of grill until it has completely cooled (about 45 minutes) to avoid burns, unless you are wearing protective gear (pot holders, gloves, BBQ mittens, etc...).
- Do not alter this grill in any manner.
- Clean and inspect the hose before each use. If there is evidence of abrasion, wear, cuts, or leaks, the hose must be replaced prior to operating the appliance. The replacement hose assembly will be that which is specified by the manufacturer.
- Move gas hoses as far away as possible from hot surfaces and dripping hot grease.
- Keep the grill's valve compartment, burners and circulating air passages clean. Inspect the grill before each use. Do not obstruct the flow of gas or ventilation air.
- The use of alcohol, prescription or non-prescription drugs may impair the operator's ability to properly assemble or safely operate the grill.
- Do not leave a lit grill unattended. Keep children and pets away from the grill at all times.
- Do not place this grill on any type of tabletop surface. The grill should be placed on a flat and level surface.
- Do not use the grill in high winds.

| PART | DESCRIPTION | QUANTITY |
| A Hood Handle 1 | ||
| B Temp Gauge 1 | ||
| C Grill Body Assembly 1 | ||
| D Control Knob 5 | ||
| E Grease Pan 1 | ||
| F Grease Cup 1 | ||
| G Warming Rack | 1 | |
| H Cooking Grate | 3 | |
| I | Heat Tent | 4 |
| J | Left Side Table Assembly | 1 |
| K | Side Burner Rack | 1 |
| L | Side Burner 1 | |
| M | Right Side Burner Body | 1 |
| N Control Knob Bezel | 1 | |
| PART | DESCRIPTION | QUANTITY |
| O | Left Leg Assembly | 1 |
| P | Leg End Cap | 2 |
| Q | Cylinder Block Bar | 1 |
| R | Cart Rear Support | 1 |
| S | Bottom Shelf's Rear Bracket Assembly | 1 |
| T | Cart Front Panel - Upper | 1 |
| U | Cart Front Panel - Lower | 1 |
| V | Right Leg Assembly | 1 |
| W | Bottom Shelf | 1 |
| X | Axle | 1 |
| Y | Wheel | 2 |
| Z | Bottom Shelf's Front Bracket Assembly | 1 |
Hardware Contents
 |  |  |  |  |  |
 |  |  |  |  |  |
| ST4.8x10 Screw | M10 Nut | M10-M6 Wrench | M6x16 Bolt | M5x12 Bolt | M6 Wingnut |
| Qty. 2 | Qty. 2 | Qty. 2 | Qty. 34 | Qty. 2 | Qty. 2 |
 |  |  | |||
 |  |  | |||
| M6 Spring Washer | M6 Washer | M4x10 Bolt | |||
| Qty. 2 | Qty. 2 | Qty. 2 | |||
| Preparation | |||||
Before beginning assembly of product, make sure all parts are present. Compare parts with package contents list on previous page and hardware contents above. If any part is missing or damaged, do not attempt to assemble the product. Contact customer service for replacement parts.
Estimated Assembly Time: 50 minutes with 2 people.
Tools Required for Assembly and Leak Testing (not included): Phillips screwdriver, Spray bottle, Plier, Adjustable Wrench

CAUTION
THIS UNIT IS HEAVY. Two people required for safe assembly.
Two people required for safe assembly. Some parts may contain sharp edges. Wear protective gloves if necessary. Read and follow all safety statements, warnings, assembly instructions and use and care instructions before attempting to assemble and use.
- Put two leg end caps (P) under left leg assembly (O), and fasten them with two ST4.8X10 screws (AA).
Hardware Used

ST4.8x10 Screw

x 2

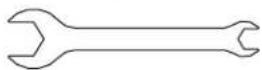
- Slide the axle (X) through the right leg assembly (V) and then put the wheels (Y) on both sides, and tighten the wheels with M10 nuts (BB) with wrenches (CC). Please note, this step requires two people to complete, and if necessary any other plier or adjustable wrench can be used for assembly.
Hardware Used

M10 Nut

x 2

M10-M6
Wrench
x 2

- Use eight M6x16 bolts (DD) to assemble cart front panel - upper (T) and cart front panel - lower (U) between left leg assembly (O) and right leg assembly (V). Please note the front panel - lower's (U) direction, the side with rivet nut in the middle should be downward.
Hardware Used

M6x16 Bolt

x 8
- Use four M6X16 bolts (DD) to fasten the bottom shelf's front bracket assembly (Z), bottom shelf's rear bracket assembly (S) and bottom shelf (W).
Hardware Used

M6x16 Bolt

x 4

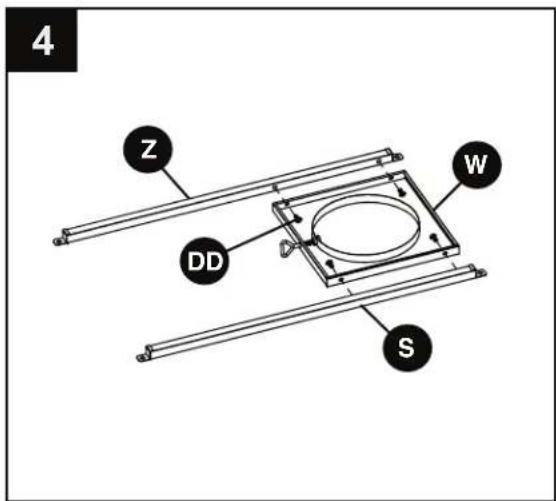
- Assemble bottom shelf assembly to the left leg assembly (O) and right leg assembly (V) with four M6X16 bolts (DD).
Hardware Used

M6x16 Bolt

x 4
- Use four M6x16 bolts (DD) to fasten the cart rear support (R) to the left and right leg assembly. Please note the cart rear support's (R) direction, the side with the rivet nut in the middle should be upward. Then use two M5x12 bolts (EE) to fasten the cylinder block bar (Q) between the cart front panel - lower (U) and the cart rear support (R).
Hardware Used

M6x16 Bolt

x 4

M5x12 Bolt

x 2

6

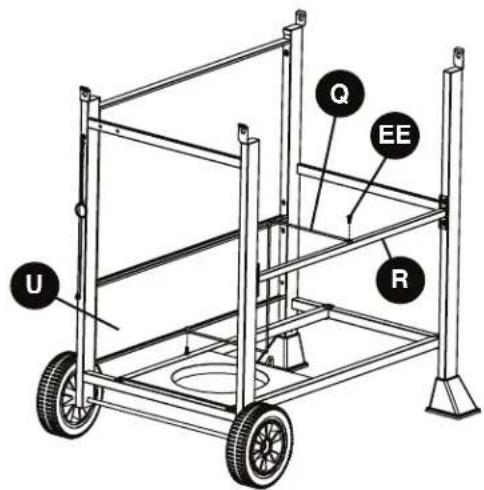
- Assemble the hood handle (A) to the hood with two M6 wingnuts (FF) and two M6 spring washers (GG) and two M6 washers (HH).
Hardware Used
| FF | M6 Wingnut | 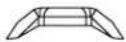 | x 2 |
| GG | M6 Spring Washer |  | x 2 |
| HH | M6 Washer |  | x 2 |

- Assemble the temp gauge (B) onto the hood. Please use the washer and wing nut pre-assembled with temp gauge to install the temp gauge (B) onto the hood.

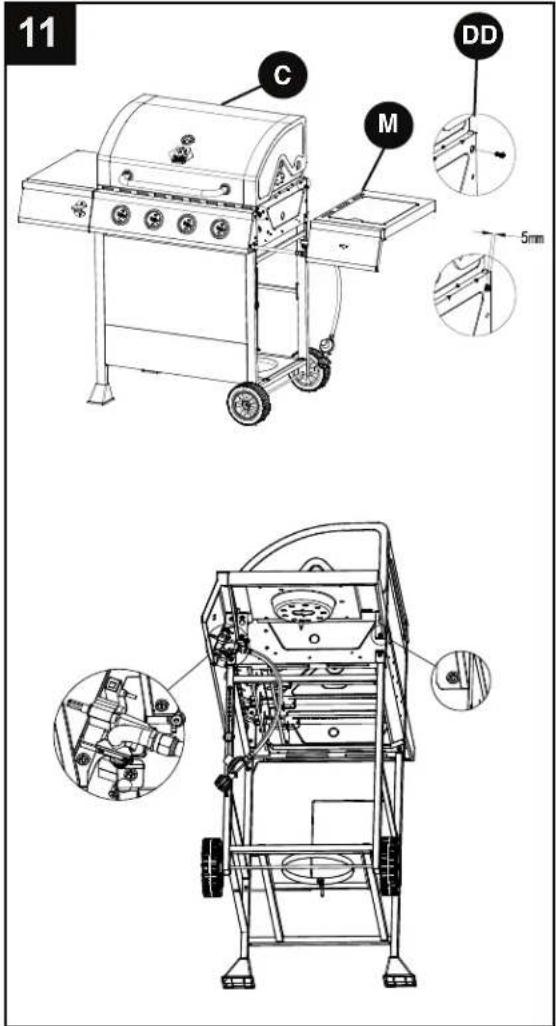
- Assemble the grill body assembly (C) onto the cart assembly with four M6x16 bolts (DD).
Hardware Used

M6x16 Bolt

x 4
- Pre-assemble two M6x16 bolts (DD) onto the grill body assembly (C) and do not tighten them and make sure to leave a 5mm gap between the bolt and grill body's end cap. Then hang the left side table assembly (J) on the bolts and fasten the left side table assembly (J) with three M6x16 bolts (DD) and tighten all bolts.
Hardware Used

M6x16 Bolt

x 5
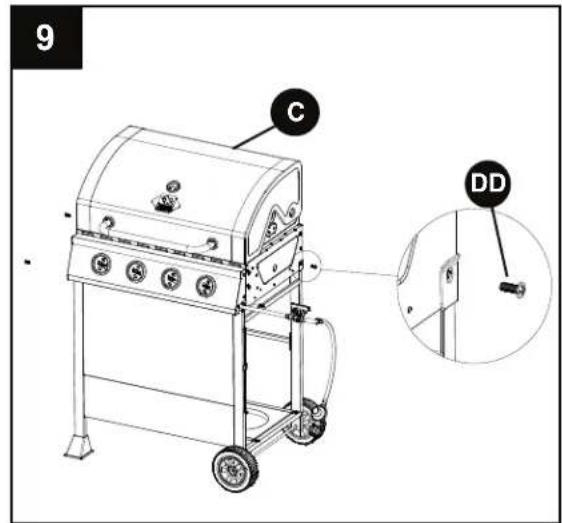

- Pre-assemble two M6x16 bolts (DD) onto the grill body assembly (C) and do not tighten them and make sure to leave a 5mm gap between the bolt and grill body's end cap. Then hang the right side burner body (M) on the bolts and fasten the right side burner body (M) with three M6x16 bolts (DD) and tighten all bolts.
Hardware Used

M6x16 Bolt

x 5
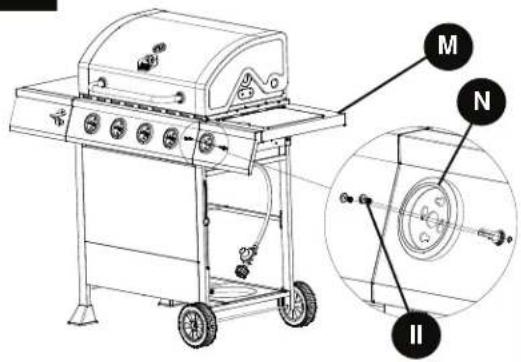
- Use two M4x10 bolts (II) to assemble the side burner valve assembly and control knob bezel (N) to the right side burner body (M).
Hardware Used

M4x10 Bolt

x 2
12
- Disassemble two M4x10 bolts that are pre-assembled on the side burner (L) and use them to assemble the side burner (L) on the right side burner body (M).
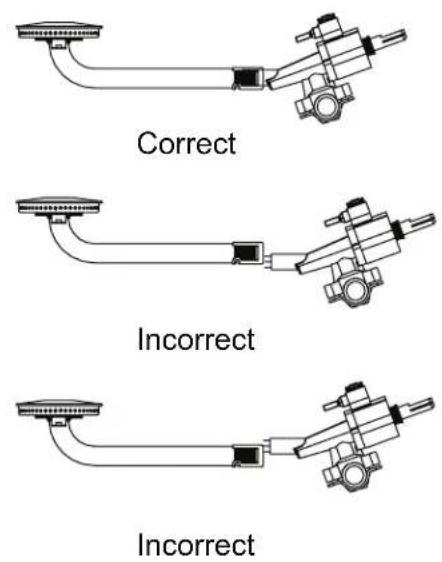
Please ensure the gas valve orifice is correctly positioned inside side burner inlet (venturi).
- Connect the side burner sparker wire to the side burner sparker.
WARNING: IT IS VERY IMPORTANT TO CHECK AND ENSURE THAT EACH AND EVERY BURNER IS FULLY ENGAGED WITH THE ADJACENT VALVE ORIFICE BEFORE COMPLETING STEP 15. FAILURE TO DO SO MAY RESULT IN FIRE OR EXPLOSION, POSSIBLY CAUSING SERIOUS INJURY OR DEATH. REFER TO MAINTENANCE SECTION INSTRUCTIONS TO PROPERLY CHECK THE ENGAGEMENT.

Wrong

Wrong

Correct

14

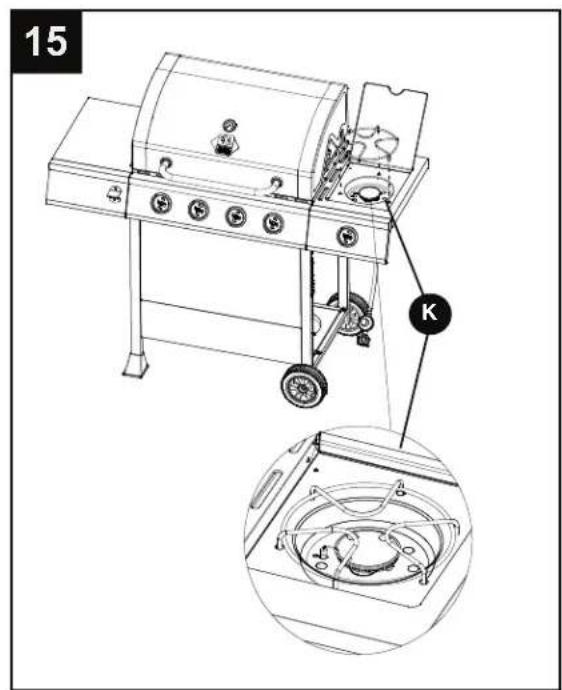
- Put the side burner rack (K) in place.
- Assemble the five control knobs (D).

- Put the four heat tents (I) into place over each burner.

- Put three cooking grates (H) and one warming rack (G) in place.

-
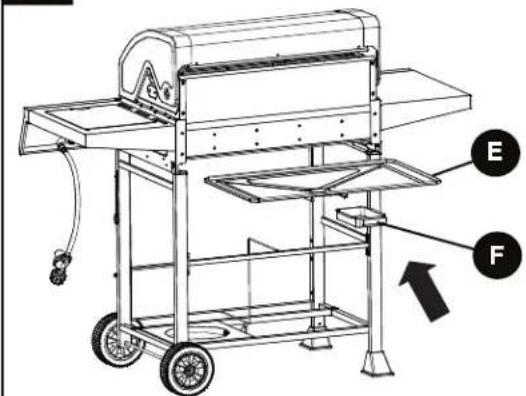
Place grease pan (E) and grease cup (F) in place.
-
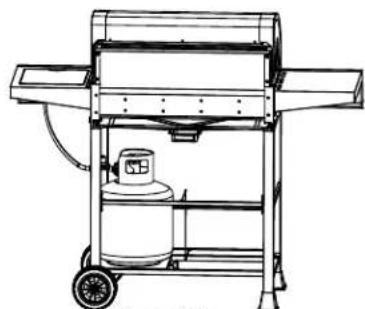
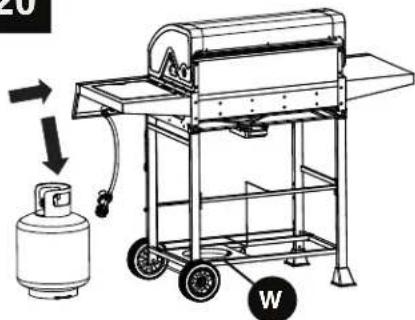
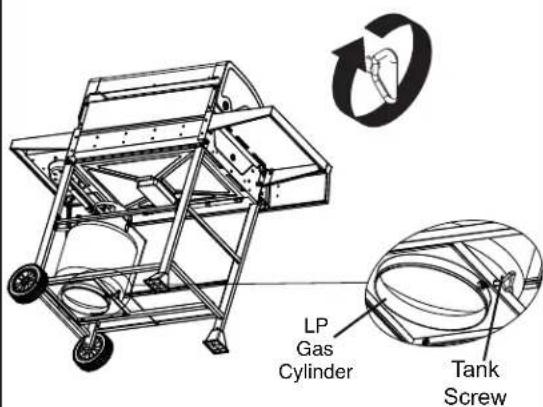
Place gas cylinder (sold separately) into the nesting hole located in the Bottom shelf (W). Rotate the gas cylinder until the hose/regulator coupling aligns with the threaded valve of the cylinder. Hand-tighten the hose/regulator coupling to the threaded valve of the LP gas cylinder.
Tighten the tank screw clockwise in the bottom shelf (W) until the cylinder is secured in place inside the nesting hole of the Bottom shelf (W).

Front View
Rear View
19
20
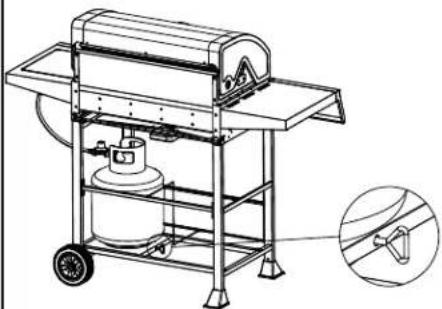
CHECKING FOR LEAKS
After all connections are made, check all connections and fittings on the LP gas tank valve, gas hose and regulator for leaks with a water and soap solution.
To prevent fire or explosion while testing for a leak:
• Always perform leak test prior to lighting the grill.
- Do not smoke while testing for a leak.
• Always perform leak tests outdoors in a well-ventilated area.
- Do not use any source of flame while testing for leaks.
- Do not use the grill until any and all leaks are corrected.
- If you are unable to correct a leak, disconnect the propane supply and call a gas appliance service dealer.
PERFORM LEAK TEST
• Prepare leak test solution by 50/50 ratio of liquid dish soap and water.
Total solution required is approximately 2 - 3 ounces (70 - 90 ml). Put leak test solution in a spray bottle.
- Ensure all control knobs are in the OFF position.
- Connect the gas hose to the gas supply.
- Open the LP gas tank valve.
- Spray leak test solution on all gas carrying connections and fittings. Presence of bubbles at areas of applied test solution indicates a gas leak. If leaks are detected or you smell or hear gas, shut off the gas supply valve immediately and repair or replace the defective part. Do not use the grill until all leaks are corrected.
CAUTION
Only use the regulator and hose assembly provided! If a replacement is necessary, please call our customer service center. Do not use replacement parts that are not intended for this grill.
WARNING
ALL INSTRUCTIONS AND SAFEGUARDS ON THIS PAGE MUST BE FOLLOWED TO PREVENT FIRE, DAMAGE AND/OR INJURY.
CONNECTING GAS CYLINDER
The propane gas supply cylinder to be used must be constructed and marked in accordance with the Specifications for LP Gas Cylinders of the U.S. Department of Transportation (D.O.T.) or the National Standard of Canada, CAN/CSA-B339, Cylinders, Spheres and Tubes for Transportation of Dangerous Goods; and Commission, as applicable; and provided with a listed overfilling prevention device.
Use only 20-pound cylinders (height: 18.11 inches, tank diameter: 9.84 inches, foot diameter: 8.03 inches) equipped with a cylinder connection device compatible with the connection for outdoor cooking appliances.
The cylinder must include a collar to protect the cylinder valve. The gas cylinder should not be dropped or handled roughly!
If the appliance is not in use, the gas cylinder must be disconnected. Storage of an appliance indoors is permissible ONLY if the cylinder is disconnected and removed from the appliance. Cylinders must be stored outdoors out of the reach of children and must not be stored in a building, garage or any other enclosed area. Your cylinder must never be stored where temperatures can reach over 125° F.
Place dust cap on cylinder valve outlet whenever the cylinder is not in use. Only install the type of dust cap on the cylinder valve outlet that is provided with the cylinder valve. Other types of caps or plugs may result in leakage of propane.
Before connection, be sure that there is no debris caught in the outlet of the gas cylinder, outlet of the regulator valve or in the outlet of the burner and burner ports. Connect regulator valve and hand-tighten firmly. Keep the propane cylinder valve closed and disconnect the propane cylinder from the regulator valve when the grill is not in use.
DO NOT obstruct the flow of combustion air and ventilation air to the grill. The propane cylinder must be arranged for vapor withdrawal and equipped with a listed overfilling prevention device. Please use the proper cylinder orientation to provide vapor withdrawal. NOTE: The cylinder must be fully upright for the cylinder to have vapor withdrawal only.
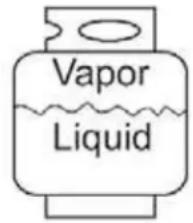
Correct

Wrong

Wrong
CAUTION
a. Do not store a spare LP-gas cylinder under or near this appliance.
b. Never fill the cylinder beyond 80 percent full.
c. If the information in (a) and (b) is not followed exactly, a fire causing death or serious injury may occur.
NOTE: Other cylinders may be acceptable for use with this appliance provided they are compatible with the appliance nesting hole and retention means. Refer to Step 20 of the Assembly Instructions for correct cylinder to cylinder holder connection.
⚠ WARNING
ALL INSTRUCTIONS AND SAFEGUARDS ON THIS PAGE MUST BE FOLLOWED TO PREVENT FIRE, DAMAGE AND/OR INJURY.
CONNECTING THE LP TANK
- The knob on the LP tank must be closed. Make sure that the knob is turned clockwise to a full stop. The cylinder supply system must be arranged for vapor withdrawal.
- Check that the control knob on the control unit is turned off.
- Remove the protective cap from the LP tank valve and coupling nut.
- Hold the regulator in one hand and insert the nipple into the valve outlet. Be sure the nipple is centered in the valve outlet. The coupling nut connects to the large outside threads on the valve outlet. Use care – do not cross thread the connection.
- Hand-tighten the coupling nut clockwise until it comes to a full stop. Firmly tighten by hand only. Do not use tools.
To Disconnect: Fully close the tank valve by turning clockwise.
Turn the coupling nut counterclockwise until the regulator assembly detaches.

WARNING
In the connection process, make sure:
- the regulator inlet connector mates with the cylinder valve outlet properly, safely and firmly, and;
- the LP gas hose does not come in contact or remain in contact with the firebox.
Lighting The Grill
Before first use:
Remove all hangings or plastic straps, if present. Before you cook on your new gas grill, it is important to clean your grill with heat. To do this, operate the grill for approximately 15 minutes with the lid closed and the control knob in the highest position. This will clean the internal parts by burning off any residue and odor from the manufacturing process.
CAUTION
If the flame extinguishes accidentally during ignition or operation, immediately TURN OFF the cylinder valve and then TURN OFF the control knob.
WARNING
Do not lean over grill when lighting. Read instructions before lighting.
- Check that the control knobs are in the OFF position.
- Open valve at tank fully by turning counterclockwise.
- Open lid during lighting.
- Depress and turn control knob counterclockwise from off position, past the ignite position, to the high position. You may need to repeat several times to ignite the burner.
If ignition does not occur in 5 seconds, turn the control(s) off, O wait 5 minutes, and repeat the lighting procedure.
If the burner still does not light, check that there is gas in the cylinder and follow the match lighting instructions. Check the Troubleshooting Guide on page 25 for more information.
LIGHTING THE GRILL WITH A MATCH
- Open the lid.
- Insert a match in the end of the match holder that is installed on the right leg assembly.
- Light the match.
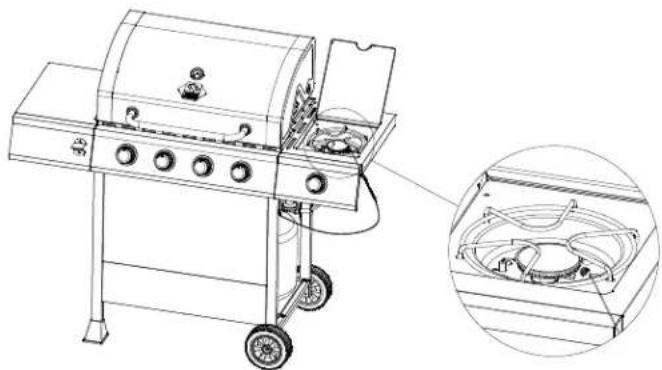
- Immediately place the lit match through the spaces in the grill gates near the ports of the burner between the heat tents as shown. Make sure the lit match is close to the burner ports.
- Press in the control knob that operates the burner and rotate counter-clockwise to High position and burner should light immediately.
- Repeat 2\~5 steps to lighting the remaining burners.
- Adjust burners to desired cooking settings.
CAUTION
Make sure all burners controls are off except for the burner being lit and the burners that have been lit.
Main Burner Match Lighting

Side Burner Match Lighting
SHUTDOWN INSTRUCTIONS
- Turn control knobs clockwise to the OFF position.
- Close valve at tank fully by turning clockwise.
- Close lid.
Turn off LP supply at cylinder when appliance is not in use.
Cooking Grates
The best time to 'burn-off' the cooking grates is after every use (approx. 15 minutes). The grill is already hot from cooking thus requiring less fuel to obtain necessary temperature for 'burn-off'.
To 'burn off' or heat clean your grill, turn the burners to highest position and run for 15 minutes with the lid closed. Then turn off the burners and use a wire brush to clean excess food residue from the grates.
The porcelain grates have an enamel finish (similar to glass) and should be handled with care not to chip.
CAUTION
Ensure the grill is cool before cleaning and conducting maintenance and with the gas supply turned off at the LP-Gas Cylinder.
Recommended Cleaning Supplies
Mild liquid dish soap, warm water, nylon cleaning pad, wire brush
DO NOT use cleaners that contain acid, mineral spirits or any abrasive substance.
Outside Surfaces
It is recommended to use only mild dish soap and hot water to clean grill and grill parts. Rinse with warm water.
Inside Bottom Pan of Grill Body
To avoid flare-ups, the bottom pan of the cooking box should be kept clean on a regular basis. Remove residue using a brush, scraper and/or cleaning pad. Wash with mild dish soap and warm water. Rinse with warm water. Avoid water splashing into venturi tubes of burners.
Heat Tents
Clean residue with wire brush and wash with mild dish soap an warm water. Rinse with warm water.
Grease Cup
Empty the grease cup and clean with mild dish soap and warm water on a regular basis.
Checking The Flame
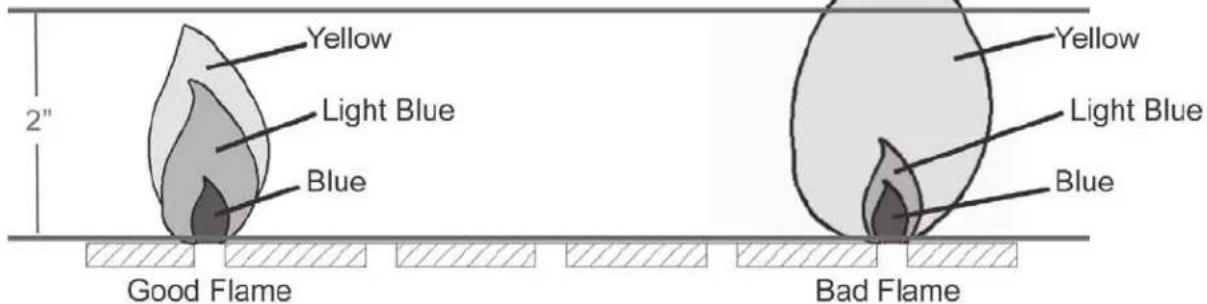
For maximum fuel efficiency and cooking performance, flame should be a blue-yellow color and be between 1-2 inches high. To check the flame, view the flame through the holes in both sides of the firebox.

Hole for viewing the flame
Burner Assembly
Removing The Burner Assembly
- Make sure all control knobs are in the OFF position, gas supply valve is closed, and the gas hose is disconnected from the gas supply
- Open lid and remove warming rack, cooking grates, heat tents, clip for burner, ignition chain and main burner.
- Remove hinge pin as illustrated in Figure 1.
- Slide main burmers out of firebox.
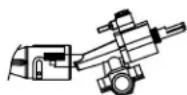
- Detach ignition wire from electrode in Figure 2.

Figure 1
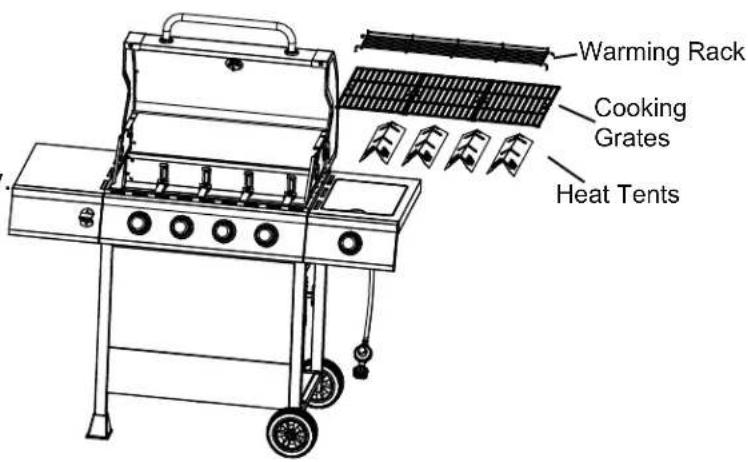
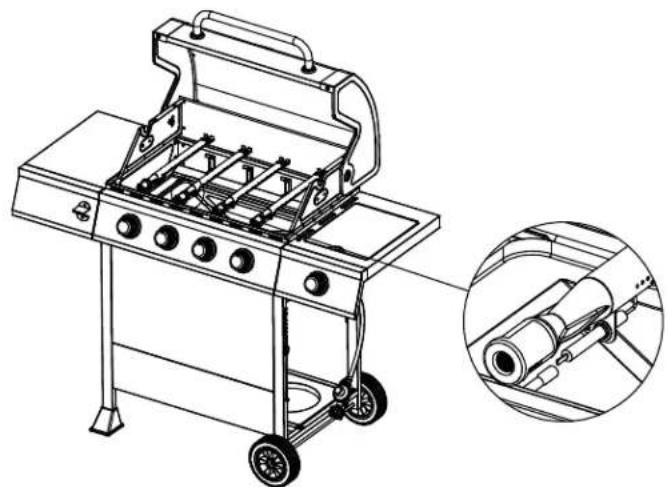
Figure 2
Cleaning the Burner Assembly
- Make sure the grill is cool
- Turn gas off at the control knobs and LP gas cylinder.
- Disconnect LP gas cylinder from regulator and hose.
- Remove warming rack, cooking grates and heat tents.
- Detach burner by removing the cotter pins at the back of the burners to detach them from the brackets.
- Detach ignition wire from electrode by hand only. DO NOT use pliers or any other tool as it may damage the electrode or wire.
- Lift burner slowly.
- Ensure all burner ports are clear of clogs. Use of a pin or paper clip works well.
- Ensure burner is free of any damage. If damage is found, replace with new burner.
- Ensure the end of the burner and primary air screen are clear from insect nests, dirt or debris.
Re-installing the Burner
Ensure that gas valve orifices are correctly positioned inside burner inlet (venturi).
The use of a flashlight may be necessary to ensure the correct position.
It is recommended to view the correct position through the firebox vent holes as illustrated below.
Reattach each burner with the hinge pin and reattach the ignition wire to electrode.


Bottom View

Wrong

Wrong
Correct
View the correct position from the bottom of the firebox
WARNING
If the instructions above are not followed, a fire or explosion may result, possibly causing serious bodily injury or death.
Other Care and Maintenance
It is recommended that inspection and service on this appliance be conducted annually by a qualified service person.
It is recommended that you always check that the outdoor cooking appliance area is clear and free from combustible material, gasoline and other flammable vapors and liquids before lighting.
It is recommended that you regularly check that the flow of combustion and ventilation air is not obstructed.
It is recommended that you regularly check that the ventilation openings of the grill cabinet are free and clear from debris.
It is recommended that you regularly check and clean the burner/venturi tubes for insects and insect nests. A clogged tube can lead to a fire beneath the grill.
Troubleshooting
If you have any questions regarding the product, please call customer service at 1-877-447-4768, 9:00 am - 6:00 pm EST, Monday – Friday.
| PROBLEM POSSIBLE CAUSE CORRECTIVE ACTION | ||
| The burner will not light using the ignitor procedure (weak or no spark being generated). | 1. The igniter electrode may be covered with grease or residue.2. The igniter electrode may have a loose or disconnected wire.3. Cracked or broken ignition electrode. | 1. Clean the ignitor electrode.2. Check the connection and reconnect any loose or disconnected wires.3. Replace ignition electrode (see Replacement Parts List). |
| Low Heat. | 1. Insufficient gas pressure to the unit. | 1. Call a qualified service agency to check the gas supply pressure and correct the pressure. |
| Excessive Flare Ups. | 1. Grease and/or residue build-up on heat tents or in firebox.2. Excessive dripping of fat or marinade from food.3. Cooking temperature too high. | 1. Clean the grill components.2. Trim the fat from meat and use non-oil based marinades.3. Lower temperature accordingly. |
| The burner will not light with a match. | 1. Match not reaching burners (when holding match with hand).2. Empty tank.3. Poor connection between valve regulator and LP cylinder coupling.4. Burner inlet blocked. | 1. Use match holder found in cabinet door.2. Check fuel level and refill tank if necessary.3. Turn off grill knobs, close the LP cylinder valve at top of cylinder and check the connection between the regulator valve and cylinder coupling.Disconnect and reconnect, if necessary.4. Clean the burner inlet (venturi) and burner as described by the Care and Maintenance section in the manual. |
| No gas flow or an obstructed gas flow. | 1. Tank valve not on or fully opened.2. Empty tank.3. Poor connection between valve regulator and LP cylinder coupling.4. Burner inlet blocked. | 1. Fully open tank valve by turning counterclockwise.2. Check fuel level and replace fuel if necessary.3. Turn off grill knobs, close the LP cylinder valve at top of cylinder and check the connection between the regulator valve and cylinder coupling.Disconnect and reconnect, if necessary.4. Clean the burner inlet (venturi) and burner as described by the Care and Maintenance section in the manual. |
1-Year Limited Warranty
This LP gas grill is warranted for 1 year (5 years on the Stainless Steel burners) against broken or damaged parts at the time of purchase. It is warranted to be free of defects. Paint is warranted to be free of defects except for rust, which may appear after repeated use.
This warranty does not cover damage or issues related to neglect, abuse, or modifications to the appliance. Repair labor is not covered.
All parts that meet the warranty requirements will be shipped at no charge via the discretion of the manufacturer (ground shipments, US Mail, or Parcel Post ONLY). Any special handling charges (i.e. Second Day, overnight, etc.) will be the responsibility of the consumer.
All warranty claims apply only to the original purchaser and require a proof of purchase verifying purchase date. Do not return parts without first obtaining a return authorization number from our customer service. This service is available by calling toll free 1-877-447-4768, 9:00 am - 6:00 pm EST, Monday – Friday.
NOTICE: Some states do not allow the exclusion or limitation of incidental or consequential damages or limitations on how long an implied warranty lasts, so the above limitations or exclusions may not apply to you. This warranty gives you specific legal rights and you may also have other legal rights which may vary from state to state.
GHP Group Inc.
6440 W. Howard Street
Niles, IL, USA
60714-3302
Item Name: 4-Burner LP Gas Grill With Side Burner
Model #: DGB495ADP
Main Burner Total rated BTU: 48,000 BTU/Hr
Side Burner rated BTU: 12,000 BTU/Hr

For replacement parts, call our customer service department at 1-877-447-4768, 9:00 am - 6:00 pm EST, Monday – Friday.
| PART DESCRIPTION PART # | |
| 1 Temp gauge assembly 70 - 01 - 386 | |
| 2 Badge 70 - 10 - 589 | |
| 3 Hood handle 70 - 01 - 173 | |
| 4 Warming rack 70 - 01 - 272 | |
| 5 Cooking grate 70 - 01 - 580 | |
| 6 Heat tent 70 - 01 - 179 | |
| 7 Main burner with clip 70 - 01 - 282 | |
| 8 Main burner sparker 70 - 01 - 283 | |
| 9 Left side table assembly 70 - 01 - 300 | |
| 10 Left side table front panel with bottle opener | 70 - 01 - 189 |
| 11 Left leg assembly | 70 - 01 - 274 |
| 12 Leg end cap | 70 - 01 - 275 |
| 13 Hood assembly (with inner plate) | 70 - 01 - 387 |
| 14 Hood hinge (with nut, washer and clip) | 70 - 01 - 285 |
| 15 Lid bumper | 70 - 01 - 176 |
| 16 Main burner and heat tent support | 70 - 01 - 181 |
| 17 Firebox assembly - with heat shield | 70 - 01 - 277 |
| 18 Main valves and manifold assembly | 70 - 01 - 388 |
| 19 Control panel assembly | 70 - 01 - 389 |
| 20 Control knob bezel | 70 - 01 - 390 |
| 21 Control knob 70 - 01 - 391 | |
| 22 Grease pan | 70 - 01 - 279 |
| 23 Grease cup | 70 - 01 - 187 |
| 24 Bottom shelf's rear bracket assembly | 70 - 01 - 286 |
| 25 Tank attachment screw | 70 - 01 - 317 |
| 26 Bottom Shelf | 70 - 01 - 291 |
| 27 Bottom shelf's front bracket assembly | 70 - 01 - 318 |
| 28 Cylinder block bar | 70 - 01 - 288 |
| 29 Cart rear support | 70 - 01 - 287 |
| 30 Cart front panel - upper | 70 - 01 - 289 |
| 31 Cart front panel - lower | 70 - 01 - 290 |
| 32 Side burner lid rod | 70 - 01 - 265 |
| 33 Side burner sparker | 70 - 01 - 269 |
| 34 Side burner lid | 70 - 01 - 264 |
| 35 Side burner rack | 70 - 01 - 266 |
| 36 Side burner valve | 70 - 01 - 267 |
| 37 Side burner pan | 70 - 01 - 268 |
| 38 Right side burner body assembly | 70 - 01 -314 |
| 39 Corrugated hose | 70 - 01 - 194 |
| 40 Side burner valve | 70 - 01 - 392 |
| 41 Regulator and hose assembly | 70 - 02 - 107 |
| 42 Right side table front panel | 70 - 01 - 393 |
| 43 Right leg assembly | 70 - 01 - 394 |
| 44 Match holder with chain | 70 - 01 - 204 |
Replacement Parts List
For replacement parts, call our customer service department at 1-877-447-4768, 9:00 am - 6:00 pm EST, Monday – Friday.
| PART DESCRIPTION PART # | |
| 45 Axle 70 - 05 - 103 | |
| 46 Wheel 70 - 05 - 104 | |
| n/a Hardware pack 70 - 09 - 502 | |
| n/a Instruction manual 70 - 10 - 588 |
Printed in China70-10
- USER MANUAL MANUAL DEL USUARIO
- 4-BURNER GAS GRILL WITH SIDE BURNER
- CONTENTS
- DANGER
- IF YOU SMELL GAS
- WARNING
- ⚠️ DANGER
- CALIFORNIA PROPOSITION 65
- CAUTION
- HARDWARE USED
- CHECKING FOR LEAKS
- PERFORM LEAK TEST
- CONNECTING GAS CYLINDER
- ⚠ WARNING
- CONNECTING THE LP TANK
- IN THE CONNECTION PROCESS, MAKE SURE
- LIGHTING THE GRILL
- BEFORE FIRST USE
- LIGHTING THE GRILL WITH A MATCH
- SHUTDOWN INSTRUCTIONS
- COOKING GRATES
- RECOMMENDED CLEANING SUPPLIES
- OUTSIDE SURFACES
- INSIDE BOTTOM PAN OF GRILL BODY
- HEAT TENTS
- GREASE CUP
- CHECKING THE FLAME
- BURNER ASSEMBLY
- REMOVING THE BURNER ASSEMBLY
- CLEANING THE BURNER ASSEMBLY
- RE-INSTALLING THE BURNER
- OTHER CARE AND MAINTENANCE
- TROUBLESHOOTING
- 1-YEAR LIMITED WARRANTY
- REPLACEMENT PARTS LIST
Marke : Ambiano
Modell : 4 Burner Gas Grill
Kategorie : Grill