Z500 Motorized Treadmill - Heimtrainer Spirit - Kostenlose Bedienungsanleitung
Finden Sie kostenlos die Bedienungsanleitung des Geräts Z500 Motorized Treadmill Spirit als PDF.


| Produkttyp | Motorisiertes Laufband (Heimtrainer) |
| Modell | Z500 Motorized Treadmill |
| Marke | Spirit |
| Stromversorgung | 120 V, 20 A, geerdeter Stecker |
| Maximale Geschwindigkeit | Bis zu 12 mph (ca. 19,3 km/h) |
| Steigung | Einstellbar über Tasten (0-12 % Stufen) |
| Anzeige | Dot-Matrix-Display mit Zeit, Distanz, Kalorien, Puls, Geschwindigkeit, Steigung |
| Programme | 7 vorinstallierte Programme, 2 benutzerdefinierte, 1 manuelles Programm |
| Pulssteuerung | Brustgurt (drahtlos) und Handpulssensoren; HRC-Programme (H-1, H-2) und Auto-Pilot |
| Lautsprecher | 2 eingebaute Lautsprecher mit Audioeingang (3,5 mm Klinke) |
| Sicherheit | Sicherheitsschlüssel (Magnetschalter) und Not-Stopp-Taste |
| Klappmechanismus | Klappbar mit Verriegelung und Transportrollen |
| Abmessungen (aufgestellt) | Ca. 180 x 80 x 130 cm (L x B x H) – geschätzt |
| Gewicht | Ca. 85 kg – geschätzt |
| Maximale Benutzerlast | Ca. 150 kg – üblich für dieses Modell |
| Lauffläche | Ca. 140 x 45 cm – geschätzt |
| Motor | Gleichstrommotor, 30 Jahre Garantie (bei Heimgebrauch) |
| Wartung | Regelmäßige Reinigung, Schmierung der Lauffläche alle 180 Stunden, Spannung und Zentrierung des Laufbands |
| Garantie | 5 Jahre Teile, 1 Jahr Arbeit (Heimgebrauch); Motor 30 Jahre, Rahmen lebenslang |
| Zubehör | Sicherheitsschlüssel, Schmiermittel, Inbusschlüssel (M5, M6) |
Häufig gestellte Fragen - Z500 Motorized Treadmill Spirit
Benutzerfragen zu Z500 Motorized Treadmill Spirit
0 Frage zu diesem Gerät. Beantworten Sie die, die Sie kennen, oder stellen Sie Ihre eigene.
Eine neue Frage zu diesem Gerät stellen
Laden Sie die Anleitung für Ihr Heimtrainer kostenlos im PDF-Format! Finden Sie Ihr Handbuch Z500 Motorized Treadmill - Spirit und nehmen Sie Ihr elektronisches Gerät wieder in die Hand. Auf dieser Seite sind alle Dokumente veröffentlicht, die für die Verwendung Ihres Geräts notwendig sind. Z500 Motorized Treadmill von der Marke Spirit.
BEDIENUNGSANLEITUNG Z500 Motorized Treadmill Spirit
SPIRIT
natural_image
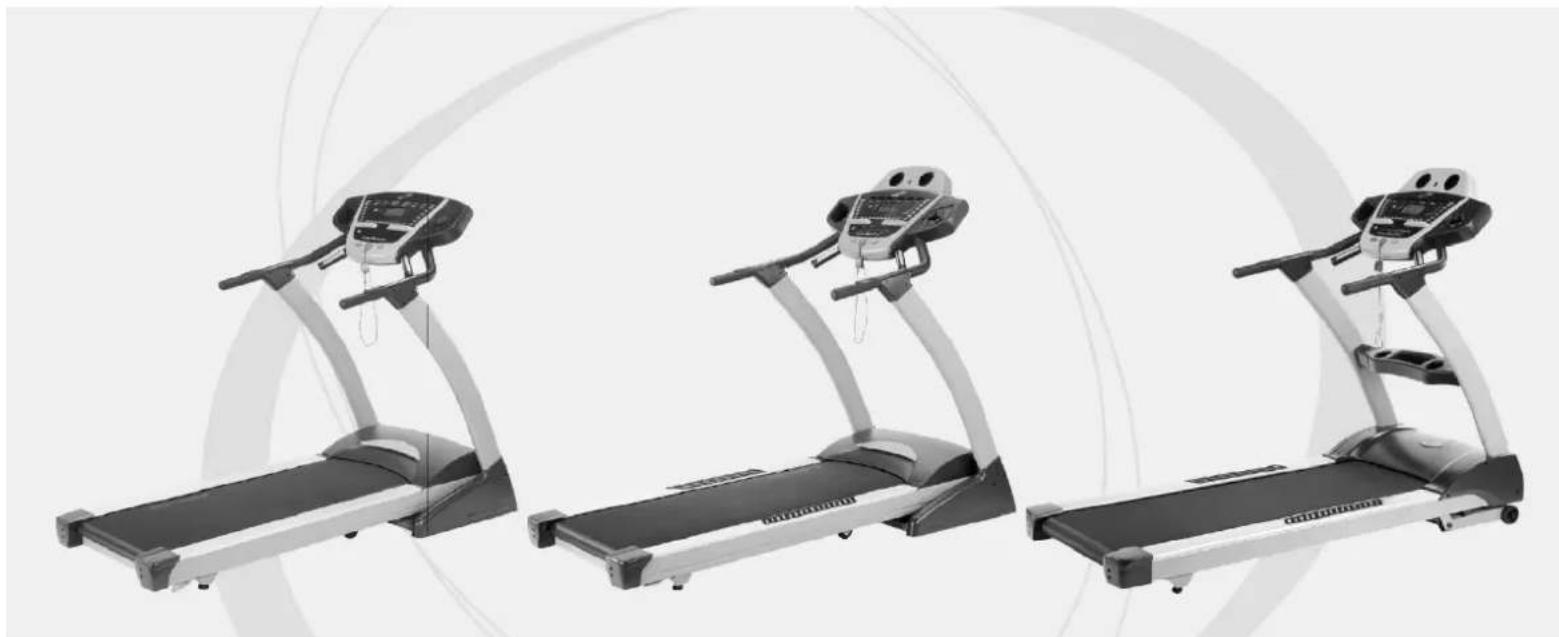
Three identical treadmills shown in black and silver, displayed against a white background with abstract circular graphics (no text or symbols visible)Z100
Motorized Treadmill
Z500
Motorized Treadmill
Z900
Motorized Treadmill
OWNER'S MANUAL
PLEASE CAREFULLY READ THIS ENTIRE MANUAL BEFORE OPERATING YOUR NEW TREADMILL!
Table of Contents
Product Registration....2
Important Safety Instructions....3
Important Electrical Information....4
Important Operation Instructions....5
Assembly instructions....6
Folding & Transport Instructions....10
Operation of Your New Treadmill....11
Programmable Features....14
Target Heart Rate....16
Using a Heart Rate Transmitter....17
Heart Rate Control Operation....18
General Maintenance....19
SPIRIT
CONGRATULATIONS ON YOUR NEW TREADMILL AND WELCOME TO THE SPIRIT FAMILY
Thank you for your purchase of this quality treadmill from Spirit Manufacturing, Inc. Your new treadmill was manufactured by one of the leading fitness manufacturers in the world and is backed by one of the most comprehensive warranties available. Through your dealer, Spirit will do all we can to make your ownership experience as pleasant as possible for many years to come. The local dealership where you purchased this treadmill is your administrator for all Spirit warranty and service needs. Their responsibility is to provide you with the technical knowledge and service personnel to make your experience more informed and any difficulties easier to remedy.
Please take a moment at this time to record the name of the dealer, their telephone number, and the date of purchase below to make any future, needed contact easy. We appreciate your support and we will always remember that you are the reason that we are in business. Please complete and mail your registration card today and enjoy your new treadmill.
Yours in Health,
Spirit Manufacturing, Inc.
Name of Dealer
Telephone Number of Dealer
Purchase Date
Product Registration
RECORD YOUR SERIAL NUMBER
Please record the Serial Number of this fitness product in the space provided below.
Serial Number
REGISTER YOUR PURCHASE
The self-addressed product registration card must be completed in full and returned to Spirit Manufacturing, Inc. or visit www.spiritfitness.com to register online.
Ver. B
Important Safety Instructions
WARNING - Read all instructions before using this appliance.
DANGER - To reduce the risk of electric shock disconnect your Spirit treadmill from the electrical outlet prior to cleaning and/or service work.
WARNING - To reduce the risk of burns, fire, electric shock, or injury to persons, install the treadmill on a flat level surface with access to a 120-volt, 20-amp grounded outlet.
DO NOT USE AN EXTENSION CORD: DO NOT ATTEMPT TO DISABLE THE GROUNDED PLUG BY USING IMPROPER ADAPTERS, OR IN ANY WAY MODIFY THE CORD SET. A serious shock or fire hazard may result along with computer malfunctions. See Grounding Instructions, page 3.
Do not operate treadmill on deeply padded, plush or shag carpet. Damage to both carpet and treadmill may result.
Do not block the rear of the treadmill. Provide a minimum of 3 1/2 feet clearance between the rear of the treadmill and any fixed object.
- Keep children away from the treadmill. There are obvious pinch points and other caution areas that can cause harm.
- Keep hands away from all moving parts.
■ Never operate the treadmill if it has a damaged cord or plug. If the treadmill is not working properly, call your dealer.
- Keep the cord away from heated surfaces.
Do not operate where aerosol spray products are being used or where oxygen is being administered. Sparks from the motor may ignite a highly gaseous environment.
■ Never drop or insert any object into any openings.
Important Electrical Information
WARNING!
- NEVER use a ground fault circuit interrupt (GFCI) wall outlet with this treadmill. Route the power cord away from any moving part of the treadmill including the elevation mechanism and transport wheels.
● NEVER remove any cover without first disconnecting AC power. - If voltage varies by ten percent (10%) or more, the performance of your treadmill may be affected. Such conditions are not covered under your warranty. If you suspect the voltage is low, contact your local power company or a licensed electrician for proper testing. See Diagnosis Guide, page 27.
- NEVER expose this treadmill to rain or moisture. This product is NOT designed for use outdoors, near a pool or spa, or in any other high humidity environment.
Grounding Instructions
This product must be grounded. If the treadmill should malfunction or breakdown, grounding provides a path of least resistance for electric current, reducing the risk of electric shock. This product is equipped with a cord having an equipment-grounding plug. The plug must be plugged into an appropriate outlet that is properly installed and grounded in accordance with all local codes and ordinances.
DANGER - Improper connection of the equipment-grounding conductor can result in a risk of electric shock. Check with a qualified electrician or serviceman if you are in doubt as to whether the product is properly grounded. Do not modify the plug provided with the product if it will not fit the outlet, have a proper outlet installed by a qualified electrician.
This product is for use on a nominal 120-volt circuit, and has a grounding plug that looks like the plug illustrated below. A temporary adapter that looks like the adapter illustrated below may be
- NEVER operate this treadmill without reading and completely understanding the results of any operational change you request from the computer.
- Understand that changes in speed and incline do not occur immediately. Set your desired speed on the computer console and release the adjustment key. The computer will obey the command gradually.
- NEVER use your treadmill during an electrical storm. Surges may occur in your household power supply that could damage treadmill components.
- Use caution while participating in other activities while walking on your treadmill; such as watching television, reading, etc. These distractions may cause you to lose balance or stray from walking in the center of the belt; which may result in serious injury.
- NEVER mount or dismount the treadmill while the belt is moving. Spirit treadmills start with at a very low speed and it is unnecessary to straddle the belt during start up. Simply standing on the belt during slow acceleration is proper after you have learned to operate the unit.
● Always hold on to a handrail or hand bar while making control changes (incline, speed, etc.). Do not use excessive pressure on console control keys. They are precision set to function properly with little finger pressure. Pushing harder is not going to make the unit go faster or slower. If you feel the buttons are not functioning properly with normal pressure contact your Spirit dealer.
Safety Tether Cord
A safety tether cord is provided with this unit. It is a simple magnetic design that should be used at all times. It is for your safety should you fall or move too far back on the tread-belt. Pulling this safety tether cord will stop tread-belt movement.
To Use:
- Place the magnet into position on the round metal portion of the console control head. Your treadmill will not start and operate without this. Removing the magnet also secures the treadmill from unauthorized use.
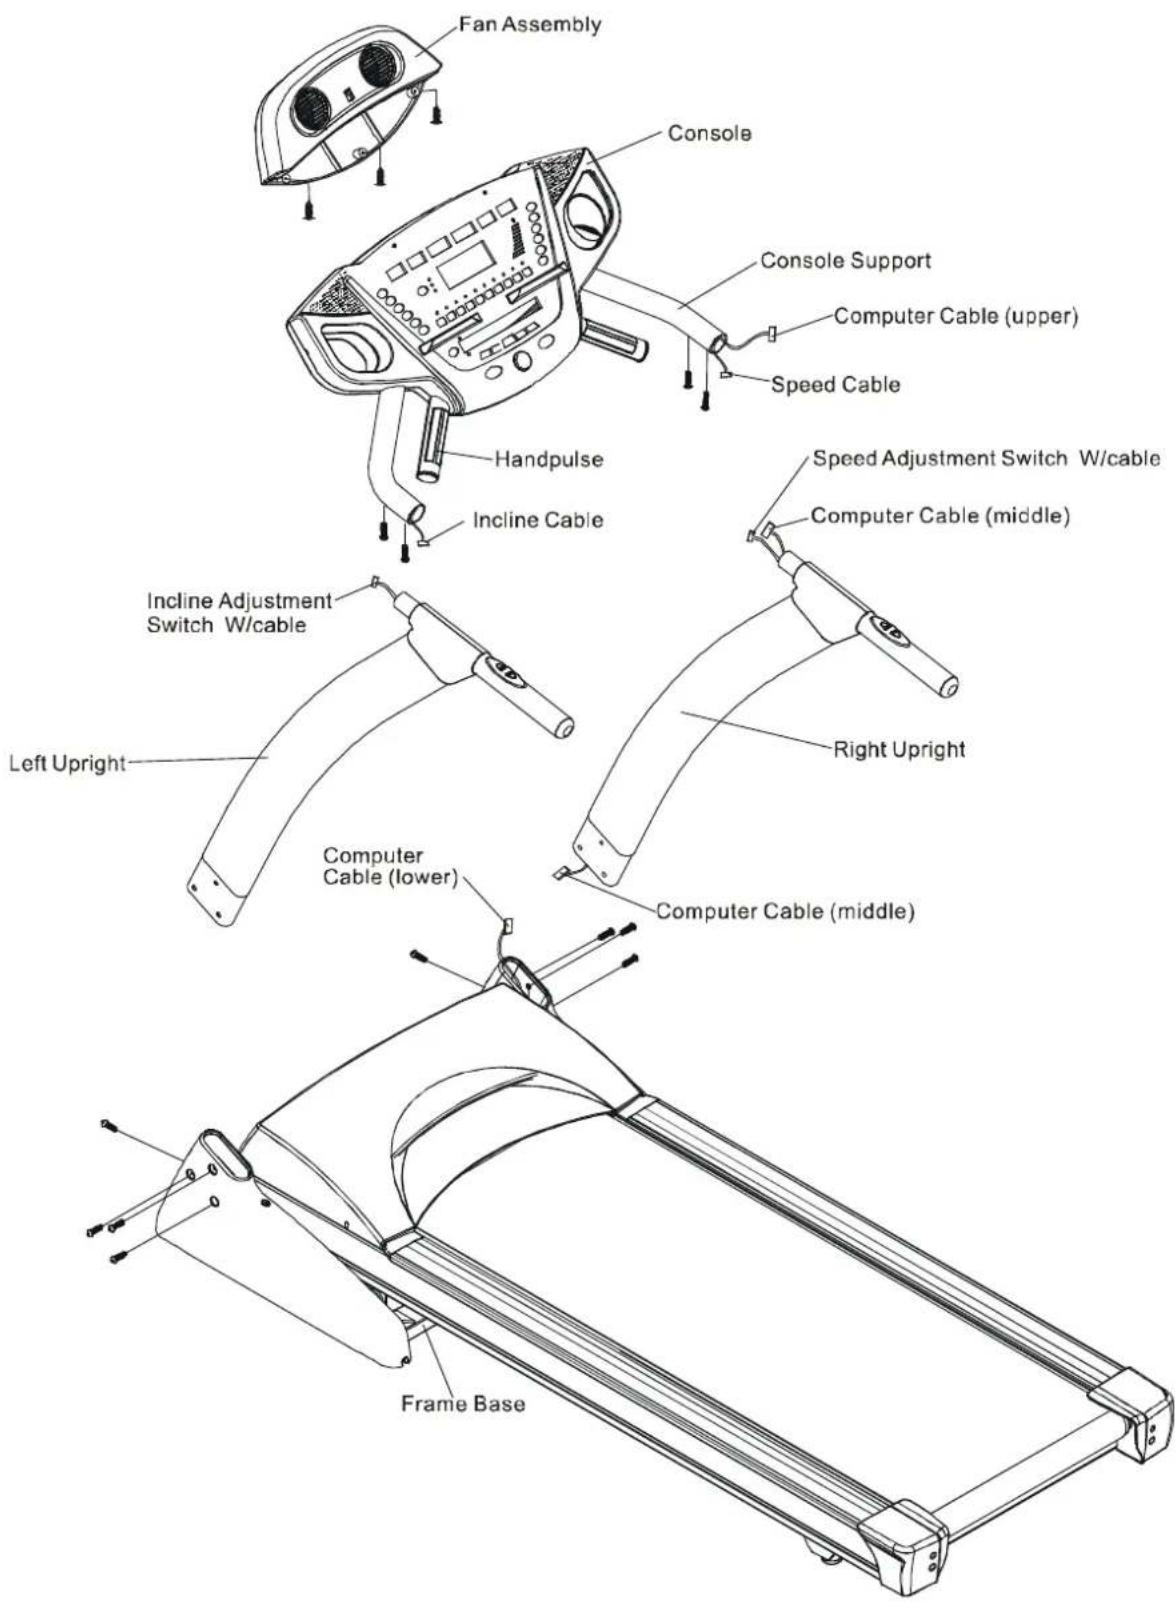
Assembly Instructions ( Z100 / Z500 )
text_image
Fan Assembly Console Console Support Computer Cable (upper) Speed Cable Handpulse Incline Cable Speed Adjustment Switch W/cable Computer Cable (middle) Incline Adjustment Switch W/cable Right Upright Left Upright Computer Cable (lower) Computer Cable (middle) Frame Base!!ATTENTION: IMPORTANT UNPACKING INSTRUCTIONS. PLEASE READ BEFORE UNPACKING YOUR FOLDING TREADMILL!!
Serious injury could occur if this folding treadmill is not unpacked properly.
There is a Velcro strap installed around the treadmill base that prevents the treadmill from unfolding accidentally during shipping. If this strap is not removed properly the treadmill could spring open unexpectedly and cause injury if someone is standing near the treadmill when the strap is removed.
To ensure your personal safety during removal of the shipping strap please make sure the treadmill is positioned flat on the ground, in the orientation it would be in if you were using the treadmill. Do not turn the treadmill up on it's side while removing the shipping strap. This could cause the treadmill's folding mechanism to spring open. If the end of the Velcro strap (that you need to grab to remove it) happens to be under the treadmill deck, reach under the deck to grab it, but do not tilt the treadmill up to gain access to the strap end.
ASSEMBLY PACK CHECK LIST (Z100 / Z500)
(12 pcs) 5/16" x 1/2" Button Head Socket Screw
(3 pcs) M3 x 18 m/m Phillips Head Screw (Z500 only)
(1pc) Safety Key
(1 pc) Deck / Belt Lubricant
(1 pc) Combination M5 Allen Wrench & Phillips Head Screwdriver
(1 pc) M6 Allen Wrench
Assembly (Z100 / Z500)
STEP 1
Remove all parts from the carton.
STEP 2
Connect Computer Cable (Lower) with Computer Cable (Middle).
STEP 3
Hand tighten Right and Left Uprights into the Frame Base with 8 pcs of 5/16" x 1/2"
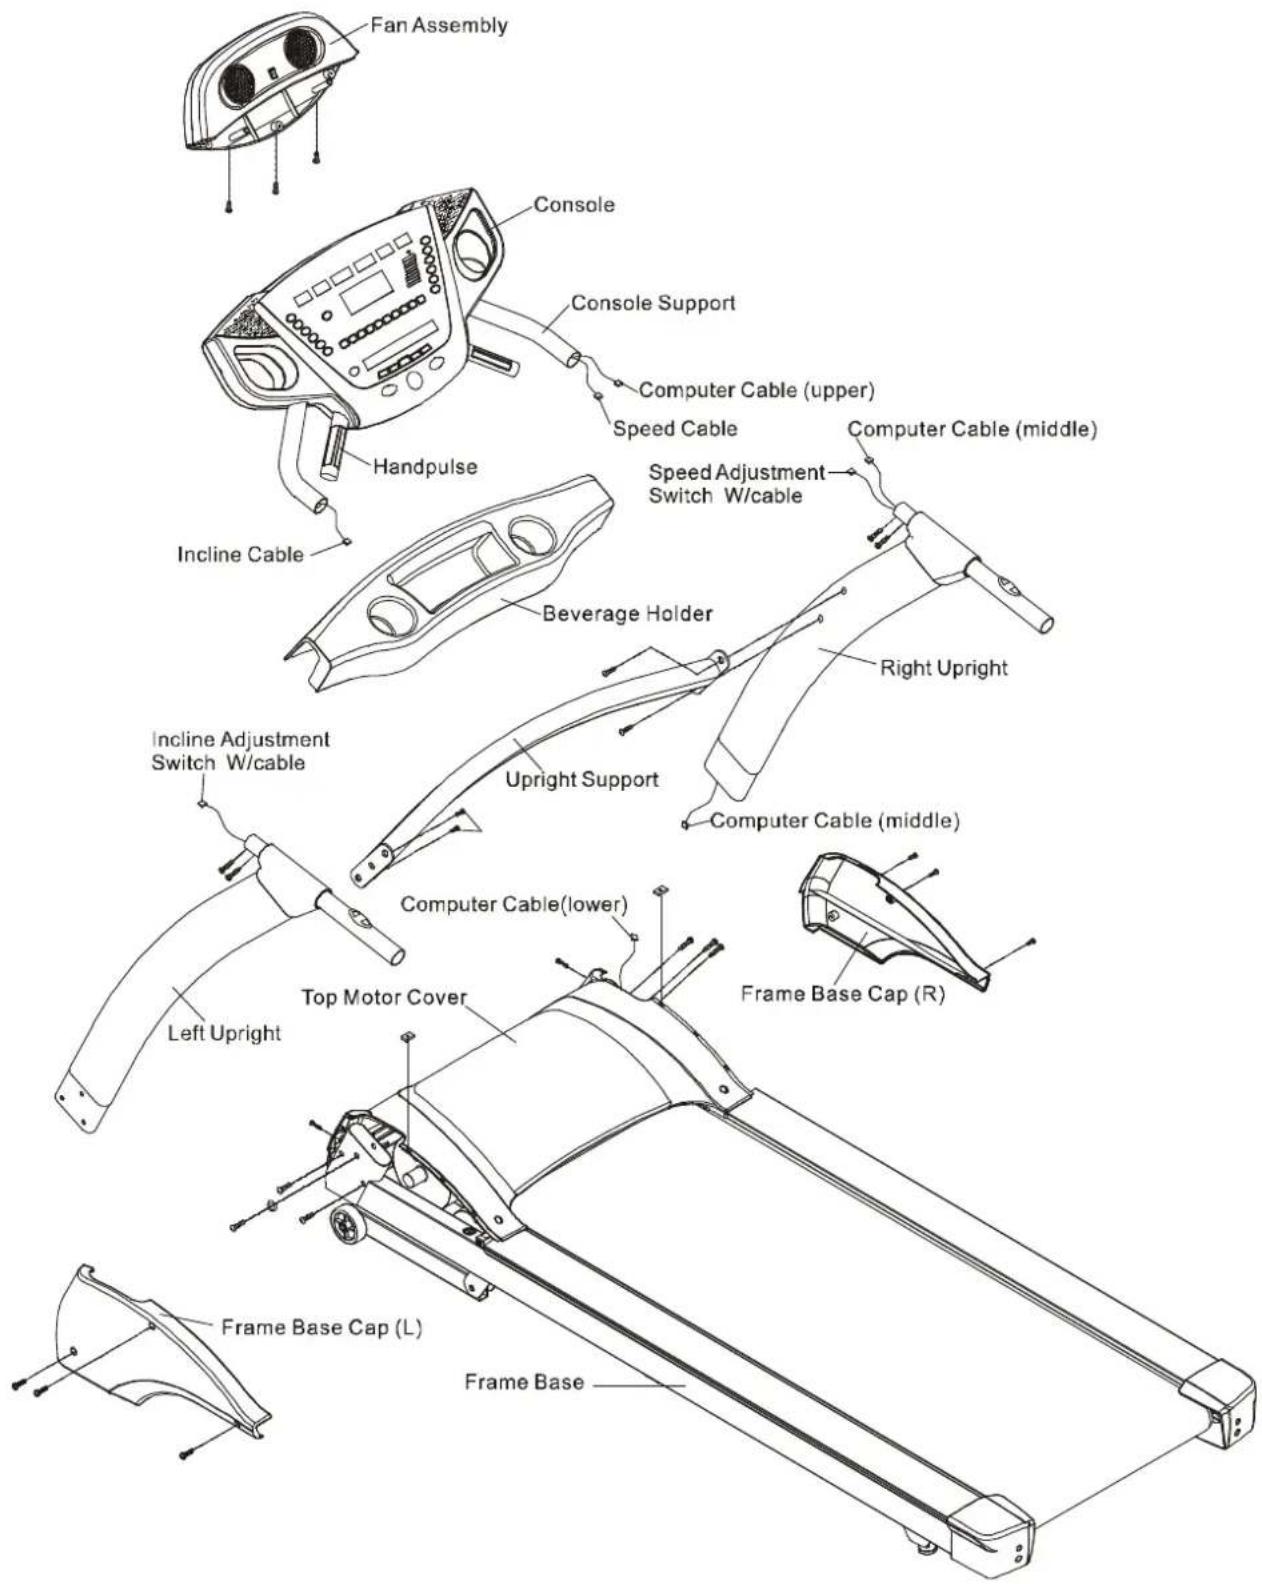
Assembly Instructions (Z900)
text_image
Fan Assembly Console Console Support Computer Cable (upper) Speed Cable Computer Cable (middle) Handpulse Speed Adjustment Switch W/cable Incline Cable Beverage Holder Right Upright Incline Adjustment Switch W/cable Upright Support Computer Cable (middle) Computer Cable(lower) Left Upright Top Motor Cover Frame Base Cap (R) Frame Base Cap (L)ASSEMBLY PACK CHECK LIST (Z900)
(3 pcs) M3 x 18 m/m Phillips Head Screw
(10 pcs) 5/16" x 1/2" Button Head Socket Screw
(4 pcs) 5/16" x 3/4" Button Head Socket Screw
(2 pcs) M5 Iron Plate Nut
(2 pcs) 3/8" x 2T Spring Washer
(2 pcs) 5 x 16 m/m Tapping Screw
(4 pcs) 5 x 16 m/m Tapping Screw
(1 pc) Safety Key
(1 pc) Belt / Deck Lubricant
(1 pc) Combination M5 Allen Wrench & Phillips Head Screwdriver
(1 pc) M6 Allen Wrench
Assembly (Z900)
STEP 1
Remove all parts from the carton.
STEP 2
Connect Computer Cable (Lower) with Computer Cable (Middle).
STEP 3
Hand tighten Right and Left Uprights into Main Frame with 2pcs of 3/8" x 2" Button Head Socket Screws), 2pcs of 3/8" x 2T Spring Washers and 6pcs of 5/16" x 1/2" Button Head Socket Screws by using the Combination M5 Allen Wrench & Phillips Head Screwdriver and M6 Allen Wrench.
STEP 4
Install the Upright Support onto the Left and Right Uprights with 4pcs of 5/16" x 3/4" Button Head Socket Screws, by using the Combination M5 Allen Wrench & Phillips Head Screwdriver. *Please don't tighten them, yet.
STEP 5
Connect Computer Cable (Middle) with Computer cable (Upper). Connect Speed Adjustment Switch W/Cable with Speed Cable (Upper). And connect loading Adjustment Switch W/Cable with loading Cable (Upward)
Z100 / Z500 Folding Instructions
Do not attempt to move the unit unless it is in the folded and locked position. Be sure the power cord is secured to avoid possible damage. Use both handrails to maneuver the unit to the desired position.
■ To Fold The Treadmill:
Make certain the treadmill is at minimum incline. Lift the treadmill running deck until it is secured by the locking telescoping tube assembly in center back of base.
■ To Unfold The Treadmill:
Apply slight forward pressure* on the treadmill running deck with one hand. Pull down on the unlocking lever and slowly lower the running deck to the floor. The deck will lower unassisted when it reaches about waist high.
*At the rear roller area to relieve pressure on the locking system.
Transport
Z100/Z500
The treadmill is equipped with four transport wheels which are engaged when the treadmill is folded. After folding simply roll the treadmill away.
Z900
Carefully lift the treadmill at the rear roller area, grasping the two side end caps, and roll the treadmill away.
Operation of Your Treadmill
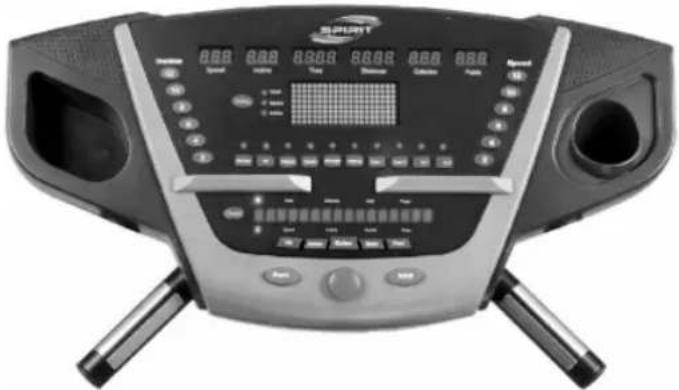
Getting familiar with the control panel
Z100 Console
natural_image
Front view of a modern exercise machine with digital display and control buttons (no visible text or symbols)Z500 / Z900 Console
natural_image
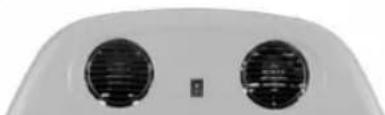
Top-down view of a white appliance with two circular vented fans and a small indicator light (no text or symbols visible)Getting Started:
Power the treadmill on by plugging it into an appropriate wall outlet, then turn on the power switch located at the front of the treadmill below the motor hood. Ensure that the safety key is installed, as the treadmill will not power on without it.
When the power is turned on, all the lights on the display will light for a short time. Then the Time and Distance windows will display Odometer readings for a short time. The Time window will show how many hours the treadmill has been in use and the Distance window will show how many miles (or Kilometers if the treadmill is set to metric readings) the treadmill has gone. Then a message will scroll across the message showing the current software version. The treadmill will then enter idle mode, which is the starting point for operation.
Quick-Start Operation:
STEP 1: Press and release the Start key to wake display up (if not already on).
Note: Installing the tether key will also wake up the console.
STEP 2: Press and release the Start key to begin belt movement, at .5 mph, then adjust to the desired speed using the Fast / Slow keys (console or hand rail). You may also use the rapid speed keys 2 through 12 to adjust the speed.
STEP 3: To slow tread-belt press and hold the Slow key (console or hand rail) to the desired speed. You may also press the rapid speed adjust keys, 2 through 12.
STEP 4: To stop the tread-belt press and release red Stop key.
Pause/Stop/Reset Feature:
STEP 1: When the treadmill is running the pause feature may be utilized by pressing the red Stop key once. This will slowly decelerate the tread-belt to a stop. The incline will go to zero percent. The Time, Distance and Calorie readings will hold while the unit is in the pause mode. After 5 minutes the display will reset and return to the start up screen.
STEP 2: To resume your exercise, when in Pause mode, press the Start key. The speed and incline will return to their previous settings.
1 Pause is executed when the Stop button is pressed once. If the Stop key is pressed a second time, the program will end and a workout summary will be displayed. If the Stop button is pressed a third time, the console will return to the idle mode (start up) screen. If the Stop button is held down for more than 3 seconds the console will reset.
Incline Feature:
1 Incline may be adjusted anytime after belt movement.
1 Press and hold the Adjust ▲ keys (console or hand rail) to achieve desired level of effort. You may also choose a more rapid increase / decrease by selecting desired key, 2 through 12, on left hand side of console (incline).
1 The display will indicate incline percent as adjustments are made.
1 Incline will remain in it's position when display is turned off.
Dot Matrix Center Display (Manual Operation):
Twenty rows of Red (Tri-color on Z500 / Z900) "dots"(8 high) indicate each segment of a workout. The dots are only to show an approximate level (speed/indline) of effort. They do not necessarily indicate a specific value - only an approximate percent to compare levels of intensity. In Manual Operation the Speed / Incline dot matrix window will build a profile "picture" as values are changed during a workout.
Next to the Dot Matrix window are three LEDs labeled: Track, Speed and Incline, along with a Display button. When the Track LED is lit the Dot matrix displays the Track profile, when the Speed LED is lit the Dot matrix displays the Speed profile and when the Incline LED is lit the Dot Matrix displays the Incline profile. You may change the Dot Matrix profile view by pressing the Display button. After scrolling through the three profiles, by pressing the Display button, the Dot matrix will automatically scroll through the three displays showing each one for four seconds. The LED associated with each profile will blink while that view is displayed. One more press of the Display button will return you to the Track profile.
1/4 Mile Track:
The 1/4 mile track will be displayed around the dot matrix window. The flashing dot indicates your progress. Once the 1/4 mile is complete this feature will begin again.
Dulse Grin Feature:
Speakers:
The console has 2 built-in Speakers. You may Plug an Audio Source (CD player, MP3, Computer, etc.) into the Jack on the Left side of console.
There is no volume control on console, volume must be controlled by Audio Source.
To Turn Treadmill Off (Blank out Display):
Two methods accomplish this: Use either one.
(1) Display will automatically turn off (blank out) after 30 minutes (no key operations) in Pause / Stop mode.
(2) Remove tether cord.
Programmable Features
The New Spirit's Series offers 7 factory preset programs, 2 user defined programs and one Manual program.
Each preset program has a maximum speed level that is displayed when a desired workout is chosen. The maximum speed that the particular program will achieve will be displayed in the Speed window.
Also included are two user programs (User 1 and User 2) for custom workouts.
To Select a Program:
STEP 1: Press the desired PROGRAM key. Press enter to select the program. The display will prompt you through the programming or you can just press Start to begin the program with default values.
STEP 2: If enter was pressed, the Time window will blink with the default value of 20 minutes. You may use any of the up/down keys to adjust the time. After adjusting, or to accept the default, press enter. (Note: You may press start at any time during the programming to start the program.)
STEP 3: The Calorie window will now be blinking a value, which is your Body Weight. Entering the correct body weight will affect the calorie count. Use the Up/Down keys to adjust, then press enter. A note about the Calorie display: No exercise machine can give you an exact calorie count because there are too many factors which determine exact calorie burn for a particular person.
Even if someone is the exact same body weight, age and height, their calorie burn may be very different than yours. The Calorie display is to be used as a reference only to monitor improvement from workout to workout.
STEP 4: The Heart Rate window will now be blinking a value, which is your Age.
Entering your correct age affects the heart rate Bar Graph Display (Z500 / Z900 only) and the Heart Rate Control programs. Use the Up/Down keys to adjust, then press enter. Your age determines the maximum heart rate you may achieve. Since the Bar Graph Display and the Heart Rate control features are based on a percentage of your maximum heart rate, it is important to enter the correct age for these features to work properly.
STEP 5: The Speed window will now be blinking the preset top speed of the selected program. Use the Up/Down keys to adjust, then press enter. Each program has various speed changes through out, this allows you to limit the highest speed the program can reach.
User Programs:
STEP 1: Select User 1 or User 2 via the PROGRAM key then press Enter. Note that the dot matrix display portion will have a single row of dots at the bottom (Unless there is a previously stored program).
STEP 2: Note the clock (Time) window is flashing. Use the Adjust keys to adjust up from 10 minutes (if desired). Press ENTER key. This is a must to continue even if time is not adjusted.
STEP 3: The Calorie window will now be blinking a bodyweight value. Enter your odyweight and press Enter.
STEP 4: The Pulse window will now be blinking an Age value. Adjust the age and press enter.
STEP 5: The first column (segment) will now be blinking. Using the Fast / Slow keys, adjust the speed level to your desired effort for the first segment then press enter. The second column will now be blinking. Repeat the above process until all segments have been programmed. The first column will be blinking again. This is for the incline programming. Repeat the above process to program all segments for incline.
STEP 6: Press the Start button to begin the workout and also save the program to memory.
Target Heart Rate
- The old motto, "no pain, no gain", is a myth that has been overpowered by the benefits of exercising comfortably. A great deal of this success has been promoted by the use of heart rate monitors. With the proper use of a heart rate monitor, many people find that their choice of exercise intensity is either too high or too low and exercise is much more enjoyable by maintaining their heart rate in the desired benefit range.
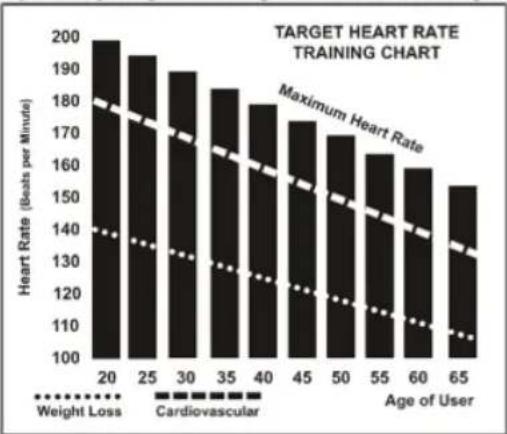
- To determine the benefit range in which you wish to train, you must first determine your Maximum Heart Rate. This can be accomplished by using the following formula: 220 - User's Age
= Maximum Heart Rate. If you enter your age during programming of the console the console will perform this calculation automatically. This is used for the HR control programs and also for the Heart rate bar graph (Z500/Z900 only) After calculating your Maximum Heart Rate, you can decide upon which goal you would like to pursue. The two most popular reasons for, or goals of exercise, are cardiovascular fitness (training for the heart and lungs) and weight control. The black columns on the chart above represent the Maximum Heart Rate for a person whose age is listed at the bottom of each column.
bar
| Age of User | Weight Loss | Cardiovascular | | ----------- | ----------- | -------------- | | 20 | 140 | 180 | | 25 | 135 | 175 | | 30 | 130 | 170 | | 35 | 125 | 165 | | 40 | 120 | 160 | | 45 | 115 | 155 | | 50 | 110 | 150 | | 55 | 105 | 145 | | 60 | 100 | 140 | | 65 | 95 | 135 |Using a Heart Rate Transmitter
How to wear your wireless chest strap transmitter:
- Attach the transmitter to the elastic strap using the locking parts.
- Adjust the strap as tightly as possible as long as the strap is not too tight to remain comfortable.
-
Position the transmitter with the Spirit logo centered in the middle of your body facing away from your chest (some people must position the transmitter slightly left of center). Attach the final end of the elastic strap by inserting the round end and, using the locking parts, secure the transmitter and strap around your chest.
-
Position the transmitter immediately below the pectoral muscles.
-
Sweat is the best conductor to measure very minute heart beat electrical signals. However, plain water can also be used to pre-wet the electrodes (2 black square areas on the reverse side of the belt and either side of transmitter). It's also recommended that you wear the transmitter strap a few minutes before your work out. Some users, because of body chemistry, have a more difficult time in achieving a strong, steady signal at the beginning. After "warming up", this problem lessens. As noted, wearing clothing over the transmitter/strap doesn't affect performance.
-
Your workout must be within range - distance between transmitter/receiver - to achieve a strong steady signal. The length of range may vary somewhat but generally stay close enough to the console to maintain good, strong, reliable readings. Wearing the transmitter immediately against bare skin assures you of proper operation. If you wish, you may wear the transmitter over a shirt. To do so, moisten the areas of the shirt that the electrodes will rest upon.
Note: The transmitter is automatically activated when it detects activity from the user's heart. Additionally, it automatically deactivates when it does not receive any activity. Although the transmitter is water resistant, moisture can have the effect of creating false signals, so you should take precautions to completely dry the transmitter after use to prolong battery life (estimated transmitter battery life is 2500 hours). The replacement battery is Panasonic CR2032.
Erratic Operation:
Caution! Do not use this treadmill for Heart Rate Control unless a steady, solid Actual Heart Rate value is being displayed. High, wild, random numbers being displayed indicate a problem.
Areas to look for on interference:
Heart Rate Control
How the Heart Rate Control Program Works:
Heart Rate Control (HRC) uses your treadmill's speed and incline systems to adjust your heart rate. Increases and decreases in elevation affect heart rate much more efficiently than changes in speed alone. The HRC program automatically changes the speed and elevation gradually to achieve the programmed target heart rate.
Heart rate Auto-Pilot feature (Z500/Z900 only)
This unique feature allows the user to instantly enter the Heart Rate Control mode at any time with the press of a button. The HR2 program button also doubles as the Auto-Pilot button. During any program the user may press the Auto-Pilot button to enter the HRC program. Your current heart rate (the heart rate you are at when you press Auto-Pilot) will be maintained automatically by the Auto-Pilot program. You may press the elevation/incline up or down buttons to change your target heart rate while in the Auto-Pilot mode.
Selecting a Heart Rate Control Program:
You have the option, during the setup mode, to choose either the Weight Control (H-1) program or the Cardiovascular (H-2) program. Weight Control attempts to maintain your heart rate at 70% of your Maximum Heart Rate. Cardiovascular attempts to maintain your heart rate at 90% of your Maximum Heart Rate. Your Maximum Heart Rate is based upon a formula that subtracts your age from 220. Your age input is performed during the setup mode.
CAUTION!
The target value used in H-1 and H-2 programs is a suggestion only for normal, healthy individuals. Do not exceed your limits! You may not be able to obtain your chosen target. If in question, enter a higher age value that will set a lower target goal.
Heart Rate Control programming
CAUTION!
Intended for wireless transmitter chest strap only. Do not use Pulse Grip bar for Heart Rate Control. You must receive a strong / steady value in heart rate window.
STEP 1: Press HR1 or HR2 button.
STEP 2: The Pulse window will be blinking, showing the default HR for this program. You may adjust it and press enter if you want or just press enter to accept the default value.
STEP 3: The Calorie will now be blinking showing bodyweight. Adjust and press enter or press enter to accept default.
STEP 4: The Pulse window will now be blinking showing age. Adjust and press enter or press enter to accept default. Adjusting Age will change the Target HR value.
STEP 5: The Time window will now be blinking. Adjust the time and press enter.
STEP 6: Press Start to begin program.
During the program you may increase or decrease the target heart rate by pressing the elevation/incline up or down buttons.
General Maintenance
Belt and Bed - Your treadmill uses a very high-efficient low-friction bed. Performance is maximized when the bed is kept as clean as possible. Use a soft, damp cloth or paper towel to wipe the edge of the belt and the area between the belt edge and frame. Also reach as far as practical directly under the belt edge. This should be done once a month to extend belt and bed life. Use water only - no cleaners or abrasives. A mild soap and water solution along with a nylon scrub brush will clean the top of the textured belt. Allow to dry before using.
Belt Dust - This occurs during normal break-in or until the belt stabilizes. Wiping excess off with a damp cloth will minimize buildup.
General Cleaning - Dirt, dust, and pet hair can block air inlets and accumulate on the running belt. On a monthly basis, vacuum underneath your treadmill to prevent buildup. Once a year, you should remove the black motor hood and vacuum out dirt that may accumulate. UNPLUG POWER CORD BEFORE THIS TASK.
BELT ADJUSTMENTS:
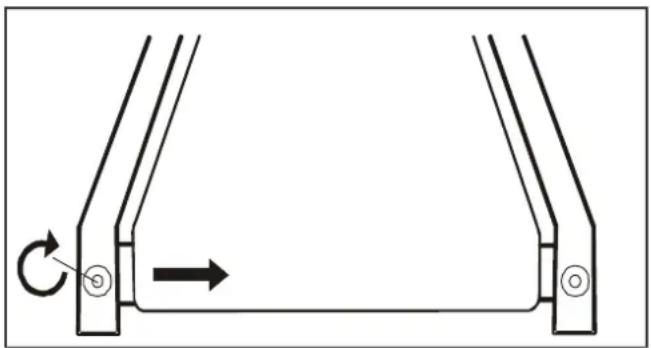
Treadbelt Tension Adjustment - Belt tension is not critical for most users. It is very important for joggers and runners in order to provide a smooth, steady running surface. Adjustment must be made from the right side of the rear roller in order to adjust tension with the 6 mm Allen wrench provided in the parts package. The adjustment bolt is located at the end of the right side rail as noted in diagram below.
natural_image
Pure geometric lines without any text, numbers, or symbolsTREADBELT TRACKING ADJUSTMENT:
The performance of your treadmill is dependent on the frame running on a reasonably level surface. If the frame is not level, the front and back roller cannot run parallel, and constant belt adjustment may be necessary.
The treadmill is designed to keep the treadbelt reasonably centered while in use. It is normal for some belts to drift near one side while the belt is running with no one on it. After a few minutes of use, the treadbelt should have a tendency to center itself. If, during use, the belt continues to move toward one side, adjustments are necessary.
TO SET TREADBELT TRACKING:
A 6 mm Allen wrench is provided to adjust the rear roller. Make tracking adjustments from the left side only. Set belt speed at approximately 2 to 3 mph. A small adjustment can make a dramatic difference. Turn the bolt only a 1/4 turn and wait a few minutes for the belt to adjust itself. Continue to make 1/4 turns until the belt stabilizes in the center of the running deck. The belt may require periodic tracking adjustment depending on use and walking/running characteristics. Some users will affect tracking differently. Expect to make adjustments as required to center the treadbelt. Adjustments will become less of a maintenance concern as the belt is used. Proper belt tracking is an owner responsibility common with all treadmills.
natural_image
Diagram of a mechanical component with rotational arrow indicating motion (no text or symbols)ATTENTION:
DAMAGE TO THE RUNNING BELT RESULTING FROM IMPROPER TRACKING / TENSION ADJUSTMENTS IS NOT COVERED UNDER THE SPIRIT WARRANTY.
BELT / DECK LUBRICATION:
Do not lubricate with other than Spirit approved lubricant. Your treadmill comes with one tube of lubricant and extra tubes can be ordered directly from Spirit. There are commercially available lube kits, but the only one currently approved by Spirit is Lube-N-Walk. These kits come with an application wand that makes applying the lubrication easier. The kits can be purchased from Spirit or directly from Lube-N-Walk here: http://www.jadfitness.com/
Keeping the deck lubricated at the recommended intervals ensures the longest life possible for your treadmill. If the lubricant dries out, the friction between the belt and deck rises and places undue stress on the drive motor, drive belt and electronic motor control board, which could result in catastrophic failure of these expensive components. Failure to lubricate the deck at regular intervals may void the warranty.
The deck comes pre-lubricated and subsequent lubrication should be performed every 180 hours of use, or every three months, whichever comes first. The console has a built in lubrication reminder indicator that lights every 180 hours of use. To lubricate the deck with the tube of lubricant supplied it will be necessary to loosen the walking belt. Using the 6 mm allen wrench supplied, loosen the two rear roller adjustment bolts -- located in the rear end caps - enough to get your hand under the belt (5 - 10 turns). Make sure to loosen both bolts the same amount of turns and also remember how many turns, because when finished you will need to tighten the bolts back to the point they were before.
Once the belt is loose, wipe the deck with a clean lint free cloth to remove any dirt. Apply the whole tube of lubricant onto the deck surface about 18 inches from the motor cover. Squeeze out the contents of the tube across the deck (parallel to the motor cover) in about a one foot line, like toothpaste on a toothbrush. The one foot line should be in the middle of the deck at approximately equal distance from both side edges of the belt. You want the lubricant to be applied about the spot that your feet would hit the belt as you are walking. This should be about 18 inches from the motor cover, but you may want to walk on the treadmill before loosening the belt to note where your feet
Service Checklist - Diagnosis Guide
Before contacting your dealer for aid, please review the following information. It may save you both time and expense. This list includes common problems that may not be covered under the treadmill's warranty.
PROBLEM
SOLUTION/CAUSE
| Display does not light | Tether cord not in position.Circuit breaker on front grill tripped. Push circuit breaker in until it locks.Plug is disconnected. Make sure plug is firmly pushed into AC household wall outlet.Household circuit breaker may be tripped.Treadmill defect. Contact your Spirit dealer. |
| Treadbelt does not stay centeredTreadmill belt hesitates when walked/run on | A user may be walking while favoring or putting more weight on either the left or right foot. If this walking pattern is natural, track the belt slightly off-center to the side opposite from the belt movement. See General Maintenance section on Treadbelt Tension. Adjust as necessary. |
| Motor is not responsive / Display is lit | Make certain clock is running. |
| Treadmill will only achieve approximately 7 mph but shows higher speed on display | This indicates motor should be receiving power to operate. Low AC voltage to treadmill. Do not use an extension cord. If an extension cord is required it should be as short as possible and heavy duty 16 gauge minimum. Low household voltage. Contact an electrician or your Spirit dealer. A minimum of 110 volt AC current is required. |
Treadbelt stops quickly/suddenly when
High halt/deck friction. See General Maintenance
Manufacturer's Limited Warranty
Effective October 15, 2006
TREADMILL WARRANTY
Spirit Manufacturing Inc. warrants all its treadmill parts for a period of 5 years from the date of retail sale, as determined by sale receipt, or in the absence of a receipt eighteen (18) months from the original factory shipping date. Spirit's responsibilities include providing new or remanufactured parts, at Spirit's option, and technical support to our independent dealers and servicing organizations. In the absence of a dealer or service organization, these warranties will be administered by Spirit directly to a consumer. An extended warranty period applies to the following components:
Home Use WARRANTY
| Drive Motor | 30 Years |
| Electronics / Belt / Rollers | 5 Years |
| Frame Weldments | Lifetime |
| All Other Components | 5 Years |
| Labor | 1 Year |
| Light Institutional WARRANTY | |
| Motor | 5 Years |
| Parts | 3 Years |
| Labor | 1 Year |
| 6hr / day maximum use | |
NORMAL RESPONSIBILITIES OF THE CONSUMER
This warranty applies only to products in ordinary household use or light Institutional facility. The consumer is responsible for the items listed below: 1. The warranty registration card must be completed and returned to the address listed on the card within 10 days of the original purchase to validate the manufacturer's limited warranty.
2. Proper use of the treadmill in accordance with the instructions provided in this manual, including belt trading.
3. Proper installation by an authorized Spirit service company in accordance with instructions provided with the treadmill and with all local electric codes.
4. Proper connection to a grounded power supply of sufficient voltage, replacement of brown fuses, repair of loose connections or defects in house wiring.
5. Expenses for making the treadmill accessible for servicing, including any item that was not part of the treadmill at the time it was shipped from the factory.
6. Damages to the treadmill finish during shipping, installation or following installation.
EXCLUSIONS
This warranty does not cover the following
1. CONSEQUENTIAL, COLLATERAL, OR INCIDENTAL DAMAGES SUCH AS PROPERTY DAMAGE AND INCIDENTAL EXPENSES RESULTING FROM ANY BREACH OF THIS WRITTEN OR ANY IMPLIED WARRANTY.
Note: Some states do not allow the exclusion or limitation of incidental or consequential damages, so this limitation or exclusion may not apply to you.
2. Service call reimbursement to the consumer. Service call reimbursement to the dealer that does not involve malfunction or defects in workmanship or material, for units that are beyond the warranty period, for units that are beyond the service call reimbursement period, for treadmills not requiring component replacement, or treadmills not in ordinary household use.
3. Damages caused by services performed by persons other than authorized Spirit service companies; use of parts other than original