EPC460 - Pfanne Cook's essentials - Kostenlose Bedienungsanleitung
Finden Sie kostenlos die Bedienungsanleitung des Geräts EPC460 Cook's essentials als PDF.


Benutzerfragen zu EPC460 Cook's essentials
0 Frage zu diesem Gerät. Beantworten Sie die, die Sie kennen, oder stellen Sie Ihre eigene.
Eine neue Frage zu diesem Gerät stellen
Laden Sie die Anleitung für Ihr Pfanne kostenlos im PDF-Format! Finden Sie Ihr Handbuch EPC460 - Cook's essentials und nehmen Sie Ihr elektronisches Gerät wieder in die Hand. Auf dieser Seite sind alle Dokumente veröffentlicht, die für die Verwendung Ihres Geräts notwendig sind. EPC460 von der Marke Cook's essentials.
BEDIENUNGSANLEITUNG EPC460 Cook's essentials
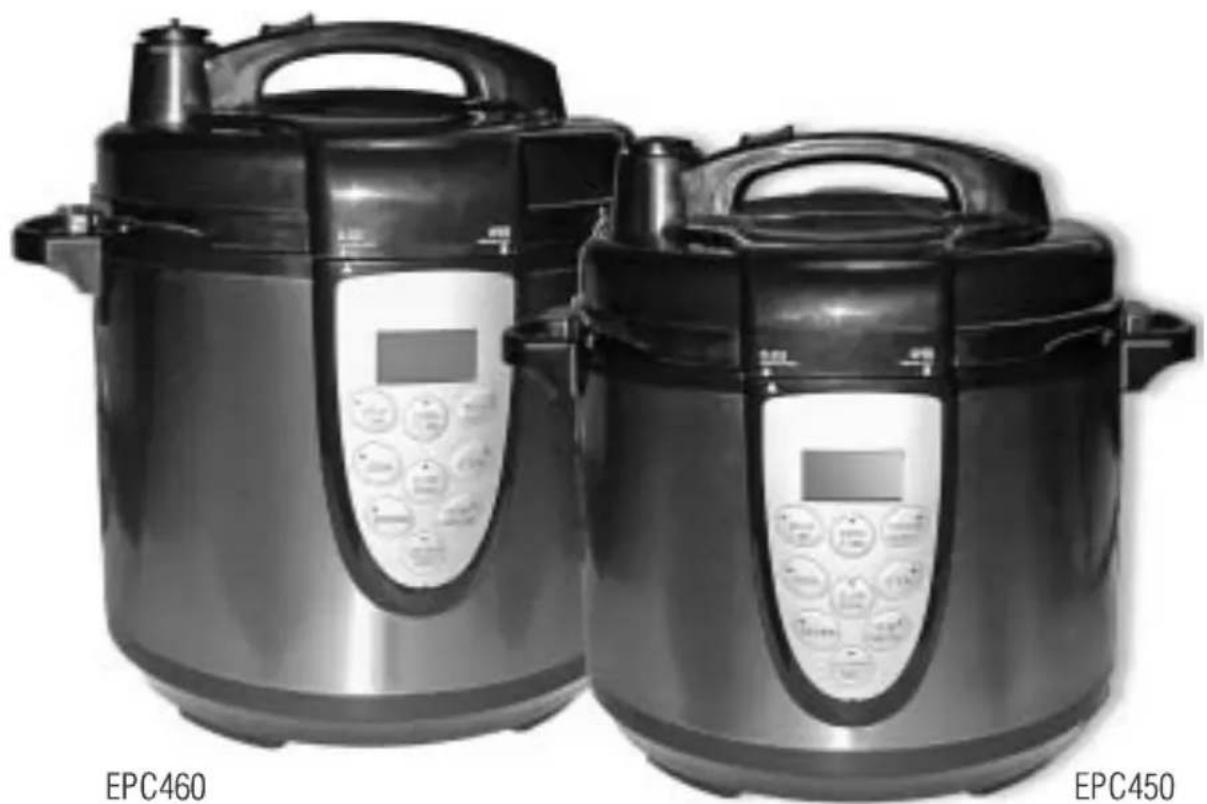
For Model Numbers EPC460 and EPC450
natural_image
Two black rice cookers labeled EPC460 and EPC450, with no visible text or symbols on the devices themselves.ELECTRONIC DIGITAL
Pressure Cooking System
Important: Do Not Use This Pressure Cooker Until You Have Read This Entire Manual Thoroughly!
Table of Contents
WELCOME....3
IMPORTANT....4-5
ADDITIONAL IMPORTANT SAFEGUARDS......6
PRODUCT FEATURES....7
INTRODUCTION......8
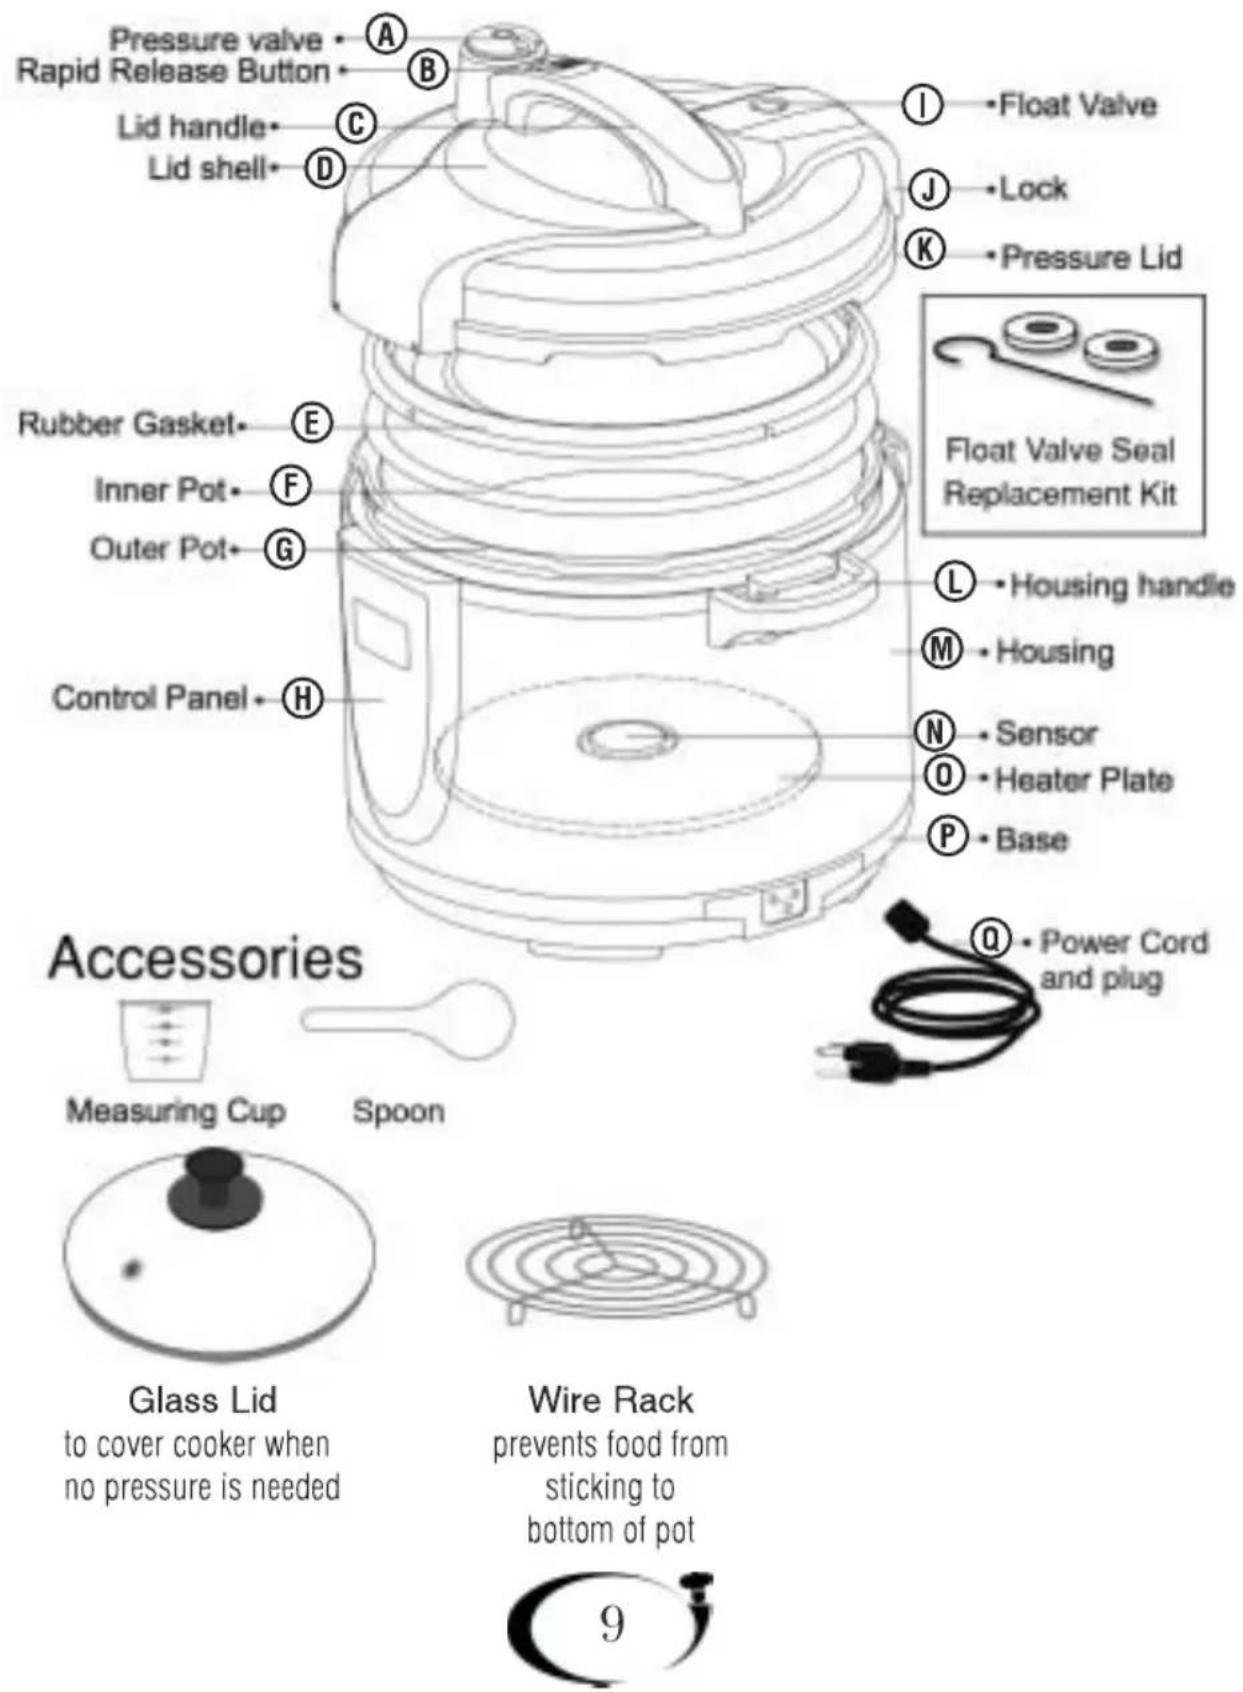
PARTS AND ASSEMBLY....9
CONTROL PANEL SETTING....10-11
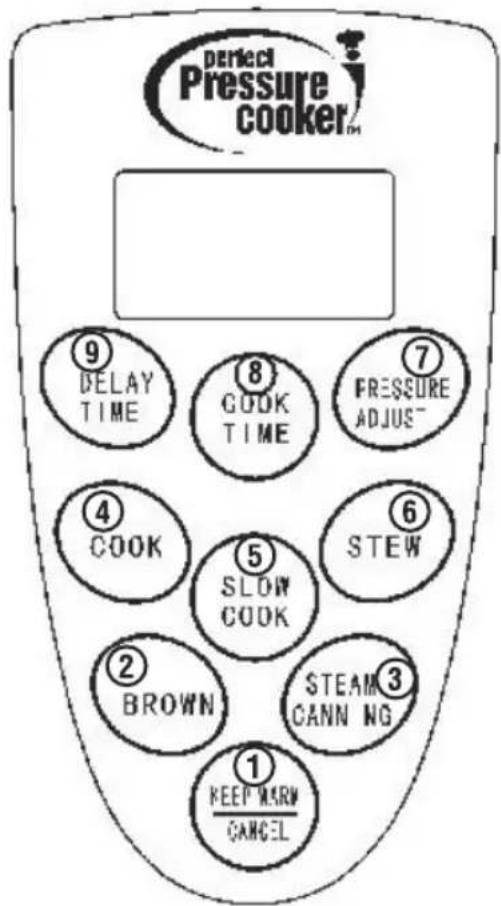
CONTROL PANEL DIAGRAM .....11
INSTRUCTIONS FOR USE....12-13
STEP-BY-STEP COOKING....14-20
CARE AND CLEANING....21
MEAT PRESSURE COOKING GUIDE......22
VEGETABLE PRESSURE COOKING GUIDE.....23
Welcome... to the world of healthier cooking
As a new owner of a Cook's Essentials Perfect Pressure Cooker System, you are about to discover what so many other food aficionados have known for years. Simply
that meals prepared properly in a good pressure cooker, taste better, and cook faster than those prepared using conventional cooking methods.
We have taken the art of cooking with pressure to the next level. Our culinary design division tested numerous materials, metals and cooking surfaces before deciding on the combination that would work best with the latest digital electronics to create The Cook's Essentials Perfect Pressure Cooker System.
natural_image
Black-and-white photo of a plated dish featuring dark meat, bread, and sliced onions (no visible text or symbols)Once familiar with the system, you'll find that many of your favorite family recipes can be cooked perfectly in a fraction of the time. The sealed cooking chamber builds up heat and pressure... the result, more flavor stay locked within the food and less energy is wasted in a shorter cooking time. The "sealed" cooking process eliminates messy stovetop spills and contains heat making for cooler kitchens and easier cleanups.
The Cook's Essentials Perfect Pressure Cooker System has been designed to provide you and your family with many years of delicious meals and memories around the dinner table...but before you begin it is very important that you read this entire manual making certain that you are totally familiar with its operation and precautions.
Cook's Essentials Perfect Pressure Cooker
IMPORTANT
Do Not Operate The Cook's Essentials Perfect Pressure Cooker Before Reading The Following.
- Read everything contained in this manual.
- Keep this and all appliances unplugged when not in use.
- To avoid electrical shock, never immerse this appliance, plug or electrical cord in water or liquid of any kind.
- When in operation, handle all hot surfaces with potholders or cooking mitts.
- Children should not be permitted to operate this or any kitchen appliance without the constant supervision of a qualified adult.
- This product is designed for indoor use only.
- Before cleaning or storing the Cook's Essentials Perfect Pressure Cooker you must unplug the unit and allow ample time for all surfaces to cool thoroughly.
- Keep electrical cord away from all hot surfaces.
- This Appliance Has been designed for use with a 3 prong, grounded. 120V electrical outlet only.
- The Cook's Essentials Perfect Pressure Cooker generates extreme heat and steam in its operation. All necessary precautions must be taken to avoid fire, burns and other personal injury during its operation.
- If the electrical cord or any other part of the unit appears to be damaged or malfunctioning discontinue use immediately and contact the manufacturer or customer service. Never attempt any home repairs.
- When in operation the Cook's Essentials Perfect Pressure Cooker requires sufficient air space on all sides including top and bottom. Never operate the unit near any flammable materials such as dish towels, paper towels, curtains, paper plates, etc.
- Always plug the electrical cord directly into the wall outlet. Never use the Cook's Essentials Perfect Pressure Cooker with an extension cord of any kind.
IMPORTANT
- The use of kitchen utensils not recommended here for use with this unit could result in personal injury or damage to the unit voiding your guaranty.
- The Cook's Essentials Perfect Pressure Cooker is designed for counter top operation. Do not operate on a gas / electric stove top or in an oven.
- Once the cooking process has started, do not move the unit from place to place.
- Always attach the AC cord first to the Cook's Essentials Perfect Pressure Cooker and then plug the AC cord into the 120 V wall outlet. To unplug, first remove the AC cord from the wall outlet and then disconnect it from the Cook's Essentials Perfect Pressure Cooker.
- To avoid clogging and excess pressure buildup, never fill the inner cooking pot over the maximum fill line. Foods that expand during cooking such as rice or dried vegetables, should never fill above 1/2 mark in the inner cooking pot.
- Great Caution and strict adherence to recipes for this unit should be used when cooking the following: applesauce, cranberries, pearl barley, oatmeal, cereals, split peas, noodles, macaroni, rhubarb and spaghetti to name some...they can foam, froth, sputter and may clog the pressure release device (steam vent).
- Before cooking with the unit, always be certain that the pressure release devices are totally free of clogs or dried-on food particles.
- Never open the unit until the all internal pressure has been released. If the handles are difficult to push apart, this indicates that the unit is still pressurized... do not force it open. See "Operating Instructions" in this manual.
- Do not use this pressure cooker for pressure deep frying with oil.
- When the normal operating pressure is reached, turn the heat down so all the liquid, which creates the steam, does not evaporate.
- Only the removable cooking pot is made to hold food. Never use the inner compartment for cooking.
- Save these instructions.
Additional Important Safeguards
CAUTION: The Cook's Essentials Perfect Pressure Cooker generates heat and steam during use. Proper precautions must be taken to prevent injury to persons or damage to property.
- Anyone who has not fully read and understands all operating and safety instructions contained in this manual is not qualified to operate or clean this appliance.
- If this unit falls or accidentally becomes immersed in water, unplug it from the wall outlet immediately. Do not reach into the water!
- When using this unit, provide adequate air space above and on all sides for air circulation. Do not operate this appliance near curtains, wall coverings, clothing, dish towels and other flammable materials.
- To reduce the risk of fire, do not leave this appliance unattended during use.
- If this appliance begins to malfunction during use, immediately unplug the cord. Do not attempt home repairs...contact manufacturer or customer service.
Caution: If you need to open the pressure cooker, press the stop button and slide the quick release lever down to release the building pressure inside the cooker. Do not attempt to open the lid until all the steam has escaped the cooker and the float valve retracts into the lid shell. Turn the handle counter clockwise. Always open the lid away from you to avoid personal injury from excess heat and steam.
Note: This product must be grounded. If it should malfunction or break down, grounding provides a path of least resistance for electric current reducing the risk of electric shock. This Cook's Essentials Perfect Pressure Cooker is equipped with a cord that has an equipment grounding conductor and a grounding plug. Be certain that electrical service conforms with all local codes.
SHORT CORD INSTRUCTIONS
A short power-supply cord is provided to reduce the risk of accidents or tripping that might result from longer power cords. Never use an extension cord with this unit.
PLASTICIZER WARNING
CAUTION: To prevent Plasticizers from migrating from the finish of the counter top or other surface that supports the unit while in operation, place NON-PLASTIC and FIAMMABLE coasters or place mat between the unit and the surface of the counter or table top. Failure to do so may cause the finish to become permanently discolored.
ELECTRIC POWER
The Cook's Essentials Perfect Pressure Cooker should operate on its own dedicated electrical circuit. Overloading electrical circuits with many appliances can lead to overheating and fire hazards.
Product Features
- The Cook's Essentials Perfect Pressure Cooker electronic digital display offers a wide range of cooking methods including browning, slow cooking, stewing and steaming.
- Automatically choose and maintain pressure level and cooking time to conform to your recipe. Once cooked the unit can be programmed to keep the food warm.
- This unit utilizes high pressure and temperature...cooking foods quickly, saving time and energy. Savings Examples: Rice - Saves Time 20% - Saves Energy 25% Stews, Soups, etc. - Saves Time 40% - Saves Energy 45%
- The Cook's Essentials Perfect Pressure Cooker utilizes a sealed cooking technology, trapping flavor in the food...flavors that would be lost if cooked using conventional methods.
- Other quick cooking methods such as microwave ovens can not measure up to the results achieved by pressure cooking.
- Hot kitchens and messy spills and boil-overs are a thing of the past with the Cook's Essentials Perfect Pressure Cooker.
Built In Safety Features
- The Safety Lid will not allow pressure build up if lid is not properly seated and it will not allow lid to be opened until all pressure has been released from cooker.
- The Automatic Pressure Control Sensor maintains pre-selected setting throughout entire cooking process.
- The Automatic Temperature Sensor will stop the cooking process should the temperature exceed the preset limit...it will turn back on once the temperature falls below the preset temperature.
- The Pressure Limit Safety Control will automatically engage the steam release valve should the internal pressure exceed its maximum setting.
- The Clog Prevention Device prevents the steam release hole from becoming blocked by food particles.
- The Relief Valve will release steam automatically should one of the other steam release controls not work properly.
- The Float Valve Device will cause the silicon gaskets to disengage, releasing the pressure should other pressure release safety devices fail.
- The Spring Pressure Relief Safety Mechanism will engage in the event above safety devices fail...it will release causing the inner pot to move down and separate from the silicon gasket, releasing the pressure.
- Maximum Temperature Shut-Off will cut power to the cooker and will not reset should should internal temperatures reach maximum.
Introduction
We know you will appreciate the convenience of cooking with The Cook's Essentials Perfect Pressure Cooker. The recipes that are included with this cooker were developed to help you make gourmet meals quickly and easily. Since individual tastes vary you may need to adjust cooking times and recipe ingredients to accommodate your personal taste.
-
Your Cook's Essentials Perfect Pressure Cooker works like a traditional unit combining pressure, heat and steam to shorten the cooking time for your favorite recipes. Since an air tight seal is formed when the lid (Fig. K) is closed and locked, the heat and steam stay trapped inside the Removable Cooking Pot (Fig. F). As the steam builds and the pressure rises, the cooking temperature will get as hot as 250 F, which is 38 F hotter than food cooked using traditional stove top methods. This combination of high heat and pressure helps the food retain water soluble nutrients and flavor.
-
Your Cook's Essentials Perfect Pressure Cooker takes the guesswork out of "pressure" cooking. A built-in pressure sensor (Fig. N) knows exactly when pressure is reached inside the inner Pot and automatically adjusts the heat. These computerized functions eliminate the need to make manual heat adjustments.
-
The 1000watt Heating Element (Fig. 0) responds quickly, maintaining even cooking temperature and pressure.
-
The large capacity, heavy-duty, non-stick, aluminum inner Pot heats up quickly and evenly.
-
The Pressure Cooker has a BROWN MODE that allows you to sear, saute or brown food in the inner Pot before cooking under pressure.
-
The Rapid Release Feature (Fig. B) allows you to release pressure with the simple push of a button. Press this button in short bursts to prevent sudden ejection of hot liquid and steam.
-
The STEAM MODE will bring liquid in the inner Pot to a boil in a matter of minutes for steaming a large variety of foods such as vegetables and shellfish, as well as rice.
-
If it is necessary to reset cook or delay times, a single press of the cancel button on the control panel will stop any operation in progress.
This action allows restarting the desired function with a change in the time setting.
- The KEEP WARM MODE keeps cooked food warm for an unlimited period of time. The sturdy, brushed stainless steel and molded digital Pressure Cooker Housing is both attractive and functional.
Specificatio
| Model | Supply power | Rated power | Capacity of inner pot | Working pressure | Safety valve working pressure |
| EPC450 | 120V~ 60Hz | 1000W | 5 L | 20~80 Kpa | 120 ~ 170 Kpa |
| EPC460 | 120V~ 60Hz | 1000W | 5 L | 20~80 Kpa | 120 ~ 170 Kpa |
Parts and Assembly
Your Cook's Essentials Perfect Pressure Cooker has been shipped with all the parts and accessories listed below. Please check to be certain that everything has been included and is in good working order. Using this unit with any parts missing or damaged could cause personal injury or additional damage to the unit. If any part appears damaged or missing, contact manufacturer or customer service...do not use cooker.
text_image
Pressure valve Rapid Release Button Lid handle Lid shell Pressure Valve A B C D I Float Valve J Lock K Pressure Lid Rubber Gasket E Inner Pot F Outer Pot G Control Panel H Floating Valve Seal Replacement Kit L Housing handle M Housing N Sensor O Heater Plate P Base Power Cord and plug Accessories Measuring Cup Spoon Glass Lid to cover cooker when no pressure is needed Wire Rack prevents food from sticking to bottom of pot 9Control Panel Settings
- KEEP WARM/CANCEL: Selecting this button will cancel any operation in progress. In the "CANCEL" mode the LCD background will turn green. At this point, if you select KEEP WARM/CANCEL again, the cooker will be in the Keep Warm mode and the LCD background will turn to yellow.
- BROWN: Selecting this button will begin the "Browning" process after an 8 second count down. The default process is 30 minutes. You may manually select a "browning time" from 10 to 90 minutes.
- STEAM/CANNING: Selecting this button will begin the "Steam/Canning" process after an 8 second count down. The default process is 30 minutes. You may manually select a "Steam/Canning" from 10 to 90 minutes.
- COOK: Selecting this button will begin the "Cook" process after an 8 second count down. The default time is 15 minutes and the default pressure is 40Kpa. The cooker will count down when the right pressure is reached. You may manually select a "cooking time" from 10 to 90 minutes.
- SLOW COOK: Selecting this button will begin the "Slow Cooking" process after an 8 second count down. The default process is 6 hours. You may manually select a "slow cooking" time from 3 to 20 hours.
Control Panel Diagram
- STEW: Selecting this button will begin the "Stew" process after an 8 second count down. The default time is 30 minutes and the default pressure is 80Kpa. The cooker will count down when the right pressure is reached. You may manually select a "stewing time" from 20 to 90 minutes.
- PRESSURE ADJUST: After an 8 second countdown, the unit will be set to a default of 15 min. cooking time and a pressure of 40Kpa. You may now select COOK TIME and set the desired time and then select and set PRESSURE to the desired Kpa...from 20 to 80 Kpa. Note: This cooker measures pressure in Kpa units. 1 PSI unit is equal to slightly less than 7 Kpa units. Ex: 2PSI is approx. 14Kpa
- COOK TIME: Selecting this button allows you to set the cooking time... from 10 to 90 minutes.
- DELAY TIME: Selecting this button will allow you to delay the preselected cooking process for a period of time. When the LED flashes, you may press the DELAY TIME button and select the number of hours you want your cooker to finish.
text_image
perfect Pressure cooker™ ⑨ DELAY TIME ⑧ COOK TIME ⑦ PRESSURE ADJUST™ ④ COOK 5 SLOW COOK ⑥ STEW ② BROWN STEAM CANN NG ① KEEP WARM CANCEL
Instructions For Use
natural_image
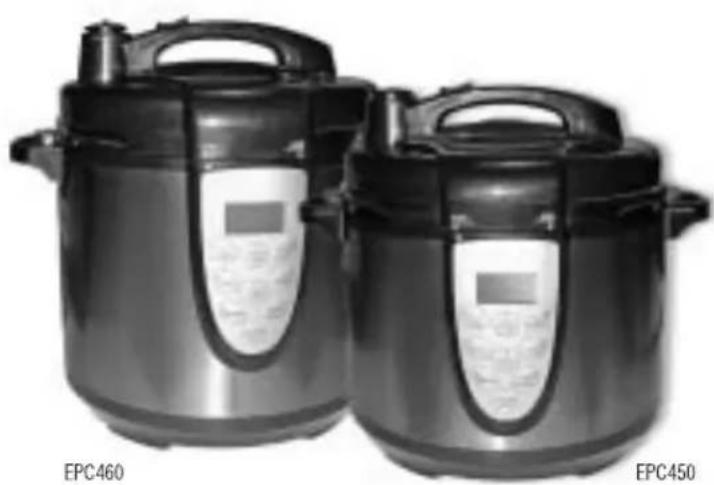
Two black rice cookers labeled EPC460 and EPC450, no visible text or symbols on the devices themselves.BEFORE USING ...
For best results, always check that the Pressure Valve (Fig. A), Float Valve (Fig. I), and Rapid Release Button (Fig. B) making sure they are in good working order and that there are no foreign particles blocking the valve openings on the underside of the Lid.
- Before using the Cook's Essentials Perfect Pressure Cooker for the first time, wash the inner pot (Fig. F), the Lid (Fig. D) and the Rubber Gasket (Fig. E) with warm soapy water. Rinse with clean water and dry thoroughly.
- Make sure the Rubber Gasket (Fig. E) is seated properly around the Lid. To ensure correct fitting of the Rubber Gasket, fill the inner Pot 2/3 full with water and run on stew for 15 minutes. Wait 15 minutes, then release pressure by pressing on the Rapid Release Button (Fig. B) in short bursts. The Float Valve (Fig. I) will drop. Let the appliance cool to room temperature. Pour out the water. Rinse and towel dry the inner Pot. The Cook's Essentials Perfect Pressure Cooker is now ready for use.
POWER SURGE PROTECTION FEATURE
The Cook's Essentials Perfect Pressure Cooker has a back-up feature to prevent malfunction in the event of a power surge. In the event of a system shut down caused by a power surge, unplug the cooker allow to "clear" for 1 hour before plugging it back into the outlet.
Instructions For Use
-
Place the Inner Pot (Fig.F) in the cooker's main housing then load with food. Never load food above the Max Line in pot. Turn inner pot left and right making certain that it is seated properly on the heating element's surface.
-
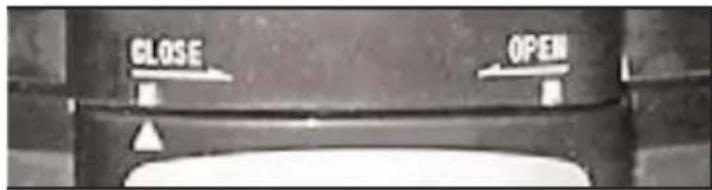
Place Lid carefully on cooker and turn counter-clockwise until you feel it "click" into place. The small white arrow on cooker base over
text_image
CLOSE OPENcontrol panel should align with the word "Close" as pictured (Illustration A).
- Make sure that the Pressure Valve (Fig. A) moves easily and is totally free of any debris that might cause a clog and pressure build up.
- Connect the AC Cord to the Cook's Essentials Perfect Pressure Cooker then plug the other end of the AC cord into a dedicated 120V AC wall outlet.
- Select cook mode. (SEE PAGE 7) It is normal if some steam escapes from Pressure Valve during operation. The Cooking Time starts when the selected pressure setting is reached. A "buzzer" will indicate when cooking time is complete. The unit will switch to "Keep Warm" automatically, and the Keep Warm indicator light will be visible. (Cooking time is adjustable during cooking cycle)
- Push the RAPID STEAM RELEASE button forward to reduce the cooker's inner pressure...The Float Valve will settle in the "down" position. Avoid Burns and Personal Injury...keep exposed body parts clear of release valve while steam is escaping during the rapid release process.
- Once inner pressure is fully released and the float valve is all the way in the down position, the Lid should open with a clockwise turn so that the word "Open" on the Lid is aligned with the small white arrow on the cooker's base. Never force the lid... if you meet resistance it could mean the the pressure has not been fully released (Repeat above procedures).
- When the process is finished, select the "KEEP WARM/CLEAR" button. Unplug the Cook's Essentials Perfect Pressure Cooker from wall outlet.
Step By Step Cooking
COOK MODE
1
Place the inner pot into the unit. Place ingredients into the inner pot and secure the lid.
2
Plug the power cord into the outlet.
3
Press the "Cook" button once.
4
Set the cooking time.
5
After the indicator light blinks for 8 seconds the cooking process will finish.
6
When the timer runs to zero the process is complete...cooker will go into a "Keep Warm" mode until cancelled / shut off.
Step By Step Cooking
SLOW COOK MODE
Place the inner pot into the unit. Place ingredients into the inner pot and secure the lid. Move Button on handle to Rapid Release position.

text_image
1Plug the power cord into the outlet.

text_image
2Press the "SLOW COOK" button once.

text_image
3Set the cooking time from 3 to 20 hours in "SLOW" mode. Default time is 6 hours.

text_image
4After the indicator light blinks for 8 seconds the cooking process will begin.

text_image
5When the timer runs to zero the process is complete...cooker will go into a "Keep Warm" mode until cancelled / shut off.

text_image
6Step By Step Cooking
STEW MODE
1
Place the inner pot into the unit. Place ingredients into the inner pot and secure the lid.
2
Plug the power cord into the outlet.
3
Press the "STEW" button once.
4
Set the cooking time.
5
After the indicator light blinks for 8 seconds the cooking process will begin. Default Time: 30min. Default Pressure: 80Kpa
6
When the timer runs to zero the process is complete...cooker will go into a "Keep Warm" mode until cancelled / shut off.
Step By Step Cooking
STEAM/CANNING COOK MODE
Place the inner pot into the unit. Place ingredients into steamer basket & inner pot and secure the lid. Move Button on handle to Rapid Release position.

text_image
1Plug the power cord into the outlet.

text_image
2Press the "STEAM" button once.

text_image
3Set the cooking time from 10 min. to 90 min.

text_image
4After the indicator light blinks for 8 seconds the cooking process will begin.

text_image
5When the timer runs to zero the process is complete...cooker will go into a "Keep Warm" mode until cancelled / shut off.

text_image
6Step By Step Cooking
BROWN MODE
1
Place the inner pot into the unit and plug the power cord into the wall outlet.
2
Put cooking oil (as per recipe) and food into inner pot... Do not put lid on cooker.
3
Press the "BROWN" button once.
4
Set the cooking time from 10 min. to 90 min.
5
After the indicator light blinks for 8 seconds the cooking process will begin.
6
When the timer runs to zero the process is complete...cooker will go into a "Keep Warm" mode until cancelled / shut off.
Step By Step Cooking
PRESSURE ADJUST MODE
Place the inner pot into the unit. Place ingredients into the inner pot and secure the lid.

text_image
1Plug the power cord into the outlet.

text_image
2Press the "PRESSURE ADJUST" button once.

text_image
3Set the Cooking Time and Pressure.

text_image
4After the indicator light blinks for 8 seconds the cooking process will begin.

text_image
5When the timer runs to zero the process is complete...cooker will go into a "Keep Warm" mode until cancelled / shut off.

text_image
6Step By Step Cooking
DELAY TIME MODE
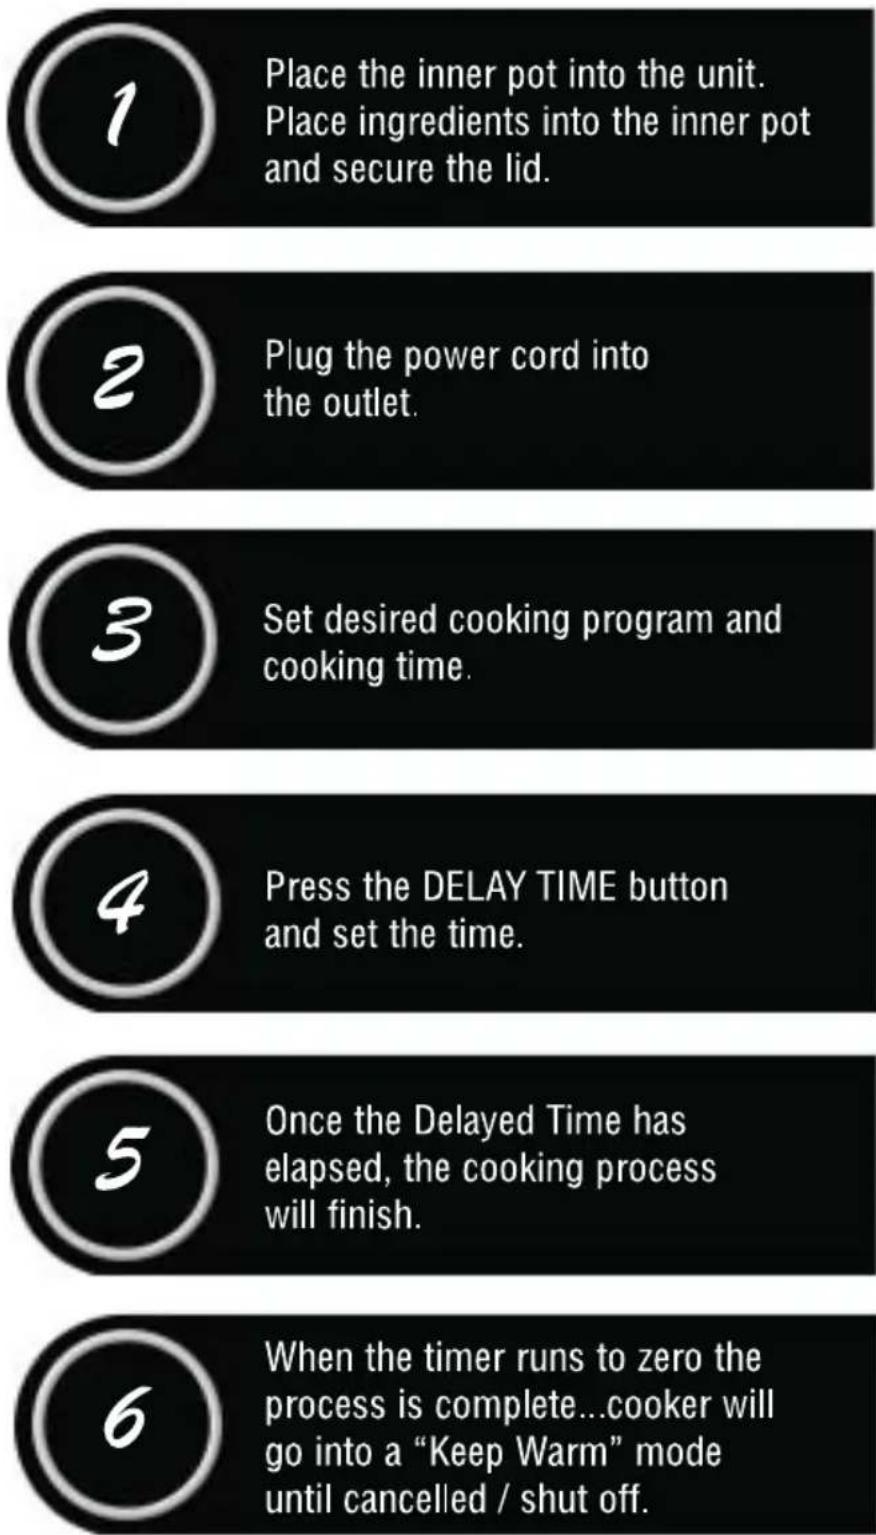
With this feature you can prepare and program your meal in advance and have it cook hours later. It is not recommended that you use this feature with foods that perish easily at room temperature.
text_image
1 Place the inner pot into the unit. Place ingredients into the inner pot and secure the lid. 2 Plug the power cord into the outlet. 3 Set desired cooking program and cooking time. 4 Press the DELAY TIME button and set the time. 5 Once the Delayed Time has elapsed, the cooking process will finish. 6 When the timer runs to zero the process is complete...cooker will go into a "Keep Warm" mode until cancelled / shut off.Care And Cleaning
CLEANING THE SAFETY DEVICES:
In addition to the gasket, the other safety devices on the pressure cooker must also be cleaned after each use.
THE PRESSURE REGULATOR:
Remove pressure regulator from lid by pressing down on it slightly while turning it to the Cleaning position. Then pull upward. Apply Mild detergent and wash it under warm running water. After cleaning, check to see that the interior spring-loaded part moves freely by pressing down on it. Put the regulator back on the unit. This appliance requires little maintenance. It contains no user serviceable parts. Do not try to repair it yourself. Contact customer service for qualified repair information.
TO CLEAN:
After use, unplug unit and allow to cool completely before cleaning. The Cook's Essentials Perfect Pressure Cooker must be cleaned thoroughly after each use in order to avoid staining caused by a build-up of food or cooking residue.
DO NOT POUR COLD WATER INTO A HOT PRESSURE COOKER.
Note: To ensure safe operation of this pressure cooker, strictly follow the cleaning and maintenance instructions after each use, should a tiny fragment of food (such as a grain of rice or pea shell) remain in the unit, it could prevent the safety devices from operating during subsequent use.
IMPORTANT: Always remove the pressure valve and clean the opening with pin to remove any blockage that might have occurred during the cooking process. This must be done after each use. The removable cooking pot and lid are immersible for cleaning. Rinse cooking pot and lid under hot running water. Use only a mild liquid detergent and a soft cloth, sponge or nylon scrubber for cleaning. Do not use abrasive powders, bicarbonate of soda or bleach. Do not use scouring pads.
WIPE BASE AFTER EACH USE WITH A SOFT, DAMP CLOTH OR SPONGE, MAKING SURE ALL FOOD RESIDUE IS REMOVED. DO NOT IMMERSE BASE IN WATER
When cleaning the lid, gasket must be lifted out and washed separately. Clean all around gasket housing with a sponge or soft cloth and warm, soapy water. Rinse under running water.
To replace gasket, ease it back into place under the rim of the lid.
- Unplug and let the pressure cooker cool to room temperature before cleaning.
- Wash the removable pot with warm, soapy water and clean with a soft cloth or sponge. Rinse off with clean water and towel dry.
- Remove the rubber gasket from the underside of the self-locking lid, Wash both with warm, soapy water and clean with a soft cloth or sponge. Rinse off with clean water and towel dry.
- The rubber gasket must always be properly positioned on the underside of the lid. Check periodically to make sure that it is clean, flexible and not torn. If damaged, do not use this unit.
- Wipe the mirror finished outer housing with a damp soft cloth or sponge (glass cleaner gives housing a brilliant luster).
- Never use harsh chemical detergents, scouring pads or powders on any of the parts or components.
• Always check that the pressure and float valves are in good working order and debris free.
Note: The gasket must be replaced every year, or sooner if necessary. Gasket may also need replacing if pressure cooker is not used for a long period of time, as it can harden from disuse, making it unable to form an airtight seal. Gasket must be replaced only with another one of the correct type and size for this pressure cooker.
Meat Pressure Cooking Guide
| MEAT | LIQUID | COOKING TIMEUse Stew Mode(80kpa) |
| Beef: | ||
| Beef, corned; 3 to 4 inches thick | 4 cups | 45 min |
| Beef, flank steak | 1 cup | 35 min |
| Beef, liver; sliced | 1 1/4 | 5 min |
| Beef, pot roast blade, chuck, or rump;2 to 3 inches thick | 1 1/4 cups | 30-40 min |
| Beef, round steak (Swiss); 1/2 inch thick | 1 1/4 cups | 20-25 min |
| Beef, short ribs | 1 1/4 cups | 35-40 min |
| Beef Stew; 1 inch cubes | 2 1/2 cups | 15-20 min |
| Poultry: | ||
| Chicken, fricassee; 3 to 4 lbs | 2 cups | 15-20 min |
| Chicken, stewed; 4 to 5 lbs | 2 cups | 25-30 min |
| Pork: | ||
| Ham, uncooked shank; 3 to 5 lbs | 2 1/2 cups | 35-45 min |
| Ham, uncooked slices; 1/2 inch thick | 3/4 cup | 5-6 min |
| Pork chops | 1 cup | 9 min |
| Pork shanks | 2 1/2 cups | 35 min |
| Pork shoulder | 1 1/2 cups | 35-40 min |
| Pork spareribs | 1 cup | 15 min |
| Lamb: | ||
| Lamb shoulder; 3 to 6 lbs | 3 cups | 35-40 |
| Lamb steak; 1/2 inch thick | 3/4 cup | 9 min |
| Lamb stew; 1 inch cubes | 2 cups | 10 min |
| Mutton; 4 to 6 lbs | 2 1/2 cups | 45 min |
| Other: | ||
| Oxtails 3 to 6 lbs. | 2 cups | 45 min |
| Rabbit | 1 cup | 12-15 min |
| Veal shank | 2 1/2 cups | 40-45 min |
| Veal steak; 1/2 inch thick | 1 cup | 12-15 min |
| Veal Stew; 1 inch cubes | 2 cups | 10 min |
| Venison, pot roast; 3 to 4 inches thick | 1 1/4 cups | 30-40 min |
Vegetable Pressure Cooking Guide
Vegetables cook very quickly in the pressure cooker. Use a pressure cooking rack to elevate them above the cooking liquid. Cooking racks are available in culinary and housewares retail locations. Remember not to fill cooker over 2/3 full, and use the quick release method to bring the pressure down.
| Vegetable | Liquid | Cooking TimeUse Cook Mode(40kpa) |
| Frozen Vegetables: | ||
| Asparagus | 3/4 cup | 2 min |
| Beans, green or wax | 3/4 cup | 2-3 min |
| Broccoli | 3/4 cup | 2-3 min |
| Cauliflower | 3/4 cup | 2 min |
| Corn, kernel or on the cob | 3/4 cup | 2 min |
| Green Peas | 3/4 cup | 1 min |
| Lima beans | 3/4 cup | 2 1/2 - 4 min |
| Peas and carrots | 3/4 cup | 2 min |
| Spinach | 3/4 cup | 1 min |
| Fresh Vegetables: | ||
| Artichoke | 1 1/4 cups | 15 min |
| Asparagus | 3/4 cup | 72-2 1/2 min |
| Beans, green or wax | 3/4 cup | 2-3 min |
| Beets, (small, whole) | 1 cup | 12 min |
| Broccoli | 3/4 cup | 2-2 1/2 min |
| Cabbage, wedges | 1 cup | 5-8 min |
| Cabbage, red, shredded | 1 cup | 5 min |
| Carrots, sliced | 1/2 cup | 2 1/2 min |
| Carrots (small, whole) | 1/2 cup | 2 1/2 min |
| Cauliflower, flowerets | 3/4 cup | 2-3 min |
| Celery | 3/4 cup | 3-5 min |
| Corn on the cob | 1 1/4 cup | 5 min |
| Corn, whole kernel | 3/4 cup | 3 min |
| Kale or Collard Greens | 3/4 cup | 4-6 min |
| Onions, sliced | 3/4 cup | 3 min |
| Onions, medium, whole | 1 cup | 7-10 min |
| Peas | 3/4 cup | 2-3 min |
| Potatoes, sliced | 1 1/4 cups | 2 1/2 min |
| Potatoes, medium, halved | 2 cups | 8 min |
| Potatoes, Sweet or Yams | 1 1/2 cups | 6 min |
| Potatoes, Sweet or Yams; halved | 1 1/2 cups | 8-10 min |
| Spinach, Swiss Chard & other greens | 3/4 cup | 1 mi |
| Squash, Acorn | 1 cup | 6-7 min |
| Tomatoes | 1/2 cup | 2 1/2 min |
| Turnips | 1 cup | 5 min |
Distributed by

V1 012407