PC028 - Pfanne Cook's essentials - Kostenlose Bedienungsanleitung
Finden Sie kostenlos die Bedienungsanleitung des Geräts PC028 Cook's essentials als PDF.


Benutzerfragen zu PC028 Cook's essentials
0 Frage zu diesem Gerät. Beantworten Sie die, die Sie kennen, oder stellen Sie Ihre eigene.
Eine neue Frage zu diesem Gerät stellen
Laden Sie die Anleitung für Ihr Pfanne kostenlos im PDF-Format! Finden Sie Ihr Handbuch PC028 - Cook's essentials und nehmen Sie Ihr elektronisches Gerät wieder in die Hand. Auf dieser Seite sind alle Dokumente veröffentlicht, die für die Verwendung Ihres Geräts notwendig sind. PC028 von der Marke Cook's essentials.
BEDIENUNGSANLEITUNG PC028 Cook's essentials
cook's essentials
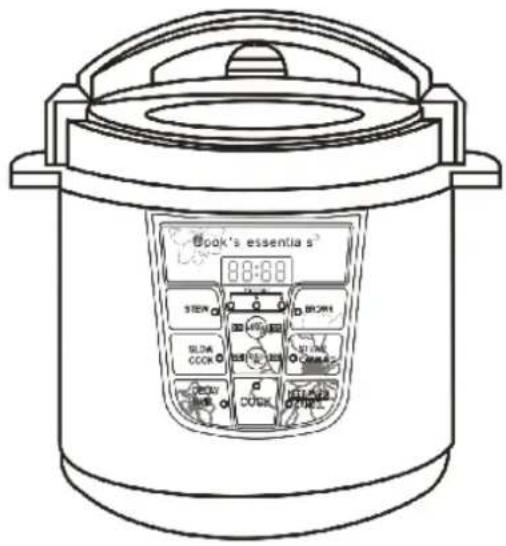
ELECTRIC PRESSURE COOKER
INSTRUCTION MANUAL
Model PC028
text_image
Book's essential s 88:88 5.00 10.00 20.00 5.00 10.00 20.00 5.00 10.00 20.00Index
Important safeguards 1
Product Features 3
Product Parts 4
General Operating Instructions 5
Pressure Cooking Guide 13
Care and Cleaning 15
Frequently Asked Questions/Troubleshooting 16
FOR HOUSEHOLD USE ONLY
Important: Do Not Use This Pressure Cooker
Until You Have Read This Entire Manual Thoroughly!
IMPORTANT SAFEGUARDS
When using electrical appliances, basic safety precautions should always be followed including:
- Read and follow all instructions carefully.
- Always be sure the floating valve is on correctly before use. Incorrect assembly may prevent the cooker from building pressure or allow steam to come out from the sides of the lid.
- Do not touch hot surfaces. Use handles or knobs.
- To protect against electric shock do not immerse or rinse cords or plugs or appliance in water or other liquid; to reduce risk of electric shock, do not immerse the housing or base in water or other liquid.
- This appliance should never be operated by children and special care should be taken when the unit is in use in their presence.
- Unplug from outlet when not in use and before cleaning. Allow to cool before putting on or taking off parts.
- Do not operate any appliance with a damaged cord or plug or after the appliance malfunctions or has been damaged in any manner. Return appliance to the nearest authorized service facility for examination, repair, or adjustment.
- Do not use any attachments or utensils that were not recommended or supplied by the manufacturer. The use of attachments not recommended for use by the manufacturer may cause serious hazardous situations including personal injury. To reduce the risk of electric shock, only use the removable Inner Pot for cooking.
- Do not use outdoors.
- Do not let cord hang over edge of table or counter, or touch hot surfaces.
- Do not place on or near a hot gas or electric burner, or in a heated oven.
- Extreme caution must be used when moving an appliance containing hot oil or other hot liquids.
- Always attach plug to appliance first, then plug cord into the wall outlet. To disconnect, set any control to 'off', then remove plug from wall outlet.
- Do not use appliance for anything other than its intended use.
- This appliance cooks under pressure. Improper use may result in scalding injury. Make certain unit is properly closed before operating. See General Operating Instructions.
- Never fill the unit above the MAX LINE in the Inner Pot. When using foods that expand during cooking such as rice or dried beans, follow the recipe for 'pressure cooking' those products, and as a rule of thumb, do not fill the unit above the 'halfway' point. Overfilling may cause clogging, allowing excess pressure to develop. See General Operating Instructions.
- Be aware that certain foods, such as applesauce, cranberries, pearl barley, oatmeal or other cereals, split peas, noodles, macaroni, rhubarb, and spaghetti, can foam, froth, sputter and clog the pressure release device (steam vent). Recipes using these items must be followed carefully to avoid problems.
- Always check the pressure release devices for clogs before use.
- Do not open the pressure cooker until the unit has cooled and all internal pressure has been released. If the unit is difficult to open, this indicates that the cooker is still pressurized – do not force it open. Any pressure in the cooker can be hazardous. General Operating Instructions.
- Do not use this pressure cooker for pressure frying with oil.
- This appliance has been designed for use with a 3 prong, grounded, 120V electrical outlet only. Do not use any other electrical outlet.
- The Pressure Cooker generates extreme heat and steam in its operation. All necessary precautions must be taken to avoid fire, burns and other personal injury during its operation.
- When in operation the Pressure Cooker requires sufficient air space on all sides including top and bottom. Never operate the unit near any flammable materials such as dish towels, paper towels, curtains, paper plates, etc.
SAVE THESE INSTRUCTIONS.
FOR HOUSEHOLD USE ONLY.
IMPORTANT SAFEGUARDS CONTINUED
- Always plug the electrical cord directly into the wall outlet. Never use this unit with an extension cord of any kind.
- Anyone who has not fully read and understood all operating and safety instructions contained in this manual is not qualified to operate or clean this appliance.
- If this unit falls or accidentally becomes immersed in water, unplug it from the wall outlet immediately. Do not reach into the water!
- Do not operate this appliance on an unstable surface.
- If this appliance begins to malfunction during use, immediately unplug the cord. Do not use or attempt to repair a malfunctioning appliance!
- Never force the pressure cooker open. If you need to open the pressure cooker, press the 'keep warm/cancel' button and carefully turn the pressure valve to the vent position to release the building pressure inside the cooker. Make sure that all the steam has dissipated from the cooker and the floating valve fully settled back into the lid shell. Always open the lid away from you to avoid skin contact with any remaining heat or steam.
- Before use, clean the bottom of the Inner Pot, and the surface of the heating plate. Make sure no water is on the heating plate. Insert the Inner Pot, turning it slightly clockwise and counter clockwise until you are sure it is sitting correctly on the heating plate. Failure to do so will prevent proper operation and may cause damage to the unit.
- Caution hot surfaces. This appliance generates heat and escaping steam during use. Proper precautions must be taken to prevent the risk of personal injury, fires, and damage to property.
SHORT CORD INSTRUCTIONS
A short detachable power-supply cord should be used to reduce the risk resulting from becoming entangled in or tripping over a longer cord. Longer detachable power-supply cords or extension cords are available and may be used if care is exercised in their use. If a longer detachable power-supply cord or extension cord is used: The marked electrical rating of the cord set or extension cord should be at least as great as the electrical rating of the appliance; The cord should be arranged so that it will not drape over the countertop or tabletop where it can be pulled on by children or tripped over unintentionally
PLASTICIZER WARNING
Caution: To prevent Plasticizers from migrating from the finish of the counter top or table top or other furniture, place Non-plastic coasters or place mats between the appliance and the finish of the counter top or table top. Failure to do so may occur, or stains can appear.
ELECTRIC POWER
If the electrical circuit is overloaded with other appliances, your appliance may not operate properly. It should be operated on a dedicated electrical circuit.
Note: This product must be grounded. If it should malfunction or break down, grounding provides a path of least resistance for electric current to reduce the risk of electric shock. This product is equipped with a cord having an equipment grounding conductor and a grounding plug. The plug must be plugged into an appropriate outlet that is properly installed and grounded in accordance with all local codes and ordinances.
SAVE THESE INSTRUCTIONS. FOR HOUSEHOLD USE ONLY.
PRODUCT FEATURES
SPECIAL FEATURES
- The Digital Display on your Pressure Cooker offers a wide range of one touch cooking options.
- Cooking Time and Pressure Levels may be adjusted to suit any recipe or personal preference. At the completion of the cooking cycle, the unit will automatically shift to the Keep Warm mode.
- Cooking Electronically with Pressure saves time and energy. For example, rice dishes cook 20% quicker and save 25% on energy. Most other dishes average a 40% time saving and 45% on energy.
- Digital Pressure Cooking utilizes temperatures up to 248 °F (120°C) creating a more sterile and healthier environment when compared to traditional cooking methods.
- This Pressure Cooker creates a 'sealed environment' that preserves flavour and 'locks in' valuable vitamins and nutrients.
- Hot kitchens, messy spills and 'boil-overs' are a thing of the past.
- The Steam Mode heats liquid in the Inner Pot to a boil in a matter of minutes, for steaming and cooking an endless variety of foods.
- The Keep Warm mode holds and keeps cooked food warm for an unlimited period of time. Foods kept at Warm Mode for periods beyond 4 hours may lose their good flavor and texture.
BUILT-IN SAFETY FEATURES
- Lid Safety Device: Prevents pressure build-up if lid is not closed properly and prevents lid from opening until all pressure is released.
- Pressure and Temperature Sensor Controls: Maintains even heat and pressure by automatically activating or deactivating the power supply.
- 'Back-up' Safety Release Valve: Should the Temperature/Pressure Sensor device malfunction, causing pressure to build beyond maximum setting, the 'Back-up' will automatically 'kick in' and release the built up pressure.
- 'Clog Resistant' Feature: Prevents food from blocking the steam release port.
- 'Spring Loaded' Safety Pressure Release: Should all safety features listed above fail, this 'spring-loaded' device located beneath the heating element will automatically lower the Inner Pot, causing it to separate automatically from the Rubber Gasket. This will enable the steam and pressure to automatically escape around the pot lid, avoiding a dangerous situation.
- Temperature 'Cut-Off' Device: Should the unit malfunction and cause the internal temperature to rise beyond the 'safe' limit, this device will cut-off the power supply and will not automatically reset.
PRODUCT PARTS
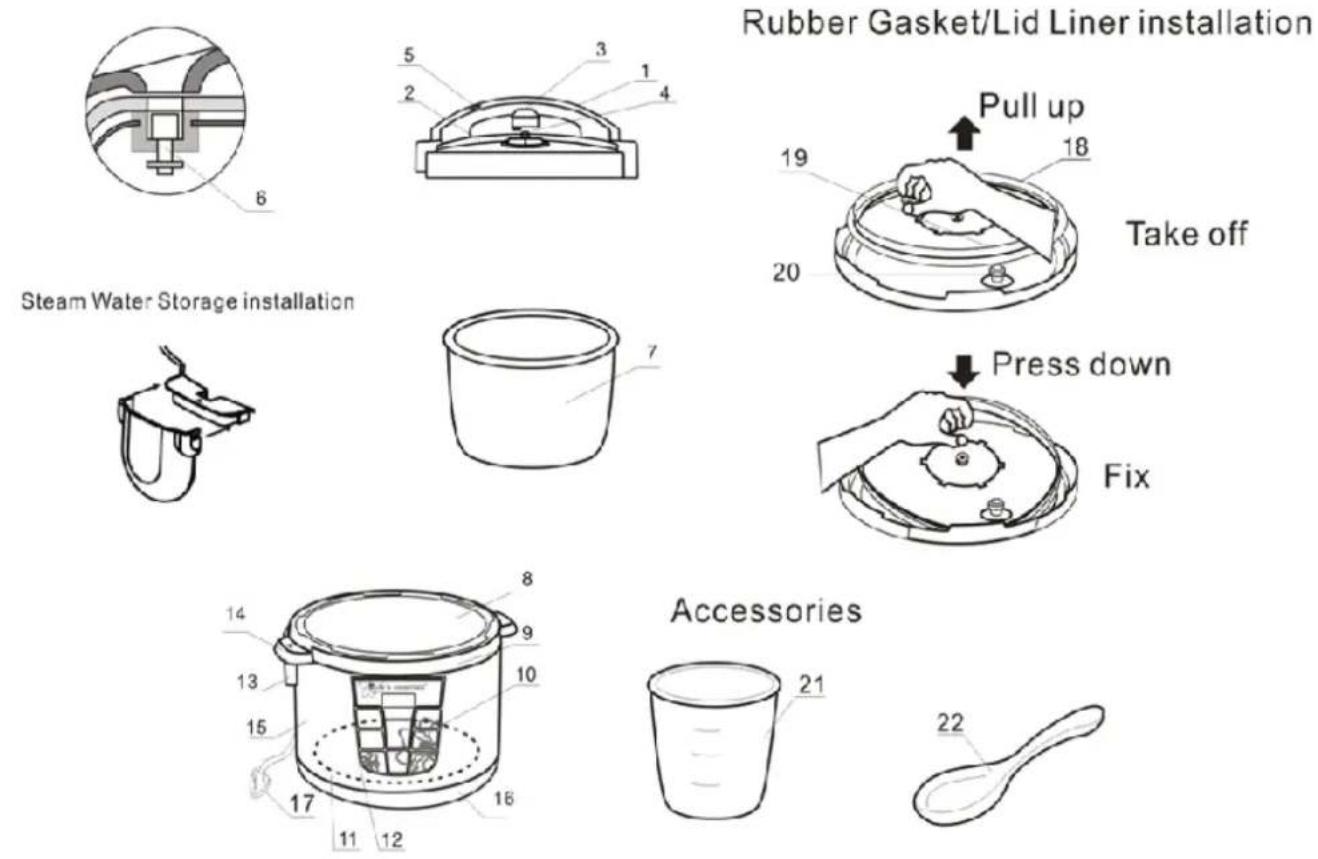
1 Lid Handle
2 Cooker Lid
3 Pressure Valve
4 Steam Vent
5 Floating Valve
6 Floater
7 Inner Pot
8 Outer Pot
9 Support Ring
10 Control Panel
11 Heating Plate
12 Sensor
Important: Your Pressure Cooker has been shipped with the components shown above. Check everything carefully before use.
TECHNICAL PARAMETERS
| Model | Power Supply | Power | Capacity of Inner Pot | Working Pressure | Warming Temperature | Preset Timer |
| PC028 | AC 120V 60HZ | 1000W | 6 litres | 0-80Kpa | 60~80°C | 0.5~24hrs |
GENERAL OPERATING INSTRUCTIONS
BEFORE FIRST USE
- Remove all of the packaging materials and literature.
- Clean the appliance and all of the accessories (See 'Care and Cleaning').
- Make sure the Pressure Valve is properly attached onto the Steam Vent.
- Make sure the rubber gasket is seated properly inside the lid. To ensure the correct fitting, fill the Inner Pot with water about 3/5 full, place the Lid on the unit, set the Pressure Valve to the Seal position and run on the Cook mode for 15 minutes. It may take several minutes to begin counting down.
- Once the Cook mode is complete, the Floating Valve will drop and the Keep Warm button will illuminate.
- Let the appliance cool down to room temperature, empty and clean.
- The Pressure Cooker is now ready for use.
FOR GENERAL USE
Opening the Lid
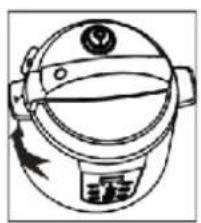
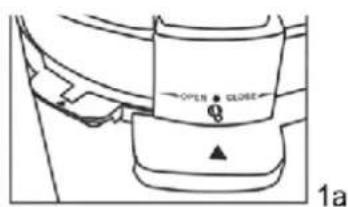
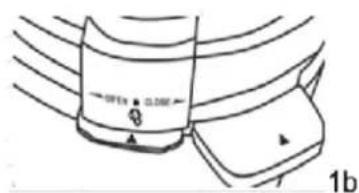
- To open the lid, hold the handle, press down gently, and turn it clockwise until you meet some resistance and the symbols on the Lid and Support Ring are properly aligned. (Figs. 1, 1a and 1b)
- Holding the handle, lift carefully and place aside. (Fig. 2) Be cautious of hot surfaces and dripping liquids.
natural_image
Line drawing of a cooking pot with lid and side handles (no text or symbols)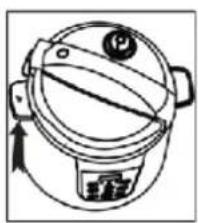
natural_image
Simple line drawing of a cooking pot with a lid and side handles (no text or symbols)2
text_image
OPEN CLOSE θ 1aLid Close
text_image
OPEN CLOSE 1bLid Open
Adding Ingredients
- Remove the Inner Pot and add ingredients per the recipe selected and then replace the Inner Pot into the Outer Pot.
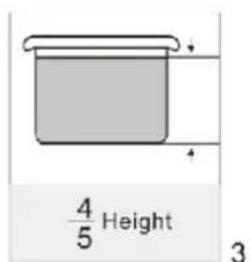
- Ingredients should never exceed the MAX line (4/5) marking on the Inner Pot. (Fig. 3)
- When cooking rice, grains, beans, or other ingredients that will expand during cooking, never fill the inner pot above the 3/5 marking. (Fig. 4)
- Liquids and ingredients together should never fill less than the 1/5 marking on the Inner Pot (Fig. 5)
text_image
4/5 Height 3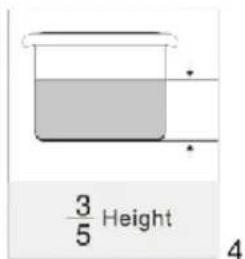
text_image
3/5 Height 4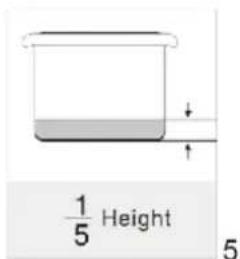
text_image
1/5 Height 5Inserting the Inner Pot
- The surface of the Heating Plate and Outer Pot should be clean prior to putting the Inner Pot into the Outer Pot.
- Insert the Inner Pot into the Outer Pot and rotate the Inner Pot to make certain that it is seated properly on the Heating Plate. (Fig. 6)

natural_image
Line drawing of hands holding a cooking pot with a lid and arrow indicating rotation (no text or symbols)6
Closing the Lid
- To close the Lid, place on the Cooker with the Lid Handle and Pressure Valve pointed to the "☐" Seal position. (Fig. 7)
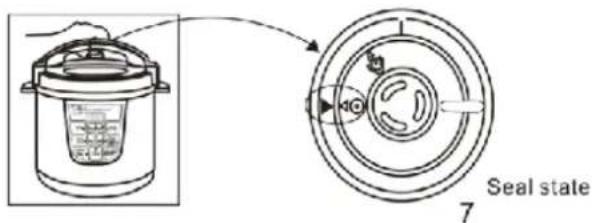
text_image
Seal state 7- Holding the handle, cover it against the cooker, and then turn it counter-clockwise to the close position, until a click is heard and the symbols on the Lid and Carry Handle are properly aligned. (Figs. 8, 8a, 9 and 9a)

text_image
8 close state 9 Lid Open 8a Lid Close 9aSteam Water Storage
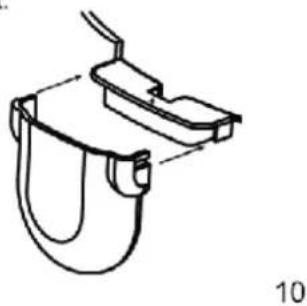
- Attach the Steam Water Storage to the bottom of the Carry Handle. (Fig.10)
- Slide in the Steam Water Storage until it is held in place. (Fig. 11)
- Steam water will be collected here, and should be emptied after each use.
- To remove the Steam Water Storage, wait until the unit is completely cooled, as the water will be hot, and then slide out.
natural_image
Technical line drawing of a mechanical component with no visible text or symbols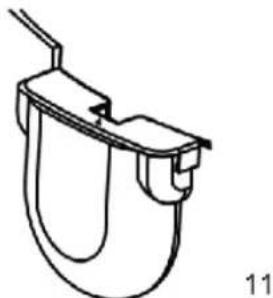
natural_image
Simple line drawing of a hook-shaped object with a handle and base, no text or symbols presentPowering the Unit
- Attach the Electrical Cord to the base of the unit and then plug the Cord into a dedicated 120V wall outlet. The display will beep and show 0000, and the unit will be ready for use.
Releasing Unit Pressure
- Steam and Pressure must be released completely from the Pressure Cooker before the Lid will open.
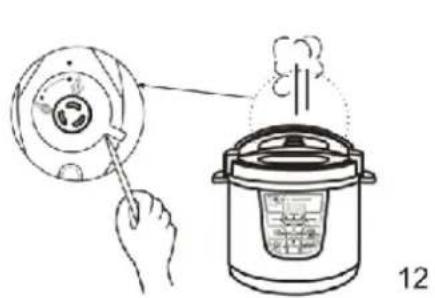
To do this, carefully rotate the Pressure Valve forward to the "Vent position (Figs.12 and 13) until all pressure and steam have escaped and the digital pressure indicator does not register.
text_image
Diagram showing a hand using a tool to clean a cooking pot, with smoke rising from the lid and labeled as item 12.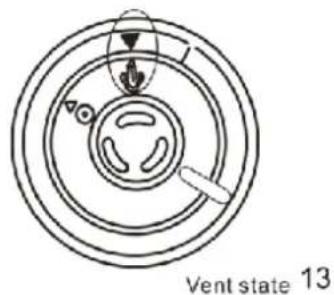
text_image
Vent state 13Caution: When releasing pressure, protect your skin from any contact with escaping steam. When opening the Lid, avoid personal injury resulting from hot unit surfaces and dripping liquids.
Cooking Times
- The cooking mode presets and recipe times should be used as a guide.
- It takes 5-30 minutes for the Pressure Cooker to build up pressure, depending on the volume of ingredients. Once the pressure has been reached, it will begin to count down the minutes.
- Check to make sure that your food has reached the desired doneness. You can always continue cooking for a few additional minutes if need be.
Note: The cooking process will begin 5 seconds after you select a cooking mode. Within these 5 seconds, you can adjust the Mode, Time or Pressure. If the 5 seconds has passed and you would like to make a change, press and hold the KEEP WARM/CANCEL button and start over.
CONTROL PANEL OPTIONS
The Cook's Essentials Pressure Cooker offers eight cooking modes to produce an infinite variety of results.
Mode Selection Overview
When the unit is first plugged in the display will beep and show 0000.
When a cooking mode is selected, the indicator light beside that process will illuminate, as will the preset pressure level of low (L), medium (M) or high (H), and the display window will indicate the preset cooking time.
If no changes are made within 5 seconds, the unit will begin the selected cooking process. The display window will show ---- moving up and down, and once the appropriate pressure is reached, the display window will begin counting down the cooking time until it finishes.
Cook Mode
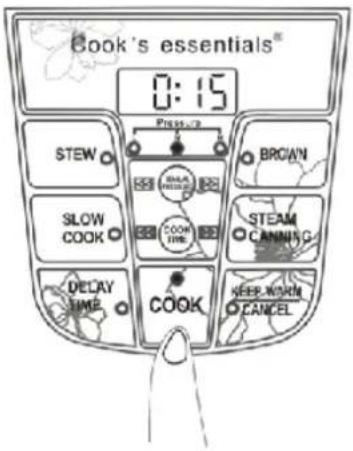
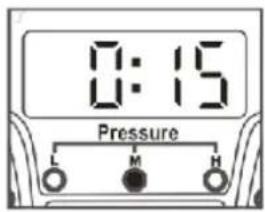
Push the COOK button on the Control Panel. (Fig.14) The COOK and Medium Pressure indicator will illuminate, and the display window will show the preset cooking time of 0:15, (Fig.15) 15 minutes. The Middle Pressure indicator has a preset pressure of 45kpa.
text_image
Cook's essentials® 0:15 STEW SLOW COOK DELAY TIME COOK BROWN STEAM CANNING NEER WARN CANCEL14
text_image
0:15 Pressure L M H15
Slow Cook Mode
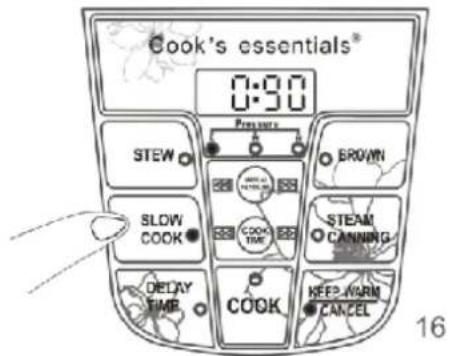
Push the SLOW COOK button on the Control Panel. (Fig.16) The SLOW COOK and Low Pressure indicator will illuminate, and the display window will show the preset cooking time of 0:90 (Fig.17), 90 minutes. The Low Pressure indicator has a preset pressure of 30kpa.
text_image
Cook's essentials® 0:30 Stew SLOW COOK DELAY TIME Prevent BROWN COOK TIME STEAM CANNING COOK KEEP/WARM CANCEL 16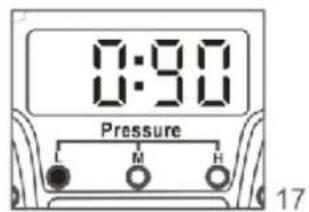
text_image
0:90 Pressure L M H 17Stew Mode
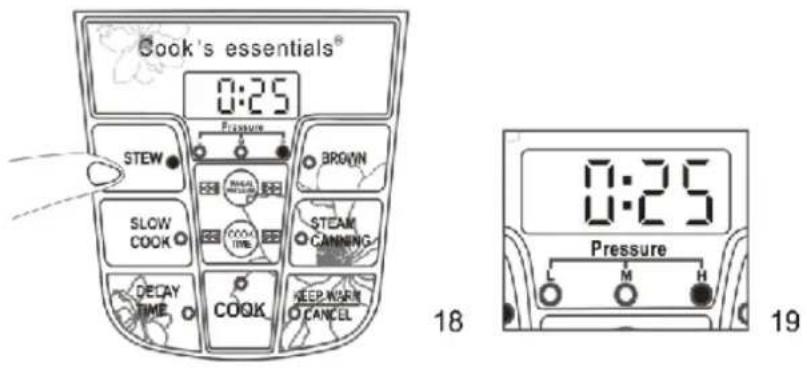
Push the STEW button on the Control Panel (Fig.18). The STEW and High Pressure indicator will illuminate, and the display window will show the preset cooking time of 0:25 (Fig.19), 25 minutes. The High Pressure indicator has a preset pressure of 60kpa.
text_image
Cook's essentials® 0:25 STEW PICKERM BROWN SLOW COOK COOK TIME STEAM CANNING DECAY TIME COOK KEEP/WARN CANCEL Pressure 0:25 L M H 18 19Steam/Canning Mode
Steam Mode
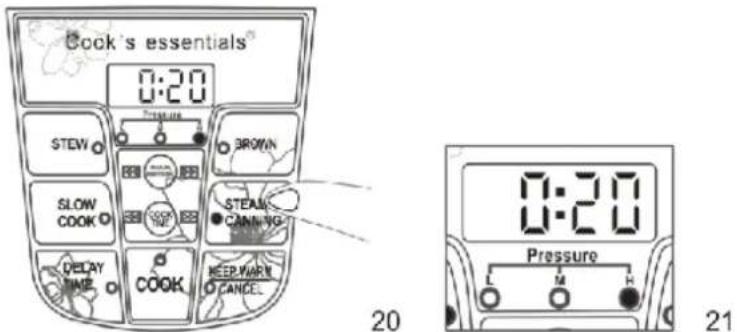
Push the STEAM button on the Control Panel (Fig.20). The STEAM/CANNING and High Pressure indicator will illuminate, and the display window will show the preset steaming/canning time of 0:20 (Fig.21), 20 minutes. The High Pressure indicator has a preset pressure of 60kpa.
text_image
Cook's essentials 0:20 STEW BROWN SLOW COOK STEAM CANNING DELAY TIME COOK KEEP.WARN CANCE Pressure 0:20 Pressure L M H 20 21Canning Mode
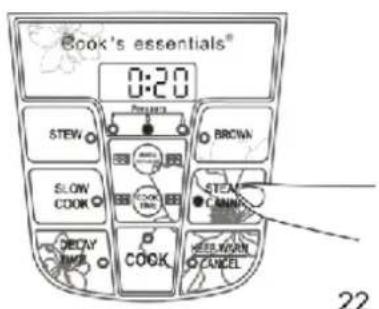
Push the CANNING button on the Control Panel (Fig.22). The STEAM/CANNING and High Pressure indicator will illuminate, and the display window will show the preset steaming/canning time of 0:20 (Fig.22), 20 minutes.
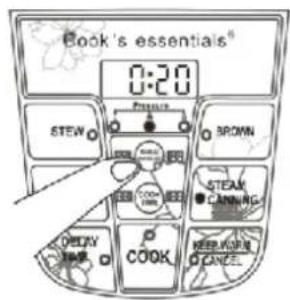
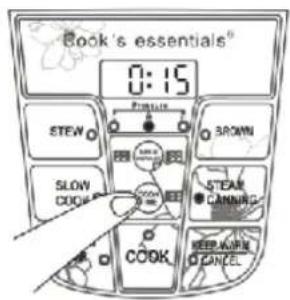
Within 5 seconds, push the MANUAL PRESSURE button to change the pressure to Medium (Fig. 23), and then to reduce the cooking time, press and hold the COOK TIME button until it reaches 15 minutes. The display window will show the canning time of 0:15. (Fig.24) The Medium Pressure indicator has a preset pressure of 45kpa.
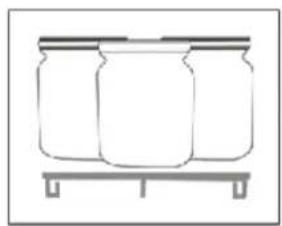
Notes: 1. Use only jars and lids made specifically for canning. (Fig. A)
- Place a small, heat-resistant rack (not included) in the bottom of the removable Inner Pot then place jars on rack. Then place Inner Pot into the Base Unit. (Fig .B)
natural_image
Simple line drawing of three jars on a base (no text or symbols)A

text_image
Hand-drawn sketch of a cooking pot with a digital display showing text and iconsB
(Not Included)
text_image
Book's essentials® 0:20 STEW BROWN SLOW COOK STEAM CANNY COOK WHEN KONN CANCEL 2222
text_image
Book's essentials® 0:20 STEW BROWN STEAM CANNING COOK COOK PICKLE PICKLE PICKLE PICKLE PICKLE PICKLE PICKLE PICKLE PICKLE PICKLE PICKLE PICKLE PICKLE PICKLE PICKLE PICKLE PICKLE PICKLE PICKLE PICKLE PICKLE PICKLE PICKLE PICKLE PICKLE PICKL23
text_image
Book's essentials® 0:15 STEW SLOW COOK COOK BROWN STEAR CANNING KEEP OPEN CANCEL24
Brown Mode
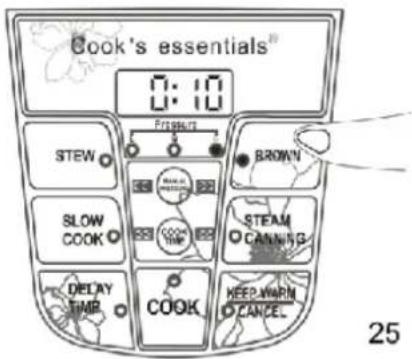
Push the BROWN button on the Control Panel (Fig.25). The BROWN and High Pressure indicator will illuminate, and the display window will show the preset browning time of 0:10 (Fig. 26), 10 minutes. The High Pressure indicator has a preset pressure of 60kpa.
Note: No lid should be placed on the Pressure Cooker when utilizing the browning mode.
text_image
Cook's essentials® 0:10 STEW SLOW COOK DISPLAY TIME Fries/2 BROWN STEAM CANNING COOK KEEP WARM CANCEL 25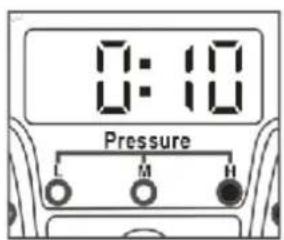
text_image
0:10 Pressure L M H26
Manual Pressure
The MANUAL PRESSURE button allows you to change the pressure setting for any mode selected from the preset pressure.
Push the Mode you would like to select and the Mode indicator will illuminate. Within 5 seconds, push the MANUAL PRESSURE button to change the pressure to Low, Medium or High, and the corresponding
pressure indicator light will illuminate. The display window will show the preset cooking time depending on the Mode selected.
For example, the preset pressure for the COOK Mode is the Middle option; you can change this to the Low or High option using the MANUAL PRESSURE button, following the steps below.
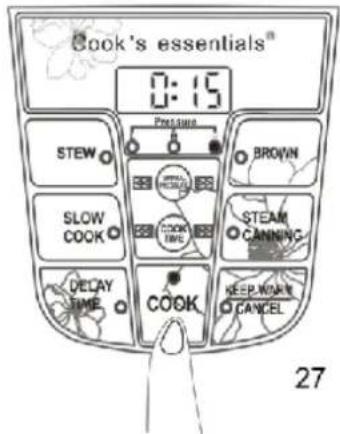
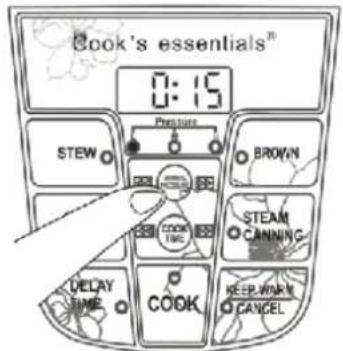
- Push the COOK button on the Control Panel (Fig. 27). The COOK and Middle Pressure indicator will illuminate, and the display window will show the preset cooking time of 0:15, 15 minutes.
- Within 5 seconds, push the MANUAL PRESSURE button to change the pressure to Low or High, and the corresponding pressure indicator light will illuminate (Figs. 28 and 29)
text_image
Cook's essentials® 0:15 Pressure STEW BROWN SLOW COOK STEAM CANNING DELAY TIME COOK KEEP/WARN CANCEL 27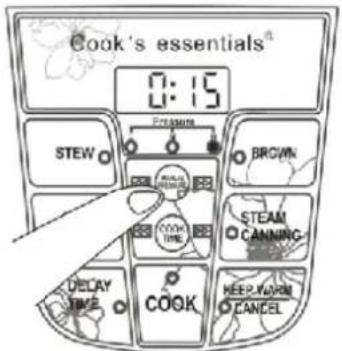
text_image
Cook's essentials® 0:15 STEW Pension BROWN STEAM CANNING COOK TIME DELAY TIME COOK KEEP/WARM CANCEL28
text_image
Cook's essentials® 0:15 STEW Pressure BROWN STEAM CANNING COOK TIME DELAY TIME COOK KEEP WORK CANCEL29
| Control Panel Options | Preset Pressure | Adjustable Manual Pressure |
| COOK | Medium / 45Kpa | Low / 30kpaHigh / 60kpa |
| SLOW COOK | Low / 30Kpa | Medium/45kpaHigh/60kpa |
| STEW | High/ 60Kpa | Low/30kpaMedium/45kpa |
| STEAM/CANNING | High/ 60Kpa | Low/30kpaMedium/45kpa |
| BROWN | High / 60kpa | Low / 30kpaMedium/45Kpa |
| KEEP WARM | none | none |
| DELAY TIME | none | none |
Cook Time
The COOK TIME button allows you to change the cooking time for any mode selected from the preset cooking time.
Push the Mode you would like to select and the Mode and applicable Pressure indicator will illuminate. Within 5 seconds, push and hold the COOK TIME button to change the cooking time within a defined
range for the selected Mode. The time will start from the preset time for that Mode, run up to a maximum and then begin again at a minimum setting. The display window will show the selected cooking time.
For example, the preset cooking time for the COOK Mode is 15 minutes; you can change this to anywhere between 10-20 minutes using the COOK TIME button, following the steps below.
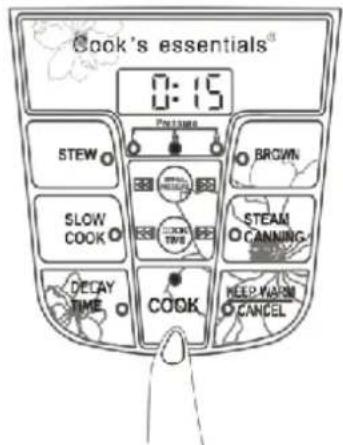
- Push the COOK button on the Control Panel (Fig.30). The COOK and Medium Pressure indicator will illuminate, and the display window will show the preset cooking time of 0:15, 15 minutes.
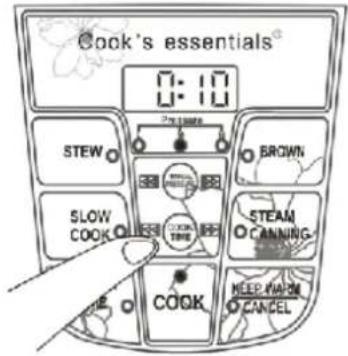
- Within 5 seconds, push and hold the COOK TIME button to change the cooking time to anywhere between 10-20 minutes, and this will be shown in the display window (Fig.31).
text_image
Cook's essentials® 0:15 Pressure STEW BROWN SLOW COOK STEAM CANNING DECAY TIME COOK KEEP KON CANCEL30
text_image
Cook's essentials® 0:10 STEW SLOW COOK COOK BROWN STEAM CANNING- KEEP VOLUME CANCEL31
| Control Panel Options | Preset Time | Adjustable Cook Time |
| COOK | 15 min | 10-20 minutes |
| SLOW COOK | 90min | 60-120 minutes |
| STEW | 25min | 15-35 minutes |
| STEAM/CANNING | 20min | 10-30 minutes |
| BROWN | 10min | 2-18 minutes |
| DELAY TIME | none | 30 minutes-24 hours |
Delay Time
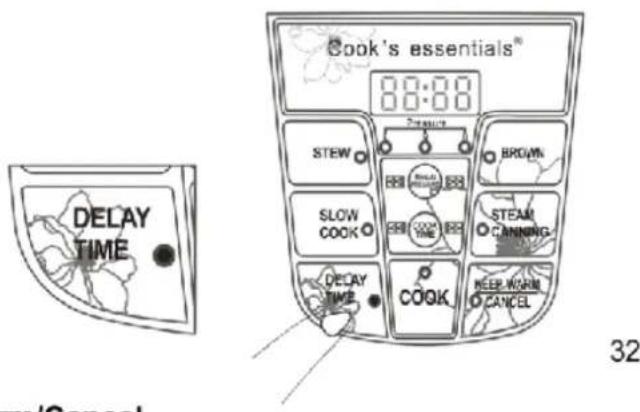
If you would like your Pressure Cooker to start cooking at a later time, use the DELAY TIME button. Push the DELAY TIME button on the Control Panel and the DELAY TIME indicator will illuminate (Fig. 32). Hold the DELAY TIME button to select a cooking start time from 30 minutes to 24 hours later. The display window will show the selected delay time. Once the delayed time has passed, the cooking process will automatically begin.
CAUTION: Perishable foods such as meat and poultry products, fish, cheese and dairy products cannot be left at room temperature for more than 2 hours. (No longer than 1 hour when the room temperature is above 90°F) When cooking these foods, do not set the delay time function for more than 1-2 hours.
text_image
Cook's essentials® 8:00:00 STEW BROWN SLOW COOK STEAM CANNING DELAY TIME COOK KEEP WARM CANCEL 32Keep Warm/Cancel
This function is used to keep cooked foods warm and to stop/cancel a current operation.
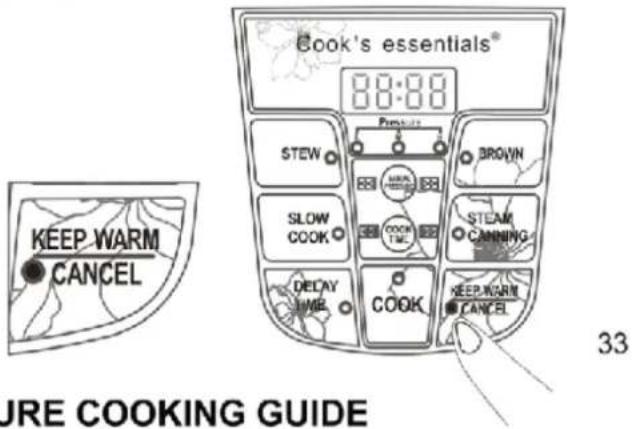
Pushing the KEEP WARM/CANCEL button while the unit is in a cooking cycle will stop the cooking cycle (Fig. 33). Once a cooking process is complete, the cooker will automatically move to the KEEP WARM function, and pushing the KEEP WARM/CANCEL button when the unit is already in the KEEP WARM function will stop this function. Pushing the KEEP WARM/CANCEL button when the unit is in a neutral mode will reset the unit to the KEEP WARM function. The KEEP WARM indicator will illuminate when these function is on.
text_image
Keep WARM CANCEL Cook's essentials® 00:00 STEW BROWN SLOW COOK STEAM CANNING DECAY LIME COOK KEEP WARM CANCEL URE COOKING GUIDE 33PRESSURE COOKING GUIDE
All pressure cooking modes require the addition of liquid in some form (water, stock, etc.). Unless you are familiar with the pressure cooking process, follow recipes carefully for liquid addition suggestions. Never fill inner pot above MAX line.
| Meats | Liquid (Cups) | Approximate Cook Time Minutes | Pressure Setting |
| Beef/Veal, roast or brisket | 3-4 | 10-30 | High |
| Beef Meatloaf, 2lbs | 2-4 | 2-18 | Medium |
| Beef, Corned | 4-5 | 60-120 | High |
| Pork, roast | 2-4 | 2-18 | High |
| Leg of lamb | 2-4 | 60-120 | High |
| Chicken, whole, 2-3 lbs | 3-4 | 10-35 | High |
| Chicken, pieces, 2-3lbs. | 3-4 | 10-35 | High |
| Cornish hens, two | 3-4 | 10-20 | High |
| Pork, ribs, 2 lbs | 2-4 | 15 | High |
| Meat/poultry soup/stock | 4-6 | 10-15 | High |
| Vegetables | Liquid (Cups) | Approximate Cook Time (Minutes) | Pressure Setting |
| Asparagus, thin whole | 1-2 | 2 | High |
| beans, fava | 1-2 | 4 | High |
| Beans, green | 1-2 | 2-3 | High |
| Beans, lima | 1-2 | 2 | High |
| Beets, medium | 1-2 | 10 | High |
| Broccoli, pieces | 1-2 | 3 | High |
| Brussel sprouts, whole | 1-2 | 4 | High |
| Carrots, 1-inch pieces | 1-2 | 4 | High |
| Corn, on-the-cob | 1-2 | 3 | High |
| Onions, whole | 1-2 | 2 | High |
| Potatoes, 1 1/2 chunks | 1-2 | 6 | High |
| Potatoes, whole, medium | 1-2 | 10-11 | High |
| Squash, acorn, halved | 1-2 | 7 | High |
| Squash, summer, zucchini | 1-2 | 4 | High |
| Seafood /Fish | Liquid (Cups) | Approximate Cook Time (Minutes) | Pressure Setting |
| Clams | 1-2 | 2-3 | Medium |
| Lobster | 1-2 | 2-3 | Medium |
| Shrimp | 1-2 | 2 | Medium |
| Fish, soup or stock | 1-4 | 5-6 | Medium |
| Rice | Rice/Liquid (Cups) | Approximate Cook Time (Minutes) | Pressure Setting |
| Brown | 1 / 2 | 10-20 | Medium/ High |
| White | 1 / 2 | 10--20 | Medium/ High |
| Wild Rice | 1 / 2 | 10-20 | Medium/ High |
CARE AND CLEANING
The Pressure Cooker must be cleaned thoroughly after each use in order to avoid staining caused by a build-up of food or cooking residue, and to ensure that the safety devices operate correctly.
• Unplug and let the unit cool before cleaning.
- Wash the removable Inner Pot in the dishwasher. You can also wash the Inner pot with warm soapy water. Use a sponge or non-metallic soft brush. Rinse and dry thoroughly with a clean cloth.
- Wipe the Housing with a soft, clean cloth. Do not submerge in water or spray water on it.
- Be sure that the bottom, in the area of the heating plate is wiped with a soft, damp cloth, and dried thoroughly after each use.
- Remove the Steam Water Storage, rinse it thoroughly and let it dry.
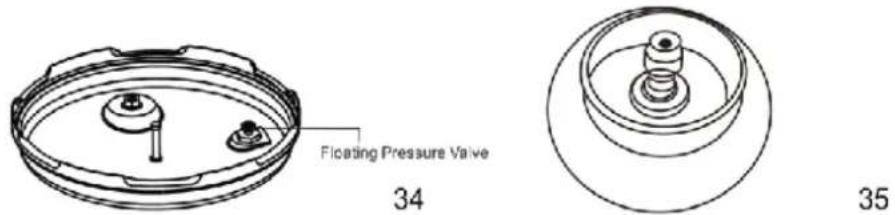
- Remove the Lid from the Cooker. Remove the Lid Liner/Rubber Gasket as outlined below (Fig. 36) and rinse the inner side of the Lid with water, as well as the Floating Pressure Valve, and steam vents (Figs 34 and 35). Dry thoroughly with a clean cloth.
- Wash the Lid Liner/Rubber Gasket with warm soapy water. Use a soft sponge. Rinse and dry thoroughly with a clean cloth.
- Do NOT use any abrasive cleaning products.
- The removable Inner Pot can be washed in the dishwasher. Do NOT wash any other parts of the Pressure Cooker in the dishwasher. Always wash the Cooker thoroughly after every use, or if it has not been used for an extended period of time.
- Do NOT pour cold water into a hot Pressure Cooker.
INSERTING AND REMOVING THE LID LINER/RUBBER GASKET
Removing the Lid Liner/Rubber Gasket from the Lid
- Pull on the small metal knob located on the face of the Liner until the Lid Liner separates from the Lid. The Rubber Gasket should be separated from the Lid Liner for proper cleaning.

text_image
Pull up 36Inserting the Lid Liner/Rubber Gasket into the Lid
- The Lid Liner is not reversible, and therefore must be correctly inserted into the Lid. Once inserted, the side with the words 'pull it out for cleaning' should be visible.
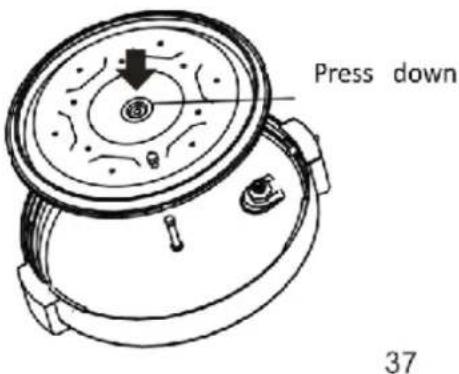
- Align the center hole in the Lid Liner with the raised metal shaft located in the center of the underside of the Lid, and press firmly into place. (Fig. 37)
text_image
Press down 37Note: The Rubber Gasket must be replaced every year, or sooner if necessary. The Rubber Gasket may also need replacing if the Pressure Cooker has not been used for a long period of time, as it can harden from disuse, making it unable to form an airtight seal. The Rubber Gasket must be replaced only with another one of the correct type and size for this Pressure Cooker.
FREQUENTLY ASKED QUESTIONS/TROUBLESHOOTING
FAQ's
1. What functions does this Pressure Cooker have?
You can pressure cook, slow cook, stew, brown, steam and can in this unit.
You can also prepare your meal and have it cook at a later time, and keep your meal warm after it has finished cooking.
2. Can you adjust the Pressure and Cooking Time for your own recipes?
Yes, you can set the pressure from 30 to 60 kpa and the time can be adjusted as well, depending on the mode you select.
3. Can you put frozen foods in without defrosting?
Yes, remember to add an extra 10 minutes for frozen meats.
4. When will the unit begin to count down the Cooking Time?
The time will begin to count down once your Pressure Cooker reaches the selected pressure setting. This may take from 5-30 minutes.
5. Is it normal to have steam come out the sides of the lid?
It is normal for some steam to escape from the Pressure Valve during the cooking process. However, if there is steam coming out the sides then the Lid may not be closed properly. Carefully release the pressure as outlined in the Instruction Manual and then follow the instructions in number 8 below for Closing the Lid.
6. What happens if my Lid doesn't open after I cook my meal?
For safety reasons, the Lid will only open once the inner pressure of the unit has been fully released and the floating valve is all the way in the down position.
7. What do I do if my Pressure Cooker is not building pressure?
Check that the Pressure Valve and Floating Valve are in good working order, and that no foreign particles are blocking the valve openings on the underside of the Lid.
Make sure the Lid Liner/Rubber Gasket is seated properly in the inside of the Lid.
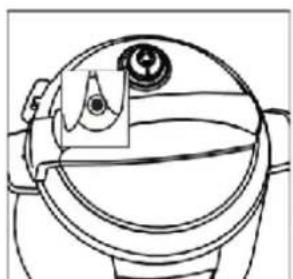
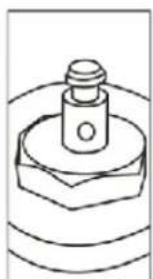
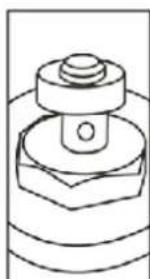
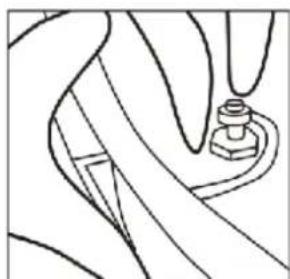
Check that the Floating Valve is assembled correctly. The floating valve should be able to move up and down freely only stopping when the silicon gasket meets the lid. See illustration and instructions below for assembly. (Figs. 38, 39, 40 and 41).
a) Hold the head of the floating valve and insert the fluted end into the hole in the lid of the pressure cooker. Press and hold the head of the floating valve tightly in place and reverse the lid to the stainless steel side.
b) The fluted end of the floating valve should be sticking out of the inside of the lid.
c) Place the silicon gasket onto the fluted end of the floating valve so it sits in the groove.
d) The floating valve should be able to move up and down freely only stopping when the silicon gasket meets the lid.
natural_image
Line drawing of a mechanical component with a circular head and internal structure (no text or symbols)38
natural_image
Simple line drawing of a bolt and nut on a base plate (no text or symbols)39
natural_image
Technical line drawing of a mechanical component with a bolt and housing (no text or symbols)40
natural_image
Line drawing of a hand holding a small object near a hexagonal base, with no text or symbols present.41
8. I can't close the Lid. What should I do?
Make sure that the Inner Pot is seated properly inside the Pressure Cooker.
Make sure the Lid Liner/Rubber Gasket is seated properly in the inside of the Lid.
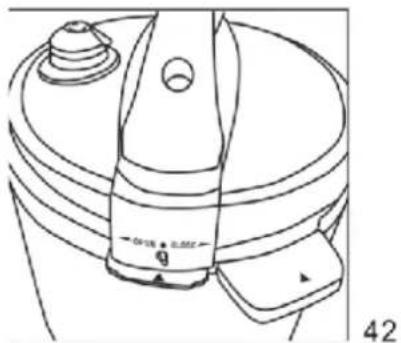
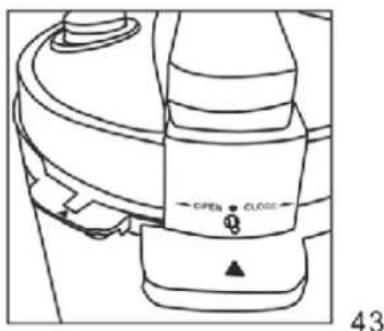
Check to see that the Lid is properly seated on the unit (Fig. 42) and turned counter-clockwise until you hear a click. The symbols on the Lid and Carry Handle should be aligned. (Fig. 43)
natural_image
Technical line drawing of a mechanical component with no visible text or symbolsOpen Position
text_image
OPEN CLOSE θ 43Closed Position
9. I am getting an error code on the digital display. What should I do?
This may be an issue with the sensor. Unplug the unit, let it cool completely, and then restart.
10. How do I order a replacement for the inner Rubber Gasket?
Contact Customer Service to purchase this replacement part.
TROUBLE SHOOTING
| Issue | Cause | Solution |
| Floating Valve does not rise. | Sufficient food/liquid has not been added to the Inner Pot. | Add food / liquid so that it is above the minimum requirement level. |
| Lid can't be opened. | Floating Valve has not sunk even after all pressure has been released. | Press the valve slightly with a toothpick. |
| Lid can't be closed. | Lid Liner/Rubber Gasket is not positioned properly. | Adjust the Lid Liner/Rubber Gasket so that it is seated correctly in the lid. |
| Steam is leaking from around the lid. | Lid is not closed properly.Floating Pressure Valve is clogged.Cooker is over filled. | Re-close the Lid per instructions.Clean Floating Pressure Valve.Remove excess liquid / food. |
Error Codes
| Error Code | E1 | E2 | E3 | E4 |
| ERROR | Broken circuit of the sensor | Short circuit of the sensor | Overheat | Signal Switch malfunction |