ARNPR3G5U1 - Router Nexxt - Kostenlose Bedienungsanleitung
Finden Sie kostenlos die Bedienungsanleitung des Geräts ARNPR3G5U1 Nexxt als PDF.


Benutzerfragen zu ARNPR3G5U1 Nexxt
0 Frage zu diesem Gerät. Beantworten Sie die, die Sie kennen, oder stellen Sie Ihre eigene.
Eine neue Frage zu diesem Gerät stellen
Laden Sie die Anleitung für Ihr Router kostenlos im PDF-Format! Finden Sie Ihr Handbuch ARNPR3G5U1 - Nexxt und nehmen Sie Ihr elektronisches Gerät wieder in die Hand. Auf dieser Seite sind alle Dokumente veröffentlicht, die für die Verwendung Ihres Geräts notwendig sind. ARNPR3G5U1 von der Marke Nexxt.
BEDIENUNGSANLEITUNG ARNPR3G5U1 Nexxt
NEXXT
SOLUTIONS
Quick Installation Guide
123
Introduction
Thank you for purchasing the new mobile hotspot from Nexxt Solutions™. If any of the following items are mismatched, missing or damaged, please contact the merchant from whom you purchased the unit for immediata replacement.
• 3G mobile hotspot
• Rechargeable 2000mAh battery
- Micro USB to USB charging cable
- Quick installation guide
System requirements
- A compatible SIM card with mobile data service
- A computer with Windows®, Macintosh®, or Linux-based operating system
- Internet Explorer 7, Firefox 12.0, Chrome 20.0, or Safari
Preliminary steps
This device belongs to the new generation of portable SIM based Wi-Fi hotspots. This device comes with a built-in 3G modem and a 2000mAh battery making it a true mobile solution. The rechargeable battery works up to 6 hours or 72 hours in standby mode. The hotspot operates under the HSPA+ protocol, supporting download speeds of 21.6Mops with up to 8 simultaneous users.
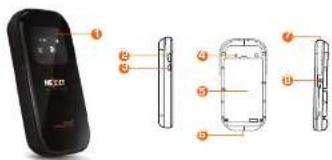
Product layout
Side and back viewsFront view
text_image
Diagram of a mobile phone with labeled parts showing front, side, and top views456
- OLED screen
- WPS button
- Power button
- Reset button
- Battery compartment
- Micro-USB charging port
- Groove
B. Micro SD card slot
Basic setup
Installing the battery, SD memory and SIM card
Before using your hotspot for the first time, you must insert a SIM card. You need to have one available in order to operate on a GSM network, known as Global System for Mobile Communication. The installation process is as follows:
- Unmost, once a daily hot-bechatting installation hot spiking Gently pry open the back cover in order to remove it.
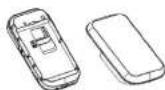
- Slide the SIM card in the slot inside the compartment, as marked, making sure the contacts of the card are facing down.
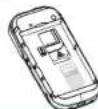
3
the contacts on the unit with the connectors inside the compartment.
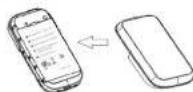
- Slide the micro-SD card (if you have one available) in the corresponding memory slot located on the side, as marked, also making sure the contacts of the card are facing down.
- Replace the hotspot cover by carefully pressing it down until it locks in place.
78
Charging your mobile device
- You must fully charge the battery prior to using the hotspot for the first time. Firmly insert the micro-USB end of the supplied charger cable into the I/O port on the hotspot, and the other end to an AC power adapter (faster way to charge), power bank or to an available USB port on your computer. - The new battery needs to be initially charged for at least 5 hours. - Let the battery drain completely, before recharging it to full capacity once again. Thereafter, allow the battery to charge until the indicator meter on the screen is full. - The device can be used while it is charging.
Device operation
This section describes the functions of the controls and buttons, as well as the icons and parameters displayed on the OLED screen.
- Hardware components
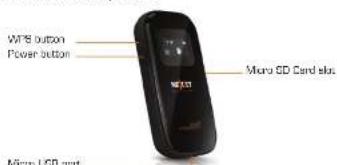
text_image
WiFi button Power button NE51 Micro LCD card elac Micro LCD port9
| Button | Description |
| WPS button | Press this button for 1 to 3 seconds to add new wireless devices quickly and easily using WiFi Protected Setup (WPS)Press this button for almost 7 seconds to turn the wireless feature on and off |
| Power button | Press this button for 1 to 2 seconds to turn the OLED screen on and offPress this button for 7 seconds to turn your device on and off |
| Reset button | Press this button with a needle or a sharp pointed tool for 4 to 5 seconds to initialize the device |
| Micro SD card slot | The device supports memory cards with a maximum capacity of 325B. Insert a user-supplied micro-SD card in this slot, if desired |
| Micro USB connector | Use the included cable to connect to a powered USB port to charge the device, or to access the configuration utility. |
10 11 12
2. OLED screen
This convenient OLED screen provides key information about your device, such as network activity, signal strength, current battery level and connection status, all done in real time.
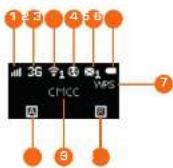
| Function | Description |
| 1 Signal strength | The number of bars displayed reflects the signal strength of your network. More bars indicate a stronger signal. No bars represent no connection to the network |
| 2 Network type | H: Currently connected to a HSPA+ mobile network H: Currently connected to a HSPA mobile network 3G: Currently connected to a WCOMA mobile network 2G: Currently connected to a GHEV/EDGE network y: No network is active. When no SIM card is detected by the device, the icon y will also be displayed on the screen |
| 3 Wi-Fi and clients | The icon □ indicates that your Wi-Fi network is currently burned on The number displayed next to this icon indicates how many clients are currently using the Wi-Fi signal. The device allows a maximum of 8 users to be connected simultaneously to the network |
| Function | Description |
| 4 Internet connection status | The icon is displayed when there is an active internet connection |
| 5 SMS | When the envelope icon is displayed, it means that there are unread messages in the inbox. The number indicates how many unread messages are currently stored in this folder |
| 6 Battery status | This icon displays the amount of energy stored in the battery. While charging, the animated icon and the current battery level will be shown on the screen |
| 7 WPS | Wi-Fi Protected Setup: When WPS is displayed, it means that the device is ready for WPS association with wireless clients |
NEXXT
SOLUTIONS
Quick Installation Guide
13 14
Function Description
| 8Connecting method | 1 Auto mode. The device is set to connect to the mobile network automatically2 Manual mode. The device is set to connect on the mobile network manually3 On send mode. The device will connect to the preferred mobile network when Internet access is required |
| 9Operator | The name of the mobile network operator to which the device is currently connected |
| 10Roaming | The device is currently roaming on a network other than the home network |
Installation
Initial configuration
Our hotspot can be accessed using a wireless connection from anywhere within the operating range of its wireless network. Keep in mind that the quantity, thickness and location of walls, ceilings, or other objects
that the wireless signals must pass through may adversely affect wireless signals.
After charging your device and installing a SIM card, you can connect it via WiFi, as described below:
- Press the power button on the side panel to switch the hotspot on.
- Nexxt Solutions will be displayed on the screen as the router performs its initialization process.
- After a few moments, the OLED display will show the current status of the router. For more details on the OLED display functions, please refer to the table on the previous section.
Note: The following example uses Windows 7 built-in wireless connection utility. The process may differ if you are using a different operating system, or a third party connection utility.
15
Connect your device via Wi-Fi
Note: If your computer is not set to Obtain an IP address automatically and Obtain DNS server address automatically, you will need to execute these three initial steps. Otherwise, you may skip to step 4 of the configuration process.
- Go to Start → Control Panel → Network and Internet → Network and Sharing Center → Change adapter settings. Right click on Wireless Network Connection, and select Properties.
- On the item list, click on Internet Protocol Version (TCP/IPv4).
- Check both options: Obtain an IP address automatically and Obtain DNS server address automatically.
- Click on the wireless connection icon in the lower right corner of the computer's desktop. When done, proceed to click on the refresh button, followed by the selection of the default SSD of the router. Finish by checking the
16 17
Connect automatically box in order to enable the selected link.
- Click on the Connect button. When the Connected message appears on the screen, it means that you have successfully connected to your wireless router.
Note:
The default SSID of the network is Nexxt XXXXXX [whereby XXXXXX represent the last unique six characters of each router's MAC address]. No default wireless password is required at this point.
Web browser configuration
By default, the hotspot is set to match your SIM card settings automatically to gain Internet access. Should the automatic mode fail, and no icon appears on the screen, the user will need to execute the manual procedure described below:
- Open a web browser and enter 192.168.0.1 on the address field, and press enter. When prompted, enter admin as the default user name and password, both in lower case. Click Login to continue.
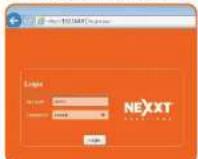
- After successfully logging in, configure the router according to the mode selected. In this case, the Manual mode is used to illustrate the process.
18
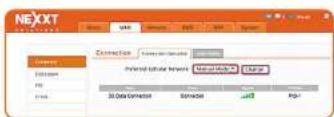
- Select WAN > Connection > User Profile, click Add to configure the Name, APN, Protocol, User, password (If you cannot locate this information, contact your service provider). Then click OK followed by Apply.
19 20
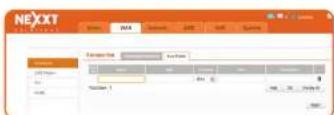
- Go back to the Connection Operation page, and select the item you just configured in the previous step. Click on Set and Connect to move on to the next step.
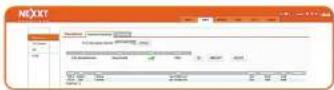
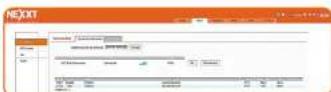
- When the link status of the device appears as Connected, it means that internet access is enabled.
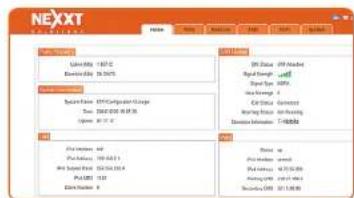
- At this stage, the user can click on the Home tab. This main page provides a summary of the current status of your network, configuration settings, traffic statistics, as well as all relevant information pertaining to the device system. In addition, this page also gives the user access to the more advanced settings, such as WAN, Network, SMS, WiFi, etc. if he later decides to customize any special features on the device.
21
text_image
NEXXT File Edit View Insert Help New File Edit 100% New Document Edit 200% New Format Edit 50% New Style Edit 30% New Style Format Edit 100% New Style Format Edit 50% New Style Format Edit 100% New Style Format Edit 50% New Style Format Edit 100% New Style Format Edit 50% New Style Format Edit 100% New Style Format Edit 50% New Style Format Edit 100% New Style Format Edit 50% New Style Format Edit 100% New Style Format Edit 50% New style format: Solid End: 100% End: 50% End: 100% End: 100% End: 100% End: 100% End: 100% End: 100% End: 100% End: 100% End: 100% End: 100% End: 100% End: 100% End: 100% End: 100% End: 100%22 23
FCC Statement
This device complies with Part 15 of the FCC Rules. Operation is subject to the following two conditions: (1) This device may not cause harmful interference, and (2) this device must accept any interference received, including interference that may cause undesired operation.
This equipment has been tested and found to comply with the limits for a Class B digital device, pursuant to Part 15 of the FCC Rules. These limits are designed to provide reasonable protection against harmful interference in a residential installation. This equipment generates, uses and can radiate radio frequency energy and, if not installed and used in accordance with the instructions, may cause harmful interference to radio communications. However, there is no guarantee that
interference will not occur in a particular installation.
If this equipment does cause harmful interference to radio or television reception, which can be determined by turning the equipment off and on, the user is encouraged to try to correct the interference by one of the following measures:
• Reorient or relocate the receiving antenna.
- Increase the separation between the equipment and receiver.
- Connect the equipment into an outlet on a circuit
different from that to which the receiver is connected.
- Consult the dealer or an experienced radio/TV technician for help.
FCC ID: X4YTRNTY3G