HE-303 - Nicht kategorisiert Home Easy - Kostenlose Bedienungsanleitung
Finden Sie kostenlos die Bedienungsanleitung des Geräts HE-303 Home Easy als PDF.


| Produkttyp | Fernbedienung |
| Modell | HE-303 |
| Marke | Home Easy |
| Abmessungen (ca.) | 80 x 30 x 15 mm |
| Gewicht (ca.) | 50 g |
| Stromversorgung | 2 x AAA-Batterien (nicht enthalten) |
| Frequenz | 433 MHz |
| Reichweite | bis zu 30 m |
| Funktionen | Ein/Ausschalten von Geräten, programmierbar |
| Anzahl Kanäle | 1 |
| Farbe | Weiß |
| Material | Kunststoff |
| Betriebstemperatur | 0 °C bis 40 °C |
| Reinigung | Mit einem weichen, trockenen Tuch abwischen |
| Sicherheitshinweise | Nicht in Wasser tauchen, von Kindern fernhalten |
| Ersatzteile | Keine separaten Ersatzteile erhältlich |
| Reparierbarkeit | Bei Defekt Gerät entsorgen |
| Garantie | 2 Jahre |
Häufig gestellte Fragen - HE-303 Home Easy
Benutzerfragen zu HE-303 Home Easy
0 Frage zu diesem Gerät. Beantworten Sie die, die Sie kennen, oder stellen Sie Ihre eigene.
Eine neue Frage zu diesem Gerät stellen
Laden Sie die Anleitung für Ihr Nicht kategorisiert kostenlos im PDF-Format! Finden Sie Ihr Handbuch HE-303 - Home Easy und nehmen Sie Ihr elektronisches Gerät wieder in die Hand. Auf dieser Seite sind alle Dokumente veröffentlicht, die für die Verwendung Ihres Geräts notwendig sind. HE-303 von der Marke Home Easy.
BEDIENUNGSANLEITUNG HE-303 Home Easy

HE-303 Remote control Indoor PIR
RE-INVENTING THE HOME
The HE-303 Indoor PIR adds extra security and ease of use to your Home Easy products
-Selectable timer setting
-Selectable Detection Range
-Variable Light setting
-25 Metre Wire Free Range
Battery Powered 2*AAA
The HE-303 allows you to control your
HomeEasy Receiver sockets or modules via a wire free
PIR sensor. When the PIR beam is broken the indoor PIR will switch
on your Remote control sockets or modules for between
5 seconds to 10 minutes, Ideal for controlling house hold lighting.
Compatible with all Home Easy products.
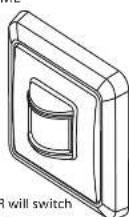
Installation:
The HomeEasy Indoor PIR can be placed in any location, even in bathrooms. Only use the adhesive strip on suitable surfaces.
Avoid placing the PIR in direct sunshine, above direct heat sources or on metallic surfaces.
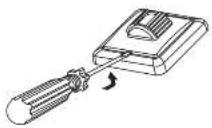
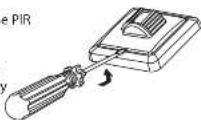
- Using a small screwdriver remove the front cover and base plate.
V1.0
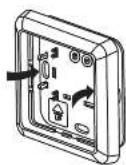
- The base unit can be attached to the wall using either the adhesive strips or screws (Included).
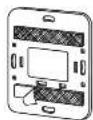

- Replace the two front covers.
Detection Area
Detection Range:
The Indoor PIR has 3 selectable detection ranges: 1, 3 or 6 Metres.
To alter the detection range, remove the front cover and move the slide switch to the required setting.
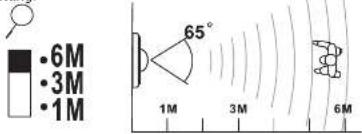
text_image
6M 3M 1M 65° 1M 3M 6M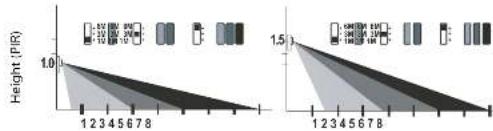
bar
| Category | Height (m) | |---|---| | 1 | 1.0 | | 2 | 1.0 | | 3 | 1.0 | | 4 | 1.0 | | 5 | 1.0 | | 6 | 1.0 | | 7 | 1.0 | | 8 | 1.0 | | 9 | 1.0 | | 10 | 1.0 | | 11 | 1.0 | | 12 | 1.0 | | 13 | 1.0 | | 14 | 1.0 | | 15 | 1.0 | | 16 | 1.0 | | 17 | 1.0 | | 18 | 1.0 | | 19 | 1.0 | | 20 | 1.0 | | 21 | 1.0 | | 22 | 1.0 | | 23 | 1.0 | | 24 | 1.0 | | 25 | 1.0 | | 26 | 1.0 | | 27 | 1.0 | | 28 | 1.0 | | 29 | 1.0 | | 30 | 1.0 | | 31 | 1.0 | | 32 | 1.0 | | 33 | 1.0 | | 34 | 1.0 | | 35 | 1.0 | | 36 | 1.0 | | 37 | 1.0 | | 38 | 1.0 | | 39 | 1.0 | | 40 | 1.0 | | 41 | 1.0 | | 42 | 1.0 | | 43 | 1.0 | | 44 | 1.0 | | 45 | 1.0 | | 46 | 1.0 | | 47 | 1.0 | | 48 | 1.0 | | 49 | 1.0 | | 50 | 1.0 | | 51 | 1.0 | | 52 | 1.0 | | 53 | 1.0 | | 54 | 1.0 | | 55 | 1.0 | | 56 | 1.0 | | 57 | 1.0 | | 58 | 1.0 | | 59 | 1.0 | | 60 | 1.0 | | 61 | 1.0 | | 62 | 1.0 | | 63 | 1.0 | | 64 | 1.0 | | 65 | 1.0 | | 66 | 1.0 | | 67 | 1.0 | | 68 | 1.0 | | 69 | 1.0 | | 70 | 1.0 | | 71 | 1.0 | | 72 | 1.0 | | 73 | 1.0 | | 74 | 1.0 | | 75 | 1.0 | | 76 | 1.0 | | 77 | 1.0 | | 78 | 1.0 | | 79 | 1.0 | | 80 | 1.0 | | 81 | 1.0 | | 82 | 1.0 | | 83 | 1.0 | | 84 | 1.0 | | 85 | 1.0 | | 86 | 1.0 | | 87 | 1.0 | | 88 | 1.0 | | 89 | 1.0 | | 90 | 1.0 | | 91 | 1.0 | | 92 | 1.0 | | 93 | 1.0 | | 94 | 1.0 | | 95 | 1.0 | | 96 | 1.0 | | 97 | 1.0 | | 98 | 1.0 | | 99 | 1.0 | | Note: The 'Height (m)' values are estimated based on the provided code format.Detection Distance (Metres)
Detection Angle:
The PIR detection area is 65 degrees, this can be reduced using the clip-on covers (included). if required the covers can be cut to size.
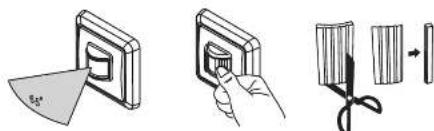
natural_image
Three-step diagram showing a folding panel, a close-up of the screen, and a cutting tool (no text or symbols)If required the covers can be cut to size.
Pairing/Deleting with Remote Control:
Up to Six remote control units can be paired with each
HomeEasy Receiver socket or module, to pair the indoor
PIR with a receiver unit, remove the front cover and.
slide the switch to DEL.
Now press the "Learn" button, the LED will start to flash, then slide the "LEARN" switch to "SET", the units are now paired together.
Example
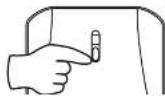
Deleting Remote Control:
To delete the PIR from the memory of a HomeEasy receiver socket or module control, simply press the "Learn" button. The LED will start to blink; slide the "LEARN" switch to "DEL", the LED will blink twice to confirm that the remote control has been removed from the receiver sockets memory.
Setting Timer :
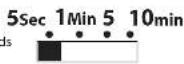
The HomeEasy indoor PIR will switch on the receiver socket or module for a predefined period of time; this can be set between 5 seconds and 10 minutes.
To select the time period, remove the front cover and slide the switch to the required timer
Day/Night Setting:
The PIR can operate one of three setting depending upon the ambient light Level, to alter the light setting remove the front cover and use the slide switch to select the setting.
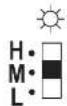
H PIR will operate 24Hrs a day
M PIR will operate between 4pm to 6am
L PIR will operate between 6pm to 6am
Times are approximations only
Changing Batteries:
-
Unclip the front cover from the front of the PIR using a small screw driver.
-
Remove the batteries and replace using 2 new 'AAA' batteries, making sure the polarity is correct.
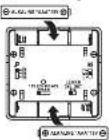
Always dispose of old batteries in a environmentally responsible way
- Replace the frontcover making sure the clips are correctly aligned and firmly push the case together.

Help Section :
No Activation: Check the battery level and polarity, replace with new batteries if necessary
Receiver Stays: The PIR may be suffering from false activation, try ON Continuously adjusting the position and detection angle.
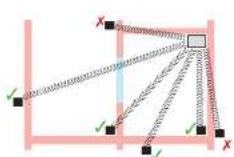
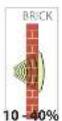
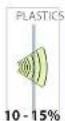
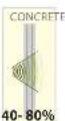
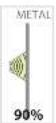
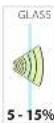
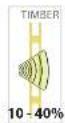
RF Range: The radio signals operating distance is reduced when the signal has to pass through walls. The radio signals achieve a range of 25m; this can be reduced depending on the type of material.
Range Reduction Guide:
Product Specification:
Remote Control: HE-303
Battery: 2 * AAA
Range: 25Metres (Open Distance)
Frequency: 433.92MHz
Warning: Never Exceed the
Product Specification
Contact: Helpline: 0845 2301 231
C H Byron
34, Sherwood Rd
Aston Fields
Bromsgr B60 3DB
Tel:08452301231
Fax: 01527 57701
Web: www.chbyron.com E-mail:
E-mail: support@chbyron.com