KAV-250P - Nicht kategorisiert Krell - Kostenlose Bedienungsanleitung
Finden Sie kostenlos die Bedienungsanleitung des Geräts KAV-250P Krell als PDF.


Benutzerfragen zu KAV-250P Krell
0 Frage zu diesem Gerät. Beantworten Sie die, die Sie kennen, oder stellen Sie Ihre eigene.
Eine neue Frage zu diesem Gerät stellen
Laden Sie die Anleitung für Ihr Nicht kategorisiert kostenlos im PDF-Format! Finden Sie Ihr Handbuch KAV-250P - Krell und nehmen Sie Ihr elektronisches Gerät wieder in die Hand. Auf dieser Seite sind alle Dokumente veröffentlicht, die für die Verwendung Ihres Geräts notwendig sind. KAV-250P von der Marke Krell.
BEDIENUNGSANLEITUNG KAV-250P Krell
Instructions for Use
natural_image
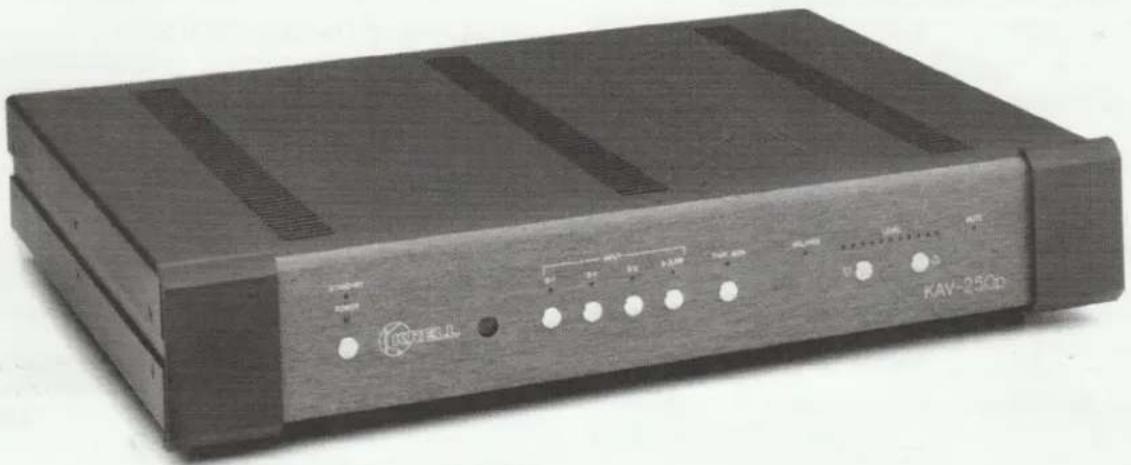
Exterior view of a black electronic device labeled KAV-25CD, showing ports and indicator lights (no readable text beyond branding)KAV-250p Preamplifier
CONTENTS
| Page | |
| INTRODUCTION | 3 |
| UNPACKING | 3 |
| PLACEMENT | 3 |
| AC Power Guidelines | 4 |
Krell ^® Industries, Inc.
45 Connair Road
Orange, CT 06477-3650 USA
TEL 203-799-9954
FAX 203-799-9796
E-MAIL krell@krellonline.com
CONNECTING THE KAV-250p
| TO YOUR SYSTEM | 4 |
| Inputs | 4 |
| Outputs | 4 |
| Connecting the KAV-250p | 5 |
| Additional Connections | 5 |
PREAMPLIFIER AND REMOTE
| CONTROL OPERATION | 5 |
| Battery Installation and Removal | 6 |
| OPTIONAL CONFIGURATIONS | 8 |
| WARRANTY | 9 |
RETURN AUTHORIZATION
PROCEDURE 10
SPECIFICATIONS 12
ILLUSTRATIONS
| Page | |
| REMOTE CONTROL | 7 |
| S-3/PR OPTIONAL INPUT CONFIGURATION | 8 |
CE Marking
This product complies with the EMC directive (89/336/EEC) and the low-voltage directive (73/23/EEC).
Introduction
Thank you for your purchase of the Krell KAV-250p. To obtain the best performance from your KAV-250p preamplifier, pay careful attention to its placement, installation, and operation. A thorough understanding of these details will help insure satisfactory operation and long life for the KAV-250p and related system components.
THERE ARE NO USER-SERVICEABLE PARTS INSIDE ANY KRELL PRODUCT.
Please contact your authorized dealer, distributor, or Krell®, if you have any questions not addressed in this reference manual.
Unpacking
- Open the box and remove the top layer of foam. You will see these items:
1 KAV-250p
1 KAV-250p remote control
1 T-10 Torx wrench
1 AC power cord
1 packet containing the Owner's Reference and the Warranty Registration Card
NOTE: If any of these items are not included, please contact your authorized Krell dealer or distributor immediately for assistance.
- Carefully remove the unit and accessories from the box. Remove the protective plastic wrap from the unit.
NOTE: Save all packing materials. If you must ship your KAV-250p in the future, repack the unit in its original packaging to prevent transit damage.
Placement
WARNINGS
The preamplifier must not be located where it could be exposed to dripping or splashing fluids.
Before you install the KAV-250p into your system, review the following guidelines to choose the location for the KAV-250p. This will facilitate a clean, trouble-free installation. The KAV-250p does not require any type of special rack or cabinet for installation. For the dimensions of the KAV-250p, see Specifications, on page 12.
Placement, continued
Place the KAV-250p on a firm level surface, away from excessive heat, humidity or moisture. Other components may be placed on or around the KAV-250p, since the KAV-250p is not particularly hum sensitive.
You may experiment with feet or cones as long as they are not permanently affixed to the chassis. Any unauthorized modifications to the electronics or chassis will void the warranty.
AC Power Guidelines
WARNING
Do not remove or bypass the ground pin on the end of the AC cord. This may cause RFI (radio frequency interference) to be induced into your playback system.
The KAV-250p has superb regulation and does not require a dedicated AC circuit. Avoid connections through extension cords or multiple AC adapters. High quality 15 amp grounded AC strips are acceptable. High quality AC line conditioners or filters can be used if they are grounded.
Connecting the KAV-250p to Your System
WARNING
When making connections to this component or any other, make sure the power amplifier is Off and the KAV-250p is in the Mute or Stand-by mode. Make sure all cable terminations are of the highest quality, free from frayed ends, shorts, or cold solder joints.
Inputs
The KAV-250p is equipped with three pairs of single-ended inputs via RCA connectors (S-1, S-2, and S-3/PR), one single-ended tape input via RCA connectors (Tape), and one pair balanced input via XLR connectors (B-1). The S-1 and S-2 inputs are standard single-ended inputs. The S-3/PR has a user configurable option. The S3/PR input is set as a standard input from the factory, and it may be set for use as a surround processor throughput. See Optional Configurations, on page 8.
The XLR input pin configuration is described below:
Pin 1 Ground
Pin 2 Non-inverting (0°)
Pin 3 Inverting (180°)
Outputs
Outputs include one pair single-ended output via RCA connectors, one single-ended tape output via RCA connectors, and one pair balanced output via XLR connectors. Both RCA and XLR outputs are active at all times, allowing simultaneous connections to separate amplifiers or separate systems. Do not connect both outputs to a single stereo amplifier at one time.
Connecting the KAV-250p
The left and right channel RCA and balanced inputs and outputs are labeled on the backplate. Maintain the correct left/right orientation.
To prevent the introduction of hum or other noise into the system, organize all wiring between the KAV-250p and other system components neatly. Separate AC wires from audio cables.
- Connect the left and right outputs of your source components to the inputs on the KAV-250p.
- Connect the output of the KAV-250p to the input of your power amplifier.
Krell ^® recommends the use of balanced interconnects. Balanced interconnects not only have the ability to minimize sonic loss but also have immunity to induced noise, especially for installations using long cable lengths. Balanced connections have 6dB more gain than single-ended connections. When level matching is critical, keep this specification in mind.
Additional Connections
RC-5 IN
This input accepts baseband RC-5 input commands from various remote devices, facilitating custom installations. The input allows the KAV-250p to be controlled via hard-wired signals sent from such units.
12 VDC REMOTE POWER OUT
These outputs send 12 volt power on/off signals to other Krell components, as well as to other devices that incorporate a 12 volt power on/off trigger input. This allows for remote turn on/off of other components when the KAV-250p is powered on/off. NOTE: Consult the owner's reference of any device used in a custom installation to take full advantage of the remote capability of the KAV-250p.
Preamplifier and Remote Control Operation
The KAV-250p provides input selection and volume control from the front panel. The KAV-250p remote provides complete pre-amplifier functions as well as Krell CD transport and power amplifier remote functions.
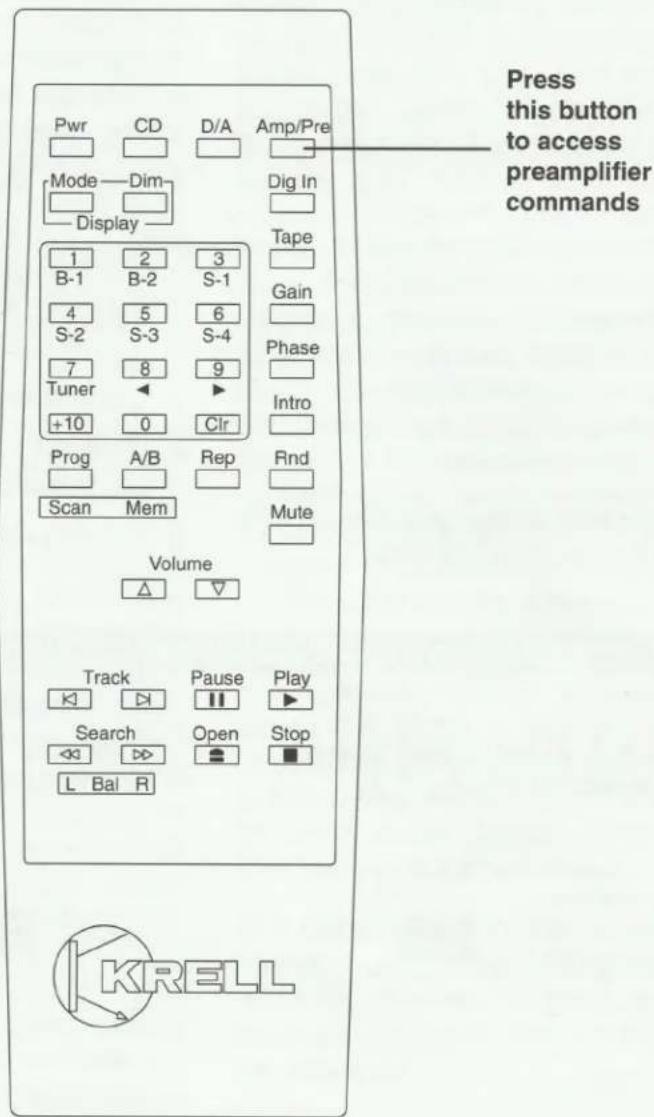
NOTE: Not all buttons on the remote control function with the KAV-250p. Press the Amp/Pre button on the remote to access preamplifier commands.
NOTE: When a function button on the remote control is pressed, the blue pilot led will flash on the KAV-250p. When the button is released the flashing stops.
- Engage the power switch on the KAV-250p either manually or using the remote control. After pressing the power switch, the red Stand-by led on the KAV-250p will turn off and the blue Power led on the KAV-250p will illuminate. The preamplifier is now ready for operation.
- Choose a listening source and select that input either manually or via the remote control.
- Start play of the source.
- Set the volume to a comfortable listening level.
- When changing sources, lower the volume to the Off position or Mute the output (see Mute, on page 6). This insures
that the next source played will not damage your system with a high output transient.
A description of the buttons on the KAV-250p and the KAV-250p remote is provided below.
PWR Power On/Off Button
▲VOLUME Raises volume
▼VOLUME Lowers volume
◀L Bal R (remote control only)
Shifts the balance to the left in 1dB increments. The "L" position mutes the right channel.
▶ L Bal R (remote control only)
Shifts the balance to the right in 1dB increments. The "R" position mutes the left channel.
BALANCE and LEVEL
When either the "L" or the "R" on the Balance control button is pressed on the remote, the Balance led on the KAV-250p will illuminate and the volume control leds convert to a Balance control indicator. The center led (Level) will always remain dimly illuminated indicating the center balance position. As balance is adjusted either left or right, another more brightly lit led illuminates to indicate the now modified balance setting. After 5 seconds of inactivity or a volume adjustment, the leds revert back to volume control indicators. If the Balance has been set to an off-center position, the Balance led will remain lit after the adjustment period. If returned to a centered Balanced position, the Balanced led will extinguish after the adjustment period.
MUTE (front panel only)
Press the input button of the active source to mute the output.
UNMUTE (front panel only)
Press the input button of the active source again to unmute the input. If the active source is changed while the KAV-250p is muted, press the input button of the new active source a second time to unmute the KAV-250p.
MUTE (remote control only)
Press the mute button of the remote to mute the output of the active source.
UNMUTE (remote control only)
Press the mute button of the remote to unmute the output of the active source.
NOTE: When the mute led on the KAV-250p is illuminated, there is no signal output.
B-1 Selects the B-1 input
S-1 Selects the S-1 input
S-2 Selects the S-2 input
S-3 Selects the S-3/PR input*
TAPE Engages the tape monitor
Battery Installation and Removal
NOTE: Batteries should be replaced when functions from the remote control become intermittent. The KAV-250p remote uses two AAA size 1.5 volt batteries.
-
Remove the backplate to expose the batteries.
-
Remove the old batteries.
-
Install the new batteries, following the battery position diagram on the plastic battery receptacle.
-
Re-install the backplate.
-
Check to make sure the remote control is functioning properly.
*See Optional Configurations, on page 8.
THE KAV-250p REMOTE CONTROL
text_image
Press this button to access preamplifier commands Pwr CD D/A Amp/Pre Mode—Dim Display 1 2 3 B-1 B-2 S-1 4 5 6 S-2 S-3 S-4 7 8 9 Tuner +10 0 Clr Prog A/B Rep Rnd Scan Mem Volume △ ▼ Track Pause Play ◀ ▶ □ ▶ Search Open Stop ◀ ▶ ▶ ▶ L Bal R KRELLOptional Configurations
S-3/PR
For simplified integration of an A/V surround sound processor, the S-3/PR input can be set to operate as a unity gain stage. In this Theater Throughput™ mode, when the S-3/PR input is selected, the volume and balance controls of the KAV-250p are disabled. Volume control is transferred from the KAV-250p to the A/V surround sound processor connected to the S-3/PR input. The left and right channel volume settings become independent from the volume control of the KAV-250p and the overall system level is determined exclusively by the A/V surround sound processor.
NOTE: The factory default position sets the S-3/PR input as a standard input.
To enable this option, it is necessary to remove the top cover of the KAV-250p.
- Unplug the KAV-250p from the AC outlet.
- Remove the KAV-250p top cover screws with the supplied T-10 Torx wrench. Lift the cover from the KAV-250p.
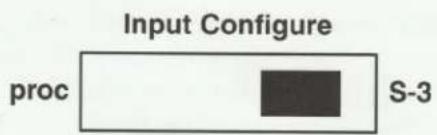
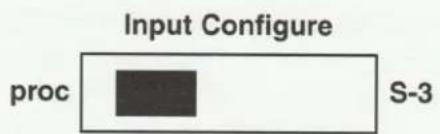
- Find the section labeled Input Configure located behind the faceplate directly in back of the KRELL logo. The factory default setting is shown in Figure 1 below. Remove the jumper from the S-3 side and place it on the side labeled proc as shown in Figure 2 below.
- Place the top cover back on the KAV-250p and insert the cover screws.
- Plug the KAV-250p back into the AC outlet.
S-3/PR OPTIONAL INPUT CONFIGURATION
FIGURE 1 S-3/PR configured as a standard input
text_image
Input Configure proc S-3Figure 2 S-3/PR configured for Theater Throughput™
text_image
Input Configure proc S-3Warranty
Krell warrants this product to be free from defects in material or workmanship for a period of five years for circuitry and three years for all mechanical components from the original date of purchase. Should this product fail to perform at any time during the warranty, Krell® will repair it at no cost to the owner, except as set forth in this warranty. Transfer of warranty to a second owner occurs automatically. Please contact Krell® to have the name on the warranty changed. Transfer of warranty does not extend the duration of the original warranty period.
NOTE: This warranty does not apply to damage caused by acts of God or nature.
The warranty period begins on the date of retail purchase as noted on the retail sales slip provided by an authorized Krell dealer or distributor, or on the warranty registration card sent to Krell®. In the event that an adequate proof of purchase date is unavailable, the warranty period will begin on the date the product was originally shipped from the factory. The warranty described in this paragraph shall be in lieu of any other warranty, express or implied, including, but not limited to, any implied warranty of merchantability or fitness for a particular purpose. There are no warranties which exceed beyond those described in this document. If this product does not perform as warranted herein, the owner's sole remedy shall be repair. In no event will Krell® be liable for incidental or consequential damages arising from purchase, use, or inability to use this product, even if Krell® has been advised of the possibility of such damages.
The warranty for this Krell product is valid only in the country to which the product was originally shipped, through the authorized Krell distributor for that country, and at the factory. There may be restrictions on or changes to Krell's warranty because of regulations within a specific country. Please check with your distributor for a complete understanding of the warranty in your country.
Freight to the factory is your responsibility. Return freight within the United States (U.S.A.) is included in the warranty. If you have purchased your Krell product outside the U.S.A. and wish to have it serviced at the factory, all freight and associated charges to the factory are your responsibility. Krell® will pay return freight to the U.S.A.-based freight forwarder of your choice. Freight and other charges to ship the product from the freight forwarder to you are also your responsibility.
The operating voltage of this product is determined at the factory and can only be changed by an authorized Krell distributor or at the factory. The voltage for this product in the U.S.A. cannot be changed for six months from the original purchase date.
Any unauthorized voltage conversion, disassembly, component replacement, perforation of chassis, updates, or modifications performed to the product will void the warranty.
Return Authorization Procedure
IMPORTANT: If you believe there is a problem with your unit, please contact your dealer, distributor, or the Krell factory immediately. Do not return any unit to Krell® for repair without first discussing the problem and obtaining a Return Authorization Number.
To return a product, the owner is required to:
■ Obtain a Return Authorization Number (R/A number) and shipping address from the Krell Service Department.
■ Insure and accept all liability for loss or damage to the product during shipment to the Krell factory and prepay all shipping charges. The product may also be hand delivered if arrangements with the Service Department have been made in advance. Proof of purchase may be required for warranty validation at the time of hand delivery.
Use the original packaging to insure the safe transit of the product to the factory, dealer, or distributor. The use of any packaging material other than the original packaging materials is not recommended. Krell® may, at its discretion, return a product in new packaging and bill the owner for such packaging if the product received by Krell® was boxed in non-standard packaging or if the original packaging was so damaged that it was unusable. If Krell® determines that new packaging is required, the owner will be notified before the product is returned. To purchase additional packaging,
please contact your authorized Krell dealer, distributor, or the Krell Service Department for assistance.
Krell ^® is not responsible for any damage incurred in transit. Krell ^® will file claims for damages as necessary for products damaged in transit to the factory. The owner is responsible for filing claims for shipping damages that occur during the return shipment.
Replacement parts and/or products will be furnished on an exchange basis only; any parts and/or products returned to Krell® for exchange become the property of Krell®.
No expressed or implied warranty is made for any Krell product damaged by accident, abuse, misuse, natural or personal disaster, or unauthorized modification.
In the event that Krell® receives a product for warranty service which has been modified in any way without Krell authorization, all warranties on that product will be void. The product will be returned to original factory layout specifications at the owner's expense before it is repaired. All repairs required after the product has been returned to original factory specification will be charged to the customer, at current parts and labor rates.
To contact the Krell Service Department
TEL 203-799-9954 Monday-Friday 9:00 AM to 5:00 PM EST
FAX 203-799-9796 E-MAIL krell@krellonline.com
KAV-250p
PRODUCT
SERIAL NUMBER
To register your product for warranty benefits, complete and return the Warranty Registration Card enclosed in the shipping box within 15 days of purchase.
Krell ^® Industries, Inc.
45 Connair Road
Orange, CT 06477-3650 USA
TEL 203-799-9954 FAX 203-799-9796
E-MAIL krell@krellonline.com
KAV-250p
Specifications
FREQUENCY RESPONSE
.5Hz-132KHz + 0, -3dB
SIGNAL TO NOISE, "A" WEIGHTED
-105dB
DISTORTION
< 0.007% THD 20Hz-20KHz
INPUT TO OVERLOAD
10.3 Vrms
GAIN
12dB (balanced)
INPUT IMPEDANCE
160K ohms
OUTPUT IMPEDANCE
15 ohms
POWER CONSUMPTION
35 Watts
INPUTS
1 pair balanced via XLR connectors
3 pairs single-ended via RCA connectors
1 single-ended tape input via RCA connectors
OUTPUTS
1 pair balanced via XLR connectors
1 pair single-ended via RCA connectors
1 single-ended tape output via RCA connectors
REMOTE CONTROL
Wireless infrared
DIMENSIONS
19w x 3.5h x 15.5d in
48.3w x 8.9h x 39.4d cm
WEIGHT
Shipping 17 lbs, 7.7 kg
Unit only 13 lbs, 5.9 kg
All operational features, functions, specifications, and policies are subject to change without notification.