310-0111 - Nicht kategorisiert Neets - Kostenlose Bedienungsanleitung
Finden Sie kostenlos die Bedienungsanleitung des Geräts 310-0111 Neets als PDF.


Benutzerfragen zu 310-0111 Neets
0 Frage zu diesem Gerät. Beantworten Sie die, die Sie kennen, oder stellen Sie Ihre eigene.
Eine neue Frage zu diesem Gerät stellen
Laden Sie die Anleitung für Ihr Nicht kategorisiert kostenlos im PDF-Format! Finden Sie Ihr Handbuch 310-0111 - Neets und nehmen Sie Ihr elektronisches Gerät wieder in die Hand. Auf dieser Seite sind alle Dokumente veröffentlicht, die für die Verwendung Ihres Geräts notwendig sind. 310-0111 von der Marke Neets.
BEDIENUNGSANLEITUNG 310-0111 Neets
Neets
Level expansion
Installation guide
Congratulations on your new Level control Expansion.
This short description will describe how to wire the Level control Expansion, and also how to change the address of the unit.
To turn e.g. the volume up and down you turn the knob.
By pressing the button you can mute and un-mute the sound.
There are 5 LED for clear level indication.
The lover left will flash, when muted.
How to change NEB address
To setup the address (Default: address = A) for the system in the NEB network to be used in the project editor software, you will have to do the following:
Press the center of the turn knob within 5 seconds after connecting power to the unit (within the countdown shown in Figure 1) and hold it until either LED 1 (Adr = A) or LED 2 (Adr = B) starts to flash. (Figure 2 shows Adr = A).
Then let go of the press and turn the turn knob to the desired address. (Turn either left or right). When the desired LED is flashing, press the center button again and the address (A or B) is stored.
Connections to the unit
On the back of the unit you will find a 4 pin connector marked PWR, NDA, NCL, GND. Those 4 pins you must connect to the same 4 pins on the backside of the control system (Figure 3).
Please note that there can max be 3 units in a chain (including the control system) and the max cable length is 20 cm between any two units in the chain.
LED's
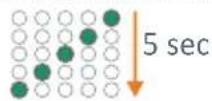
Figure 1
LED's
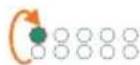
Figure 2, Address = A
Connection
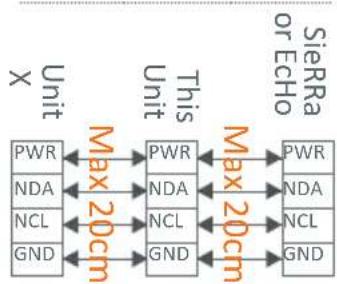
flowchart
graph LR
    subgraph "Unit X"
        PWR --> Max20cm["Max 20cm"]
        NDA --> Max20cm
        NCL --> Max20cm
        GND --> Max20cm
    end
    subgraph "This Unit"
        PWR --> Max20cm["Max 20cm"]
        NDA --> Max20cm
        NCL --> Max20cm
        GND --> Max20cm
    end
    PWR --> Dierra["Dierra or Echo"]
    NDA --> Dierra
    NCL --> Dierra
    GND --> Dierra
    Dierra --> Max20cm
    style Dierra fill:#f9f,stroke:#333
Figure 3
Doc no#: 310-0X11-001-005 REV1