DataHarbor - NAS CRU - Kostenlose Bedienungsanleitung
Finden Sie kostenlos die Bedienungsanleitung des Geräts DataHarbor CRU als PDF.


Benutzerfragen zu DataHarbor CRU
0 Frage zu diesem Gerät. Beantworten Sie die, die Sie kennen, oder stellen Sie Ihre eigene.
Eine neue Frage zu diesem Gerät stellen
Laden Sie die Anleitung für Ihr NAS kostenlos im PDF-Format! Finden Sie Ihr Handbuch DataHarbor - CRU und nehmen Sie Ihr elektronisches Gerät wieder in die Hand. Auf dieser Seite sind alle Dokumente veröffentlicht, die für die Verwendung Ihres Geräts notwendig sind. DataHarbor von der Marke CRU.
BEDIENUNGSANLEITUNG DataHarbor CRU
CRU® DataHarbor®
Network Backup Appliance
User Manual
natural_image
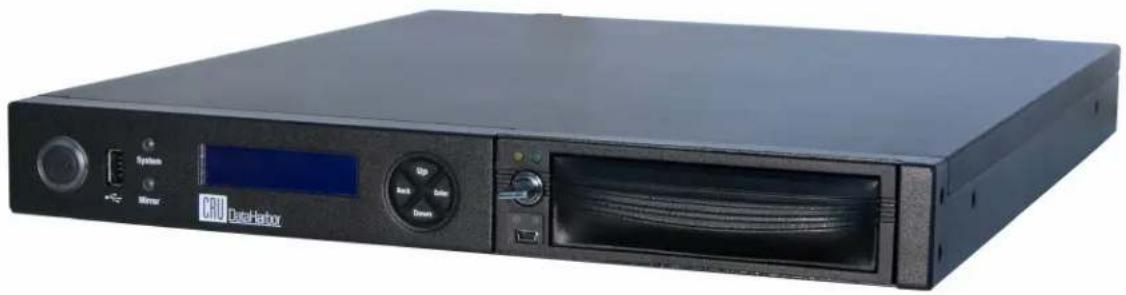
Black CRU DataHatox internal storage unit with control buttons and drive (no visible text or symbols beyond branding)Features
- Ease of Use – Fast setup, easy rotation, fast recovery. When it's time to swap drives, simply pull the drive and insert another.
- Scheduled Backup – Create the backup schedule that works for you and your networked PCs with the easy-to-use Microsoft Storage Server Essentials software.
- Remote Administration – Administrators can update or change the DataHarbor configuration over the network. Email and/or text message notifications.
- Windows Environemnt – Pre-installed with Windows Storage Server Essentials 2008 R2
Table of Contents
| 1. Pre-Installation Steps | |
| 1.1 Accessories 2 | |
| 1.2 Identifying Parts of Your DataHarbor 2 | |
| 1.3 Warnings and Notices 3 | |
| 1.4 Additional Online Help 3 | |
| 2. Installation Steps | |
| 2.1 Mounting Options 3 | |
| 2.2 Windows Storage Server 2008 R2 Essentials Setup Procedure | |
| 2.3 Configuring the System State Backup 4 | |
| 2.4 Connecting the DataHarbor to a Network 5 | |
| 2.5 Joining a Domain | 5 |
| 2.6 Joining a HomeGroup | 5 |
| 2.7 Installing Connector Software on Client Computers | 6 |
| 2.7.1 Install Dashboard and Launchpad on Windows | 6 |
| 2.7.2 Install Launchpad on Mac | 7 |
| 3. Server Management | |
| 3.1 User Account Management | 7 |
| 3.2 Server Folder and Hard Drive Management | 8 |
| 3.3 Manage Backups | 8 |
| 3.3.1 Configuring Automatic Backups for Mac OS | 9 |
| 3.4 Set Up Remote Access | 10 |
| 3.5 Manage Alerts | 11 |
| 3.6 Manage Add-Ins | 11 |
| 3.7 Shut Down or Restart the DataHarbor | 12 |
| 3.8 Other Server Settings 12 | |
| 4. Restore Lost Files or Folders | |
| 4.1 Create a Client Recovery Thumb Drive | 12 |
| 4.2 Full Windows Client System Restore | 12 |
| 4.3 Restore Files From Windows Client Computers | 12 |
| 4.4 Restore Files From Mac Client Computers | 13 |
| 5. Restore a DataHarbor Server | |
| 5.1 Restore From A Failed Primary Hard Drive | 13 |
| 5.2 Rebuild a Degraded RAID | 13 |
| 5.3 Restore to a New DataHarbor with Hardware | 13 |
| 5.4 Restore to a New DataHarbor From an Encrypted Backup Drive | 14 |
| 5.5 Migrate Data to a Newer Version of DataHarbor | 15 |
| 6. Buzzer and Temperature Configuration | 15 |
| 7. Best Practices for a Proper Backup Strategy | 16 |
| 8. Encryption | 17 |
| 9. Technical Specifications | 18 |
1. Pre-Installation Steps
1.1 Check the Accessories with Your DataHarbor
Please contact CRU if any items are missing or damaged.
The box should contain the following items:
| Accessories | Quantity |
| DataHarbor | 1 |
| Power Cord | 1 |
| Ethernet Cable | 1 |
| Hard Drive Carrying Case | 2 |
| DataPort 10 Screw Kit* | 1 |
| Stand Kit- Thumb Screw- Flat Stand Bracket- Rubber Foot | 1224 |
| Rack Mount Kit- Ear Mounting Bracket- Large S-Bracket- Small S-Bracket- Packet of Rack Mounting Screws | 12221 |
| Thumb Drive for Client Recovery | 1 |
| Security Key** | 3 |
| Lanyard for Security Key** | 3 |
| Security Key ID Tag** | 3 |
| Security Key Label** | 6 |
* Included only with DataHarbor models with a DataPort 10 bay
** Included only with DataHarbor models with a secure encrypted removable bay
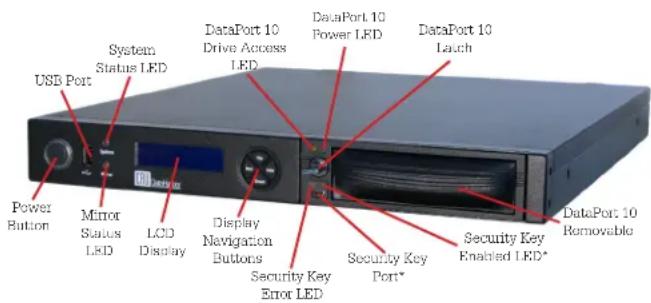
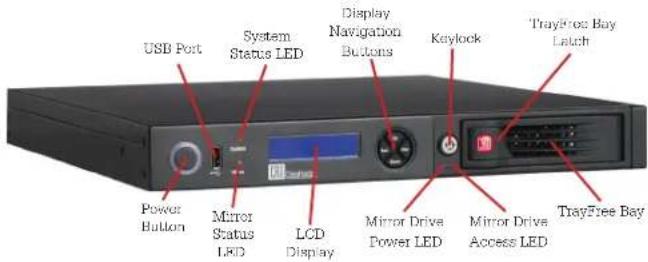
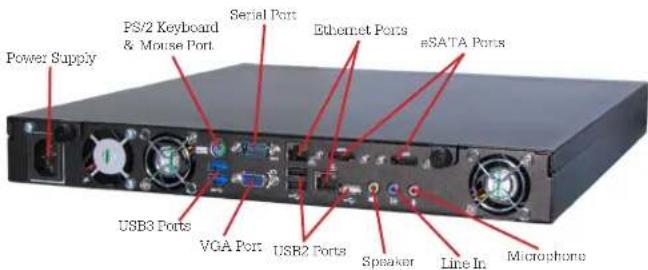
1.2 Identifying Parts of Your DataHarbor
Take a moment to familiarize yourself with the pDataHarbor. This will help you to better understand remaining instructions.
Models with DataPort 10
text_image
USB Port System Status LED DataPort 10 Drive Access LED DataPort 10 Power LED DataPort 10 Launch Power Button Mirror Status LED LCD Display Display Navigation Buttons Security Key Error LED Security Key Port* Security Key Enabled LED* DataPort 10 Removable**Included only with the DataHarbor with Secure Encrypted Bay
TrayFree Model
text_image
USB Port System Status LED Display Navigation Buttons Kaylock TrayFree Bay Latch Power Button Mirror Status LED LCD Display Mirror Drive Power LED Mirror Drive Access LED TrayFree BayRear (All Models)
text_image
Power Supply PS/2 Keyboard & Mouse Port Serial Port Ethernet Ports eSATA Ports USB3 Ports VGA Port USB2 Ports Speaker Line In Microphone1.3 Warnings and Notices
Please read the following before beginning installation.
General Care
- The main circuit board of the HDD carrier and the hard drives themselves are susceptible to static electricity. Proper grounding is strongly recommended prevent electrical damage to the enclosure or other connected devices, including the computer Avoid all dramatic movement, tapping on and vibration.
- Avoid placing hard drives or the HDD carrier close to magnetic devices, high voltage devices, or near
a heat source. This includes any place where the product will be subject to direct sunlight. Do Use the thumb screws from the stand kit to secure the flat allow water to make contact with the carrier stand brackets to the right side of the DataHarbor case.
receiving frame.
- Before starting any type of hardware installation while it is standing in vertical position. Once the brackets please ensure that all power switches have been turned off and all power cords have been installed, place two rubber feet on the bottom of each bracket. disconnected to prevent personal injury and damage to the hardware. 2.1.3 Front Rack Mount
- To avoid overheating, the DataHarbor should operate in a well-ventilated area.
RAID Backup
- Use only hard drives that are in perfect condition brackets so that the short ends face outward from Avoid using drives that have ever developed sides of the DataHarbor and screw them in using the sectors during previous usage. This could lead provided short screws. possible device failure or loss of data.
- The DataHarbor supports SATA hard drives of various specifications and different capacities. However, we recommend using drives of the same cap cache, and transfer speed for optimal performance. If drives of different capacities are used in a RA the capacity of the smallest drive will determine how much of each drive is used. The additional capacity on the larger drives will not be used by the RAID.
Encryption
- Though the Security Key port* is mechanically identical to the standard Mini-USB port, inserti Security Keys into any other Mini-USB port may damage the keys and render them usele Please only use Security Keys in CRU produc
Likewise, inserting a Mini-USB cable or other device into the DataHarbor Security Key port on the carrier may cause internal damage and potentially lead loss of data.
*Available only with DataHarbor models with a secure encrypted removable bay
1.4 Additional Online Help
Windows Storage Server 2008 R2 Essentials contains secondary features not necessary for normal operation of your DataHarbor. Additional online help for these and the primary features discussed herein can be found on Microsoft Technet: http://technet.microsoft.com/en-us/library/ff953176.
to 2. Installation Steps
2.1 Mounting Options
2.1.1 Horizontal Orientation
Place the rubber feet from the stand kit on each of four bottom corners of the DataHarbor and set it in a clear
area close
2.12 Vertical Orientation
Use the thumb screws from the stand kit to secure the flat stand brackets to the right side of the DataHarbor case.
The metal tabs on the brackets should face aw the cover to allow access to the inside of the DataHarbor
while it is standing in vertical position. Once the brackets are installed, place two rubber feet on the bottom of each bracket.
2.1.3 Front Rack Mount
The DataHarbor can be mounted into a four-post using just the ear mount brackets from the rack mo kit, providing your four-post rack is strong enough support the weight. Attach the ear mount bracket the front of each side of the DataHarbor. Rotate the ear
amount.brackets so that the short ends face outward from sides of the DataHarbor and screw them in using the provided short screws.
2.1.4 Slide Rack Mount
To use the DataHarbor with CRU's slide rail kit, attach the ear mount brackets to the front of each side of the unit. Rotate the ear mount brackets so that the short ends face outward from the sides of the DataHarbor and screw them in using the provided short screws. the middle screw hole open.
cover. Then place the hard drive inside, connecting it to fuse unified power and data connector on the carrier.
Turn the carrier and hard drive over and inse screws from the DataPort 10 screw kit through bottom of the DataPort 10 and secure the har Leake carrier. Replace the cover and secure it with the screw you removed.
Next, use the provided long screws to attach the Forargenodels with a DataPort 10 bay, insert th S-brackets to middle of the ear mount brackets. Ensure into the bay and lock it into place by turning the latch the threaded screw hole is attached to the DataHarbor. so that it is horizontal.
Finally, use the provided short screws to attach the small S-brackets to the dual holes on the rearward sides of the DataHarbor. Ensure the threaded screw holes are packaged with the DataHarbor into the TrayFree bay. For the TrayFree model, insert the hard drive that came attached to the DataHarbor. Insert the drive connector-first and then close the bay.
Your DataHarbor is now ready to be used with the CRU slide rail kit.
2.1.5 Rack Mounting Warnings
Elevated Operating Ambient Temperature: The operating ambient temperature of the rack environment may be greater than the room ambient temperature the enclosure is installed in a closed or multi-unit assembly. Install the equipment in an environment compatible with the maximum ambient temperature 40^ C.
Reduced Air Flow: Do not block or inhibit the air flow required for safe operation of the enclosure.
c. Boot up the DataHarbor. The LCD readout should show MIRROR STATUS: NORMAL. If you do not get this message, refer to the note just below.
NOTE: If the DataHarbor alarms, do not proceed with setup. Mute the alarm by pressing the Enter rack button on the front of the DataHarbor. You can then pull out the removable drive and continue with setup, opting to rebuild the RAID mirror later. Or you can rebuild the mirror first, referring to Section 5.2 for instructions. A mirror rebuild will take several hours to complete.
Mechanical Loading: Use care when mounting the rack in order to prevent injury.
Circuit Overloading: Do not overload the circuits. Refer to the name plate ratings on the equipment.
Reliable Grounding: Maintain reliable grounding of rack-mounted equipment by using indirect connections to the branch circuit (i.e. UPS battery backups, strips).
Removing the Cover: Turn off and unplug the enclosure before removing the cover.
After a few moments, the setup process for Windows Storage Server 2008 R2 Essentials will begin. Follow the prompts and provide the needed information for each.
The setup program will then begin finishing the installation process, which can take up to an complete. The system may reboot several times. Once the setup program displays "Your server is now ready to use", the setup has completed and you can click the Close button to log in to the server desktop.
2.3 Configuring the System State Backup
a. Log into the server desktop with the username password you created during setup in Section 2.2.
2.2 Windows Storage Server 2008 R2 Essentials Setup Procedure
You will need a keyboard, mouse and monitor. Do power on the DataHarbor before following the first steps below:
Click on Start and navigate to All Programs → Administrator Tools and select Windows Server Backup.
a. For the TrayFree model or models with preinstalled in the Actions pane Actions hard drives, proceed to Step B. the right, select Backup Schedule... Backup Schedule... Backup Once... For models with a DataPort 10 bay that do not have preinstalled hard drives, remove the screw from the The Backup Schedule Wizard will open. Click Next. DP10 carrier that secures the cover and remove the e.
f. On Select Backup Configuration, choose Custom and click Next.
g. Click on the Add Items button and check System state. Click OK, and then Next.
h. Specify your backup frequency and time of day, then click Next.
i. On Specify Destination Type, select Back up to a volume and click Next.
j. On Select Destination Volume, click the Add button and select Local disc (D:). Click OK and then click Next.
k. On the Confirmation window, click Finish. The server will take a moment to set up the backup schedule. When it is finished, click Close. Then close the Server Backup window.
Your server is now configured to backup its system state.
2.4 Connecting the DataHarbor to a Network
Insert an Ethernet cable from your network into the Ethernet port located above the USB 2.0 ports. This is the port for Local Area Connection in the server's Connections list.
2.4.1. DHCP
On DHCP networks, a new IP address is assigned to the DataHarbor as soon as the network detects it. No configuration is required. You can determine the address by performing the following actions:
a. Click on the Start Menu → Run, type in cmd, and click OK.
b. On the Command Prompt window that opens, type in ipconfig. The IP address is listed under the entry for "IPv4 Address".
2.4.2 Static Network
a. Click on the Start Menu → Control Panel.
b. In the Control Panel, under Network and Inte select View network status and tasks.
c. Click on Change adapter settings in the sidebar.
d. Right click on the Local Area Connection select Properties.
e. In the Local Area Connection Properties window that
pops up, select Internet Protocol Version 4 (TCP/IPv4) from the list and click on the Propert button.
f. Select the Use the following IP address radio button and enter in the IP address, Subnet mask, and Default gateway addresses appropriate to your server configuration.
g. Select the Use the following DNS server addresses radio button and enter in the Preferred DNS server and Alternate DNS server addresses.
h. Click OK and close the Network Connections window.
2.5 Joining a Domain
a. Open the Dashboard program and select Server Settings Windows on the toolbar on the right side of the window.
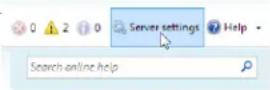
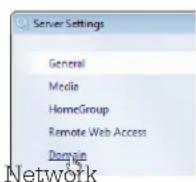
b. Select Domain from the list on the left.
c. Type in the name of the dom name in the text field and then click the Join domain button.
d. Restart the server for changes to take effect.
Joining a domain requires managing users differently than the instructions described in this document. For instructions on how to manage domain users in Windows Storage Server 2008 R2 Essentials, refer to the Microsoft Technet Website: http://technet.microsoft.com/en-us/library/manage-domain-users-3
2.6 Joining a HomeGroup
You can join the server to an already existing HomeGroup by following these instructions:
a. Open the Dashboard program and select Server Settings from the toolbar on the right side of the window.
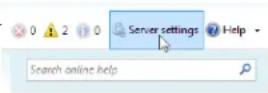
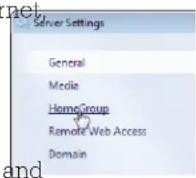
b. Select HomeGroup from the list on the left.
c. Click on the Join now... button.
d. Type in the HomeGroup password and click the Join now button.
2.7 Installing Connector Software on Client Computers
Dashboard vs. Launchpad
Dashboard is the server administration program that allows system administrators to fully manage the server from a client PC or from the server itself. Dashboard is only available on Windows PCs. In order to maintain a secure server environment, it is recommended that system administrators manage the server via a client PC instead of logging directly into the server itself. The Dashboard requires the server's local administrator account password in order to log in.
Launchpad is a server access program that allows users to manage their client PC's backup settings, use Remote Web Access, access shared folders on the server, and launch the Dashboard program. Launchpad is available on both Windows PCs and Macs. In order to log in, a user account must be created on the server from the Dashboard, which allows system administrators to set basic accessibility permissions for different users (see Section 3.1). The user would then log in utilizing the account's username password.
text_image
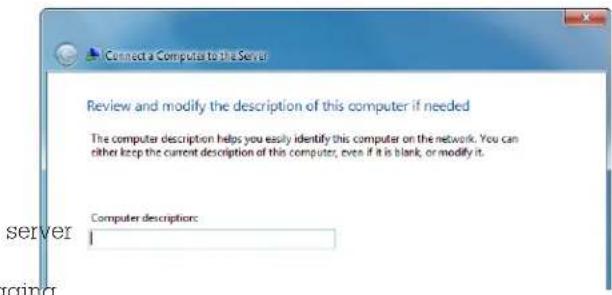
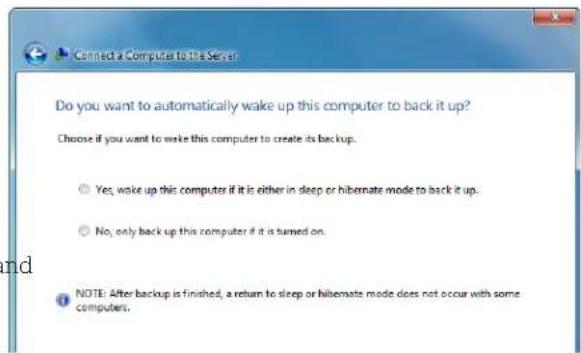
Connect a Computer to the Server Review and modify the description of this computer if needed The computer description helps you easily identify this computer on the network. You can either keep the current description of this computer, even if it is blank, or modify it. Computer descriptions: server rangingChoose whether or not you would like to v computer when the server attempts to back it up and then click Next.
text_image
Do you want to automatically wake up this computer to back it up? Choose if you want to wake this computer to create its backup. Yes, wake up this computer if it is either in sleep or hibernate mode to back it up. No, only back up this computer if it is turned on. NOTE: After backup is finished, a return to sleep or hibernate mode does not occur with some computers.2.7.1 Install Dashboard and Launchpad on Windows
a. On the client computer, open a web browser and type the following into the URL field and press Enter: http://
The
b. The browser will open a page with a button on it asking you to download software. Click on the button, download and open the software setup program.
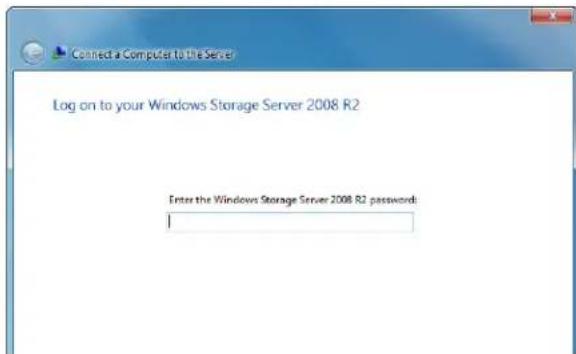
c. Click the Next button until the program verifying and installing necessary components. When it is done, it will ask you for the server password. Type in the password and click Next.
text_image
Log on to your Windows Storage Server 2008 R2 Enter the Windows Storage Server 2008 R2 password:d. Add a description for the client computer and click Next.
f. Choose whether you would like to participate the Windows Customer Experience Improvement Program and click Next.
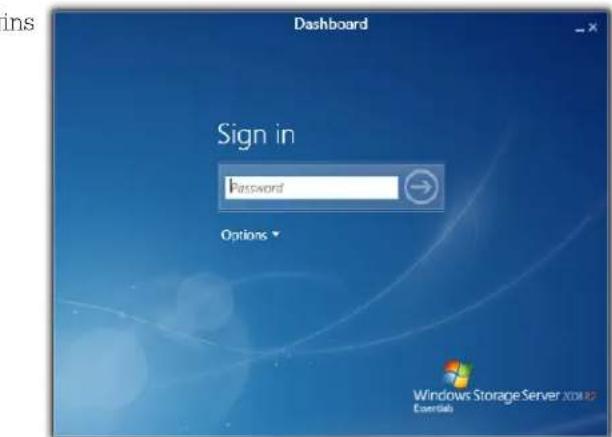
g. The setup program will now configure your computer and install the Dashboard software. When it is finished, you can optionally choose to Dashboard. If you do so, it will ask you for the server's local administrator account password. Type in password and click the Right arrow to log into the Dashboard.
text_image
Dashboard Sign in Password Options Windows Storage Server XCOM XP EssentialTo access the Dashboard or Launchpad, open the Start Menu and navigate to All Programs → Windows Storage Server 2008 R2 and click on the appropriate list item.
2.7.2 Install Launchpad on Mac
Dashboard is not available on Mac OS. However, of the most common tasks can still be accomplished from the Launchpad. Install Launchpad by following the instructions below.
a. On the client computer, open a web browser and type the following into the URL field and press Enter: http://
b. The browser will open a page with a button on it asking you to download software. Click on the button, download and open the software setup program.
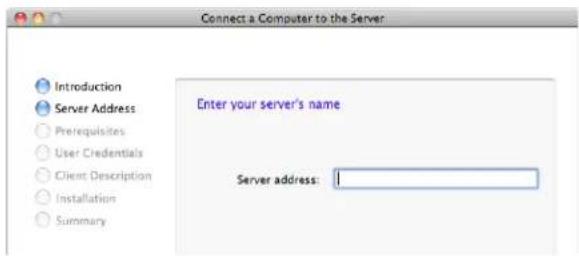
c. Click the Continue button and enter the server's address in the field. The address is the
text_image
Connect a Computer to the Server Introduction Server Address Prerequisites User Credentials Client Description Installation Summary Enter your server's name Server address: 1d. The program will verify that the Mac meets the server's requirements. When it does, name your computer and click Continue. This name will appear as the Computer's name in the Computer and Backup icon on the Dashboard.

text_image
Connect a Computer to the Server Introduction Server Address Prerequisites User Credentials Client Description Installation Summary Review and modify the identification of this computer if needed Type an identification for your computer. The identification helps you easily identify this computer on the server. You can either keep the current identification for this computer or you can modify it. The identification must have 15 characters or less and cannot consist of numbers only, contain spaces, or any of these characters: ~@#&^O_-||N|..^<>/? Identification of this computer:e. Enter the server's password and click Continue.
text_image
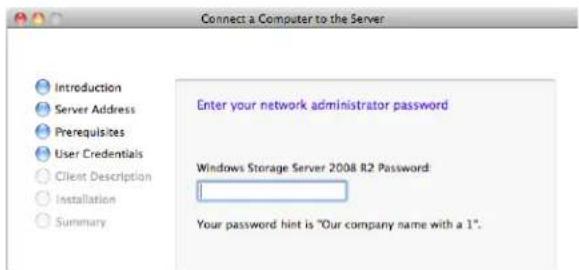
Connect a Computer to the Server Introduction Server Address Prerequisites User Credentials Client Description Installation Summary Enter your network administrator password Windows Storage Server 2008 R2 Password: Your password hint is "Our company name with a 1".f. Add a description for the client computer and click Continue.
text_image
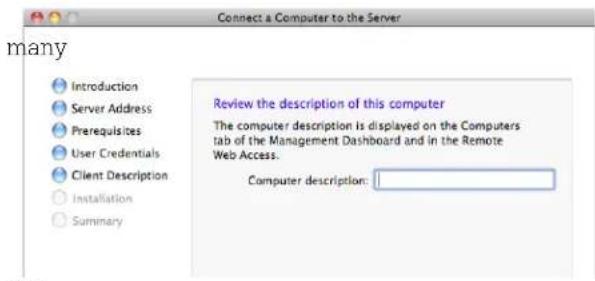
Connect a Computer to the Server many Introduction Server Address Prerequisites User Credentials Client Description Installation Summary Review the description of this computer The computer description is displayed on the Computers tab of the Management Dashboard and in the Remote Web Access. Computer description:g. The program will now show that the computer is now connected to the server. You can optionally choose to open Launchpad automatically at startup before clicking on the Close button. If you do so, Launchpad will open and will ask you for a username and password. Usernames must be assigned by the server. Administrator from the Dashboard (see Section 3.1). Type in the use and password and click the Right arrow to log in the Dashboard.
To access Launchpad, open a Finder window, click on the Applications in the sidebar, and then scroll down to double-click on Windows Server Launchpad.
Server Management
3.1 User Account Management
User accounts are necessary to allow users limited access to the server via Launchpad. On the Dashboard, click the Users icon. The following table describes the various server folder tasks that are available

in the task pane to the right. Some of the tasks are account specific, and are only visible when you select an account in the list.
| Task Name | Description |
| View the account properties | Displays the properties of the selected user account.General TabChange the user account owner's first namesChange the account passwordActivate or deactivate the accountDetermine whether users logged in under the account can view network health alertsShared Folders TabChange the account's access permissions to the server's foldersRemote Web Access TabSelect which server assets are accessible to the account via Remote Web Access |
| Deactivate the user account/Activate the user account | Deactivating a user account closes down does not delete the accountActivating a user account reactivates a previously deactivated user account |
| Remove the user account | Deletes the user account. |
| Change the user account password | Allows you to change the user account's password. |
| Add a user account | Allows you to create a user account and assign access permissions to the server. |
| Set the password policy | Lets you determine the complexity of the used for each user account.Weak: Any non-blank password is acceptedMedium: Passwords must contain at least 5 charactersBest: Passwords must contain at least 5 characters and must include letters, numbers, and symbolsStrong: Passwords must contain at least 7 characters and must include letters, numbers, and symbols |
3.2 Server Folder and Hard Drive Management
3.2.1 Server Folders
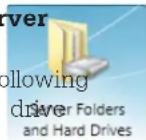
On the Dashboard, click the
Server
Folders and Hard Drives icon and click on the Server Folders tab. The following table describes the various server tasks that are available in the task pane to the right. Some of the tasks are only visible when you select a folder in the
| Task Name | Description |
| Open the folder | Displays the contents of the folder. |
| Delete the folder | Allows you to delete the folder. This task is not available for the default folders created by Windows Storage Server 2008 R2 Essentials. |
| View the folder properties | Displays the properties of the selected folder.General TabRename user-created foldersChange the description of the folderOpen the folder in Windows ExplorerSharing TabModify user account access permissions for the folder |
| Move the folder | Opens the Move a Folder Wizard that will allow you to move the folder to a new location. |
| Stop sharing the folder | Prevents users from accessing the folder. |
| Add a folder | Opens the Add a Folder Wizard which allows you to create a folder and assign permissions. |
| Understanding Server Folders | Opens a Microsoft Online Help web page that further explains the usage of server folders for centralized storage. |
but
3.2.2 Hard Drives
On the Dashboard, click the Server
Folders and Hard Drives icon and click on the Hard Drives tab. The table describes the various hard tasks that are available in the task pane to the right. Some of the tasks are hard drive are only visible when you select a drive in
passwords
| Task Name | Description |
| View the hard drive properties is | Displays the properties of the selected hard drive.General TabAllows you to rename the hard driveAccess the Disk Cleanup wizardCheck and repair problems with the hard driveShadow Copies TabEnable or disable shadow copies, which allow users to access files and folders as they were at a previous point in time. |
| How do I increase storage on the server? | Opens a Microsoft Online Help web page for ing additional storage. CRU does not re following these instructions for adding st as it will require disabling the DataHar mirror of the server. |
3.3 Manage Backups
Backup is automatically set up the first time that connector software is installed on a client PC and PC is joined to the server. No additional configuration is and are necessary.
Macs will have to be configured independently. See Section 3.3.1 for detailed instructions.
On the dashboard, click on the Computers
and Backup icon. The following table describes the various backup tasks are available in the task pane to the right. Some of the tasks are computer or server
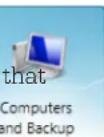
specific, and are only visible when you select a computer or the server in the list.
| Task Name | Description |
| View the computer/server properties | Allows you to view basic information about the computer (name, description, OS) and the computer's or server's backup history. |
| Start/Stop a backup for the computer | Begins or stops a manual backup of the server. |
| Restore files or folders for the computer | Allows the user to choose a specific backup to restore to the computer. |
| Customize Backup for the computer | Allows you to add or remove backup items or disable backup for the client computer. |
| Customize Backup for the server | On first use, this opens the Set Up Server Backup Wizard, which allows you to set up a backup for the server to an external or network drive. For moments, it is not necessary to set a server backup since the server is already backed up to the removable hard drive inside the DataHarbor. |
| Remove the computer | Removes the client computer from the so client computer will no longer be able to access server resources and the server will be unable to manage the client computer. |
| View alerts for the server | Opens the Alert Viewer. |
| Additional client computer backup tasks | Allows you to modify the server's backup tasks.Settings TabClient computer backup schedule: Set the start and end time during which client computers will be backed up.Client computer backup retention policy:Set how long daily, weekly, and mon ups are retained before they are deleted from the server.Tools TabRepair backups: Attempts to repair client computer backups if they become unstable.Computer recovery: Allows you to create a key to restore a client computer from an existing backup. This option requires the use of drive. |
| Change the server password | Allows you to change the server's password. |
| How do I connect computers to the server? | Opens a Microsoft Online Help web page for connecting client computers to the server. |
3.3.1 Configuring Automatic Backups for Mac OS
a. Open the Dashboard from a PC and create a new server folder backups. Go to the Server Folders and Hard Drives icon, make sure the Server Folders tab is selected,
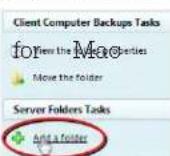
and then click on Add a folder in the tasks pane. Name your folder and then Next. Click on the Specific people icon, and then make sure the access level for the user account you are assigning to the Mac computer is set to full Read/Write access. Click Add a folder to create the folder.
b. Enable unsupported network volumes so they can be detected by Time Machine. On the Mac Finder, select the Go menu and click on Utilities. Op Terminal and type in the following as one line:
defaults write com.apple.systempreferences TMShowUnsupportedNetworkVolumes 1

text_image
Last login: Tue Jun 5 12:33:81 on console Chriss-IMac-Computer:~ Chris$ defaults write com.apple.systempreferences TMShowU unsupportedNetworkVolumes 1configura-
Hit Enter. If you typed it in right, no extra text aside from another prompt should print in the window. This will enable Time Machine to view the Mac backups folder you just created on your DataHarbor, provided you do not reboot the machine before finishing this process. If you do, simply repeat this step to re-enable support for unsupported network volumes.
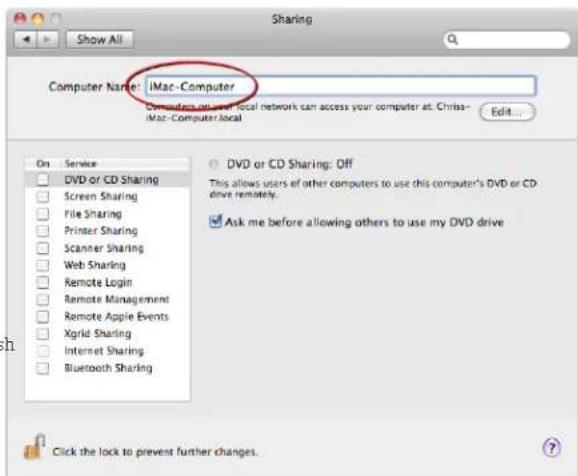
c. Obtain the Mac's computer name for use in E. Open the Apple menu and select System Preferences... Click on the Sharing icon. You computer name is shown at the top of the window.
text_image
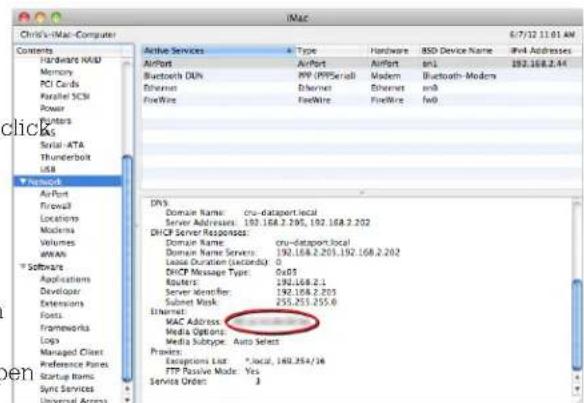
Sharing Computer Name: iMac-Computer Downders on user local network can access your computer at: Chriss- iMac-Computer Local Edit... On Service DVD or CD Sharing Screen Sharing File Sharing Printer Sharing Scanner Sharing Web Sharing Remote Login Remote Management Remote Apple Events Xigrid Sharing Internet Sharing Bluetooth Sharing DVD or CD Sharing: Off This allows users of other computers to use this computer's DVD or CD drive remotely. Ask me before allowing others to use my DVD drive Click the lock to prevent further changes.d. Obtain the Mac's Ethernet port MAC address for use in Step E. Open the Apple menu and select About This Mac. Click on the More Info... button. Click on Network and then choose Ethernet from list of Active Services in the upper right-hand pane. Below, scroll down to where it says MAC Address. The series of 6 numbers separated by colons is your MAC Address.
text_image
iMac 6/7/22 11:01 AM Contents Hardware NAD Memory PCI Cards Parallel SCM Power Centers Serial ATA Thunderbolt USB Networks AirPort Firewall Locations Modems Volumes www Software Applications Developer Extensions Fonts frameworks Logs Managed Client Preference Panels Startup Items Sync Services Universal Access Active Services Type Hardware BSD Device Name iMail Addresses AirPort AirPort AirPort on1 Bluetooth-Modern Bluetooth-Modern Ethernet Ethernet Ethernet fwd9 Domain Name: cru-datasetort.local Server Addresses: 192.168.2.295, 192.168.2.292 DHCP Server Responses: Domain Name: cru-datasetort.local Domain Name Servers: 192.168.2.295, 192.168.2.292 License Duration (Tuesday): 0 DHCP Message Type: 0x05 Routers: 192.168.2.1 Server Identifier: 192.168.2.293 Subset Mask: 255.255.255.6 Ethernet: MAC Address: Media Options: Media Subtype: Auto Select Providers: Exscriptions List: *.locif, 160.254/16 FTP Passive Mode: Yes Service Order: JEnsure that the MAC Address you select is the Mac's Ethernet port's. The Airport Mac Address, ever
you are connected to the network via Airport, will not allow the backups to work.
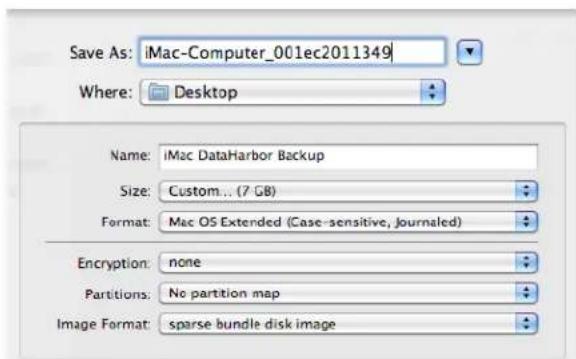
e. Create a sparse bundle disk image for Time Machine. On the Mac Finder, select the Go menu and click on Utilities. Open Disk Utility and select the New Image. Use the following settings:
Save As:
Where: Desktop
Name:
Format: Mac OS Extended (Case-sensitive, Journaled)
Encryption: none
Partitions: No partition map
Image Format: sparse bundle disk image
text_image
Save As: iMac-Computer_001ec2011349 Where: Desktop Name: iMac DataHarbor Backup Size: Custom... (7 GB) Format: Mac OS Extended (Case-sensitive, journaled) Encryption: none Partitions: No partition map Image Format: sparse bundle disk imageClick Create. A disk image will mount on the desktop along with the .sparsebundle file. Feel free the disk image as it is not needed.
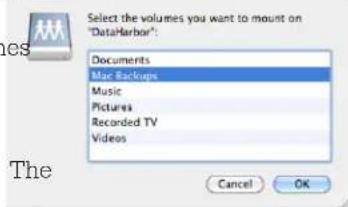
f. Copy the sparse bundle image to your Mac backups folder on the DataHarbor. On the Finder, s Go menu and click on Connect to Server... Type in smb://
asking you to select the volumes you want to mount. Select your Mac
Backups folder and click OK. folder will open in a
text_image
Select the volumes you want to mount on "Data Harbor". Documents Mac Backups Music Pictures Recorded TV Videos Cancel OKnew window. Drag the sparse bundle disk image file on your Desktop over to the window to copy it over.
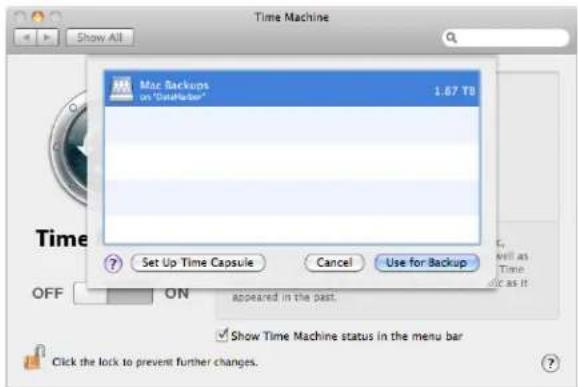
g. Configure your Time Machine backup. Open
Machine Preferences by opening the Apple menu and selecting System Preferences... Click on the Time Machine icon. If this is your first time using Time Machine, click the Select Backup Disk... button. If you have a previous Time Machine setup, click the Select Disk button. Your Mac backu folder should appear in the list. Select it an Use for Backup. The Mac will ask you to enter the DataHarbor user name and password assigned to the Mac. Enter the information and click Connect.
text_image
Time Machine Mac Backups on "TakeShaper" 1.67 TB Set Up Time Capsule Cancel Use for Backup OFF ON appeared in the past. Show Time Machine status in the menu bar Click the lock to prevent further changes.Your Mac backup is now configured! In about minutes, the first backup will automatically start. While you will not be able to see the percentage completion in the Dashboard's Computers and Backup section like you can with PCs that are performing a client back will be able to see the Backup status, and the server will notify you of any Alerts pertaining to the backup.
3.4 Set Up Remote Access
3.4.1 Turn on Remote Access
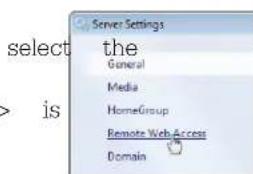
a. Open the Dashboard to eject Server Settings from the toolbar.

text_image
select > is the General Media HomeGroup Remote Web Access Domainb. Click on Remote Web Access from the sidebar on the left.
c. Click the Turn on button and complete the wizard.
password
3.4.2 Manage Remote Web Access Permissions
a. Open the Dashboard and select the Users icon.


text_image
User Account Tasks View the account properties Deactivate the user account Remove the user account Change the user account passwordb. Click on the user account you want to manage and then click View the account properties in the tasks pane on the right. The user account properties window will open.
Time
c. In the Properties box, click the Remote Web. Access tab.
d. Click the Allow Remote Web Access and show selected links on Remote Access radio button to enable Remote Access for this user account. select the assets the user account is allowed to access via Remote Web Access.
e. To turn off Remote Web Access for this account, select the Do not allow Remote Web Access radio button.
f. Click OK.
3.5 Manage Alerts
3.5.1 Organize Alerts
a. Open the Dashboard and select any of the displayed alerts icons on the toolbar, next to the Settings button. The Alert Viewer will open.
b. Click on the Organize list drop-down menu select your desired option.
Filter by computer – Only the alerts for the selected computer will be displayed in the Alert Viewer.
Filter by alert type – Only the certain type of alert (Warning, Critical, or Informational) will be displayed in the Alert Viewer.
3.5.2 Delete Alerts
You can use the Alert Viewer on the Dashboard to delete an alert. If you delete an alert and the server detects the same problem, it will create a new alert.
a. Open the Dashboard and select any of the displayed alerts icons on the toolbar, next to the Settings button.
b. Right-click the alert that you want to delete and select Delete the alert.
c. The server will ask if you want to delete the alert. If so, click Yes.
3.5.3 Ignore Alerts
a. Open the Dashboard and select any of the displayed alerts icons on the toolbar, next to the Server Settings button.
b. Select the alert you want to ignore, and then select Ignore the alert from the Tasks section. This will disable and ignore the alert.
3.5.4 Enable Alerts
a. Open the Dashboard and select any of the displayed alerts icons on the toolbar, next to the Settings button.
Select the alert you want to enable, and then select Enable the alert from the Tasks section. This will enable the alert.
3.5.5 Set up E-mail Alert Notifications
Then Open the Dashboard and select any of the displayed alerts icons on the toolbar, next to the Serv Settings button.
b. At the bottom of the Alert Viewer, select email notification for alerts.
c. Click on the Enable button.
d. Type in the SMTP server settings for your mail server and the e-mail address from which the alerts will be sent, then click OK.
Server Type in the e-mail recipients, separating each with a semicolon, and click the Apply and send email button to test that all the information has been and correctly.
f. If successful, click OK to to close the wizard click the Close button to close the Alert V unsuccessful, click Change SMTP settings to correct the server information.
3.6 Manage Add-Ins
You can perform certain administrative tasks by using the Add-Ins section Dashboard. On the dashboard, click Add-ins icon. The following table describes the various backup tasks that are a in the task pane to the right. Some of the tasks are specific, and are only visible when you select an the list.
Server

| Task Name | Description |
| Remove the add-in | Allows you to remove the add-in from the server and from all the computers on the network. |
| Install the add-in on computers | Allows you to schedule the installation of the add-in on all other computers in the network. |
| Got help with the add-in | Opens a web page where you can find help for using the Add-In. |
| Update the add-in | Download and install updates for add-ins already installed on the DataHarbor and network computers. |
| Renew the add-in subscription | Opens a web page where you can renew your add-in subscription. |
| How do I install or remove add-ins? | Opens a Microsoft Online Help web page for installing and removing add-ins. |
| Search for Add-ins at Microsoft Pinpoint server | Opens the Microsoft Pinpoint website where you can search for, download, and install new add-ins. |
3.6.1 Downloading and Installing an Add-In
a. Open the Dashboard and click on the Add-ins icon. Click on the Search for Add-ins at Microsoft Pinpoint button in the task pane on the right. It will open a web page.
b. Search for your add-in from the site and download it.
c. Open the .wssx file. You will be prompted to enter the DataHarbor's administrator account password. Do so and then follow the setup instructions.
d. When the add-in is completely installed, show up in the listing on the Add-ins section of the Dashboard.
3.7 Shut Down and Restart the DataHarbor
To shut down or restart DataHarbor, log into the Dashboard and click on the Server Settings

button. In the lower left corner of the Server Settings window, you'll see a red button. Click on the arrow portion of the button and select your desired option.
3.8 Other Server Settings
The following settings can accessed by clicking Server Settings on the Dashboard.

3.7.1 Date, Time, and Region
Located in the General Tab, Date, Time, and Region allows you to change these settings.
3.7.2 Windows Update
It is very important for the administrator to download and install new Windows updates each month. Updates are set by default to be downloaded and installed automatically. Sometimes this requires a server reboot, which should be done before or after business hours. Change the Windows Update settings by clicking on the Install updates... button in the General Tab.
Windows Update settings and error reporting

Install updates automatically (recommended)

3.7.3 Media Server
The scope of this manual does not cover setting up a media server on the DataHarbor, nor is it supported by CRU Technical Support. Should you wish to do so, follow the instructions at http://technet.microsoft.com/en-us/library/ff953176.aspx.
4 Restore Lost Files or Folders
4.1 Create a Windows Client Recovery Thumb Drive
a. Insert a blank thumb drive into the USB DataHarbor server or client computer.
b. Open the Dashboard and click on the Computers and Backup icon.
c. Click on Additional client computer backup tasks in the tasks pane to the right.
d. Click on the Tools tab and select the Create key... button.
e. Follow the steps in the Create Computer Recovery Key Wizard.
will 4.2 Full Windows Client System Restore
a. Insert the client recovery thumb drive you created : Section 4.1 into a USB port on your client computer.
b. Boot into your computer's BIOS to ensure that primary boot device is the client recovery thum drive. See your motherboard's documentation for exact instructions.
c. Boot the computer and allow it to load the Boot Manager from the thumb drive. Then select whether your computer is a 32-bit operating system or a 64-bit operating system.
d. Follow the steps in the Full System Restore Wizard.
4.3 Restore Files From Windows Client Computers
f. Open the Dashboard and click Computers and Backup icon.
g. Select the computer you want to restore and cli Restore files or folders for the computer in the tasks pane to the right. The Restore Files or wizard will open. ideally
h Select the backup that contains the files you wa to restore and click Next. The wizard will op backup volume.
i. Navigate the volume to select the files and folders you would like to restore. Then click Next.
j. Select a restore location for the file. The default file path will work if you are restoring the file to its original location. Click Next.
k. The wizard will restore the file. If a copy of already exists in the location you've chosen, Windows will ask you if you would like to replace the file in the destination folder with the one from the backup. Select Copy and Replace and your file will be successfully restored. Click the Close button to close the wizard.
port on your
4.4 Restore Files From Mac Client Computers
a. Open Time Machine in the dock or in the Applications folder. The Time Machine window will open.
b. Use the timeline on the right side of the screen to navigate back to the point in time you wish to restore from.
c. Navigate to the files or folders you wish to restore. Highlight them and click the Restore button in the bottom right corner.
5 Restore a DataHarbor Server
There are three methods for restoring a DataHarbor server. Choose the method appropriate to your situation.
5.1 Restore From a Failed Primary Hard Drive
Use these instructions if:
• The primary hard drive in your DataHarbor has failed.
- And you have a brand new replacement drive that is the same capacity or larger as the failed drive.
NOTE: Do not replace your failed primary hard drive with an encrypted backup drive. You must use a non-encrypted drive as your primary hard drive and follow these instructions since the DataHarbor will only access encrypted data through its removable drive bay.
a. Power down the DataHarbor and unplug all cables from the back of the unit. Then remove it from the rack or storage area.
b. Open the top of the DataHarbor case by removing the two thumb screws and the safety screw securing the cover. Set the cover aside.
c. Unplug and remove the hard drive from the case. To remove the drive, untwist the thumb screw securing the hard drive bracket in place. Then slide the drive away from the thumb screw and lift it out of the bracket.
d. Mount the new replacement drive into the DataHarbor. Line up the new drive's screw holes with the mounting pins on the side of the bracket opposite the thumb screw and slide it into the bracket. Then twist the thumb screw to secure the mounting bracket. Plug the SATA data cable into the drive, but do not plug the power cable into the drive yet.
e. If the latest backup drive is not already inserted into the removable bay, insert it now. If you have a model with a DataPort 10 bay, secure it by turning latch 90 degrees clockwise. This will be the drive the DataHarbor will boot from and use to mirror to the replacement primary hard drive.
f. Connect the monitor, keyboard, mouse, and power cables back into the rear of the unit.
g. Power on the DataHarbor. The RAID alarm will sounding. Press the Enter button to mute the alarm.
h. After the DataHarbor boots up, plug in the SATA power cable into the replacement primary hard drive.
i. Once the drive spins up, the LCD screen will you if you would like to add a new drive.
Enter button. The RAID will now automatically begin rebuilding* from the DataPort 10 to the primary drive.
j. Once the rebuilding process is finished, restart server so that it will boot from the primary drive.
You have successfully replaced the primary drive a restored your server. Replace the cover using the thumb screws and remount it into your rack setup or place it back into its storage area.
*The rebuild process will take several hours to complete, during which you can still use the DataHarbor. Simply reconnect the Ethernet network cable to the rear of the unit.
5.2 Rebuild a Degraded RAID
Use these instructions if:
- Power to the DataPort 10 or TrayFree bay has been shut off or the drive inside the carrier has failed.
- And the DataHarbor's LCD screen reports that the mirror is degraded.
a. Mute the RAID alarm by pressing the Enter button.
b. For models with a DataPort 10, remove the drive carrier from the DataHarbor and replace the drive inside carrier with a known good hard drive. Then reinsert the drive carrier into the DataHarbor and turn the latch 90 degrees clockwise to power the new drive.
For the TrayFree model, remove the hard drive from the TrayFree bay and replace it with a known good hard drive. Then close the bay door.
c. Wait a few seconds and the LCD will ask if you would like to add a new drive. Press the Enter button to confirm. The RAID will now automatically begin rebuilding. This process will take several hours.
5.3 Restore to a New DataHarbor with Identical Hardware
the Use Dats Point instructions if:
- You are replacing your old DataHarbor with a brand new DataHarbor that has identical internal hardware.
- And you have retained the primary hard drive from your old DataHarbor and are not restoring encrypted backup drive.
a. Power down the DataHarbor and unplug all cables from the back of the unit. Then remove it from the rack or storage area.
b. Open the top of the new DataHarbor case by removing the two thumb screws and the Phillips-head securing the cover. Set the cover aside.
c. Unplug and remove the hard drive from the case. To remove the drive, untwist the thumb screw securing the hard drive bracket in place. Then slide the drive away from the thumb screw and lift it out of the bracket.
d. Mount the primary drive from your old DataHarbor into the new DataHarbor. Line up the new drive's screw holes with the mounting pins on the side of the bracket opposite the thumb screw and slide it into the bracket. Then twist the thumb screw to secure the mounting bracket. Plug the SATA data and power cables into the drive.
e. Put the cover back on the case and screw it back down.
f. Mount the new DataHarbor into your rack or place it back into your storage area. Connect the appropriate cables into the rear of the unit.
g. For models with a DataPort 10, remove the carrier from the DataHarbor. If there is no drive installed into the carrier, install one.
For the TrayFree model, remove the hard drive from the TrayFree bay.
h. Power on the DataHarbor. The RAID alarm will begin beeping. Press the Enter button to mute the alarm.
i. For models with a DataPort 10, replace the carrier into the DataHarbor and lock it into place.
For the TrayFree model, reinsert the hard drive into the TrayFree bay and close the bay door.
j. Wait a few seconds as the drive spins up and the LCD will then ask if you would like to add a new drive. Press the Enter button to select 'Yes'. The RAID will now automatically begin rebuilding, populating the from the primary drive inside the DataHarbor secondary drive that came inside the carrier.
You have successfully restored your server.
5.4 Restore to a New DataHarbor From an Encrypted from Backup Drive
Use these instructions if:
- You are replacing your old DataHarbor server wDataHarbor that is newer or different from your original configuration from an encrypted backup drive.
- Or you are restoring your DataHarbor from an encrypted screwbackup drive.
a. Plug a keyboard, mouse, and monitor into the DataHarbor and power on the unit.
b. After the DataHarbor starts up, follow the setup procedure laid out in Section 2.2.
c. Install your backup drive into a DataPort HotDock Secure (sold separately) and attach the HotDock Secure to the DataHarbor via eSATA or USB (eSATA is recommended for faster transfer times).
d. Insert your backup Security Key from your orig DataHarbor configuration into the HotDock Secure's Security Key port.
e. Turn the HotDock Secure on. Windows Storage Server should detect the disk after a few seconds and mount the drive.
f. Open Server Manager from the Task Bar. In navigation pane to the left, expand the Storage section and select Windows Server Backup.
g. On the Actions pane to the right, select Recover... to open the Recovery Wizard.
h. The wizard will ask where the backup is stored. Select A Backup stored in another location and click Next.
i. The wizard will then ask you to choose the location type. Select Local Drive and click Next.
j. The next screen should already have the HotDock Secure drive selected, so click Next again.
k. Choose the server to recover. Select your original server name from the list and click Next.
data: Select the most recent backup from the calendar and to the select Next.
m. Select System State as the recovery type and click Next.
n. Select Recover to an Alternate Location and click
the Browse button. Choose the local C: drive from the file listing and click OK. Then click Next.
o. Click the Recover button to begin the process. This will take approximately 15-20 minutes to complete.
p. When the recovery is complete, you must client backups to the new DataHarbor. Click Start menu and select Computer. Navigate the following folder on the HotDock Secure drive:
q. Copy the Client Computer Backups folder and paste it into C:/Server Folders/. If Windows asks you to overwrite any files or folders, select Yes. This process will take several hours, depending on the size of your backups.
r. When the file copy is finished, remove the Secure from the DataHarbor and restart the server.
You have successfully restored your server.
5.5 Migrate Data to a Newer Version of DataHarbor
Use these instructions if:
- You are replacing your old DataHarbor server
DataHarbor that is newer or different from your original configuration. - And you have retained the primary hard drive from your old DataHarbor and are not restoring encrypted backup drive.
a. First, ensure that you have configured the system state backup (see Section 2.3) and have created at least one system state backup.
b. Power down your original DataHarbor and cables from the back of the unit. Then remove it from the rack or storage area.
c. Open the top of your original DataHarbor case by removing the two thumb screws and the Phillips-head screw securing the cover. Set the cover aside.
d. Unplug and remove the hard drive from the remove the drive, untwist the thumb screw the hard drive bracket in place. Then slide away from the thumb screw and lift it out of the bracket.
e. Insert the drive into an external enclosure and attach that enclosure to your brand new DataHarbor.
f. Turn both the enclosure and the DataHarbor on. After logging into Windows Storage Server, the system will detect the disk and mount the drive.
g. Open Server Manager from the Task Bar. In navigation pane to the left, expand the Storage section and select Windows Server Backup.
h. On the Actions pane to the right, select Recover... to open the Recovery Wizard.
i. The wizard will ask where the backup is stored. Select move the A Backup stored in another location and click on the Next.
j. The wizard will then ask you to choose the type. Select Local Drive and click Next.
k. The next screen should already have the external drive selected, so click Next again.
1. Choose the server to recover. Select your original server name from the list and click Next.
HotDock Select the most recent backup from the calendar and select Next.
n. Select System State as the recovery type and Next.
o. Select Recover to an Alternate Location and select the Browse button. Choose the local C: drive from the file listing and click OK. Then click Next.
with a
p. Click the Recover button to begin the recover process. This will take approximately 15-20 minutes to complete.
q. When the recovery is complete, you must move from client backups to the new DataHarbor. Click or Start menu and select Computer. Navigate to t following folder on the external drive:
r. Copy the Client Computer Backups folder and paste it into C:/Server Folders/. If Windows asks you to
unplug all overwrite any files or folders, select Yes. This process will take several hours, depending on the size of your backups.
s. When the file copy is finished, remove the en from the DataHarbor and restart the server.
You have successfully migrated your files to your DataHarbor server.
6 Buzzer and Temperature Configuration
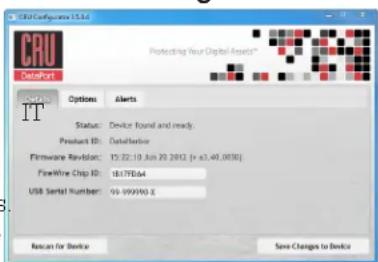
The DataHarbor is compatible with CRU Configurator 3.5 or higher, which allows administrators to change internal settings to
meet individual needs operating Configurator allows the
text_image
CRU Security 15.4 Options Alerts Status: Device found and ready. Product ID: Datailler Firmware Revision: 15:22:10 Jun 20 2012, (r x3,49,0030) FireWire Chip ID: 1817E64 USB Serial Number: 99-999990 X Reason for Device Save Changes to Deviceuser to set the password, enable and disable audible alarms, and change temperature alarms and warnings download Configurator and the full Configurator manual, visit www.wiebetech.com/software/configurator.php.
6.1 Accessing DataHarbor's Settings
a. Power down the DataHarbor and unplug all cables from the back of the unit. Then remove it from the storage area.
b. Open the top of the new DataHarbor case by removing the two thumb screws and the Phillips-head screw securing the cover. Set the cover aside.
c. Disconnect the 3 SATA data cables from the PCA board mounted directly behind the LCD Display.
d. Connect a USBA-to-USB-mini-B cable to the mini USB connector located on the PCA board and connect other side of the cable to a computer.
e. Download and install Configurator onto the and then open it.
f. Customize the settings to your desired preferences.
g. Click Save Changes to Device.
Be sure to reconnect the SATA data cables to their correct positions on the PCA board before using the DataHarbor
6.2 Customizable Options
text_image
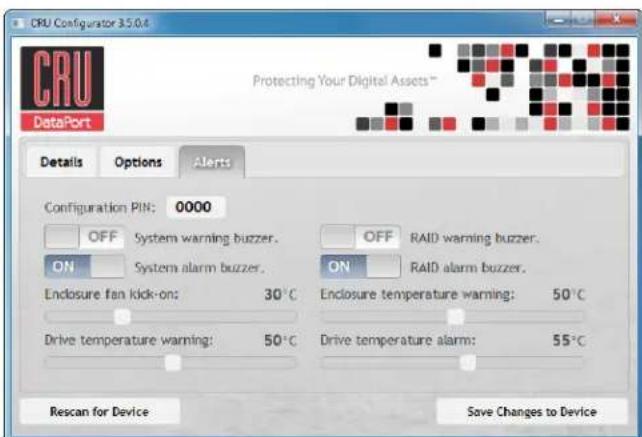
CRU Configurator 3.5.0.4 DataPort Protecting Your Digital Assets™ Details Options Alerts Configuration PIN: 0000 OFF System warning buzzer. ON System alarm buzzer. Enclosure fan kick-on: 30°C Drive temperature warning: 50°C Rescan for Device Save Changes to DeviceThe following options are available on the Alerts tab of the Configurator:
Configuration PIN
This feature allows you to set a PIN to prevent unauthorized configuration. The default PIN is 0000. The DataHarbor only requires you to enter a PIN if a different value has been set.
Buzzers
Place a check in the boxes to indicate which warning/alarm buzzers you want to be activated or remove a check from the boxes next to the buzzers you want to deactivate.
System Warning Buzzer
This buzzer will sound when a drive reaches the temperature set using the Drive temperature warning slider below. This buzzer is disabled by default. As a visual alert, the System rastats LED will glow amber when the temperature reached, regardless of whether the buzzer is enabled or not.
System Alarm Buzzer
This buzzer will sound on 3 occasions:
- When a drive reaches the temperature set using Drive temperature alarm slider below
- When the enclosure reaches the temperature set using the Enclosure temperature warning slider below the
- When the fan fails
computer As a visual alert, the System Status LED on your DataHarbor will glow red when any of these three situations regardless of whether the buzzer is enabled or not.
RAID Warning Buzzer
This buzzer will sound when the DataHarbor is in degraded RAID mode (a drive has failed and is in need of rebuild or the RAID is rebuilding). This buzzer is disabled by default. The Mirror Status LED will glow amber if this occurs, regardless of whether the buzzer is enabled or not.
RAID Alarm Buzzer
This buzzer will sound when the RAID has failed invalid. The Mirror Status LED will glow red if this occurs, regardless of whether the buzzer is enabled or not.
Temperature Sliders
When your DataHarbor reaches a certain temperature buzzers will sound if they are enabled (see the subsection above) and the fan will kick on. You may want to change these default temperatures according to environment. With these sliders, you can change the default temperatures of the:
• Enclosure fan kick-on
• Enclosure temperature warning
• Drive temperature warning
• Drive temperature alarm
7 Best Practices for a Proper Backup Strategy
Since there are many things besides hard drive fail can compromise your data (e.g. malware, theft, fire, CRU suggests the following steps to ensure your data remains intact:
- Ensure you have at least three different copies of your data. The DataHarbor allows you to do this by maintaining a daily backup of your original copy and mirroring it to a removable hard drive.
- Retain a weekly backup offsite. Remove the external hard drive and take it offsite with you on a weekly basis. Insert a third hard drive into the DataHarbor and let it rebuild the data over the weekend so that the DataHarbor's mirror is retained.
Any single copy of your important data must always be considered at risk. Without an effective backup strategy, recovering data may be impossible, or the cost of data recovery may be quite expensive. The CRU warranty does not cover costs associated with data loss (nor do the warranties of other storage manufacturers).
Plan accordingly and backup data to minimize downtime!
8 Encryption
- The DataHarbor with DataPort 10 Secure Encrypted Removable Bay* uses full disk hardware encryption to encrypt the entire contents of the drive—including the boot sector, operating system and all files—without performance degradation.
- A Security Key must be installed prior to powering on the DataHarbor with Secure Encrypted Removable Bay for the data to be decrypted on the drive. The DataHarbor has a Security Key internally connected at all times, but also includes two additional external Security Keys. Always store these keys offsite away from your backups so that in the event that the DataHarbor suffers catastrophic damage or is stolen, your backup data is still retrievable.
- The same or a duplicate key must be used in order to access the data. There is no “back door” to access the data; lost keys make data recovery virtually impossible.
9 Technical Specifications
| Product Name | DataHarbor with TrayFree Bay, DataHarbor with DataPort 10 Removable Bay, DataHarbor with DataPort 10 Secure Bay |
| Interface Types & Speeds | Gigabit Ethernet: up to 1 GbpseSATA: up to 3 GbpsUSB 3.0: up to 5 GbpsUSB 2.0: up to 480 MbpsSerial RS-232: up to 11520 bit/s |
| Drive Types Supported | 3.5" SATA* Hard Drives*SATA III Drives must be jumpered to run at 3.0 Gbps transfer speed |
| Connectors Two | (2) Gigabit Ethernet connectorsTwo (2) eSATA connectorsTwo (2) USB 3.0 connectorsFour (4) USB 2.0 connectors (3 rear, 1 front)One (1) Serial connectorOne (1) PS/2 connectorOne (1) VGA connectorOne (1) Speaker connectorOne (1) Line In connectorOne (1) Microphone connector |
| Server Operating System | Windows Storage Server 2008 R2 Essentials |
| Client Operating System Requirements | Windows XP SP3 32-bit, Vista SP2, 7, or 8.1Mac OS 10.5 Leopard or Mac OS 10.6 Snow Leopard**Client: Backups must be manually configured |
| Compliance EMI | Standard: FCC Part 15 Class B, CEEMC Standard: EN55022, EN55024 |
| Shipping Weight | 24 pounds (includes accessories) |
| Product Dimensions | 16.14" x 1.72" x 14.17" (410mm x 44mm x 360mm) |
| Technical Support | Please contact your IT administrator if you have questions about Microsoft Windows Storage Server 2008 R2 Essentials, or visit http://technet.microsoft.com/cn-us/library/ff953176.aspxContact us at www.CRU.com/support for support related to your DataHarbor hardware. We also offer phone support at (800) 260-9800 or (360)-816-1800. |
©2014 CRU Acquisitions Group, LLC.
This User Manual contains proprietary content of CRU Acquisition Group, LLC ("CRU") which is protected by copyright, trademark, and other intellectual property rights.
Use of this User Manual is governed by a license granted exclusively by CRU (the "License"). Thus, except as otherwise expressly permitted by that License, no part of this User Manual may be reproduced (by photocopying or otherwise). Transmitted, stored (in a database, retrieval system, or otherwise), or otherwise used through any means without the prior express written permission of CRU.
Use of the full DataHarbor product is subject to all of the terms and conditions of this User Manual and the above referenced License.
CRU® and DataHarbor®(collectively, the "Trademarks") are trademarks owned by CRU and are protected under trademark law. This User Manual does not grant any user of this document any right to use any of the Trademarks.
Product Warranty
CRU (CRU) warrants this product to be free of significant defects in material and workmanship for a period of two years from the original date of purchase. CRU's warranty is nontransferable and is limited to the original purchaser.
Limitation of Liability
The warranties set forth in this agreement replace all other warranties. CRU expressly disclaims all other warranties, including but not limited to, the implied warranties of merchantability and fitness for a particular purpose and non-miningement of third-party rights with respect to the documentation and hardware. No CRU dealer, agent, or employee is authorized to make any modification, extension, or addition to this warranty. In no event will CRU or its suppliers be liable for any costs of procurement of substitute products or services, lost profits, loss of information or data, computer malfunction, or any other special, indirect, consequential, or incidental damages arising in any way out of the sale of, use of, or inability to use any CRU product or service, even if CRU has been advised of the possibility of such damages. In no case shall CRU's liability exceed the actual money paid for the products at issue. CRU reserves the right to make modifications and additions to this product without notice or taking on additional liability.
FCC Compliance Statement: "This device complies with Part 15 of the FCC rules. Operation is subject to the following two conditions: (1) This device may not cause harmful interference, and (2) this device must accept any interference received, including interference that may cause undesired operation."
This equipment has been tested and found to comply with the limits for a Class B digital device, pursuant to Part 15 of the FCC Rules. Those limits are designed to provide reasonable protection against harmful interference when the equipment is operated in a home or commercial environment. This equipment generates, uses, and can reduce radio frequency energy and, if not installed and used in accordance with the instruction manual, may cause harmful interference to radio communications.
In the event that you experience Radio Frequency Interference, you should take the following steps to resolve the problem:
1) Ensure that the case of your attached drive is grounded.
2) Use a data cable with RFI reducing ferrites on each end.
3) Use a power supply with an RFI reducing ferrite approximately 5 inches from the DC plug.
4) Reorient or relocate the receiving antenna.