SSL VPN 380 - VPN Barracuda Networks - Kostenlose Bedienungsanleitung
Finden Sie kostenlos die Bedienungsanleitung des Geräts SSL VPN 380 Barracuda Networks als PDF.


Benutzerfragen zu SSL VPN 380 Barracuda Networks
0 Frage zu diesem Gerät. Beantworten Sie die, die Sie kennen, oder stellen Sie Ihre eigene.
Eine neue Frage zu diesem Gerät stellen
Laden Sie die Anleitung für Ihr VPN kostenlos im PDF-Format! Finden Sie Ihr Handbuch SSL VPN 380 - Barracuda Networks und nehmen Sie Ihr elektronisches Gerät wieder in die Hand. Auf dieser Seite sind alle Dokumente veröffentlicht, die für die Verwendung Ihres Geräts notwendig sind. SSL VPN 380 von der Marke Barracuda Networks.
BEDIENUNGSANLEITUNG SSL VPN 380 Barracuda Networks

Barracuda SSL VPN - Quick Start Guide
The Barracuda SSL VPN is a secure remote access appliance that allows you to access your internal network resources such as files, intranet Web sites and client/server applications using just a standard Web browser. It is common for the Barracuda SSL VPN to be installed directly inside your LAN or in a more advanced DMZ configuration.

Getting Started
This guide provides you with setup instructions for the Barracuda SSL VPN. We recommend reading these instructions fully before starting the setup. To begin setting up your Barracuda SSL VPN, you will need the following:
• Barracuda SSL VPN
- AC Power Cord
- Ethernet Cables
• VGA Monitor (recommended)
• PS2 Keyboard (recommended)

Physical Installation
To install the Barracuda SSL VPN:
- Fasten the Barracuda SSL VPN to a 19-inch rack or place it in a stable location.
- Connect an Ethernet Cable from your network switch to the Ethernet port on the back of the Barracuda SSL VPN.
- Connect a Standard VGA Monitor, PS2 Keyboard, and AC power cord to the Barracuda SSL VPN. Note: Immediately after connecting an AC Power Cord to the Barracuda SSL VPN, it may power ON for a few seconds and then power OFF. This is because the Barracuda SSL VPN is designed to automatically return to a powered ON state in the event of a power outage.
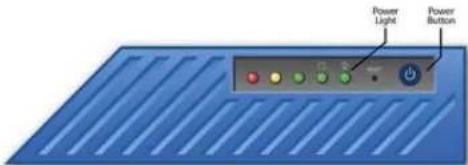
- Press the POWER button on the front panel to turn it on.
text_image
Power Light Power Button
Configure IP Address and Network Settings
If you have a monitor connected, the Barracuda SSL VPN will display the Boot Menu initially, and the Administrative Console login prompt once fully booted. To begin the configuration:
-
Login to the Administrative Console using the admin login:
-
Login: admin
- Password: admin

- Configure the IP Address, Subnet Mask, Default Gateway, Primary DNS Server and Secondary DNS Server as appropriate for your network.
- Save your changes
If you do not have a monitor and keyboard and want to set the IP address using the RESET button on the front panel, press and hold the RESET button per the following table:
| IP address | Press and hold RESET for... | |
| 192.168.200.200 | 5 | seconds |
| 192.168.1.200 | 8 | seconds |
| 10.1.1.200 | 12 seconds | |

Opening Firewall Ports
If your Barracuda SSL VPN is located behind a corporate firewall, ensure that the following ports on your firewall are open to ensure proper operation.
| Port | Direction | TCP | UDP | Usage |
| 25 | Out | Yes | No | Email alerts + One-time passwords |
| 53 | Out | Yes | Yes | Domain Name Service (DNS) |
| 80 | Out | Yes | No | Virus, firmware and updates |
| 123 | Out | No | Yes | Network Time Protocol (NTP) |
| 443 | In/Out | Yes | No | HTTPS/SSL port for SSL VPN access |
| 8000 | In/Out | Yes | No | Appliance administrator interface port (HTTP) |
| 8443 | In/Out | Yes | No | Appliance Administrator interface port (HTTPS) |
Note: The Appliance Administrator interface ports on 8000/8443 should only be opened if you intend to manage the appliance from the Internet.

Barracuda SSL VPN Configuration
Use a computer with a Web browser that is connected to the same network as the Barracuda SSL VPN and follow these steps:
n your Web browser's address bar, enter http:// followed by the IP address of the Barracuda SSL VPN, followed by the default Appliance Administrator Web interface HTTP port (:8000). For example, if you configured the Barracuda SSL VPN with an IP address of 192.168.200.200, you would type: http://192.168.200.200:8000
-
Log in to the Appliance Administrator Web interface as the administrator:
-
Username: admin
-
Password: admin
-
Go to the Basic → IP Configuration page and perform the following:
-
Verify the IP Address, Subnet Mask, and Default Gateway
- Verify the Primary and Secondary DNS Server.
-
If you are using a proxy server on your network, you should also verify the Proxy Server Configuration settings.
-
Click any one of the Save Changes buttons to save all of the information.

Update the Firmware
Go to Advanced → Firmware Update. If there is a new Latest General
Release available, perform the following steps to update the system firmware:
- Click on the Download Now button located next to the firmware version that you wish to install. To view download progress, click on the Refresh button. When the download is complete, the Refresh button will be replaced by an Apply Now button.
- Click on the Apply Now button to install the firmware. This will take a few minutes to complete. To avoid damaging the Barracuda SSL VPN, do not manually power OFF the system during an update or download.
- After applying the firmware, the Barracuda SSL VPN will automatically reboot, displaying the login page when the system has come back up.
- Log back into the Appliance Administrator Web interface and read the Release Notes to learn about enhancements and new features. It is also good practice to verify any settings you may have already entered, as new features may have been included with the firmware update.

Change the Administrator Password
To avoid unauthorized use, we recommend you change the password for the default Appliance Administrator Web interface to a more secure password. You can only change the password for the Appliance Administrator Web interface. You cannot change the password for the Administrative Console, which is only accessible via the keyboard which you can disconnect at any time.
- Go to Basic Administration and enter your old and new passwords.
- Click on Save Password

Product Activation
Verify that the Energize Updates feature is activated on your Barracuda SSL VPN by going to the Basic →Status page.
- Under Subscription Status, make sure the Energize Updates subscription is Current. If the Energize Updates is Not Activated, click the corresponding activation link to go to the Barracuda Networks Product Activation page and complete activation of your subscriptions.
- Reboot your Barracuda SSL VPN.

Route Incoming SSL Connections to the Barracuda SSL VPN
To take advantage of all available features, you must route HTTPS incoming connections on port 443 to the Barracuda SSL VPN. This is typically achieved by configuring your corporate firewall to port forward SSL connections directly to the Barracuda SSL VPN.
Note: The Appliance Administrator Web interface ports on 8000/8443 will also need similar port forward configurations if you intend to manage the appliance from outside the corporate network.

Verify Incoming Connections to the Barracuda SSL VPN
Once you have configured your corporate firewall to route SSL through to the Barracuda SSL VPN, you should be able to accept incoming SSL connections.
- To test the connection, use a Web browser from the Internet (not inside the LAN) to establish an SSL connection to the external IP address of your corporate firewall. For example, if your firewall's external IP address is 192.168.1.1, connect your browser to: https://192.168.1.1
- You will be prompted to accept an un-trusted SSL certificate, which will cause a warning message to appear in your browser. Accept the warning and proceed to load the page.
- You will be prompted with the login page for the SSL VPN User Interface. Log in with the credentials for the VPN administrator:
- Username: ssladmin
• Password: ssladmin
- You will now be successfully logged in as the VPN administrator, and taken directly to the SSL VPN Management Interface. From here you can set up accounts and other resources for users of the Barracuda SSL VPN.

Post-Setup Configuration Items
Your Barracuda SSL VPN should now be at the minimum configuration required to accept incoming connections from the Internet. Refer to your product documentation as necessary for more details regarding the following additional steps:
- Register a hostname with your DNS server for the Barracuda SSL VPN, such as: sslvpn.example.com
- Install an SSL certificate on the Barracuda SSL VPN for the hostname, to ensure your users are able to determine that they are connecting to a genuine Barracuda SSL VPN that is registered to your organization.
- Integrate the Barracuda SSL VPN with your existing user database. To cleanly integrate with your environment, the Barracuda SSL VPN can read in user accounts and authenticate against a number of different databases, including Microsoft Active Directory.
- Grant access to resources to your VPN users, set up a policy-based access control framework.
- If your network uses a DMZ you may wish to configure the Barracuda SSL VPN in this topology for greater security.
Additional documentation, including the Administrator's Guide, can be found at http://www.barracuda.com/documentation
Contact and Copyright Information
Barracuda Networks, Inc. 3175 S. Winchester Blvd. Campool, CA 96008 USA • phone: 408.342.5400 • fax: 408.342.1061 • www.barracuda.com Copyright 2004-2009 @ Barracuda Networks, Inc. All rights reserved. Use of this product and this manual is subject to license. Information in this document is subject to change without notice. Barracuda SSL VPN is a trademark at Barracuda Networks, Inc. All other brand and product names mentioned in this document are registered trademarks or trademarks of their respective holders. 10v1-061007-03-1029