62406 - Animal de compagnie Trixie - Kostenlose Bedienungsanleitung
Finden Sie kostenlos die Bedienungsanleitung des Geräts 62406 Trixie als PDF.


Benutzerfragen zu 62406 Trixie
0 Frage zu diesem Gerät. Beantworten Sie die, die Sie kennen, oder stellen Sie Ihre eigene.
Eine neue Frage zu diesem Gerät stellen
Laden Sie die Anleitung für Ihr Animal de compagnie kostenlos im PDF-Format! Finden Sie Ihr Handbuch 62406 - Trixie und nehmen Sie Ihr elektronisches Gerät wieder in die Hand. Auf dieser Seite sind alle Dokumente veröffentlicht, die für die Verwendung Ihres Geräts notwendig sind. 62406 von der Marke Trixie.
BEDIENUNGSANLEITUNG 62406 Trixie
Stückliste/Part List

Kleintierstall/Small Animal Hutch
4c to me 52408
| Pos. | BeschreibungDescription | MaßeMeasurement | AnzahlQuantity | Art.-Nr.Item | Kart.-Nr.Cert. No. |
| 1 | Rickwand Stall, obenBack wall hatch, top | 1105 × 438 × 25 mm 1.62406-10 1 | |||
| 2 | Sottenwand Schlaffhaus, oben, knotsBack wall sleeping house, top, right | 984 × 438 × 25 mm 1.62406-20 1 | |||
| 3 | Rickwand Auslauf, untenBack wall enclosure, bottom | 1105 × 450 × 25 mm 1.62406-30 1 | |||
| 4 | Sottenwand Auslauf, unten, rechtsSide wall enclosure, bottom, right | 984 × 450 × 25 mm 1.62406-31 | 1 | ||
| 5 | Sotteniell Schlaffhaus, oben, linksSide part sleeping house, top, left | 984 × 477 × 25 mm | 1.62406-21 | 1 | |
| 6 | Vorderiell, rechtsFront part, right | 444 × 928 × 25 mm | 1.62406-22 | 1 | |
| 7 | Sotteniell, hinten, linksRear side part, left | 388 × 927 × 25 mm | 1.62406-11 | 1 | |
| 8 | Vorderiell Auslauf, unten linksFront part hatch, left below | 506 × 450 × 25 mm | 1.62406-32 | 2 | |
| 9 | Sotteniell Auslauf, varno linksSide part hatch, left front | 661 × 450 × 25 mm | 1.62406-33 | 2 | |
| 10 | Vordore Stallwand, oben, linksFront wall of hatch, top, left | 661 × 477 × 25 mm | 1.62406-12 | 2 | |
| 11 | Luisle für RumpeBatten for ramp | 307 × 23 × 15 mm | 1.62406-42 | 2 | |
| 12 | RumpeRump | 754 × 172 × 20 mm | 1.62406-43 1 | ||
| 13 | Auszinsbore Bodenwanne, hintenDrawer with plastic inley, back | 836 × 420 × 50 mm 1.62406-40 | 2 | ||
| 14 | Auszinsbare Bodenwanne, varneDrawer with plastic inley, front | 1005 × 396 × 50 mm | 1.62406-41 1 | ||
| 15 | Soderate für RumpeFlaul for Ramp | 297 × 185 × 15 mm | 1.62406-44 | 1 | |
| 16 | Esch für AuslaufRoof for enclosure | 858 × 583 × 23 mm | 1.62406-25 | 2 | |
| 17 | Dachplatte, hintenRoof plate, back | 1153 × 503 × 35 mm | 1.62406-50 1 | ||
| 18 | Dachplatte, rechtsRoof plate, right | 1077 × 503 × 35 mm 1.62406-51 | 1 | ||
| 19 | FirstleisteRidge bar | 751 × 80 × 12 mm | 1.62406-52 | 1 |
| Pos. | BeschreibungDescription | GrößeSize | AnzahlQuantity | Art.-Nr.Item | Kart.-Nr.Cert.-No. | ||
| A | SenkopfschraubeCountorsunk screw | 4 × 50 mm | 22+1 | 62406-60 | 1 | ||
| B | SenkopfschraubeCountorsunk screw | 4 × 25 mm | 4+1 | ||||
| C | SenkopfschraubeCountorsunk screw | 3 × 18 mm | 24+1 | ||||
| D | SenkopfschraubeCountorsunk screw | 3 × 16 mm | 8+1 | ||||
| E | Fangound, links/nachtsCheck strap, left/right | 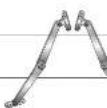 | plus 16 Schrauben Fplus 16 screws F | 28 cm | 1/7 | 62406-61 | 1 |
| F | LinverskopfschraubeLenthead screw | 4 × 16 mm | 16=1 | ||||
| G | VerschusslegelLocking bolt |  plus 1 Schrauben Hplus 1 screw H plus 1 Schrauben Hplus 1 screw H | 70 mm | 2 | 6235-56 | 1 | |
| H | SenkopfschraubeCountorsunk screw | 4 × 30 mm | 2 | ||||
| I | Verschusslegel, vorneLocking bolt, front | [T820]plus 4 Schrauben |plus 4 screws | | 214 × 30 × 30 mm | 1 | 62406-62 | 1 | |
| J | Senkopfschraube, schwarzCountorsunk screw, black | 3 × 12 mm | 4 | ||||
Weitere bereits vormontierte Telle (als Ersatzteile separat erhältlich) Other parts already assembled (spare parts separately available)
| BeichreibungDescription | GrößeSize | AnzahlQuantity | Art.-No.Item | |
| Schanvier, für DachInge, für roof | 7,6 cm | 5.023574 | ||
© Sie finden eine französische und italienische Anleitung unter der jeweiligen Artikel-Nummer auf www.trixie.de.
Aufbauanleitung/Assembling Instruction

Kleintierstall/Small Animal Hutch
4c to me 52408
② Verbinden Sie die abere Rückwand (1) mit der unteren Rückwand (3) und die obere Seitenwand (2) mit der unteren Seitenwand (4).
Fix the upper back wall (1) together with the lower back wall (3) and the upper side wall (2) together with the lower side wall (4).
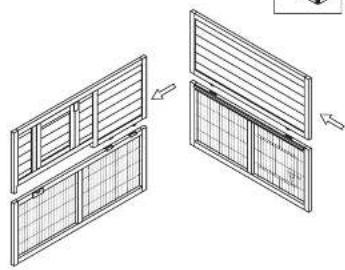
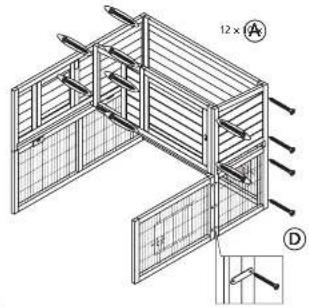
② Verschrauben Sie nun die Teile (1–4) mit dem oberen linken Seitenteil des Schlafhauses (5) und dem rechten Vorderteil (6). Montieren Sie denach das untere linke Vorderteil des Auslaufs (8) en den drei Verbindern.
④ Screw the parts (1–4) to the top left side part of the sleeping house (5) and the right front part (6). Afterwards fix the left front part below (8) with the help of the three connectors.
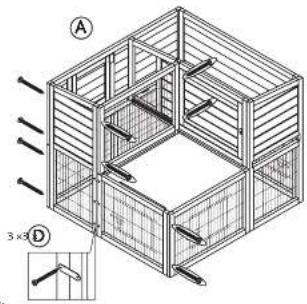
(6) Jetzt fligen Sie das hintere linke Seitenteil (7) und die vordere Stallwand oben links (10) hinzu. Montieren Sie danach links das Seitenteil des Auslaufs (9) an den drei Verbindem und fixieren Sie die Teile an der linken vorderen Erke.
⑥① Now add the rear left side part (7) and the front wall of hatch (10) top left. After that fix the left front part below (9) with the help of the three connectors and fix the parts at the left corner.
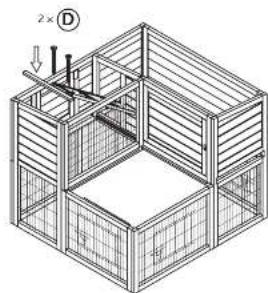
⑨ Fügen Sie die Leiste (11) ein und befestigen Sie die Rampe (12) daran.
Insert the batten (11) and fix the ramp (12) to the batten.
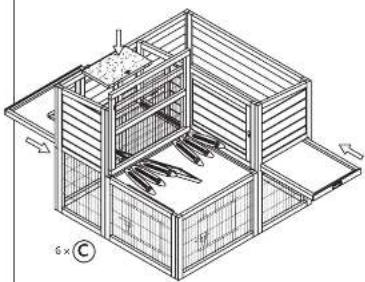
① Schieben Sie die Bodenwannen (13/14) ein. Legen Sie die Bodenluke (15) ein. Schrauben Sie die Scharriere des Daches für den Auslauf (16) an die Vorderseite des Stalles.
Slide in the drawers (13/14). Insert the floor hatch (15). Screw the hinges of the roof for the enclosure (16) to the front side of the hatch.
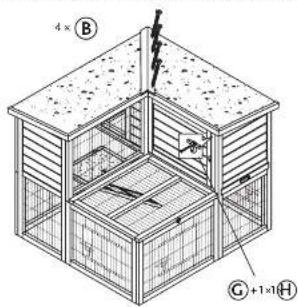
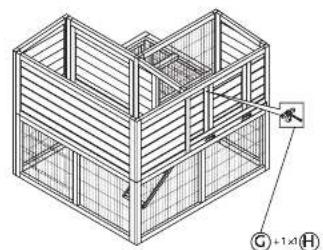
① Schrauben Sie einen der Verschlussriegel (G) neben die hintere Stalltür.
② Screw one of the locking bolts (G) beside the hutches back door.
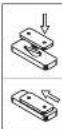
(6) Schrauben Sie die Scharriere der Dachplatten (17/18) an die Rückwand und die rechte Seite des Stalles. Befestigen Sie das linke und das rechte Fangband (E) an den Innenseiten der Dachplatten und den Wänden (6/7) und montieren Sie den vorderen Verschlussriegel (I).
① Screw the hinges of the roof plates (17/18) to the back wall and the right side wall. Screw the left and the right check strap (E) to the inner sides of the roof plates and
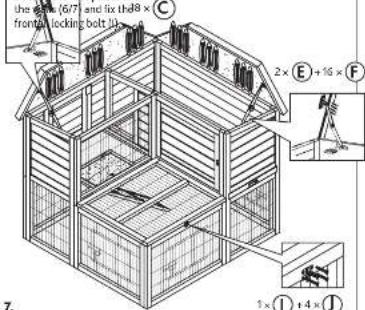
⑥ Zuletzt bringen Sie die Firstleiste (19) an der rechten Dachplatte (18) an und schrauben den zweiten Verschlussriegel (G) neben die Schlafhoustür.
Finally fasten the ridge bar (19) to the right roof plate (18) and screw the second locking bolt (G) beside the door of the sleeping house.