
J02830 (2003) - Motorrad HARLEY-DAVIDSON - Kostenlose Bedienungsanleitung
Finden Sie kostenlos die Bedienungsanleitung des Geräts J02830 (2003) HARLEY-DAVIDSON als PDF.


Benutzerfragen zu J02830 (2003) HARLEY-DAVIDSON
0 Frage zu diesem Gerät. Beantworten Sie die, die Sie kennen, oder stellen Sie Ihre eigene.
Eine neue Frage zu diesem Gerät stellen
Laden Sie die Anleitung für Ihr Motorrad kostenlos im PDF-Format! Finden Sie Ihr Handbuch J02830 (2003) - HARLEY-DAVIDSON und nehmen Sie Ihr elektronisches Gerät wieder in die Hand. Auf dieser Seite sind alle Dokumente veröffentlicht, die für die Verwendung Ihres Geräts notwendig sind. J02830 (2003) von der Marke HARLEY-DAVIDSON.
BEDIENUNGSANLEITUNG J02830 (2003) HARLEY-DAVIDSON
BULLET CHROME DIRECTIONAL BAR KIT (HDI)
General
This directional bar fits 1999 and later HDI Touring and FLSTC/I models. Softail models only: This kit will not fit with the stock saddlebags, part numbers 90476-00 and 90477-00.
This kit contains the following items:
QTY DESCRIPTION PART NO.
1 Directional bar assembly 68997-04
2 Hex screw, serrated flange 3576
NOTE
A Service Manual for your model motorcycle is available from any Harley-Davidson dealer.
Installation
WARNING
To prevent accidental vehicle start-up, which could cause death or serious injury, disconnect battery cables (negative cable first) before proceeding.
WARNING
Disconnect negative (-) battery cable first. If positive (+) cable should contact ground with negative (-) cable connected, the resulting sparks can cause a battery explosion, which could result in death or serious injury. (00049a)
- Refer to the Service Manual and follow the instructions given to remove the seat and disconnect the battery cables, negative cable first.
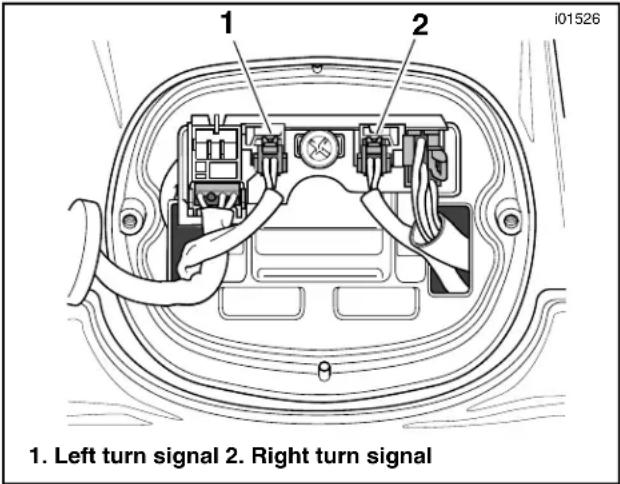
- See Figure 1. Remove the taillight cover and disconnect the turn signal wires at the connectors shown in the illustration. See the TAIL LAMP section of the Service Manual.
- Remove and discard the existing directional bar from the motorcycle, and the two hex head bolts and flat washers.
- Position the new Bullet Directional Bar Assembly to the rear fender, and secure the bar to the motorcycle using the two hex screws from the kit.
- Route the turn signal wires through the grommet in the fender. Connect the turn signal wires at the connectors shown in the illustration and replace the taillight cover
IMPORTANT NOTE
After making wire connections and routing wires, check to make sure that no wires are hanging loose from fender.
text_image
1. Left turn signal 2. Right turn signalFigure 1. Turn Signal Connections
WARNING
Connect positive (+) battery cable first. If positive (+) cable should contact ground with negative (-) cable connected, the resulting sparks can cause a battery explosion, which could result in death or serious injury. (00068a)
- Connect the battery cables, positive cable first.
- Refer to the Service Manual, and follow instructions to install the seat.
WARNING
After installing seat, pull upward on front of seat to be sure it is in locked position. While riding, a loose seat can shift causing loss of control, which could result in death or serious injury. (00070a)
WARNING
Check for proper turn signal operation before riding motorcycle. Weak, intermittent, or non-operational lights indicate a poor connection or a short in the wires.
Visibility is a major concern for motorcyclists. Improper turn signal operation may lead to an accident which could result in death or serious injury.
- Start the motorcycle and make sure that both turn signals function properly.