
BT Single - Walkie-Talkie MIDLAND - Kostenlose Bedienungsanleitung
Finden Sie kostenlos die Bedienungsanleitung des Geräts BT Single MIDLAND als PDF.


| Produkttyp | Bluetooth-Kommunikationssystem für Motorradhelme |
| Marke | Midland |
| Modell | BT Single |
| Bluetooth-Version | 2.0 (Headset/Handsfree/A2DP-Profil) |
| Reichweite (Funkgerät) | max. 5 km (mit optionalem Kabel) |
| Akku | Lithium-Ionen, 8 Stunden Gesprächszeit, bis zu 2 Tage Standby |
| Ladezeit | ca. 4 Stunden (Erstladung 5-6 Stunden) |
| Wasserschutz | Vollständig wasserdicht (Gummikappen schützen die Anschlüsse) |
| AGC (Automatische Lautstärkeregelung) | Ja, passt Lautstärke an Hintergrundgeräusche an |
| VOX (Sprachsteuerung) | Ja, aktivierbar/deaktivierbar im Setup-Modus |
| Multifunktionstasten | 5 Tasten: Telefon, Musik, AUX, Lautstärke +/– |
| Kabelgebundene Anschlüsse | Ladebuchse (Mini-USB), Audio-Kit-Buchse, AUX-Eingang (für MP3/iPod oder PMR446-Funkgerät) |
| Kompatible Bluetooth-Geräte | Mobiltelefone, GPS-Navigationsgeräte (Garmin Zumo, TomTom Rider 1 & 2) |
| Abmessungen | 87 x 47 x 16 mm (L x B x H) |
| Audio-Kit | 2 Ultra-Flach-Stereolautsprecher, 2 austauschbare Mikrofone (Bügel- und Kabelmikrofon) mit Klett-/Klebestreifen |
| Befestigung | Klebeplatte oder Klemmschelle (mit Inbusschlüssel) |
| LED-Anzeigen | Rot und Blau; verschiedene Signale für Betrieb, Standby, Akku schwach, Laden, Setup, Pairing |
| Reset der Pairing-Liste | Gleichzeitiges Drücken von Lautstärke + und – für 4 Sekunden |
| Sicherheitshinweise | Nicht während der Fahrt programmieren; immer Umgebungsgeräusche wahrnehmen |
| CE-Kennzeichnung | Ja (gemäß RTTE-Richtlinie 99/5/EG) |
Häufig gestellte Fragen - BT Single MIDLAND
Benutzerfragen zu BT Single MIDLAND
0 Frage zu diesem Gerät. Beantworten Sie die, die Sie kennen, oder stellen Sie Ihre eigene.
Eine neue Frage zu diesem Gerät stellen
Laden Sie die Anleitung für Ihr Walkie-Talkie kostenlos im PDF-Format! Finden Sie Ihr Handbuch BT Single - MIDLAND und nehmen Sie Ihr elektronisches Gerät wieder in die Hand. Auf dieser Seite sind alle Dokumente veröffentlicht, die für die Verwendung Ihres Geräts notwendig sind. BT Single von der Marke MIDLAND.
BEDIENUNGSANLEITUNG BT Single MIDLAND
INDEX
Technical specifications of Midland BT Single 3
Charging batteries....3
Description of the unit and installation brackets....4
Switching your Midland BT SINGLE on and off 6
Pairing with Bluetooth devices....6
Adjusting the volume....7
Using the features of the Bluetooth devices ....8
Using the wired audio input....9
Using a Two Way Radio transceiver....10
Light and sound signals/Unit functions 11
Midland BT Single
Thank you for choosing MIDLAND BT Single, the wireless multimedia system for bikers.
MIDLAND BT Single has been designed to be fitted on your helmet and to be used for communicating with Bluetooth devices such as mobile phones or GPS navigators.
MIDLAND BT Single is also equipped with a wired connection to connect an iPod/MP3 play or PMR446 transceiver for bike-to-bike communications up to a maximum distance of 5km.
Technical specifications of Midland BT Single
General:
Bluetooth ver. 2.0 stereo (Headset/Handsfree/A2DP protocol)
AGC system automatically controls the volume in relation to background noise
Voice (VOX) or manual call option
Fully waterproof
Lithium battery with 8 hours talk time (up to 2 days in standby mode)
Recharge time: app. 4 hours
Dimensions. Length: 87 mm – Width: 47 mm - Thickness: 16 mm
Bluetooth connections:
Mobile phone, GPS (Garmin Zumo and TomTom Rider 1) and 2)
Wire connections:
For stereo audio input (iPod/MP3 player)
For PMR446 transceivers (with optional cable)
Attention: before using BT Single for the first time, remember to recharge it for at least 4 hours.
Attention: Midland BT Single is designed to withstand rain and water. However, if it is raining, always verify that the rubber caps protecting the sockets are fully fitted.
Charging batteries
Make sure that the unit is fully charged before use. Allow at least 5-6 hours for a full charge before using the unit for the first time. Normally, after the first time, it takes 4 hours for a full charge.
Charge the unit by inserting the wall-charger into the charging socket (lift the rubber cover to insert the plug).
The red LED on the unit will start flashing when charging begins.
Allow the headset to charge until the red LED turns off.
When the charge is complete, release the headset from the charger.

Description of the unit and installation brackets
Description of the BT SINGLE unit
The BT Single has 5 multifunction buttons on the front and 3 wired connections in the lower section.
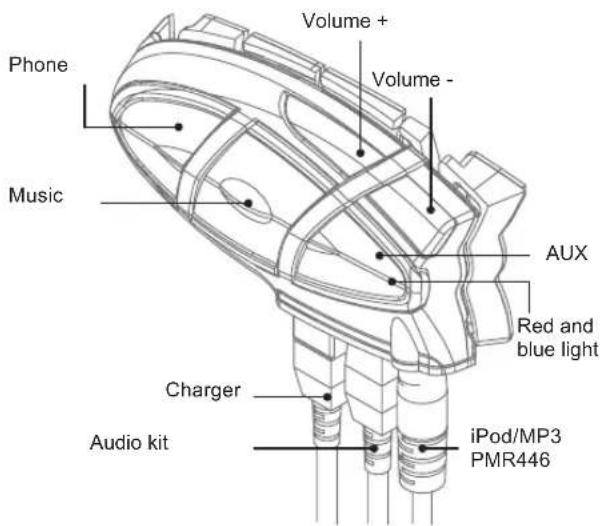
Description of the button features:
Telephone: can be used to enable/disable and manage mobile phone features
Music: allows you to enable/disable the listening to the music from MP3 player of your mobile phone
AUX: can be used to enable/disable the wired audio input
Volume+: enables you to increase the volume
Volume -: enables you to decrease the volume
Description of the wired connections
Charger jack: enables to recharge the unit using a standard miniUSB power supply
Audio kit jack: enable to connect an audio kit (stereo headset and microphone)
Auxiliary audio jack (AUX): can be used to connect an audio source, like a stereo iPod/MP3 player or PMR446 transceiver
Description of the audio kit
The audio system includes two ultra-flat stereo speakers and two interchangeable microphones, which are both supplied with a bracket and wire connection.
Fixing the stereo speakers. The two stereo speakers have a Velcro/adhesive strip that aids their fixing to your helmet. Beware to not completely cover your ear with the speakers, you must always be able to listen to the traffic sound and indication.
The microphone can be fixed onto the helmet in two ways:
Boom Microphone. Place the section with the Velcro/adhesive strip between the padding and the rigid cover of the helmet, so that the microphone is correctly positioned in front of your mouth and that the white symbol is facing your mouth. This type of microphone is suited for Open Faced and Flip Front helmets.

natural_image
Simple line drawing of a curved pipe or tube with two endpoints (no text or symbols)Wire microphone. Using the Velcro/adhesive strip, place the microphone inside the helmet in front of your mouth. This type of microphone is more suited for Full Faced helmets. The mini connector on the microphone allows you choose the microphone that best suits the helmet you are using.

natural_image
Simple line drawing of a medical or anatomical device with a curved handle and a circular head (no text or symbols)The audio kit must then be connected to the central jack of the Midland BT Single unit using the "L" shaped connector. This connector is very flexible and can be easily adapted to most commercial helmets.
Description of the installation brackets
The Midland BT Single can be fixed onto the helmet in two different ways: By either using the plate with bi-adhesive strip, or the clamp. These methods allow you to safely "fix" the BT Single unit onto your helmet and to remove it at any time in order to recharge or store it.
Plate with bi-adhesive strip
The fixing plate has a bi-adhesive strip on one of its sides. To fix the plate in place, clean the application area on the helmet surface, remove the bi-adhesive film and place the fixing plate on the helmet by keeping it contact with the surface for a few seconds.
Clamp
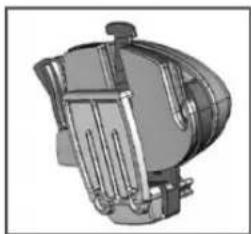
Using the Allen Key, loosen the two screws on the clamp and place the rear plate between the helmet padding and the external rigid protection. Then, tighten the two screws in order to firmly fix the clamp in place.
natural_image
3D mechanical component diagram showing internal parts and mounting features (no text or symbols)Fitting and removing your Midland BT Single
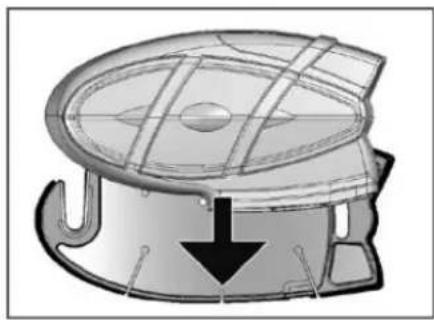
The BT Single can be easily fitted onto the helmet by sliding it downwards so that it fits into the slot of the selected fixing device (plate with bi-adhesive strip or clamp).
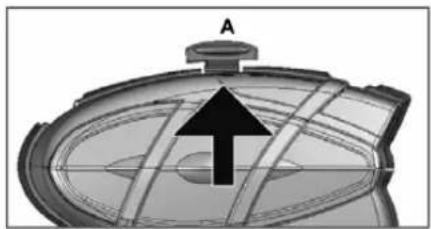
BT Single is maintained in position thanks to the fixing clip located on the upper section (A).
natural_image
Technical illustration of a mechanical component with a downward arrow indicating force or direction (no text or symbols present)To detach the BT Single, simply press the fixing clip and push the unit upwards.
natural_image
3D mechanical component with a black arrow pointing upward, labeled 'A' at the top (no text or symbols on the component itself)
Switching your Midland BT SINGLE on and off
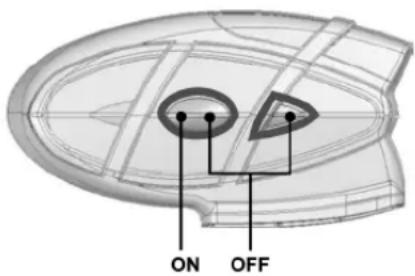
BT Single can be switched on by means of the central button labeled "Music".
To switch off the unit you must use a combination of two buttons (Music+AUX), thus lessening the chances that you might turn off the unit accidentally (especially whilst wearing heavy gloves).
Switching the unit on:
Press and hold "Music" button down for approximately 3 seconds until the BLUE indicator lights.
Switching the unit off:
Press and hold both "Music" and "AUX" buttons together for approximately 3 seconds until the RED indicator flashes 3 times.
Pairing with Bluetooth devices
Your Midland BT Single is a Bluetooth unit that can be paired with other Bluetooth devices.
Before performing this procedure, it is necessary to set BT Single into "Pairing mode" (Setup).
The only operations permitted in this mode are the pairing ones. To use the BT Single unit after pairing it with the desired devices, it is necessary to quit the "Setup" mode and switch to the "Operating" mode.
Setup mode
Switch off the BT Single device. Press and hold down the central button (Music/on) for about 7 sec. until the red indicator switches on permanently. BT Single is now in "Setup" mode and can therefore be paired with other devices.
Pairing the unit with your mobile phone
-
Enable the Bluetooth device search feature on your mobile phone. As this procedure varies according to the brand and model of the mobile phone, refer to the manual supplied to your particular phone for further information.
-
Set the BT Single unit in "Setup" mode, then press the "Phone" button on the unit until the red and blue indicators start flashing.
-
After a few seconds the mobile phone will display "Midland BT Single". Select it and follow the instructions provided in your mobile phone manual to accept the pairing. When prompted, enter the pairing code, which is 0000 (four zeroes). Your mobile phone should then display a confirmation message if the pairing operation has been successfully completed (In case of error message, complete anyway the procedure, exit the "setup" mode and try to use the BT Single with your phone).
4 The BT Single unit returns to the Setup mode (red indicator permanently on) to indicate that it is ready to be paired with other devices
If you pair the BT Single unit with a mobile phone, you will not be able to pair it with a GPS Sat-Nav, because both these devices are assigned (high) priority 1.
This problem can be easily solved by pairing your mobile phone directly with your GPS Sat-Nav and then pairing the GPS with your Midland BT Single using the above procedure. In this case, the mobile phone features will be managed by the GPS Sat-Nav.
Pairing the unit with a GPS Sat-Nav
It is generally possible to pair the BT Single unit with all GPS Sat-Navs that support Bluetooth earpieces.
Midland BT Single has been successfully tested for use with GPS ZUMO Sat-Navs manufactured by Garmin and TOM-TOM Rider 1 and 2 Sat-Navs.
- On your GPS Sat-Nav, enable the Bluetooth earphone search feature. As this procedure varies according to the brand and model of GPS, we recommend you refer to the
manual supplied with your GPS Sat-Nav for further information.
- Ensure that the BT Single is in Setup mode (Red light on) & Press the "Phone" button on the BT Single unit until the red and blue indicators start to flash.
- After a few seconds the GPS Sat-Nav will display "Midland BT Single". Select it and follow the instructions provided in the GPS Sat-Nav manual to accept the pairing. When prompted, enter the pairing code, which is 0000 (four zeroes).
The GPS should then display a confirmation message if the pairing operation has been successfully completed.
- The BT Single unit returns to the Setup mode (red indicator permanently on) to indicate that it is ready to be paired with other devices.
If you pair the BT Single unit with a GPS Sat-Nav, you will not be able to pair it with a mobile phone, because both these devices are assigned (high) priority 1.
This problem can be easily solved by pairing the mobile phone directly with the GPS Sat-Nav and by then pairing your GPS with the Midland BT Single. In this case, the mobile phone features will be managed by the GPS Sat-Nav.
Attention: the device search procedure (red and blue lights flashing) continues for approximately 2 minutes. If no device is found within this interval of time, the BT Single returns to the Setup mode (red light permanently on). To start again the search, repeat the pairing procedure from step 2. To cancel the pairing procedure (red and blue indicators flashing) and return to the Setup mode at any time, press "Music" button twice.
Resetting all paired devices
Sometimes you may find it necessary to delete all the pairing references stored in the BT Single unit (reset operation).
To perform this operation, simultaneously press and hold down the "Volume +" and "Volume -" buttons for 4 seconds. The Blue Light will be lit on for 1 sec.
This procedure deletes all the paired Bluetooth devices stored in the memory and it is therefore possible to start a new "clean" pairing session.
Exiting from the Setup mode
After you have paired the desired Bluetooth devices, you must quit the "Setup" mode in order to be able to use your BT Single.
Press and hold the Music button (central button) for 3 seconds.
The red indicator switches off and the blue one starts to flash. You can now use your BT Single.
Reconnecting the unit to bluetooth devices
After successfully pairing your devices, you can switch them off and on without having the repeat the pairing procedure.
If a connection failure occurs between the two devices (for example because one device is switched off or you are not within the maximum range), it is not necessary to repeat the pairing procedure.
Simply switch the device on again or move within the maximum range. If the connection cannot be re-established automatically, select the device from the "devices menu" of your Bluetooth device (for example mobile phone, GPS, etc...) and re-enable the connection.
Adjusting the volume
Your Midland BT Single uses AGC technology, which automatically adjusts the listening volume in relation to background noise.
However, it is also possible to manually adjust the volume by means of the "Volume+" and "Volume-"buttons.
For example, you can manually adjust the maximum volume in very noisy environments (for example when travelling at high speeds), to allow the AGC automatic system to change the volume and use the manually set volume as maximum setting. This operation is useful because each type and standard of helmet is influenced in different ways by wind and background noise.
Using the features of the bluetooth devices
Using the telephone feature
To use the Telephone feature, be sure both units are turned on and correctly paired together, following the pairing procedure described in section "Pairing the unit with a mobile phone".
Attention: information provided in this section refers to the establishment of a direct communication between the mobile phone and the BT Single unit. If the mobile phone is connected via the GPS Sat-Nav, the mobile phone features can only be managed via the GPS itself.
Answering a call
When you hear the phone ring, you can answer in two different ways:
Vocally:
Simply say one word to answer the call and start talking. Remembering that you can only do this if you answer the call after the third Ring. (Be aware that some phones may not support voice answering)
Manually:
Tap the "Phone" button and start speaking
Attention: Remember that you can answer the call only after the third Ring.
Rejecting a call
If you don't wish to answer, you can let the mobile phone ring or press the "Telephone" button for a few seconds (you will hear one audio confirmation tone).
Making a call
There are several ways to make a call.
From the mobile keypad:
Dial the number on the mobile keypad:
Press "Send" on the mobile phone.
This way of calling should never be carried out whilst in charge of a moving vehicle.
To redial the last number:
Press and hold "Telephone" button for 3 seconds in order to redial the last number (you will hear one audio confirmation tone).
To make a voice call:
Briefly press "Telephone" button. If your mobile phone supports voice calls, you will be asked to spell the name of the
contact you wish to call.
The correct operation of this feature depends on the type of helmet used (Open or closed faced) and on the speed you are travelling at. We suggest you perform a few tests to determine the best settings for you as an individual.
Attention: if you are listening to the music using an MP3 Player connected via Bluetooth (A2DP protocol), you will not be able to use the "Dial last number" and "Voice call" commands, because these buttons are used to control the MP3 player. Therefore, if you want to make a call, you must first disable the music by pressing the "Music" button for 3 seconds (you will hear two audio confirmation tones) before making the call.
Ending a call
There are several ways to end a call:
Wait for the called person to end the call.
Press the Telephone" button for 3 seconds (you will hear an audio confirmation tone).
Press "End" button on the mobile phone. (This way of ending a call should never be carried out whilst in charge of a moving vehicle)
Enabling/Disabling the VOX feature on the mobile phone
With your BT Single switched off, press and hold down the 'MUSIC' button until the light is steady red. Now BT Single is in 'Pairing' mode (setup).
Hold down the 'Phone' and 'AUX' buttons for 3 seconds at > the same time.
If the VOX feature was enabled, it will be deactivated (blue > light with 2 flashes every 2 seconds)
On the contrary, if it was disabled, it will be activated (stea- dy blue light for 2 seconds).
Using the MP3 player feature of the mobile phone
Many mobile phones are now designed to be used as stereo MP3 players. Your Midland BT Single fully supports the A2DP and AVRCP protocols that enable you to listen to stereo music and remotely control your mobile phone's MP3 player.
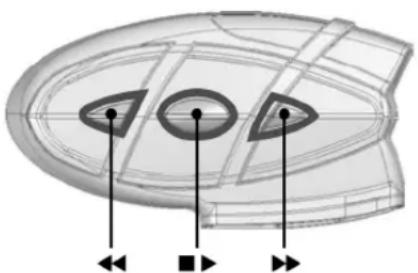
You can even use the buttons on the BT Single unit to control
the following play options:
Play, Pause, Forward and Backward.
Attention: The remote control is enabled only if the MP3 player device supports the AVRCP protocol.
natural_image
3D model of a boat hull with visible eye and tail features, marked with arrows indicating direction (no text or symbols)Available controls:
To enable your connected MP3 Player, press and hold down the "Music" button for 3 seconds.
To play/pause music, briefly press the "Music" button.
To skip forward to the next song, briefly press the "Telephone" button.
To skip backwards to the previous song, briefly press the "AUX" button.
To disable the MP3 player, press and hold down the "Music" button for 3 seconds (2 beeps will confirm it).
Using the features of your GPS sat-nav
To use the features of your GPS Sat-Nav, be sure both units are turned on and correctly paired together, following the pairing procedure described in the "Pairing the unit with a GPS Sat-Nav" section.
Listening to voice instructions from your GPS Sat-Nav
Traffic directions from your GPS Sat-Nav will always be immediately transmitted by temporarily disabling all other active communications. Once these voice directions have been transmitted, your BT Single will automatically re-enable all existing communications.
Listening to music from your GPS Sat-Nav
The most popular GPS devices usually enable you to listen to music when no directions are being given. In this case, the communication with the GPS is always active.
Using a mobile phone with a GPS Sat-Nav
If you have connected a GPS Sat-Nav to your Midland BT Single, you will not be able to connect the mobile phone directly to the unit; you must instead, connect the phone to the GPS Sat-Nav. By doing so, all the mobile phone features will be managed directly by your GPS Sat-Nav. For information on how to pair a mobile phone and answer/make calls, see the manual supplied with your particular Sat-Nav.
Using the wired audio input
Your Midland BT Single is also fitted with a wired audio input (labeled AUX), that can be used to connect a stereo audio source, like an iPod (or any other MP3 Player) or a PMR446 transceiver for bike-to-bike communications.
Priority: the wired audio input has the lowest priority when compared to the other Bluetooth connections and will therefore always be disabled when another Bluetooth communication is opened.
Listening to music
To listen to music from the wired input, connect the audio source using the cable supplied with the BT Single unit. The volume level is automatically adjusted by the AGC system, which means that you only need to adjust the volume of your iPod/MP3 player to a level that will allow you to listen to music in normal speed.
Attention: never set the volume of the MP3 Player to the maximum possible.
Hint: We recommend that you perform a few tests adjusting the volume of your iPod/MP3 player so at the normal speed the Headset volume is suited to your needs.
The AGC system will automatically increase the volume on higher speed. Make a note to remember this setting for future trips.
Attention: the volume adjustment, ("Volume+" and "Volume−") buttons, cannot be used to adjust the volume of the wired audio source(eg MP3 player), only the volume of the BT Single that the device is connected to.
Enabling/disabling the wire input
The wire input can be enabled and disabled by means of the "AUX" button.
Disabling: briefly press the "AUX" button (you will hear two
audio confirmation tones).
Enabling: briefly press the "AUX" button (you will hear one audio confirmation tone).
Using a Two Way Radio transceiver
To be able to use the transceiver, it is necessary to purchase a specific cable (sold separately) in order to connect the radio to your Midland BT Single:
NB, Some manufacturers radios use a different pin configuration, so we recommend that you ask your dealer as to which cable is best suited to your needs
To communicate via the attached radio, press the transmission Press Top Talk (PTT) button to speak and release it to listen. It is not possible to talk and listen simultaneously. The cable connected to the transceiver has a PTT button that can be placed on the handlebar of your bike.
Adjust the volume of the transceiver to your needs, remembering that the volume adjustment is controlled by the automatic AGC system and that it will therefore be automatically increased in relation to background noise.
LIGHT AND SOUND SIGNALS
| LED indication Status | |
| GENERAL | |
| None Unit is switched off or full charged when connected to the power supply | |
| Single Blue flash every 3 seconds Unit being turned on | |
| Triple red flash Unit being turned off | |
| Single Blue flash every 3 seconds Single Red flash every 3 seconds | Standby Standby - low battery |
| RED and BLUE (together) every 3 seconds | Active |
| RED and BLUE (together) and one flash of RED light every 3 seconds | Active but low battery |
| Single red flash every 2 seconds Unit in charge when connected to the power supply | |
| SETUP | |
| Steady Red Setup mode | |
| Rapid Red-Blue alternating flash Pairing mode (searching for devices) | |
| Steady Blue for two seconds Successful pairing/ Reset paired devices | |
| Audio signals Status | |
| Ascending tone (low-high) Unit being turned on | |
| Descending tone (high-low) Unit being turned off | |
| 1 tone Specific feature turned on | |
| 2 tones Specific feature turned off | |
UNIT FUNCTIONS
| If you want to... | ...do this |
| GENERAL | |
| Turn on the unit | Press the Music button for 3 seconds at least (start Blue flash) |
| Turn off the unit | Press the Music and AUX button together for 3 seconds (triple Red flash) |
| Increase the volume | Short or continues press on the Volume Up control |
| Decrease the volume | Short or continues press on the Volume Down control |
| MOBILE PHONE | |
| Answer a call | Short press of the Phone button / say a word |
| Reject a call | Long press the Phone Button / remain silent until the rings stop |
| Terminate a call | Short press the Phone Button |
| Voice Dial (in stand by mode) | Short press the Phone button and state the name of the person to call. |
| Redial Last number (in stand by mode) Long press of the Phone button | |
| GPS Navigator | |
| The control is done only by the GPS | |
| BLUETOOTH MP3 player | |
| Activate the MP3 player Press and hold down the "Music" button for 3 seconds. | |
| Play and Pause Press the "Music" button | |
| Forward (next song) While the music play, short press of the Phone button | |
| Backword (previous song) While the music play, short press of the AUX button | |
| Deactivate the MP3 Player Press and hold down the "Music" button for 3 seconds. | |
| WIRED CONNECTION | |
| Activate /Deactivate Short press of the AUX button | |
| SETUP/PAIRING | |
| Enter SETUP mode Press the Music button for 7 seconds while the unit is off | |
| Pairing a Phone or a GPS Navigator | While in Setup mode, press the phone button until the LED light flash Red and Blue alternately |
| Reset all paired devices While in Setup mode, long press he Volume + and he Volume -. On a successful reset, the Blue light will turn on for two second. | |
| SPECIAL SETUP CONFIGURATION | |
| Enable/disable the VOX feature | In Setup mode (steady red light), hold down the 'Telephone' and 'AUX' buttons at the same time.Blue steady light: VOX enabledBlue light with 2 long flashes: VOX disabledExit the Setup mode. |
| Exit SETUP mode While in Setup mode, long press the Music button. The Red light will turn off and the Blue light starts flashing. | |
European CE Notice Certification and Safety Approvals Information
This product is CE marked according to the RTTE Directive (99/5/EC) and is free use in all the EU countries.
Users are not permitted to make any changes or modifications to the device.
Modifications which are not expressly approved by the producer invalidate the warranty card.
For further information, please go to our website
www.cte.it
- INDEX
- Midland BT Single
- Technical specifications of Midland BT Single
- General:
- Bluetooth connections:
- Wire connections:
- Charging batteries
- Description of the unit and installation brackets
- Description of the BT SINGLE unit
- Description of the button features:
- Description of the wired connections
- Description of the audio kit
- Description of the installation brackets
- Plate with bi-adhesive strip
- Clamp
- Fitting and removing your Midland BT Single
- Switching your Midland BT SINGLE on and off
- Switching the unit on:
- Switching the unit off:
- Pairing with Bluetooth devices
- Setup mode
- Pairing the unit with your mobile phone
- Pairing the unit with a GPS Sat-Nav
- Resetting all paired devices
- Exiting from the Setup mode
- Reconnecting the unit to bluetooth devices
- Adjusting the volume
- Using the features of the bluetooth devices
- Using the telephone feature
- Answering a call
- Vocally:
- Manually:
- Rejecting a call
- Making a call
- Dial the number on the mobile keypad:
- To redial the last number:
- To make a voice call:
- Ending a call
- Enabling/Disabling the VOX feature on the mobile phone
- Using the MP3 player feature of the mobile phone
- Available controls:
- Using the features of your GPS sat-nav
- Listening to voice instructions from your GPS Sat-Nav
- Listening to music from your GPS Sat-Nav
- Using a mobile phone with a GPS Sat-Nav
- Using the wired audio input
- Listening to music
- Attention: never set the volume of the MP3 Player to the maximum possible.
- Enabling/disabling the wire input
- Using a Two Way Radio transceiver
- European CE Notice Certification and Safety Approvals Information
Marke : MIDLAND
Modell : BT Single
Kategorie : Walkie-Talkie