
8501 - Gartenhäcksler BLACK & DECKER - Kostenlose Bedienungsanleitung
Finden Sie kostenlos die Bedienungsanleitung des Geräts 8501 BLACK & DECKER als PDF.


| Produkttyp | Gartenhäcksler |
| Marke | Black & Decker |
| Modell | 8501 |
| Abmessungen (L x B x H) | ca. 60 x 40 x 80 cm |
| Gewicht | ca. 15 kg |
| Motorleistung | 2000 W |
| Stromversorgung | 230 V ~ 50 Hz |
| Leerlaufdrehzahl | 3000 min⁻¹ |
| Schneidsystem | Messerscheibe |
| Maximaler Astdurchmesser | 40 mm |
| Auffangbehälter | 40 L |
| Schutzklasse | II (schutzisoliert) |
| Geräuschpegel | 95 dB(A) |
| Hauptfunktionen | Häckseln von Ästen und Gartenabfällen, automatischer Einzug |
| Wartung | Klingen schärfen, regelmäßige Reinigung |
| Sicherheitsmerkmale | Überlastschutz, Sicherheitsschalter |
| Entsorgung | Umweltgerecht gemäß örtlichen Vorschriften |
| Reparatur | Fachwerkstatt oder autorisierter Kundendienst |
Häufig gestellte Fragen - 8501 BLACK & DECKER
Benutzerfragen zu 8501 BLACK & DECKER
0 Frage zu diesem Gerät. Beantworten Sie die, die Sie kennen, oder stellen Sie Ihre eigene.
Eine neue Frage zu diesem Gerät stellen
Laden Sie die Anleitung für Ihr Gartenhäcksler kostenlos im PDF-Format! Finden Sie Ihr Handbuch 8501 - BLACK & DECKER und nehmen Sie Ihr elektronisches Gerät wieder in die Hand. Auf dieser Seite sind alle Dokumente veröffentlicht, die für die Verwendung Ihres Geräts notwendig sind. 8501 von der Marke BLACK & DECKER.
BEDIENUNGSANLEITUNG 8501 BLACK & DECKER
Garden Shredder
Owner's Manual
Model 8501 Type 2
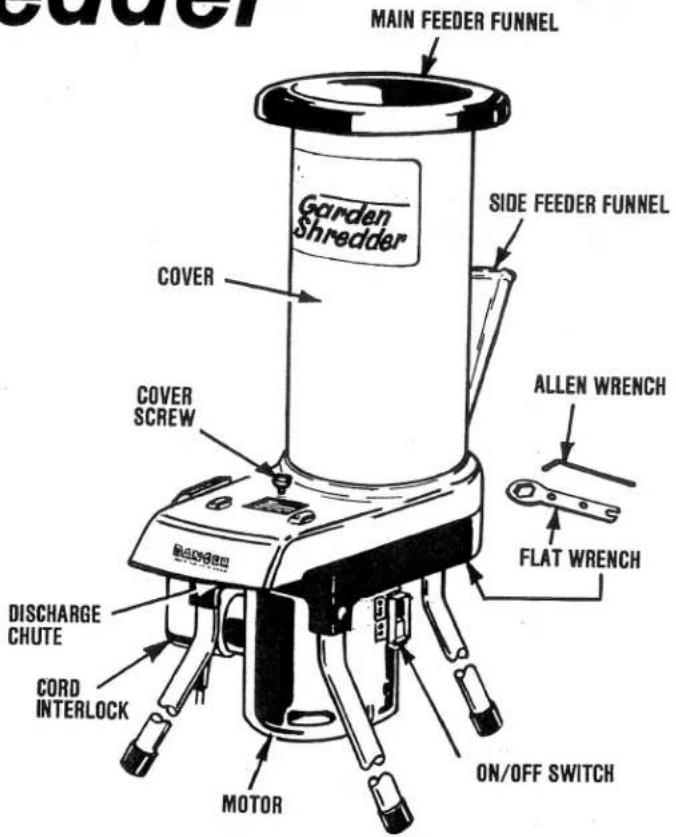
CONTENTS OF CARTON
This carton contains the following:
1 Garden Shredder
3 Support Legs
1 Parts Bag Containing:
1 Flat Wrench
1 Allen Wrench
3 Bolts
3 Washers
3 Nuts
1 Warranty Card

BLACK&DECKER™
Purpose of Product
Thank you for buying a Black & Decker GARDEN SHREDDER. Your GARDEN SHREDDER will make helpful garden mulch out of twigs, leaves, hedge and grass clippings, bark, stalks, stems, vines or any other garden wastes. Newspapers (black & white) and organic kitchen scraps such as fruit and vegetable peelings can also become a rich source of nutrients for your garden when mulched.
Two sets of tough steel blades driven by a 1 horsepower motor quickly reduce waste to a fraction of its original size.
Lightweight and easy to use, the GARDEN SHREDDER will help you to produce a healthier and more beautiful garden.
This Product is Listed by UNDERWRITERS' LABORATORIES, INC. and Bears the Mark:

Purpose of Manual
A few minutes spent reading this manual will assure satisfaction when using the GARDEN SHREDDER.
The GARDEN SHREDDER will give you many years of service as long as it is properly maintained and cared for. It is EXTREMELY IMPORTANT that all SAFETY INSTRUCTIONS are read and strictly followed.
SAVE THIS MANUAL FOR FUTURE REFERENCE.
Important
To assure product Safety and Reliability all repairs and adjustments other than those described in this manual must be performed by Black & Decker Service Centers or Authorized Service Stations.
Home Use Warranty
(A Full One Year Warranty)
Black & Decker warrants this product for one year. We will repair, without charge, any defects due to faulty material or workmanship or at our option replace the product free. Please return the complete unit, transportation prepaid, to any Black & Decker Service Center or Authorized Service Station listed under "Tools Electric" in the yellow pages. This warranty does not apply to accessories. This warranty gives you specific legal rights and you may have other rights which vary from state to state. Should you have any questions, contact your nearest Black & Decker Service Center manager.
I. Important Safety Instructions
WARNING: To guard against injury all safety instructions should be observed.
-
WEAR SAFETY SPECTACLES OR GOGGLES at all times when using your shredder. Do not look directly into feeder funnels while operating shredder.
-
DRESS PROPERLY:
-
Do not operate shredder when barefoot or wearing open sandals. Wear only substantial non-skid, rubber soled footwear.
- Do not operate the shredder without sturdy gloves.
-
Do not wear loose clothing or jewelry since they can catch onto the shredder. Wear long pants to protect legs and wear long sleeve shirt to protect arms.
-
DANGER - CUT HAZARD - KEEP HANDS AND FEET AWAY FROM BLADES.
Do not place hands in the cutting area while the cutters are rotating. The blades will continue to rotate up to a minute after shredder is turned off. If shredder blades become jammed:
- Turn shredder off and disengage cord interlock.
- loosen cover screw and remove cover.
-
Carefully clean out all materials in the shredder. Avoid any hand contact with the blades.
-
STAY ALERT: Watch what you are doing - use common sense. Do not operate shredder when fatigued.
-
KEEP CHILDREN AWAY: All bystanders should be kept a safe distance away from work area.
-
AVOID DANGEROUS ENVIRONMENTAL CONDITIONS:
- Do not use shredder in rain.
- Do not use shredder in damp or wet location.
- Do not OPERATE the shredder on concrete or paved surfaces.
- Ensure that the shredder is standing firmly when being operated.
- Do not operate shredder in gaseous or explosive atmospheres.
- USE OF AN EXTENSION CORD
WARNING: To reduce the risk of electric shock, use only with a U.L. listed outdoor extension cord. Always connect extension cords to a fused line or one protected by a circuit breaker.
- Never use a damaged cord - always inspect your extension cord for loose or exposed wires or damaged insulation.
- Do not abuse cord - keep cord away from heat, oil and sharp edges.
- Do not yank cord from receptacle.
- We recommend using No. 16 AWG wire size for lengths up to 100 ft., and No. 14 or larger wire size for longer lengths.
- To prevent disconnection of the shredder cord from extension cord when operating, make a knot as shown in Figure 4A.
- Blowing a fuse or tripping a circuit is an indication that too many devices are drawing power from the circuit. Determine the cause and correct it. Do not install a higher capacity fuse.
-
DISCONNECT SHREDDER FROM EXTENSION CORD:
-
when being transported.
- prior to cleaning or making adjustments.
- when not in use.
- when removing or replacing parts.
9: DO NOT PULL ON CORD to transport shredder.
-
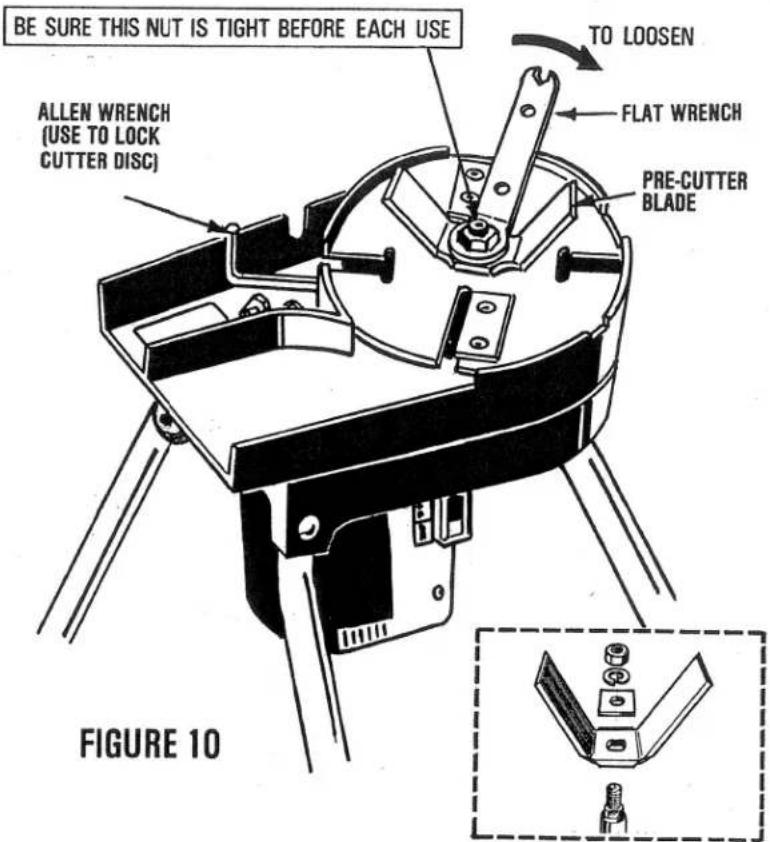
CHECK SHREDDER FOR LOOSEBOLTS, nuts, etc. before each operation. (See Figure 10)
-
AVOID ACCIDENTAL STARTING: Make sure switch is always turned off before reconnecting cord interlock or plugging unit into extension cord.
-
USE SHREDDER PROPERLY:
-
Do not use the shredder for any job except for which it is intended.
- Do not attempt to shred hard objects such as metal, glass, stones, masonry materials, ceramics, bones or plastics.
- Do not attempt to shred ropes or rags. This will cause the unit to bind up.
In the event that one or more of the above materials is mistakenly fed into the shredder, follow the procedure outlined in safety instruction no. 3.
- Do not operate a damaged shredder. Have it repaired before further operation is attempted.
-
Do not force the tool - allow the shredder to clear itself before inserting additional materials.
-
DON'T OVERREACH - keep proper footing and balance at all times. Position yourself behind the unit away from the discharge chute when feeding material into the feeder funnels.
-
DO NOT SWITCH MOTOR OFF - until the shredder is completely empty, as it may be difficult to restart.
-
STORE SHREDDER INDOORS - when not in use, shredder should be stored indoors in a dry location, out of reach of children.
-
MAINTAIN SHREDDER WITH CARE - Do not operate a damaged shredder. Follow all product care and maintenance instructions.
Double-Insulation
Your tool is DOUBLE-INSULATED to give you added safety. This means that it is constructed throughout with TWO separate "layers" of electrical insulation or one DOUBLE thickness of insulation between you and the tool's electrical system.
Tools built with this insulation system are not intended to be grounded. As a result, the extension cord used with your tool can be plugged into any conventional 120 volt electrical outlet without concern for maintaining a ground connection.
NOTE: DOUBLE-INSULATION does not take the place of normal safety precautions when operating this tool. The insulation system is for added protection against injury resulting from a possible electrical insulation failure within the tool.
CAUTION: When servicing Double Insulated Tools, USE ONLY IDENTICAL REPLACEMENT PARTS. Replace or repair damage cords.
II. Assembly
NOTE: Assembly of shredder is necessary before operation.
To assemble the legs you will use the flat wrench provided:
- Place the shredder upside down so that it is resting on the main feeder funnel.
- Taking the bolts, nuts and washers provided, secure the legs in the base of the unit, ensuring the legs are pointing outward. (See Fig. 2)
- Place both wrenches in the designated area located beneath the shredder base.
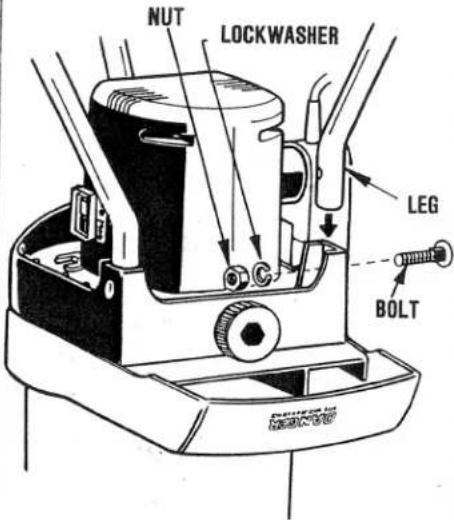
FIGURE 2
III. Operating Instructions
- SAFETY - be sure to carefully read and follow all safety instructions shown in this manual.
- Before connecting the shredder to a power source make sure the shredder is switched off.
To switch the unit off press the red (top) switch. The unit is switched on by pressing the white (bottom) switch. See Fig. 3.
- Connect the shredder cord to the extension cord as shown in Figure 4A.
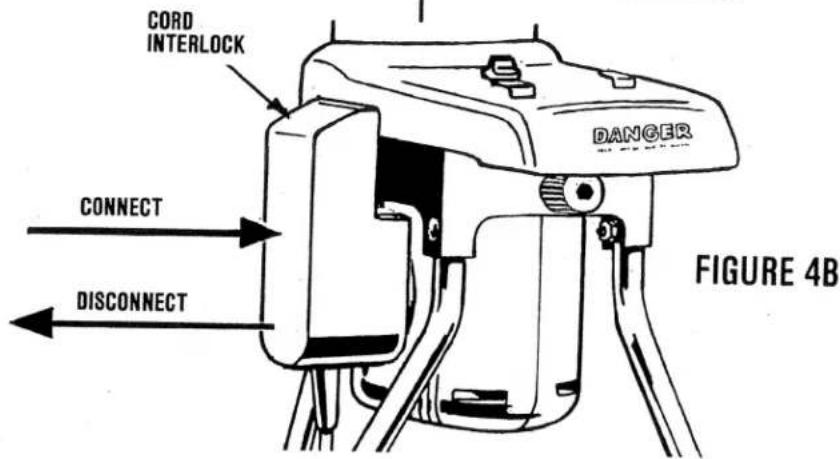
- The shredder comes equipped with a cord interlock, this must be firmly pressed into the motor housing inlet as shown in Figure 4B.
The shredder can be disconnected by pulling (disengaging) the cord interlock away from the motor housing inlet.
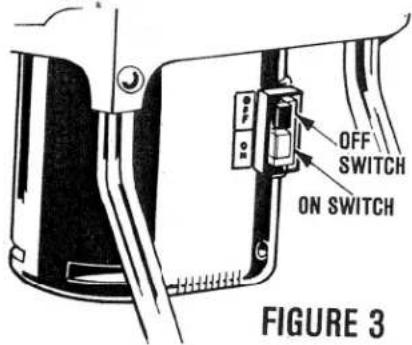
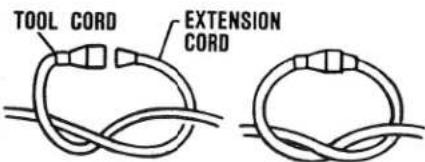
FIGURE 4A
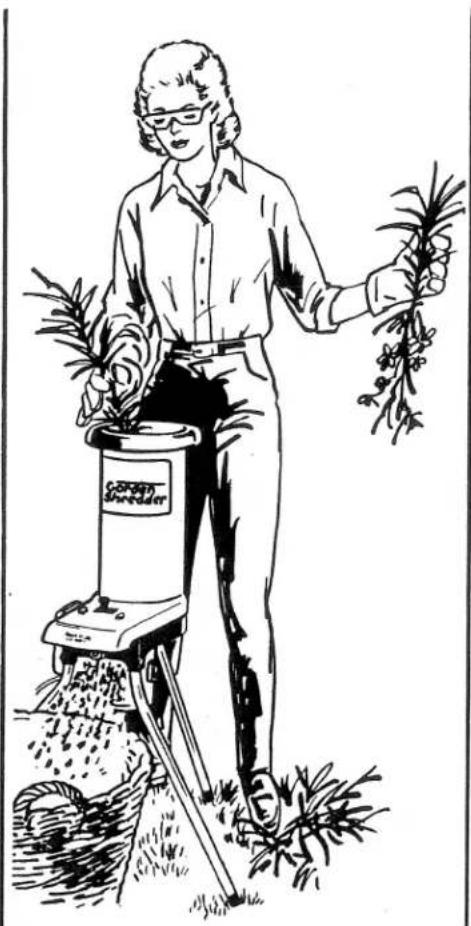
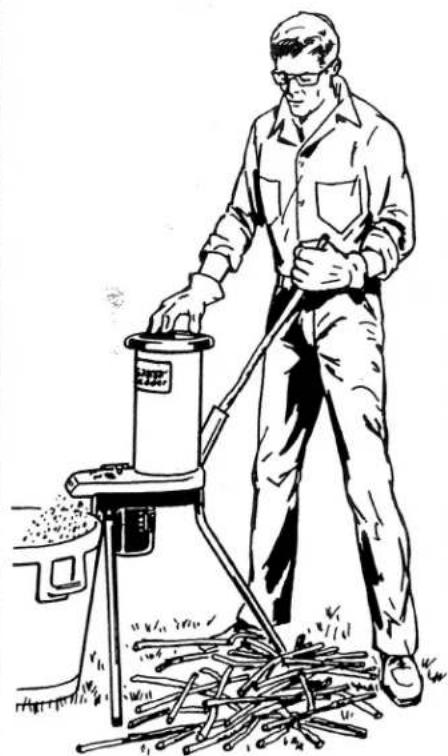
- When feeding material into the shredder, position yourself behind the unit and away from the discharge chute as shown in figure 5 & 6.
- Use the main feeder to shred bulk materials such as hedge and grass clippings, leaves, vines, peelings, cardboard and newspapers. (Fig. 5) Use the side feeder for twigs and branches up to one inch in diameter after they have been prunned. (See Fig. 6)
- Remove any soil or stones from materials before shredding to prevent damage or dulling of blades.
- The shredder is equipped with an integral overload switch to protect the motor from damage. If overload occurs, the shredder will automatically be switched off. It can then be switched on again after a cool down period of one or two minutes.
If the motor continues to turn itself off it is an indication that the shredder is jammed. If this occurs, follow this procedure:
a. Make sure the shredder is switched OFF.
b. Disengage cord interlock.
c. Loosen cover screw and remove the cover (See Fig. 7).
d. Carefully clean out all material left in the shredder. WARNING: Blades are sharp and may cause injury even when not moving.
e. Replace cover and tighten cover screw.
f. Make sure switch is OFF and reconnect cord interlock.
9. The shredder will slow down if large amounts of material are quickly fed into it. If this occurs allow the shredder time to clear itself before feeding any additional materials.
10. Do not allow shredded material to build up in the discharge chute, this may prevent proper discharge and can result in kickback of material through the feed opening.
natural_image
Illustration of a person tending to plants in a small water filter (no text or symbols)FIGURE 5
natural_image
Illustration of a worker operating a manual presser machine with tools nearby (no text or symbols)FIGURE 6
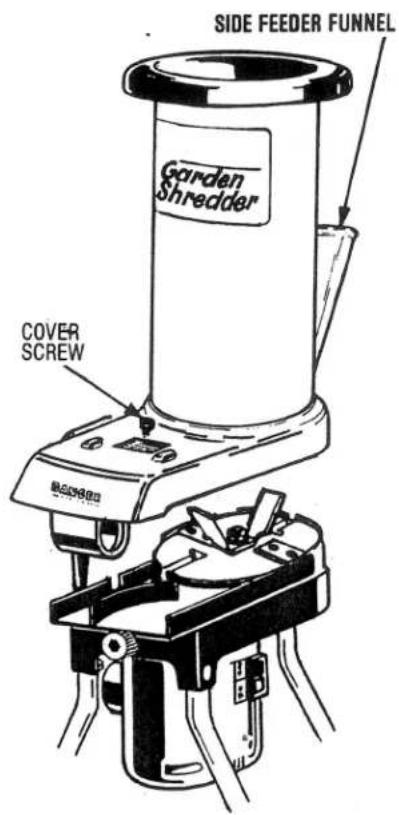
FIGURE 7
- Do not turn the shredder off until all shredded material has been cleared. Any material that is left inside the feeders may jam the unit and prevent it from operating when switched on again. If this occurs, follow the procedure outlined above in Item 8.
- It is advisable to shred damp and dry materials alternatively as this will prevent sticking and clogging of the shredder. Dry materials should be ground last to absorb any moisture which may be left in the shredder. This will aid in clearing the unit.
-
When operating the shredder it is important that the drive belt is run at the correct tension. DURING THE FIRST HOUR OF USE, THE TENSION MAY NEED TO BE ADJUSTED SEVERAL TIMES. The procedure for adjusting belt tension is explained under Product Care & Maintenance.
-
The two clips in the front of the shredder are used to attach a common plastic trash bag that can be separately purchased (See Fig. 8). In using these clips be sure that the bottom of the bag is touching the ground.
- Store your shredder indoors in a dry location out of the reach of children and away from chemicals and fertilizers which can cause rapid corrosion.
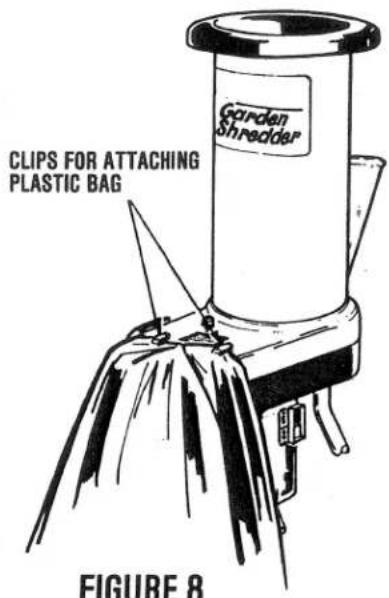
FIGURE 8
IV. Product Care & Maintenance
WARNING: Use only Black & Deck replacement parts. Use of any other replacement part may increase risk of injury.
CUTTING BLADES
At the end of the season the cutting blades should be checked for sharpness to assure good performance and reliability.
This is done in the following manner:
a) Turn shredder off and disengage cord interlock.
b) Loosen cover screw and remove cover.
c) Check the condition of both the cutter and pre-cutter blades. Any blade found dull will have to be changed.
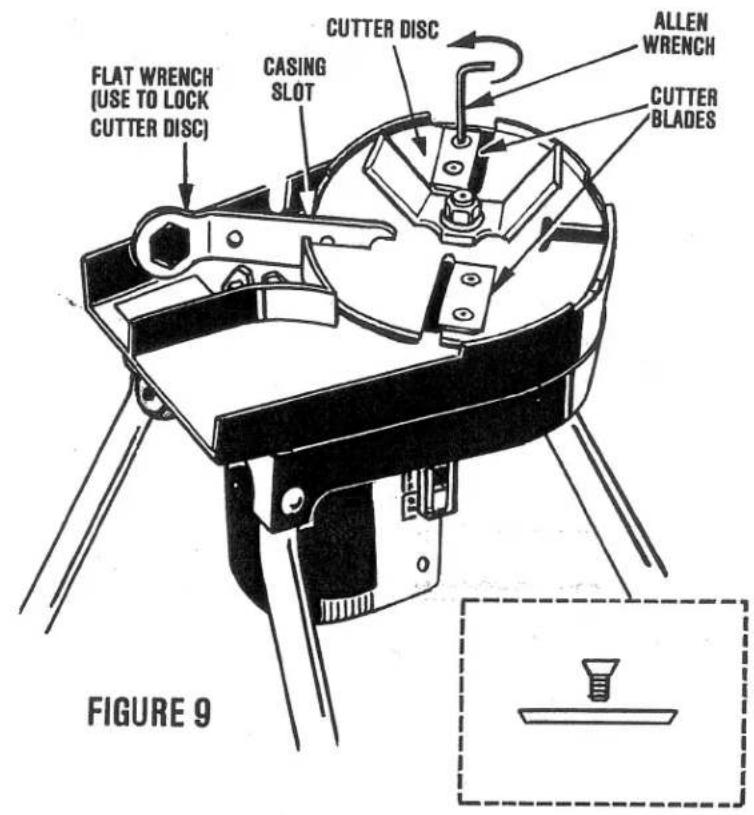
CHANGING THE CUTTER BLADES (See Figure 9)
WARNING: Do not change cutter blades without gloves.
In order to change the cutter blades it is necessary to lock the cutter disc by placing the flat wrench through the slot in the casing and cutter disc, so that the blade can not rotate.
The cutter blades are initially sharp on both edges. The second edge can be used by removing the two Allen head screws and rotating the blade horizontally 180 degrees then retighten the screws.
Remove flat wrench before replacing cover and tightening cover screw. If necessary, a new set of cutter blades (Cat. NO. 682044) can be obtained at any Black & Decker Service Center.
CHANGING THE PRE-CUTTER BLADE (See Figure 10)
WARNING: Do not change pre-cutter blade without gloves.
In order to change the pre-cutter blade, it is necessary to lock the cutter disc by placing the Allen wrench through the slot in the casing and cutter disc. The disc must then be rotated CLOCKWISE until it locks up. Then loosen the nut CLOCKWISE. Remove the pre-cutter and replace it with a new one (Cat. No. 918224) obtained from your Black & Decker Service Center. Position the pre-cutter blade 90° to the cutting blades. Tighten nut COUNTER \~ CLOCKWISE.
Remove Allen wrench before replacing cover and tightening screw.
DRIVE BELT
ADJUSTING DRIVE BELT TENSION In order to adjust drive belt tension: (See Figure 11)
a) Turn shredder off and disengage cord interlock.
b) Loosen cover screw and remove cover.
c) Turn shredder upside down and gently lay unit on a soft (preferably grass) surface.
d) Loosen the four Allen head motor mounting screws.
e) Turn the tension adjusting knob clockwise until the bump on the plastic knob hits the projection on the metal base.
f) Retighten the four Allen head motor mounting screws.
CHANGING THE DRIVE BELT
If the shredder motor is running without driving the cutter disc it indicates the drive belt has worn and will need replacing. A new drive belt (Cat. No. 682045) can be ordered from any Black & Decker Service Center.
Follow above instructions a) to c)
g) Remove the back support leg with the spanner.
h) Remove the black cover plate by releasing the two screws.
j) Remove the belt tension adjuster located at the front of the shredder.
k) Remove the motor by releasing the 4 hexagonal screws.
1) Remove the old drive belt and replace the new one over the belt pulley. Make sure that the drive spindle on the motor encases the drive belt.
m)Replace the four hexagonal screws and washers but do not yet tighten.
n) Turn the pulley to check that the drive belt is wound on correctly.
o) Replace tension adjuster and tighten according to e).
p) The four hexagonal screws can now be tightened.
q) Replace cover plate and back support leg.
r) Check belt tension after 1 hour of use.
STORAGE
No not storage this tool next to fertilizers or chemicals. Such storage can cause rapid corrosion.
Accessories & Replacement Parts
CAUTION: The above accessories & replacement parts are recommended for use with your shredder. The use of any other accessory or attachment might be hazardous.
The following accessories or replacement parts can be purchased separately from any Black & Decker Service Center, or by writing to:
Customer Services Black & Decker (U.S.) Inc. Easton, Maryland 21601
| Part/Description | Cat. No. |
| Outdoor Extension cord50 ft., 16 ga, 3 wire | 88-050 |
| Outdoor Extension cord100 ft., 16 ga., 3 wire | 88-100 |
| Protective Goggles | 72-000 |
| Pre-Cutter Blade | 918224 |
| Cutter Blades(Set of Two) | 682044 |
| Drive Belt | 682045 |
| Flat Wrench | 874933 |
| Allen Wrench | 870103 |
THIS ELECTRIC TOOL IS RADIO AND TV SUPRESSED IN COMPLIANCE WITH THE DIRECTIVE OF THE EUROPEAN COMMUNITIES 76/889 + 82/499.
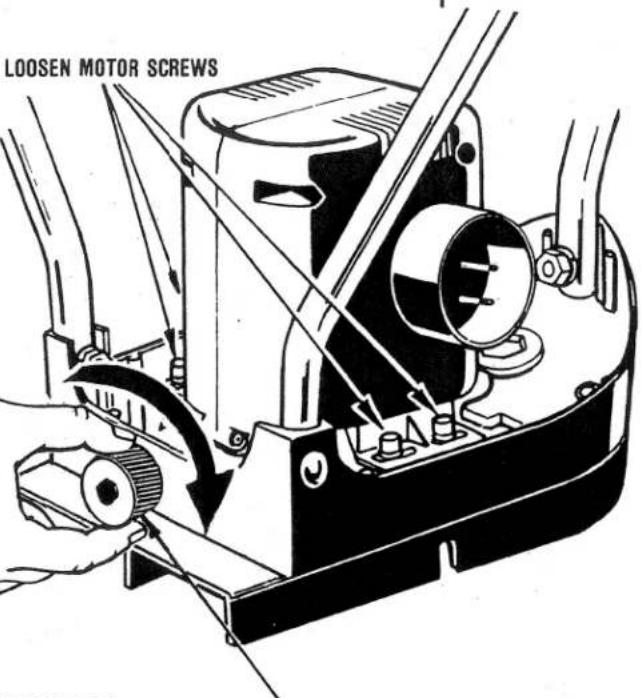
FIGURE 11
TENSION ADJUSTING
KNOB
BLACK & DECKER (U.S.) INC. OUTDOOR DIVISION 515 GLEBE ROAD, EASTON, MD 21601
Form NO. 688177-01
(MAY84)
©1984
Printed in W. Germany
Made in W. Germany by Black & Decker
- Garden Shredder
- Owner's Manual
- CONTENTS OF CARTON
- Purpose of Product
- Purpose of Manual
- Important
- Home Use Warranty
- (A Full One Year Warranty)
- Important Safety Instructions
- Double-Insulation
- Assembly
- Operating Instructions
- Product Care & Maintenance
- CUTTING BLADES
- CHANGING THE CUTTER BLADES (See Figure 9)
- CHANGING THE PRE-CUTTER BLADE (See Figure 10)
- DRIVE BELT
- CHANGING THE DRIVE BELT
- STORAGE
- Accessories & Replacement Parts
Marke : BLACK & DECKER
Modell : 8501
Kategorie : Gartenhäcksler