90944-14 - Thermometer Welby - Kostenlose Bedienungsanleitung
Finden Sie kostenlos die Bedienungsanleitung des Geräts 90944-14 Welby als PDF.


Benutzerfragen zu 90944-14 Welby
0 Frage zu diesem Gerät. Beantworten Sie die, die Sie kennen, oder stellen Sie Ihre eigene.
Eine neue Frage zu diesem Gerät stellen
Laden Sie die Anleitung für Ihr Thermometer kostenlos im PDF-Format! Finden Sie Ihr Handbuch 90944-14 - Welby und nehmen Sie Ihr elektronisches Gerät wieder in die Hand. Auf dieser Seite sind alle Dokumente veröffentlicht, die für die Verwendung Ihres Geräts notwendig sind. 90944-14 von der Marke Welby.
BEDIENUNGSANLEITUNG 90944-14 Welby

text_image
Welby® HEALTHEar and Forehead Thermometer
natural_image
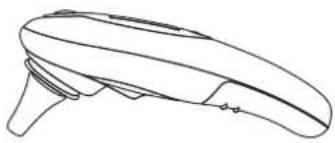
Line drawing of a handheld electronic device with a handle and spout (no text or symbols)INSTRUCTIONS
Item No. 90944-14
page: 1of8 page: 2 of8
Basic functions:
-
Current date and time display: Date display falls between calendar years 2001 and 2099; time displays either as 12-hour clock or 24-hour clock (user selectable). The initial date for a powered-up system is January 01, 2013.
-
Measurement and display of temperature: Measurement ranges from 89.6°F to 109.3°F (32.0°C to 42.9°C).
3.20 sets of measurement readings: Stores up to 20 sets of temperature readings. Temperature is stored with measuring date, time and measurement mode (Ear or Forehead).
-
Measurement and display of room temperature: Measurement ranges from 41.0°F to 139.8°F (5.0°C to 59.9°C).
-
Voice prompt: Reports measurement results (in °F or °C), room temperature and current time.
-
Built-in white Mini Flashlight: Press the LIGHT BUTTON to turn on the LCD backlight. The LCD backlight will turn off automatically after 5 seconds. Press and hold the LIGHT BUTTON for 2 seconds to turn on the white Mini Flashlight; the white Mini Flashlight will turn off automatically after 5 seconds. Press any button to turn off Mini Flashlight or LCD backlight.
Setup
Clock mode:
-
Displays time in a sequence of year, month, date, day of the week, hour and minutes with a flickering * : * stands for passing seconds. The LCD displays current time and room temperature in alternating 5-second intervals.
-
Press TALK/OK to hear current time and room temperature.
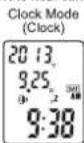
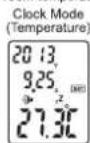
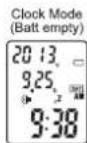
- Press and hold TALK/OK for 2 seconds to toggle on/off the talking function - however, during measurement, you will hear " didi " sound whether or not the unit is in talking or non-talking mode.
- When the TALK function is enabled, the [ ➤ ] icon is turned on. If disabled, the [ ➤ ] icon is off. The default setting is TALK enabled.
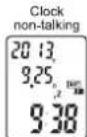
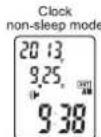
- Press MEM/SET to retrieve the recorded temperature or press and hold MEM/SET for 2 seconds to enter into set up mode.
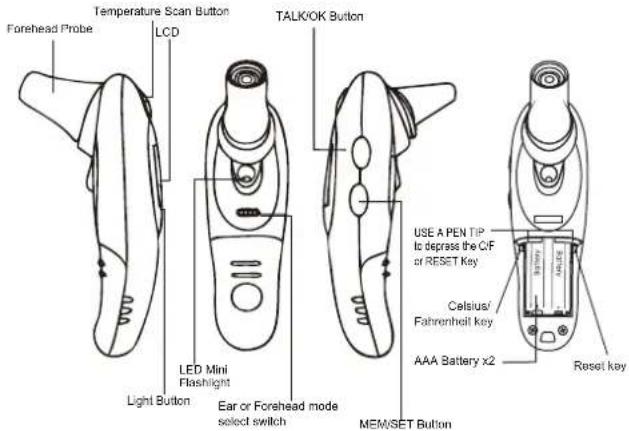
- With a pen depress C/F Key inside battery area to toggle between Celsius or Fahrenheit (illustration on pg 2)
- Press the LIGHT BUTTON to turn on the LCD backlight. The LCD backlight will turn off automatically after 5 seconds.
- Press and hold the LIGHT BUTTON for 2 seconds to turn on the white Mini Flashlight; the white Mini Flashlight will turn off automatically after 5 seconds.
- Sleep mode - System enters into sleep mode 3 minutes after last key pressed.
page: 3 of 8
Instruction Manual for the Ear and Forehead Thermometer
Thank you for purchasingEar and Forehead Thermometer. For safe use of this product, be sure to read and fully understand this manual as well as the safety precautions, prior to any use. Please keep this manual safely stored for convenient reference. The device is intended for the intermittent measurement and monitoring of human body temperature by consumers in the home.
Safety precautions
- It is dangerous for patients to perform a self-evaluation or self-treatment based on the measuring results. Be sure to follow your doctor's instructions at all times.
- Do not touch or blow on the infrared sensor.
- Clean a soiled infrared sensor with a soft damp cloth in a gentle manner.
- Keep the device out of children's reach.
- Do not take any measurements just after physical activity, which could affect body temperature. Wait 30 minutes for the body to adjust.
- You may need to allow 30 minutes for the thermometer to attain room temperature if stored in an area at a temperature different from the room in which you will use the device.
- Stop using this product if there is any pain.
• This product is not recommended for users suffering ear disease such as otitis or tympanitis. - Do not use the product in a wet ear passage (such as from swimming or bathing).
• Do not throw batteries into fire.
• Do not use the product for other purposes.
• This is not a waterproof device. - Do not expose this product to any liquids, chemical solvent, direct sunshine or high temperature.
• Do not use a mobile phone nearby when the thermometer is in use.
• Take out the batteries if you are not going to use the unit for a long period of time.
text_image
Temperature Scan Button Forehead Probe LCD TALK/OK Button LED Mini Flashlight Light Button Ear or Forehead mode select switch MEM/SET Button USE A PEN TIP To depress the C/F of RESET Key Celsius/ Fahrenheit key AAA Battery x2 Reset keySetup mode:
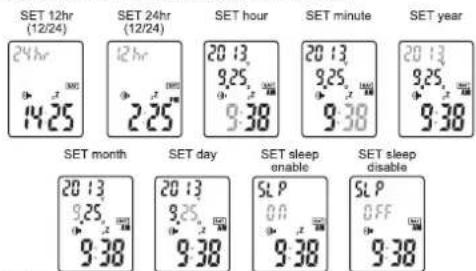
Press and hold MEM/SET for 2 seconds to enter into setup mode
1. Press MEM/SET to shift between a setting of 12/24Hr, HOUR, MINUTE, YEAR, MONTH, DAY and SLEEP enable/disable.
2. Press MEM/SET again to adjust the values, then press TALK/OK to confirm.
3. Press and hold MEM/SET to increase the values rapidly.
* Unit returns to clock mode automatically 30 seconds after last key pressed.
text_image
SET 12hr (12/24) 24 hr 14:25 SET 24hr (12/24) 12 hr 2:25 SET hour 9:38 SET minute 20:13 9:25 9:38 SET year 20:13 9:25 9:38 SET month SET day SET sleep enable SET sleep disable 20:13 9:25 9:38 SET sleep enable SLP OFF SLP 9:38Memory mode:
- Press MEM/SET in clock mode to enter into memory mode.
- *-* will be displayed if no data is stored.
- Maximum storage is 20 sets of readings with date and time shown.
- Unit returns to clock mode automatically 5 seconds after last key pressed.

Notes:
- Press MEM/SET, the LIGHT BUTTON or the TEMPERATURE SCAN BUTTON to stop the speech.
- When either the Mini Flashlight or LCD backlight is on. Press any button to turn it off.
- In case of nearby electrostatic discharge, the device may need to be reset with a pen depress. Reset key inside battery area.
- Please store the Thermometer on the table stand when not in use.
- Thermometer display will invert 180 degrees when turned upside down to place onto holding base and will read correctly for Clock Mode. When using in the hand the display will invert back 180 degrees.
Preparations:
- Reset the unit if there is missing segment on LCD, LCD is blurred or system is not working. The reset key is located inside the battery compartment. (See illustration on page 2.)
- Replace any low-voltage batteries to ensure a full power supply.
- An unexpected fluctuation of ambient temperature is likely to affect the measurement's accuracy. For example, never attempt to perform a temperature measurement in front of an air conditioner or heater, as this can result in inaccurate measurements.
- Measurement should not be taken immediately after exercise or bathing, as this can affect body temperature. Please wait for a period for the body to return to normal temperature.
page: 4 of 8
How to Take a Body Temperature Measurement
IMPORTANT: Before taking a reading allow the thermometer to acclimate to room temperature for 30 mins. How to Take a Measurement:
NOTE: You may choose to take 2 or 3 consecutive readings, at 15-second intervals, to ensure a correct reading. Wait at least 10 minutes for the device to cool down before taking further readings in this case.
1) To measure Ear Temperature:
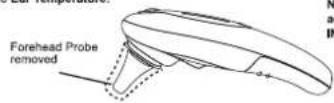
NOTE: Ear readings are the most accurate because they read from INSIDE the ear canal. The next measurement could not be taken at once after last measurement. Please wait a minimum of 12 seconds between readings
Make sure the ear is clean and dry. Pull the FOREHEAD PROBE off the unit, Turn Ear or Forehead mode select switch to select the Ear lost modinsert the temperature probe into the ear, then press the TEMPERATURE SCAN BUTTON (just above the LCD screen) once to start the measurement. You will hear a beep sound. Upon completion you will hear a "DI DI" sound, then hear the result via the speaker or see it on the LCD screen.
2) To measure Forehead Temperature:
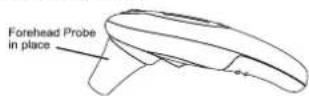
NOTE: Though accurate, readings from OUTSIDE areas may be one degree lower than inside readings. The BEST outside reading area is actually the TEMPLE.
Put the FOREHEAD PROBE onto the unit, Turn Ear or Forehead made select switch to select the Forehead test mode. then gently position the probe onto the center of the forehead, midway between the eyebrow and the hairline. Press the TEMPERATURE SCAN BUTTON once to start the measurement & you will hear a beep sound. Upon completion you will hear a "DI DI" sound, then hear the result via the speaker or see it on the LCD.
3) The result will be stored into memory automatically. If 20 sets of readings are stored already, the earliest reading will be removed each time a new reading is taken.
4) If the LCD shows "HI", then the temperature reading was above the device's limit of 109.3°F/42.9°C.
5) If the LCD shows "LO", then the temperature reading was below the device's limit of 89.6°F/32.0°C.
6) The unit automatically returns to lime display mode after 30 seconds on inactivity.
7) The display will be turned off after 3 minutes of inactivity (if sleep mode is enabled).
Reviewing Previous Temperature Readings Stored in Memory
While in Clock Mode, press the Mem/Set button to view the last temperature reading. Recorded temperatures will be displayed with date and time stamp. Press the Mem/Set button again to view successive previously recorded temperatures.
page: 5 of 8 page: 6 of 8
Glossary of Symbols
 | Batch code |
 | Serial number |
| [CTWO] | Attention: Read the operating instruction for use! |
 [4YYYZ] [4YYYZ] | Electrical devices are recyclable material and should not be disposed of with household waste after their useful life! Help us to protect the environment and save resources and take this device to the appropriate collection points. Please contact the organization which is responsible for waste disposal in your area if you have any questions. |
| [227H] | Type B Applied Part |
| [8W80] | Consult instructions for user |
 | The date of manufacture |
| [14°F - 10°C] | The upper and lower limits of temperature for Storage environment |
| [10%] | The upper and lower limits of humidity for Storage environment |
page: 7 of 8 page, 8 of 8
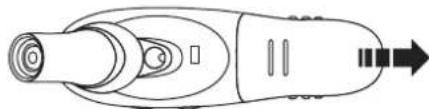
Replace a battery
Remove the battery compartment cover. Use only new batteries (2 x AAA battery). Replace the battery compartment cover.
natural_image
Line drawing of a mechanical component with no text or symbols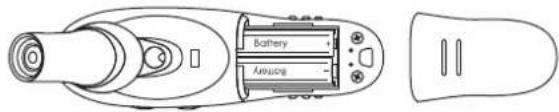
text_image
Battery Air ventMaintenance, storage and calibration
Maintenance:
-
Remove any stains on the device with a soft damp cloth.
-
Don't wash with water or detergent containing abrasive or benzene.
Storage:
- Clean the thermometer and put the cover on to protect the lens after each use.
- Do not expose the thermometer to direct sunshine, high temperatures, dampness, vibration or impact.
- Remove the battery for long periods of no use.
Calibration:
This thermometer is calibrated at the time of manufacture. If the thermometer is used according to the instructions, periodic recalibration is not required. If at any time you question the accuracy of the measurement, please contact the retailer immediately
Do not attempt to modify or disassemble the thermometer.
Troubleshooting
| Display on LCD | Possible issue | Solutions |
| Nothing | Battery is exhausted or placed in the wrong position | Check battery orientation or replace batteries |
| Battery symbol | Low battery | Change battery |
| Missing segment | Temporary malfunction | Reset the unit |
| "Lo" | Reading is below 89.6°F/32°C | Refer back to this manual for proper use |
| "Hi" | Reading is above109.3°F/42.9°C | Refer back to this manual for proper use |
| "ErrE" | Ambient temperature out of range | Do not use the thermometer under extreme temperature conditions |
| "ErrU" | Cannot measure | Refer back to this manual for proper use |
| "ErrH" | Hardware problem | Consult your dealer |
| "ErrS" | Sensor error | Consult your dealer |
| "ErrR" | Hardware problem | Consult your dealer |
| "ErrP" | Hardware problem | Consult your dealer |
Specification:
- Product Name: Ear and Forehead Thermometer 90944-14
- Power supply: DC3V (2 x AAA battery)
- Power consumption: 50mA (for voice prompt)
- Temperature sensing part: IR sensor
- Measuring range: 89.6°F - 109.3°F (32.0°C - 42.9°C)
Room temperature: 41.0°F - 139.8°F(5.0°C - 59.9°C) - Measuring accuracy: +0.2°C/60°F/85.9°F \~ 107.6°F (35.5°C \~ 42.0 °C)
10.3°C) 90.8°C 89.6°C - 95.8°C (32.0°C - 35.4°C)
+0.3℃/h@m#B107.7℃\~109.3℃(42.1℃\~42.9℃)
Room temperature accuracy: (±0.53°F)
- Outer dimension: 134mm x 58mm x 40mm
- Weight: 76g (with batteries)
- Working environment: Temperature: 59°F - 104.0°F (15°C - 40°C)
Relative humidity: 20%RH - 85%RH - Storage environment: Temperature: 14°F - 122°F (-10°C - 50°C)
Relative humidity: 10%RH - 85%RH
*Dispose of used batteries with care consult your distribution center for details.
Accessories:
1 x FOREHEAD PROBE
1 x User's Manual
1 x Table Stand Holder
Limited Warranty
Handelshaus Dittmann GmbH warrants this product to be free from defects in material and workmanship for a period of ninety (90) days from the date of purchase. Should this product prove to be defective at any time during the warranty period, Handelshaus Dittmann GmbH, at its option, either replace or repair it without charge. After the warranty period, a service charge will be applied for replacement of parts or labor for repair. To obtain warranty service please return the product to Dittmannalong with a dated sales receipt from the place of purchase. This warranty does not cover damage caused by accident, misuse, abuse, improper maintenance, unauthorized modification, or connection to an improper power supply. A charge will be made for repair of such damage. This warranty excludes all incidental or consequential damages and any liability other than what is stated above. ©2012 Handelshaus Dittmann GmbH Rights Reserved.

Distributed by ALDI Inc.
Batavia, IL 60510
Visit us at
www.Aldi.us
Service-Center Adress:
Greater Concepts By Design Team
1803 Springside Drive
Plainfield IL 60586
www.greaterconceptsbydesign.com
815-342-5850 office
815-230-3318 fax