Slim - Smartphone Orbic - Kostenlose Bedienungsanleitung
Finden Sie kostenlos die Bedienungsanleitung des Geräts Slim Orbic als PDF.


Benutzerfragen zu Slim Orbic
0 Frage zu diesem Gerät. Beantworten Sie die, die Sie kennen, oder stellen Sie Ihre eigene.
Eine neue Frage zu diesem Gerät stellen
Laden Sie die Anleitung für Ihr Smartphone kostenlos im PDF-Format! Finden Sie Ihr Handbuch Slim - Orbic und nehmen Sie Ihr elektronisches Gerät wieder in die Hand. Auf dieser Seite sind alle Dokumente veröffentlicht, die für die Verwendung Ihres Geräts notwendig sind. Slim von der Marke Orbic.
BEDIENUNGSANLEITUNG Slim Orbic
orbic
Unlocked all the way.
SLIM™
OWNER'S MANUAL
Please read this manual first before using the device to ensure safe and proper use:
- Descriptions are based on the device's default settings.
- Some content may differ from your device depending on the region, service provider, model specifications, or the device software.
- Content (high quality content) that requires high CPU and RAM usage will affect the overall performance of the device. Apps related to the content may not work properly depending on the device specifications and the environment that it is used in.
- Orbic is not liable for performance issues caused by apps supplied by providers other than Orbic.
- Orbic is not liable for performance issues or incompatibilities caused by edited registry settings or modified operating system may cause the device or apps to work improperly.
- Software, sound sources, wallpapers, images and other media provided with this device are for limited use. Extracting and using these materials for commercial or other purpose is an infringement of copyright laws. Users are entirely responsible for illegal use of media.
- You may incur additional charges for data services, such as messaging, uploading and downloading, auto syncing, or using location services depending on your data plan. For large data transfers, it is recommended to use the Wi-Fi feature.
- Default apps that come with the device are subject to updates and may no longer be supported without prior notice. If you have questions about an app provided with the device, contact Orbic customer service. For user-installed apps, contact service providers.
- Modifying the device's operating system or installing software
natural_image
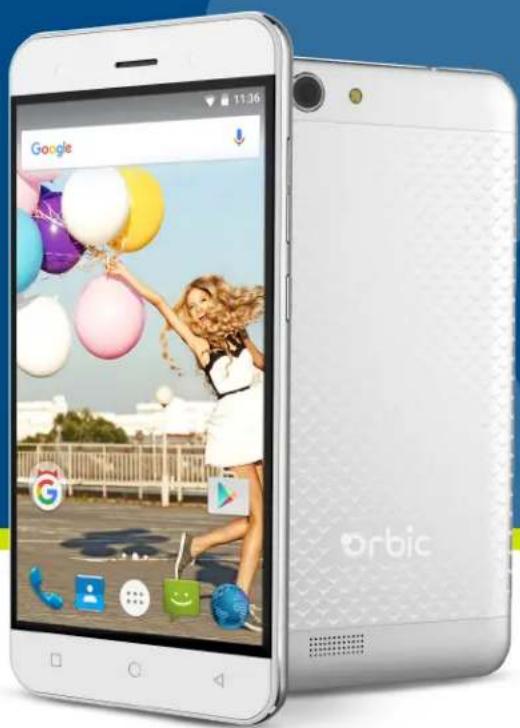
Exterior view of a silver compact smartphone with a woman in a dress, displayed on its screen (no visible text or symbols on the device body beyond branding)from unofficial sources may result in device malfunctions and data corruption or loss. These actions are violations of your Orbic license agreement and will void your warranty.
Package Contents:
- Device
- Charger
- Data Cord
- Headset
- Quick Start Guide
• Product Safety and Warranty Guide
Only use accessories and charging devices approved by the phone manufacturer. Failure to do this may invalidate your warranty.
Table of Contents
| 2 Phone Features | 4 Quick Settings |
| 2 SIM Cards | 4 Manage Battery Life |
| 2 Charge the Battery | 5 Favorites Tray |
| 3 Setting Up Your Phone | 5 Navigation Buttons |
| 3 Using Onscreen Gestures | 5 Menus |
| 3 Locking and Unlocking Your Phone | 5 To Change The Wallpaper |
| 3 Send an SMS (text message) | 5 Add an App Icon to a Home Screen |
| 3 Delete messages | 5 Add a Widget |
| 3 Delete conversations | 6 Move an App or Widget to Another Position |
| 3 Make a Phone Call | 6 Connecting to a Wi-Fi Network |
| 4 Send an Email | 6 - 8 Safety and Warranty |
| 4 Status Bar |
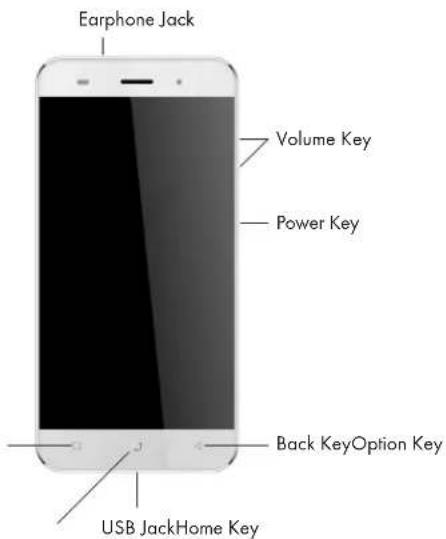
Phone Features
text_image
Earphone Jack Volume Key Power Key Back KeyOption Key USB JackHome KeySIM Cards
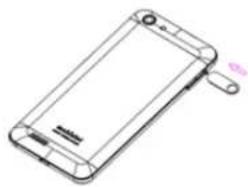
Insert SIM Card and MicroSD Card
To open the SIM Card Tray, use the SIM tray removal tool included with your device.
natural_image
Line drawing of a smartphone showing front panel, screen, and battery (no text or symbols)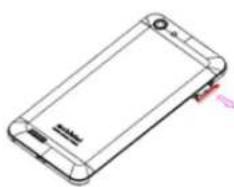
natural_image
Line drawing of a smartphone with a small screen and a red arrow pointing to the side panel (no text or symbols)SIM Card Slot 1
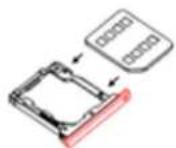
SIM Card Slot 2
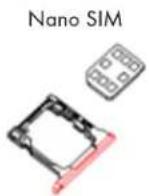
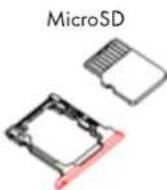
* Slot 2 can be used for a Nano SIM card or MicroSD card
Charge the Battery
Before turning on your phone, charge the battery fully. Connect the wall charger and the USB cable that came with your phone together. Plug one end into the charging port of your phone and the other end into an electrical outlet.
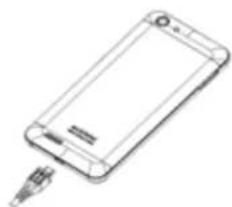
natural_image
Line drawing of a smartphone with an attached cable (no text or symbols)
WARNING: Use only an approved charging accessory to charge your phone. Improper handling of the charging port, as well as the use of an incompatible charger, may cause damage to your device and void the warranty.

- When the battery power is low, the battery icon appears empty. - If the battery is completely discharged, the device cannot be turned on immediately when the charger is connected. Allow a depleted battery to charge for a few minutes before turning on the device.
- Using a power source other than a USB power adaptor, such as a computer, may result in a slower charging speed due to a lower electric current.
Setting Up Your Phone
When you first turn on your phone, you'll see a Welcome screen. Choose your language and touch the arrow to continue.
When prompted, sign in with your Google Account or create one at that time. Signing in lets you immediately access everything associated with your Google Account, like Gmail. If you prefer, you can skip this step and create an account later.
An email address that you use for any of the following counts as a Google Account:
- Gmail
- YouTube
- Google Play
- Google Apps
- AdWords
• Any other Google product
If you have multiple Google Accounts, you can add others later from Settings > Personal > Accounts. You can also add guest users in Settings > Device > Users.
Using Onscreen Gestures
After you finish setting up your device, the Home screen appears for the first time. Here, you can add app icons and widgets to easily find them.
• To move between Home screens, swipe left or right.
- To see notifications, swipe down from the top of the screen with one finger.
- To open Quick Settings—frequently used settings—swipe down from the top of the screen twice with one finger or once with two fingers.
- To open ⚙️ Settings, swipe down from the top of any screen with two fingers or swipe twice with one finger, then touch ⚙️ in the top right.
Locking and Unlocking Your Phone
Prevent accidental key presses by locking your phone.
• To Lock, press the Power/Lock button.
- To Unlock, press the Power/Lock button. Then swipe your finger across the screen.
Send an SMS (text message)
To send an SMS from your phone:
- Touch ➤ Messenger on your Home screen.
- Touch ☐ to create a new message.
- At the top of the screen, enter a phone number or select a contact. Type your message, then touch 🤔.
Delete Messages
- Open a conversation in Messenger.
- Touch and hold the message you wish to delete.
- When the "Message options" box appears, touch Delete.
Delete Conversations
- While viewing your list of conversations in Messenger, touch and hold a conversation to select it.
- To delete the conversation, touch 📋 Trash in the top right corner of the screen.
Make a Phone Call

You can place calls from the Phone app, the Contacts app, or other apps or widgets that display contact information. Wherever you see a phone number, you can usually touch it to dial.
To place a call to one of your contacts:
- Touch Phone on a Home or All Apps screen.
- To choose someone to call, scroll through your contacts or use the search option. To place a call, touch the contact's name.
To view recent calls, touch the RECENTS tab. To use the keypad, touch the 📋 keypad.
Send an Email
Use the M Gmail app to read and write email from your Gmail account.
- Touch Gmail on a Home or All Apps screen.
- If you already signed into a Gmail account during setup, your email will be synced to your device. Otherwise, add an email address now.
Status Bar
The status bar is at the very top of the screen. On the right, is the Wi-Fi and Network signal strength, how much battery power is left, and the time. On the left, you can see which apps have sent you notifications.

text_image
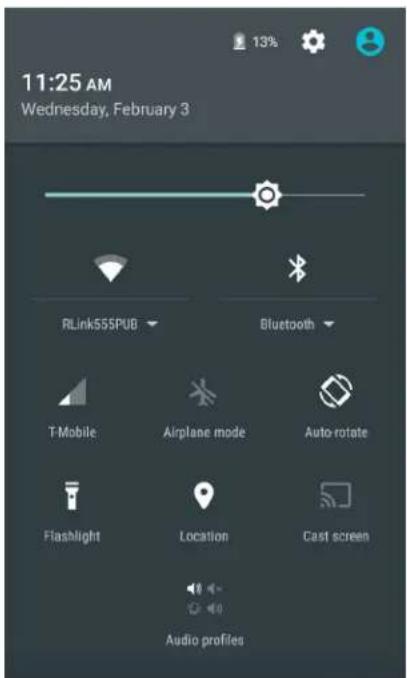
11:25 AM Wednesday, February 3 RLink555PUB Bluetooth T-Mobile Airplane mode Auto-rotate Flashlight Location Cast screen Audio profilesQuick Settings
Use Quick Settings to easily get to frequently used settings, like turning on Bluetooth. To open Quick Settings, swipe down from the top of the screen with two fingers or twice with one finger. To change a setting, just touch the icon:
Wi-Fi network: Turn Wi-Fi on or off. To open Wi-Fi settings, touch the Wi-Fi network name.
Bluetooth settings: ✪ Turn Bluetooth on or off. To open Bluetooth settings, touch the word "Bluetooth".
Cellular data: See cellular usage data and turn it on or off.
Airplane mode: Turn airplane mode on or off. Airplane mode means your phone won't connect to Wi-Fi or a cell signal, even if one is available.
Flashlight: Turn the flashlight on or off.
Display brightness: Slide to lower or increase the brightness of your screen.
Auto-rotate: You may lock your device's orientation in portrait or landscape mode.
Manage Battery Life
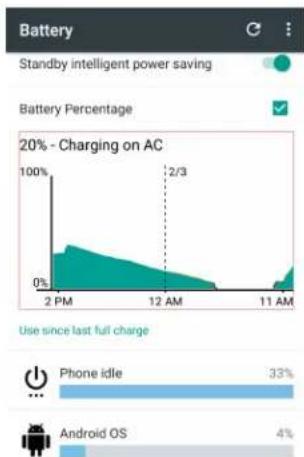
The status bar shows how much battery you have left, but you can also see the exact percentage and approximate time of battery life remaining. Swipe down from the top of the screen, then touch Battery.
area
| Time | Battery Percentage | | -------- | ------------------ | | 2 PM | 100% | | 12 AM | 2/3 | | 11 AM | 0% |Manage Battery Life (cont'd)
When your battery is running low, Android's battery saver conserves battery power so you can still make calls and send SMS (text) messages. To turn it on, go to:

Settings > Battery > Standby Intelligent Power Saving.
Favorites Tray
At the bottom of every Home screen you'll find the Favorites tray: another quick way to access your apps.

natural_image
Five digital interface icons on a dark background: telephone, mobile app, chat bubble, smiley face, and globe (no text or symbols)Navigation Buttons
At the bottom of the phone you will find the three navigation buttons.
Back

Opens the previous screen you were working in, even if it was in a different app. Once you back up to the Home screen, you can't go back any further.
Home

Opens the central Home screen.
Overview
Opens a list of thumbnail images of screens you've worked with recently. To open one, touch it. To remove a screen from the list, swipe it left or right or touch on the X.
Menus
Many screens in Apps and in Settings include a Menu icon at the top right of the screen. Touch it to explore additional options, including Help and Settings.
To Change The Wallpaper
- Touch and hold the background, then touch Wallpapers.

- Swipe right to left to choose a wallpaper image. Or choose an image from your Photos or Downloads.
Add an App Icon to a Home Screen
- Go to the Home screen where you want to place the app.
- Touch ⚠ All Apps.
- Swipe from right to left, if necessary, to find the app you want.
- Touch and hold the app until the Home screen appears, slide it into place, and lift your finger.
Add a Widget
- Touch and hold the background, then touch

Widgets.
- Swipe right to choose a widget.
- Touch and hold the widget until the Home screen appears, slide it into place, and lift your finger.
Move an App or Widget to Another Position
- Touch and hold the icon.
- Slide your finger to the new position.
- Lift your finger.
(To move between Home screens, slide toward the edge of the screen. To bump another icon out of the way, slide slowly into it.)
Connecting to a Wi-Fi Network
Activate the Wi-Fi feature to connect to a Wi-Fi network and access the Internet or other network devices.
- From the Settings menu, tap the Wi-Fi switch to activate it.
- Select a network from the Wi-Fi networks list. Networks that require a password appear with a lock icon.
- Tap CONNECT.
Once the device connects to a Wi-Fi network, the device will reconnect to that network each time it is available without requiring a password. To prevent the device from connecting to the network automatically, select it from the list of networks and tap FORGET.
Important Safety Information
Keep the phone ("Product") away from dust, water, damp areas, precipitation and humidity. Dust, water, liquids, precipitation and humidity may cause overheating, electrical leakage, and/or Product failure. The Product, battery, charger and AC adapter are not waterproof. Keep them away from liquid, fuels and chemicals. If the Product gets wet, do not place the Product in an oven, microwave or dryer, as this will damage the Product and could cause a fire or explosion.
Only use the battery and charger approved by the manufacturer. Using other brands may cause battery leakage, overheating, explosion or even fire.
Do not use the Product where it might cause danger. Do NOT text and drive.
Battery Use
Handle and store batteries properly to avoid injury or damage. Most battery issues arise from improper handling of batteries and, particularly, from the continued use of damaged batteries.
- Do not disassemble, crush, puncture, shred, or otherwise attempt to change the form of your battery.
-
Do not let the phone or battery come in contact with liquids.
-
Do not place your battery in or near a heat source. Excessive heating can damage the phone or the battery and could cause the phone or the battery to explode.
- Do not dispose of the phone or the battery in a fire.
- Do not handle a damaged or leaking battery.
- Do not allow the battery to touch metal objects.
- Misuse of or use of incomplete phones, batteries and charging devices could result in damage to equipment and possible risk of fire, explosion or leakage, leading to serious injuries, damage to your phone or other serious hazards.
Cleaning and Maintenance
The Product, the battery and the charger are not waterproof. Do not use them in places with high humidity like a bathroom and also avoid spilling any liquids on the Product, battery or charger.
Use a soft cloth to clean the Product, the battery and the charger. Do not use alcohol, diluted liquid or benzene to clean the Product.
Disposal of Product and Batteries
Follow local regulations regarding disposal of mobile devices and batteries. In some areas, the disposal of these items in household or business trash may be prohibited.
Please follow your local regulations and recycle Product if required. Batteries must be recycled or disposed of properly.
Certification Information (RoHs)
We at Orbic take our social responsibility seriously and are committed to the cause of serving our environment. It is in keeping with these commitments that we are proud to state that Orbic phones are RoHs compliant.
Certification Information (SAR)
Your Product is designed not to exceed the limits of emission of radio waves recommended by international guidelines. These guidelines include safety margins designed to assure the protection of all persons, regardless of age and health. SAR (Specific absorption rate) is a measure of the rate at which energy is absorbed by the human body when exposed to a radio frequency (RF) electromagnetic field. SAR value is ascertained according to the highest RF level generated during laboratory tests. The true SAR level during Product usage will be far lower than this level. The SAR value of the phone may change depending on factors such as how close you are to a network tower, use of accessories and other enhancements. The highest SAR value of the device is less than 1.6W/Kg averaged over 10gm of human tissue. The SAR value may differ depending on national reporting testing requirements and the network band.
FCC Statement
This Product complies with Part 15 of the FCC Rules. Operation is subject
ORBIC LIMITED WARRANTY
WHO THIS WARRANTY COVERS
This 12 month limited warranty extends only to the original purchaser of this product within the United States. This warranty is not transferable. This warranty is conditioned upon the proper use of the Product.
WHAT THIS WARRANTY COVERS
Orbic offers you a limited warranty that extends for the first twelve (12) month period to the original purchaser from the date of original purchase with proof of purchase. Without valid proof of purchase, Orbic offers a limited warranty extending fifteen (15) months from date of manufacture, which is coded on the product label ("Warranty Period").
Should the Product, inbox accessories or any part during normal consumer usage and conditions be proven defective in material or workmanship that results in Product failure, such defect(s) will be repaired or replaced (with new or rebuilt parts) at Orbic's discretion, without charge for parts or labor directly related to the defect.
WHAT THIS WARRANTY DOES NOT COVER
-
Warranty claims outside of the Product warranty Period.
-
Damage or defects caused by using the Product other than in the normal course.
-
Defects or damages resulting from accidental, misuse, abnormal use,
to the following two conditions:
(1) This Product may not cause harmful interference, and
(2) This Product must accept any interference received, including interference that may cause undesired operation.
NOTE 1
This Product has been tested and found to comply with the limits for a Class B digital device, pursuant to part 15 of the FCC Rules. These limits are designed to provide reasonable protection against harmful interference in a residential installation. This Product generates uses and can radiate radio frequency energy and, if not installed and use in accordance with the instructions, may cause harmful interference to radio communications. However, there is no guarantee that interference will not occur in a particular installation. If this Product does cause harmful interference to radio or television reception, which can be determined by turning the Product off and on, the user is encouraged to try to correct the interference by one or more of the following measures:
• Reorient or relocate the receiving antenna.
- Increase the separation between the equipment and receiver.
- Connect the equipment into an outlet on a circuit different from that to which the receiver is connected.
NOTE 2
Orbic or the manufacturer is not responsible for any radio or TV interference caused by unauthorized modifications to the Product. Such modifications could void the user's authority to operate the equipment.
abnormal conditions, improper storage, unauthorized modifications, unauthorized repair, improper installation, or other acts which are not the fault of Orbic.
- Defects or damage resulting from excessive force or use of a metallic object when pressing the touch screen.
- Product with altered, defaced or removed serial number.
- Damage resulting from use of accessories not approved by Orbic.
- Damage from exposure to moisture, humidity, excessive temperature or extreme environment.
- Liquid damage due to not properly sealed/locked accessories, ports and or battery latches of water resistance devices.
- All surfaces and externally exposed parts that are scratched or damaged due to normal customer use.
- All software, including operating system software, third-party software, applications, and all other software of any kind.
- Damage caused by ordinary wear and tear of the Product.
- Customer abuse or other physical abuse or mistreatment of a Product as evidenced by:
a. Missing required faceplate;
b. Damaged LCD or Touch Lens (e.g., the product is either broken, cracked, smashed, bleeding, etc.;
c. IMEI is unreadable electronically or due to missing or altered serial
number, IMEI and/or reliance date label so as to affect readability;
d. Missing keys on keypad beyond normal wear and tear;
e. Unapproved Product modification;
f. Visible Product surface physical damage resulting in product being smashed, chewed, gouged, burned or melted;
g. Liquid damage as evidenced by submission in liquid or any other evidence of liquid ingress, including corrosion of any of the connections and noticeable excessive residue.
WHAT ARE THE LIMITS OF ORBIC'S LIABILITY
THIS LIMITED WARRANTY SETS OUT THE FULL EXTENT OF ORBIC'S RESPONSIBILITIES AND THE EXCLUSIVE REMEDY REGARDING THE PRODUCT. ALL IMPLIED WARRANTIES, INCLUDING, WITHOUT LIMITATION, IMPLIED WARRANTIES OF MERCHANTABILITY AND FITNESS FOR A PARTICULAR PURPOSE, ARE LIMITED TO THE DURATION OF THIS LIMITED WARRANTY. IN NO EVENT SHALL ORBIC BE LIABLE FOR DAMAGES IN EXCESS OF THE PURCHASE PRICE OF THE PRODUCT OR FOR, WITHOUT LIMITATION, COMMERCIAL LOSS OF ANY SORT; LOSS OF USE, TIME, DATA, REPUTATION, OPPORTUNITY, GOODWILL, PROFITS, OR SAVINGS; INCONVENIENCE; INCIDENTAL, SPECIAL, CONSEQUENTIAL, OR PUNITIVE DAMAGES ARISING FROM THE USE OR INABILITY TO USE THE PRODUCT. SOME STATES AND JURISDICTIONS DO NOT ALLOW LIMITATIONS ON HOW LONG AN IMPLIED WARRANTY
LASTS, OR THE DISCLAIMER OR LIMITATION OF INCIDENTAL OR CONSEQUENTIAL DAMAGES, SO THE ABOVE LIMITATIONS AND DISCLAIMERS MAY NOT APPLY TO YOU.
ORBIC MAKES NO WARRANTIES OR REPRESENTATIONS, EXPRESS OR IMPLIED, STATUTORY OR OTHERWISE, AS TO THE QUALITY, CAPABILITIES, OPERATIONS, PERFORMANCE OR SUITABILITY OF ANY THIRD-PARTY SOFTWARE OR EQUIPMENT USED IN CONJUNCTION WITH THE PRODUCT, OR THE ABILITY TO INTEGRATE ANY SUCH SOFTWARE OR EQUIPMENT WITH THE PRODUCT DISTRIBUTED BY ORBIC OR OTHERWISE. RESPONSIBILITY FOR THE QUALITY, CAPABILITIES, OPERATIONS, PERFORMANCE AND SUITABILITY OF ANY SUCH THIRD-PARTY SOFTWARE OR EQUIPMENT RESTS SOLELY WITH THE USER AND THE DIRECT VENDOR, OWNER OR SUPPLIER OF SUCH THIRD-PARTY SOFTWARE OR EQUIPMENT.
Nothing in the Product instructions or information shall be construed to create an express warranty of any kind with respect to the Product. No agent, employee, dealer, representative or reseller is authorized to modify or extend this Limited Warranty or to make binding representations or claims, whether in advertising, presentations or otherwise, on behalf of Orbic regarding the Product or this Limited Warranty.
This Limited Warrant gives you specific legal rights and you may also have other rights that vary from state to state.
WHAT ARE THE PROCEDURES FOR RESOLVING DISPUTES?
ALL DISPUTES WITH ORBIC ARISING IN ANY WAY FROM THIS LIMITED WARRANTY OR THE SALE, CONDITION OR PERFORMANCE OF THE PRODUCT SHALL BE RESOLVED EXCLUSIVELY THROUGH FINAL AND BINDING ARBITRATION, AND NOT BY A COURT OR JURY. Any such dispute shall not be combined or consolidated with a dispute involving any other person's or entity's products or claim and, specifically, without limitation of the foregoing, shall not under any circumstances proceed as part of a class action. The arbitration shall be conducted before a single arbitrator, whose award may not exceed, in form or amount, the relief allowed by applicable law. The arbitration shall be conducted according to the American Arbitration Association (AAA) Commercial Arbitration Rules applicable to consumer disputes. This arbitration provision is entered pursuant to the Federal Arbitration Act. The laws of the State of New York, without reference to its choice of laws principles, shall govern the interpretation of the Limited Warranty and all disputes that are subject to this arbitration provision. The arbitrator shall decide all issues of interpretation and application of this arbitration provision and the Limited Warranty. This arbitration provision also applies to claims against Orbic's employees, representatives and affiliates if any such claim arises from the Product's sale, condition or performance.
HOW TO GET WARRANTY SERVICE
To obtain warranty service, please call the following telephone number from anywhere in the continental United States: 1-877-872-4555