Roadchamp - Fahrrad Koga - Kostenlose Bedienungsanleitung
Finden Sie kostenlos die Bedienungsanleitung des Geräts Roadchamp Koga als PDF.


Benutzerfragen zu Roadchamp Koga
0 Frage zu diesem Gerät. Beantworten Sie die, die Sie kennen, oder stellen Sie Ihre eigene.
Eine neue Frage zu diesem Gerät stellen
Laden Sie die Anleitung für Ihr Fahrrad kostenlos im PDF-Format! Finden Sie Ihr Handbuch Roadchamp - Koga und nehmen Sie Ihr elektronisches Gerät wieder in die Hand. Auf dieser Seite sind alle Dokumente veröffentlicht, die für die Verwendung Ihres Geräts notwendig sind. Roadchamp von der Marke Koga.
BEDIENUNGSANLEITUNG Roadchamp Koga
About this instruction manual
This instruction manual provides you with the information you need to maintain and use your Koga bicycle safely. The manual describes only the major parts of the bicycle and the most common settings. This manual is intended for all types of bicycles from Koga. That means that certain information might not apply to your Koga bicycle. Visit www.koga.com to find the most up to date version of this document.
Manuals for specific parts may have been supplied along with your Koga bicycle. Consult these manuals if you want extra information about the part in question. If you want more information about a certain part, or you want to make adjustments that have not been described in these manuals, contact your Koga dealer.
Safety

Use the bicycle for the purpose for which it was designed.
Traffic
Every rider is legally obliged to maintain his or her bicycle in a condition that is safe for traffic and ready for riding. Make sure you are familiar with these legal obligations so you are not faced with unwelcome situations.
Koga supplies bicycles that meet the legal obligations for the purpose for which they are made. The Trekking, Comfort, Special and most of the Light Touring bicycles are suitable for public roads. The Race, MTB and a few Light Touring bicycles are not suitable for public roads if they do not have the necessary adjustments. In their standard models they do not have any lighting, and therefore may not be ridden on public roads in conditions of poor visibility. Separate light units are available for these bicycles.

Ride particularly carefully on wet road surfaces. The braking distance is longer on a slippery road surface.

Use lights that work properly in all cases of poor visibility.
(Cycle) clothing
When riding your bicycle, wear close-fitting pants, or use a bicycle clip. Loose clothing can get between moving parts.

Koga is not liable for grease and/or lubricants in clothing.
When riding your bicycle, wear clothing that attracts attention. When riding your bicycle, wear a DIN-EN 1078 approved bicycle helmet.
Before you start riding, check that:
• The wheels are properly mounted.
• The brakes work properly.
- The saddle is at the correct height.
- The seat post is at the correct height.
- The seat post is at the correct height.
- The lights work properly.
- The gears work properly.
• The bolts, nuts and pedals are attached firmly. - The air pressure in the tyres is correct.
- The tread of the tyres is correct.
After an accident
After an accident or a fall, have your Koga dealer check your Koga bicycle thoroughly.
• A bent or deformed aluminium frame cannot be repaired.
• A slightly bent or deformed steel frame can be repaired.
• After an accident, carbon parts must be replaced entirely. Carbon parts can receive visible and invisible damage.
Accessories and equipment
You can mount extra accessories on your Koga bicycle. All parts that are mounted additionally on the bicycle must be suitable for the Koga bicycle. Therefore, use accessories only in consultation with your Koga dealer. Parts that do not fit can lead to damage or accidents.
KOGA
Handlebar bags and baskets
When you use handlebar bags or baskets, check that:
• the lights are not obstructed.
• cables are not jammed.
- the handlebar and the frame are not damaged.
• steering is not influenced.

Never carry more than 5 kg in handlebar bags or baskets.
Aluminium handlebars are not directly suitable for handlebar bags or baskets. Special attachment brackets are available for aluminium handlebars.
Child seats and trailers
Always consult your Koga dealer about the type of child seat or trailer that is suitable for your Koga bicycle. Always take your Koga bicycle along with you to your Koga dealer

• Buy only EN 14344 approved child seats.
- Riding with children has a significant effect on the cycling behaviour of the bicycle. The braking distance is always longer.
• Make sure no limbs can come between moving parts.
• Make sure fingers cannot come between suspension parts of the saddle.
- Never transport more weight on the luggage carrier than specified. It can result in the luggage carrier breaking and serious accidents.
• Children must always wear a helmet and a seat belt.
- Never leave children behind on a parked bicycle. First take the child from the bicycle and then put the bicycle on its stand.
- Never use more than one child seat on the bicycle.
- The Light Touring men's bicycles are not suitable for child seats
- Aluminium handlebars are not suitable for child seats.
• Children up to a maximum of 20 kg may be carried in child seats.
• Only cyclists at least 16 years of age may carry children.
Bicycle carriers
A number of types of bicycle carriers (on car, caravan, camper etc.) can damage your bicycle when mounting or transporting it. An incorrect mounting position or tightening the mounting construction too far can cause damage to the frame/front fork. The damage to the frame or fork can result it in it breaking.
Environment
Dispose of excess lubricants, cleaning agents and paints. Dispose of these agents as specified on their packaging and take local legislation into consideration. If you are discarding a bicycle, return it to your Koga dealer or dispose of it in accordance with local authority's.
Proof of ownership
Have your Koga dealer fill in the proof of ownership completely, and place his signature and business stamp.
Check that frame number, lock number, key number and chip number have been filled in. Store the proof of ownership carefully. It is also the guarantee.
The proof of ownership is unique and can therefore only be issued once.
Guarantee
You are entitled to 2 years guarantee on your Koga bicycle (Details page 22). You are also entitled to a lifetime guarantee for the frame against manufacturing faults. The guarantee period starts on the day of sale by the dealer. The guarantee is solely for the first owner of the Koga bicycle. The guarantee can never be transferred. Damage due to overdue maintenance is not covered by the guarantee. The full guarantee provisions can be found at the back of this instruction manual.
page 21

page 9
page 16
page 8
page 6

page 14
natural_image
Simple line drawing of a bicycle with no text or symbols
page 17
page 10page 18
page 14
page 20
page 22
Contents
KOGA
natural_image
Illustration of a hand gripping a cable with directional arrows indicating movement (no text or symbols)Handlebar
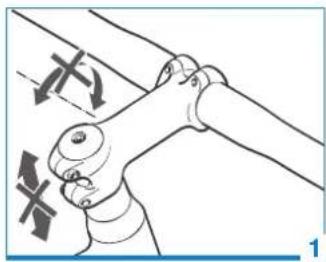
The position of the handlebar determines the riding comfort to a great extent. Most handlebars can be adjusted fully according to your wishes.
text_image
Diagram showing mechanical assembly with labeled components and directional arrows, including a cross mark and letter A.Adjusting the handlebar position

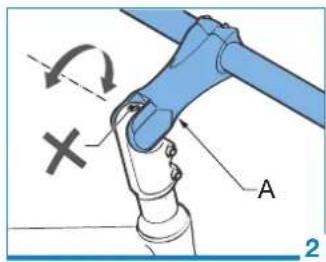
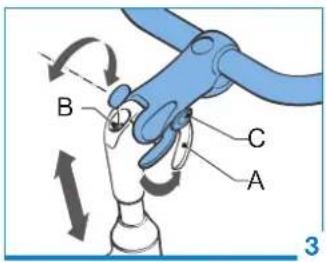
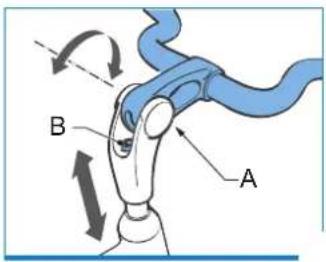
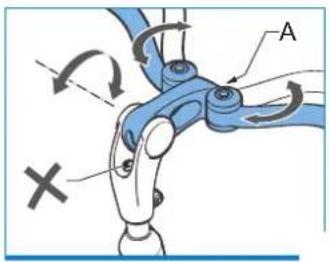
Check whether the illustration of the handlebar corresponds with the handlebar of your Koga bicycle.
- Pull out the pawl (only 3C).
- Loosen the screw (A).
- Pull out the caps (only 5C).
- Adjust the handlebar to the desired position.
- Push the caps in (only 5C).
- Tighten the screw (A).
text_image
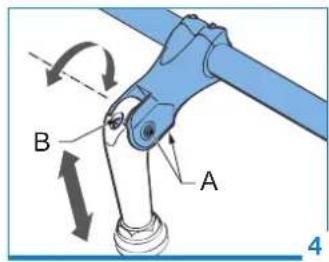
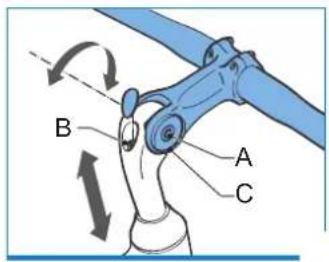
B C A 3Setting the handlebar height
- Loosen the screw (B).
- Adjust the handlebar to the desired height.
- Tighten the screw.
text_image
A B 4Maintenance
Regularly check for play in the headset.
- Apply the front brake.
- Push the bicycle forwards and backwards.
- If you feel play between the handlebar and the wheel, the headset must be adjusted again.
text_image
A B CRegularly check the bearing of the headset.
- Lift the bicycle.
- Turn the handlebar to the left and to the right.
- The handlebar should turn without effort and without jerking.
text_image
A B
An incorrectly adjusted headset or a headset with play can result in the front fork breaking.

Setting the headset requires experience and special tools.
Leave this job up to your Koga dealer.
text_image
Diagram illustrating robotic arm joint movement with labeled components A and X, showing rotational arrows and a cross symbol.
Please respect the recommended torque as stated on the item when fastening nuts and bolts. If not stated, please see the list on page 21.

www.koga.com
KOGA
text_image
A B 3/4 1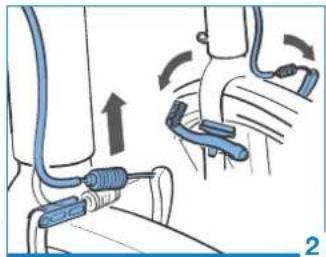
natural_image
Illustration of a medical procedure showing tubing placement and movement arrows (no text or symbols)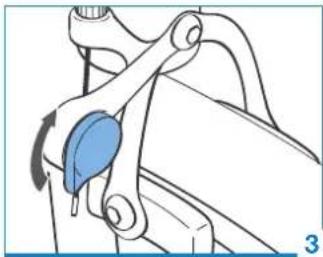
natural_image
Mechanical diagram showing a blue component being inserted into a bracket (no text or symbols visible)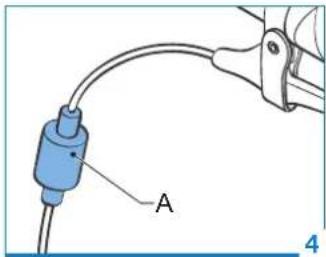
natural_image
Diagram of a blue electrical connector labeled 'A' connected to a wire, with no visible text or symbols beyond the label.Brakes
The left brake lever is for the front wheel.
The right brake lever is for the back wheel.
Familiarize yourself with how the brakes work.

Do a couple of brake tests before you start riding.

Always use an appropriate combination of rim and brake blocks.
Regularly check the operation of the brakes.
Adjustment
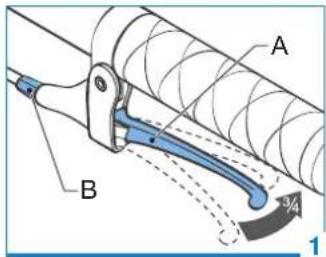
When the brake lever is pulled three-quarters of the way (1A), the braking power must be full.
Regularly check the wear indication of the brakes.
When the brakes wear out, the braking power can decrease.
- Release the brake lever.
- Adjust the brakes by turning the screw (1B).
- If the result of adjusting the screw (1B) is unsatisfactory, the brakes are probably worn out. Contact your Koga dealer.
Maintenance

Never use protective agents or lubricants on brake blocks or braking surfaces.

Never grease cables that have a protective Teflon layer.

After maintenance or adjustment of the brakes, always do a brake test.

Loosen the brakes before you take out the wheel (2 and 3).
Disc brakes
Disc brakes reach their full braking power after a certain running-in period.
Brake Power Controller
If you brake hard suddenly, the Brake Power Controller (4A) administers the braking power. This means you can brake more safely.

The Brake Power Controller is not an ABS system.
text_image
A A 1Saddle
The saddle is largely responsible for comfortable cycling. You can adjust the saddle entirely to your wishes.
Guidelines for a comfortable sitting position:
- Turn the pedal to the lowest position.
- The heel of your foot must be on the pedal.
- The toe of your other foot must touch the ground.
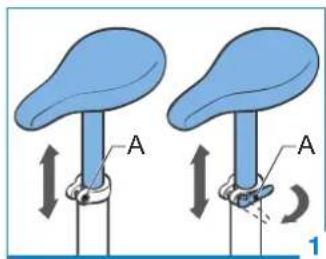
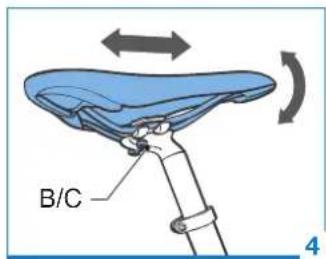
Adjusting saddle height
- Loosen the screw (A) or open the quick release (A).
- Adjust the height of the saddle.
- Tighten the screw or close the quick release.

Never move the seat post further than the safety marks on it.
Once a year, take the seat post out of the frame completely, to prevent the seat post from getting stuck in the frame.
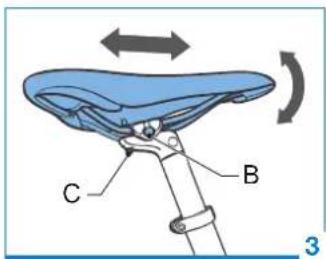
Adjusting the lengthwise position
- Loosen the Allen bolt (B)
- Adjust the position of the saddle forwards or backwards.
- Tighten the Allen bolt (B).
text_image
C B 3Adjusting saddle angle
- Loosen the Allen bolt (C).
- Adjust the saddle angle.
- Tighten the Allen bolt (C).

Please respect the recommended torque as stated on the item when fastening nuts and bolts. If not stated, please see the list on page 21.
Maintenance

Never change or remove the seat post or the seat post binder bolt.
Under normal use the saddle does not need extra maintenance.
text_image
B/C 4The saddle cover is subject to wear. The warranty does not include wear of the saddle cover. Replace the saddle when it wears out.
Leather saddles
Leather is a product of nature, and behaves naturally. Leather saddles can cause stains. We recommend to pay attention to this in your choice of clothing. Cover the leather saddle if the bicycle is stored outside.

Staining caused by leather saddles is not covered by the guarantee

www.koga.com
KOGA
text_image
B A 1Wheels
The wheels have quick release fittings that enable you to fit and remove wheels quickly. Make sure when dismounting the rear wheel that the chain is on the middle sprocket wheel on the front and on the smallest wheel on the rear. Also see page 8 for dismounting the brakes. Quick releases come in two models:
- Conventional quick release
- Clix quick release
Conventional quick release
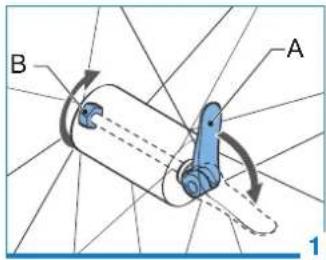
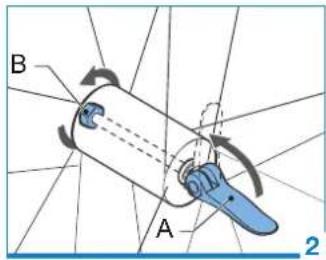
- Opening the quick release: 1. Flip the quick release lever (1A) fully open.
text_image
B A 2-
Loosen the adjustment nut (1B).
-
Remove the wheel
- Closing the quick release:
- Fit the wheel.
- Turn the adjustment nut clockwise to the desired clamping stress (2B).
- Flip the quick release lever fully closed (2A).
- Check that the quick release lever cannot be turned.

Closing the quick release lever requires so much force that you should need to use the palm of your hand.
If you don't need that much force to close it, turn the adjustment
text_image
A B 3nut (2B) half a turn clockwise. If the force required to close it is excessive, turn the adjustment nut (2B) half a turn anti-clockwise.

The levers of the quick releases are never located on the side of the chain.
Clix quick release
A Clix quick release is used for a number of models.

Clix quick releases are adjusted by the Koga dealer and do not need further adjustment.
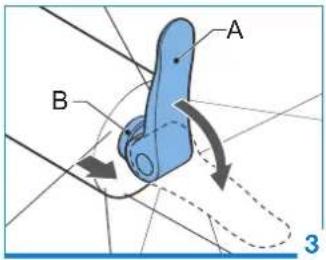
- Opening the Clix quick release: 1. Flip the quick release lever fully open (3A)..
text_image
B A 4- Pull the ring (3B) towards the lever.
- Remove the wheel.
• Closing the Clix quick release: - Fit the wheel.
- Flip the quick release lever fully closed (3A).
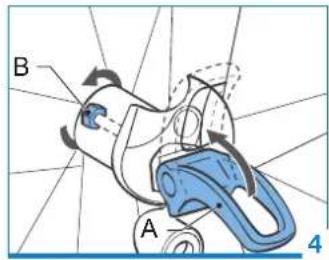
Q-Guard quick release
A Q-Guard quick release is used for a number for the back wheel of a number of models.
The handle of this quick release also functions as a protective bracket for the rear derailleur.
Open Q-Guard quick release:
- Flip the quick release lever (4A) fully open.
- Remove the wheel.
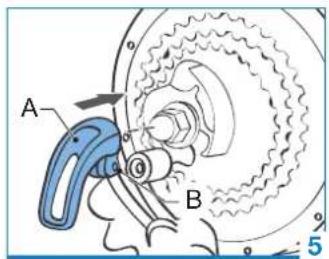
Q-Guard snelspanner sluiten:
- Fit the wheel.
text_image
A B 5- Turn the adjustment nut clockwise to the desired clamping stress (4B).
- Turn the quick release lever (4A) so that it flips exactly vertically downward,
- Flip the quick release lever (4A) fully closed.

Flip the Q-Guard quick release vertically downward, fully shut. Only in this position will the quick release lever also function as protection.
The Q-Guard's quick release lever is located at the side of the derailleur.
text_image
A 6E-Guard
An 'E-Guard' rear derailleur protector (5A) is fitted on some Koga E-bike models.
You can fit this by pushing the E-Guard onto the rear wheel axle and securing it with the Allen bolt (5B).
Tires
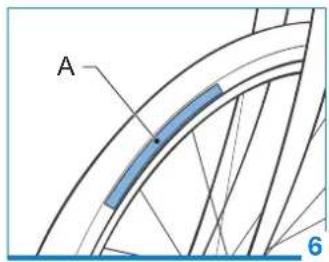
Never pump the tyre harder than the maximum allowable air pressure. The maximum allowable air pressure is shown on the outer tyre (6A).
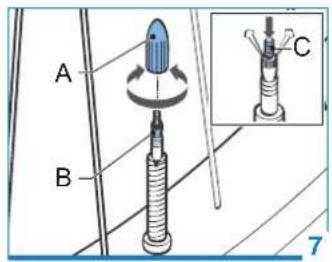
Almost all Koga bicycles are fitted with Sclaverand or French valves (7). A few Koga bicycles have Dunlop, or normal, valves. Adapters are available for sale.
text_image
A B C 7Pumping the tyres
- Remove the valve cap (7A).
- Loosen the nut (7B).
- Press the top of the valve briefly and allow a little air to escape (7C).
- Pump the tyre to the correct air pressure.

The air pressure must be maximum for bicycles with suspension.
- Tighten the nut (7B).
- Replace the valve cap (7A)
Maintenance
Regularly check the tyre pressure

If the tyre is too soft, it can cause irreparable damage to the tyre and the rim.
Regularly check the tread depth of the tyres.

www.koga.com
KOGA
text_image
A 1Rims
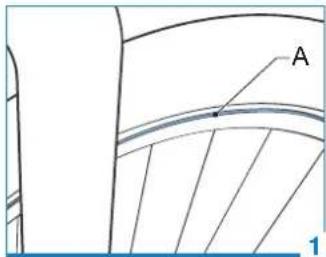
Most rims have a wear indicator (1A). If the wear indicator becomes invisible, the rim must be replaced.

A worn rim can burst due to excessive tyre pressure.
Spokes

Setting the spokes requires experience and special tools. Leave this job up to your Koga dealer.
text_image
A B C D 2Tyre trouble
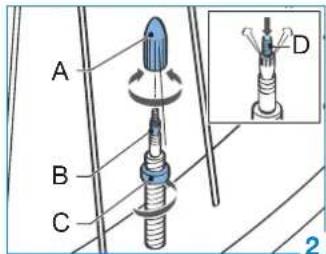
- Remove the valve cap (2A).
- Loosen the nut (2B).
- Press on the top of the valve (1D) and release all the air from the tyre.
- Unscrew the nut (2C) from the valve.
text_image
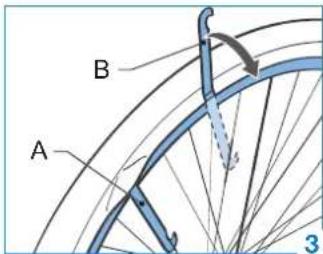
A B 3- Insert a tyre lever (3A) between the rim and the outer tyre.
- Lift the bead of the outer tyre over the rim.
- Place a second tyre lever (3B) 10 cm further along between the rim and the outer tyre.
- Lift the bead of the outer tyre over the rim.
natural_image
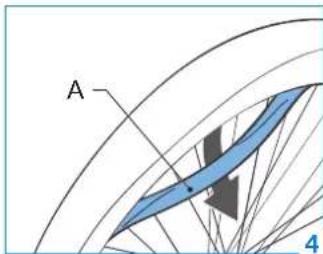
Abstract diagram with curved lines and a blue shaded region, labeled 'A' and '4' (no text or symbols beyond labels)- Remove the outer tyre entirely from the rim on one side.
- Remove the inner tube (4A) from the outer tyre.
text_image
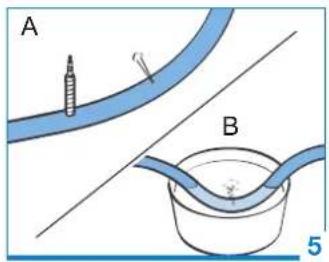
A B 5- Slightly inflate the inner tube.
- Find the puncture in the inner tube (5A). If desired, you can use a container of water for this purpose (5B).
- Dry the tube and mark the puncture with a pencil.
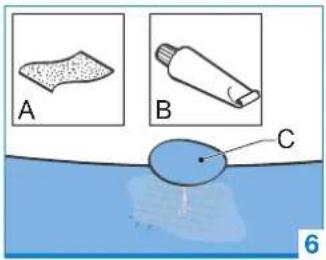
text_image
A B C 6- Lightly sandpaper the place of the puncture (6A) and apply some glue (6B) to the spot.
- Wait 20 seconds and then put the patch (6C) on the glue.
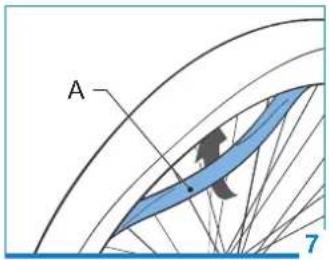
natural_image
Diagram showing a blue shaded region with an arrow labeled 'A' and a number '7' at the bottom (no text or symbols within the diagram itself)- Place the inner tube (7A) in the outer tyre.
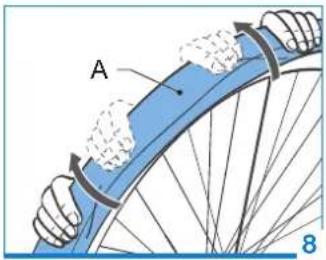
text_image
A 8- Turn the outer tyre back on to the rim (8). You need to apply some extra force to get the last part of the outer tyre back on.
KOGA
text_image
A 30° -25° 1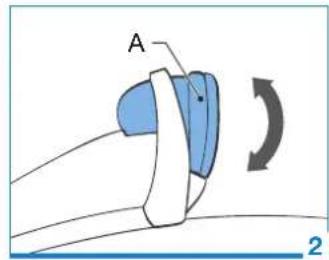
natural_image
Diagram of a mechanical or fluidic component with labeled point A and rotational arrow (no text or symbols beyond labels)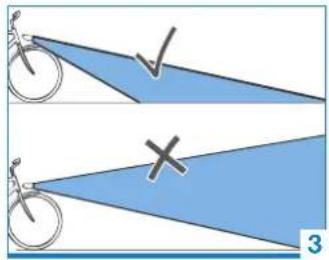
text_image
Diagram showing two bicycle positions with checkmark and cross symbols indicating correct and incorrect matches, labeled with number 3.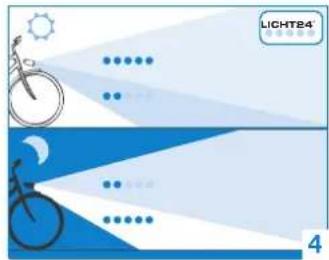
text_image
LICHT84 4Lights

Use lights that work properly in all cases of poor visibility.

Fix defective lights immediately, or have your Koga dealer do this job.

LED lights can dazzle. Take account of other road users.
Dynamo-powered lights
With dynamo-powered lights, the front and back lights work at the same time.
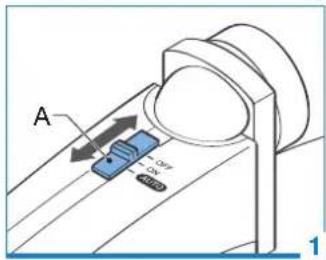
The light switch (1A) has 3 settings:
• ON: lights are on.
• OFF: lights are off.
- AUTO: The lighting automatically switches on when it gets dark or automatically switches between the day and night position.
You can adjust the direction of the light beam (2A) with most light units.

Set the position of the lights so that you don't blind fellow road users (3).
LICHT24®
By constant light see better and be seen (4).
• Day mode: other road users see you.
- Daytime lighting = maximum.
- Main lighting = dimmed.
• Night mode: maximum lighting for roads.
- Daytime lighting = dimmed.
- Main lighting = maximum.
Lights come as:
• dynamo-powered lights
- battery-powered lights
text_image
A 5Battery-powered lights
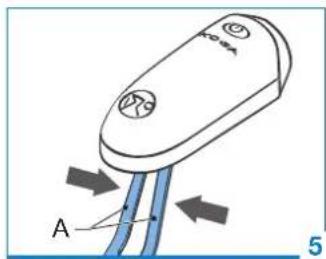
Battery-operated lighting units have on/off-buttons.
Replace batteries
- Press the clamp ends towards each other (5A).
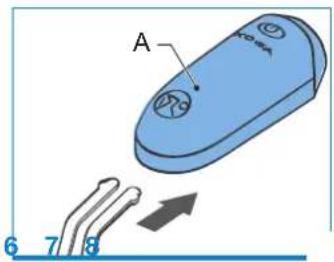
- Take the light unit from the bracket (6A).
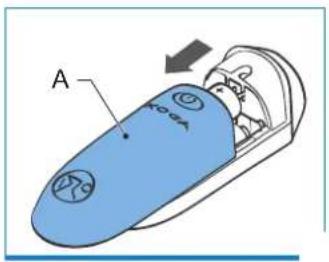
- Slide the cap with the Koga logo backwards (7A).
- Replace all batteries.
text_image
A 6 7 8For replacing the batteries of the rear lamp, slightly bend down the red tab on the bottom side (8A) and remove the unit from the rear plate.

Dispose of (empty) batteries in accordance with local legislation.
text_image
A V10 V20
text_image
A V10 V20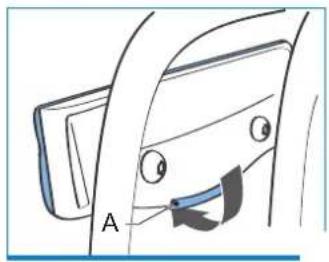
natural_image
Simple line drawing of a car's seat with a band and arrow, no text or symbols present
www.koga.com
KOGA
natural_image
Diagram showing a mechanical component with an arrow indicating motion, and a magnified inset of a blue cylindrical component (no text or symbols)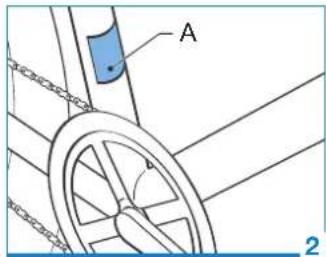
text_image
A θ 2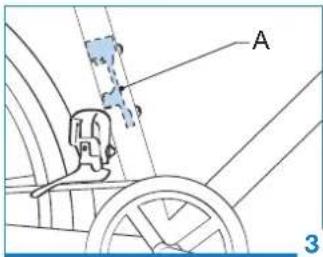
text_image
A 3Frame
The frame can end up bent after an accident or a fall. If you are uncertain, have your Koga dealer check the frame. In some cases the frame can be straightened.

Never ride bicycle with a frame that has cracks or is visibly bent. Take your bicycle to a Koga dealer.
Maintenance
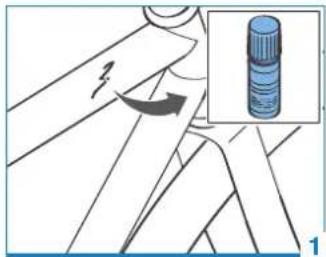
Treat paint damage and rust spots immediately with original Koga paint pens (1A). Keep the frame clean. Regularly polish the frame with car wax or cleaning oil.

Always remove oil and grease residue from the paint.
After cycling on roads with salt on them, fully rinse your bicycle with cold water. Never use warm water because this encourages the corrosive working.
Perspiration

Perspiration is highly conducive to corrosion.
Clean and treat the places that are exposed to perspiration extra.

Corrosion caused by perspiration is not covered by the guarantee.
Maintenance of polished (frame) surface
Polished surfaces are provided with a durable blank lacquer layer. Stone chippings or user damage can cause damage to the blank lacquer, which can lead to corrosion in the long term. It is therefore of great importance that you regularly check your frame for (blank) lacquer damage and touch it up where necessary. It is important to apply sufficient lacquer; generously on the place of the damage so that it is fully closed off from exposure to the weather.
A blank lacquer paint pen is available from your Koga dealer.
Frame number
The frame number can be found on the frame sticker (2A).
Di2 electronic shifting system
Road racing bicycles featuring the Shimano Di2 electronic shifting system with an internal battery have been developed with a carrier at the water bottle basements at the inside of the seat tube. The battery is mounted into this carrier. This battery carrier is positioned and mounted with an M5 stud. Charging the battery is carried out through the control unit located at the stem.
text_image
AChain and toothed belt drive
Chain
Make sure your chain is sufficiently lubricated.

A poorly lubricated chain rusts extremely quickly and is subject to excessive wear.

Never use too much grease or lubricant. Dirt and dust adhere well to them.
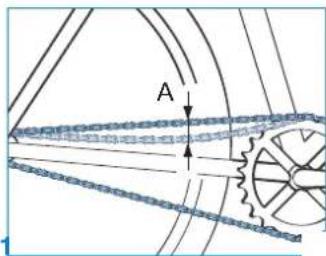
Regularly check the play on the chain. The play on the top part of the chain may not exceed 2 cm (1A).

Replacing and tensioning chains requires special tools. Leave this job up to your Koga dealer.
Toothed belt drive
Maintenance
Clear off rough dirt regularly, particularly from the toothed side of the belt.
Do not lubricate the belt.

The working life and proper functioning of the belt can be affected by:
- twisting
- folding, kinking or rolling up
- Turning inside out
- Knotting
- Excessive dirt
- Objects coming between the teeth of the drive belt (pebbles, twigs etc.)
Replacement of the toothed belt drive
With normal use and regular cleaning, the toothed belt has a long working life. We recommend that if it is ever necessary, belt replacement is carried out only by a Selected Koga Dealer.

www.koga.com
KOGA
text_image
A 1Pedals
Click and Combi pedals
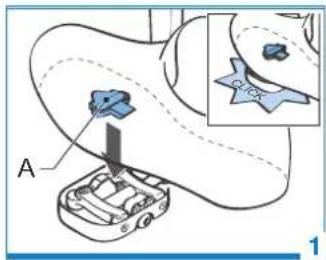
Click pedals work with special cycling shoes. The cycling shoes have a special shoe plate (1A) that clicks into place in the Click pedals. This improves the transmission of energy on the pedals.
A Combi pedal is a normal pedal on one side, suitable for normal shoes, and a Click pedal on the other side, suitable for the special cycling shoes
natural_image
Diagram of a mechanical device inside a curved gear or cam, showing internal components and motion arrows (no text or symbols)Adjustments and usage
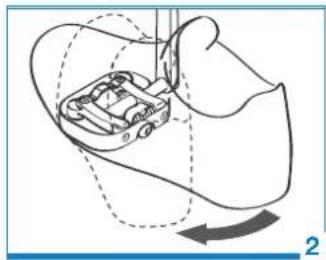
Clicking in the shoe.
- Place your foot on the Click pedal.
- Push your foot on the pedal (1).
- The shoe attaches firmly to the Click pedal (1) with a clearly audible click.
Clicking out the shoe.
- Turn your heel outwards (2).
- The shoe slips out of the Click pedal.

Become familiar with how the Click pedals work before you start cycling.

text_image
B A 3The position of the shoe plates on the shoes can often be adjusted (3B).
Tighten or loosen the screw (3A) to adjust the gripping power of the Click pedal.

Always turn the screws the same number of times on each pedal.

Always turn the screws the same number of times on each pedals.
Maintenance
Regularly clean the pedals. After every ride, clean the clamping mechanism of Click pedals.

Regularly clean the pedals. After every ride, clean the clamping mechanism of Click pedal.
flowchart
graph TD
    A["3 2 1"] --> C["1"]
    B["12345676"] --> C["1"]
    C --> D["2"]
    C --> E["3"]
    C --> F["4"]
    C --> G["5"]
    C --> H["6"]
    C --> I["7"]
    C --> J["8"]
    D --> K["1"]
    E --> L["2"]
    F --> M["3"]
    G --> N["4"]
    H --> O["5"]
    I --> P["6"]
    J --> Q["7"]
flowchart
graph TD
    A["3 2 1"] --> B["..."]
    C["72345678"] --> D["..."]
    B -.-> D
    style A fill:#f9f,stroke:#333
    style C fill:#f9f,stroke:#333
    style B fill:#ccf,stroke:#333
    style D fill:#ccf,stroke:#333
    X below B
Crank axle
Regularly check the crank axle for play.
- Regularly check the crank axle for play.
- You must not feel any play.

If there is some play on the crank axle, it can result in damage to the frame.

Tightening the crank axle requires special tools. Leave this job up to your Koga dealer.
Gears
The gears are used to shift the gear ratio as desired.
Hub gears
The right lever operates the hub gears.

Stop pedalling when you change gears.

Setting the hub gear requires experience and special tools.
Leave this job up to your Koga dealer.
Derailleur gears
The left lever operates the front chain rings.
The right lever operates the back chain rings.

Continue pedalling lightly while you switch gears, but do not apply force to the pedals.

When switching gears, never pedal backwards.

Never operate both gear levers at the same time.
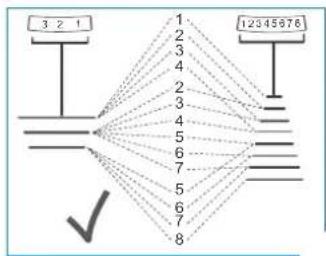
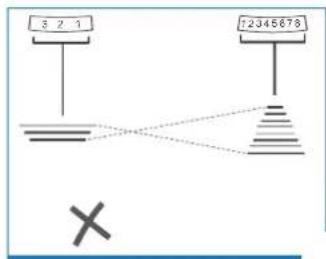
Use gears in such a way that the chain runs diagonally as little as possible (1). A chain that runs at too great an angle (2) will wear excessively.
Maintenance
If gear shifting does not go smoothly, have your Koga dealer adjust your gears.

www.koga.com
KOGA
text_image
A B 1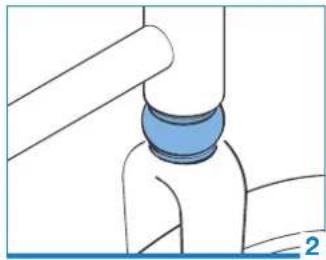
natural_image
Diagram of a mechanical joint or connector with blue circular component, no visible text or symbolsFront fork

Never cycle with a damaged or bent front fork. Never try to repair a front fork or bend it back into shape.
Front suspension fork
The front suspension fork comes in two models:
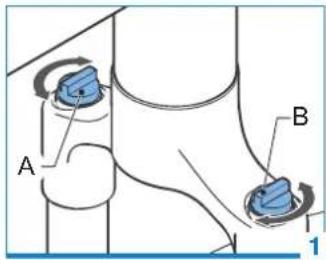
• double suspension front fork (1)
• Koga FeatherShock front fork (2)
Adjusting the double suspension front fork:
- Turn the knob (1A) or change air pressure depending on type of fork to set the stiffness of the spring.
- Turn the knob (1B) to fix or release the spring (lock-out).
The brochure of the front suspension fork is supplied standard with the Koga bicycle.
Consult the appropriate brochure about adjustment and maintenance.
Minor play is needed for smooth shock absorption, this is within tolerance and safe.
The FeatherShock front fork can not be adjusted manually. Spring stiffness can be adjusted by your Koga-dealer. No manual is supplied for the FeatherShock front fork.
Maintenance
Keep the front suspension fork clean.

Repairs to suspension elements require experience and special tools. Leave this job up to your Koga dealer.
natural_image
Technical line drawing of a metal truss structure with labeled component A (no text or symbols beyond label)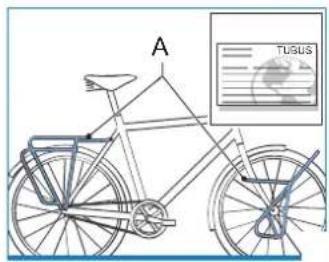
text_image
A TUSUS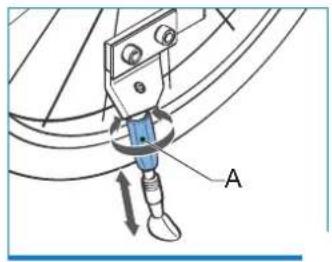
natural_image
Mechanical assembly diagram showing a robotic arm with labeled component A (no text or symbols beyond label)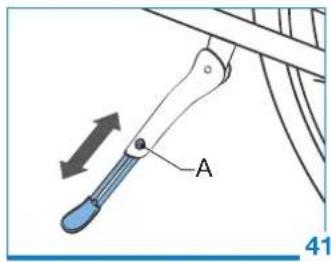
text_image
A 412
Luggage carrier
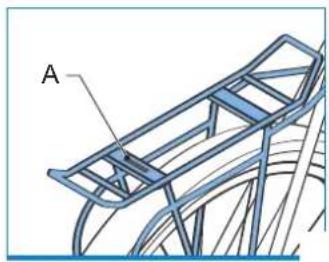
The maximum load of the luggage carrier is engraved on the carrier (1A).

Never transport more weight on the luggage carrier than specified. That can result in the luggage carrier breaking and serious accidents.

Riding with luggage has a significant effect on the cycling behaviour of the bicycle. The braking distance is always longer.

Make sure luggage does not protrude and cannot come between moving parts of your Koga bicycle.

Using panniers can damage the rear carrier rack. If protective tape (available via your Koga dealer) is not applied to the rack, Koga can accept no liability for any resulting damage.
TUBUS carriers
The Trekking models come standard with TUBUS front and back carriers.
Register your TUBUS front and back carriers for a 3-year guarantee on defects and for worldwide service (2A). The registration form is in the bag you received with your Koga bicycle. Warranty periods can be found on the Tubus website (www.tubus.com).
Stand

Never mount your bicycle while it is parked on the stand.
Always park your bicycle out of the wind on a flat surface.
Lowrider stand
Certain models have a lowrider stand (3) mounted on the luggage carrier of the front wheel. Use the lowrider stand if the bicycle is parked and there is luggage on the front wheel.
Turn the nut (3A) to adjust the length of the lowrider stand.
Adjustable stand
Adjust the stand:
- Loosen the screw (4A).
- Adjust the length of the stand.
- Tighten the screw.

www.koga.com
KOGA
Maintenance
Regularly clean your Koga bicycle. This can prevent unnecessary wear and/or damage and keeps your Koga bicycle in good condition. Be careful when cleaning frames with matt lacquer. Excessive cleaning/polishing could cause shimmering.
To maintain your bicycle you do need some knowledge of and experience in bicycle maintenance.
| When Check Measure | ||
| After every ride in the rain | Chain Brakes Gears | Clean and grease Clean and grease Clean and dry |
| 100 km service at your Koga dealer | ||
| 300-500 km | Chain Chain rings Back chain rings Play in headset | Clean and grease Clean and grease Clean and grease Service at your Koga dealer |
| 1.000 km Service at your Koga dealer | ||
| 3.000 km Service at your Koga dealer | ||

Always use the appropriate tools for maintenance. If in doubt, leave the work up to your Koga dealer.
Regardless of the number of kilometres ridden, it is sensible to check various parts regularly according to the table below.
| Part Chek Instruction | ||
| Handlebar Play in headset bearings of headset | page. 6 | |
| Breaks Operation of brakes Wear in brakes | page. 8 | |
| Wheels Tyre pressure Tread depth of tyres Wear of rims | page. 10+11 | |
| Lights Operation of lights page. 13 | ||
| Frame Paint damage corrosion page. 14 | ||
| Chain Play in chain Lubrication of chain | page. 15 | |
| Pedals Cleanness Functioning of Click system | page. 16 | |
| Gears Operation and switching behaviour | page. 17 | |
| Front suspension fork Operation contamination | page. 18 | |
| Ring lock Contamination and lubrication | check website manufacturer | |
Tools and aids
The following aids can be useful for maintenance:
• Koga tool
• Stiff brush and/or toothbrush
- Flannel cloth
- Warm water with dishwashing liquid. However, in case of dirt from brine, do not use warm water.
• Special degreasers and cleaning agents
- Thick shoelace

• Never use petrol as a cleaning agent.
- Never use too much grease or lubricant. Dirt and dust adhere well to them.
- Never use a high pressure cleaner to clean your Koga bicycle.
- Never replace bolts or nuts with randomly chosen other bolts and nuts. Leave this job up to your Koga dealer.
- Protect non-stainless steel bolts and nuts against corrosion.
Technical data
Maximum allowable load per model:
| Model | max. load*[kg] |
| MTB/RACE 110 | |
| Founder-S 110 | |
| Light Touring 120 | |
| Comfort 120 | |
| Electric Hybrid 130 | |
| Trekking 140 | |
| Tandem 200 |
* Maximum weight is bicycle+cyclist and luggage!
Torques

Always handle to the specified tightening torque for the part.
Unless otherwise indicated, the following tightening torques apply.
| Part | Torque [Nm] |
| Handle stem bolt - cone 15 - 20 | |
| Brake blocks 5 - 6 | |
| Seat post binder bolt 5 - 7 | |
| Pedals 30 | |
| Wheel nut front* 20 - 25 | |
| Wheel nut front* 25 - 30 | |
| Bolt M8 Lodo F3 rear carrier 15 | |
* Does not apply to torque of E-bike engine nuts. Ask your dealer for correct adjustment.

Stainless steel connections are used where possible.
The strength properties of stainless steel mean this material cannot be used everywhere.

www.koga.com
KOGA
Maintenance, usage and guarantee conditions for Koga wheel sets
Maintenance
- Regularly disassemble the quick release, clean and grease the shaft (Also see Koga instruction booklet p. 10)
- Never clean the wheels with a pressure washer. Only use water with detergent. Do not use an abrasive sponge. Dry off the wheel after washing it or, or rain, in order to prevent oxidation.
- In order to retain optimal braking power, avoid traces of oil or grease etc. on the brake surface.
- Regularly clean the brake surface of your rims with grease-free products.
- Check the brake blocks for foreign particles (stones, bits of metal etc.) Also check the state of the brake blocks and replace them regularly.
- When the brake blocks make contact with a new rim, this may cause noise. This noise will disappear after a certain running in period.
Important Information for your safety during use
• Make no adjustments whatsoever to your wheel
- Check the correct functioning of the quick releases before every ride.
- Every wheel is only intended for the specifically indicated usage. For example: a race wheel for the road, MTB wheel for Cross Country circuit, etc.
- Check the degree of wear on the brake walls. Replace the rim if it is worn. (Also see Koga instruction booklet p. 11) Inspect the inside of the rim (underneath the rim ribbon) and the outside of the rim for traces of metal fatigue or wear: worn in brake walls, tears in the side walls or at the spoke nipple.
- Respect the prescribed spoke tension. A different spoke tension can create tension concentrations or can weaken it. Contact your recognised Koga dealer for this.
- Consult your Koga dealer for every defect of your product.
- Not respecting the recommendations is at the user's risk and will cancel the validity of Koga's guarantee.
Koga guarantee
- Koga are guaranteed for 2 years, measured from the purchase date at a recognised Koga dealer.
- Koga's only obligation will be the replacement of the product (Koga reserves the right to replace the defective product with a comparable product from its range) or the defective part.
- For all else, we refer to the general guarantee terms and conditions for Koga bicycles.
Guarantee conditions for Koga bicycles
Article 1 Guarantee
1.1 Koga provides a guarantee only to the first owner of the bicycle in question; the second or following owner can only call in the party from whom the bicycle was purchased in the event of damage.
1.2 Guarantee lapses in accordance with the provisions of articles 3.1 and 5.1.
1.3 The guarantee cannot be transferred.
Article 2 Guarantee period
2.1 Every Koga bicycle has a limited life, the so-called useable life cycle. The duration of the useable life cycle of bicycles depends on the type of frame, the way in which and the circumstances under which the bicycle is ridden and the care/maintenance the bicycle receives. The duration of the useable life cycle is not equal to the duration of the lifetime guarantee period. The lifetime guarantee period is established on the basis of the duration of the useable life cycle of the bicycle. This cycle depends to a great extent on various factors; these factors are stated in article 2.5. Koga sets this cycle at an average of 25 years. Koga frames and non-suspension front forks have a lifetime guarantee on the absence of construction and/or material defects, this guarantee applying to all aluminium, Scandium and chrome-molybdenum frames and non-suspension front forks. The warranty period for carbon frames is 10 years. Spring frames have a warranty period of 3 years. Frames and forks that are or have been used in (professional or semi-professional) races have been excluded from the warranty. The above-mentioned warranty periods apply to the current product range. The warranty periods for our earlier products ranges are to be found on our website (www.koga.com) or through the dealer.
2.2 For front suspension forks, dampers and all other parts, except for the parts mentioned in paragraphs 1 and 4 of this article, there is a guarantee on the absence of construction and/or material defects for a period of 2 years.
2.3 For paintwork of frame and non-suspension front forks there is a guarantee period of 10 years for the absence of corrosion and oxidation from the inside, if the bicycle is well maintained. For other paintwork and chrome parts there is a guarantee period of 2 years for the absence of corrosion and oxidation from the inside, if the bicycle is well maintained.
2.4 No guarantee is given for parts subject to wear, such as tyres, chain, chain rings, back gear rings, cables and brake blocks, unless there is a question of construction and/or material defects.
2.5 Among other things, the following factors or a combination of these factors can influence the useable life cycle of a bicycle: use of the bicycle for competitions and intensive training, use of the bicycle for purposes for which it was not designed, excessive weight, riding in all weather conditions or different climates, geographical circumstances. Koga recommends all Koga bicycles be checked regularly by a recognized Koga dealer for signs of potential problems such as corrosion, break, deformation and improper use.
These preventative checks are important for preventing accidents and injuries. In principle, service checks are not free of charge.
Article 3 Guarantee exclusions
3.1 The guarantee lapses in the following cases:
a. Improper and/or careless use of the bicycle and use that does not correspond with its intended use;
b. The bicycle has not been maintained in accordance with the user manual;
c. Technical repairs have not been performed in a competent manner;
d. Parts mounted at a later date do not correspond with the technical specification of the bicycle in question or have been mounted incorrectly;
e. The bicycle is used for hire or made available to more than one unspecified person in other ways.
3.2 Furthermore, Koga B.V. expressly disclaims any responsibility for damage to (parts of) the bicycle as a result of:
a. Incorrect adjustment/tensioning of the handlebar, saddle, seat post, derailleur set, brakes, quick release of the derailleur set, brakes, quick release of the wheels and tyres; and mounting/transporting it on bicycle carrier. b. Not replacing parts in time such as brake or derailleur cables, brake blocks, tyres, chain and gear wheels;
c. Climatological influences such as normal weathering of the lacquer of corrosion as a consequence of (lacquer) damage.
Article 4 Guarantee parts
4.1 During the guarantee period, all parts for which Koga B.V. has established that there is a question of material and/or construction defect, will be repaired or reimbursed at the discretion of Koga B.V.
4.2 Any expenses of mounting or disassembly are at the expense of the owner.
4.3 Contrary to the provisions of the previous paragraph, for frames and front forks the labour wages are at the expense of the manufacturer during 3 years after the date of purchase.
4.3.1 Costs of transport of the bicycle and/or parts from and to Koga B.V. are at the expense of the owner.
4.3.2 If a certain part qualifies for guarantee, this part will be replaced by a new part or equivalent part. Koga B.V. cannot, however, guarantee that frame types or colours remain available.
4.4 Parts that no longer fit technically, or are no longer available for the replacement guarantee frame are delivered free of charge in the first three years after the date of purchase. After this period, the replacement parts are charged to the customer.
Article 5 Submitting a claim
5.1 Claims under this guarantee must – with presentation of the bicycle for inspection – be submitted via the Koga dealer from whom the bicycle was purchased. At the same time, the proof of purchase and/or the proof of ownership provided with the bicycle must be handed over to the dealer.
5.2 If the owner has moved house or the dealer is no longer available, Koga B.V. will, if requested, provide information about the nearest Koga dealer.
Article 6 Liability
6.1 A guarantee claim accepted by Koga B.V. does not automatically mean that Koga B.V. also assumes responsibility for any damage suffered. The liability of Koga B.V. is confined to what is set out in these guarantee conditions. Any liability of Koga B.V. for consequential damage is expressly excluded. The provisions of this condition do not apply if and insofar as they arise from mandatory statutory provisions.

www.koga.com