Velocity Duo X2 - Régulateur Apricorn - Kostenlose Bedienungsanleitung
Finden Sie kostenlos die Bedienungsanleitung des Geräts Velocity Duo X2 Apricorn als PDF.


Benutzerfragen zu Velocity Duo X2 Apricorn
0 Frage zu diesem Gerät. Beantworten Sie die, die Sie kennen, oder stellen Sie Ihre eigene.
Eine neue Frage zu diesem Gerät stellen
Laden Sie die Anleitung für Ihr Régulateur kostenlos im PDF-Format! Finden Sie Ihr Handbuch Velocity Duo X2 - Apricorn und nehmen Sie Ihr elektronisches Gerät wieder in die Hand. Auf dieser Seite sind alle Dokumente veröffentlicht, die für die Verwendung Ihres Geräts notwendig sind. Velocity Duo X2 von der Marke Apricorn.
BEDIENUNGSANLEITUNG Velocity Duo X2 Apricorn
Velocity Duo Quick Start Guide
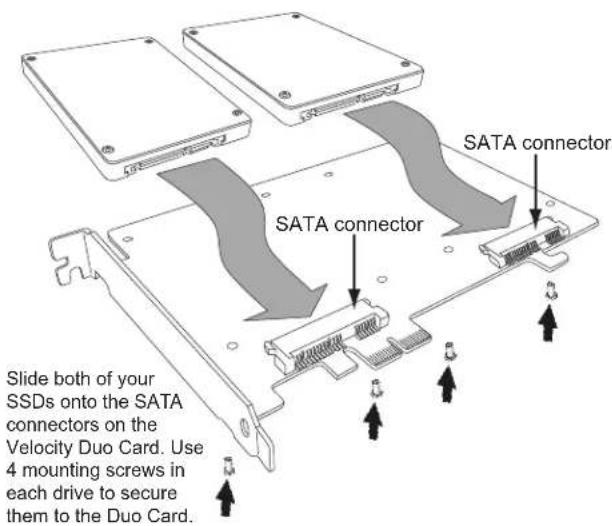
Connecting your SSD to the Velocity DUO Card
text_image
SATA connector SATA connector Slide both of your SSDs onto the SATA connectors on the Velocity Duo Card. Use 4 mounting screws in each drive to secure them to the Duo Card.
To prevent ESD (Electrostatic Discharge) damage
IMPORTANT HANDLING INFORMATION
Use an ESD wrist strap or discharge static electricity by touching a grounded bare metal surface before handling, installing, and removing the Velocity Duo. Observe proper ESD grounding techniques. Store your HDD or SSD in an anti-static bag until you are ready to install it in the system. When installing and removing the Velocity Duo Card hold by the edge of the printed circuit board (PCB), and avoid touching components including connectors.

NOTE: Windows XP users and those using the Velocity Duo with a boot disk (i.e. with OS already installed)
Before connecting your SSD to the Velocity Duo, please refer to the directions below for installation of Windows drivers.
Installing the Velocity Duo in your desktop computer
- Power-down the system and physically remove the power cord(s) from the system.
- Remove the cover from the system's chassis, following instructions provided by the manufacturer.
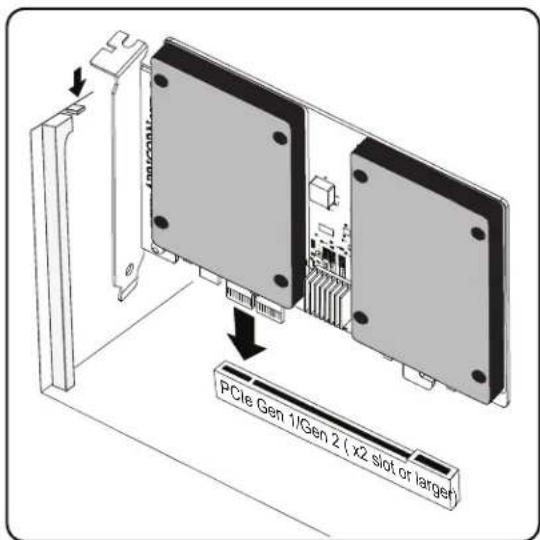
- Select an available PCIe Gen 1 / Gen 2 (x2, x4, x8 or x16) slot and insert the Velocity Duo card into the slot, as shown in Figure 1. (NOTE: x2 slots are very rare in desktop systems, typical installation will use a x4 slot).
- Hold the Velocity Duo card at the edges and press down gently into place.
- Secure the Velocity Duo metal bracket to the system chassis by tightening the slot screw.
- After the Velocity Duo is installed, replace the chassis cover, reconnect the power cord(s) and boot the computer.
- Follow the directions below to complete your upgrade.
Figure 1. Installing the Velocity Duo on PCIe Gen 1 / Gen 2 slot
text_image
PCIe Gen 1/Gen 2 ( x2 slot or larger )To ensure optimal RAID □ functionality, both of the SSDs on the Velocity Duo must be identical (same brand, same firmware revision and capacity) Additionally, prior to data cloning, each drive must be □ oered out□ using a disk utility such as Gparted, Parted □agic, or a utility native to your OS. Since RAID □ is strictly a performance-enhancing array with data being striped across 2 drives, if one of those drives should fail, all data on both will be lost. When using Velocity Duo with RAID □ configuration, regular backup is recommended to minimi □e data loss.
Installation of drivers and initial setup of the Velocity Duo
Windows - Before booting any version of Windows from the Velocity Duo, Windows must detect and install drivers for the new storage controller. If you installed new blank SSDs on the Velocity Duo (directions above) AND are running Windows 7 or Vista, drivers will be automatically installed. If you are installing a boot drive (i.e. with OS already installed) to the Velocity Duo or are running Windows XP, please ensure that Windows is booted one time with the Velocity Duo card installed in the computer but without the SSDs connected. After the drivers are installed, the SSDs may be attached to the Velocity Duo.
- Windows XP owners need to download drivers from www.apricorn.com/downloads/VelDuo_drivers.zip
- Windows Vista and 7 will automatically detect and install the drivers from Windows Update.
Mac - Hardware support for the Velocity Duo product family is built into the Mac OSX, so no driver install is necessary. Mac OSX can be booted from any drive attached to the Velocity Duo.
If the Velocity Duo drive is not detected, check the drive connections and ensure that the velocity Duo is installed correctly in the PCIe slot.
Cloning your hard drive using Apricorn's EZ Gig for Windows
PC CLONING SOFTWARE DOWNLOAD
Apricorn EZ Gig Software for the Velocity Duo www.apricorn.com/products/software/ezgig.html
Apricorn's innovative EZ Gig allows you to clone your entire hard drive or deselect data files from the cloning process to save space, giving you the option to run your OS and applications from a fast, smaller SSD boot drive, while keeping your documents and media files on your original hard drive. As EZ Gig is able to run from inside the Windows operating system, simply download EZ Gig from Apricorn's website (apricorn.com/products/software/ezgig.html) and run the program. The EZ Gig wizard will guide you through the cloning process in a few simple steps.
For complete instructions go to Apricorn's website to download the Velocity Duo manual.
- After downloading EZ Gig from Apricorn's site, open the EZ Gig program or double click on the EZ Gig icon to get started. Click "Run EZ Gig" from the EZ Gig Start-up Options window.
- Select "Let's Get Started" from the EZ Gig main screen. EZ Gig will then scan for connected drives.
Note: The Velocity Duo card must be installed for EZ Gig to run. EZ Gig will only run with Apricorn Upgrade devices.
- The EZ Gig Wizard will then ask you to choose your Source drive and your Destination drive. Choose your internal drive as the Source and the Velocity Duo drive as your Destination drive.
- Once the Source and Destination drives are selected, EZ Gig will give you the option of cloning your entire system or deselecting data files from the cloning process to save space. Make your selection then click "Start Clone."
- Once the clone is complete, you can boot your computer from the new drive. Please refer to the directions below.

Note: Do not turn your computer of or allow your computer to sleep during the cloning process. Let the process continue until you see the congratulations screen. When the congratulations screen appears, select "Quit EZ Gig" and then turn your computer.
Changing the boot drive on your PC
Once you have cloned your system to your Velocity Duo drive, you have two options.
- Remove your original drive, thereby forcing your system to boot from the Velocity Duo drive.
- Go into your system's BIOS and change your boot order to the Velocity Duo drive, keeping your original drive for storage.
Entering your computer's BIOS to change the boot order is dependent on your particular system. For directions that apply to your particular system, please refer to your computer's product manual.
Cloning your hard drive using Apple's Built-in Disk Utility
Starting in Mac OSX 10.4 it is possible to use the Disk Utility application to perform a Restore operation of the Boot disk other disk. Starting in OSX 10.7 this operation needs to be performed while booted in Recovery mode, but the process is still the same. On Disk Utility from Applications / Utilities / Disk Utility. Select the Restore tab located at the top of the application window. Carefuling your original boot volume to the Source field, and then drag the new SSD mounted to the Velocity Duo to the Destination field. Click the Restoration and the process will begin. Once the process has finished you will quit the Disk Utility application, and open the System Preference for the Startup Disk preference pane to choose your new Velocity Duo as the startup disk. Reboot the Mac and the OS will start from the new dis
Free Tech Support
Need help? Download product manuals, checkout FAQs and set up questions at www.apricorn.com
Apricorn's Technical Support Specialists are available 8.00am to 5.00pm, PST Monday through Friday
Email our Technical Support Department at support@apricorn.com or call 800-458-5448 option 3