Lotus YS-1600 - Staubsauger Arnica - Kostenlose Bedienungsanleitung
Finden Sie kostenlos die Bedienungsanleitung des Geräts Lotus YS-1600 Arnica als PDF.


Benutzerfragen zu Lotus YS-1600 Arnica
0 Frage zu diesem Gerät. Beantworten Sie die, die Sie kennen, oder stellen Sie Ihre eigene.
Eine neue Frage zu diesem Gerät stellen
Laden Sie die Anleitung für Ihr Staubsauger kostenlos im PDF-Format! Finden Sie Ihr Handbuch Lotus YS-1600 - Arnica und nehmen Sie Ihr elektronisches Gerät wieder in die Hand. Auf dieser Seite sind alle Dokumente veröffentlicht, die für die Verwendung Ihres Geräts notwendig sind. Lotus YS-1600 von der Marke Arnica.
BEDIENUNGSANLEITUNG Lotus YS-1600 Arnica
arnica™
LOTUS
ELEKTRİK SÜPÜRGESİ
YS-1600 / YS-1800 / TURBO-2400
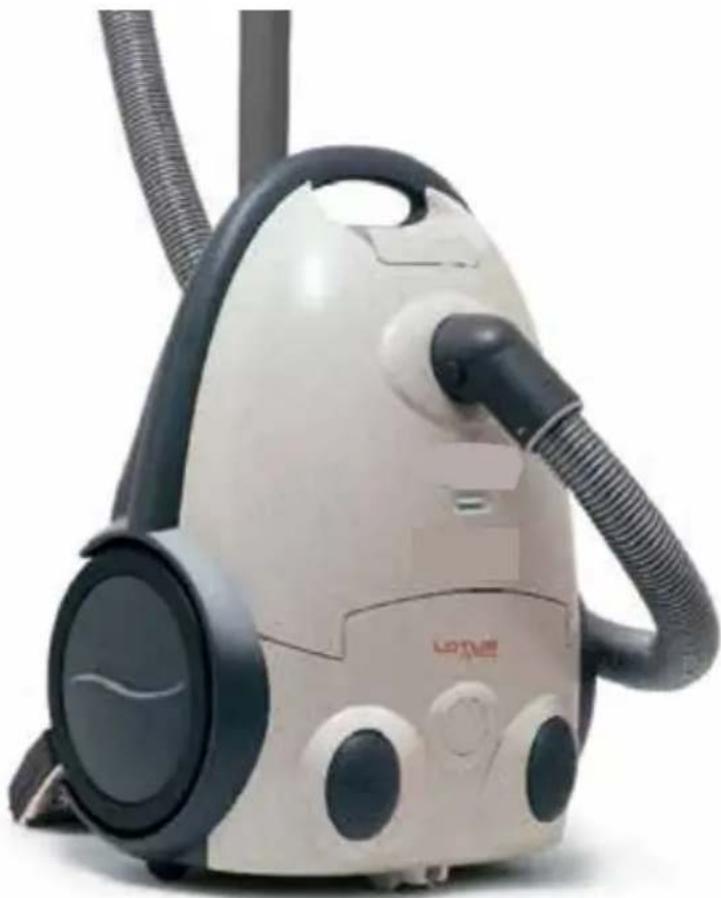
natural_image
White and black LOTS vacuum cleaner with coiled hose and control buttons (no visible text or symbols)Kullanma Kılavuzu
Instruction Manual
Tüketici Danışma Hattı 0850 333 27 62
text_image
B2 B3 B1 B4 A3 A5 A6 A7 A8 A9 A10 A2 B6 B7 B6 T T5 T1 T6 T3 T2 T7 T4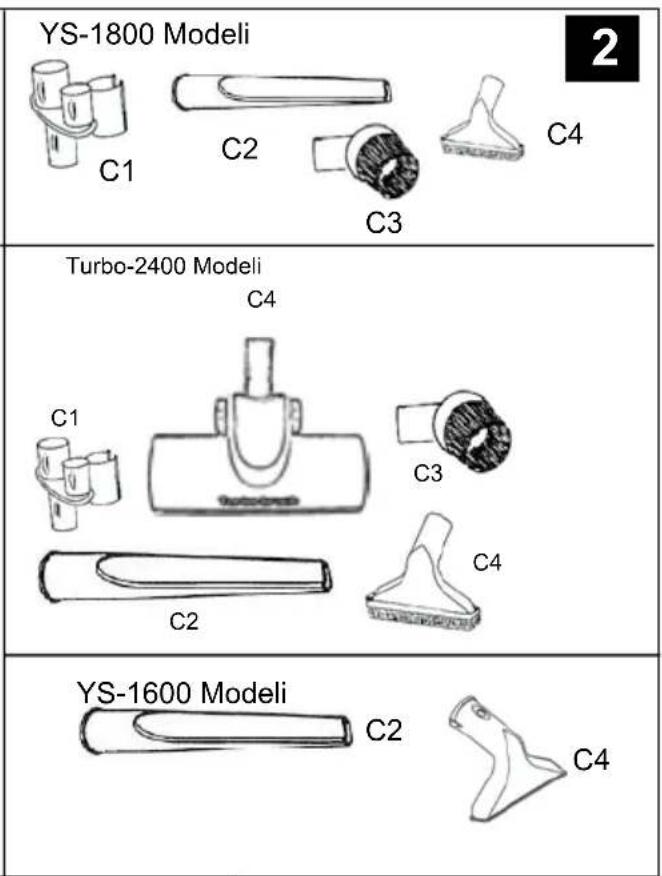
text_image
YS-1800 Modeli C1 C2 C3 C4 Turbo-2400 Modeli C4 C1 C3 C2 C4 YS-1600 Modeli C2 C4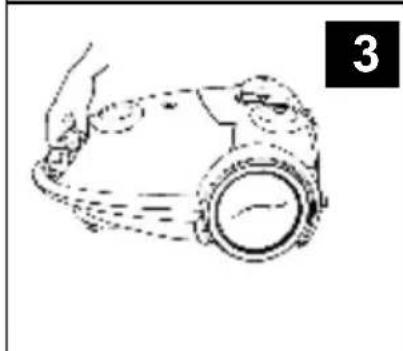
natural_image
Line drawing of a wristwatch with a circular lens (no text or symbols)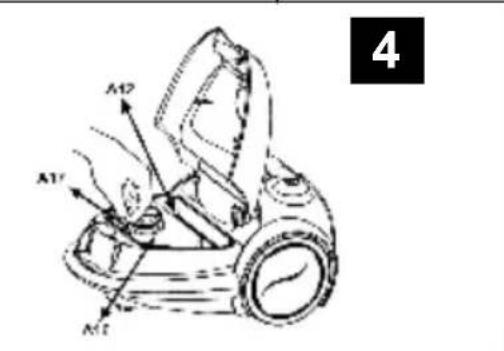
text_image
A1 A2 A3 A4 4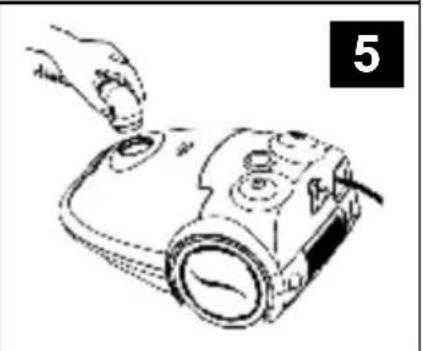
natural_image
Line drawing of a hand using a handheld device to press or install a device (no text or symbols present)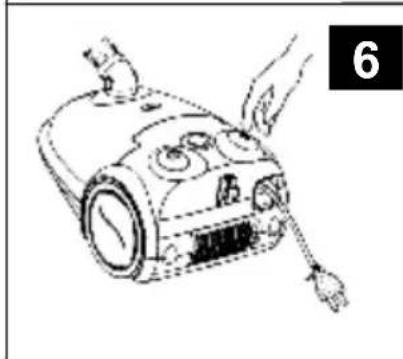
natural_image
Line drawing of a hand holding a vacuum cleaner with attached components (no text or symbols)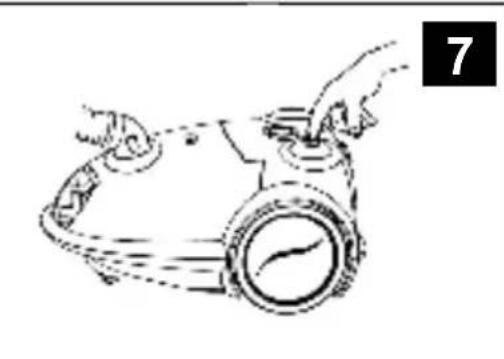
natural_image
Line drawing of a hand holding a circular object with motion lines, no text or symbols present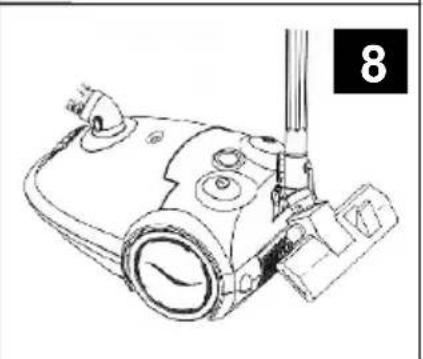
natural_image
Line drawing of a vacuum cleaner device with no visible text or symbols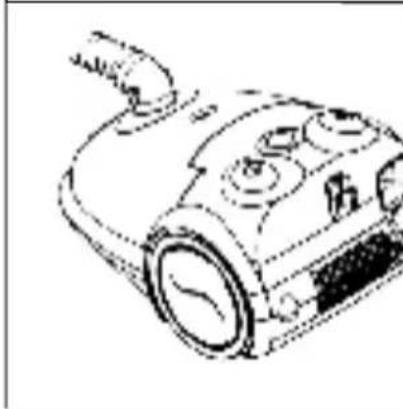
natural_image
Line drawing of a vacuum cleaner device (no text or symbols)
text_image
9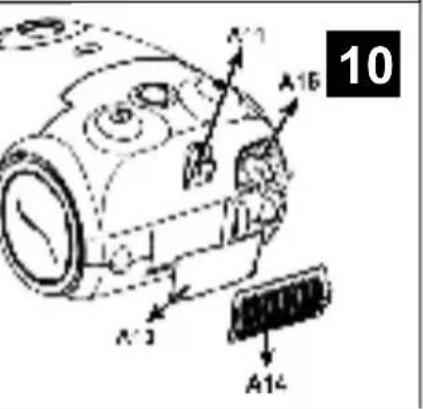
text_image
A11 A16 10 A13 A14KURU ELEKTRİK SÜPÜRGESİ
Süpürgenizi kullandıkça ne kadar doğru seçim yaptığınızı anlayacaksınız. Hedefimiz size ödediğinizden daha fazlasını verebilmektir. Süpürgemizi seçtiğiniz için teşekkür ederiz. Süpürgenizi; bu kullanma kılavuzunu okuyup, kılavuz da belirtilen şekilde kullanırsanız her şeyin ne kadar kolay olduğunu göreceksiniz. Böylece süpürgenizden en yüksek performansı elde edebilirsiniz. İyi günlerde kullanın.
iÇİNDEKİLER
I. Emniyet Kuralları
II. Cihazın Tanıtımı
III. Teknik Özellikler
IV. Montaj ve Kullanıma Hazırlama
V. Kullanım
VI. Temizlik ve Bakım
I. EMNIYET KURALLARI
• Güvenli kullanım kurallarını mutlaka okuyunuz.
- Cihazınızı çocukların erişemeyeceği bir yerde ve çocuklardan uzak tutunuz.
- Cihaz ve kablosunu 8 yaşından küçük çocukların erişemeyeceği şekilde saklayın.
- Bu cihaz, güvenli bir şekilde kullanılmasıyla ilgili kendilerine gözetim veya talimat verilmişse ve içermiş olduğu tehlikeler kendileri tarafından anlaşılmışsa 8 yaş ve üzeri çocuklar ve fiziksel, duyusal veya zihinsel yetenek eksikliği bulunan veya tecrübe ve bilgi eksikliği olan kişiler tarafından kullanılabilir.
- Besleme kordonu hasarlanırsa, bu kordon, tehlikeli bir duruma engel olmak için, imalâtçısı veya onun servis acentesi ya da aynı derecede ehil bir personel tarafından değiştirilmelidir.
- Cihazınızı kullanmadan önce cihazınızın, güç ve geriliminin şebekenize uygun olup olmadığını kontrol ediniz.
• Cihazınızı emniyetli ve en az 10 A'lık sigorta bağlı prize takarak kullanınız.
- Cihazınızı taşımadan, temizlemeden ve bakım yapmadan önce fişini mutlaka prizden çekiniz.
• Fişi prizden kablosundan çekerek çıkarmayınız.
- Kabloyu sıkıştırmayınız, aşırı bükmeyiniz ve keskin kenarlı yerlerden geçirmeyiniz.
- Kablo ya da fiş üzerinde herhangi bir hasar var çalıştırmayınız. Hasarlı kablo ve fişi değiştirmek üzere en yakın yetkili servise başvurunuz.
- Cihazınızı çalışır durumda bırakıp gitmeyiniz. Çocuklardan, özürlülerden ve aşırı yaşlılardan uzak tutunuz, kullanmalarına müsaade etmeyiniz.
- Merdivenleri temizlerken özellikle dikkat ediniz.
• Arızalı cihazı kullanmaya çalışmayınız.
- Hortumu insanlara ve hayvanlara doğru tutmayınız.
• Cihazın gövdesini hiçbir zaman suya daldırmayınız ve üzerine su dökülmesini engelleyiniz
- Asitler, aseton ve solventler cihaza zarar verir ve korozyona yol açar.
- Yalnızca orijinal parça ve aksesuar kullanınız.
• Tamir ve yedek parça için en yakın yetkili servise başvurunuz.
• Cihazınızı ıslak yerlerin temizliğinde kullanmayınız ve sıvıları emdirmeyiniz.
• Cihazınızı insan veya hayvanların temizliğinde kullanmayınız.
- Eğer uzatma kablosu kullanacaksanız hasarsız durumda olmasına dikkat ediniz.
- Cihazınız sadece evdeki normal kullanım için tasarlanmıştır ve ticari kullanıma uygun değildir.
- Torbasız ve filtresiz temizlik yapmayınız.
DIKKAT : Cihazınızı benzin, tiner, alkol, gazyağı ve benzeri yanıcı sıvıları, 60°C den daha yüksek sıcaklıktaki toz ve yangın tehlikesi oluşturacak cisimlere sağlığa zararlı atıkları emmekte kullanmayınız.
II. CIHAZIN TANITIMI
Cihazın ana parçaları ve aksesuarlar aşağıya çıkarılmıştır.
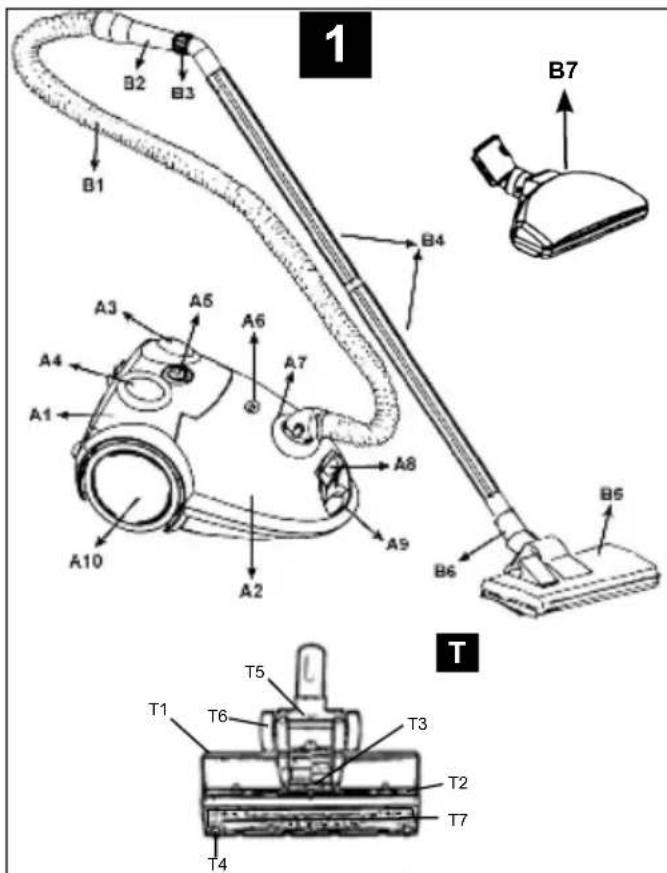
A. GÖVDE GRUBU (Şekil 1, 4 ve 10)
Bu grup motor, üst kapak, açma-kapama düğmesi, kablo ve kablo sargı düğmesi, toz torba bölümü ve diğer fonksiyonel üniteleri kapsamaktadır.
A1 - Gövde
A2 - Üst kapak
A3 - Açma-kapama düğmesi
A4 - Kablo sargı düğmesi
A5 - Emiş gücü ayar düğmesi (YS-1800 modelinde)
A6 - Toz torbası doluluk göstergesi
A7 - Emiş ağzı
A8 - Üst kapak kilitleme mandalı
A9 - Sap
A10 - Tekerlekler
A11- Yatay park pozisyonu kızağı (Şekil 10)
A12- Motor koruma filtresi (Şekil 4)
A13- Çıkış filtresi (Şekil 10)
A14- Çıkış filtresi kapağı (Şekil 10)
A15- Fisli kablo (Şekil 10)
A16- Toz torbası (Şekil 4)
A17- Toz torbası kilitleme mandalı (Şekil 4)
B. HORTUM VE BORU GRUBU (Şekil 1)
Bu grup; bir ucuna Emme Ucu diğer ucuna ise hortumu elle tutmaya yarayan Sap takılmış Elastik Hortum ile Uzatma Borularından oluşmaktadır. Sap ucuna borular takılabildiği gibi doğrudan aksesuarlarda takılabilmektedir. Tetik üzerinde emiş gücünü azaltan veya yükselten
bir hava klapesi mevcuttur.
B1 - Elastik hortum
B2 - Tabanca
B3 - Hava klapesi
B4 - Uzatma boruları
» Plastik boru (YS-1600 modelinde)
» Teleskopik boru (YS-1800 modelinde)
B5- Emme ucu (YS-1800 modelinde)
B6- Askılı kelepçe
B7- Emme ucu (YS-1600 modelinde)
C. AKSESUAR GRUBU (Şekil 2)
Süpürgenin değişik fonksiyonları için değişik aksesuarlar kullanılabilmektedir.
C1 - Aksesuar tutucu (YS-1800 modelinde)
C2 - Dar uçlu boru
C3 - Yuvarlak perde fırçası (YS-1800 modelinde)
C4 - Koltuk temizleme aparati
C5 - Turbo fırça (YS-2400 modelinde)
Turbo Süpürme Ucu (YS-2400 - Modelinde)
Turbo süpürme ucu, içinde süpürgenin çektiği hava ile çalışan bir turbo türbin, buna bağlanmış spiral fırçadan oluşmaktadır. Emilen hava türbini çevirmekte, dönen türbin hava yardımıyla spiral fırçayı döndürmektedir. İki yandan yataklanmış fırçada dönerek tozları havalandınp emmektedir.
T1 - Süpürme ucu üst gövde
T2 - Lastik tampon conta
T3 - Süpürme ucu alt kapak
T4 - Ön lastik küçük tekerlekler
T5 - Dirsek
T6 - Büyük tekerlekler
T7 - Turbo spiral fırça
D. MODELLER
Değişik modeller kullanılan aksesuarlar.
| Aksesuarlar | YS-1600 | YS-1800 | T-2400 |
| İşte chârazınlızı | |||
| Elektronik kart | √ | √ | |
| Teleskopik boru (nikelaj) | √ | √ | |
| Plastik normal boru | √ | ||
| Dar uçlu boru | √ | √ | √ |
| Emme ucu (B5) | √ | √ | |
| Emme ucu (B7) | √ | ||
| Koltuk temizleme aparatı | √ | √ | √ |
| Yuvarlak fırça (tül fırçası) | √ | √ | |
| Aksesuar tutucu | √ | √ | |
| Turbo fırca | √ |
III. TEKNİK ÖZELLİKLER
| Voltaj | : 220 - 230 V, 50 - 60 Hz |
| Güç | : IEC 1400 W, max 1600 W |
| Çıkış Gücü | : 300 Watt |
| Elektrik İzolasyonu | : II |
| Güç Kablosu Boyu | : 5 m. |
| Ağırlık (Brüt/Net) | : 6.8 / 5.5 kg. |
| Kullanım Ömrü | : 7 Yıl |
| Ses Gürültü Seviyesi | : 70 dB (A) EN ISO 7779 |
IV. KULLANIMA HAZIRLAMA
- Üst kapağı, üst kapak kilitleme mandalını (A8) yukarıya doğru çekerek açınız. (Şekil 3)
- Toz torbasını yerine takınız ve toz torbası kilitlendiğinden emin olunuz (Şekil 4). Üst kapağı kapatınız. (Şekil 3)
• Elastik hortumunu emiş ağzına takınız. (Şekil 5)
- Fişli kabloyu fişten tutarak istenen uzunluğa kadar çekiniz ve elektrik fişini prize takınız. (Şekil 6)
- Açma-kapama düğmesine basarak cihazı çalıştırınız. (Şekil 7)
- Hortum grubunun tabancasındaki hava klapesini çevirerek emme kuvvetini ayarlayınız.
- Emiş gücünü emiş gücü ayar düğmesini döndürerek ayarlayabilirsiniz. (YS-1800 modelinde)
- Toz torbası doluluk göstergesini kontrol ediniz. Toz torba doluluk göstergesinin sürekli kırmızı rengi göstermesi durumunda;
» Toz torbası dolmuştur, torbayı değiştiriniz.
» Emici uçlarda, borularda veya hortumda tıkanma olabilir; tıkanıklığı gideriniz.
V. KULLANIM
- Yapacağınız işe en uygun aksesuarları seçiniz ve bu aksesuarları doğrudan Tabanca'ya takınız ya da önce Uzatma Boruları'nı takıp sonra bunların ucuna aksesuarı takınız.
- Etkili bir temizlik için aksesuarları aşağıdaki şekilde kullanınız.
» Kuru Temizleme Ucu; halı, kilim, parke, fayans, mermer gibi yüzeylerin temizliğinde kullanılır.
» Dar Uçlu Boru; radyatör, çekmece, köşe vb. dar alanlardaki toz, kırıntı ve benzeri küçük parçaları almak için kullanılır.
» Ucuna hiçbir şey takmadan Uzatma Borusu; toprak, talaş, kırıntı, tüy vb. emmekte kullanılır.
» Yuvarlak Fırça; rafların, kitaplıkların, lambaların, abajurların, mobilyaların, giysilerin, elektronik aletlerin vb. üzerindeki tozları süpürmekte kullanılır. Kullanılırken önce bu
haliyle de Tabanca yada Uzatma Borusu ucuna takılır.
» Koltuk temizleme aparati; yastık, şilte, minder, koltuk yüzeylerinin temizlenmesinde kullanılır.
» Turbo Fırça, özellikle halı ve kilimlerin etkili temizlik işleminde kullanılır.
• Cihazınızın fişini prize sokunuz ve Açma-Kapama anahtarına basarak çalıştırınız.
• Kullanım sona erdikten sonra
» Cihazınızı durdurunuz ve elektrik fisini prizden çıkarınız.
» Kablo sargı düğmesine basarak kabloyu sarınız.(ekil 6)
Dikkat ! Sadece kuru kablo sarılmalıdır. Kablo ıslak ise sarmadan önce kurulayınız.
- Cihazınızı kullanmadığınız zamanlarda süpürme ucunu, borular ve hortumla beraber yatay veya dikey park pozisyonu kızagina yerleştiriniz. (Şekil 8)
- Cihazınızı açık alanda (dışarıda) ve donna derecesinin altındaki sıcaklıklarda muhafaza etmeyiniz.
• Toz torbasının değiştirilmesi.
» Cihazınızı durdurunuz ve elektrik fişini prizden çekiniz.
» Hortumu yanlarındaki düğmelere basarak emiş ağzından çıkarınız. (Şekil 5)
» Üst kapağı öndeki mandalı yukanya doğru çekerek açınız. (Şekil 3)
» Toz torba mandalını açarak doğru bastırarak toz torbasını çıkannız. (Şekil 4)
» Yerine yeni torba takınız ve mandalın kilitlendiğinden emin olunuz. Yeni toz torbasını yetkili servislerimizden temin edebilirsiniz.
» Üst kapağı kapatınız.
Uyarı : Toz torbası olmayan süpürgenin üst kapağı kapatılamaz, zorlamayınız.
VI. TEMİZLEME VE BAKIM
- Temizlik ve Bakım işlemlerinden önce mutlaka fişi prizden çıkarınız.
- Süpürgenin kullanımı tamamlandıktan sonra her zaman, Hortum Grubunu, Filtreleri ve kullanılan aksesuarları temizleyiniz.
- Gerek hijyenik nedenlerden, gerekse süpürgenizin ömrünü arttırmak amacıyla süpürgenizi kirli bir halde bırakmayınız.
• Cihazınızın dışını, boruları ve aksesuarlarını nemli bir bezle siliniz. Sonra kurulayınız.
- Bez Filtre gözenekleri tamamen dolmadan silkelenerek temizlenir, çok kirlendiğinde ise, Sünger Filtre gibi ılık ve sabunlu suda ya da çeşme suyunda yıkanarak temizlenmelidir. DİKKAT : Bez Filtreleri sıcak su ya da çamaşır makinasında temizlemeyi denemeyiniz.
- Temizleme işleminden sonra aksesuarları gövde üzerindeki yerlerine yerleştiriniz. Güç kablosunu sardıktan sonra aksesuar askısındaki yerine asınız. Kablonuzun hasarlı olup olmadığını mutlaka kontrol ediniz.
- Yalnızca orijinal aksesuar ve parça kullanmanız, etkili bir temizlik ve cihazınızın ömrü ve garantisi için gereklidir. İhtiyaç duyduğunuzda en yakın yetkili servisten sağlayınız.
• Motor koruma filtresinin (A12) temizlenmesi;
» Cihazınızı durdurunuz ve fışı prizden çekiniz.
» Üst kapağı açınız.
» Toz torbasını çıkarınız.
» Motor koruma filtresini çekerek yuvasından çıkarınız.
» Sünger filtreyi su ile yıkayınız ve kurumaya bırakınız. Islak filtreyi takmayınız.
» Daha sonra filtreyi tekrar yerine takınız.
» Hasarlı veya yırtılmış filtreyi yenisi ile değiştiriniz. Yeni filtreyi yetkili servislerimizden temin edebilirsiniz.
» Motor koruma filtresini yerine takmadan cihazınızı kullanmayınız.
- Çıkış filtresinin temizlenmesi (A13);
» Filtre kapağındaki mandalı (A14) bastırarak kapağı açınız. (Şekil 9)
» Filtreyi yuvasından alınız ve silkeleyerek temizleyiniz.
Not: Cihazınız ile filtrenin tozlarını emdirerek de temizleyebilirsiniz. (Şekil 10)
» Hasarlı veya yırtılmış filtrenizi yenisi ile değiştiriniz. Yeni filtreyi yetkili servislerimizden temin edebilirsiniz.
» Filtreyi tekrar yerine takınız.
» Çıkış filtresini yerine takmadan cihazınızı kullanmayınız.
• Turbo Süpürme ucunun temizlenmesi (Turbo - 2400 Modelinde)
» Turbo Süpürme Ucu'nun içine kil, ip vb. şeylerin dolanması nedeniyle çalışmadığı durumlar olabilecektir. Bunu kontrol etmek için süpürme ucu takılı süpürge çalışırken, turbo fırçayı kaldınp altına bakınız. Eğer Turbo spiral fırça dönmüyorsa bakımının yapılması gerekir. Turbo Spiral Fırçanın yuvasında rahat dönip dönmediğini kontrol ediniz. Üzerine özellikle yatak bölgelerine kil, ip vb. şeyler dolanmış ya da kayış dişli üzerinden çıkmış olabilir. Turbo Spiral Fırçayı temizleyiniz.
» Elinizle fırçayı döndürerek rahatça hareket ettiğiniz kontrol ediniz.
Süpürgeyi Servise Götürmeden Önce Kontrol Etmeniz Gerekenler
• Cihazınızın fişini prize uygun ve tam temaslı taktığınızdan emin olunuz.
- Cihazınız yine de çalışmıyoruma prizinize bağlı sigort atmadığından emin olunuz. Sigortanızın anma akımının min. 10 A (ve W-otomatin gecikmeli tip) olmasına dikkat ediniz.
- Cihazınız çalışıyor, ama emiş yapmıyor ise, hort borularının ve fırçalarının tıkanıp tıkanmadığını kontrol ediniz. Tıkalı ise temizleyip delikleri tam açınız.
DİKKAT
- Garanti belgesini satış tarihinden itibaren muhakkak yetkili satıcı tarafından tastik ettiriniz (Unvan kaşesi ve satış tarihi).
- Herhangi bir arıza durumunda Arnica Yetkili Servisimize şahsen başvurunuz.
DRY ELECTRIC VACUUM CLEANER
First, we would like to thank you for choosing our product. The more you use the vacuum cleaner, the more you will be certain that you made the right choice. Our main goal is to give you more than the price. Your choice shows that we are achieving our goal. When you use your vacuum cleaner according to the instructions in this manual, you will be surprised how you are doing everything easily to reach its maximum performance.
CONTENTS
I. Safety Instructions
II. Parts & Accessories
III. Technical Specifications
IV. Preparation for Use
V. Operating the Appliance
VI. Cleaning and Maintenance
I. SAFETY INSTRUCTIONS
• Read this manual carefully.
- The appliance is not to be used by children or persons with reduced physical, sensory or mental capabilities, or lack of experience and knowledge, unless they have been given supervision or instruction
• Children being supervised not to play with the appliance
- Unless management and supervision regarding the device are ensured by a person responsible for safety of the devices, this device isn't designed to be used by physically and mentally disabled people (including children) or by people who are lack of experience and knowledge.
• Children must be supervised in order to ensure keeping them away from the device.
- Before using the appliance, check if the power voltage corresponds to that indicated on the rating plate.
- The appliance should be connected to power sockets which are compatible with minimum 10 Amp fuse.
• Never tug at the power cable or pull the appliance itself to unplug.
• Never squeeze or buckle the power cable or pull it over sharp edges.
- Do not allow the appliance to pass over the cable as this may damage the insulating shield.
- Do not use the appliance if the power supply cord is damaged. Contact a certified technician. Do not try to repair it yourself for your own safety!
- Never leave the appliance unattended when it's on and keep it out of the reach of children or disabled people.
• Do not attempt to use defected appliances.
• Acids, acetone and solvents can damage and corrode appliance parts.
• Never direct the hose or tube to people or animals.
• Never drop the appliance into water and never pour the water on the appliance.
• Never use the appliance to clean wet areas and to vacuum liquids.
• Use only original accessories and spare parts.
- Contact a certified technician for repairs and spare parts
• Do not use the appliance to clean people and animals.
• Do not use the appliance without its filter.
• Be very cautious when you clean stairs.
• If you are going to use an extension cord, make sure that the cord is not damaged.
- This appliance is specially designed for home use and is not suitable for commercial use.
• Do not use your vacuum cleaner without a filter bag.
WARNING: Never use the appliance to clean up flammable or explosive solvents, object soaked with such solvents, explosive dusts, liquids such as gas, oil, alcohol, thinners and objects that are hotter than 60 °C. This will cause a dangerous explosion and fire hazard!
II. PARTS & ACCESSORIES
Main parts of the appliance are shown below:
A. BODY PARTS (Figures 1, 4 and 10)
This group includes motor, top cover, on/off switch, cable and cord rewinder button, dust bag, other functional units.
A1 - Main Body
A2 - Top Section Cover
A3 - On/Off Switch
A4 - Power Cord Button
A5 - Speed Adjustment Button (YS-1800)
A6 - Dust Full Indicator
A7 - Suction Opening
A8 n - a trp Top Section Cover Lock Clip
A9 - Carrying Handle
A10 - Wheels
A11 un u_n, Horizontal Parking socket (Picture 10)
A12 - Motor protection filter (Picture 3)
A13 - Air Filter (Picture 10)
A14 - Air Filter Cover (Picture 10)
A15 - Cable with Plug (Picture 10)
A16 - Dustbag (Picture 3)
A17- Locking latch for the dustbag (Picture 3)
B. HOSE AND TUBE GROUP (Figure 1)
This group includes flexible hose with handle, extension tubes, and other functional units. Accessories can be fixed directly to the handle without the use of extension tubes. An air valve is placed on the handle to adjust the vacuum power.
B1 - Flexible Hose
B2 - Handle
B3 - Air Valve
B4 - Extension Tubes
» Plastic Tube (YS-1600)
» Telescopic Tube (YS-1800)
B5 - Main Brush (YS-1800)
B6 - Tube Hook
B7 - Main Brush (YS-1600)
C. ACCESSORIES GROUP (Figure 2)
For different functions, various accessories can be used.
C1 - Accessories Holder (YS-1800)
C2 - Crevice Nozzle
C3 - Round Brush (YS-1800)
C4 - Small Brush
C5 - Turbo Brush (YS-2400)
Turbo Brush (YS-2400)
The brush has a removable brush bar cover which gives you easy access to the brush bar and a switch which allows you to vacuum hard floors without the risk of scratching in addition to vacuuming carpets and rugs.
T1 - Brush body
T2 - Rubber bumper seal
T3 - Brush soleplate
T4 - Small wheels
T5 - Elbow and tilt mechanism
T6 - Large wheelies
T7 - Big Brush bar cover
T8 - Spiral brush bar
T9 - Brush bar cover access latches
T10 - Hard floor and carpet selector
D. MODELS
Accessories used in models:
Accessories YS-1600 YS-1800 T-2400
| Electronic Card | √ | √ | ||||
| Telescopic Tube (nickel-plated) | √ | √ | ||||
| Plastic Tube | √ | |||||
| Crevice Nozzle | √ | √ | √ | |||
| Main Brush (B5) | √ | √ | ||||
| Main Brush (B7) | √ | |||||
| Small Brush | √ | √ | √ | |||
| Round Brush | √ | √ | ||||
| Accessories Holder | √ | √ | ||||
| Turbo Brush | √ |
III. TECHNICAL SPECIFICATIONS
Voltage : 220-230 V,50-60 Hz
Power : IEC 1400 W, max. 1600W
Output Power : 300 Watt
Elec. Isolation Class : II
Power Cord Length : 5m.
Weight (Gross/Net) : 6.8/ 5.5 kg
Used Life : 7 Year
Max. Noise Level : Less than 70 dB (A) EN ISO 7779
IV. PREPARATION FOR USE
- Release the top section cover by pulling the dip locks outwards. (Figure 3)
- Place the dust bag and close the top section cover (Figure 4-3)
• Fix the flexible hose to the suction opening by using the latches (Figure 5)
- Hold the plug, pull the power cord to the desired length and plug it to the socket. (Figure 6)
• Turn on the appliance by using the On/Off Switch (Figure 7)
- Adjust the vacuum power by turning the air valve on the handle
• Vacuum power can be adjusted electronically by using the adjustment button (Electronic Model Only)
- Check the Dust Full Indicator. If the indicator shows red;
» Dust bag is full. Change the dust bag.
» There might be a blockage inside the brushes, tubes or hoses; clean inside them.
V. OPERATING THE APPLIANCE
- Choose the most appropriate accessories for the task you are going to perform and fix those accessories directly to the handle or to the extension tube.
• For an effective cleaning, following accessories can be used:
» Main Brush: For carpets, rugs, tiles, parquetry, marble surfaces
» Crevice Nozzle: For narrow areas such as radiators, drawers, corners etc.
» Extension Tube without brush: For soil, wood chippings, hair, fur and etc.
» Round Brush: For removing the dust on shelves, lamps, shades, clothes, furnitures,
electronic devices and etc. Should be fixed to the crevice nozzle
» Small Brush: For pillows, mattresses, cushions and couches
» Turbo Brush : For especially effective cleaning of carpets and rugs surfaces.
- Plug the appliance to the power socket and turn on the appliance by pressing the On/Off Switch.
• After the use of the appliance:
» Turn off the appliance and unplug it from the power socket.
» Press the Power Cord button to rewind the cable.(Figure 6)
Warning! Only rewind if the cable is dry. Do not rewind the cable if it gets wet for your safety.
First dry the cable, and then rewind it!
- Brushes,tubes, crevice nozzle and hose can be placed to the parking socket when you are not using the appliance.
- Do not preserve the appliance outdoors or at the temperatures that are below freezing degrees.
• Replacing the dust bag:
» Turn off the appliance and unplug it from the power socket.
» Remove the hose from the suction opening by pressing the buttons on the sides (Figure 5)
» Open the top section cover by pulling the latch upwards. (Figure 3)
» Remove the dustbag by pressing the latches on the side (Figure 4)
» Replace the dustbag. The new dustbag can be obtained from the certified services.
» Close the top section cover
Warning! If your vacuum cleaner does not have a dustbag, do not force the upper cover, because the cover will be not closed.
VI. CLEANING AND MAINTENANCE
• Always unplug the appliance before starting any cleaning and maintenance operations.
• Always clean the hose, tubes, filters and accessories after use.
- To ensure perfect hygiene and to extend your vacuum cleaner's life, never leave the appliance dirty.
- Clean the appliance's surface, tubes and accessories with a moist towel and dry it afterwards.
- Clean the textile filter by shaking before it's pores get completely filled. If it gets completely dirty, the filter can washed with warm, soapy water or running water.
Warning! Never wash the textile filter at washing machines nor hot water.
- Keep the accessories on the accessories holder after use. Check if the cable is damaged after rewinding the cable.
- Use only original accessories and parts to ensure effective cleaning, to extend your vacuum cleaner's life and to benefit from warranty. The parts and accessories can be obtained from a certified service.
• To clean the motor filter (A12):
» Turn off the appliance and unplug it from the power socket.
» Open the top section cover.
» Remove the dust bag.
» Remove the motor filter by pulling it from its socket.
» Wash the filter with water and leave it to dry. Never put a wet filter!
» Place the filter back to its socket
» Replace damaged filters with new ones. A new filter can be obtained from a certified service.
» Do not operate the appliance without the motor filter.
• To clean the output air filter (A13):
» Use the latch (A14) on the air filter cover to open the cover. (Figure 9)
» Remove the filter from its socket and shake it. The filter can also be cleaned by vacuuming.(Figure 10)
» Place the filter back to its socket.
» Replace damaged filters with new ones. A new filter can be obtained from a certified service.
» Do not operate the appliance without the air filter
• To clean the Turbo Brush (For Turbo - 2400 Model)
» The cleanness of the turbo brush should be checked periodically. According your usage and type of dirt soaked by brush ropes, hairs fibres and similar dirtis abstract the spiral brush bar and spiral brush bar could not turn properly. For these reason periodically look at the bottom side of the turbo brush for checking the turning of the spiral brush bar after operating the vacuum cleaner. If it doesn't move freely clean the turbo brush.