EFB0003 - Kaffeemaschine Mastro - Kostenlose Bedienungsanleitung
Finden Sie kostenlos die Bedienungsanleitung des Geräts EFB0003 Mastro als PDF.


Benutzerfragen zu EFB0003 Mastro
0 Frage zu diesem Gerät. Beantworten Sie die, die Sie kennen, oder stellen Sie Ihre eigene.
Eine neue Frage zu diesem Gerät stellen
Laden Sie die Anleitung für Ihr Kaffeemaschine kostenlos im PDF-Format! Finden Sie Ihr Handbuch EFB0003 - Mastro und nehmen Sie Ihr elektronisches Gerät wieder in die Hand. Auf dieser Seite sind alle Dokumente veröffentlicht, die für die Verwendung Ihres Geräts notwendig sind. EFB0003 von der Marke Mastro.
BEDIENUNGSANLEITUNG EFB0003 Mastro
mastro
CATERING EQUIPMENT
ISTRUZIONI PER L'USO OPERATING INSTRUCTIONS
MODE D'EMPLOI
BEDIENUNGSANLEITUNG
GBRUIKSAANWIJZING
BRUGERVEJLEDNING
INSTRUCCIONES DE USO
INSTRUCÕES DE UTILIZAÇÃO
ΟΔΗΓΙΕΣ ΛΕΙΤΟΥΡΓΙΑΣ

text_image
M®CE
EFB0002 / M2
EFB0003 / DM4
EFB0004 / DA4
| S | Installation och igångsättning M och DM 3 - 4 | M och DM | 3 - 4 |
| Installation och igångsättning A och DA 3 - 5 | A och DA | 3 - 5 | |
| Bruksanvisning 6 - 7 | 6 - 7 | ||
| Skötselråd 8 - 9 | 8 - 9 | ||
| Service/ Viktigt 10 | 10 | ||
| Kontroll / Åtgård 11 | 11 | ||
| Reservdelsförteckning M1,M2,DM2,DM4 och Office M8,M2,DM2,DM4 och Office | 16 | ||
| Reservdelsförteckning A1,A2,DA2 och DA4 17 | A1,A2,DA2 och DA4 | 17 | |
| GB | Installation and start | M1 and DM1 3 - 4 | 3 - 4 |
| Installation and start | A and DA 3 - 5 | 3 - 5 | |
| Instructions | 6 - 7 | ||
| Maintenance | 8 - 9 | ||
| Service/ Important | 10 | ||
| Possible solution | 12 | ||
| Sparepartlist M1, M2,DM-2,DM4 and OfficeM2,DM-2,DM4 and Office | 18 | ||
| Sparepartlist A-1, A-2, DA-2 and DA-4.A-19 A-2, DA-2 and DA-4. | 19 | ||
| S,GB | Exploded view | M / DM | 13 |
| S,GB | Exploded view | A / DA | 14 |
| S,GB | Exploded view | OFFICE | 15 |
| S,GB Electrical diagram | Office | 20 |
| Electrical diagram | M-1 | 21 |
| Electrical diagram | M-2 | 22 |
| Electrical diagram | DM-2 | 23 |
| Electrical diagram | DM-4 | 24 |
| S,GB | Electrical diagram | A-1 | 25 |
| Electrical diagram | A-2 | 26 | |
| Electrical diagram | DA-2 | 27 | |
| Electrical diagram | DA-4 | 28 | |
| Garanti och Service | 30 |
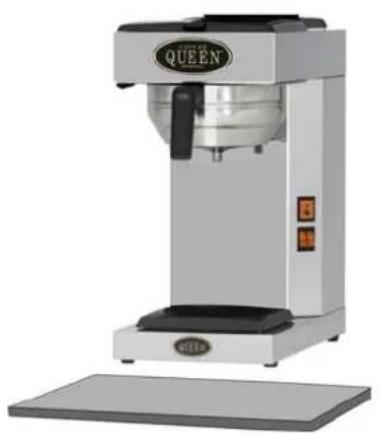
1. Placera maskinen på ett plant vattentätt underlag.
natural_image
Exterior view of a modern coffee machine with 'QUEEN' branding and control panel (no visible text or symbols beyond branding)Locate the machine on a flat level and waterproof surface.
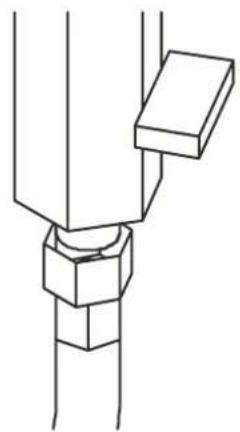
2. Anslut till Kallvattenledning med medföljande slang. Anslut lämpligen till en avstängningskran. Detta gäller endast A och DA maskiner.
natural_image
Pure mechanical assembly diagram showing a bolt and nut assembly without any text or symbolsConnect to cold water feed with connection tube supplied. This applies to A and DA machines only
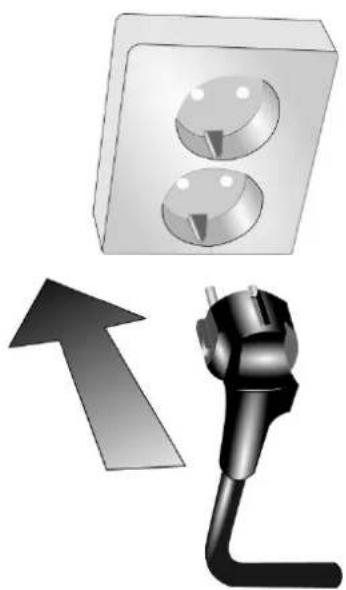
3. OBS! Detta gäller endast M-1, M-2 och Office. Anslut stickproppen till ett separat jordat vägguttag. 230 V, 10 ampere.
OBS! Detta gäller endast DM och DA. Installeras av behörig elektriker.
CAUTION!
This applies to M-1,M-2 and Office machines only. Connect the plug to a separate wall socket. 240 V, 13 amp. (230 V, 10 amp).
CAUTION! This applies to DM and DA machines only. Installation by authorised electrician.
natural_image
Illustration of a wall socket and a plug with an upward arrow (no text or symbols)4.
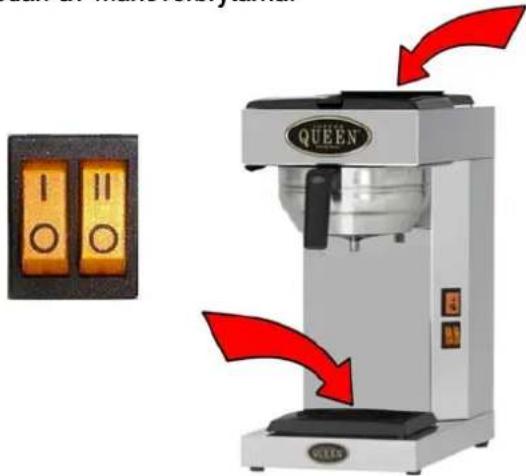
Slå på manöverbrytare 1 och 2.
Kontrollera att lamporna i knapparna tänds och att plattorna blir varma.
Slå sedan av manöverbrytarna.
text_image
QUEEN I II O O O O O O O O O O O O O O O O O O O O O O O O O O O O O O O O O O O O O O O O O O O O O O O O O O NTurn on control switches 1 and 2.
Ensure that the lamps turn on.
Ensure that the hot plates get warm.
Turn off control switches 1 and 2.
5.
Gör första bryggningarna med endast kallt vatten.
-
Sätt filterhållaren på plats utan filter och kaffe.
-
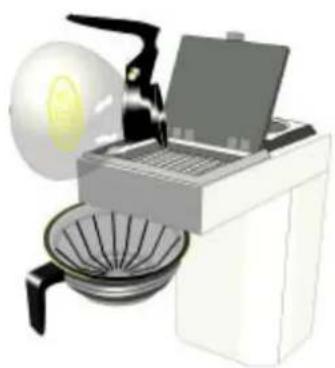
Tag av locket och fyll på en kanna kallt vatten.
natural_image
Illustration of a washing machine with a circular head and fan base (no text or symbols)An initial cycle using only cold water (no filter paper or coffee) should now be performed.
-
Ensure filter holder is in position.
-
Lift up the cover and fill the machine with one pot of cold water (as per a manual machine).
6.
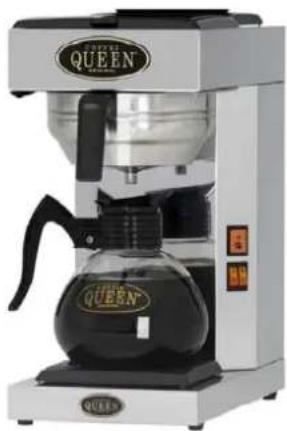
Ställ kannan på plattan under filterhållaren.
Vänta i 2 minuter så att systemet avluftas.
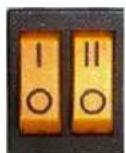
Slå sedan på manöverbrytare 1.
Bryggindikatorlampan skall nu tändas och vattnet skall börja rinna ner i kannan.
Bryggningen tar cirka 6 minuter.
natural_image
Exterior view of a modern coffee maker with clear branding (no visible text or symbols on the device itself)Place the pot on the hot plate under the filter holder.
Wait two minutes so that the system is aired-out.
Turn on control switch 1.
The control lamp which indicates that brewing is in progress shall now be lit and the water shall start pouring through the filter holder into the pot.
Brewing will take about 6 minutes.
7.
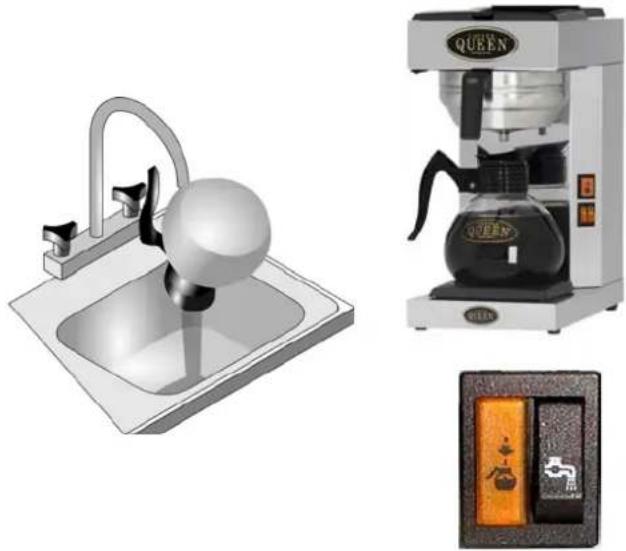
Töm kannan och ställ tillbaks den. Tryck på impulsknappen för vattenpåfyllning.
natural_image
Illustration of a coffee machine with a spherical water dispenser and a side view showing a coffee cup (no text or symbols)Empty the pot and replace on the hot plate. Push the button for automatic water filling.
8.
När bryggningen är klar: Kontrollera vattenmängden i kannan.

natural_image
Illustration of a modern coffee maker with a handle and spout, showing a black arrow pointing to its side (no text or symbols present)When the brew is ready. Check the volyme in the pot.
9.
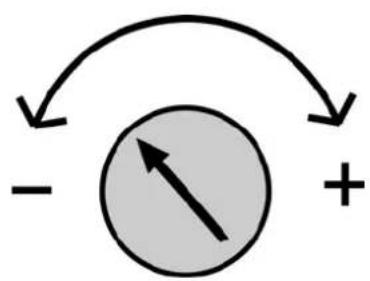
Om vattenmängden är fel: Justera timern.
Endast behörig installatör
flowchart
graph TD
    A["Start"] --> B["Negative"]
    B --> C["+"]
    C --> D["Circle with Arrow"]
    D --> A
Timer adjust only authority installation engineer
If the amount of water is wrong. Adjust the timer.
5.
1.
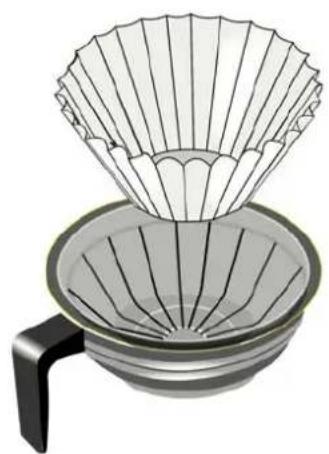
Placera ett 90mm filter i filterhållaren.
natural_image
Illustration of a filter with paper feed and meshing, no text or symbols presentPlace a 90mm filter in the filter holder.
2.
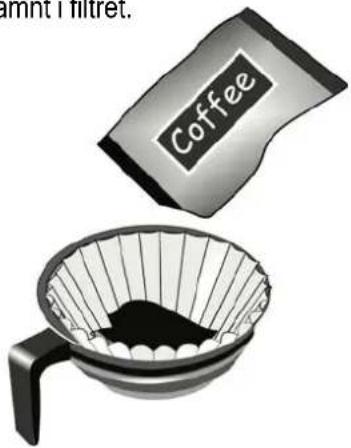
Häll i en portion kaffe
- 100 / 125 gram -
s.k. restaurangmalning (malning mellan kok och brygg).
Bred ut kaffet jämnt i filtret.
text_image
amnt I filtret. CoffeeAdd one portion of filter coffee (70-110 grams).
Make sure that the coffee is evenly spread.
3.
Sätt filterhållaren på plats.
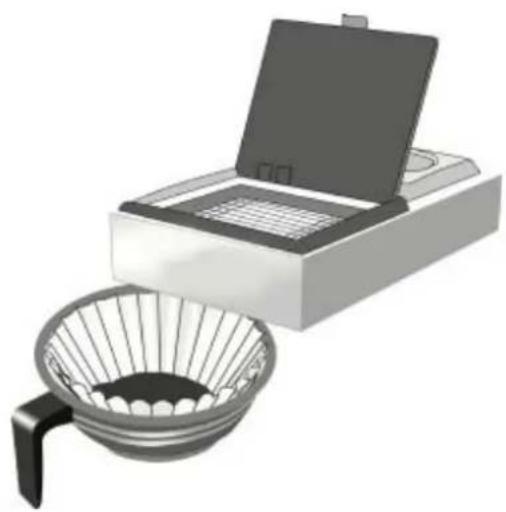
natural_image
Illustration of a kitchen appliance with a bowl and lid, no text or symbols presentPut the filter holder in place.
4.
Detta gäller endast Office, M och DM maskiner.
Lyft locket och häll i en kanna kallt vatten (1,8 L).
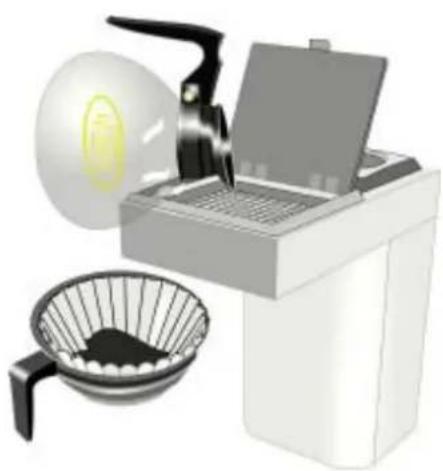
natural_image
Illustration of a washing machine with a circular component and a mesh fan (no text or symbols)This applies to Office, M and DM machines only.
Lift up the cover and pour in a pot of cold water (1,8L).
5.
Ställ kannan under filterhållaren och sätt på locket.
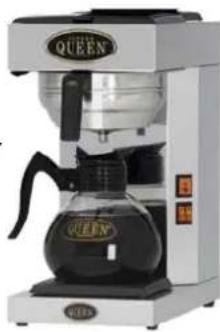
natural_image
Exterior view of a modern coffee maker with clear glass and black lid (no visible text or symbols)Place the pot under the filter holder and close the cover.
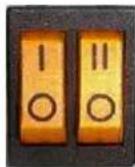
Slå på manöverbrytare 1 för bryggning.
Turn on control switch 1 for brewing.
Detta gäller endast A och DAmaskiner.
Tryck på impulsknappen för vattenpåfyllning.
This applies to A and DA machines only.
Push the brewing switch for water filling.
Under bryggningen (6 min) lyser kontrollampan.
During the brewing.(about 6 minutes) the controll lamp is lit.
6.
Om Ni vill varmhålla en kanna och samtidigt brygga en ny:
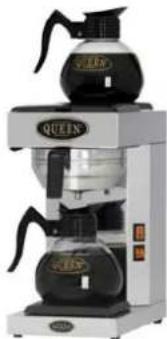
Placera kannan som skall varmhållas på den övre varmhållningsplattan. Slå på manöverbrytare 2.
OBS! Detta gäller endast modellerna M-2, DM-4, A-2 och DA-4 S
natural_image
Exterior view of a coffee maker with three round models and a clear glass (no visible text or symbols)If a second brewing is necessary, keep the first pot at the required temperature by placing on the upper hot plate.
Turn on control switch 2.
Please Note! This applies only to models M-2, DM-4, A-2 and DA-4.
Tips för bästa kvalité på kaffet.
-
Ändraräntet på åden rekrumenteldele doseringen.
-
Röllättidromikakamamimaran servering.
-
Våranhållådlädrigkaffefetnereärän 30 minuter.
-
Blårdaldrigyritykaffeffened gammalt.
Häll aldrig i bryggt kaffe i maskinen.
Some tips for best quality.
-
Do not change together then recommended portion of coffee.
-
Alwaysystistthenbrewdedoffefein ipopot.
-
Do not telepepe off e few war for on one than 30 minutes.
-
Do not think if especially brewed coffee with coffee kept warm.
Never fill brewed coffee in the machine.
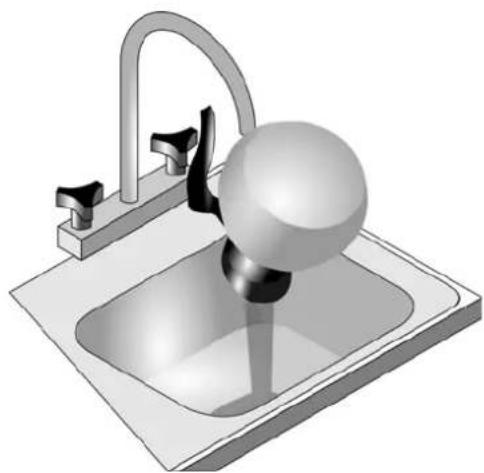
Före varje bryggning Skölj kannan.
natural_image
3D illustration of a showerhead on a sink with a spherical object inserted, no text or symbols presentBefore each brewing. Rinse the decanter.
OBS!!
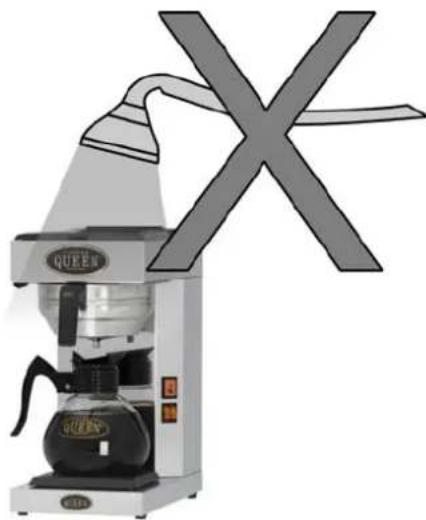
Maskinen får ej överspolas eller nedsänkas i vatten.
natural_image
Illustration of a coffee maker with a large 'X' symbol overlay (no text or symbols on the machine itself)CAUTION!
The machine should not be Submerged in water or Washed in a dishwasher
Varje dag.
Diska kannan och filterhållaren med rengöringsmedel för kaffemaskiner.
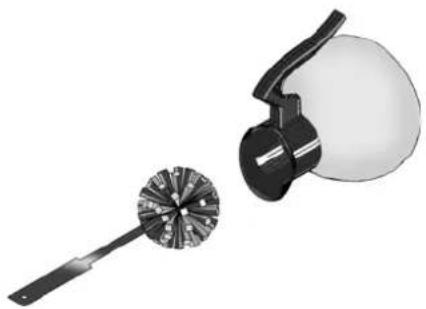
Torka rent spridarmunstycket och området runt detsamma, samt värmehällen.
Använd endast en mjuk trasa och flytande rengöringsmedel som inte repar.
Each day.
Wash the pot and the filterholder with liquid solution for coffee machines.
Clean the spray nozzle and the surrounding area.
Clean the hot plate.
Use a soft rag and liquid solution that does not scratch.
natural_image
Two kitchen utensils: a circular brush and a spherical bowl, shown in grayscale (no text or symbols)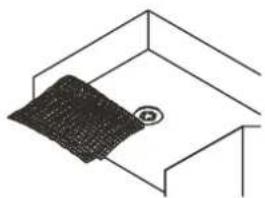
natural_image
Simple line drawing of a room with a textured floor and a circular symbol on the wall (no text or labels)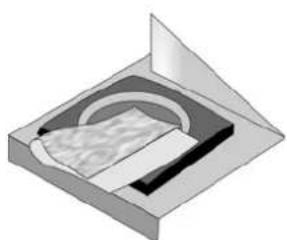
natural_image
3D diagram of a mechanical assembly with layered components and a curved housing (no text or symbols)Varje vecka
Rengöring
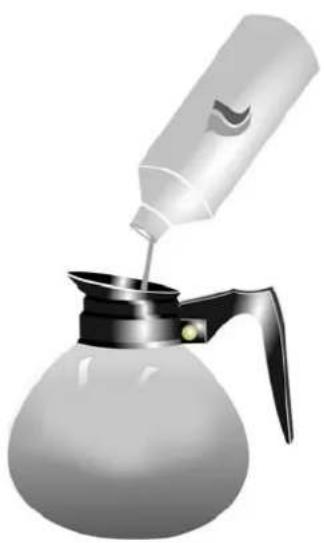
Häll 50 ml rengöringsmedel / avkalkningsmedel för kaffemaskiner i en kanna och fyll den med kallt vatten.
Häll sedan blandningen av vatten och rengöringsmedel i maskinen och genomför en bryggning utan pappersfilter och kaffe i filterhållaren.
Efter detta måste minst 3 bryggningar ske med enbart rent vatten för att skölja bort alla rester av rengöringsmedlet.
Regelbunden användning av rengöringsmedel för kaffebryggare reducerar uppbyggnaden av kalk där detta är ett problem.
Kontrollera att hålen i spridarmunstycket ej är blockerade av kalk.
Skruva bort spridarmunstycket och rengör hålen vid behov.
Vid anslutning till vatten med hög kalkhalt rekommenderas att ett kalkfilter monteras före maskinen.
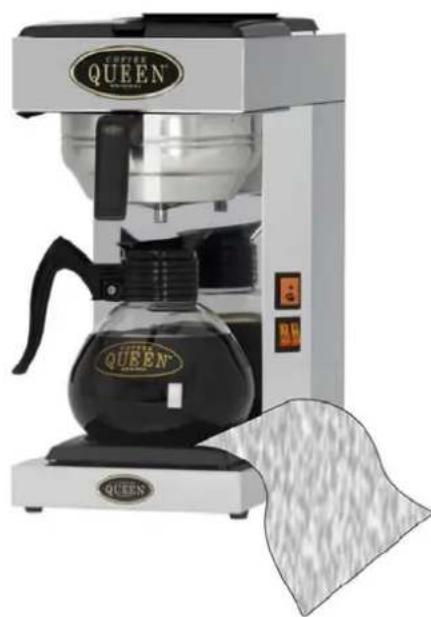
Vid utvändig rengöring använd mjuk trasa och flytande rengöringsmedel som inte repar.
natural_image
Illustration of a glass coffee maker pouring liquid from a bottle (no text or symbols)Each week.
Descaling and cleaning.
Pour 50 ml descaling / cleaning solution in a pot and fill it up with cold water.
Pour the mixture in the machine and proceed with a brewing without a filter paper or coffee.
Rinse by brewing at least 3 times with clean water so that the particles from descaling solution disappear.
Regular descaling/cleaning will ensure optimum brewing performance and a longer life of the machine.
Check that the spray nozzle is unblocked.
Dismount and clean if necessarily.
In areas with high level lime problem, a descaling filter should be mounted.
Surface cleaning.
Use a soft rag and liquid solution that does not scratch.
natural_image
Exterior view of a coffee machine with a glass coffee maker and a cloth cover (no visible text or symbols)Viktigt
Gör inte ingrepp i bryggaren. Felaktiga åtgärder kan leda till personskador och funktionsfel. Bryggaren bör stå på ett plant underlag för att den skall arbeta tillfredsställande.
Bryggaren skall placeras på ett vattentätt underlag så att eventuellt utläckande vatten blir synligt. Se till att det inte bildas veck på anslutningsslangen när bryggaren skjuts på plats. Bryggarens tillopps och VVS-anslutning skall kontrolleras regelbundet. Kontrollera att inte någon läcka har uppstått i samband med installationen. Vattenanslutningen kan alltid innebära viss risk för läckage oavsett säkerhetsutrustning.
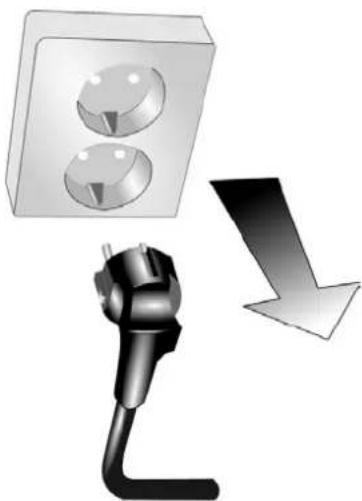
Lämna inte bryggaren helt utan tillsyn när den är igång. Stäng vattenkranen då maskinen inte används. Vid alla ingrepp i bryggaren måste denna göras spänningslös t. ex. genom att stickproppen tas ur vägguttaget, detta gäller M-1, M-2, Office 2, A-1och A-2. Vid arbete med DM-2, DM-4, DA-2 och DA-4 måste arbetsbrytaren slås av och låsas.
Allt installationsarbete måste utföras av behörig personal.
natural_image
Illustration of a wall socket connected to an electric plug with a downward arrow indicating power or current flow (no text or symbols)Important.
Do not make any alterations to the machine. Such measures may cause personal injury and the machine to fail. The machine should stand on a flat surface so that it will function properly.
The machine should be placed on a water-proof surface so that any leakage is easily noticeable, make sure there is no bendage on the connection tube when machine is pushed into its place. The tube connections should be regularly checked. Make sure that no leakage has occurred in connection with installation.
Do not leave the machine unattended while using. Close water connection when not using machine. The machine must be disconnected from electrical supply before any maintenance.
This applies to single-phase current machines. Before any maintenance disconnect the plug from the wall socket. Before any maintenance with double-machines: Turn off the headswitch andlock it.
All maintenance and installations must be done of an authorized personnel.
Symptom Kontroll/Åtgärd.
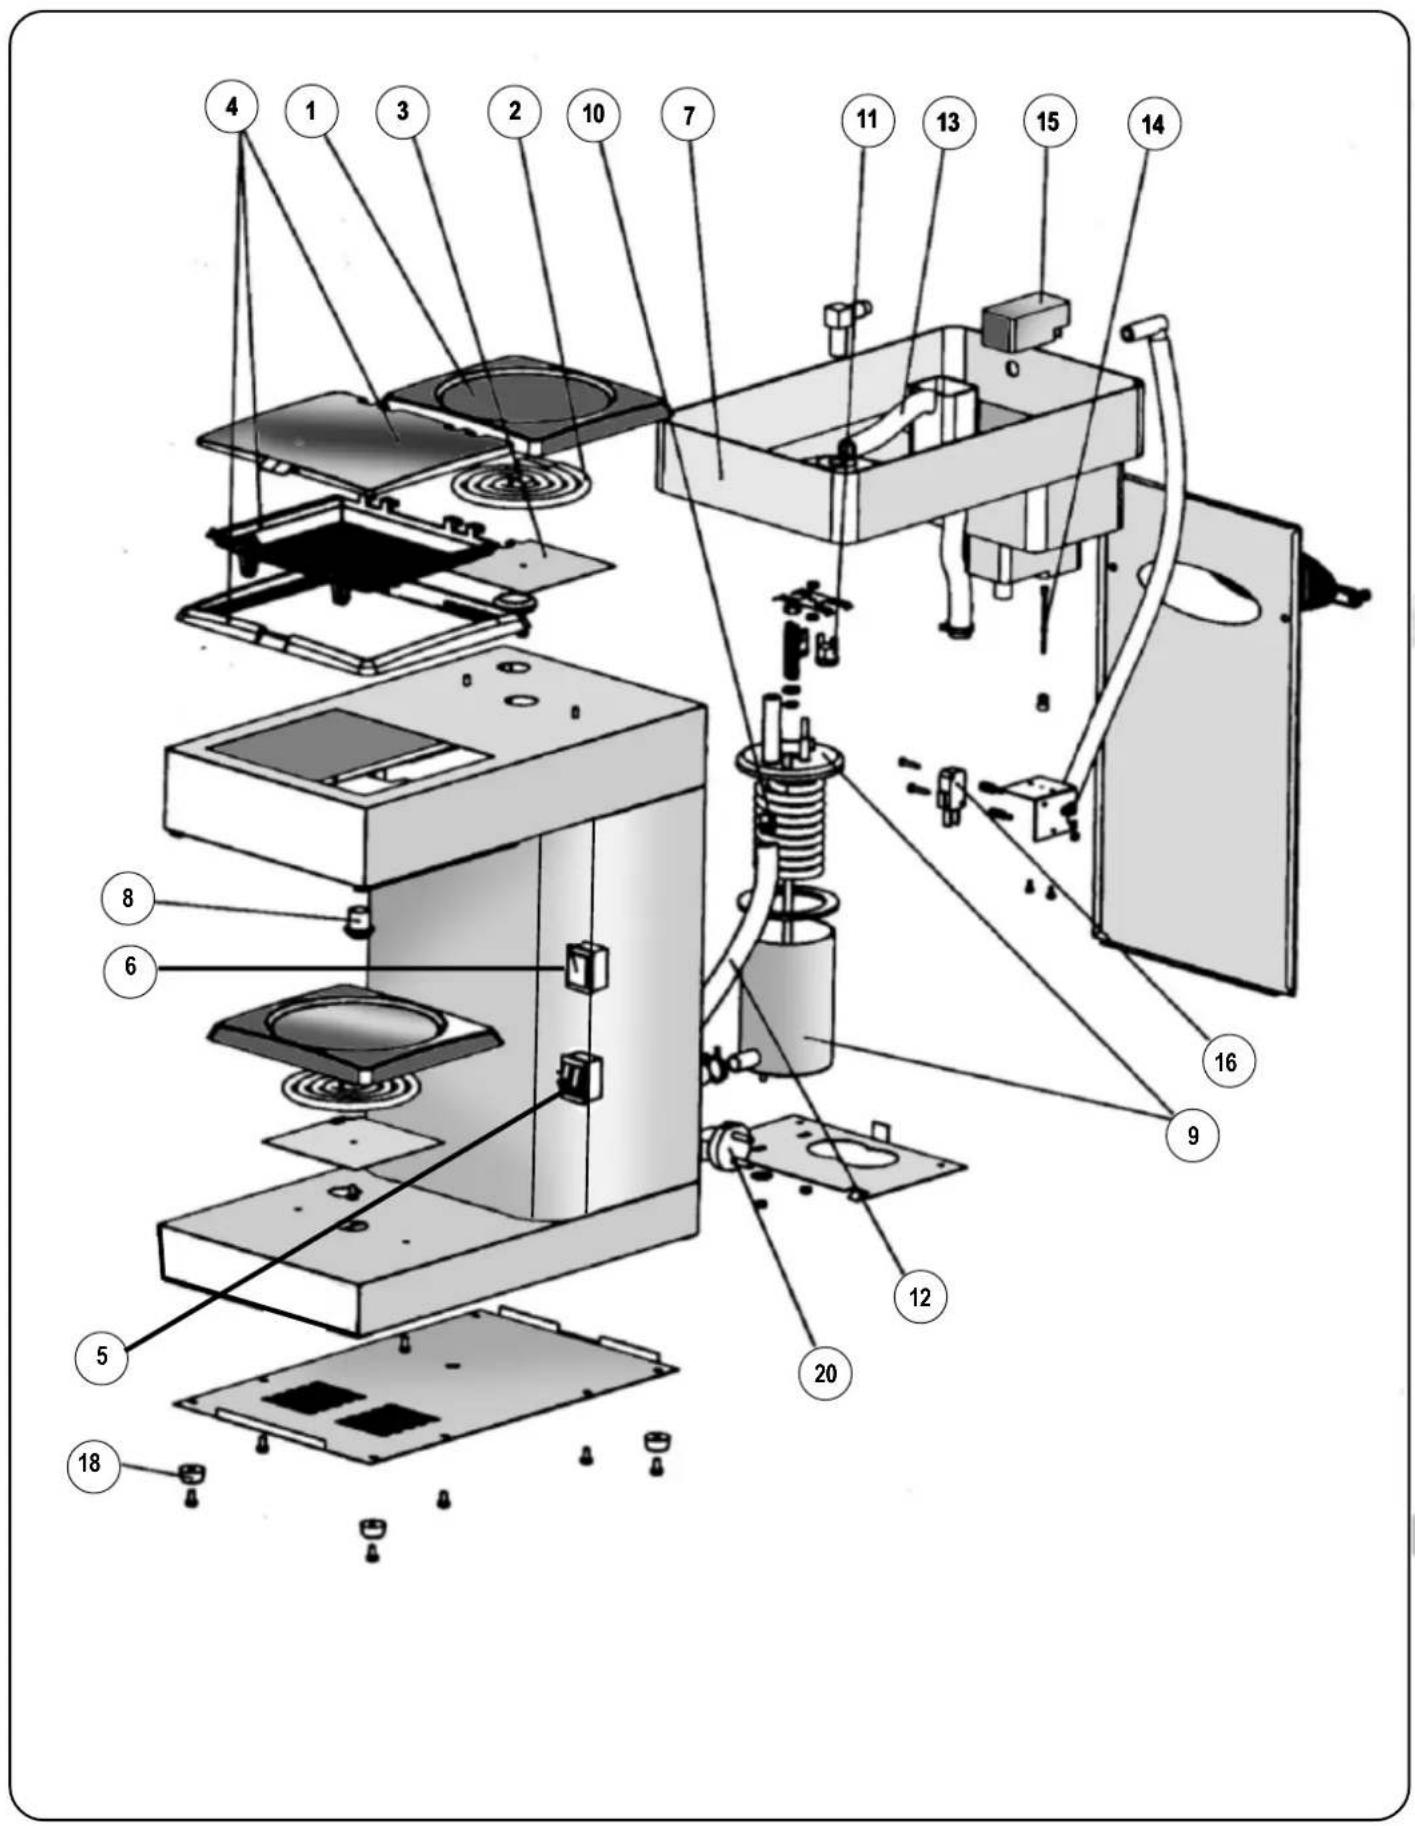
( Siffror i parantes hänvisar till detaljnummer i sprängskissen.)
A. Brytaren (5) tänds inte. 1. Kontrollera anslutningen till vägguttaget/arbetsbrytaren.
- Kontrollera säkringen till väggutaget/arbetsbrytaren (10 amp).
- Kontrollera om värmeplattan (1) blir varm, om så är fallet byt brytare (5).
- Kontrollera anslutningen till brytare (5).
B. Värmeplattan (1) blir ej varm 1. Kontrollera anslutningen till elementet (2). fastän brytaren (6) tänds. 2. Trasigt element(2), om så är fallet byt ut det.
C. Bryggaren ångar kraftigt. 1. Maskinen kan vara i behov av avkalkning.
- Spridarmunstycket (8) kan vara igensatt.
- Veck på slangen (12), (13)?
- Tilloppet till bryggelementet (9) kan vara igensatt.
D. Byggindikatorlampan (6) 1. Överhettningsskyddet (11) har löst ut. Återställes tänds inte, bryggaren börjar med knappen på densamma. Orsak se punkt C. ej att brygga. 2. Kontrollera mikrobrytaren (16).
- Kontrollera flottören (15).
E. Bryggindikatorlampan (6) tänds, 1. Kontrollera anslutningen till bryggelementet (9). men bryggaren börjar ej att brygga. 2. Bryggelementet (9) kan vara trasigt.
Endast A och DA Vattenanslutna Maskiner.
F. Bryggaren tar ej in något vatten. 1. Kontrollera att vattnet ej är avstängt.
- Kontrollera att det ej finns något veck på slangen.
- Kontrollera att det finns spänning i strömkällan.
- Kontrollera magnetventilen (19).
- Kontrollera timern (17). Vid normal funktion skall två knäpp höras; ett vid start samt ett efter ca 70-90 sekunder.
G. Bryggaren slutar ej att ta in 1. Skräp i magnet ventilen (19).
vatten.
- Timer (17) får störimpulser, byt timer.
- Trasig impulsströmbrytare (6).
H. Bryggaren ger fel vattenmängd.
- Kontrollera vattenkranen.
- Veck på slangar.
- Skräp i magnetventilen (19).
- Timern (17) feljusterad. Justeras enligt installationsanvisning.
- Defekt flödesregulator i magnetventilen (19), byt magnetventilen.
Fault Possible Solution Possible Solution (Number in brackets refer to the exploded view)
A. Switch (5) does not light. 1. Check plug connection plug wall socket to wall socket.
-
Check fuse in plug.
-
Check if hot plate (1) becomes warm, if so replace switch (5).
B. Hot plate (1) does not become 1. Check done section for element (2). warm although switch (5) is lit. 2. If element 2 (2) defective (2) plate effective, replace.
C. Brewer omits excess steam. 1. Machine may acquire descalingre descaling.
-
Spray nozzel (8) may need unblocking.
-
Hose (12, 13) may be bent?
-
Inlet to boiler (9) may be blocked. Descale machine - if boiler still defective - replace.
D. Brewing lamp (6) does not 1. Trip-switch (11).Thipassactiva(4d)-hesetactivat buttonset with button light, machine will not brew. For possible fault/poslifierade/Gsolution see C.
-
Check microswicth (16).
-
Check float (15).
E. Brewing lamp (6) is lit but 1. Check connection to boiler (9). machine will not brew. 2. Boiler unit (9) may be replaced, may need replacing.
Following applies to A and DA machines only.
F. The machine does not take in 1. Make sure Water-inlet is water-oblsted, not closed. water. 2. Make sure the tube is not bent. 2. Make sure the tube is not bent.
-
Check solenoid (19).
-
Check the timer (17). At normal function two clicks should be heard: one at start and one after approx. 90-110 seconds.
G. The machines does not stop 1. Dirt in the sDichoid(19) splenoid (19).
taking in water.
-
The timer (17) is broken, change.
-
Defective switch. (6).
H. The machine is giving wrong 1. Check watertap.
amount of water.
-
Bent tube.
-
Dirt in solenoid (19).
-
Timer (17) wrongly adjusted. Adjust according to installation manual.
-
Defect floatregulator in solenoid (19), change solenoid.
text_image
Exploded view diagram of a mechanical device with numbered components for identification
natural_image
Pure vertical lines without any text, numbers, or symbols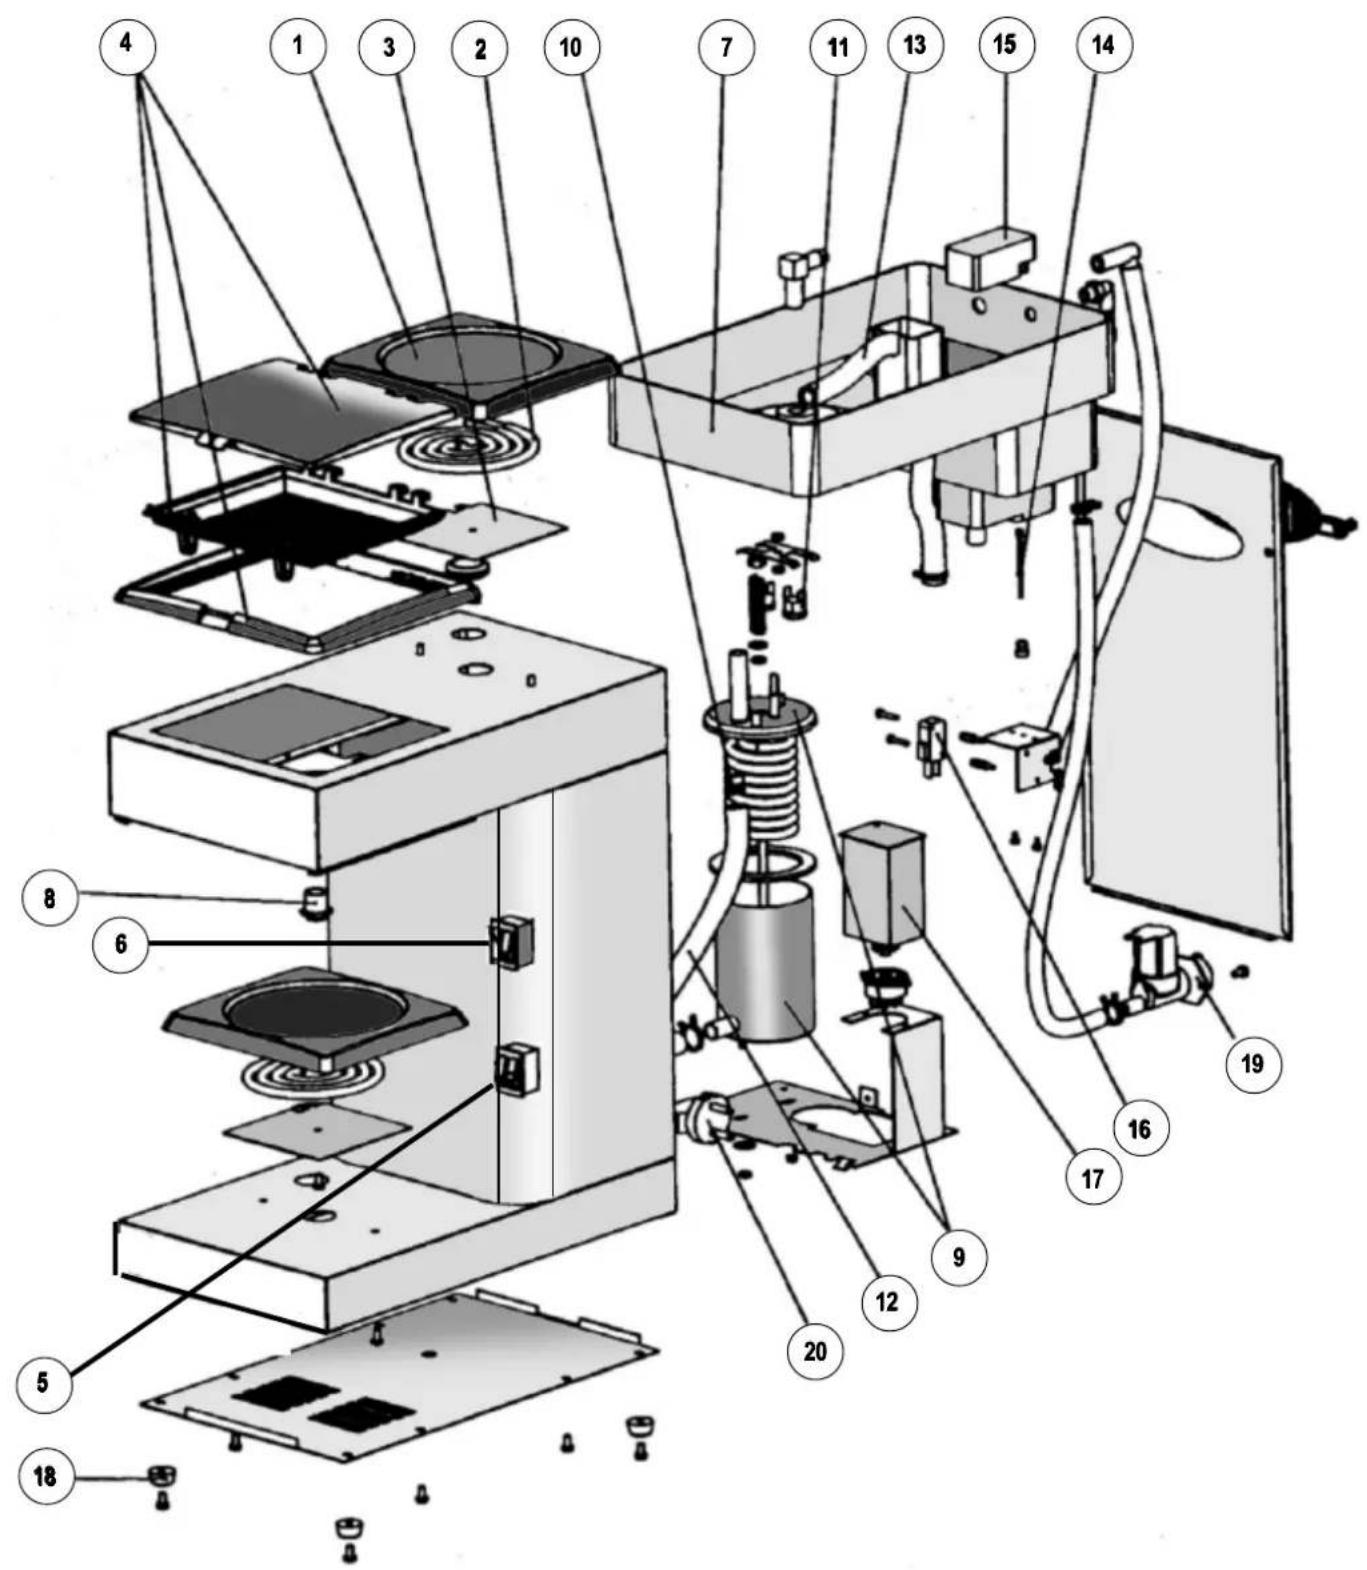
text_image
Exploded view diagram of a device with numbered components for identification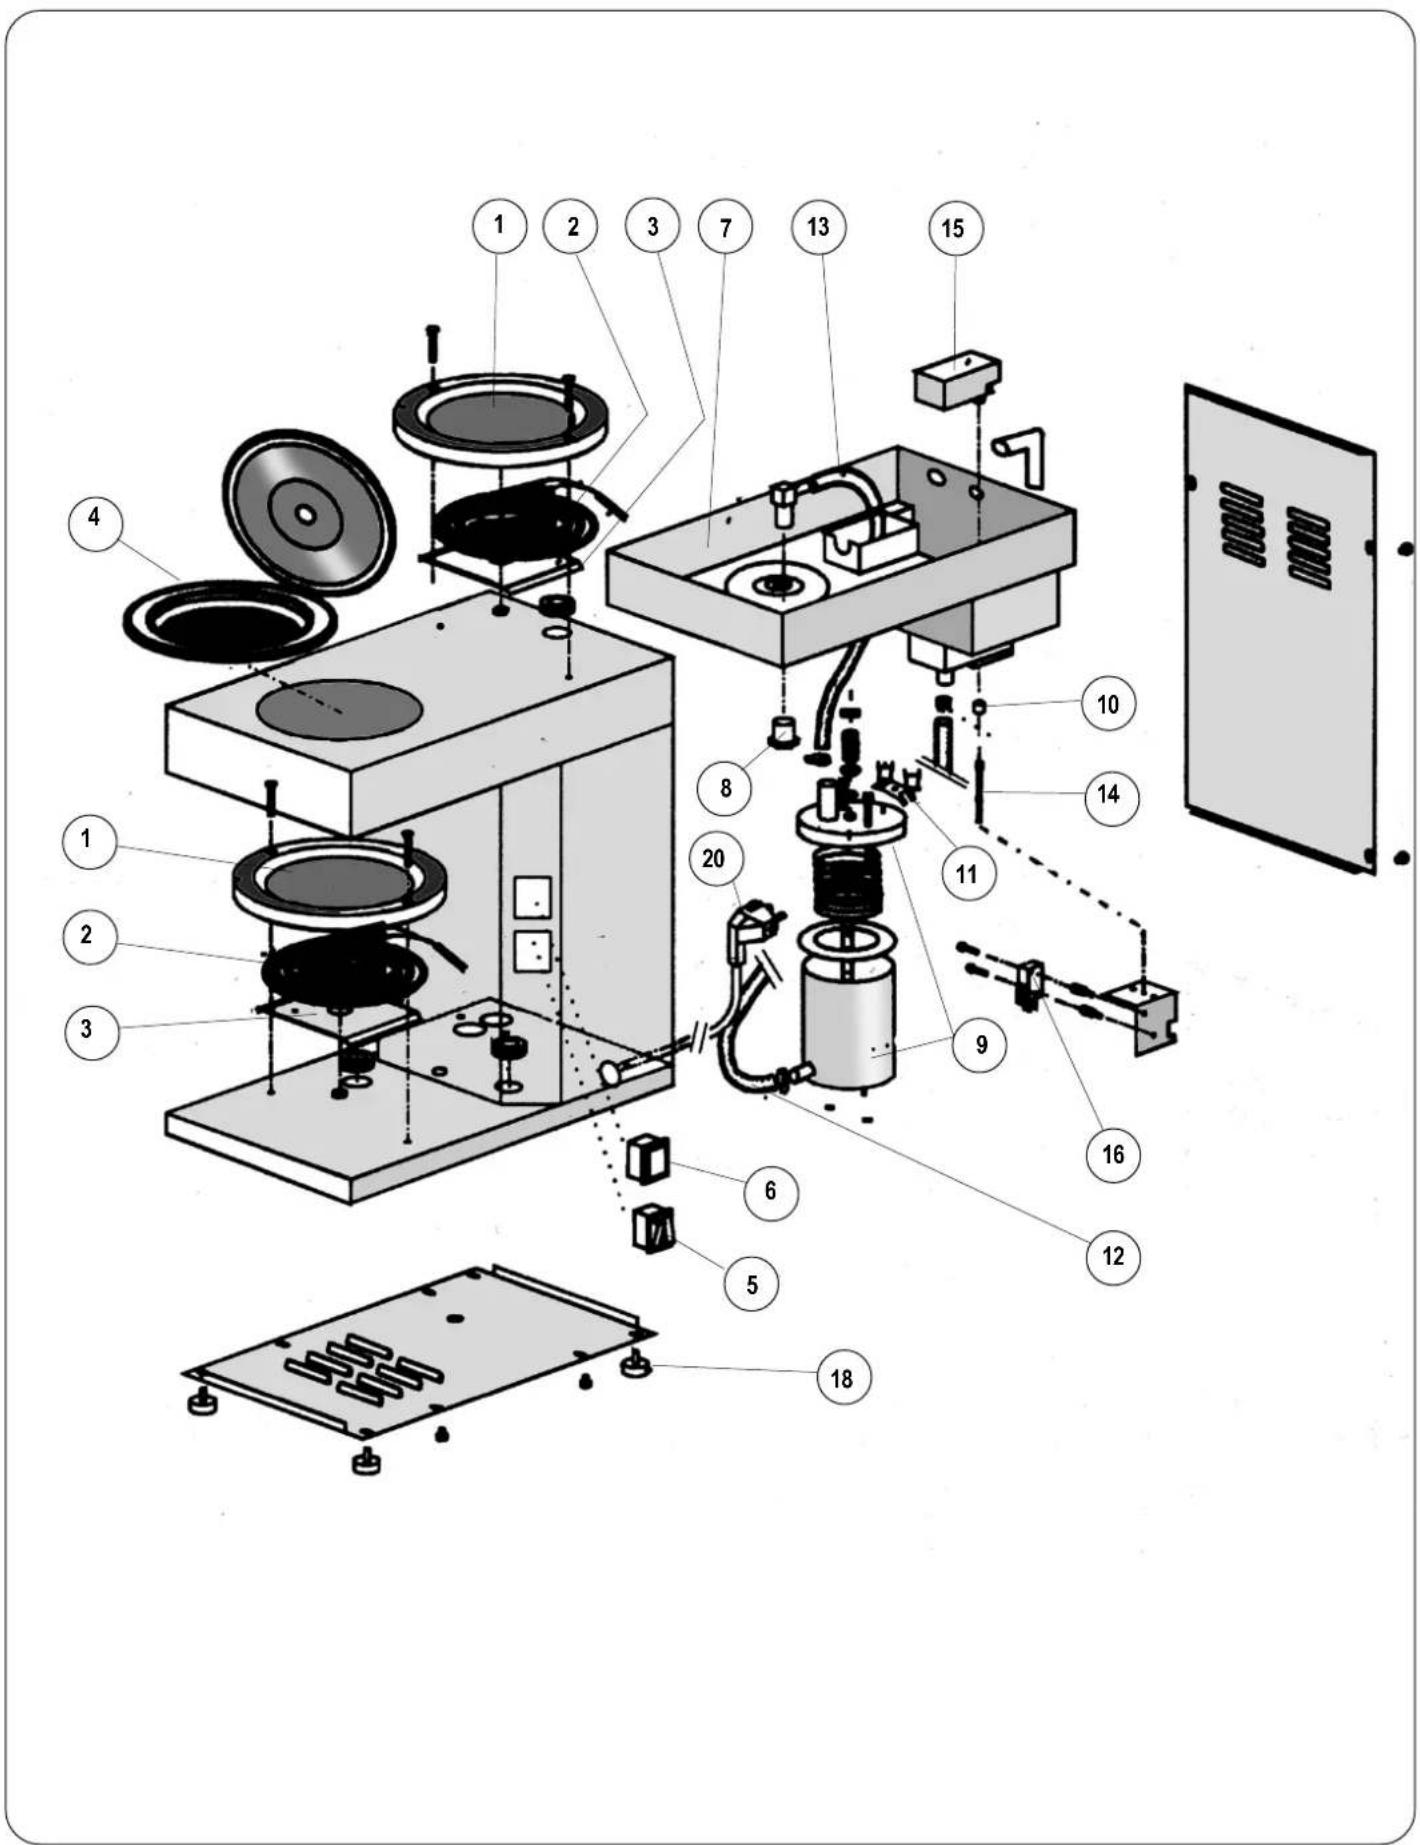
text_image
Exploded view diagram of an electronic device with numbered components for identificationBenämning Beställ- Detalj.nr i M-1 M-2 DM-2 DM-4
ningsnr. Exploded view (antal detalje)
| Värmehällstallrik 130300 rund 1 1224 | |||||||
| Värmehällstallrik 1303001 fyrkantig 1 1224 | |||||||
| Värmehällselement 160101 2 1224 | |||||||
| Stödplåt | 130301 3 | 1224 | |||||
| Lock med sil | 120404 | rund | 4 | 1 | 1 | 2 | 2 |
| Lock med sil | 1204041 | fyrkantig 4 1122 | |||||
| Strömställare enkel 160801-04 | 5 | 1020 | |||||
| Strömställare dubbel | 160802-04 | 5 | 0 | 1 | 0 | 2 | |
| Bryggindikator | 160804-03 | 6 | 1122 | ||||
| Plasttank | 120400 7 | 1122 | |||||
| Spridarmunstycke | 120412-01 | 8 | 1122 | ||||
| Bryggelement kpl. | 120501-02 | 9 | 1122 | ||||
| Backventil | 120612-02 | 10 | 1 | 1 | 2 | 2 | |
| Överhettningsskydd | 160212-03 | 11 | 1 | 1 | 2 | 2 | |
| Kallvattenslang | 150502 12 | 1122 | |||||
| Hetvattenslang 150504 13 1122 | |||||||
| Brytpinne | 180170 14 | 1122 | |||||
| Flottör | 120402 15 | 1122 | |||||
| Mikrobrytare | 160821 16 | 1122 | |||||
| Fot | 120320-03 | 18 | 4 | 4 | 4 | 4 | |
| Nätsladd inkl. plint | 160522 20 | 1100 | |||||
| Nätsladd 160523 20 0011 | |||||||
| Glaskanna | 110303 | ej i bild | 1 | 1 | 2 | 2 | |
| Filterhällare/ plast | 110200 | ej i bild | 1 | 1 | 2 | 2 | |
| Filterhällare/rostfri | 1102016 | ej i bild | 1 | 1 | 2 | 2 | |
Funktionsbeskrivning
Kaffebryggare för manuell vattenpåfyllning.
I tanken finns en flottör som aktiverar en mikrobrytare när vatten fylls på.
Mikrobrytaren aktiverar i sin tur bryggelementet och bryggningen startar.
Under bryggningen lyser brygglampan på maskinens högra sida.
Då vattnet är slut i tanken så bryts strömmen till bryggelementet och brygglampan släcks.
Den nedre värmeplattan är alltid påkopplad då bryggaren är påslagen.
Den övre värmeplattan aktiveras med en separat strömbrytare.
Maskinen är försedd med överhettningsskydd som återställes manuellt efter det att strömmen har brutits (Se servicemanualen).
| Benämning | Beställ- ningsnr. Exploded view ( antal detaljer ) | |||||
| Värmehällstallrik 130300 rund 1 1 2 2 4 | ||||||
| Värmehällstallrik 1303001 fyrkantig 1 1 2 2 4 | ||||||
| Värmehällselement 160101 | 2 1 2 2 4 | |||||
| Stödplåt | 130301 | 3 1 2 2 4 | ||||
| Lock med sil | 1204041 fyrkantig | 4 | 1 | 1 | 2 | |
| Strömställare enkel 160801-04 | 5 1 0 2 0 | |||||
| Strömställare dubbel | 160802-04 | 5 | 0 | 1 | 0 | |
| Impulsbrytare | 160805-04 | 6 | 1 | 1 | 2 | |
| Plasttank | 120418-01 | 7 | 1 | 1 | 2 | |
| Spridarmunstycke | 120412-01 | 8 | 1 | 1 | 2 | |
| Bryggelement kompl. | 120501-02 | 9 | 1 | 1 | 2 | |
| Backventil | 120612-02 | 10 1 1 2 2 | ||||
| Överhettningsskydd | 160212-03 | 11 | 1 | 1 | 2 | |
| Kallvattenslang | 150502 | 12 1 1 2 2 | ||||
| Hetvattenslang | 150504 | 13 1 1 2 2 | ||||
| Brytpinne | 180170 | 14 1 1 2 2 | ||||
| Flottör | 120402 | 15 1 1 2 2 | ||||
| Mikrobrytare | 160821 | 16 1 1 2 2 | ||||
| Timer | 160205 | 17 1 1 2 2 | ||||
| Fot | 120320-03 | 18 4 4 4 4 | ||||
| Magnetventil enkel | 120620-01 | 19 | 1 | 1 | 0 | |
| Magnetventil dubbel 120621-01 | 19 0 0 1 1 | |||||
| Nätsladd inkl. plint | 160522 | 20 | 1 | 1 | 0 | |
| Nätsladd | 160523 | 20 0 0 1 1 | ||||
| Anslutningsslang | 150503 | ej i bild | 1 | 1 | 1 | |
| Glaskanna | 110303 | ej i bild | 1 | 1 | 2 | |
| Filterhållare/plast | 110200 | ej i bild | 1 | 1 | 2 | |
| Filterhållare/rostfri | 1102016 | ej i bild | 1 | 1 | 2 | |
Funktionsbeskrivning
Kaffebryggare för automatisk vattenpåfyllning.
I tanken finns en flottör som aktiverar en mikrobrytare när vatten fylls på.
Mikrobrytaren aktiverar i sin tur bryggelementet och bryggningen startar.
Under bryggningen lyser brygglampan på maskinens högra sida.
Då vattnet är slut i tanken så bryts strömmen till bryggelementet och brygglampan släcks.
Den nedre värmeplattan är alltid påkopplad då bryggaren är påslagen.
Den övre värmeplattan aktiveras med en separat strömbrytare.
Maskinen är försedd med överhettningsskydd som återställes manuellt efter det att strömmen har brutits (Se servicemanualen).
| Description Article No. Detail No.in MA#Mo2DM-2 DM-4 | Detail No.in Exploded view ( Amo#p#r per pe#t/unit ) | ||||||
| Hotplate 130300 round 1 1224 | 130300 | round | 1 | 1 | 2 | 2 | 4 |
| Hotplate 1303001 quadrangular 1 1224 | 1303001 | quadrangular | 1 | 1 | 2 | 2 | 4 |
| Hotplate heater 160101 | 160101 | 2 1224 | 2 | 1 | 2 | 2 | 4 |
| Support plate | 130301 | 3 | 1 | 2 | 2 | 4 | |
| Support plate | 251109-01 | quadrangular | 3 | 1 | 2 | 2 | 4 |
| Cover and strainer | 120404 | round | 4 | 1 | 1 | 2 | 2 |
| Cover and strainer | 1204041 | quadrangular | 4 | 1 | 1 | 2 | 2 |
| Main switch | 160801-04 | 5 | 1 | 0 | 2 | 0 | |
| Main switch | 160802-04 | 5 | 0 | 1 | 0 | 2 | |
| Brewing lamp | 160804-03 | 6 | 1 | 1 | 2 | 2 | |
| Plastic tank | 120400 | 7 | 1 | 1 | 2 | 2 | |
| Spray nozzle | 120412-01 | 8 | 1 | 1 | 2 | 2 | |
| Boiler compl. | 120501-02 | 9 1122 | 1 | 1 | 2 | 2 | |
| Non return valve | 120612-02 | 10 | 1 | 1 | 2 | 2 | |
| Trip switch | 160212-03 | 11 | 1 | 1 | 2 | 2 | |
| Cold water hose | 150502 | 12 | 1 | 1 | 2 | 2 | |
| Hot water hose | 150504 | 13 | 1 | 1 | 2 | 2 | |
| Pin | 180170 | 14 | 1122 | 1 | 2 | 2 | |
| Float | 120402 | 15 | 1 | 1 | 2 | 2 | |
| Microswitch | 160821 | 16 | 1 | 1 | 2 | 2 | |
| Timer | 160205 | 17 | 1 | 1 | 2 | 2 | |
| Feet | 120320-03 | 18 | 4 | 4 | 4 | 4 | |
| Solenoid single | 120620-01 | 19 | 1 | 1 | 0 | 0 | |
| Solenoid dubble | 120621-01 | 19 | 0 | 0 | 1 | 1 | |
| Connection lead | 160522 | 20 | 1 | 1 | 0 | 0 | |
| Connection lead | 160523 | 20 | 0 | 0 | 1 | 1 | |
| Connection tube | 150503 | not shown | 1 | 1 | 1 | 1 | |
| Glass pot | 110303 | not shown | 1 | 1 | 2 | 2 | |
| Filterholder/plastic | 110200 | not shown | 1 | 1 | 2 | 2 | |
| Filterholder/stainless | 1102016 | not shown | 1 | 1 | 2 | 2 | |
Instructions
Coffee machine for manual water filling.
In the tank there is a float which activates a microswitch when water is filled.
Microswitch activates element unit and brewing starts.
During brewing the brewlamp is lit.
When the tank is empty the current to the boiler is cut and the brewlamp is switched off.
The bottom hot plate is always heated when the machine is switched on.
The upper hot plate is turned on with a separate switch.
The machine is equipped with an overheating protection which is manually restored when the current has been cut.
(See the service manual).
Sparepart list for
A-1, A-2, DA-2 and DA-4.
| Description Article No. | Detail | Article No-2 | DA-2 | DA-4 | |||
| Exploded view. | A-1( | A-2(Am | A-2Aum | PAupepanitinit) | |||
| Hotplate | 130300 | round 1 1 | 130300 2 round | 1 | 1 | 2 | 2 |
| Hotplate | 1303001 | quadrangular | 13030012 quadangular | 1 | 1 | 2 | 2 |
| Hotplate heater | 160101 2 | 160101 | 1224 | 2 | 1 | 2 | 2 |
| Support plate | 130301 | round | 3 | 1 | 2 | 2 | |
| Support plate | 251109-01 | quadrangular | 3 | 1 | 2 | 2 | |
| Cover and strainer | 120404 | round | 4 | 1 | 1 | 2 | |
| Cover and strainer | 1204041 | quadrangular | 4 | 1 | 1 | 2 | |
| Main switch | 160801-04 | 5 | 1 | 0 | 2 | ||
| Main switch | 160802-04 | 5 | 0 | 1 | 0 | ||
| Brewing switch/lamp | 160805-04 | 6 | 1 | 1 | 2 | ||
| Plastic tank | 120418 7 | 1122 7 | 1 | 1 | 2 | ||
| Spray nozzle | 120412-01 | 8 | 1 | 1 | 2 | ||
| Boiler compl. | 120501-02 | 9 1122 | 1 | 1 | 2 | ||
| Non return valve | 120612-02 | 10 | 1 | 1 | 2 | ||
| Trip switch | 160212-03 | 11 | 1 | 1 | 2 | ||
| Cold water hose | 150502 12 | 1122 12 | 1 | 1 | 2 | ||
| Hot water hose | 150504 13 | 1122 13 | 1 | 1 | 2 | ||
| Pin | 180170 14 | 1122 14 | 1 | 1 | 2 | ||
| Float | 120402 15 | 1122 15 | 1 | 1 | 2 | ||
| Microswitch | 160821 16 | 1122 16 | 1 | 1 | 2 | ||
| Timer | 160205 17 | 1122 17 | 1 | 1 | 2 | ||
| Feet | 120320-03 | 18 | 4 | 4 | 4 | ||
| Solenoid singel | 120620-01 | 19 | 1 | 1 | 0 | ||
| Solenoid dubble | 120621-01 | 19 | 0 | 0 | 1 | ||
| Connection lead | 160522 20 | 1100 20 | 1 | 1 | 0 | ||
| Connection lead | 160523 20 | 0011 20 | 0 | 0 | 1 | ||
| Connection tube | 150503 | not shown | 1 | 1 | 1 | ||
| Glass pot | 110303 | not shown | 1 | 1 | 2 | ||
| Filterholder/plastic | 110200 | not shown | 1 | 1 | 2 | ||
| Filterholder/stainless | 1102016 | not shown | 1 | 1 | 2 | ||
Instructions
Coffee machine for automatic water filling.
In the tank there is a float which activates a microswitch when water is filled.
Microswitch activates element unit and brewing starts.
During brewing the brewlamp is lit.
When the tank is empty the current to the boiler is cut and the brewlamp is switched off.
The bottom hot plate is always heated when the machine is switched on.
The upper hot plate is turned on with a separate switch.
The machine is equipped with an overheating protection which is manually restored when
the current has been cut. (See the service manual).
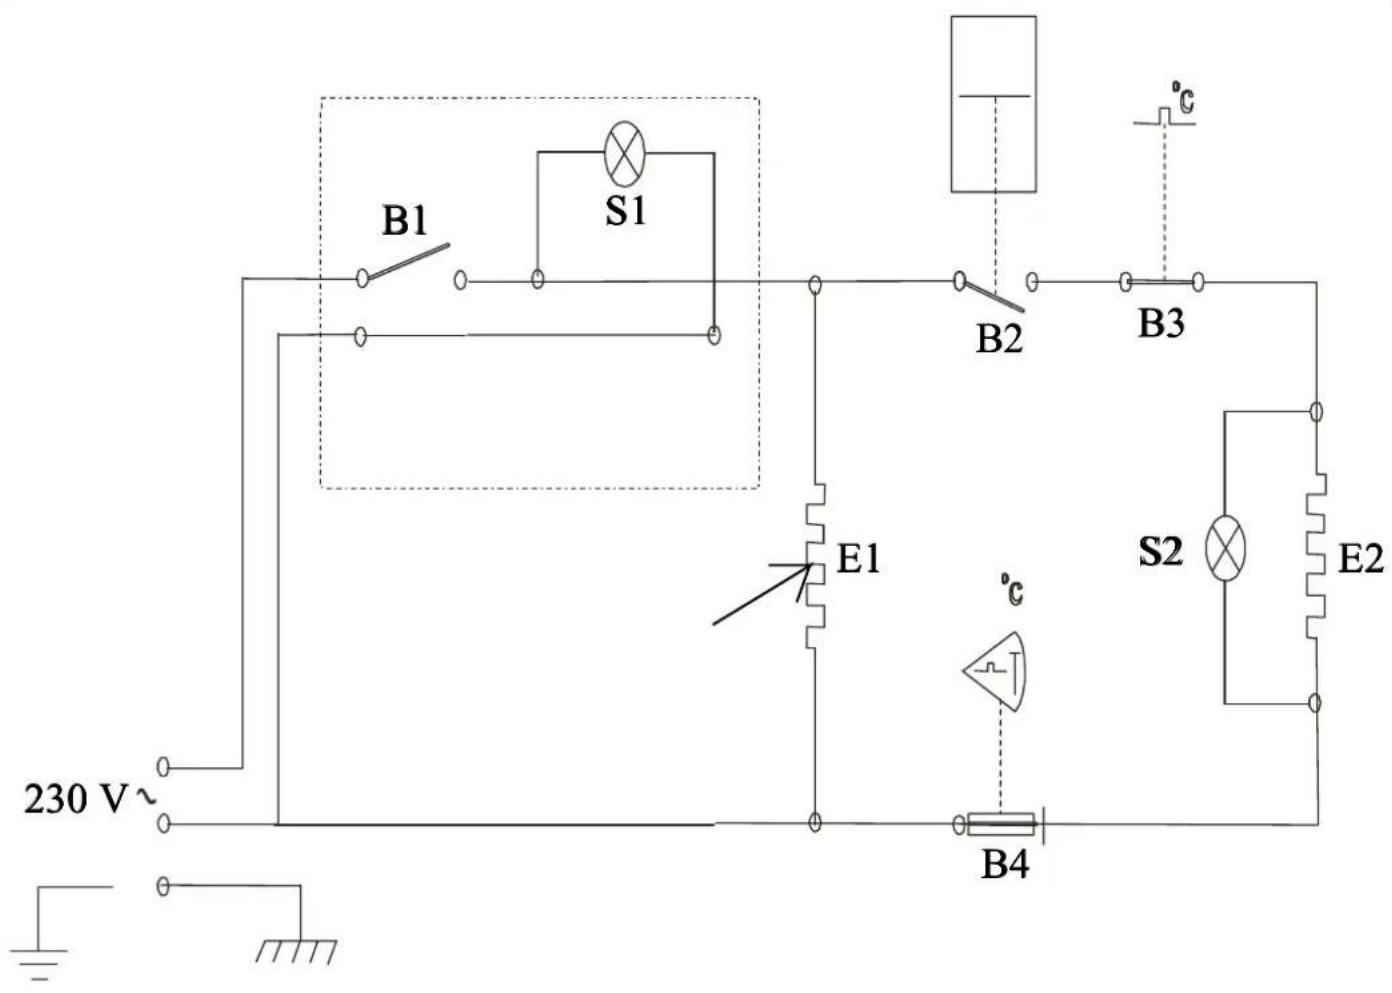
text_image
230 V~ B1 S1 E1 B2 B3 °C °C S2 E2 B4OFFICE
B1 Huvudbrytare/brytare för element E1
B2 Mikrobrytare för element E2
B3 Aut. Överhettningsskydd för element E2
B4 Man. Överhettningsskydd för element E2
S1 Signallampa för brytare B2
S2 Signallampa för element E2
E1 Underhållsvärmeelement (Ej termos)
E2 Bryggelement
B1 Main switch/switch for element E1
B2 Microswitch for element E2
B3 Aut. High limit for element E2
B4 Man. High limit for element E2
S1 Lamp for switch B1
S2 Lamp for element E2
E1 Hot plate element (Exclude termos machine)
E2 Brewing element
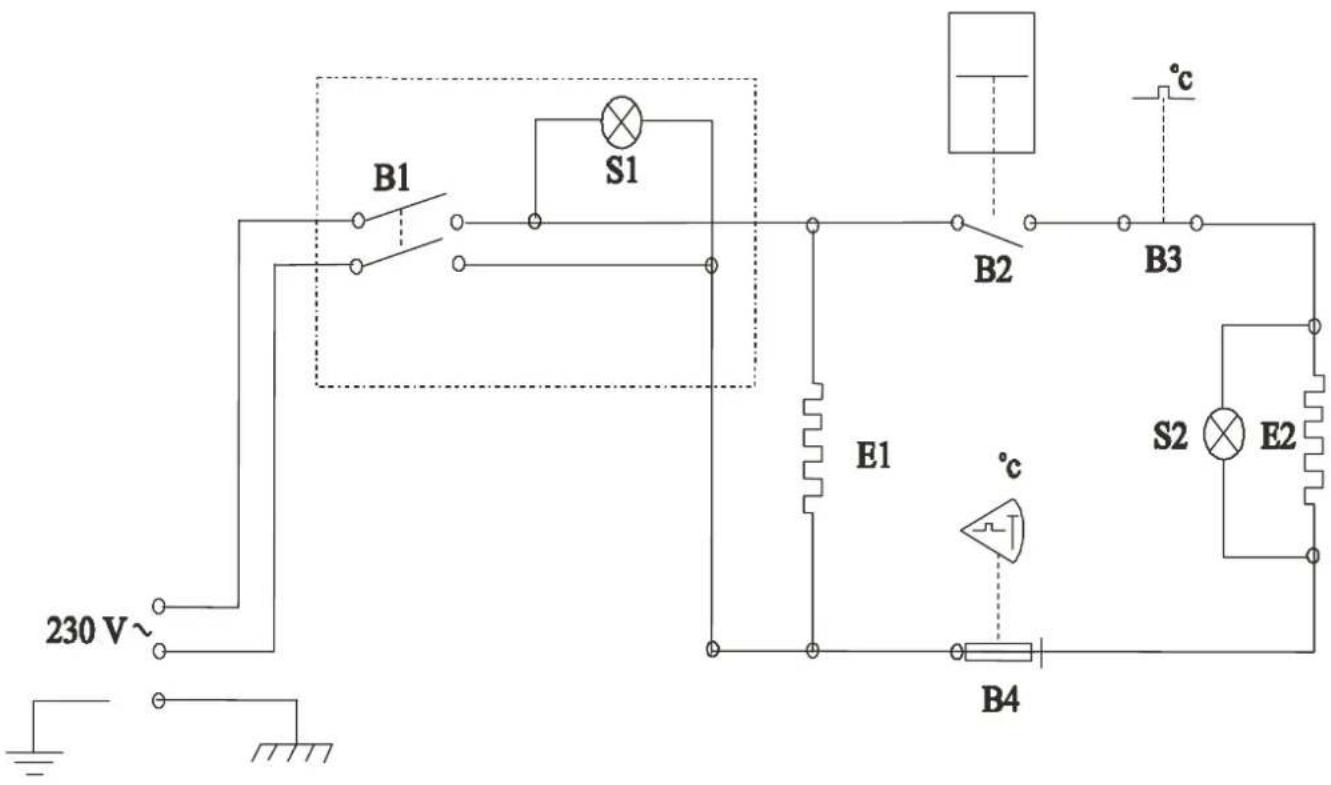
text_image
230 V~ B1 S1 B2 B3 E1 °C B4 S2 E2 °CM-1
B1 Huvudbrytare/brytare för element E1
B2 Mikrobrytare för element E2
B3 Aut. Överhettningsskydd för element E2
B4 Man. Överhettningsskydd för element E2
S1 Signallampa för brytare B1
S2 Signallampa för element E2
E1 Underhållsvärmeelement
E2 Bryggelement
M-1
B1 Main switch/switch for element E1
B2 Microswitch for element E2
B3 Aut. High limit for element E2
B4 Man. High limit for element E2
S1 Lamp for switch B1
S2 Lamp for element E2
E1 Hot plate element
E2 Brewing element
text_image
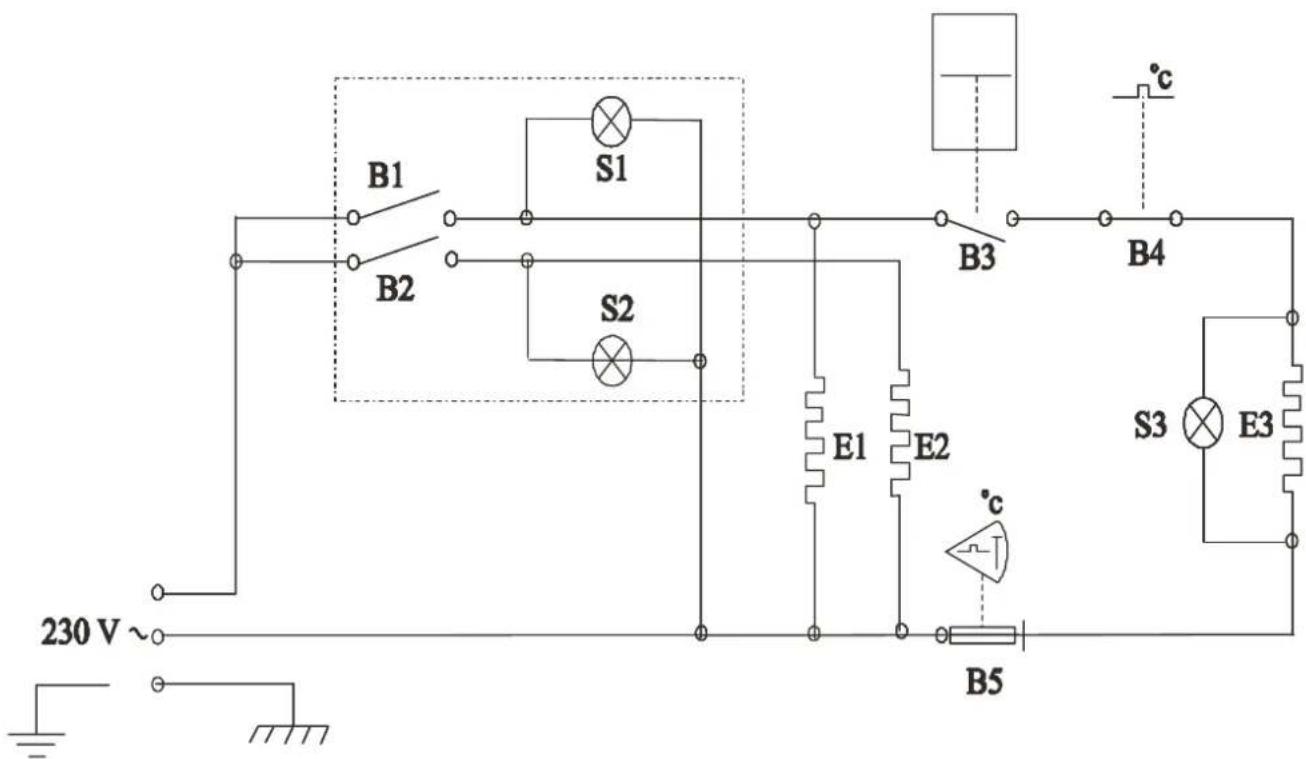
230 V B1 B2 S1 S2 E1 E2 °c B3 B4 S3 E3 B5M-2
B1 Huvudbrytare/brytare för element E1
B2 Brytare för element E2
B3 Mikrobrytare för element E3
B4 Aut. Överhettningsskydd för element E3
B5 Man. Överhettningsskydd för element E3
S1 Signallampa för brytare B1
S2 Signallampa för brytare B2
S3 Signallampa för element E3
E1 Nedre underhållsvärmeelement
E2 Övre underhållsvärmeelement
E3 Bryggelement
M-2
B1 Main switch/switch for element E1
B2 Switch for element E2
B3 Microswitch for element E3
B4 Aut. High limit for element E3
B5 Man. High limit for element E3
S1 Lamp for switch B1
S2 Lamp for switch B2
S3 Lamp for element E3
E1 Bottom hot plate element
E2 Upper hot plate element
E3 Brewing element
text_image
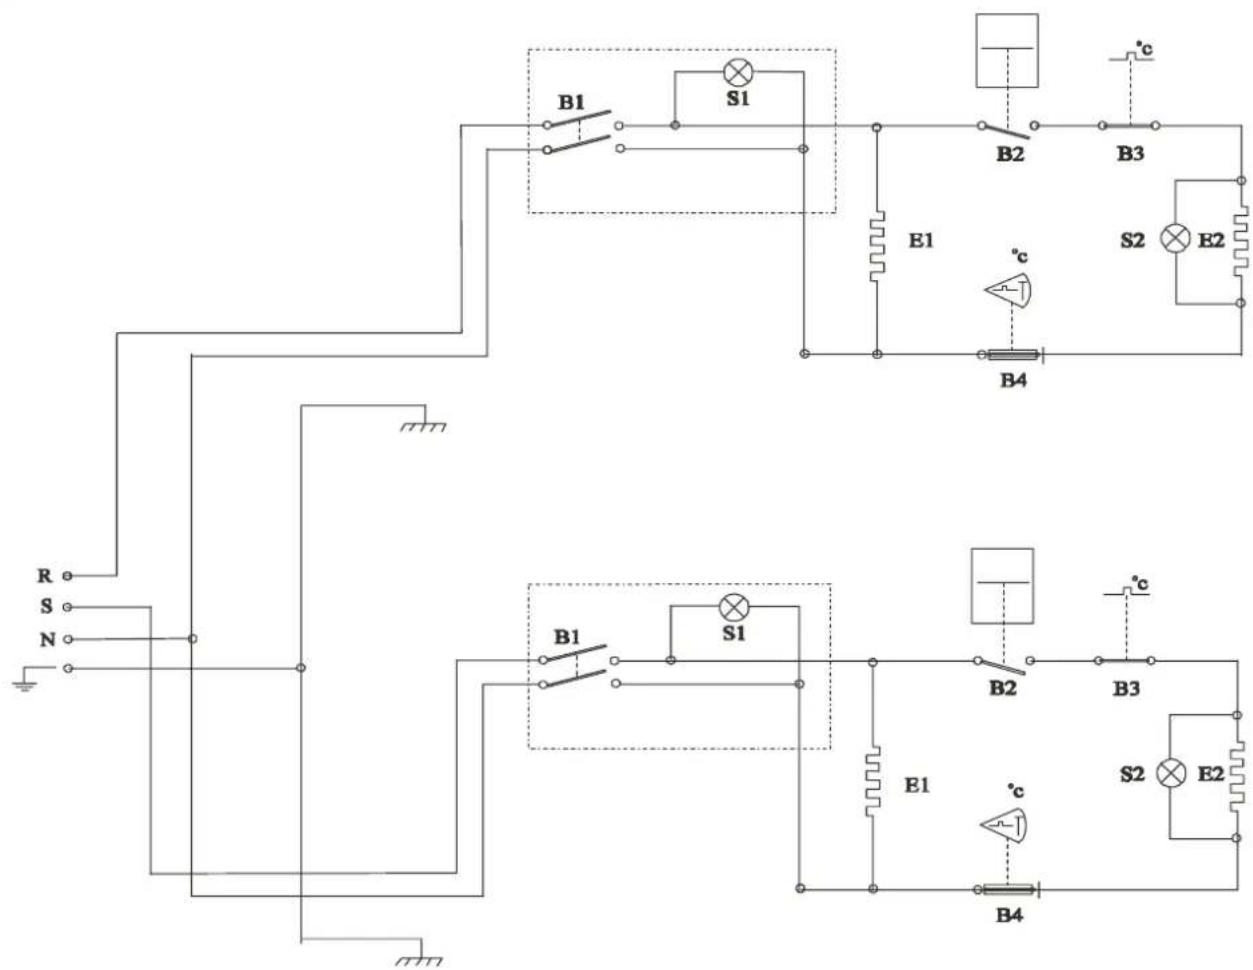
R S N B1 S1 B2 B3 E1 °c S2 E2 B4 B1 S1 B2 B3 °c E1 °c S2 E2 B4DM-2
B1 Huvudbrytare/brytare för element E1 - E2
B2 Mikrobrytare för element E2
B3 Aut. Överhettningsskydd för element E2
B4 Man. Överhettningsskydd för element E2
S1 Signallampa för brytare B1
S2 Signallampa för element E2
E1 Underhållsvärmeelement
E2 Bryggelement
DM-2
B1 Main switch/switch for element E1 - E2
B2 Microswitch for element E2
B3 Aut. High limit for element E2
B4 Man. High limit for element E2
S1 Lamp for switch B1
S2 Lamp for element E2
E1 Hot plate element
E2 Brewing element
flowchart
graph TD
    subgraph Top_Layer
        B1 --> B2
        B2 --> S1
        S1 --> B3
        S2 --> B3
        B3 --> B4
        B4 --> S3
        S3 --> E3
        E3 --> B5
    end
    subgraph Bottom_Layer
        B1 --> B2
        B2 --> S1
        S1 --> B3
        S2 --> B3
        B3 --> B4
        B4 --> S3
        S3 --> E3
        E3 --> B5
    end
    R --> A
    S --> A
    N --> A
    A --> B
    B --> C
    C --> D
    D --> E1
    E1 --> F
    F --> G
    G --> H
    H --> I
    I --> J
    J --> K
    K --> L
    L --> M
    M --> N
    N --> O
    O --> P
    P --> Q
    Q --> R
    R --> S
    S --> T
    T --> U
    U --> V
    V --> W
    W --> X
    X --> Y
    Y --> Z
    Z --> AA
    AA --> AB
    AB --> AC
    AC --> AD
    AD --> AE
    AE --> AF
    AF --> AG
    AG --> AH
    AH --> AI
    AI --> AJ
    AJ --> AK
    AK --> AL
    AL --> AM
    AM --> AN
    AN --> AO
    AO --> AP
    AP --> AQ
    AQ --> AR
    AR --> AS
    AS --> AT
    AT --> AU
    AU --> AV
    AV --> AW
    AW --> AX
    AX --> AY
    AY --> AZ
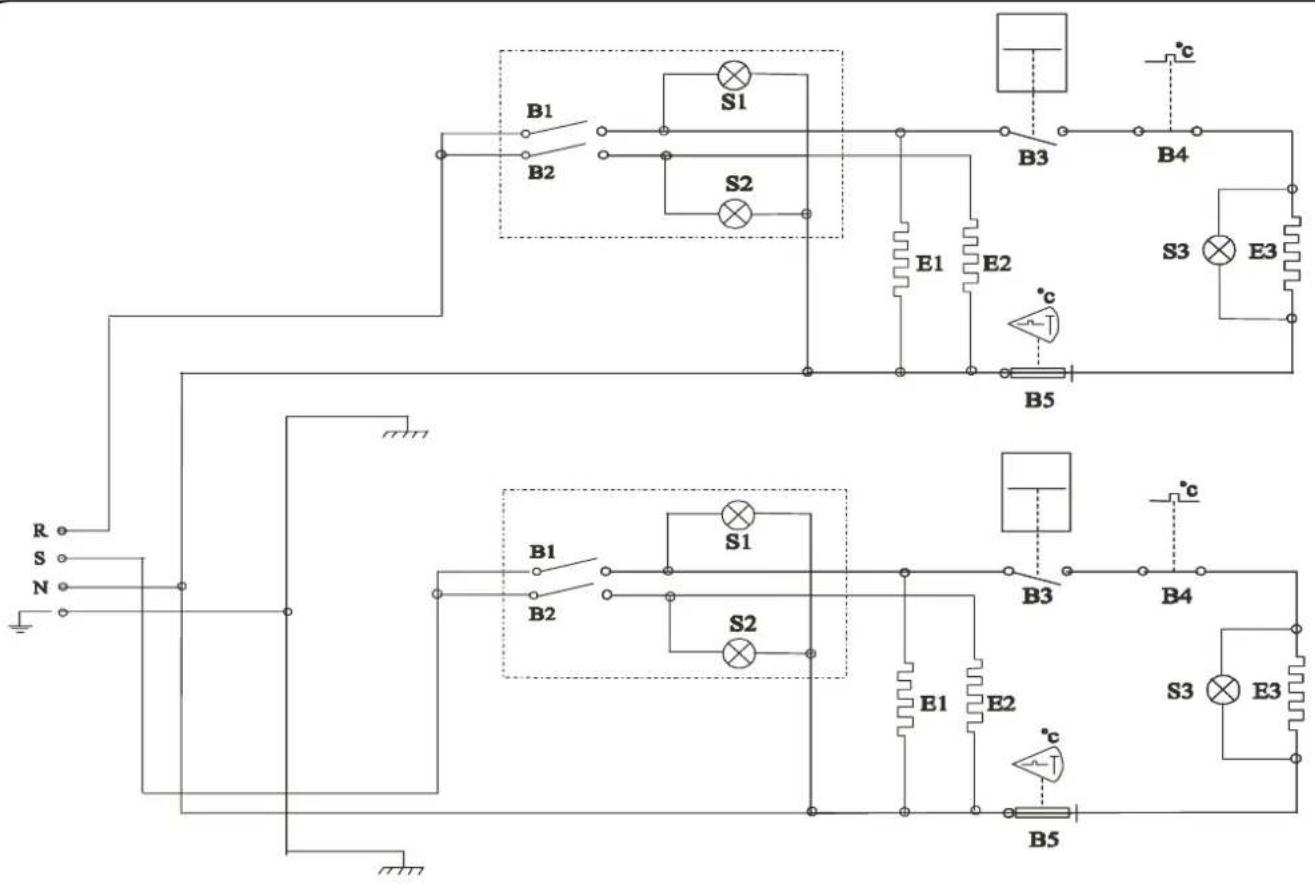
DM-4
B1 Huvudbrytare/brytare för element E1
B2 Brytare för element E2
B3 Mikrobrytare för element E3
B4 Aut. Överhettningsskydd för element E3
B5 Man. Överhettningsskydd för element E3
S1 Signallampa för brytare B1
S2 Signallampa för brytare B2
S3 Signallampa för element E3
E1 Nedre underhållsvärmeelement
E2 Övre underhållsvärmeelement
E3 Bryggelement
DM-4
B1 Main switch/switch for element E1
B2 Switch for element E2
B3 Microswitch for element E3
B4 Aut. High limit for element E3
B5 Man. High limit for element E3
S1 Lamp for switch B1
S2 Lamp for switch B2
S3 Lamp for element E3
E1 Bottom hot plate element
E2 Upper hot plate element
E3 Brewing element
text_image
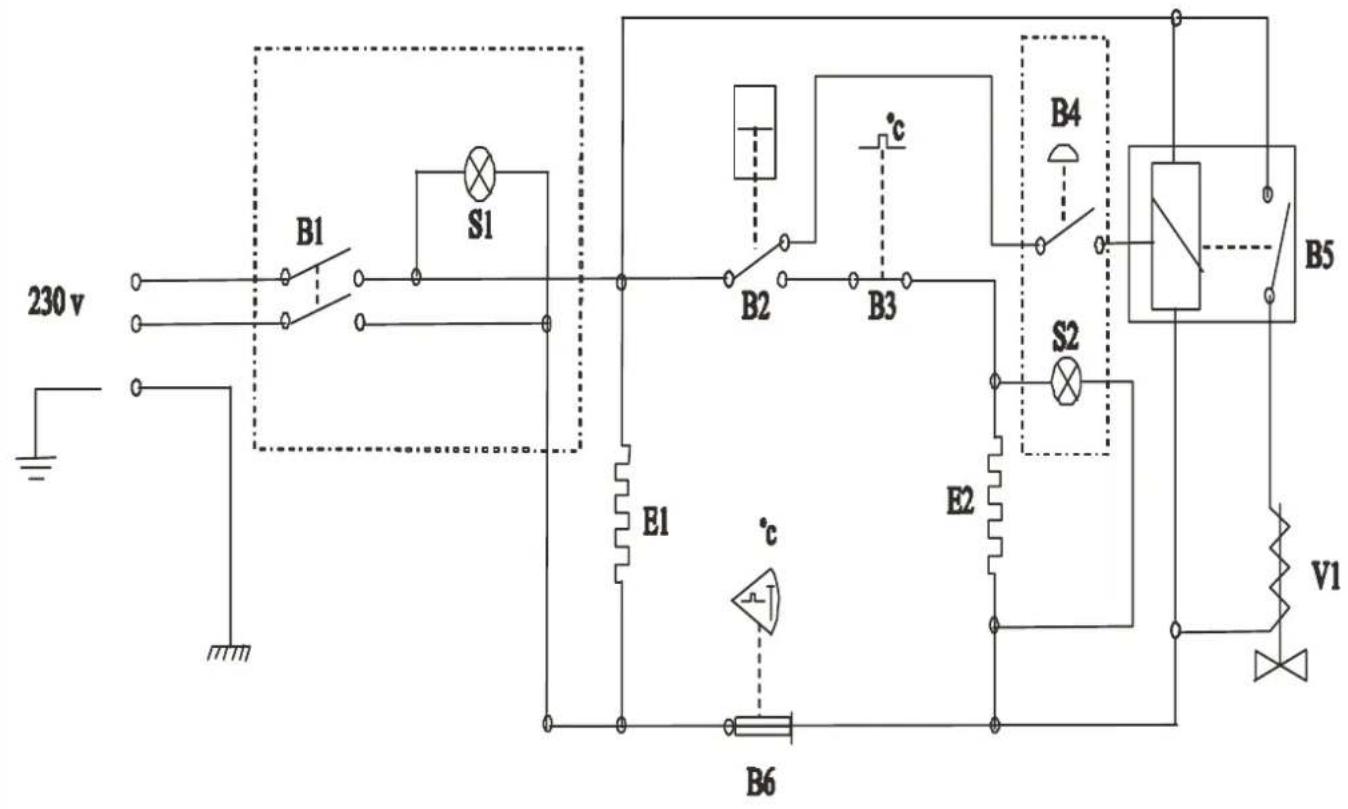
230 v B1 S1 B2 B3 E1 c B6 E2 B4 S2 B5 V1A-1
B1 Huvudbrytare/brytare för element E1
B2 Mikrobrytare för element E2
B3 Aut. Överhettningsskydd för element E2
B4 Impulsknapp för timer B5
B5 Timer för magnetventil V1
B6 Man. Överhettningsskydd för element E2
S1 Signallampa för brytare B1
S2 Signallampa för element E2
E1 Underhållsvärmeelement
E2 Bryggelement
V1 Magnetventil för vattenpåfyllning
A-1
B1 Main switch/switch for element E1
B2 Microswitch for element E2
B3 Aut. High limit for element E2
B4 Brew switch for timer B5
B5 Timer for solenoid V1
B6 Man. High limit for element E2
S1 Lamp for switch B1
S2 Lamp for element E2
E1 Hot plate element
E2 Brewing element
V1 Solenoid for waterfilling
text_image
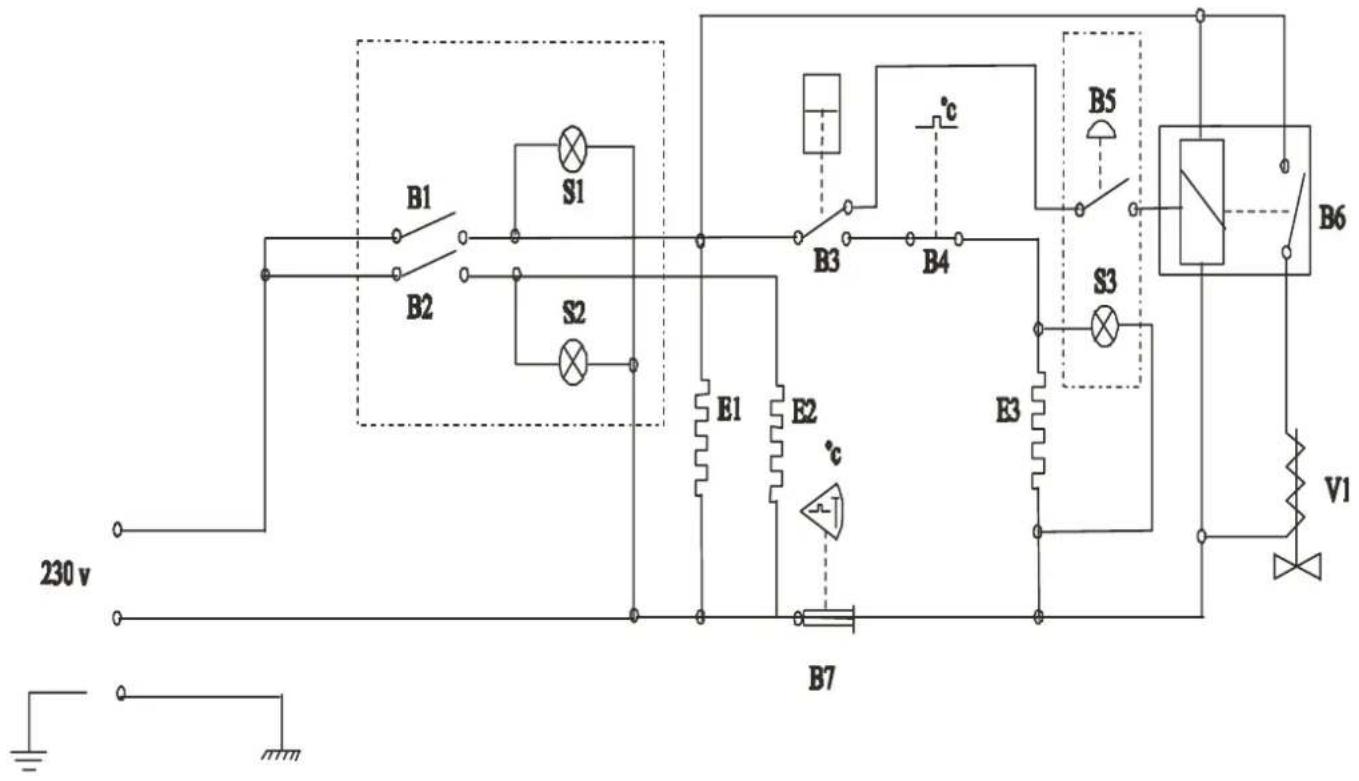
230 v B1 B2 S1 S2 E1 E2 c B3 B4 E3 B5 S3 B6 V1 B7A-2
B1 Huvudbrytare/brytare för element E1
B3 Mikrobrytare för element E3
B2 Brytare för element E2
B4 Aut. Överhettningsskydd för element E3
B5 Impulsknapp för timer B6
B6 Timer för magnetventil V1
B7 Man. Överhettningsskydd för element E3
S1 Signallampa för brytare B1
S2 Signallampa för brytare B2
S3 Signallampa för element E3
E1 Nedre underhållsvärmeelement
E2 Övre underhållsvärmeelement
E3 Bryggelement
V1 Magnetventil för vattenpåfyllning
A-2
B1 Main switch/switch for element E1
B2 Switch for element E2
B3 Microswitch for element E3
B4 Aut. High limit for element E3
B5 Brew switch for timer E3
B6 Timer for solenoid V1
B7 Man. High limit for element E3
S1 Lamp for switch B1
S2 Lamp for switch B2
S3 Lamp for element E3
E1 Bottom hot plate element
E2 Upper hot plate element
E3 Brewing element
V1 Solinoid for waterfilling
flowchart
graph TD
    subgraph LeftBranch
        A1["B1"] --> B1["Switch"]
        B1 --> C1["S1"]
        C1 --> D1["B2"]
        D1 --> E1["E1"]
        E1 --> F1["Capacitor"]
        F1 --> G1["B6"]
        G1 --> H1["V1"]
        H1 --> I1["V5"]
    end
    subgraph RightBranch
        A2["B2"] --> B2["Switch"]
        B2 --> C2["B3"]
        C2 --> D2["E2"]
        D2 --> E2["V5"]
        E2 --> F2["V1"]
        F2 --> G2["V5"]
        G2 --> H2["V5"]
        H2 --> I2["V1"]
        I2 --> J2["V5"]
        J2 --> K2["V5"]
        K2 --> L2["V1"]
        L2 --> M2["V5"]
        M2 --> N2["V1"]
        N2 --> O2["V5"]
    end
    R["R"] --> S["S"]
    S --> N["N"]
    N --> U["Ground"]
    style LeftBranch fill:#f9f,stroke:#333
    style RightBranch fill:#bbf,stroke:#333
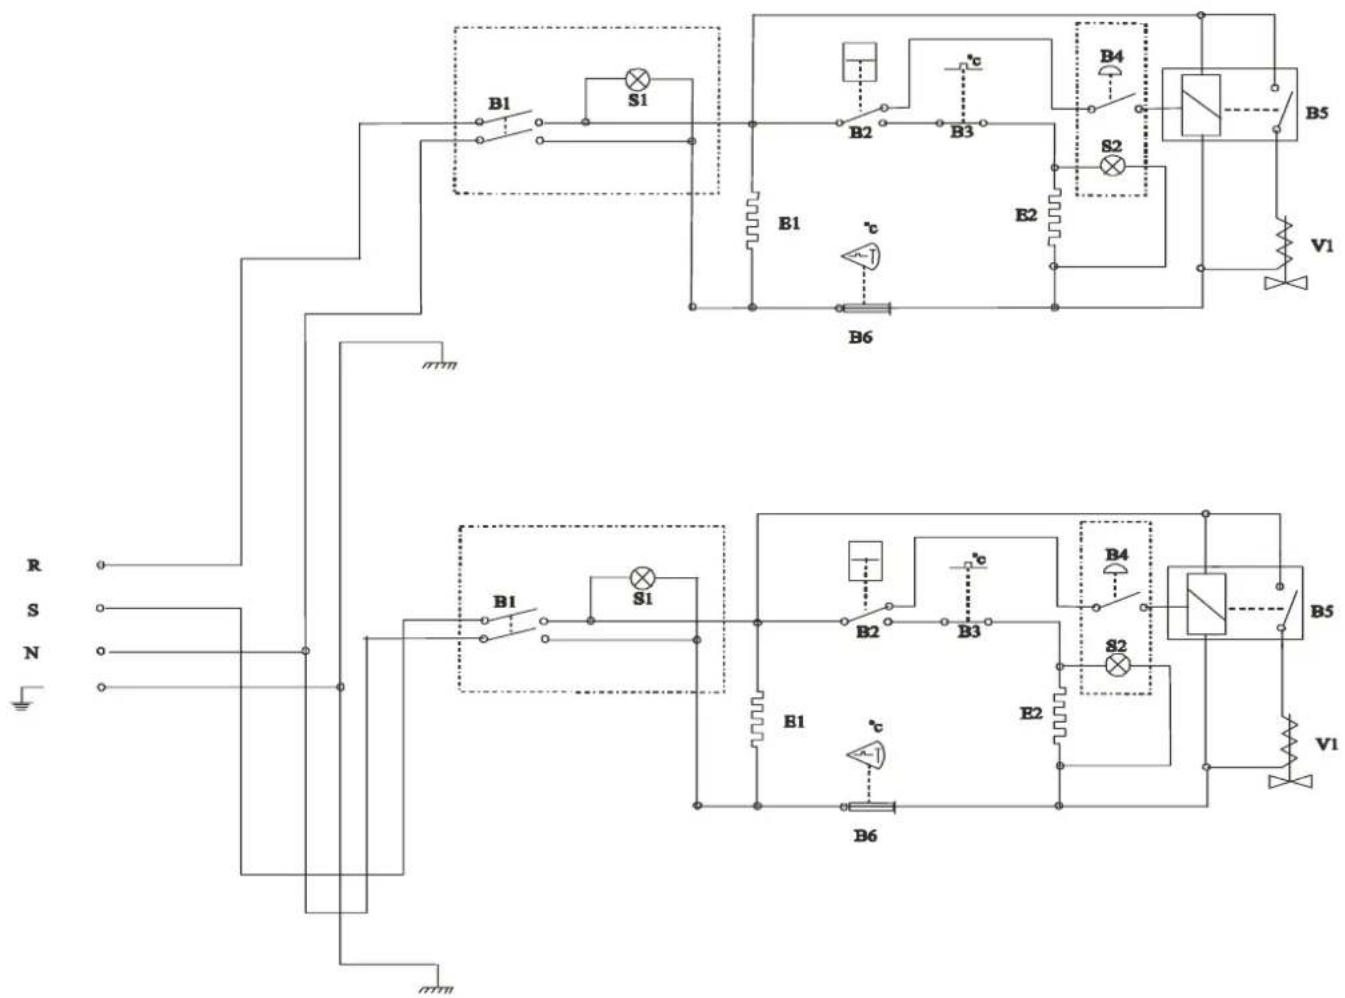
DA-2
B1 Huvudbrytare/brytare för element E1
B2 Mikrobrytare för element E2
B3 Aut. Överhettningsskydd för element E2
B4 Impulsknapp för timer B5
B5 Timer för magnetventil V1
B6 Man. Överhettningsskydd för element E2
S1 Signallampa för brytare B1
S2 Signallampa för element E2
E1 Underhållsvärmeelement
E2 Bryggelement
V1 Magnetventil för vattenpåfyllning
DA-2
B1 Main switch/switch for element E1
B2 Microswitch for element E2
B3 Aut. High limit for element E2
B4 Brew switch for timer B5
B5 Timer for solenoid V1
B6 Man. High limit for element E2
S1 Lamp for switch B1
S2 Lamp for element E2
E1 Hot plate element
E2 Brewing element
V1 Solenoid for waterfilling
flowchart
graph TD
    subgraph Top_Layer
        B1 --> B2
        B2 --> S1
        S1 --> E1
        S1 --> E2
        E1 --> B3
        E2 --> B4
        B3 --> B5
        B4 --> B6
        B5 --> V1
        B6 --> V1
    end
    subgraph Bottom_Layer
        B1 --> B2
        B2 --> S1
        S1 --> E1
        S1 --> E2
        E1 --> B3
        E2 --> B4
        B3 --> B5
        B4 --> B6
        B5 --> V1
        B6 --> V1
    end
    R --> S
    S --> N
    N --> R
    R --> S
    S --> N
    N --> R
    R --> S1
    S1 --> E1
    E1 --> B7
    B7 --> C["c"]
    C --> B4
    B4 --> E3
    E3 --> B5
    B5 --> V1
    B6 --> V1
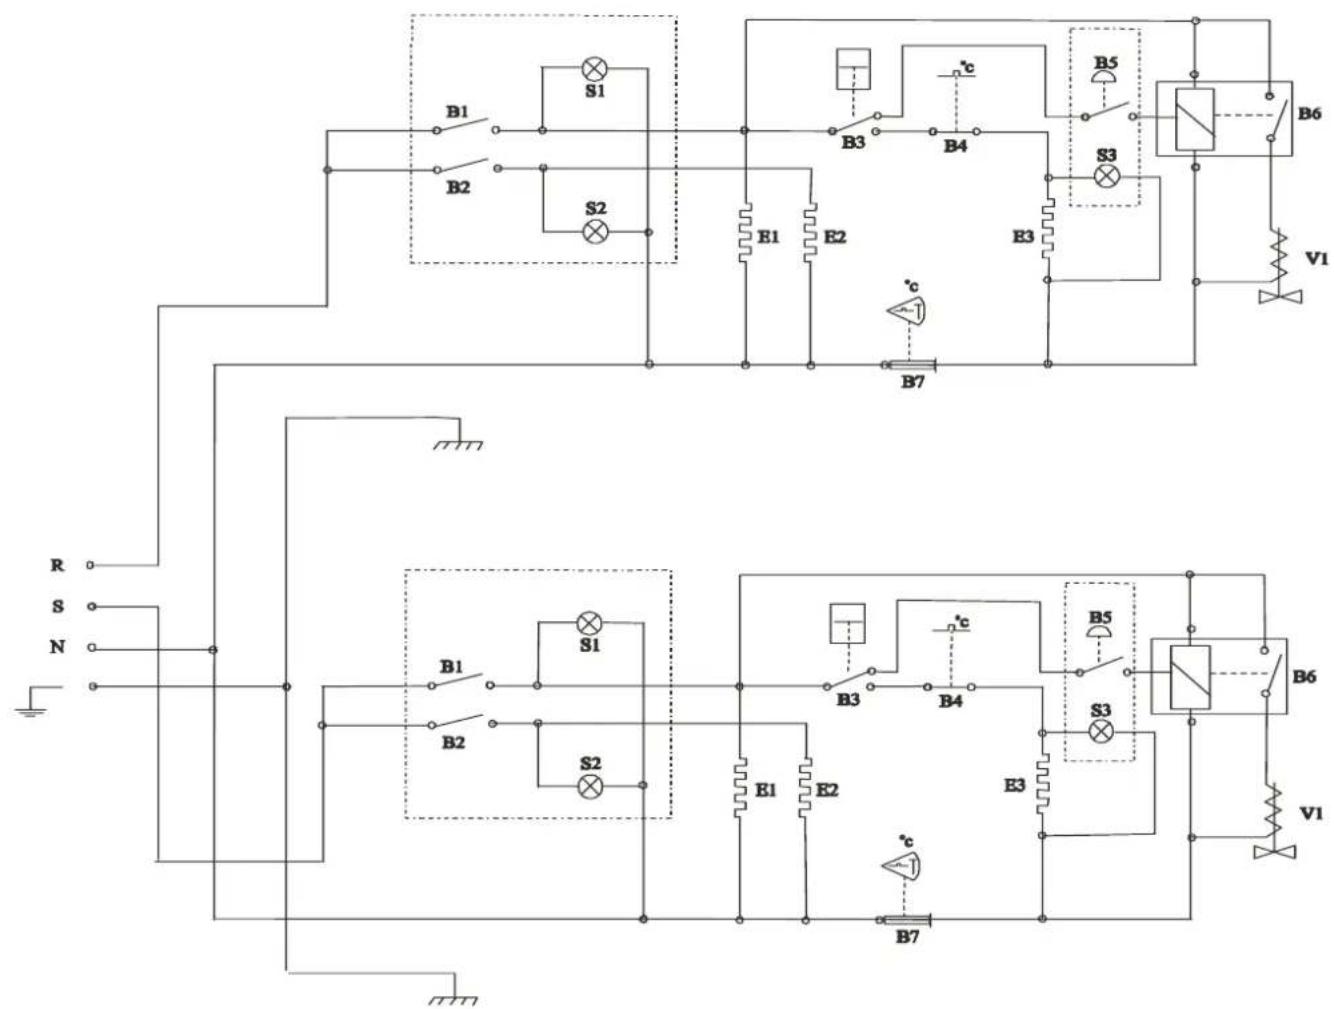
DA-4
B1 Huvudbrytare/brytare för element E1
B2 Brytare för element E2
B3 Mikrobrytare för element E3
B4 Aut. Överhettningsskydd för element E3
B5 Impulsknapp för timer B6
B6 Timer för magnetventil V1
B7 Man. Överhettningsskydd för element E3
S1 Signallampa för brytare B1
S2 Signallampa för brytare B2
S3 Signallampa för element E3
E1 Nedre underhällsvärmeelement
E2 Övre underhållselement
E3 Bryggelement
V1 Magnetventil för vattenpåfyllning
DA-4
B1 Main switch/switch for element E1
B2 Switch for element E2
B3 Microswitch for element E3
B4 Aut. High limit for element E3
B5 Brew switch for timer B6
B6 Timer for sloenoid V1
B7 Man. High limit for element E3
S1 Lamp for switch B1
S2 Lamp for switch B2
S3 Lamp for element E3
E1 Bottom hot plate element
E2 Upper hot plate element
E3 Brewing element
V1 Solenoid for waterfilling
Tips för bästa kvalité på kaffet.
- Ändra inte på den rekommenderade doseringen.
- Rör alltid om i kannan innan servering.
- Varmhåll aldrig kaffet mer än 30 minuter.
- Blanda aldrig nytt kaffe med gammalt.
Häll aldrig i bryggt kaffe i maskinen.
Some tips for best quality.
- Don't change the recommended portion of coffee.
- Always start the levered doffefe in ipotot.
- DDo not keep off the waranniformore than 30 minutes.
- Doctomixifreshally brewed coffee with coffee kept warm.
Never fill brewed coffee in the machine.
M-1, M-2, DM-2, DM-4
OFFICE 2,
A-1, A-2, DA-2, DA-4
Gäller endast Sverige / Sweden only
Garantibestämmelser
2 års garanti på delar.
Gäller för bristfälligheter i konstruktion, material eller tillverkning.
För att garantin skall gälla förutsättes att skötselinstruktionerna har följts, att skälig aktsamhet har iakttagits och att felanmälan har gjorts utan dröjsmål, samt att berörd utrustning inte använts i avvaktan på service om risk finns att skadan eller bristen skulle förvärras.
Garantin omfattar inte förbrukningsartiklar som glas, normalt underhåll som rensning av silar och filter, fel på grund av föroreningar, kalk eller fel spänning, tryck eller justering av vattenmängd.
Garantin omfattar ej heller följdskador som orsakats av fel på eller felaktig hantering av apparaten.
Garantin upphör att gälla efter reparation eller liknande ingrepp av företag annat än av oss rekommenderat.
Office Queen och Office Queen Termos
2 års garanti lämnas på felaktiga delar insända till Coffee Queen AB.
FÖR SERVICE FOR SERVICE
Vänligen kontakta din återförsäljare Please contact your retail dealer
Din återförsäljare / Your retail dealer