
SS720A - Schalter Tork - Kostenlose Bedienungsanleitung
Finden Sie kostenlos die Bedienungsanleitung des Geräts SS720A Tork als PDF.


Benutzerfragen zu SS720A Tork
0 Frage zu diesem Gerät. Beantworten Sie die, die Sie kennen, oder stellen Sie Ihre eigene.
Eine neue Frage zu diesem Gerät stellen
Laden Sie die Anleitung für Ihr Schalter kostenlos im PDF-Format! Finden Sie Ihr Handbuch SS720A - Tork und nehmen Sie Ihr elektronisches Gerät wieder in die Hand. Auf dieser Seite sind alle Dokumente veröffentlicht, die für die Verwendung Ihres Geräts notwendig sind. SS720A von der Marke Tork.
BEDIENUNGSANLEITUNG SS720A Tork
| MODEL#: SS720A, SS720AA | |
| DESCRIPTION: | 7 DAY IN-WALL DIGITAL TIMERSS720A = WHITE, SS720AA = ALMOND |
| CONTACT RATINGS: | 120VAC, 15A RESISTIVE, GENERAL PURPOSE & TUNGSTEN; 120VAC, 1 HP |
! CAUTION !
RISK OF ELECTRIC SHOCK
Disconnect power at main panel prior to installing
or servicing this lighting control or the equipment connected to it.
This timer is designed to fit a standard (min 2 1/2" deep) electrical junction box in new construction or to replace an existing wall switch. It is recommended that the installation be done by an electrician.
INSTALLATION & WIRING INSTRUCTIONS
THE OFF/TIMER SLIDE SWITCH MUST BE AT "TIMER" FOR SCHEDULES TO OPERATE.
- Turn off the power at the circuit breaker to avoid electrical shock.
- Remove and disconnect the existing switch.
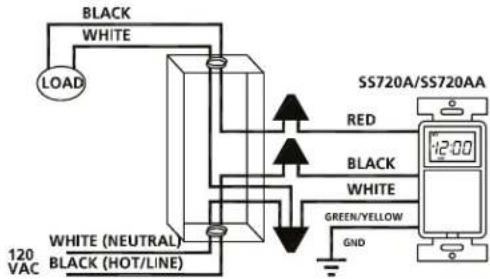
- Connect the SS720A/SS720AA wire leads to the LOAD as shown at right.
- Restore power at circuit breaker.
SETTING UP
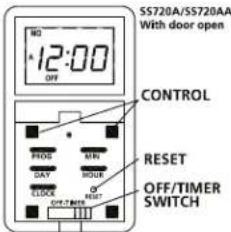
- Lift up the bottom of the door using a small screwdriver
- Position the OFF/TIMER switch to TIMER.
- Press the RESET button using a paper clip.
- On the display, 12:00 and MO should flash
If there is nothing on the screen, check the following:
a) The OFF/TIMER switch located at the bottom may be in the OFF position. Slide it to the TIMER position using a small screwdriver.
b) Check the LOAD connected to the timer. Check the 120VAC power source.
text_image
BLACK WHITE LOAD 120 VAC WHITE (NEUTRAL) BLACK (HOT/LINE) SS720A/SS720AA RED BLACK WHITE GREEN/YELLOW GNDMEMORY BACKUP: This timer is equipped with a rechargeable Ni-Mh battery which will protect your programs during power outages for up to 30 days. No need to replace battery. Note that the screen blanks during a power failure.
text_image
S5720A/S5720AA With door open 12:00 OFF CONTROL RESET OFF/TIMER SWITCHPROGRAMMING & OPERATING THE TIMER
SETTING TIME & DAY: The TIME & DAY must be set prior to programming the SS720A/SS720AA. To set the time, press and hold the CLOCK button throughout. Press the DAY, HOUR and MIN buttons respectively, to advance the time. When you see the desired time, release the CLOCK button.
PROGRAMMING: The SS720A/SS720AA memory can hold up to 7 programs. Each program consists of 2 events (ON time and OFF time). The events can be set to execute on a daily basis, or on a weekly basis (Monday-Sunday). It is necessary to program both the ON and OFF events for each program.
- Press the PROG button: "Timer 1ON -:-"appears, you are now ready to program the first ON event.
- Press the DAY, HOUR and MIN buttons respectively, to set the event time. Each press of the DAY button will advance the selection, from all days, to individual days, MO-FR, SA-SU, MO-SU, MO&WE&FR, TU&TH&SA, MO-WE, and TH-SA, then back.
- When you see the desired time, press the PROG button. "Timer 1OFF -:-" appears, and you can now ready to program the first OFF event. Repeat steps 2 and 3 for each program you need to create.
- Each press of the PROG button advances the program from ON to OFF, or from OFF to ON.
REVIEWING, EDITING, OR DELETING PROGRAMS:
- Press the PROG button to review the programs. Each press sends you forwards to the next program.
- To modify, press the DAY, HOUR and MIN buttons respectively, as before.
- To delete a program, press the HOUR and MIN buttons until you see “-:-”displayed.
MANUAL OVERRIDE: Pressing the front plate will change the load from ON to OFF, or OFF to ON. It will remain that way, until you press it again, or a schedule changes the load status.
ONE YEAR LIMITED WARRANTY: If this product fails because of a manufacturing defect within one year after purchase, we will, at our option, either repair or replace it at no charge. Our warranty does not cover damage caused by accident, abuse or misuse. We assume no further liability with respect to the sale or use of this product. THIS WARRANTY IS IN LIEU OF ALL OTHER WARRANTIES, EXPRESSED OR IMPLIED, INCLUDING THE WARRANTY OF MERCHANTABILITY. We make no warranty with respect to the fitness of any goods for the users particular application. This warranty gives you specific legal rights, and you also may have other rights which vary from state to state.
It is our intent to provide accurate and current specification information. However, in the interest of product improvement, TORK may alter the specifications or constructional details without prior notice.
TORK, INC. • 888.500.4598 • www.TORK.com
A DIVISION OF NSI NSI INDUSTRIES, LLC