
SCO 04D - Bratpfanne SCHNEIDER - Kostenlose Bedienungsanleitung
Finden Sie kostenlos die Bedienungsanleitung des Geräts SCO 04D SCHNEIDER als PDF.


| Produkttyp | Elektrischer Schnellkochtopf |
| Modell | SCO 04D |
| Marke | Schneider |
| Kapazität | 4 Liter |
| Abmessungen (ca.) | 28 × 28 × 30 cm (Durchmesser × Höhe) |
| Gewicht (ca.) | 4,5 kg |
| Leistung | 870 W |
| Stromversorgung | 220–240 V ~ 50 Hz |
| Temperaturbereich | 60–80 °C (Garbereich), max. 215 °C |
| Maximaler Druck | 90 kPa |
| Arbeitsdruck | 0–70 kPa |
| Programmierbarer Timer | Bis zu 24 Stunden im Voraus |
| Voreingestellte Menüs | 5 (Reis 9 min, Fisch/Geflügel 12 min, Kuchen 15 min, Suppe 20 min, Fleisch/Hülsenfrüchte 25 min) |
| Material Innentopf | Antihaftbeschichtet, herausnehmbar |
| Sicherheitsfunktionen | Druckventil, Schwimmerventil, Temperatursicherung, Überdruckschutz |
| Reinigung und Pflege | Innentopf spülmaschinengeeignet (Handwäsche empfohlen), Deckel und Dichtungsring regelmäßig reinigen |
| Ersatzteile | Originalteile über Schneider Kundendienst erhältlich (Innentopf, Deckel, Dichtungen) |
| Garantie | Entspricht den gesetzlichen Gewährleistungsbestimmungen |
Häufig gestellte Fragen - SCO 04D SCHNEIDER
Benutzerfragen zu SCO 04D SCHNEIDER
0 Frage zu diesem Gerät. Beantworten Sie die, die Sie kennen, oder stellen Sie Ihre eigene.
Eine neue Frage zu diesem Gerät stellen
Laden Sie die Anleitung für Ihr Bratpfanne kostenlos im PDF-Format! Finden Sie Ihr Handbuch SCO 04D - SCHNEIDER und nehmen Sie Ihr elektronisches Gerät wieder in die Hand. Auf dieser Seite sind alle Dokumente veröffentlicht, die für die Verwendung Ihres Geräts notwendig sind. SCO 04D von der Marke SCHNEIDER.
BEDIENUNGSANLEITUNG SCO 04D SCHNEIDER

SCHNEIDER
Giving if All!
OLLA A PRESIÓN ELECTRICA
Manual de usuario
natural_image
Illustration of a rice cooker with digital display and control panel (no text or symbols)INDICE
01. Especificaciones 02
02. Antes de empezar 03
Precauciones 03
Instalación 03
Dónde colocar la olla 03
Esto es un aparato eléctrico 03
Vista general 04
Components 04
La tapa 04
El cuerpo 07
03. Instrucciones de uso 09
El panel de control 09
Descripción general 09
La pantalla 09
Botones de funciones 10
Botones de menús preconfigurados 11
Guía rápida de uso 12
Preguntas frecuentes 13
Bizcocho de limón: Ejemplo de uso 15
04. Mantenimiento 17
Limpieza 17
Cómo limpiar la cubeta 17
Cómo limpiar la tapa 17
Cómo limpiar el cuerpo de la olla 17
Resolución de problemas 18
¿Qué hacer si la olla no coge presión? 18
¿Qué hacer si sale vapor por los lados? 19
¿Qué hacer si la olla no se abre? 19
¿Qué hacer si algún componente está dañado o desgastado? 19
Sistemas de seguridad 19
Códigos de error 19
Servicio técnico 20
Diagrama de circuitos 20
Garantía 21
Instrucciones de desecho 21
ESPECIFICACIONES
Gracias por su confianza en Schneider.
Esta es una olla eléctrica a presión de fácil manejo y ahorro energético de hasta un 60% con funciones combinadas de cocción, estofado, arroces, fuego lento... Permite programar la hora de inicio y dispone de hasta 5 funciones automáticas.
Las siguientes son las especificaciones más destacables de su olla
©Temporizador
©Programmable 24th
©Mienús de cocción preconfigurados
©Interior anterior Henente de alta resistencia
©5 funciones automáticas
©Accesorios: Ciudharaynnmedidor
©Recetario incluido
Este manual ofrece información a los usuarios de los siguientes modelos de olla a presión eléctrica: SCO 04D, SCO 06D y SCO 08D. Las siguientes son las características específicas a cada unos de estos modelos:
| Modelo | Capacidad | Dimensión | Potencia | Dipenancia | DipnPresión | Temp. | Presión |
| SCO 04D | 44thros280 x 2 | 2808 x 2978 mm28070 Wm20 | 26060-80°C | 2070KPa | 60-80°C | 0-70KPa | |
| SCO 06D | 64thros295 x 2 | 2958 x 3359 mm31900 Wm2 | 210060-80°C | C20-70KPa | 60-80°C | 0-70KPa | |
| SCO 08D | 84thros325 x 3 | 2528 x 3502 mm35200 Wm2 | 412060-80°C | C20-70KPa | 60-80°C | 0-70KPa | |
Temperatura máxima: 215°C - Presión máxima: 90KPa
Esta olla pertenece a la siguiente familia de productos de Schneider:

Si desea conocer más productos de Schneider visite nuestra página web:
www.schneiderespana.es
ANTES DE EMPEZAR
PRECAUCIONES
Antes de usar la olla retire todo el embalaje y aleje a los niños para que no jueguen con él
⚠ Sólo para uso doméstico en interiores.
Por su propia seguridad los niños y las personas con sus capacidades físicas, mentales o sensoriales reducidas no deben utilizar ni manipular este aparato.
⚠ Siga las instrucciones de instalación, uso, mantenimiento y limpieza.
⚠ Nunca abra la tapa antes de haber liberado la presión completamente.
Para evitar quemaduras no se acerque a la olla mientras libera vapor de agua.
La olla se calienta durante su funcionamiento. Mientras esté caliente no la toque y nunca la acerque a materiales inflamables.
Para desplazar la olla sujétela siempre por las asas laterales.
En caso de desperfectos o mal funcionamiento contacte con un servicio técnico oficial de Schneider. No trate de reparar usted el aparato.
Este aparato no es resistente al agua. Lave sólo la cubeta interior en agua. El resto del producto no debe ser sumergido.
No toque la olla con las manos mojadas, podría electrocutarse.
No acerque la olla al fuego bajo ningún concepto.
El uso de accesorios no autorizados por Schneider pueden dañar el aparato, invalidando la garantía.
INSTALACIÓN
¿Dónde colocar la olla?
Coloque la olla en un lugar de interior fresco y seco, bien ventilado y alejado de fuentes de calor. La superficie ha de ser lisa y firme, y de fácil acceso, donde le resulte cómoda la manipulación.
Esto es un aparato eléctrico
Consulte la etiqueta con los requerimientos eléctricos de este aparato y asegúrese de que su instalación eléctrica cumple con dichos requerimientos. Aténgase a la normativa local para la instalación de aparatos eléctricos.
Asegúrese de que el cable esté en perfectas condiciones, no esté aprisionado o doblado, ni en contacto con líquidos o fuentes de calor, ni cuelgue del mueble. Enchufe siempre primero el cable a la olla y después a la toma de corriente. Desenchufe siempre la olla tras su uso. Para enchufar y desenchufar sujete siempre por el enchufe, no tire del cable.
VISTA GENERAL
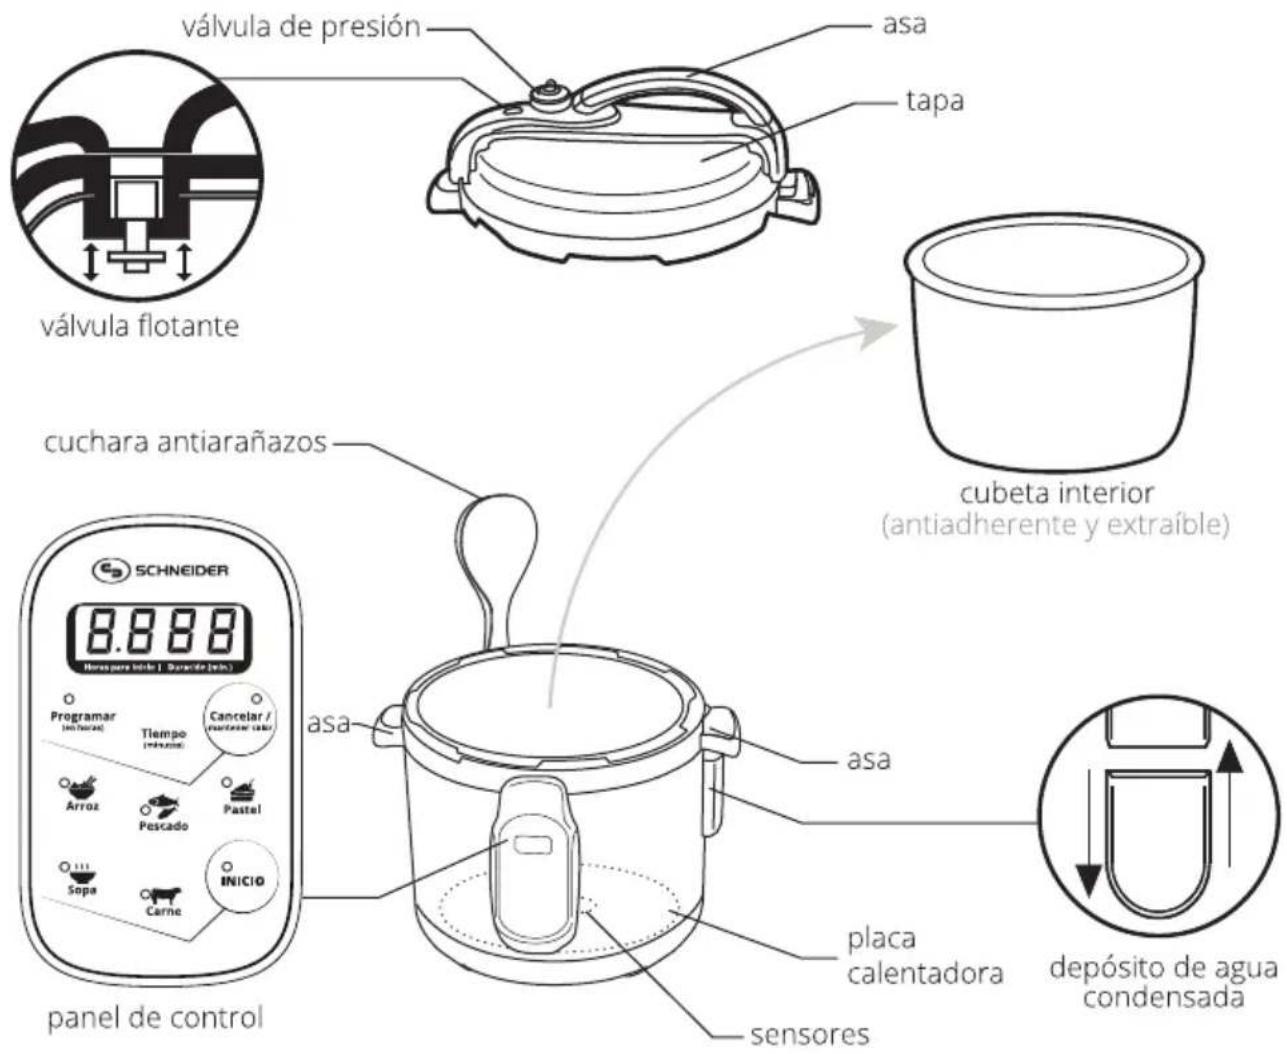
COMPONENTES
La tapa
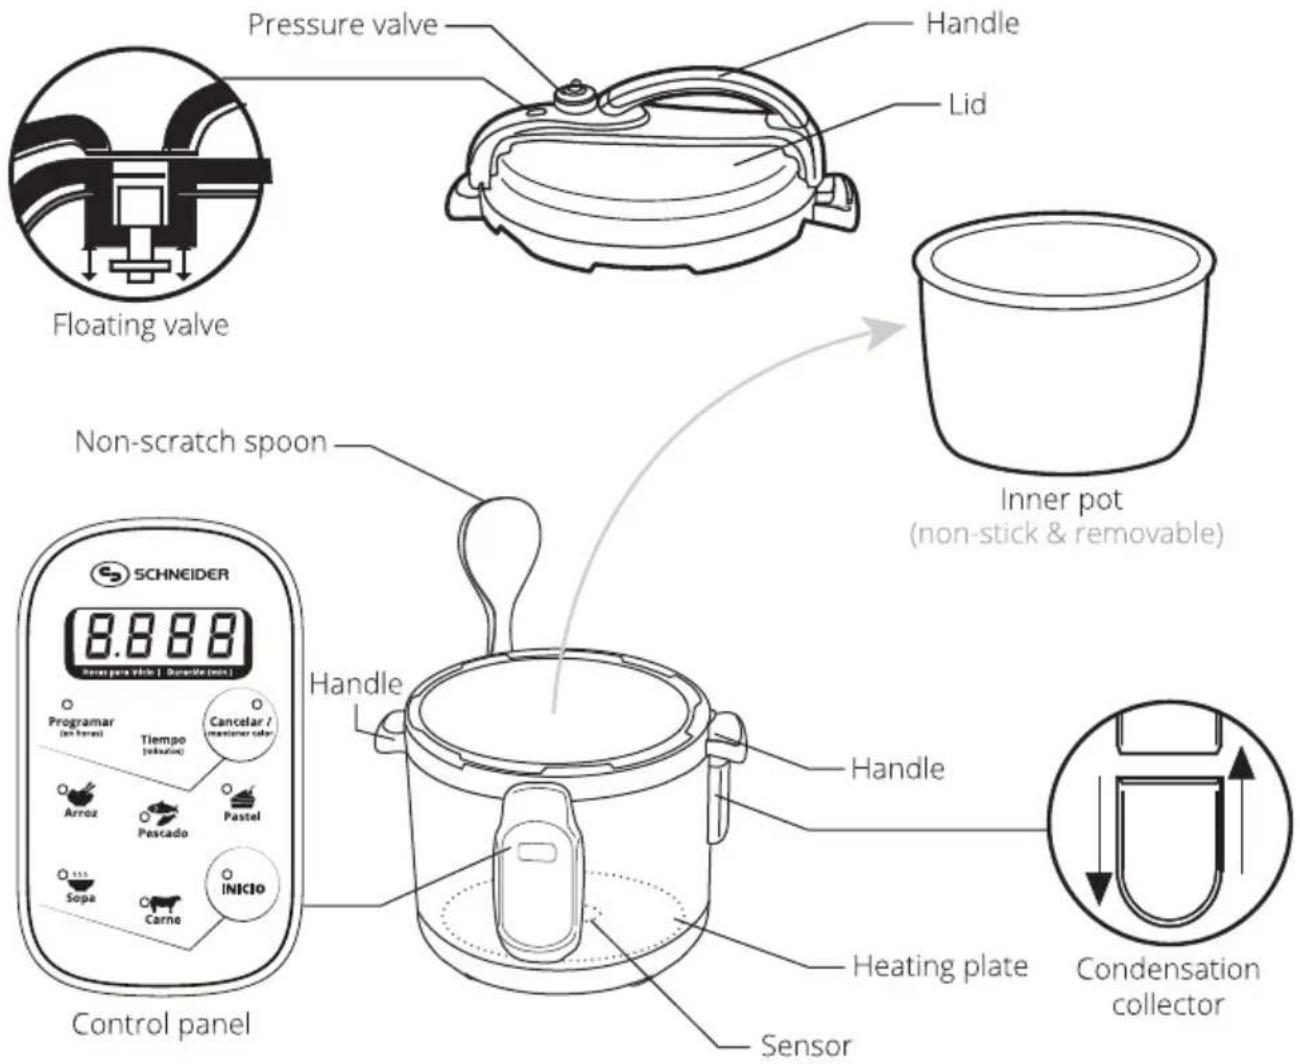
La tapa de tu olla Schneider dispone de 2 válvulas de seguridad (1 de presión y 1 flotante), un asa y un sistema de cierre hermético para cocinar a presión que incluye un anillo de goma de sellado.
△ La olla puede usarse sin tapa pero, evidentemente, no cocinaría a presión.
⚠ Si sale vapor por los bordes, desenchufe la olla, déjela enfriar y llévela a un servicio técnico.
Válvula de presión
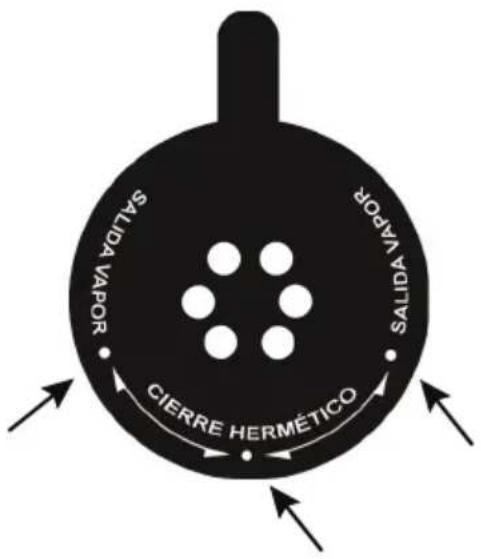
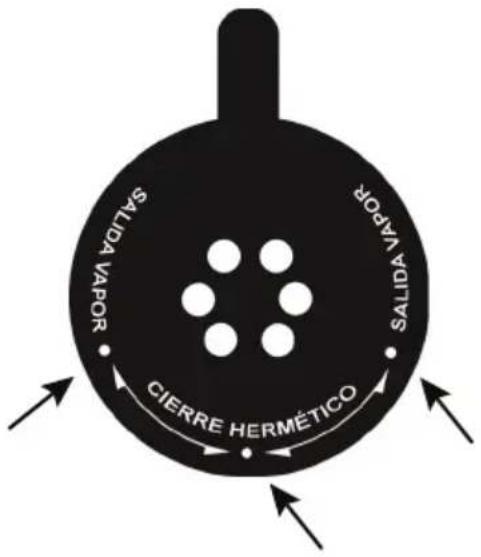
Es la válvula de color negro que sobresale en la tapa. Tiene 2 posiciones: "Cierre hermético" y "Salida Vapor". En la posición "Cierre hermético" el vapor permanece en el interior de la olla aumentando la presión. Esto hace que los alimentos se cocinen mucho más rápido. La válvula estará en una posición más baja. En la posición "Salida vapor" se libera el vapor acumulado y por tanto la presión. Libere siempre la presión antes de abrir la tapa.
natural_image
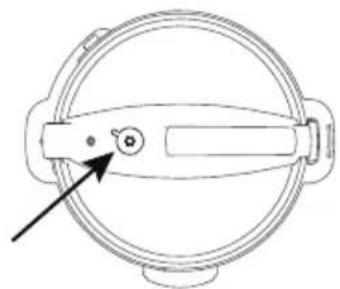
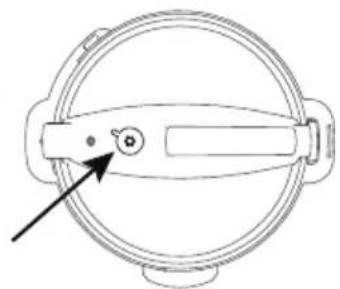
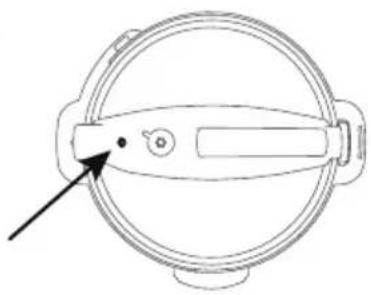
Technical line drawing of a circular mechanical component with a knob and handle (no text or symbols)Para saber en qué posición está la válvula busque una rayita vertical en relieve en un lateral de la válvula. Esta raya debe coincidir con uno de los puntos de la serigrafía de la válvula que indican su posición:
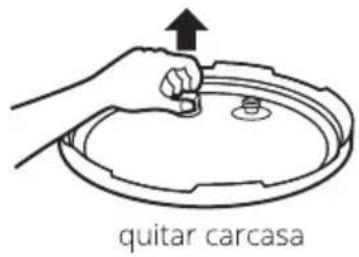
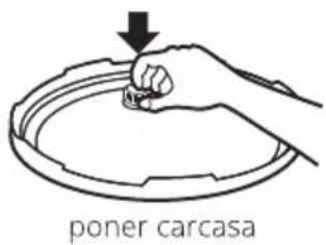
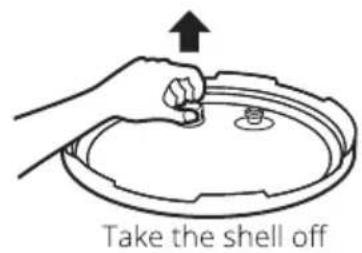
En el interior de la tapa podemos ver el otro extremo de la válvula, cubierto por una carcasa protectora que evita que la válvula se obture con restos de comida. Esta carcasa se puede extraer simplemente tirando de ella (cuando esté fría) Hasta que se libere. Debe ser lavada con regularidad, preferiblemente tras cada uso, y cuando haya secado se vuelve a colocar en su sitio sencillamente presionando hasta que quede fija:
No aplique ningún peso sobre la válvula de presión ni la sustituya por otra no homologada.
△ Manténgase alejado/a de la válvula de presión cuando libere vapor.
No coloque sobre la olla trapos u otros elementos que puedan dificultar o derivar la salida del vapor.
Válvula flotante
Es una válvula de bloqueo situada junto a la válvula de presión. Nos indicará si la olla ya ha cogido presión. Si ha subido, la olla aún tiene presión. Si ha bajado, ya podría abrir la tapa (con cuidado)
No intente destapar la olla si la válvula flotante está en suspensión (arriba).
⚠ Limpie con regularidad la junta de sellado de goma de la válvula flotante. Preferiblemente tras cada uso.
Si no hay suficiente presión la válvula no flotará. Esto puede ocurrir porque no hay bastante comida o agua o por un fallo, ya sea electrónico de la propia olla, falta de suministro eléctrico, cierre incorrecto de la tapa, desperfectos en el sistema de sellado hermético, etc.

natural_image
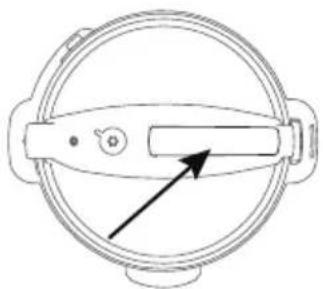
Diagram of a circular mechanical component with a pointer and mounting bracket (no text or symbols)ver detalle en la página anterior
Asa de la tapa
El asa de la tapa de esta olla Schneider nos permitirá poner y quitar la tapa con facilidad.
No debe usarse para mover la olla. Para ello use las asas laterales.
No toque las partes metálicas de la olla (sobre todo la tapa) mientras esté encendida. Podría provocarle quemaduras.
natural_image
Simple line drawing of a circular mechanical component with a central handle and arrow indicator (no text or symbols)Anillo de goma de sellado
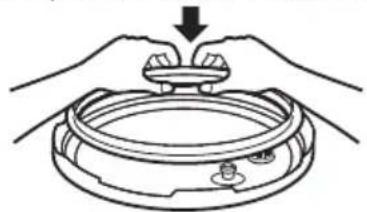
Esta olla incorpora en la parte interna de su tapa un anillo de goma que sirve para el sellado hermético una vez cerramos la olla, por lo que debe mantenerse siempre en condiciones óptimas. Este anillo se coloca como sigue:
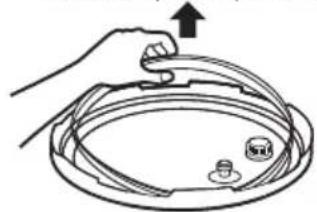
Presionamos para ponerlo entre el anillo metálico y la tapa
natural_image
Illustration of hands holding a small mechanical component with a downward arrow indicating force or adjustment (no text or symbols)Tiramos para quitarlo
natural_image
Diagram of a hand holding a circular device with a knob, showing mechanical components (no text or symbols)⚠ Si el anillo de goma o el anillo metálico que lo rodea están dañados o fuera de sitio, o la goma no encaja, no use la tapa de la olla y contacte con nuestro servicio técnico para sustituirlos.
Abrir y cerrar la tapa
Antes de abrir la tapa de la olla debemos liberar la presión completamente. Para ello colocamos la válvula de presión en una de las dos posiciones de salida de vapor (en alto):
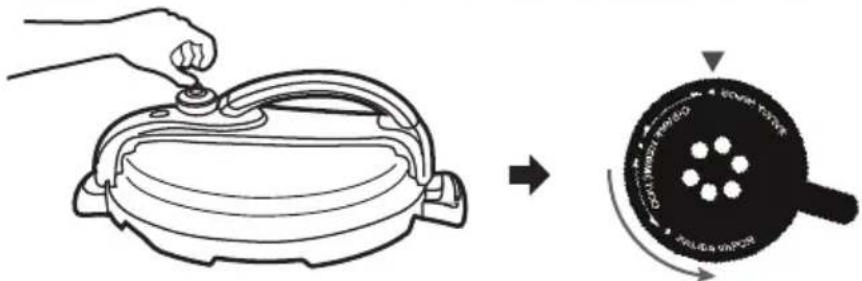
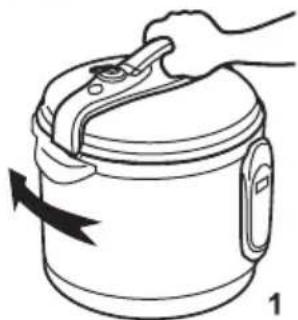
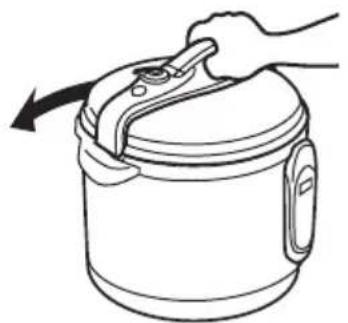
Cuando haya salido suficiente vapor bajará la válvula flotante. Esperamos a que se libere la presión y ya podremos abrir la tapa de la olla. Para ello giramos la tapa sujetándola por su asa en el sentido de la agujas del reloj hasta que se afloje. Puede sujetar el cuerpo de la olla por las asas laterales. Una vez se haya aflojado gire la tapa despacio hasta que encuentre en punto de desenganche y tire firmemente pero con cuidado (aún puede salir vapor) hacia arriba:
natural_image
Line drawing of a hand holding a lid with a curved handle, showing a black arrow indicating rotation (no text or symbols)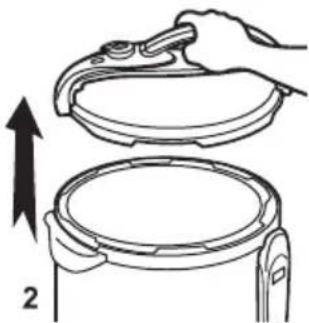
natural_image
Illustration of a hand holding a lid above a circular container, with an arrow indicating upward motion (no text or symbols)Al abrir la válvula de presión saldrá vapor de la propia válvula. Tome las medidas necesarias para evitar quemaduras.
⚠ Si cuando intente abrir la tapa ésta no gira no trate de forzarla. Desconecte la olla de la corriente y espere a que enfríe. Si después de enfriar sigue sin poder abrirla contacte con nuestro servicio técnico.
Cuando abra la tapa se disipará el vapor remanente y aire caliente. Tome las debidas precauciones para no quemarse.
Antes de cerrar la tapa asegúrese de que ambas válvulas y la goma de sellado están en perfectas condiciones y colocadas correctamente en su sitio (si la goma de sellado está bien colocada en torno al anillo de acero de la tapa debería poder girar sin moverse de su posición). Después coloque la tapa sobre la olla y hágala girar hasta que encaje. Por último gírela en sentido contrario a las agujas del reloj hasta que suene un chasquido.
natural_image
Line drawing of a hand holding a cooking pot with a handle, showing a right-hand rule (no text or symbols)- Empujar la tapa hacia abajo
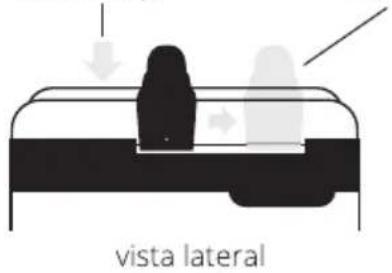
- Girar la tapa de izquierda a derecha
Una vez cerrada recuerde colocar la válvula de presión en la posición deseada.
El cuerpo
El cuerpo de su olla Schneider se compone de una base, una cubierta externa y una cubeta interior extraíble.
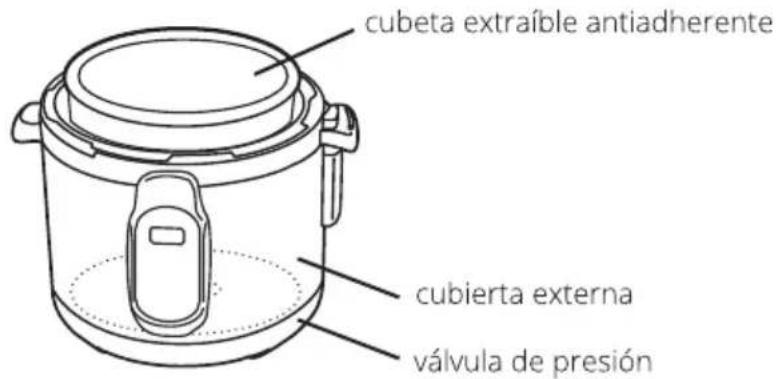
La base de la olla
En la base de la olla se encuentran los sensores de temperatura y de presión, la placa calentadora y la toma de corriente.
El exterior es de material degradable, por lo que en ningún caso debe entrar en contacto con el fuego. Tampoco debe ser sometido a condiciones de alta humedad, excesivo frío o calor, ya que pueden dañarse los componentes electrónicos.
Este es un aparato eléctrico, por lo que en contacto con el agua o la humedad externas podría provocar chispas, cortocircuitos o descargas eléctricas. Tome las debidas precauciones.
Es importante que mantenga siempre en condiciones óptimas la superficie de contacto entre la placa calentadora y la cubeta
Mantenga el cable de alimentación alejado de las partes calientes de la olla. Desenchufe la olla siempre que no la esté usando.
La cubeta extraíble antiadherente
La cubeta extraíble es donde se introducen los alimentos a cocinar. La cubeta supone una gran ventaja para usted. Por un lado es la única parte de la olla que deberá lavar en el fregadero tras su uso al ser extraíble. Por otro lado su calidad de antiadherente le facilitará en gran medida esa tarea. Según el modelo de olla que haya adquirido la cubeta tendrá una capacidad de 4, 6 u 8 litros.
Nunca debe llenar la cubeta por encima de su capacidad, que será 4/5 partes (un 80%) en el caso de alimentos que no aumenten de tamaño (carnes, verduras, etc.) y de 3/5 partes ( un 60%) en el caso de alimentos que aumenten su tamaño durante la cocción (pasta, arroz, legumbres, etc.) Tampoco debe llenar la cubeta en ningún caso por debajo de su capacidad mínima, que es de 1/5 parte (un 20%):
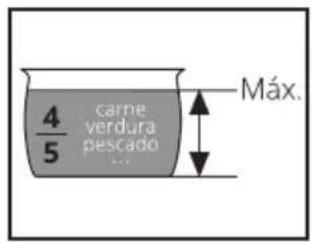
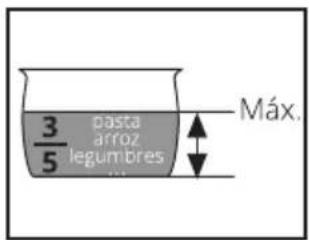
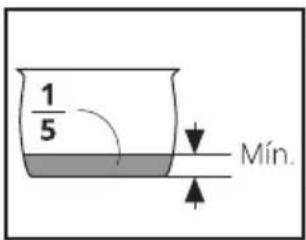
Para extraer la cubeta simplemente tire suavemente de ella hacia arriba. Si aún está caliente proteja sus manos con guantes o trapos de cocina para evitar quemaduras.
Antes de volver a colocarla en su lugar verifique que la placa calentadora y la zona de apoyo estén limpias. Después simplemente encájela en su posición anterior. Cuando esté bien colocada no debería superar por más de 2cm el borde superior de la olla a la altura de las asas.
El interior de la cubeta está recubierto de un material antiadherente que podría desprenderse o rayarse si no se toman las debidas precauciones. Use siempre utensilios blandos (madera, plástico, silicona...) en contacto con la cubeta. Para lavarla utilice la parte suave del estropajo, o estropajos especiales para sartenes antiadherentes.
⚠ Utilice esta cubeta únicamente con la olla eléctrica de Schneider, nunca con otras fuentes de calor. Si desea sustituirla contacte con nuestro servicio técnico. Use sólo piezas originales de Schneider.
Se recomienda el lavado manual para su mejor conservación y dada su fácil limpieza, aunque también puede lavar la cubeta en el lavavajillas.
La cubierta externa
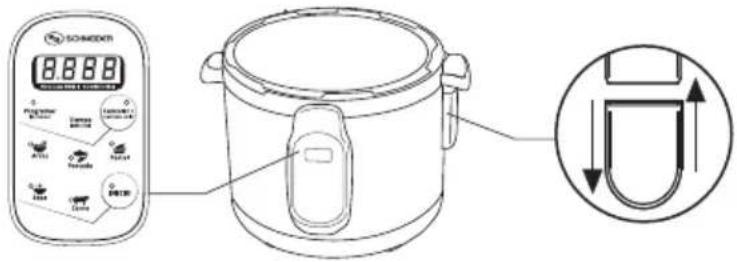
Cubierta de acero inoxidable de gran resistencia, que incorpora en su parte superior 2 asas laterales por las que debemos siempre sujetar la olla para desplazarla, un panel de control digital que se explicará en detalle a continuación y un depósito de agua para el vapor condensado. Este depósito de agua puede ser extraído fácilmente simplemente tirando de él hacia abajo y se vuelve a colocar en el mismo sitio por presión manual.
INSTRUCCIONES DE USO
EL PANEL DE CONTROL
Descripción general
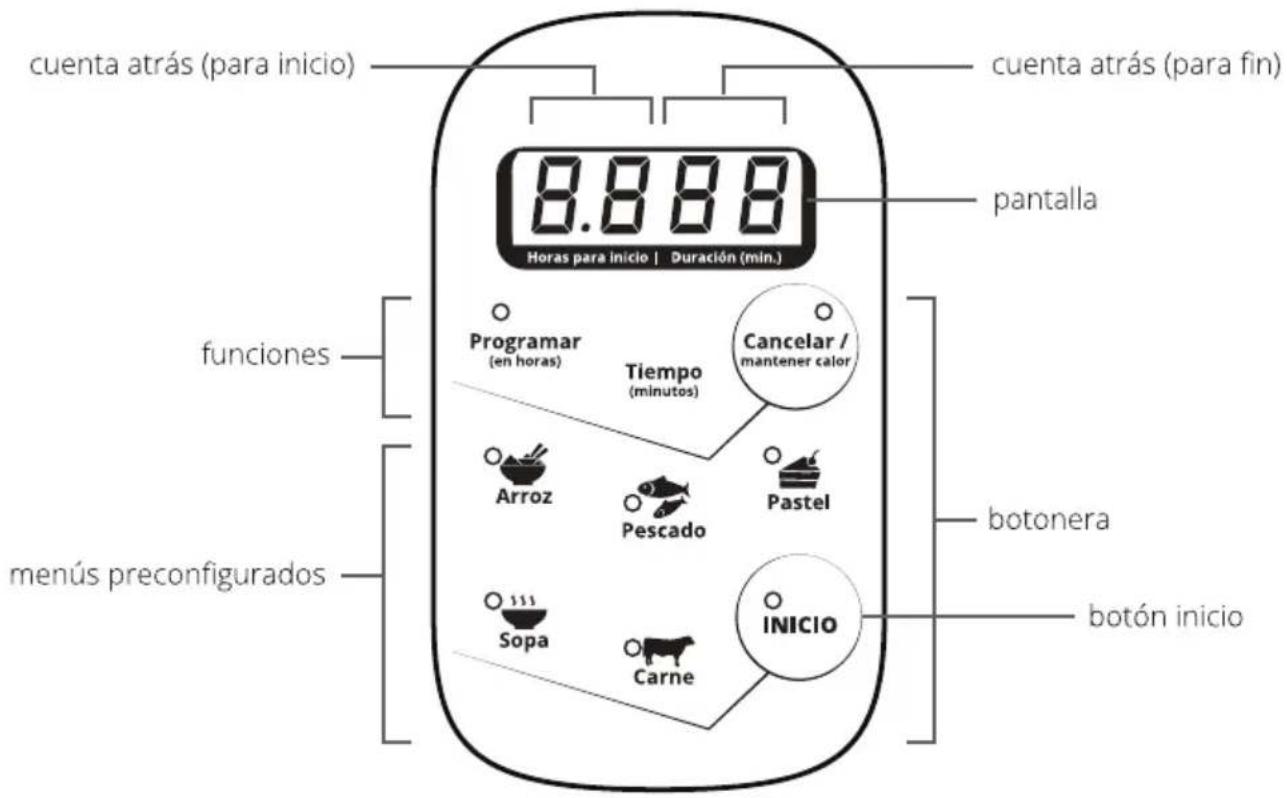
En la parte frontal de la olla disponemos del panel de control de la misma. Se trata de un panel de mandos digital con 9 botones y una pantalla alfanumérica. Los botones a su vez están repartidos entre aquellos que gestionan las diferentes funciones de la olla (en distintos colores) y los que sirven para seleccionar los diferentes menús preconfigurados (en gris).
La pantalla
La pantalla de su olla Schneider consta de cuatro dígitos: 2 rojos y 2 verdes. En cuanto enchufamos la olla se pone en modo de espera y la pantalla muestra "00 00" esperando instrucciones.
Los 2 primeros dígitos (rojos) indicarán el tiempo restante para iniciar la cocción en tramos de 30 minutos. Por ejemplo, "0.5" significa que falta media hora para que la olla se ponga en marcha, "1.0" significa que falta 1 hora, "1.5" una hora y media, etc. A partir de las 9 horas y media (9.5) los tiempos aumentan de 1h. en 1h., es decir "10", "11", "12"......"24".
Los 2 últimos (verdes) indican el tiempo que falta en minutos para que finalice la cocción a presión. Este tiempo no empieza a descontar hasta que la olla alcanza suficiente presión. Por ejemplo "12" indica que faltan 12 min. para que termine la cocción en curso.
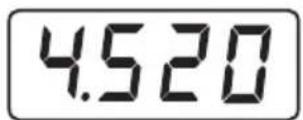
En este ejemplo la olla empezará a cocinar dentro de 4h. y media. Cocinará 20 min. a presión.
Botones de funciones
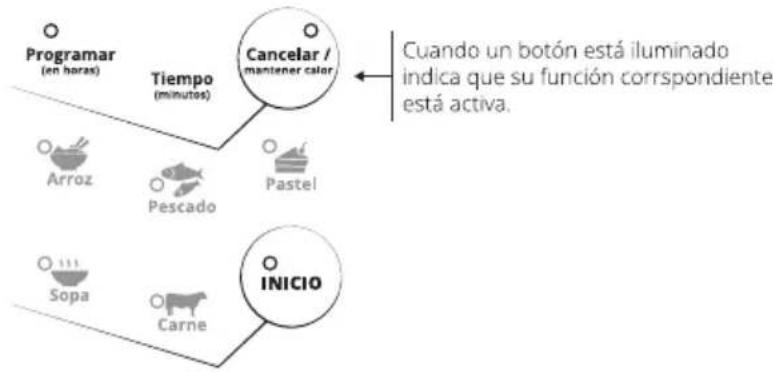
Esta olla de Schneider tiene un uso muy sencillo. La presión se ajusta automáticamente, así que sólo tiene que elegir primero la hora de inicio, luego el tiempo de cocción a presión y por último iniciar el programa. Para ello tiene 2 opciones: el ajuste manual o los menús preconfigurados. Para los ajustes manuales puede usar los botones de funciones que son los siguientes:
flowchart
graph TD
    A["Programar (en horas)"] --> B["Tiempo (mínutos)"]
    B --> C["Cancelar / mantener calor"]
    C --> D["Inicio"]
    D --> E["Sopa"]
    D --> F["Carne"]
    D --> G["Pescado"]
    D --> H["Arroz"]
    D --> I["Pastel"]
    style A fill:#f9f,stroke:#333
    style B fill:#ccf,stroke:#333
    style C fill:#cfc,stroke:#333
    style D fill:#fcc,stroke:#333
    style E fill:#ffc,stroke:#333
    style F fill:#cfc,stroke:#333
    style G fill:#fcc,stroke:#333
    style H fill:#ffc,stroke:#333
    note right of C: Cuando un botón está iluminado indica que su función correspondiente está activa.
Programar
Sirve para programar, si lo desea, la hora de inicio de la cocción, con formato de cuenta atrás. Cada vez que pulse Programar aumentará en media hora. De forma que si por ejemplo pulsa este botón 3 veces seguidas la pantalla mostrará 1500 , lo que significa que dentro de una hora y media la olla empezará a cocinar (1.5 - no confundir con 15, que serían 15 horas -) y que aún no se ha establecido durante cuánto tiempo ha de cocinar cuando empiece (00).
Cada vez que pulse Programar la olla esperará 10 segundos para que, o bien siga pulsando, o bien seleccione el tiempo de cocción. Si no hace ninguna de las 2 cosas se cancela el tiempo seleccionado y la olla pasa a modo de espera.
Si desea iniciar la cocción inmediatamente no es necesaria la selección de una hora de inicio. Ha de seleccionar siempre antes el tiempo de inicio y sólo después el menú de cocción, a menos que seleccione el tiempo de cocción manualmente, en cuyo caso no importa el orden.
Esta olla se puede programar hasta un máximo de 24 horas antes del inicio.
Si no desea establecer un tiempo de cocción pulse el botón INICIO tras elegir la hora de inicio. Tenga en cuenta que en este caso tendrá que parar usted la cocción cuando lo desee pulsando el botón Cancelar / mantener calor.
Tiempo
Una vez seleccionada la hora de inicio, o si desea iniciar la cocción inmediatamente, debe elegir el tiempo de cocción que prefiera. Para ello pulse el botón Tiempo. Cada vez que lo pulse aumentará el tiempo de cocción a presión en un minuto hasta un máximo de 99 minutos. Para corregir pulse el botón Cancelar / mantener calor.
El tiempo seleccionado hace referencia al tiempo en que se mantiene presión dentro de la olla. Esto implica que no empezará a descontar hasta que no alcance la presión necesaria.
INICIO
Una vez seleccionados la hora de inicio y el tiempo de cocción pulse INICIO para comenzar el programa o para iniciar la cuenta atrás.
Cancelar / mantener calor
Pulse este botón para cancelar un ajuste o un programa en ejecución.
Úsese también en modo de espera para mantener calor en la olla sin cocinar a presión. Cuando termina un programa la olla pasa automáticamente a modo "Mantener calor" hasta que no pulse este botón (este modo puede estar activo máximo 8h., pero no se recomiendan más de 6h.)
Botones de menús preconfigurados
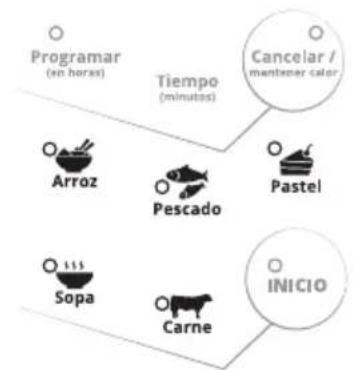
Existen 2 modos para cocinar con esta olla con un sólo toque de botón:
a) Pulsando el botón INICIO (sin presión / sin tapa). La olla empezará a cocinar y deberá detenerla manualmente pulsando el botón Cancelar / mantener calor cuando lo considere oportuno.
b) Pulsando cualquiera de los botones de menús (programas) preconfigurados. En este caso el tiempo de cocción ya viene preconfigurado y cuando haya terminado sólo tendrá que detener el modo Mantener calor para servir. Estos son los botones de menús preconfigurados:
flowchart
graph TD
    A["Programar (en horas)"] --> B["Tiempo (minutes)"]
    B --> C["Cancelar / mantener calor"]
    A --> D["Arroz"]
    A --> E["Pescado"]
    B --> F["Pastel"]
    A --> G["Sopa"]
    A --> H["Carne"]
    A --> I["INICIO"]
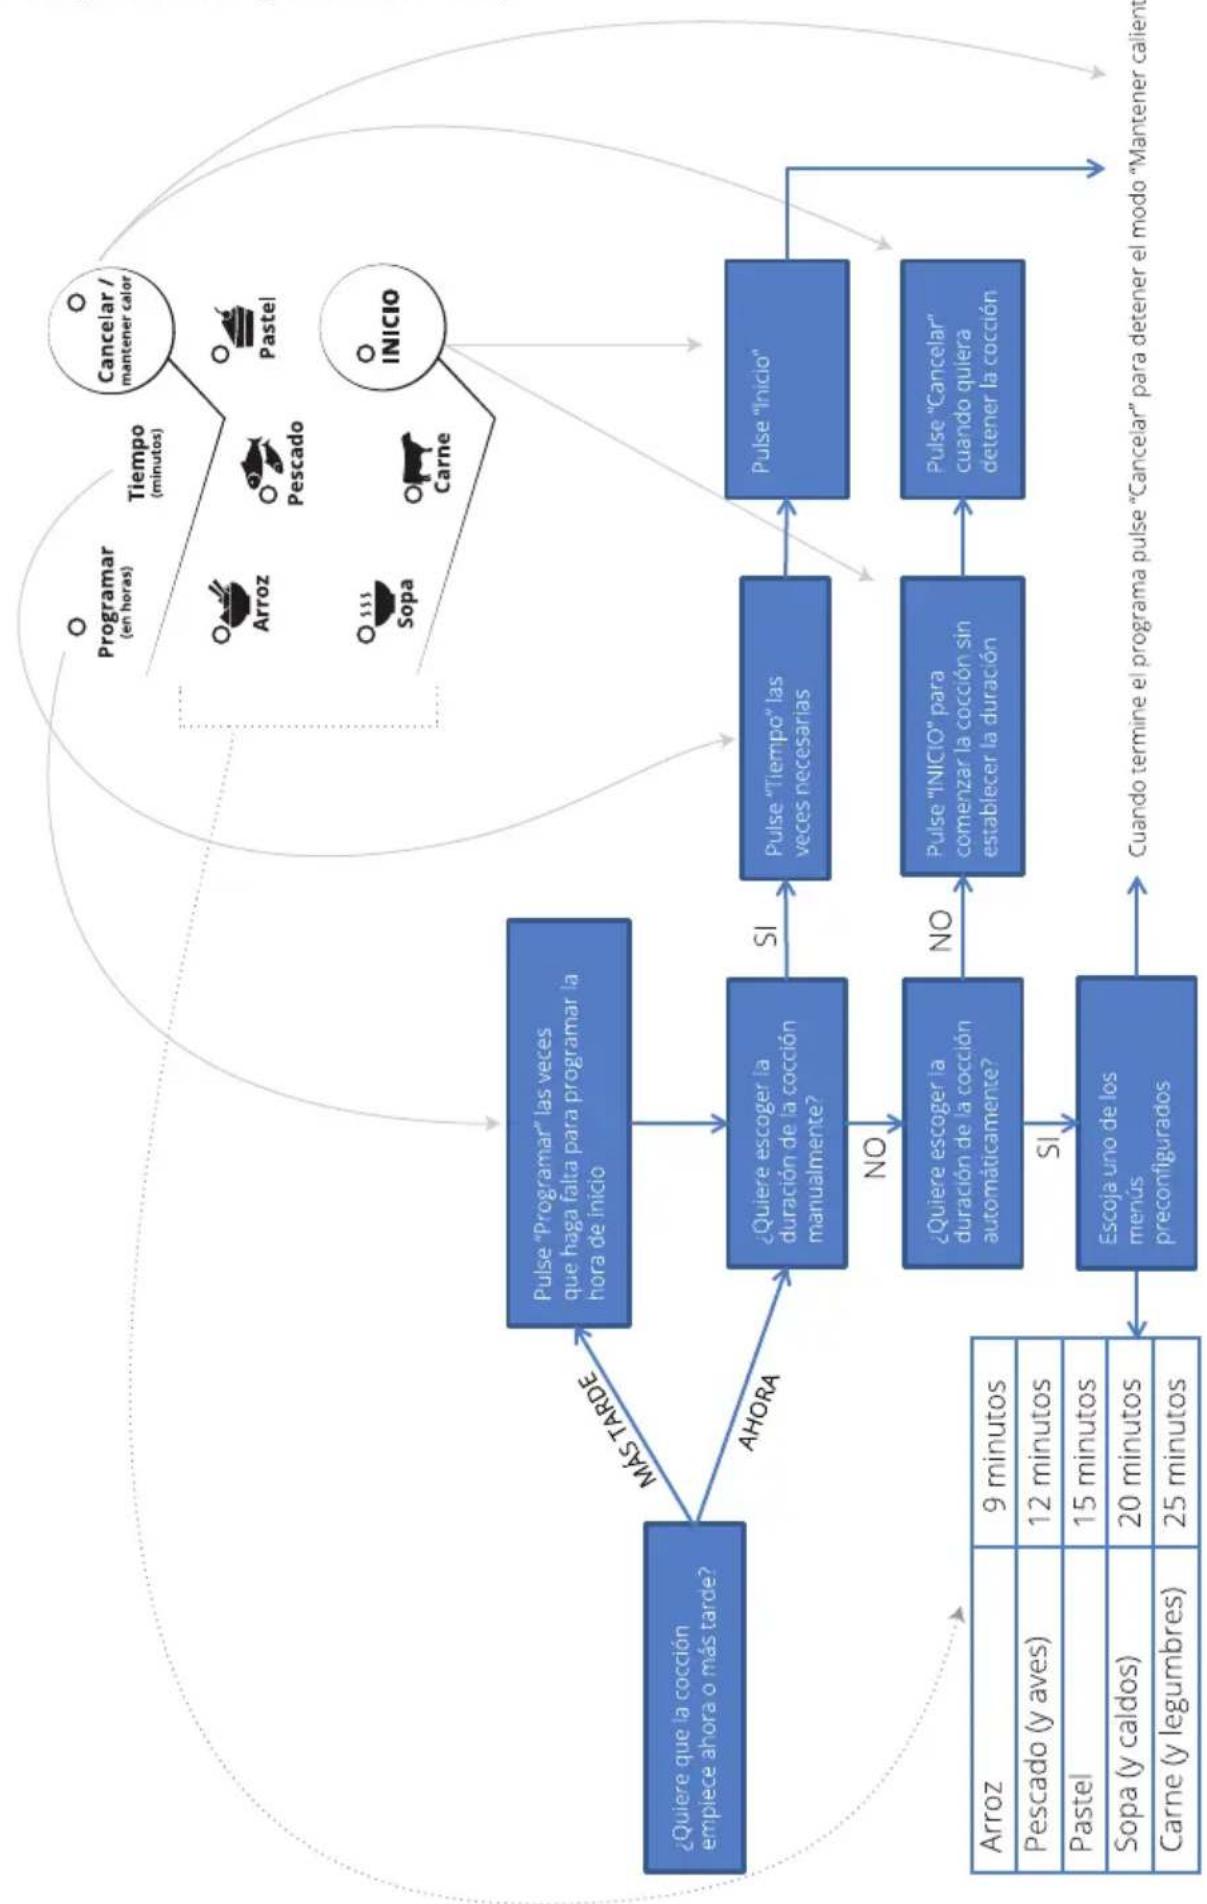
| Arroz | 9 minutos |
| Pescado (y aves) | 12 minutos |
| Pastel | 15 minutos |
| Sopa (y caldos) | 20 minutos |
| Carne (y legumbres) | 25 minutos |
Tiempos de cocción a presión. A estos tiempos hay que añadir el tiempo que tarda la olla en alcanzar la presión adecuada
Los tiempos de los menús preconfigurados están pensados para cocciones medias y porciones estándares, pero cada persona tiene sus propios gustos y necesidades, como un arroz más o menos caldoso, una carne más o menos hecha, una mayor o menor cantidad de comida... En general los usuarios noveles optarán por la comodidad y la guía de los menús preconfigurados, pero los usuarios más experimentados generalmente optan por establecer sus propios tiempos de cocción manualmente para adaptarlos a sus gustos personales (botón Tiempo).
Arroz (9 min.)
Función pensada para todo tipo de arroces pero, sobre todo, para risottos. Vale también para hacer un perfecto arroz con leche. También para sopas ligeras o precocinadas.
Pescado (12 min.)
En este menú puede cocinar trozos de pollo, o cualquier ave de corral, pescado, carnes precocinadas o blandas, mariscos... Para pollos enteros recomendamos la función Carne.
Pastel (15 min.)
Normalmente al cocinar un pastel necesitará un ciclo de 30 minutos aproximadamente. Este programa dura 15 minutos para que a media cocción pueda extraer el vapor y, si es necesario darle la vuelta al pastel y después poner el programa de nuevo hasta los 30 minutos.
Sopa (20 min.)
Ideal para sopas y caldos con carne o con verduras de cocción larga, como patatas o zanahorias. Para sopas ligeras use el menú Arroz. Para la sopa de pasta bastan 5 min. (en modo manual).
Carne (25 min.)
Use este menú tanto para carnes de cocción larga, algunos moluscos y legumbres. Cuando haga cocidos tenga en cuenta que las legumbres aumentan mucho su tamaño.
Guía rápida de uso (panel de control)
flowchart
graph TD
    A["¿Quiere que la cocción empiece ahora o más tarde?"] --> B["Pulse "Programar" las veces que haga falta para programar la hora de inicio"]
    B --> C["¿Quiere escoger la duración de la cocción manualmente?"]
    C -->|SI| D["Pulse "Tiempo" las veces necesarias"]
    D --> E["Pulse "Inicio""]
    E --> F["Pulse "Cancelar" cuando quiera detener la cocción"]
    F --> G["Cuando termine el programa pulse "Cancelar" para detener el modo "Mantener calient""]
    H["Arroz: 9 minutos"] --> I["Escoja uno de los menús preconfigurados"]
    I --> G
    J["Pescado (y aves): 12 minutos"] --> I
    K["Pastel: 15 minutos"] --> I
    L["Sopa (y caldos): 20 minutos"] --> I
    M["Carne (y legumbres): 25 minutos"] --> I
    N["Alvora: MÁS TARDE"] --> C
    O["Alvora: AHORA"] --> C
    P["Programar (en horas): Tiempo (minutos): Arroz, Pescado, Pastel, Sopa, Carne INICIO"] --> E
PREGUNTAS FRECUENTES:
A la hora de cocinar tenga siempre en cuenta las siguientes consideraciones:
¿Cocinar con tapa o sin tapa?
Esta olla puede usarse:
- Con tapa y con presión
- Con tapa y sin presión (con la válvula de presión abierta)
- Sin tapa y, por tanto, sin presión.
Por ejemplo puede sofreir un poco de ajo y cebolla con muy poquito aceite, en cuyo caso preferirá poner la olla sin tapa. O si prepara unas lentejas preferirá cocinar con tapa y con presión para que la cocción termine lo antes posible. O quizá prefiera ablandar carne con una cocción lenta, en cuyo caso es conveniente abrir la válvula para cocinar sin presión, pero con más calor y más homogeneidad que cocinando sin tapa.
¿Se puede freír en esta olla?
Esta olla está preparada para alcanzar ciertos niveles de temperatura por encima de los cuales deje de operar. Esto significa que no podrá freír normalmente - como unas patatas fritas o unos nuggets de pollo - pero si usa poco aceite sí podrá sofreír por ejemplo. El límite lo da la temperatura que alcance el aceite y la cantidad del mismo. En todo caso, para su mejor conservación, no se recomienda usar la olla para freír.
¿Qué hacer si la comida no sale con el punto de cocción deseado?
Digamos por ejemplo que ha puesto el menú Arroz y le ha salido muy pasado. Este menú está establecido en 9 minutos porque hemos observado que en la mayoría de los casos es el tiempo adecuado para cocinar arroz. Pero no siempre es así. No es lo mismo un risotto que un arroz caldoso ni es lo mismo un arroz blanco que uno con mucho condimento ni es lo mismo 200 gr de arroz que 300gr.
Pero si le ha ocurrido esto no se preocupe. La próxima vez que haga el mismo arroz que le ha salido pasado en las mismas cantidades tiene 2 opciones: O bien programar la cocción manualmente menos de 9 minutos, o bien usar el menú Arroz y abrir la válvula de presión antes de que termine. Si por el contrario le ha quedado poco hecho la próxima vez no tendrá más que programar manualmente más de 9 minutos.
¿Qué hacer si tras pulsar INICIO el tiempo no descuenta?
No hay que preocuparse. Cuando la olla empieza a cocinar calienta el contenido, pero hasta pasados unos minutos no alcanza la presión suficiente para cocinar a presión. Puede comprobar que la olla ha empezado a cocinar a presión porque la válvula flotante sube. Transcurrido 1 minuto empieza a descontar el tiempo. En la parte izquierda de la pantalla aparecerá una "P" (ej.: Q.P 09)
Puede ocurrir que transcurra mucho tiempo sin que la válvula flotante suba, esto es, que la olla no coja presión. El tiempo por tanto no descontará. Hay que hacer las siguientes comprobaciones:
- ¿Está calentando la olla?
- ¿Está la válvula de presión en posición de cierre hermético (abajo)?
- ¿Hay un mínimo de 1/5 de la cubeta cubierto con contenido líquido?
- ¿Está bien colocada la goma de sellado de la tapa?
¿Sólo se pueden cocinar las recetas que vienen con el manual?
En absoluto. Las posibilidades son infinitas. Considere esta olla como una olla a presión tradicional, pero con muchas ventajas. Puede cocinar las mismas recetas que se cocinan desde siempre en olla a presión o en olla normal, y además puede adaptar cualquier receta o consultar en Internet las recetas de Patricia, hechas específicamente para esta olla, de este blog de recetas:
http://recetasollaschneider.com
Este blog no tiene vinculación directa con Schneider, pero las recetas que se incluyen con esta olla han sido aportadas por su creadora y lo recomendamos encarecidamente, sobre todo durante el primer periodo de uso de la olla.
¿Se puede cocinar al vapor?
Esta olla le permite cocinar al vapor. Para ello necesitará un accesorio adecuado que sostenga los alimentos por encima del nivel del agua y que no arañe la cubeta. El nivel del agua no deberá superar nunca la mitad de la cubeta para cocinar al vapor. Schneider no suministra estos accesorios, pero se encuentran con facilidad en tiendas especializadas.
¿Se puede cocinar al baño María?
Al igual que la cocción al vapor esta olla permite la cocción al baño María, usando para ello un recipiente refractario - resistente a altas temperaturas y a altas presiones (no suministrado) -. Colóquelo en el centro de la olla y ponga agua en la olla sin llegar a cubrir el recipiente. Este método es adecuado para cocinar flanes. Truco: Puede colocar sobre el recipiente una rejilla y sobre ésta aprovechar para cocinar otros alimentos al vapor.
¿Cómo evitar que se queme la comida en la parte inferior?
A pesar de que la cubeta de la olla Schneider es antiadherente en ocasiones puede sobrecalentarse la comida, sobre todo en la parte inferior. Evítelo tomando las siguientes precauciones:
Use un programa más corto para esa cantidad de alimento
Compruebe que la olla coge presión durante el cocinado
Ponga más agua de lo que acostumbra
En algunos platos es posible poner papel de horno en el fondo
Si es posible unte la cubeta con mantequilla (las partes en contacto con la comida)
Una vez seleccionado un menú preconfigurado, ¿se puede aumentar o disminuir el tiempo?
Cuando pulsa el botón correspondiente a uno de los menús preconfigurados se establece automáticamente un tiempo de cocción a presión. Si desea que ese tiempo sea mayor o menor del que se muestra en pantalla pulse el botón Cancelar / Mantener calor. La pantalla se pondrá a "0" y podrá establecer el tiempo deseado manualmente pulsando repetidas veces el botón Tiempo.
¿Qué diferencia hay en calentar pulsando INICIO y pulsando Cancelar / Mantener calor?
Al pulsar el botón INICIO la olla calentará el contenido hasta que alcance el punto de presión, que se detendrá la cocción y pasará a modo "Mantener Calor". Si cocina sin tapa o con la válvula de presión abierta no se alcanzará el punto de presión, por lo que la olla continuará calentando sin presión indefinidamente hasta que usted la pare. En cambio si usa el botón Cancelar / Mantener calor la olla calentará sólo lo suficiente para mantener la temperatura, pero sin cocinar los alimentos. En los dos casos deberá detener el modo "Mantener Calor" pulsando Cancelar / Mantener calor.
BIZCOCHO DE LIMÓN: EJEMPLO DE USO
1. Hacemos la masa
En este ejemplo usaremos tiempos y cantidades referidos al modelo de 6L. (SCO 06D). Para los modelos de 4 y 8 litros puede utilizar las cantidades proporcionales al volumen correspondiente a su olla.
Ponemos en un recipiente un yogur sabor limón y usaremos su vaso como medida. Añadimos al recipiente 1 medida de aceite, 2 medidas de azúcar, 3 medidas de harina de fuerza, 3 huevos, un sobre de levadura y una pizca de sal. Si se desea se puede añadir a la mezcla un poco de ralladura de la cáscara de un limón para darle más sabor.
Batimos y amasamos bien hasta que quede uniforme y compacta.
2. Nos aseguramos de que la olla esté bien limpia
Comprobamos que la válvula flotante no esté obturada y suba y baje con facilidad. Comprobamos igualmente la válvula de presión y la carcasa que la protege en la parte interior de la tapa.
Comprobamos la goma de sellado y que la base interna de la olla y la cubeta están limpias y en perfectas condiciones (sin abolladuras ni golpes).
3. Introducimos la masa en la cubeta y la cubeta en la olla
Untamos con mantequilla el interior de la cubeta, espolvoreamos harina por encima e introducimos la masa en la cubeta de forma que cubra, como máximo, 1/3 del volumen de la cubeta y como mínimo 1/5 de la misma. Si la masa es suficientemente consistente puede colocar papel de horno en el fondo de la olla para proteger la base del bizcocho.
Introducimos la cubeta en la olla y cerramos la tapa tal y como se explica en este manual
4. Programamos la olla (opcional)
Si desea que la olla empiece a cocinar el bizcocho dentro de un tiempo en lugar de hacerlo inmediatamente pulse el botón Programar repetidas veces hasta que la pantalla indique en dígitos rojos el tiempo que desea que transcurra en horas antes de que empiece a cocinar. Por ejemplo si pulsa 3 veces la pantalla mostrará a la izquierda 1.5 y la olla empezará a cocinar el bizcocho dentro de una hora y media.
En todo caso para hacer un bizcocho es recomendable saltarse la programación y pasar directamente a una de las opciones siguientes.
5. Iniciamos la cocción
Opción a: Menú preconfigurado
Enchufamos la olla y pulsamos el botón Pastel. Se ilumina la lucecita de dicho botón. Esperamos 2 segundos (o pulsamos INICIO), suena un pitido y se ilumina la luz del botón Cancelar / Mantener calor a la vez que los 2 dígitos verdes de la pantalla cambian de 00 a 15.
Opción b: Selección manual de tiempo
Enchufamos la olla y pulsamos 15 veces el botón Tiempo. Cada pulsación suena un pitido y aumenta en una unidad el tiempo mostrado en dígitos verdes en la pantalla. Tras 15 pulsaciones la pantalla mostrará 15. Entonces pulsamos INICIO y se iluminará la luz de este botón. Espere 2 segundos y sonará un pitido, iluminándose también el botón Cancelar / Mantener calor.
Opción C: Sin selección de tiempo
Con la olla sin tapa o con la válvula de presión abierta enchufamos la olla y pulsamos el botón INICIO. Se ilumina este botón. Esperamos 2 segundos y suena un pitido, iluminándose el botón Cancelar / Mantener calor. En esta opción tendrá que estar pendiente para detener la cocción cuando llegue el momento. Tenga en cuenta que la cocción no será a presión en este modo, por lo que tendrá que alargar los tiempos.
En cualquiera de las 3 opciones la olla empieza a calentar pero en las 2 primeras tardará unos minutos hasta que la olla coja presión para que empiece a descontar el tiempo. Podemos ver si la olla ha cogido presión si aparece una "P" en pantalla y empieza a descontar el tiempo.
Transcurridos 15 minutos desde que la olla coge presión termina el programa "Pastel". Sonará un pitido y quedará en modo "Mantener calor", cuyo botón parpadeará en naranja, y que emitirá el calor suficiente para mantener la comida caliente hasta que usted lo pare, pero que en el caso del bizcocho es innecesaria. Así que paramos este modo pulsando el botón Cancelar / Mantener calor y extraemos el vapor abriendo la válvula.
El programa "Pastel" dura 15 minutos para que pueda comprobar el estado de la cocción y, si es necesario, darle la vuelta, a la mitad del proceso aproximadamente. En este punto el bizcocho ya debería haber subido y tener una buena consistencia. Puede comprobar ambas características con una varilla. Si cree que su bizcocho tiene suficiente consistencia, y la parte superior es plana, es conveniente darle la vuelta, para que se dore por los 2 lados. Para hacer esta comprobación tendrá que abrir la olla como se indica en este manual asegurándose de haber liberado toda la presión y asegurándose de no quemarse con el vapor. Si duda si la masa habrá crecido ya y si tendrá suficiente consistencia es mejor que no abra la tapa y pase al ciclo siguiente sin darle la vuelta al bizcocho. En este caso tenga en cuenta que le saldrá un bizcocho igual de bueno, pero no estará dorado en la parte superior, por lo que le recomendamos adornarlo a posteriori (por ejemplo con una capa de chocolate) para mejorar su presentación.
6. Ponemos un segundo ciclo
Completado el paso anterior volvemos a poner la tapa de la olla como se describe en este manual (si es que la hemos quitado), ponemos la válvula de presión en posición "Salida vapor (que se corresponde con su punto más alto) y pulsamos el botón INICIO. A los 2 segundos suena un pitido se pone a calentar. A los 15 minutos debería estar listo el bizcocho. No estamos cocinando ahora a presión, así que la pantalla no mostrará ninguna cuenta atrás, sino que tendrá que estar pendiente. Pulsamos Cancelar / Mantener calor, abrimos la tapa, comprobamos la cocción con una varilla, extraemos la cubeta con guantes de cocina o trapos para evitar quemaduras y desmoldamos.
En este punto debe tener en cuenta que hay muchos factores que hacen variar el punto de cocción: El tamaño de la olla (hay 3 modelos diferentes), la cantidad de masa, los ingredientes, la consistencia de la masa, el tipo de levadura y de harina, etc. Por este motivo no podemos darle una referencia exacta, pero aconsejamos hacer el segundo ciclo de 15 minutos sin presión porque es suficiente para la cocción, y permite que la olla no suba demasiado de temperatura (si se calentara demasiado se bloquearía por seguridad y la pantalla mostraría el código E3).
Deberá usted observar los resultados en su caso y adaptar la cocción de su próximo bizcocho en consecuencia, por ejemplo, poniendo 5 minutos de presión en el segundo ciclo si le ha quedado poco hecho o poniendo un segundo ciclo más corto si le ha quedado muy hecho.
Desenchufamos la olla y esperamos a que se enfríe a temperatura ambiente antes de proceder a su limpieza.
Recuerde que puede adaptar cualquier receta a sus gustos, no tiene por qué seguir ninguna receta al pie de la letra.
MANTENIMIENTO
LIMPIEZA
Cómo limpiar la cubeta
Al ser el contenedor donde se cocinan los alimentos la cubeta es la parte que más se mancha. Tiene la gran ventaja de estar recubierta de un material antiadherente que le facilitará mucho la limpieza, pero, al igual que las sartenes, deberá tener especial cuidado en no dañar este recubrimiento, para que la cubeta no pierda antiadherencia con el tiempo y le dure muchos años.
Antes de la limpieza deje que se enfríe. Podría estar muy caliente y producir quemaduras. Para limpiar la cubeta use un estropajo específico para sartenes (que no araña) y evite usar el lavavajillas, ya que es un electrodoméstico que utiliza para la limpieza sales y productos agresivos que podrían dañar el recubrimiento antiadherente.
Para soltar los restos que estén adheridos a la superficie de la cubeta no utilice rasquetas ni utensilios de metal, piedra o cualquier otro material duro que pueda rayar la superficie. Si los restos no se quitan con el estropajo utilice, con mucho cuidado, la cuchara de material plástico que se suministra con la olla. En su defecto podría utilizar también utensilios de madera blanda, siempre tomando las debidas precauciones para no dañar el recubrimiento. Use solo jabón especial para la vajilla y aclárelo bien.
Tras el lavado seque inmediatamente la cubeta con un paño seco, suave y limpio y déjela al aire al menos una hora antes de volver a ponerla en la olla.
Cómo limpiar la tapa
Para limpiar la tapa debe primero quitarla de la olla y desmontar el anillo de goma sellador y la carcasa que protege el conducto interno de la válvula de presión. Los procedimientos para tales acciones se explican en capítulos previos de este manual. Lave por separado estos componentes. En el caso de la goma use sólo agua caliente. La carcasa puede lavarla con un estropajo, jabón lavavajillas y agua caliente.
La tapa está hecha de acero inoxidable y materiales plásticos, por lo que puede lavarla con cuidado en el fregadero. Como en el caso de la carcasa protectora puede lavarla con estropajo, jabón lavavajillas y agua caliente. Preste especial atención en la limpieza de las 2 válvulas, dejando correr agua por ellas y, en el caso de la válvula de presión puede usar un bastoncillo para limpiar el conducto interno. En todo caso asegúrese de que ninguna de las 2 válvulas queda obturada y que se mueven libremente al contacto.
Cuando haya finalizado seque todos los componentes con un paño seco, suave y limpio y vuelva a colocar en su sitio correctamente la carcasa y la goma selladora.
Cómo limpiar el cuerpo de la olla
Desenchufe la olla, quite la tapa, extraiga la cubeta y limpie el interior con un paño limpio y húmedo. Cuando haya terminado séquelo inmediatamente con un paño seco y limpio y déjelo al aire al menos dos horas. Extraiga el recolector de condensación y lávelo aparte en el fregadero.
En ningún caso sumerja la olla ni la moje ni use productos abrasivos o tóxicos para limpiarla.
RESOLUCIÓN DE PROBLEMAS
¿Qué hacer si la olla no coge presión?
Hasta pasados unos minutos de cocción la olla no alcanza la presión suficiente para cocinar a presión. Puede comprobar que la olla ha empezado a cocinar a presión porque la válvula flotante sube. Pasados uno o dos minutos la pantalla indica que se ha alcanzado el punto de presión añadiendo una P en la izquierda de la pantalla (ejemplo:0.P 25). Hasta ese momento no empieza a descontar el tiempo.
Puede ocurrir que transcurra mucho tiempo sin que la válvula flotante suba, esto es, que la olla no coja presión. El tiempo no descontará. Hay que hacer las siguientes comprobaciones:
- ¿Está calentando la olla?
Acerque la mano a la olla sin tocarla estando ésta sin tapa. Compruebe que emana calor. Si no nota ningún calor:
a) Espere 10 minutos y vuelva a comprobarlo.
b) Compruebe que la olla está enchufada y hay algún programa en marcha.
c) Si está todo bien y sigue sin calentar póngase en contacto con un servicio técnico
- ¿Está la válvula de presión en posición de cierre hermético (abajo)?
Busque una rayita vertical en relieve en la pieza que rodea la válvula de presión. La notará al tacto fácilmente. El punto central serigrafiado en la parte superior de la válvula con la etiqueta "cierre hermético" debe estar alineado con esta rayita para que la olla cocine a presión. Note que cuando la válvula está en posición de cierre hermético está ligeramente más baja que cuando está abierta.
- ¿Hay un mínimo de 1/5 de la cubeta cubierto con contenido líquido?
Si no hay bastante líquido no se generará suficiente presión. Además hay altas probabilidades de sobrecalentar la olla y quemar la comida. Recuerde que debe estar cubierto al menos 1/5 de la capacidad de la olla.
- ¿Está bien colocada la goma de sellado de la tapa?
En el borde de la parte interna de la tapa hay un anillo metálico. Entre este anillo metálico y la propia tapa debe colocarse el anillo de goma que sirve para sellar la olla cuando está cerrada. Sabremos si el anillo está bien colocado si encaja perfectamente y el centro del anillo de goma en su parte cóncava coincide con el anillo metálico de la tapa.
- ¿Está bien cerrada la tapa?
En primer lugar compruebe que el asa de la tapa y las asas laterales del cuerpo de la olla están alineadas. Deben estarlo para un cierre correcto y hermético de la tapa. En la parte de material plástico negro de la tapa, en el lateral más cercano a la válvula flotante encontrará un pequeño cilindro metálico. Este cilindro no debe sobresalir lo más mínimo. Si sobresale gire la tapa en sentido contrario a las agujas del reloj hasta que el cilindro se introduzca completamente.
Tire de la tapa hacia arriba por su asa. Si se desprende de la olla es que está mal cerrada. Debe estar en la siguiente posición:

¿Qué hacer si sale vapor por los lados?
Si sale vapor por los laterales de la olla mientras cocina probablemente esté mal cerrada o tenga algún desperfecto. Si esto ocurre desenchúfela inmediatamente, aléjese y contacte con un servicio técnico de Schneider.
¿Qué hacer si la olla no se abre?
Cuando la olla supera el punto de presión sube la válvula flotante, bloqueando la tapa para que no pueda ser abierta mientras haya presión en la olla. Si la tapa no se abre ésta es la causa más probable. Para abrirla pulse el botón Cancelar / Mantener calor y desenchufe la olla. Ponga la válvula de presión en modo "Salida vapor" y espere a que se disipe el vapor lo suficiente para que baje de nuevo la válvula de vapor. Cuando ésta baje espere aún un par de minutos antes de abrir la tapa, porque todavía queda mucho vapor dentro de la olla y podría quemarse.
Si la válvula de vapor está en la posición más baja y aún así no puede abrir la tapa contacte con nuestro servicio técnico.
¿Qué hacer si algún componente está dañado o desgastado?
A causa de golpes, imprevistos o, simplemente, por el desgaste que provoca el uso cotidiano, es posible que alguno de los componentes de la olla necesite ser reparado o sustituido. Ya sea para su reparación o sustitución póngase siempre en contacto con nuestras oficinas de servicio técnico, quienes, además de realizar reparaciones, pueden ofrecer recambios, como una tapa o una cubeta nueva por ejemplo. Use siempre piezas originales de Schneider.
Sistemas de seguridad
Para su tranquilidad esta olla dispone de diversos sistemas de seguridad, por encima de las ollas a presión convencionales. Entre ellos los siguientes:
a) La olla no puede coger presión si no está bien cerrada.
b) La olla no se puede abrir si se ha superado el punto de presión.
c) Si la presión y temperatura internas alcanzan un cierto nivel la válvula de presión se activa automáticamente para liberar vapor.
d) Si fallaran los sensores de presión y ésta superara los niveles de seguridad, la olla liberará presión por los bordes de la tapa para evitar una explosión.
e) Si la temperatura superara los límites de seguridad la olla se detendría y bloquearía.
f) Si fallara el sensor de temperatura un fusible apagará la olla si fuera necesario.
Códigos de error
En caso de fallo en el sistema se mostrará en pantalla uno de estos códigos de error:
Sensor de presión inoperativo. Se detiene el proceso por precaución.
Fallo eléctrico. Continuará el proceso si se restablece el suministro
La temperatura ha superado el límite máximo (215°). Proceso detenido por precaución.
Fallo en el sensor de temperatura. Se detiene el proceso por precaución
Servicio técnico
Si la olla sufriera algún desperfecto, deformación, mal funcionamiento, o si necesitara remplazar alguna pieza, deberá ponerse en contacto con nuestro servicio técnico. Schneider dispone de oficinas de asistencia técnica en toda la geografía española.
Puede localizar su oficina local de asistencia técnica en el mapa del área de Asistencia de la web de Schneider (concretamente en "Resto de productos):
http://schneiderespana.es → Asistencia → Resto de productos
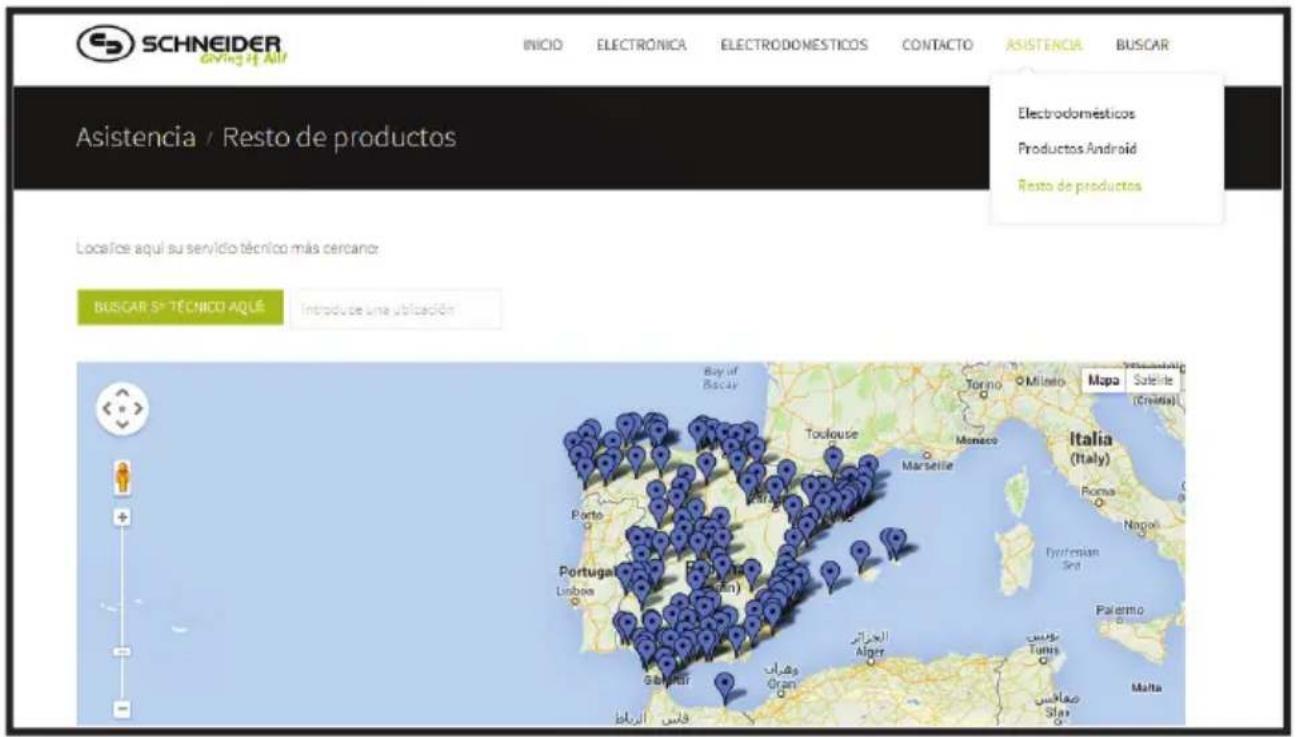
También puede acceder a este mapa escribiendo directamente la siguiente dirección URL:
http://schneiderespana.es/index.php/asistencia-tecnica/sat-electronica
Si tuviera dificultades escribanos a postventa@schneiderespana.es
Diagrama de circuitos
Este diagrama podría ser requerido por su servicio técnico:
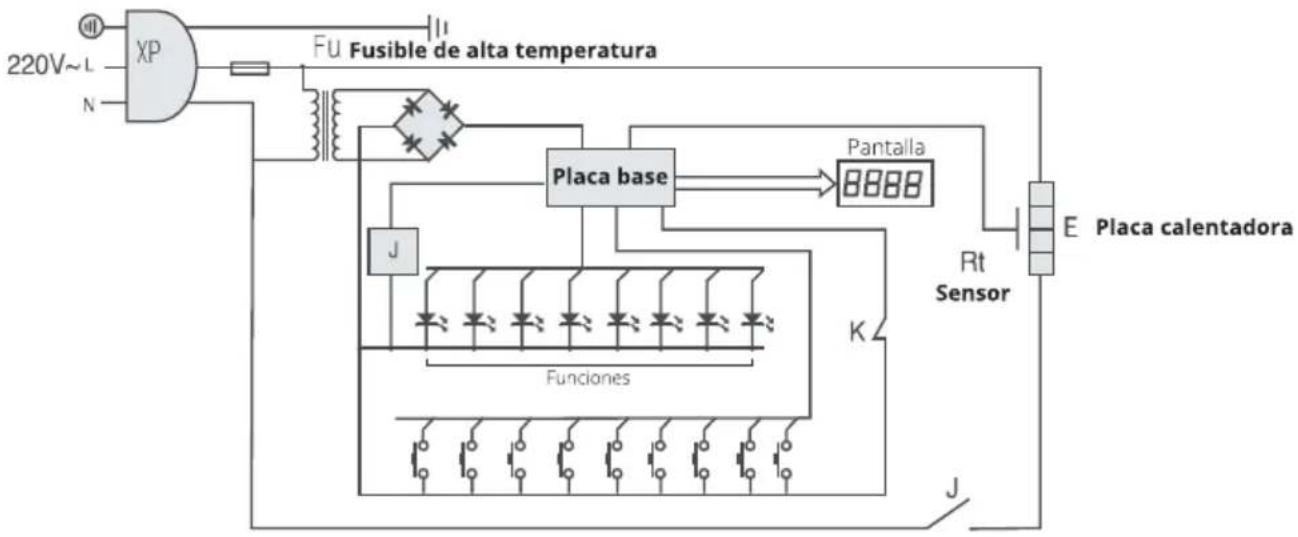
flowchart
graph TD
    A["XP"] --> B["Fusible de alta temperatura"]
    B --> C["Placa base"]
    C --> D["Pantalla"]
    D --> E["Placa calentadora"]
    E --> F["E"]
    C --> G["J"]
    G --> H["Functional blocks with diodes"]
    H --> I["K"]
    I --> J["Sensor"]
    J --> K["Rt Sensor"]
    K --> L["End"]
Garantía
La información de este apartado es meramente aclaratoria, y debe usted atenerse a las condiciones que se mencionan en la tarjeta de garantía adjunta a este manual de usuario. Este Producto cuenta con las condiciones de garantía aplicables a bienes de consumo según la legislación que a tal efecto se encuentre en vigor en el momento de su adquisición.
Para ejecutar la garantía por defecto de fabricación le será requerida una prueba de compra original (generalmente la factura), por lo que recomendamos conservarla hasta que finalice la vida útil del aparato.
En ocasiones, para la reparación del producto, será necesaria la recogida del mismo por parte de una empresa de mensajería, que no se hará responsable del estado del mismo a su entrega si no está correctamente embalado, por lo que le recomendamos conservar el embalaje original durante toda la vida útil del producto.
Cualquier uso inadecuado de la olla, contravención de las recomendaciones de este manual de usuario, o manipulación por parte de personal no autorizado invalidará la garantía oficial de Schneider.
INSTRUCCIONES DE DESECHO
natural_image
Symbol of a trash bin crossed with no visible text or labelsLa normativa europea exige que este producto sea desechado de forma adecuada para evitar daños medioambientales o a la salud humana. Frente a una eliminación de residuos descontrolada, recicle el producto de manera responsable para promover la reutilización sostenible de recursos materiales. Para devolver el dispositivo usado, utilice los sistemas de recogida locales (punto limpio) o contacte con el distribuidor autorizado al que compró el producto. Este último puede recoger el producto para un reciclaje medioambiental seguro.
Todas las informaciones contenidas en este manual de usuario (imágenes incluidas) son de mera referencia y podrían verse afectadas por errores tipográficos o de otra índole que las hagan diferir del producto real.
Schneider España de I. S.A., C/ Verano 18-20, Torrejón de Ardoz, Madrid. Made in P.R.C.
www.schneiderespana.es
INDEX
01. Specifications 02
02. Before Use 03
Caution 03
Installation 03
Placing the cooker 03
This is an electric device 03
Overview 04
Components 04
The Lid 04
The Body 07
03. Usage Instructions 09
The Control Panel 09
Overview 09
The display 09
Functions buttons 10
Preset menu buttons 11
Quick Guide 12
FAQs 13
Lemon sponge cake: Usage example 15
04. Maintenance 17
Cleaning 17
Cleaning the inner pot 17
Cleaning the Lid 17
Cleaning the Body 17
Problem solving 18
¿What if it doesn't reach enough pressure? 18
¿What if the steam comes out of the borders? 19
¿What if it doesn't open up? 19
¿What if any component is damaged or worn down? 19
Security Systems 19
Error codes 19
Technical services 20
Circuit diagram 20
Warranty 21
Disposal instructions 21
SPECIFICATIONS
Thank you for trusting Schneider.
This is an easy to use electric pressure cooker with amount outstanding energy savings up to 60% and one touch functions that will allow you to make delicious stew, beans, rice, fish, soup....
With its 24h programmer it will cook for you and have your meal ready when you get home at any time.
The following are the main specifications of this pressure cooker:
©Timer
©24th programmer
©High resistance mom stick inner post
©5 preset functions
©Accessories: Spoon and measure cup
©Recipes book included (in Spanish)
This user manual provides information to the electric pressure cooker models is easier SC0 04D4D, SCO 06D and SCO 08D. The following specifications are unique to each of these pressure cooker models (check your model name on the product packaging):
| Model Cap | Capita Dimer | Bionsn | Bioner Diameter | Temp. | Dissurer | Temp. | Pressure |
| SCO 04D 4 | litres 280 x | 2800x2980mm2 | 8700Wn20 | c8060/80° | 20-70KPa | 60-80°C | 0-70KPa |
| SCO 06D 6 | litres 295 x | 2955x3295mm3 | 31000W 22 | t0060/8 | 20-70KPa | 60-80°C | 0-70KPa |
| SCO 08D 8 | litres 325 x | 3255x3505mm3 | 51200W 24 | t2060/8 | 20-70KPa | 60-80°C | 0-70KPa |
Maximum temperature: 215°C - Maximum pressure: 90KPa
This pressure cooker is part of the following Schneider products family:

If you wish to discover more fantastic Schneider products you are welcome to visit our online catalogue at:
www.schneiderespana.es
BEFORE USE
CAUTION
First of all make sure you take off all packaging material. Keep your children away form it.
This product is intended for domestic interior use only.
⚠ For their own safety, children and people with physical, mental or sensorial disabilities should not use or manipulate this device.
⚠️ Carefully read and follow all instructions contained in this booklet.
⚠️ Never open the lid until all pressure is released.
In order to avoid injuries stay away from the cooker while it releases steam.
During the cooking process cooker surfaces may become hot. Do not touch it and keep it away from flammable materials.
⚠️ If you need to carry it, hold it always by both side handles.
⚠️ If you notice any kind of damage or malfunction please contact immediately Schneider technical services. Never try to repair it by your own means.
This device is not water resistant. Do not plunge it. Only the inner pot can be washed normally in the sink.
⚠️ Risk of electric shock. Do not touch this device with your hands wet.
⚠️ Always keep this device away from fire or other heating elements.
△ Third party accessories may damage the cooker, voiding Schneider's official warranty.
INSTALLATION
Placing the cooker
Place the cooker in a fresh, dry, interior room, well ventilated and away from heating sources. Put it on a flat, solid surface. It must be easy to reach, and comfortable to manipulate.
This is an electric device
Check the rating label information at the back of the cooker and make sure that your home electrical system matches its requirements. Make sure also that you comply with your local regulations related to electrical installations.
The mains plug and cable have to be in perfect conditions, not smashed or folded, and away from liquids and heating sources. Don't let the cable hang. Plug always first the cable to the cooker and then to the mains. To plug or unplug the cable grab it by the plug itself, not the cable.
Always unplug the device if you are not using it.
OVERVIEW
COMPONENTS
The Lid
The lid of this cooker includes 2 security valves (pressure valve & floating valve), a handle and an hermetic closure system for pressure cooking that includes a sealing rubber ring.
△ You can cook taking the lid off. It will not be pressure cooking, but it will heat anyway.
△ If steam leaks out of the lid border, unplug the cooker, let it cool down and take it to SAT.
Pressure valve
It is the black cylinder with a strange cap on top of the lid. It has 2 positions: "Cierre hermético" and "Salida Vapor". "Cierre hermético" position locks the steam inside the pot, increasing pressure. With pressure the food is cooked faster. When in "Cierre hermético" position the valve is lower compared to "Salida vapor". "Salida vapor" position releases steam and, therefore, pressure. Release always all pressure before opening the lid.
natural_image
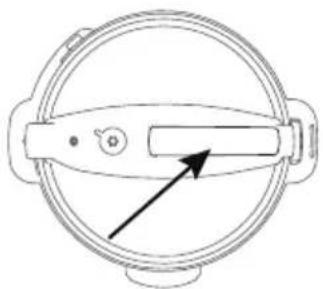
Technical line drawing of a circular mechanical component with a knob and arrow indicator (no text or symbols)To select the valve position look for a small vertical line around the pressure relief valve. This line should match the selected position dot on top of the valve cap.
In the inside of the lid we can find the opposite side opposite end of the pressure valve covered by a protective shell that prevents the valve from getting blocked with leftovers. Take this shell off by simply pulling it. You should wash it every time you use the cooker. You can put the shell back in by simply pressing on it.

Do not place anything over the pressure relief valve. Use only the original valve.
⚠️ Stay away from the pressure valve while it is releasing steam.
Do not place over the cooker clothes or anything else that could block or divert the steam escape.
Floating valve
It is a blocking valve next to the pressure relief valve. When it is lifted by the inner pressure it will lock the lid and the pressure cooking will start. You will not be able to open the lid until you release the pressure and this valve comes down again.
Do not try to force the lid to open while the floating valve is lifted.
▲ Often clean the floating valve rubber sealing join in the inner side of the lid, preferably every time you use this cooker.
The floating valve is not lifted if there is not enough pressure inside the pot. This may occur when there is not enough food or water in the pot, or because of a system failure, a power cutoff, the lid not being correctly closed, a damaged sealing system, etc.
natural_image
Technical line drawing of a circular mechanical component with a pointer indicating a feature (no text or symbols present)Lid handle
The lid handle of this Schneider cooker will let us easily put the lid on and off. It should not be used to carry the whole cooker. Please use the side handles for that purpose.
Do not touch the cooker surface (the lid most of all) while it is cooking. It can get very hot.
natural_image
Simple line drawing of a circular mechanical component with a central handle and arrow indicator (no text or symbols)Sealing rubber ring
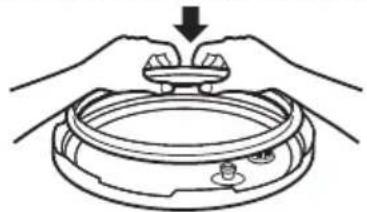
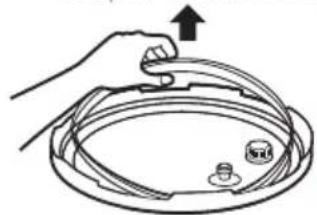
In the inner side of the lid there is a metal ring. Surrounding it you can find the rubber ring that seals the lid. You should keep it always well placed and in perfect conditions. This is the correct way to place it:
We press to affix it between the metal ring and the lid
natural_image
Illustration of hands holding a small component with a downward arrow indicating force or motion (no text or symbols)We pull to take it off
natural_image
Illustration of a hand holding a circular tray with a small knob and an arrow indicating upward motion (no text or symbols)⚠ Si the rubber ring or the metal ring around it are damaged or misplaced, or they don't fit, do not cook with the lid on and contact with our technical services to replace them.
Open and close the lid
Before opening the lid we have to fully release pressure. To do so we put the pressure valve in "Salida vapor" position:
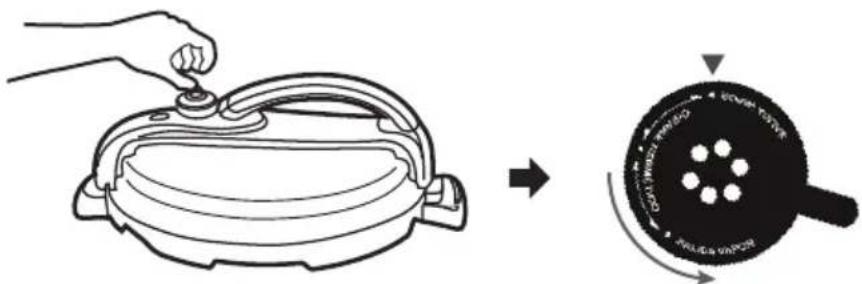
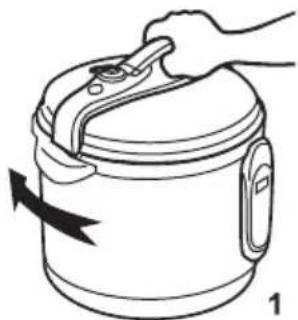
When enough steam has been released the floating valve will go down. We wait 2 minutes to make sure most steam have come out and we can open the lid. Grab the lid handle and push down a bit while turning it clockwise until it let the lid loose. With the other hand we should be holding the cooker by one of the side handles. Then we can pull slow and firmly (paying attention to the remaining steam) to take the lid off:
natural_image
Line drawing of a hand holding a cooking pot with a black arrow indicating rotation (no text or symbols)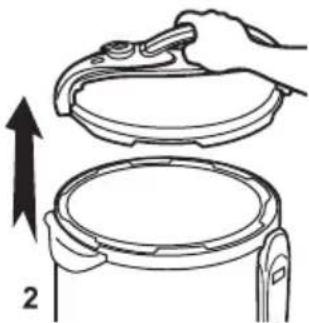
natural_image
Illustration of a hand holding a lid above a circular container, with an arrow indicating upward motion (no text or symbols)When you open the pressure relief valve it will immediately release very hot steam. Take appropriate precautions to void burns.
⚠️ If you cannot turn the lid to open it do not force it. Unplug the cooker from the mains and wait for the device to cool down again to room temperature. If you cannot open it by then please contact our technical services.
When you open the lid it will free remaining steam and hot air from the inner pot. Take appropriate precautions to void burns.
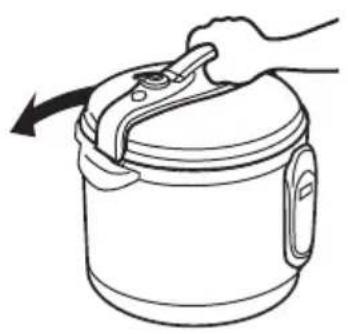
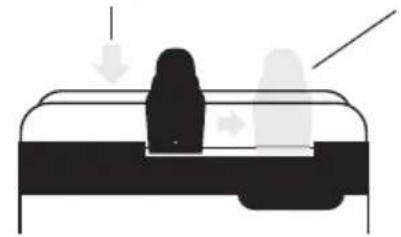
Before closing the ring make sure that both valves and the sealing ring are correctly placed and in perfect conditions. Check that you can turn the sealing ring around the metal ring. Then put the lid on the cooker body in the position shown in below right drawing. Push down first and then turn it anti-clockwise until you hear a click.
natural_image
Line drawing of a hand opening a cylindrical container with a handle, showing an arrow indicating rotation (no text or symbols)Push down the lid in this position
natural_image
Diagram of a mechanical or electrical component with arrows indicating direction (no text or symbols)Side view
Turn the lid anti-clockwise
After you close the lid and before you start cooking check that the pressure valve is in the desired position, either open or closed.
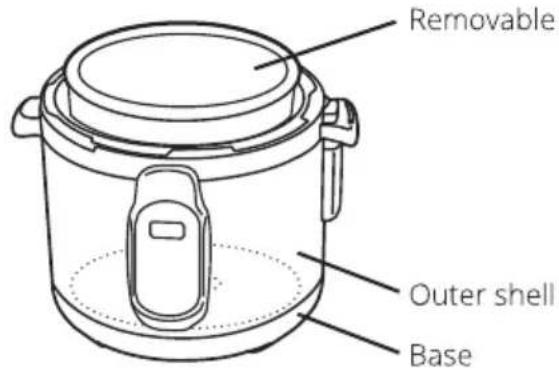
The body
Your Schneider cooker body includes the following components: A base, an outer shield and a detachable inner pot.
The cooker base
Here you can find the temperature and pressure sensors, the heating plate and the cable inlet.
The outside is made of degradable materials so it should never be in contact with fire. Neither should it be subject to high humidity conditions, extreme cold or heat, as the electronic components might get damaged.
This is an electric device, so in contact with water or humidity it may cause sparks, short-circuits, electric shocks or, even fire. Please take all due precautions.
It is important that you always keep in perfect conditions the contact surface between the heating plate and the inner pot.
Keep the cable away from the hot parts of the cooker. Always unplug the cooker when you are not using it.
Nonstick, removable, inner pot
The inner pot is where you place the food that you want to cook. It is a great advantage for you. On one hand it is the only part that you have to wash in the sink after use as it is detachable. On the other hand it will be very easy to wash because of its nonstick coating. Depending on the cooker model the inner pot capacity can be 4, 6 or 8 litres.
You should never fill the inner pot over its capacity, which is 4/5 (or 80%) for food that does not increase its volume with the cooking (like meat, vegetables, etc.), and 3/5 (or 60%) that does increase its volume with the cooking (pasta, rice, beans, etc.)
You should not either fill the inner pot under its minimum capacity, which is 1/5 (20%):
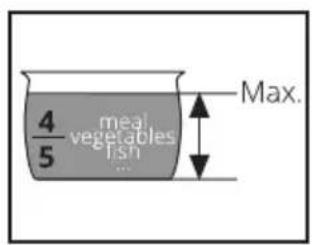
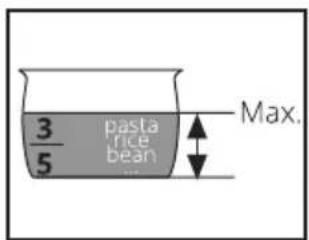
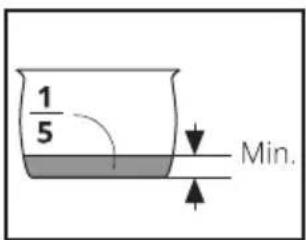
To take off the inner pot just pull it slightly to the top. If it is still hot protect your hands with gloves or clothes to void burns.
Before putting it back in place make sure that the heating plate and the support area are clean. Then just place it in the same position it was originally. If correctly placed it should not be put out of the cooker body more than 2cm over its top.
In the inside the inner pot is covered by a nonstick coating that could be damaged if you do not take the appropriate precautions. Use always heat resistant soft material tools (wood, plastic, silicone..). To wash it in the sink use the soft side of the scouring pad or use nonstick pan coating ready scouring pads.
⚠ Use the inner pot only with this Schneider cooker, and never with other heating sources. If you need to replace it contact Schneider technical services. Use only Schneider original parts for this cooker.
⚠ It is recommended that you wash the inner pot by hand in the sink, what will make it last longer and in better conditions, but still you can also wash it in the dishwasher if you prefer so.
Outer shell
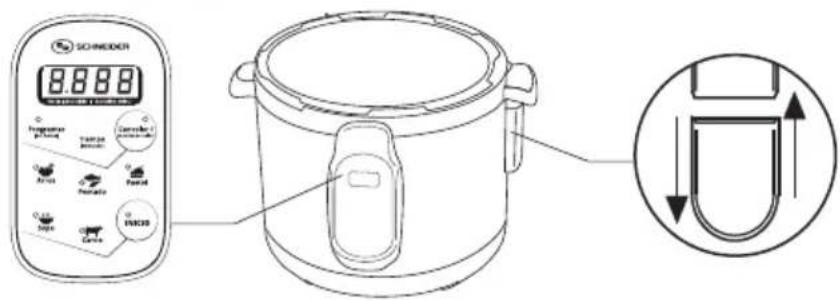
The outer shell is made of high resistance stainless steel. On top of the shell you have two side handles that you should use to carry the whole cooker. It includes also a control panel, that will be explained in detail in the next chapter, and a water deposit to collect condensed steam. This deposit can be easily removed by simply pulling it down.
USAGE INSTRUCTIONS
THE CONTROL PANEL
Overview
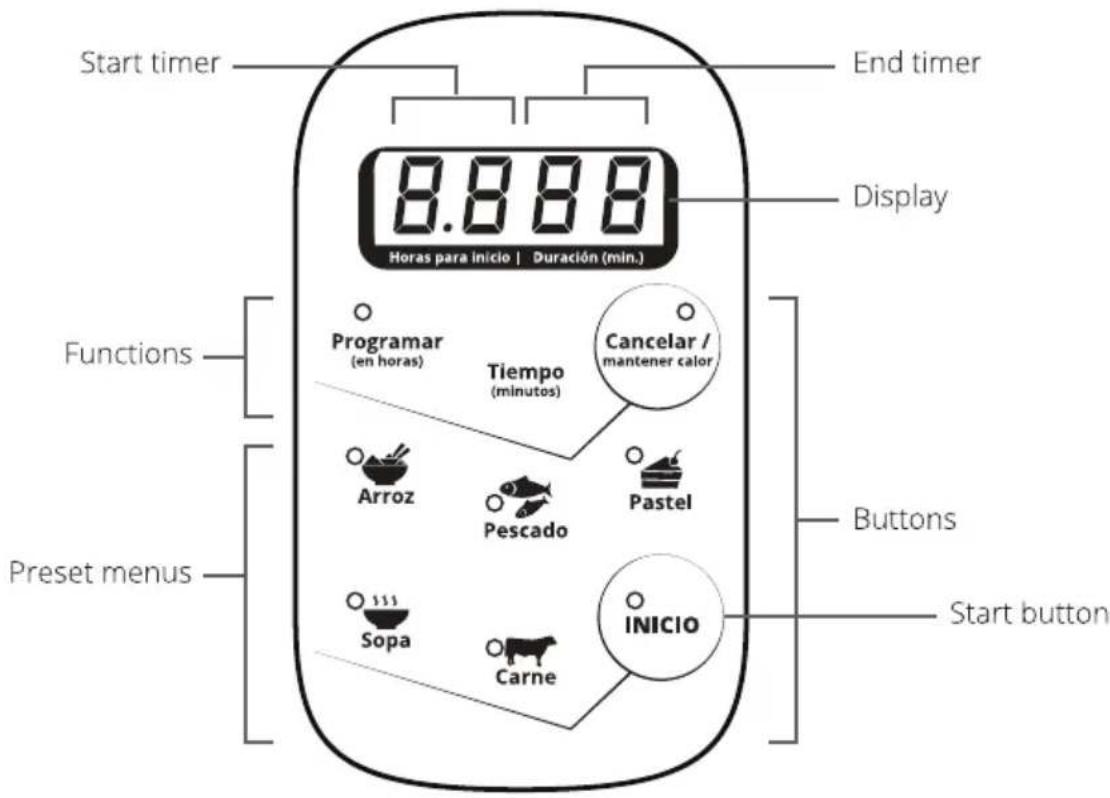
At the front side of the cooker we can see its control panel. It is a digital control panel with 9 buttons and an alphanumeric digits display. Buttons are distributed in two areas: On top you can find the functions buttons and the rest are preset menu buttons (apart from the Start button INICIO).
The display
The display will show four digits: Two of them are red and the other two are green. When we turn on the cooker it will start in stand by mode and the display will show "0000" waiting for instructions.
The first 2 digits (in red) indicate the hours left to start cooking. For example, "0.5" means that the cooker will start cooking in half an hour, "1.0" means 1 hour left, "1.5" one and a half hours, etc. From 9 and a half hours (9.5) time increases 1h at a time. ("8.5", "9.0", "9.5", "10", "11", "12"......"24"). When pressure cooking starts it shows a "P" (i.e. "OP 12").
The last 2 digits (in green) indicate the remaining pressure cooking time in minutes. The countdown will not start until there is enough pressure and a "P" shows up in the left side of the display (once started the countdown/program will continue even if you release pressure).
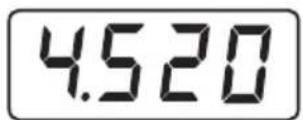
Here the cooker will start in 4 and a half hours and then it will pressure cook for 20 minutes
Functions buttons
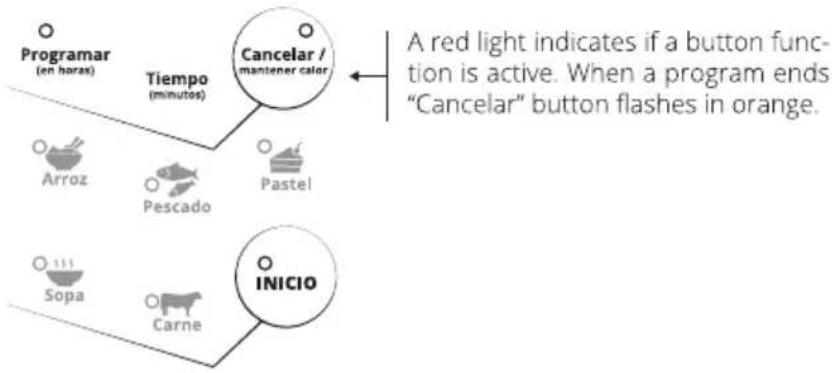
The usage of this pressure cooker is very simple. The pressure is set automatically, so you only need to choose the start time first and, then, the pressure cooking time. To do so you have 2 options: Manual setting or preset menus. For manual setting you can use the following function buttons (in black):
flowchart
graph TD
    A["Programar (en horas)"] --> B["Tiempo (minutes)"]
    B --> C["Cancelar / mantener calor"]
    C --> D["Inicio"]
    D --> E["Sopa"]
    D --> F["Carne"]
    E --> G["Arroz"]
    E --> H["Pescado"]
    E --> I["Pastel"]
    style A fill:#f9f,stroke:#333
    style B fill:#ccf,stroke:#333
    style C fill:#cfc,stroke:#333
    style D fill:#fcc,stroke:#333
    style E fill:#cff,stroke:#333
    style F fill:#ffc,stroke:#333
    note right of C: A red light indicates if a button function is active. When a program ends "Cancelar" button flashes in orange.
Programar
With this button you can set the start timer, in a countdown format. Every time you press Programar the time will increase half an hour. So if you press it for instance 3 times in a row the screen will show the following digits: 1500 , meaning that it will start cooking in one hour and a half (1.5 - not the same as 15, which means 15 hours -), and the pressure cooking time has not been selected yet (00).
Every time you press Programar the cooker waits for you to keep pressing or to select a pressure cooking time / preset menu. If you do not take any action for 10 seconds the cooker cancels the start timer setting and goes back to stand by mode.
The start timer is optional. You can start cooking immediately if you prefer.
Select always first the start time and only then the cooking time / preset menu, unless you select the cooking time manually. Then you can invert the selection order if you want.
You can set the start time up to 24 hours before.
You can directly press INICIO (Start) after selecting a start time, without selecting a cooking time. This is for non pressure cooking only. So open the lid or the pressure valve and once started you will have to manually stop the cooker by pressing Cancelar / mantener calor.
Tiempo
Once selected the cooking time, or if you prefer to start cooking immediately, you have to choose the cooking time. You can do it selecting a preset menu or manually by pressing this button: Tiempo. Every time you press it the pressure cooking time will increase 1 minute up to 99 minutes. If you need to modify your time selection press Cancelar / mantener calor.
Selected time is pressure cooking time, so the countdown will not start until the pot reaches enough pressure inside.
INICIO
Once selected the start time and/or the pressure cooking time press INICIO to start the start countdown or the cooking process.
Cancelar / mantener calor
Press this button to cancel the current setting or cooking program in execution.
In stand by mode press it to keep warm the food in the pot. When a cooking program ends the "Keep warm" function starts automatically. You can stop it by pressing this button ("Keep warm" mode may last up to 8h., but it is not recommended for more than 6h.)
Preset menu buttons
You can cook by just pressing one button in two ways:
a) By pressing INICIO (without pressure / lid). It will start cooking immediately. You will have to stop it manually by pressing Cancelar / mantener calor when you think the meal is ready.
b) By pressing any of the preset menu buttons. In this case cooking time is preset. When it finishes you will hear a beep and the Cancelar button flashes. Then "Keep warm" function starts automatically. Then you only have to stop this function and serve. These are (in black) preset menu buttons:
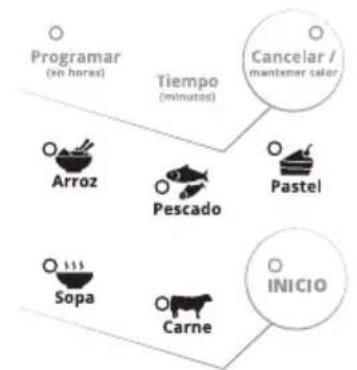
flowchart
graph TD
    A["Programar (en horas)"] --> B["Tiempo (minutes)"]
    B --> C["Cancelar / mantener color"]
    A --> D["Arroz"]
    A --> E["Pescado"]
    B --> F["Pastel"]
    A --> G["Sopa"]
    A --> H["Carne"]
    A --> I["INICIO"]
| Arroz (Rice) | 9 min. |
| Pescado (Fish/Poultry) | 12 min. |
| Pastel (Cakes) | 15 min. |
| Sopa (Soup/Broth) | 20 min. |
| Carne (Meat/Beans) | 25 min. |
Pressure cooking times. You have to add the time the cooker needs to reach the appropriate pressure
These preset menu times are intended for a standard amount of food cooked just to what we consider the perfect point of doneness, everybody has different needs and preferences, like a more (or less) soupy rice, well done (or medium) meat, more (or less) quantity... Most inexperienced users will probably choose the convenience and ease of use of the preset menus. Experienced users instead will probably choose instead for manual time selection, which gives them more control (Tiempo button).
Arroz (9 min.)
This menu can be used for different types of rice cooking but, mainly, for risotto. You can use it also for a perfect rice pudding. As a short program you can use it also for light or precooked soup.
Pescado (12 min.)
For chopped chicken or other poultry, fish, precooked meat, shellfish, etc. For a whole chicken it is advised to use menu Carne instead.
Pastel (15 min.)
Cooking a cake usually takes around 30 minutes, depending on the kind of cake you are baking. This is a 15 minutes program so you can release steam and, if necessary turn the cake down before cooking 15 more minutes to finish the program.
Sopa (20 min.)
Good for soups or meat broths, or long cooking vegetables such as potatoes or carrots. For light or precooked soups it is advised to use menu Arroz. For pasta soup it will be enough to manually set 5 minutes pressure cooking.
Carne (25 min.)
You can use this menu either for long cooking meat, some molluscs and beans. When you cook beans please keep in mind that they increase a lot their size during the cooking process.
Quick guide (control panel)
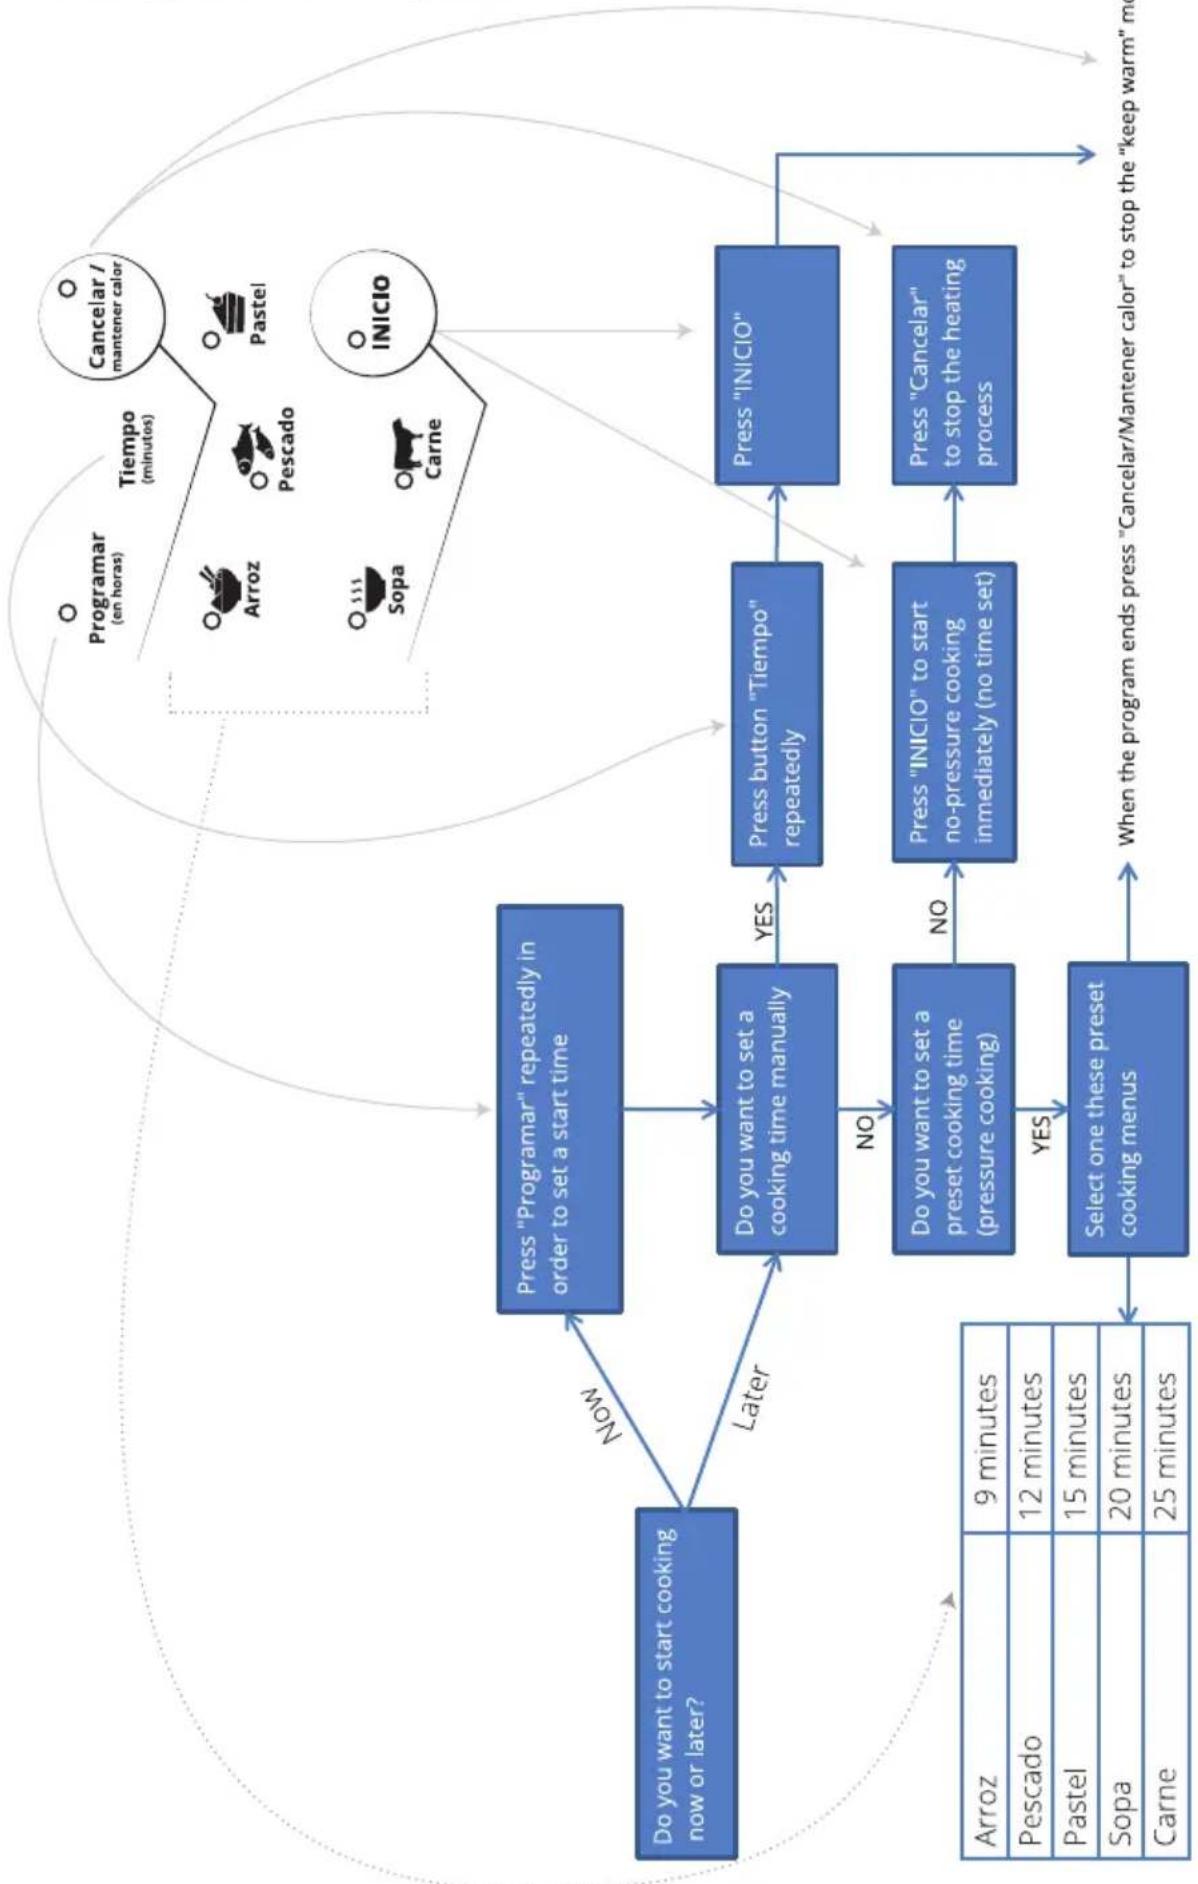
flowchart
graph TD
    A["Do you want to start cooking now or later?"] --> B["Press "Programar" repeatedly in order to set a start time"]
    B --> C["Do you want to set a cooking time manually"]
    C --> D{YES}
    C --> E{NO}
    D --> F["Press button "Tiempo" repeatedly"]
    E --> G["Do you want to set a preset cooking time (pressure cooking)"]
    G --> H{NO}
    G --> I{YES}
    H --> J["Select one these preset cooking menus"]
    I --> J
    J --> K["When the program ends press "Cancelar/Mantener calor" to stop the "keep warm" meal"]
    L["Programar (en horas)"] --> M["Tiempo (minutos)"]
    M --> N["Stop the heating process"]
    O["Cancelar / mantener calor"] --> P["Stop the heating process"]
    Q["Arroz"] --> R["9 minutes"]
    S["Pescado"] --> T["12 minutes"]
    U["Pastel"] --> V["15 minutes"]
    W["Sopa"] --> X["20 minutes"]
    Y["Carne"] --> Z["25 minutes"]
    AA["Inicio"] --> AB["Stop the heating process"]
FREQUENTLY ASKED QUESTIONS:
When cooking please keep always in mind the following considerations:
Can I cook with and without lid?
You can use this cooker:
- With lid and pressure
- With lid and without pressure (opened pressure valve)
- Without lid and, therefore, without pressure
For instance you can stir-fry a bit of garlic and onion with a bit of oil. In this case you would prefer tu use the cooker without lid. Or if you cook beans you would prefer to cook with lid and pressure so it finishes cooking as soon as possible. Or maybe you want to tenderize meat with slow cooking, in this case it is convenient to open the pressure valve so it will cook without pressure, but at a higher temperature and homogeneity than cooking without lid.
Can I fry with this cooker?
This cooker is designed to reach certain temperature levels over which it cannot operate. This means that you should not try to fry normally, like fries or nuggets with this cooker - but you can stir-fry if you do not use much oil. The limit is stablished by the temperature that the oil reaches and the amount of it. In any case, for a long life of your cooker, it is advised not to use this cooker for frying.
What if the meal is not cooked as I want it to be?
Lets say that you have used menu Arroz and, when finished, the rice was overcooked. This is a 9 minutes menu because most of the times it is the perfect time to cook rice. But it is not always like this. It is not the same time to cook risotto than soapy rice, or just rice instead of heavily seasoned rice, or 200 gr instead of 300gr.
So your rice might be overcooked but you do not need to worry. It is not always going to be like this because next time you cook the same quantities you have 2 options: Either you can set manually less than 9 minutes, either you can use again menu Arroz but opening this time earlier the pressure valve. If instead of being overcooked it is undercooked you can just set manually less 9 minutes next time.
I pressed INICIO and the countdown does not start. What now?
When the cooking process starts the cooker heats the food but it needs a few minutes to reach enough pressure for pressure cooking. First you notice that the floating valve comes up and later a letter "P" shows up at the left side of the display (0.P 09). Only then the countdown starts, as it counts only the pressure cooking time left.
It might happen that after a long while the floating valve does not come up and the cooker does not get enough pressure. In this case the countdown will not start. You need to check the following list:
- Can you feel any heat from the cooker?
- Are the floating valve, the pressure valve and the sealing ring in perfect conditions?
- Are they correctly placed?
- Is the pressure valve in cierre hermético (down) position?
- Did you put a minimum content of 1/5 of the inner pot volume?
Can I only cook the recipes from the recipes book?
Not at all. You have got endless possibilities. Consider this cooker as a traditional pressure cooker with many advantages. You can cook all the same recipes that you would usually cook in a traditional steam cooker or an ordinary pot and, also, you can adapt any recipe or check the Schneider pressure cookers specialized recipes blog by Patricia, a happy Spanish user who shares her delicious recipes here:
http://recetasollaschneider.com
Patricia has not got any direct relation to Schneider, but she provides you with her recipes, included in attached recipes book and we strongly recommend you to take a look at her interesting blog, mainly during the first period of use of the cooker.
Can I use this cooker for steam cooking?
Yes, you can use this cooker for steam cooking. To do so you will need an accessory to keep the food above the water level. It has to be made in a material that does not scratch the inner pot coating. You should not fill with water over a half of the inner pot. Schneider does not provide this accessories, but you can easily find them in specialized shops.
Can I use this cooker for bain-marie cooking?
Same as for steam cooking you can use this cooker for bain-marie cooking, using a refractory container inside the inner pot. This container should be resistant to high temperatures and pressure and it is not provided by Schneider. Put it in the middle of the inner pot and put water in the pot (you should not cover the container). This is a good method for cooking Spanish "flan". Trick: Put a rack over the container and you can also steam cook some food over it while bain-marie cooking.
How can I prevent the food to stick at the bottom?
Even if Schneider cookers inner pot is covered by a high quality non-stick coating sometimes the food might get stuck or overcooked at the bottom. You can void it following these instructions:
Use a shorter program for such amount of food
Check that the cooker reaches enough pressure
Put more water than you use to
Depending on the type of food you may put parchment paper at the bottom of the pot. If possible spread butter on the coating surface
Once I selected a preset menu, ¿May I increase or decrease the cooking time?
If you press any of the preset menu buttons a default pressure cooking time is set. If you want that time to be shorter or longer than the default one just press Cancelar / Mantener calor button. The counter resets to "0" and then you can stablish any pressure cooking time manually by pressing Tiempo button repeatedly.
What is the difference between cooking pressing INICIO and pressing Cancelar / Mantener calor? By pressing INICIO the cooker will heat at high power until it reaches pressure enough for pressure cooking. At that point it stops and goes to "Keep warm" mode. It is better to use this procedure with the pressure valve opened or taking off the lid. This way the cooker will keep heating until you stop it, as it never reaches pressure.
By pressing instead Cancelar / Mantener calor the cooker will lounch the "Keep warm" mode, which indeed keeps the food warm, but it does not cook it correctly.
In both cases you should manually stop "Keep warm" mode by pressing Cancelar / Mantener calor.
LEMON SPONGE CAKE: USAGE EXAMPLE
1. Making the dough
For this example we will use time and quantities referred to our 6L. cooker model (SCO 06D). For our 4L and 8L models you can adapt the values according to each size.
Put in a container a lemon yoghurt and use its cup as a measure cup for all other ingredients. Add to the container 1 measure cup or olive oil, 2 measure cups of sugar, 3 measure cups of strong flour, 3 eggs, a small bag of leavening and a small punch of salt. If you want you can add to the mixture some lemon zest to give it a stronger lemon taste.
Whip and knead until the dough becomes uniform and compact.
2. Make sure the cooker is perfectly clean
Check that the floating valve is clean and can easily come up and down. Check also the floating valve and its protecting shell inside the lid.
Check the sealing ring and verify that the heating plate and the inner pot are clean and in perfect conditions.
3. Place the dough in the inner pot and the inner pot inside the cooker
Spread some butter on the coating surface of the inner pot and sprinkle a bit of flour onto it. Then put the dough in the inner pot (maximum quantity: 1/3 of the pot. Minimum quantity: 1/5 of the pot). NOTE: If the dough is consistent enough you can place parchment paper at the bottom of the inner pot to protect the sponge cake base.
Put the pot in the cooker and close the lid as previously explained in this user manual
4. Program the start time (optional)
If you do not wish to start cooking the sponge cake immediately, but you prefer to start it later you can set a start time by pressing Programar repeatedly until the display shows the remaining time (hours) in red. If you press three times for instance the display shows on the left 1.5 and the cooking process will start in one hour and a half.
In any case if the dough is ready it is better if you cook it immediately.
5. Start cooking the dough
A Option: Preset menu
Plug the cooker and press Pastel button. When pressed the little LED in the button lights. Wait for two seconds (or press INICIO), a beep sounds and the button Cancelar / Mantener calor lights while the two green digits turn from 00 to 15.
B Option: Manual time setting
Plug the cooker and press 15 time Tiempo button. Every time you press it you can hear a beep and the time shown in green increases by one unit. When the screen shows 15 in green it means that the pressure cooking will last 15 minutes. Then press INICIO and this button lights. Wait a couple of seconds for a beep, then the Cancelar / Mantener calor button lights up.
Pressure cooking time is set now and the cooker starts heating.
C Option: No time selection
Take off the lid or open the pressure valve and plug the cooker. Then press INICIO. This button lights up. Wait for two minutes. The cooker beeps and the Cancelar / Mantener calor button lights up too. If you choose Option C you will have to keep an eye on the cake to stop to cooker manually when it is ready. Time will be longer as this is not pressure cooking.
Whatever of the 3 options you choose the cooker starts heating. C does not count down. A and B will take a few minutes until it takes pessure and then starts the countdown. When it starts, a "P" (for pressure) shows up on display.
Fifteen minutes after the cooker gets pressure "Pastel" program ends. A beep sounds and "Keep warm" mode starts. Cancelar / Mantener calor button flashes, letting you know that the cooker will keep your cake warm until you stop it. In this case you do not need this function so just stop it by pressing Cancelar / Mantener calor button. Then we open the pressure valve to release all the steam.
"Pastel" program lasts 15 minutes so you can check the cooking and, if necessary, turn it upside down at half of the process. At this point, the sponge cake should have risen already and have a good consistency. You can check it with a rib. If you consider that your cake is consistent enough, you should turn it upside down, so all its surface is browned. To check the consistency you have to open the lid once the pressure is fully released. If you are not sure whether the dough has risen or not it is advised not to open the lid and continue with the next cooking cycle, as the temperature would drop very quickly inside the inner pot and, if this happens and the dough did not rise yet, it would not rise any more. If you decide not to open the lid take into consideration that the top of the sponge cake will not be browned but it will be still very good to eat. You can improve its aspect with chocolate for example. If you decide to open the lid keep in mind all the advises mentioned in this user manual to void burns.
6. Start a second cycle
When you complete previous step, close back the lid as previously explained in this user manual (in case you opened it), put the pressure valve in "Salida vapor" position (which is the highest one) to let the steam out of the cooker, and press INICIO. Two seconds later you will hear a beep and the cooker will restart heating. The sponge cake should be ready in about 15 minutes. This is not pressure cooking so there is no countdown this time. You will have to keep an eye on the time. Open the lid and check the cake with a rib. If it comes out clean you may stop the cooker by pressing Cancelar / Mantener calor, if not wait for a few more minutes. When ready take out the inner pot using kitchen gloves or clothes to void burns and remove the cake from the inner pot.
At this point you should take into consideration that there are many factors that make vary the point of doneness such as the size of your cooker (there are 3 different models), amount of dough, amount and type of each ingredient, dough consistency, kind of leavening and flour, etc. For this reason we cannot give you an exact reference. 15 Minutes without pressure should be fine in most cases, but not in others. If you use pressure cooking in the second cycle it could happen that the cooker exceeds the temperature limit. In this case it gets locked for security reasons and shows E3 on screen. You just need to wait for it to cool down in this case.
In any case you should use your own experience to adapt your cooking times and ingredients quantities for better results suiting your taste.
Unplug the cooker and wait for it to cool down at room temperature before cleaning.
Remember you can cook traditional recipes too. Everything you can cook in a traditional pressure cooker you can cook in this appliance too.
MAINTENANCE
CLEANING
Cleaning the inner pot
Being the inner pot the container where you cook the food it is the cooker part that needs more cleaning. It has a great advantage which is that it is non-stick coated so cleaning becomes much easier. Same as with pan coating you should be careful not to damage the coating, in order to make last longer.
Before cleaning let the appliance cool down. It could be very hot and cause burns. Use a non-scratching scourer with soapy water to clean the inner pot. Void using the dishwasher to wash the inner pot as it might damage the inner coating.
Even with the inner coating some food may stick to the inner pot. To take it off do not use a scraper or metal (or any hard material) tools that could scratch the coated surface. You can use instead, very carefully, the spoon provided with the appliance or other plastic or wood made kitchen tools. You should take always all due precautions in order not to scratch the inner coating. Use only dish soap type and rinse it well.
When finished dry immediately the inner pot with a, soft, clean cloth and let it expose to the air for, at least, one hour before putting it back in the cooker.
Cleaning the lid
Before cleaning the lid you should unmount it and take the inner rubber ring and the pressure valve cover off the lid. You can find instructions on how to do this in previous chapters of this book. Wash all components separately. Wash the rubber ring with water only. You can wash the pressure valve cover with a scourer, dish soup and hot water.
The lid is made of stainless steel and plastic material so you can wash it carefully in the sink. y materiales plásticos, por lo que puede lavarla con cuidado en el fregadero. Same as the pressure valve cover you can wash it with a scourer, dish soup and hot water. Pay special attention when cleaning both valves, letting a stream of water into them and cleaning the inside with a cotton swab. In any case please make sure that none of the valves is blocked with dirt and they freely move up and down.
When finished dry all components with a soft, dry and clean cloth, put back the rubber ring and the pressure valve cover and place the lid back on top of the cooker.
Cleaning the body
Unplug the cooker, take the lid off, take the inner pot off and clean the inside with a slightly wet and clean cloth. Dry immediately when finished with a dry, clean cloth and let it expose to the air for, at least, two hours. Take off the condensation collector and wash it appart in the sink.
Never sink or damp the cooker. Do not use toxic or abrasive products to clean it as it could harm you and / or damage the cooker.
PROBLEM SOLVING
What if the cooker does not reach enough pressure?
Normally the cooker does not reach enough pressure for pressure cooking until a few minutes after you start the program. When that happens the floating valve comes up and you can see it. One or two minutes later the screen shows that the cooker has reached the pressure point by showing a P at the left side of the screen (for example: 0.P 25) Until this moment the countdown does not start.
It may happen that time pass and the floating valve never comes up, and, therefor, the cooker does not reach enough pressure for pressure cooking. The countdown will not start. What to do then? This check list may help you:
1. Is the cooker heating?
Take off the lid and check whether heat is coming out of the cooker or not. If you do not feel any heat at all:
a) Wait for 10 minutes and check again.
b) Is there a blackout? Is the cooker plugged? Did you press Inicio or any menu button?
c) If everything is correct but it is still not heating contact our technical services.
2. Is the pressure valve closed (down)?
Check for an embossed vertical line on the plastic part around the valve. You will clearly feel it when you touch it. On top of the valve there is also a dot marked with the words "cierre hermético" that should be inline with this embossed line for pressure cooking. If correctly closed the pressure valve should be in a slightly lower position compared with its position when it is open.
3. Is there a minimum of 1/5 of the inner pot filled with liquid?
The cooker need enough liquid to produce the required steam for pressure cooking. If you don't cook with enough liquid you may overheat the cooker and / or burn your food. Remember to fill at least 1/5 of the cooker capacity.
4. Is the sealing ring correctly placed?
check for a metal ring along the inner border of the lid. Between this metal ring and the lid itself there must be a rubber ring, which seals the cooker once closed. If correctly placed the rubber ring fits perfectly between the metal ring and the lid and the center of the concavity of the rubber ring matches the metal ring.
5. Is the lid correctly sealed?
Check first if the lid handle and the cooker body side handles are aligned. They must be aligned for a correct hermetic closure of the lid. Check the black plastic part of the lid. At the closest side to the floating valve you can find a small metal cylinder, this cylinder must be entirely inside the lid. If it does stand out (even a little bit) turn the lid counterclockwise until it gets in completely.
Check that the lid is in the following position:
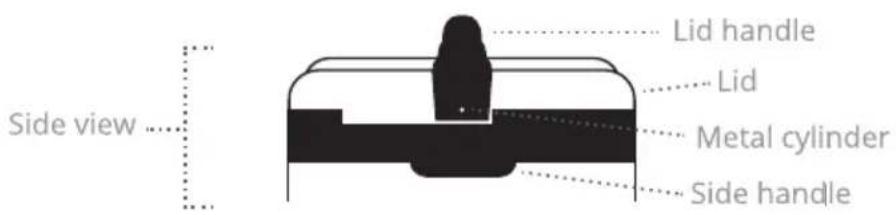
What if the steam comes out of the borders?
If the steam comes out of the cooker borders while cooking it means that the cooker is probably not correctly closed or the closure system is damaged. In case it is not correctly closed unplug the cooker and stay away from it until it cools down. If then you verify that it is correctly closed contact our technical services in case the cooker is damaged.
What if it doesn't open up?
When the cooker reaches enough pressure the floating valve comes up, locking the lid so it cannot be opened while there is steam pressure in the cooker. This means that if you cannot open the lid the cooker probably still has too much pressure and you should not open it. Press Cancelar / Mantener calor to stop any active program (if any) and unplug the cooker. Put the pressure valve in "Salida vapor" position and wait until the steam is fully released. Wait a few minutes after the floating valve goes down before opening the lid as some steam still remains inside and you could get burnt with it.
If still you cannot open the lid contact our technical services.
What if any component is damaged or worn down?
If you need to repair your cooker or replace any part of it please contact directly any of our technical services offices in Spain. You can find your closest office in our website schneiderespana.es. They can provide you also with replacements such as an inner pot or a lid. Use always original parts from Schneider.
Never try to repair the cooker by your own means nor use third party parts.
Security systems
For your own safety this cooker includes different security systems. More than you can find in a regular cooker. These security systems are among them:
a) The pressure will not rise if the cooker is not correctly sealed.
b) If the pressure is high you cannot open the lid.
c) If inner pressure and temperature are too high the pressure valve releases heat automatically.
d) If pressure sensor fails and pressure exceeds security limits the cooker will release liberará pressure from the lid borders.
e) If temperature limit is exceeded the cooker stops and gets locked (E3)
f) SIf temperature sensor fails a fuse cuts the current.
Error codes
In case of system failure one of the following error codes will be shown:
Pressure sensor failure. Process stopped for caution.
Electric failure / Blackout. The process will continue when the electricity is back.
Temperature exceeded security limit (215°). Process stopped for caution.
Temperature sensor failure. Process stopped for caution.
Technical services
If you find any cooker malfunction, distortion, damage, or if you need to replace any product part, you should contact our technical services. Schneider technical services offices are all along Spanish geography.
You can find your local technical service office at the map of the Asistencia area of Schneider website (click on "Resto de productos):
http://schneiderespana.es → Asistencia → Resto de producos
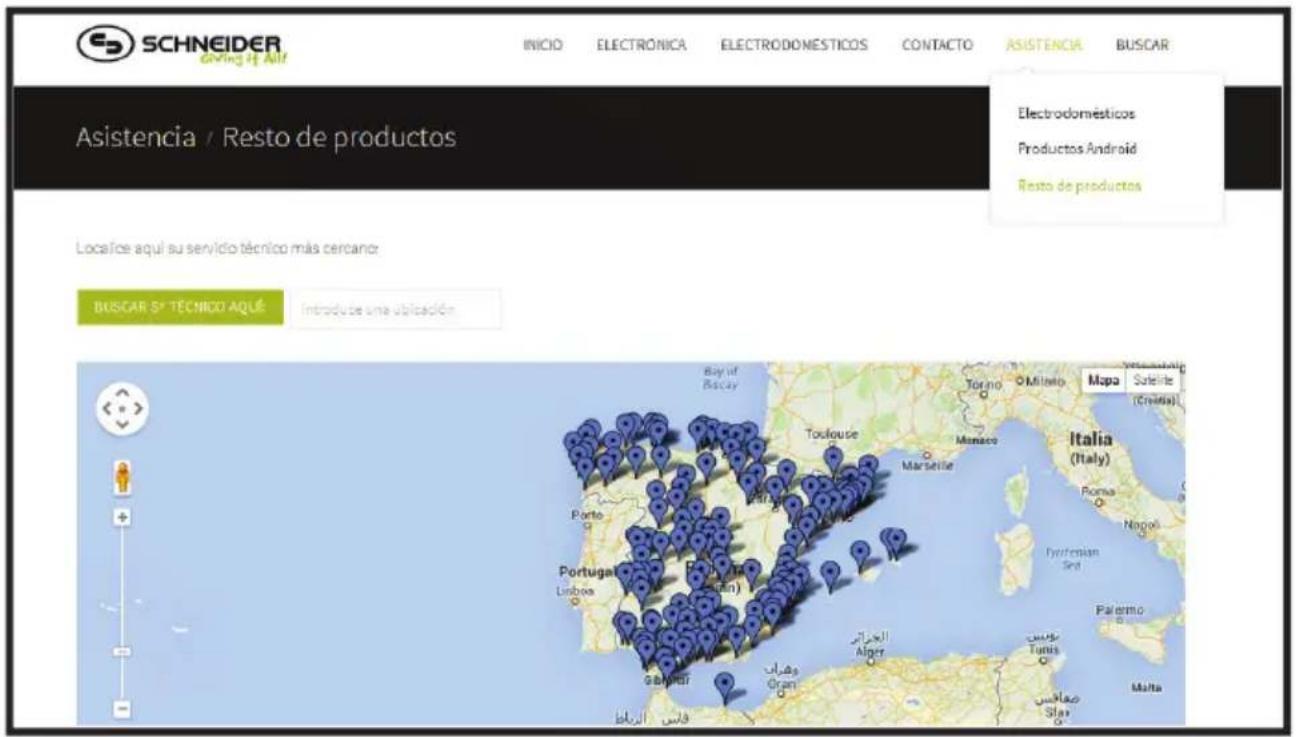
You can also access this map by writing directly the following URL address:
http://schneiderespana.es/index.php/asistencia-tecnica/sat-electronica
If any problem you can write us at postventa@schneiderespana.es
Circuit diagram
The following diagram could be required by your local technical services:
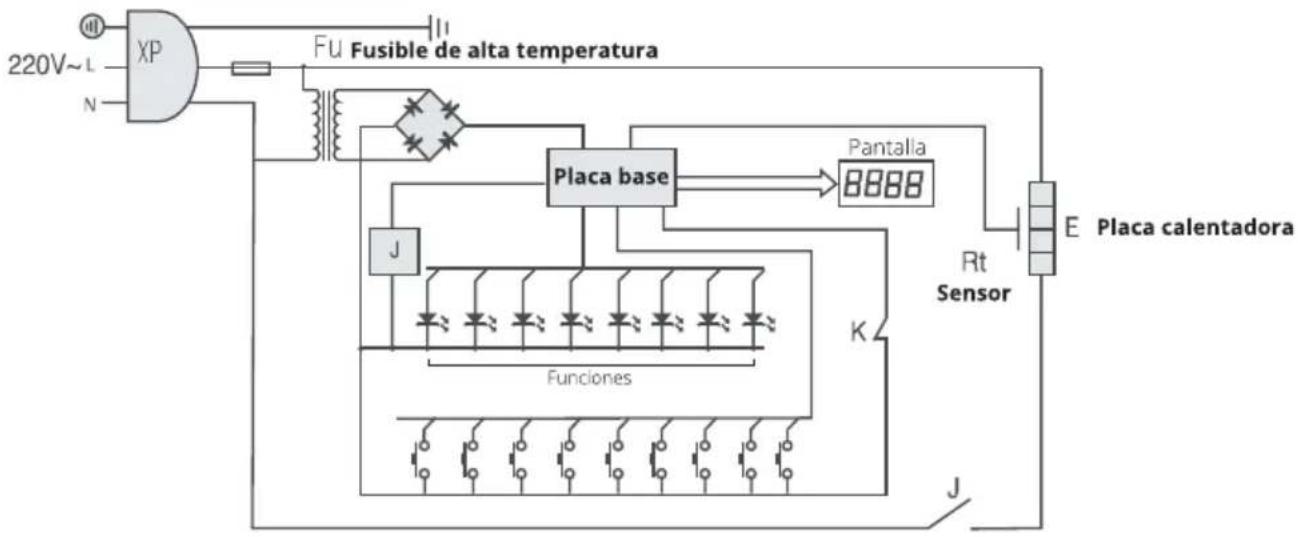
flowchart
graph TD
    A["220V~L"] --> B["XP"]
    C["N"] --> B
    B --> D["Fusible de alta temperatura"]
    D --> E["Placa base"]
    E --> F["Pantalla 8888"]
    F --> G["Rt Sensor"]
    G --> H["Placa calentadora"]
    H --> I["E"]
    J["J"] --> K["Funciones"]
    K --> L["K"]
    L --> M["End"]
DISPOSAL INSTRUCTIONS
natural_image
Symbol of a trash bin crossed with a diagonal line and a horizontal bar below (no text or numbers present)This marking indicates that this product should not be disposed with other household wastes throughout the EU. To prevent possible harm to the environment or human health from uncontrolled waste disposal, recycle it responsibly to promote the sustainable reuse of material resources. To return your used device, please use the return and collection systems or contact the retailer where the product was purchased. They can take this product for environmental safe recycling.
All informations contained in this user manual are subject to change without any prior notice. All images are only for reference.
Schneider España de I. S.A., C/ Verano 18-20, Torrejón de Ardoz, Madrid. Made in P.R.C.
www.schneiderespana.es
Atención en Postventa
Podrá encontrar nuestro servicio de asistencia técnica más próximo en:
www.schneiderespana.es
Si lo desea también puede hacernos llegar su solicitud de asistencia en postventa a la dirección: postventa@schneiderespana.es.
Todos los modelos distribuidos por Schneider España de I. S.A. cuentan con las condiciones de garantía aplicables a bienes de consumo según la legislación que a tal efecto se encuentre en vigor en el momento de su adquisición.
- OLLA A PRESIÓN ELECTRICA
- INDICE
- Especificaciones 02
- Antes de empezar 03
- Instrucciones de uso 09
- Mantenimiento 17
- Resolución de problemas 18
- Instrucciones de desecho 21
- ESPECIFICACIONES
- ANTES DE EMPEZAR
- PRECAUCIONES
- INSTALACIÓN
- ¿Dónde colocar la olla?
- Esto es un aparato eléctrico
- VISTA GENERAL
- COMPONENTES
- La tapa
- Válvula de presión
- Válvula flotante
- Asa de la tapa
- El cuerpo
- La base de la olla
- La cubierta externa
- INSTRUCCIONES DE USO
- EL PANEL DE CONTROL
- Descripción general
- La pantalla
- Botones de funciones
- Programar
- Tiempo
- INICIO
- Cancelar / mantener calor
- Botones de menús preconfigurados
- Arroz (9 min.)
- Pescado (12 min.)
- Pastel (15 min.)
- Sopa (20 min.)
- Carne (25 min.)
- PREGUNTAS FRECUENTES:
- http://recetasollaschneider.com
- BIZCOCHO DE LIMÓN: EJEMPLO DE USO
- Hacemos la masa
- Nos aseguramos de que la olla esté bien limpia
- Introducimos la masa en la cubeta y la cubeta en la olla
- Programamos la olla (opcional)
- Iniciamos la cocción
- Opción a: Menú preconfigurado
- Opción b: Selección manual de tiempo
- Opción C: Sin selección de tiempo
- Ponemos un segundo ciclo
- MANTENIMIENTO
- LIMPIEZA
- Cómo limpiar la cubeta
- Cómo limpiar la tapa
- Cómo limpiar el cuerpo de la olla
- RESOLUCIÓN DE PROBLEMAS
- ¿Qué hacer si la olla no coge presión?
- ¿Qué hacer si sale vapor por los lados?
- ¿Qué hacer si la olla no se abre?
- ¿Qué hacer si algún componente está dañado o desgastado?
- Sistemas de seguridad
- Códigos de error
- Servicio técnico
- Diagrama de circuitos
- Garantía
- INSTRUCCIONES DE DESECHO
- INDEX
- Specifications 02
- Before Use 03
- Usage Instructions 09
- Maintenance 17
- SPECIFICATIONS
- BEFORE USE
- CAUTION
- INSTALLATION
- Placing the cooker
- This is an electric device
- OVERVIEW
- COMPONENTS
- The Lid
- Pressure valve
- Floating valve
- Lid handle
- Sealing rubber ring
- Open and close the lid
- The body
- The cooker base
- Outer shell
- USAGE INSTRUCTIONS
- THE CONTROL PANEL
- The display
- Functions buttons
- Preset menu buttons
- FREQUENTLY ASKED QUESTIONS:
- LEMON SPONGE CAKE: USAGE EXAMPLE
- Making the dough
- Make sure the cooker is perfectly clean
- Place the dough in the inner pot and the inner pot inside the cooker
- Program the start time (optional)
- Start cooking the dough
- A Option: Preset menu
- B Option: Manual time setting
- C Option: No time selection
- Start a second cycle
- MAINTENANCE
- CLEANING
- Cleaning the inner pot
- Cleaning the lid
- Cleaning the body
- PROBLEM SOLVING
- What if the cooker does not reach enough pressure?
- Is the cooker heating?
- Is the pressure valve closed (down)?
- Is there a minimum of 1/5 of the inner pot filled with liquid?
- Is the sealing ring correctly placed?
- Is the lid correctly sealed?
- What if the steam comes out of the borders?
- What if it doesn't open up?
- What if any component is damaged or worn down?
- Security systems
- Error codes
- Technical services
- Circuit diagram
- DISPOSAL INSTRUCTIONS
- Atención en Postventa
Marke : SCHNEIDER
Modell : SCO 04D
Kategorie : Bratpfanne