Shrike 4 - Zelt Wynnster - Kostenlose Bedienungsanleitung
Finden Sie kostenlos die Bedienungsanleitung des Geräts Shrike 4 Wynnster als PDF.


Benutzerfragen zu Shrike 4 Wynnster
0 Frage zu diesem Gerät. Beantworten Sie die, die Sie kennen, oder stellen Sie Ihre eigene.
Eine neue Frage zu diesem Gerät stellen
Laden Sie die Anleitung für Ihr Zelt kostenlos im PDF-Format! Finden Sie Ihr Handbuch Shrike 4 - Wynnster und nehmen Sie Ihr elektronisches Gerät wieder in die Hand. Auf dieser Seite sind alle Dokumente veröffentlicht, die für die Verwendung Ihres Geräts notwendig sind. Shrike 4 von der Marke Wynnster.
BEDIENUNGSANLEITUNG Shrike 4 Wynnster
ASSEMBLY INSTRUCTIONS: SHRIKE 4
Please read the General Information before starting and familiarise yourself with each of the component parts. Please refer to the diagrams as you proceed.
Your text comprises the following parts. (As you unpack the component parts make a mental note of how the tent was packed in the carry bag as this will help you when you come to repack it.)
TAKE, EXTRA CARE AND PRECALTIONS ON WINDY DAYS SO THAT THE TENT DOES NOT BECOME DAMAGED.
COMPONENT PARTS
-
The flysheet, which is the PU coated shell of the tent that features the pole sleeves, clip on storm cap that protects the top mesh ventilation panels, attached guy ropes etc.
-
The inner tent or sleeping compartment, which has an integral groundsheet & a "D", shaped door with secondary mesh insect proof ventilation panel. Attached to the inner is an "apron" style ground sheet for the entrance to the tent.
-
A pole bag that contains 2 libreglass poles that are strong in sections on elasticated shock cord; the mid section of each pole is colour ended to match with coloured taping on its correct pole sleeve.
-
A peg lug that contains sufficient pegs to create the tent.
-
An emergency Repair Kit that contains fabric cuttings, seat sealant, spare pegs & guy rope, peg point elastic and an emergency polo repair sleeve.
AS THE ASSEMBLY PROCESS REQUIRES THE POLES AND OTHER COMPONENT PARTS TO BE PUT UNDER TENSION. CARE MUST BE TAKEN AT ALL TIMES TO PREVENT PERSONAL INJURY OR HARM TO OTHERS.
ASSEMBLY INSTRUCTIONS
-
Having selected your site, untold the flysheet ensuring the doors are zipped closed and orientate it so that where possible they face away from the prevailing wind.
-
Untold the fibreglass pole sections and gently slot them together to form 3 complete poles.
-
Taking the assen-
bled poles in turn.
genly PUSH them
sleeves in the flysheet
with the same colour
taping as the mid sev
tion at the pole (see
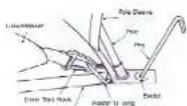
Figure 13. The north can that is attached to
the main diagonal pole
sleeves on the flysheet may need to be unfastened so that the
poles may be ready installed. Remember to re-clip the storm cap before proceeding. Where possible avoid standing on the flysheet, as this will damage it. Do not continue until all the poles have been pushed through the sleeves in the flysheet.
Always push the poles, never pull them otherwise the sections will come apart and the elastic shock cord will break.
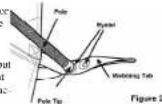
- Insert one end into the eyelet in the welding tab at the base of and nearest to the flysheet (the other is for the peg) and repeat with the other end, by grasping the welding tab firmly (see figure 2) pushing the pole through the pole sleeve. To achieve this the pole sleeves must be eased over the pales, especially
over the metal joints or terrules. Repeat with the remaining poles.
- Before starting to put
in the pages, check that
the tent's position is ac-
necessary, adjusting it necessary. Initially only
a few pegs should be put in, enough to give the text it's rough shape and none under any great tension. This will significantly ease the installation of the inner sleeping compartment.
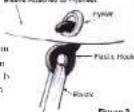
- Gather up the inner text, ensuring that its door is closed, and take it inside the flysheet. Start at the rear edge of the inner and clip the hooks that are no corners of the groundsheet to the "D" rings located on the edge of the flysheet (see figure 5).
(1)
Figure 1
-
Then, working systematically, using the hooks attach the inner to the eyelets located on Moone Attached to Flysheet fabric tabs seen to the inside to the flysheet size figure 3).
-
The inner tent has an sprain style: groundsheet that is sewn to its front edge; this should be pegged to the ground through to cyclists in its corners.
GENERAL INFORMATION
The following tips and information may help make your trip more enjoyable.
BEFORE USING YOUR TENT.
-
Get to know your tent before your trip by practising patching and familiarising yourself with its component parts and features. This will also double check that it is complete and undamaged and will not spoil your holiday.
-
Whilst there is a small repair kit included with the tent, it contains only basic items so it may be worth considering taking a more comprehensive kit; such spaces are available through your local Wynaster stocklist. It is also advisable to assemble a spaces and tan sit so that should any accidental breakage occur then this will enable the repair to be affected without delay. Items that should be considered as additional pages (to cover varying skill types such as very hard ground or even loose solely scaling), extracgrise grey ropes (to cover losses or to be used in adverse weather conditions to strengthen the structure), extra seem scales (as whilst every effort has been taken to ensure that they are adequately taped, leakage may develop during heavy or prolonged rainfall; spare pulse sections; shock cord elastic etc).
-
A multi (out of some description (or pliers, a pen knife and a janer back saw), plus a roll of water proof tape and son quick drying, multi purpose glue will get you out of most difficulties.
-
A rubber mallet will help you cope with very hard ground plus a tent peg extractor for the end of your holiday.
-
We suggest that you have some form of insurance cover against theft, accidental or storm damage.
Should you have any queries then in all instances these must be directed to the retailer from whom the tent was purchased.
CHOOSING A SITE.
-
Ideally this should be as flat as possible for both your comfort and the stability of the tent.
-
Avoid low lying ground or other such areas that may flood in heavy rain, the presence of long green grass will help you spot these places.
-
It should also be clear of any object that may puncture the ground sheet or give you discomfort in the night.
-
Avoid pecking under trees as they may drip sap or water (long) the rain has stopped falling and rain for sites that are in shadow at the height of the day as you may wish for some shade during the hotter months. For extended use it is advisable to seek a study site, as must test materials will be weakened by prolonged expatriate to strong sunlight; this is manifested in a face of colour and a weakening of the fabric. The amount of trading in our an indicator of the degree of weakening, the polyester fabric used in the manufacture of this limit is opposed to nylon will deteriorate is significantly more resistant to the effects of ultraviolet light.
-
Make use of natural windbreaks such as walls and hedges etc, avoiding exposed and or high level site that may cause problems in the event of high winds, as a tent of this size offers a very large profile to the wind.
-
For Fire Safety it is advisable to site your tent at least 6 metres from adjacent tents.
FECTING YOUR TENT.
-
Whenever possible try to pitch the tail or the lowest part of the rear into the wind as this will help the wind blow over the structure more easily, and with the door facing away from the wind so that rain cannot be blown inside.
-
As the assembly process
requires the poles and other component parts to be put under tension, care must be taken at all times.
-
If pitching the test in windy conditions then extra care and precautions must be taken to guard against personal injury and to ensure the vent does not become damaged. Whilst the poles are being installed the flybeet may need to be pegged down so that it is not blown away. The most critical point when most damage occurs is when the poles have been fully installed but before the pegs have been fully put in: emergency but temporary gaying and pegging may be required at this stage. Try and collect the help of fellow campers if you are having difficulties.
-
Pitch with all zips closed and drive all pegs in at an angle (ideally of 45° or less to the horizontal) and in line with it seams. Do not overstretch the elastized peg loops but apply sufficient pressure to tension the fabric speed. A little time to make sure all are correctly positioned. Do not peg the ground sheet down are tightly and if possible by a polyhedral sheet (or similar such as Champ Period Membrane material available from builders merchants) underneath, as this will extend the life of the test's groundsheet and help keep it eaten. Furthermore this will help alleviate the build up of condemnation by blocking the evaporation of moisture from the ground.
IN USE.
-
Keep the exit(s) clear and free from obstruction to prevent accidental damage to you and the tent, especially in an emergency.
-
To help keep the doors closed, cross over the peg points at the base of zips on the flysheet. Avoid treading on the zips and keep them free from dirt, as this will maintain their smooth operation. Should the zips become difficult to operate: do not force them but adjust the pegging/gaying of the tent to ease the pressure on them and lubricate with a silician or similar lubricant
(1)基因通过控制 通过控制
-
Once the inner has been suspended, re-adjust the tension on the pegs already in position followed by the remaining pegs. Remember to angle the pegs away from the tent. This must be done systematically so that the tent ends up being symmetrically pitched, taking care to balance the tension at each point so that the tens fabric is stretched evenly.
-
Unravel the guy ropes and loosely peg out each one ensuring that they are all pegged directly in line with the seam pole to which they will apply tension and support. Once this is achieved tighten the adjusters so that equal tension is applied to each guy point (see figure 4).
-
The doors may be rolled back and secured using the conveniently located ties.
HOW TO TAKE DOWN YOUR TENT
-
For your convenience if you are simply moving site the inner sleeping compartment can remain in place and the tent repitched "as one" to save time.
-
Please note that the pegs should be extracted by either using a tent peg extractor or more simply by using another peg. Do not pull them out by using the guy rope or the elastic.
AGAIN TAKING EXTRA CARE AND PRECAUTIONS ON WINDY DAYS SO THAT THE TENT DOES NOT BECOME DAMAGED.
-
Umping the communal spoon ground sheet and then mvelop and remove the inner sleeping compartment.
-
Umping the guy ropes, slide the adjuster up to the flysheet and neatly tie them up to prevent them becoming tangled.
-
Linpeg the flysheet and remove the pole ends from the eyelets taking great care, as those will be under tension. Keep them away from your face and children at a safe distance.
to maintain their smooth operation. Specialist products are available from your Camping retailer.
- Even though the test's outer fabric has been coated to provide protection from the weather it will step moisture vapour that is inside from escaping. This may result in water droplets appearing on its inner surface as condensation.
Condensation may come from moisture contained in the ground or expired from the occupants of the vent and held in the air as humidity, and it is most likely to appear upon the onset of rain, as this will rapidly chill the flysheet fabric. This may also happen at night time when the outside air temperature drops. These droplets may fall from the flysheet and this cannot altogether be avoided but it can certainly be alleviated.
To help prevent this, increase ventilation as much as possible by opening vents and zips and preventing a flow of air under the flysheet. Cooking and lighting are also sources of condensation particularly if using fossil fuels such as gas, petrol or pencil, therefore it is obviously heated to cook outside when the weather allows or in an alternative structure (and also from a safety point of view). Condensation should not be confused with leakage.
-
Periodically check each peg point and to adjust as necessary, especially during/after stormy weather. In adverse weather conditions extra precautions will need to be taken; more guy lines may be needed to strengthen the structure; more or alternative types or sizes of pegs may be required especially if the ground is soft or becomes saturated, double pegging some points as necessary; the communal area groundsheet may need to be unclipped in the doorways and folded back to prevent rainwater running back into the rent.
-
FIRE WARNING: The Fire Retardant fabrics that are used for the groundsheet, inner, mesh ventilation panels and flysheet
-
Gently PUSH the poles through the sleeves in the flysheet.
-
Remove the ends of the other poles from the eyesets again taking great care, as these will be under tension. Keep them away from your face and children at a safe distance.
-
Gently PUSH the poles through the pole sleeves in both the flysheet.
-
To pack the poles away, simply pull each of their sections apart and fold up and stare them in their carry bag. Collect the pegs together, cleaning them as you go, and put them in their strange bag.
-
Ensuring that the tent is thoroughly dry if it is to be stored for some time, pack the tent away into its carry bag. The easiest way to achieve this is to individually fold the inner tent and the flysheet in the rough width of the carry bag and lay them on top of each other. Then slowly roll them up around the poles, ensuring that is much of the trapped air as possible is sproxced out. The more slowly & tightly this is done the easier it will be to get a bit back into the carry bag.
-
If the tent is wet or dirty when you temporarily pack it away, remember to told "wet to wet" and "dry to dry", as this will help reduce the soiling of the inner tent etc.
of this text will significantly reduce the rate of flame propagation, but the text is still flammable.
- Keep naked flames and other heat sources well away from all the text's fabrics.
- Do not refill stoves or change fuel cartridges inside or near to the tent.
- Never leave heating, lighting or cooking appliances unattended in the vicinity of the tent.
- Think safety first -
STORAGE & MAINTENANCE.
-
NEVER store the tent unless it is completely dry. Storing when damp allows the formation of mildew which will damage the tent. Clean all components and store separately.
-
Light soiling may be removed either by the gentle use of a salt brush or a salt, tamponed cloth. Never use detergents or wash in a washing machine, as this will damage the waterproof coatings.
-
Should the text show signs of leakage along any of the fly-sheet seams, the inner text suspension points, lantern loops etc, seam sealant should be applied. A tube may be found in the repair kit with replacements readily available from your Outdoor Leisure retailer.
-
Tears and holes from accidental damage or otherwise may be repaired. Please contact your local Camping retailer from your nearest specialist repairer.