PRO510A+S - Waschmaschine ProAction - Kostenlose Bedienungsanleitung
Finden Sie kostenlos die Bedienungsanleitung des Geräts PRO510A+S ProAction als PDF.


Benutzerfragen zu PRO510A+S ProAction
0 Frage zu diesem Gerät. Beantworten Sie die, die Sie kennen, oder stellen Sie Ihre eigene.
Eine neue Frage zu diesem Gerät stellen
Laden Sie die Anleitung für Ihr Waschmaschine kostenlos im PDF-Format! Finden Sie Ihr Handbuch PRO510A+S - ProAction und nehmen Sie Ihr elektronisches Gerät wieder in die Hand. Auf dieser Seite sind alle Dokumente veröffentlicht, die für die Verwendung Ihres Geräts notwendig sind. PRO510A+S von der Marke ProAction.
BEDIENUNGSANLEITUNG PRO510A+S ProAction
Installation & User Instructions – Please keep for future reference
PRO510A+W
PRO510A+S
natural_image
Line drawing of a front-loading washing machine with control panel and buttons (no text or symbols)Important – Please read these instructions fully before installing or using
These instructions contain important information which will help you get the best from your appliance and ensure safe and correct installation, use and maintenance.
If you need help or have damaged or missing parts, call the Customer Helpline:0845 600 4632
Safety Information 2
Parts 3
Installation 4-5
Unpacking your washing machine 4
Removing the packing bolts 4
Water inlet hose connection 5
Drain hose connection 5
Electrical connection 6
Control Panel Functions 7-8
Program Selection Guide 9
User Instructions 10
Before first use 10
Preparing for a wash 10
Using your washing machine 11
Error Signals 12
Care and Maintenance 13-14
Water inlet filters 13
Pump filter 13
Detergent drawer 14
Siphon plug 14
Cabinet 14
Trouble Shooting 15
Technical Specifications 17
Guarantee 18
natural_image
Line drawing of a front-loading washing machine with control panel and buttons (no text or symbols)Product codes
PRO510A+W
PRO510A+S
Important – Please read these instructions fully before installation
Before use
- The installation of this appliance is best carried out by 2 people.
- Dispose of all packing carefully and responsibly.
- This appliance is for indoor use only. Only install in a dry indoor environment.
- The appliance MUST be positioned on a firm level base.
- Do not position the appliance where it is exposed to direct sunlight or heat sources as this will age the plastic and rubber components.
- Warning: Ensure all 4 packing bolts have been removed.
- Ensure the appliance is connected directly to a domestic mains water supply.
- Warning: This washing machine MUST only be connected to a cold water supply.
- Ensure all electrical connections are as stated in this document.
- Ensure the appliance is plugged into a separate earthed socket that is easily accessible.
- Ensure the power lead is not trapped under the appliance.
- Do not connect the appliance to the power supply until installation is complete.
- This appliance is for domestic/household use only and is not suitable for commercial use.
- Check that the water hose joints and connections are secure and there are no leaks. If the hoses leak, do not use until the leaks have been stopped.
During use
- This appliance is not to be used by children or persons with reduced physical, sensory or mental capabilities, Persons with lack of experience and knowledge.
- Do not use a multiple socket or extension cord.
- Do not use if the power lead is damaged. It must be replaced by the manufacturer, their approved service agent or similarly qualified person. Customer Helpline: 0845 600 4632.
- Do not insert the plug into the power supply with wet hands.
- Do not touch or use the appliance when barefoot or with wet or damp hands.
- Do not open the detergent drawer during a wash cycle.
- Do not touch the porthole (door) during the washing cycle - it will get hot.
- Never force the machine door open while the machine is running.
- Do not open the door if water is visible through the porthole.
- Do not wash foam rubber or sponge like materials on a hot wash.
- The machine can reach high temperatures while running. Do not touch the drain hose or waste water during draining.
- Do not forget that the packing material of your machine may be hazardous for children.
- Keep your pet away from your machine.
- Do not use flammable detergent, sprays or dry cleaning agents in or near to the appliance.
- Do not remove or insert the plug in the presence of flammable gas.
- The appliance should not be put on a carpet which can block the air ventilation on the bottom side.
- Do not place heavy objects or sources of heat or damp on top of the washing machine.
- Only use detergents which are suitable for automatic washing machines and follow the detergent manufacturers recommendations.
- Do not use this appliance if there are any missing or damaged parts.
- Do not attempt to repair the appliance yourself. Contact the manufacturer, their approved service agent or the Customer Helpline: 0845 600 4632.
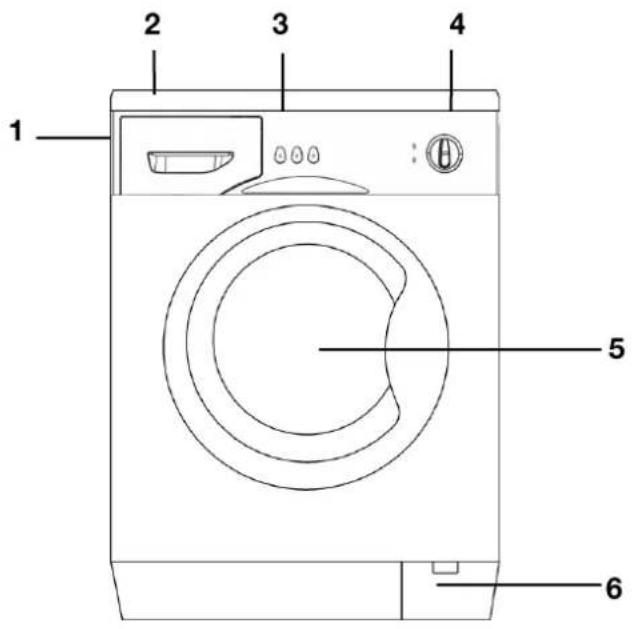
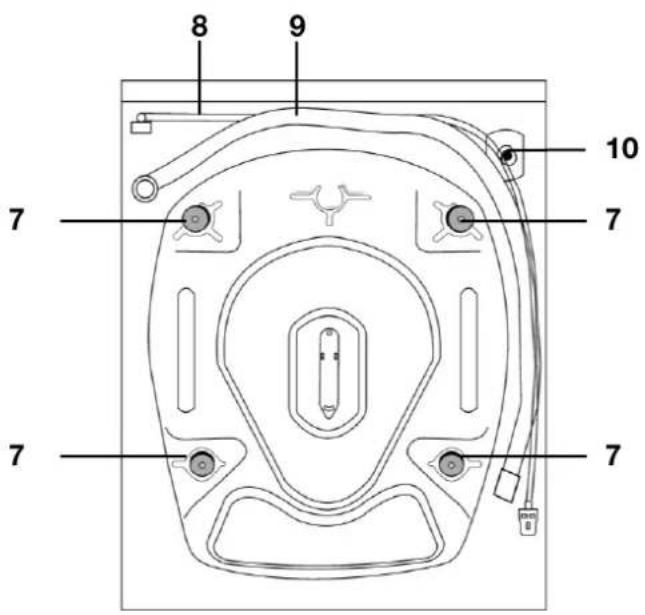
Please familiarise yourself with the parts and accessories listed below
text_image
1 2 3 4 5 6Front
- Detergent drawer
2.Top panel
3.Start / Pause button - Program selection dial
- Door
6.Filter
text_image
8 9 10 7 7 7 7Back
7.Packing bolt x 4
8.Power lead
9.Drain hose
10.Water inlet
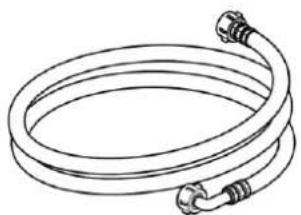
Accessories included
natural_image
Line drawing of a coiled cable or hose with connectors (no text or symbols)Water inlet hose x 1

Plastic plug x 4
Unpacking your washing machine

Caution: 2 people are required to unpack the washing machine, it is recommended that gloves are worn.
a: Carefully remove all packaging materials including the foam base, dispose of correctly.
Note: When opened, water droplets may be visible in the drum etc. this is normal as each appliance is factory tested.
Removing the packing bolts

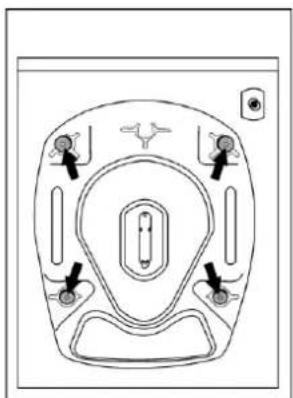
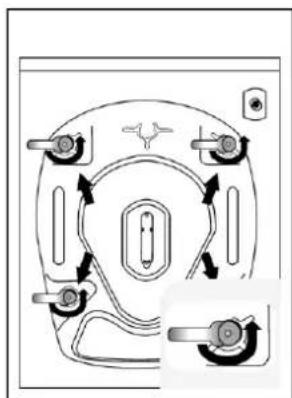
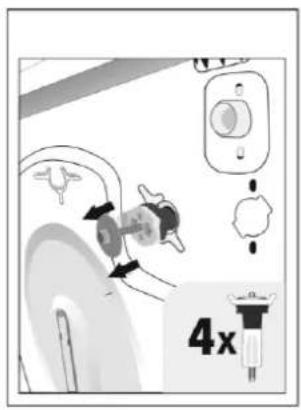
Important: The packing bolts are designed to support the internal components during transit, these MUST be removed before use.
a: Loosen the screws by rotating counterclockwise with a suitable wrench. (1 & 2)
b: Remove the bolts by pulling them. (3)
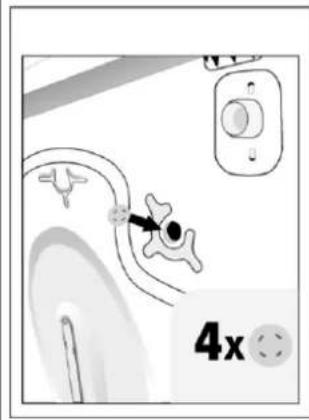
c: When the transport bolts have been removed, insert the plastic transport screw taps found in the accessories bag into the holes. (4)
Removing the packing bolts
a: For your machine to work efficiently with minimum vibration it should be settled on flat, non-slippery, firm ground.
b: You can adjust the balance of your machine by changing the positioning of its feet.
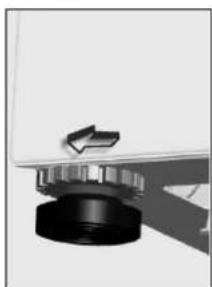
c: First, loosen the plastic adjustment nut. (5)
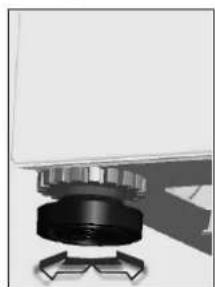
d: Adjust by rotating the feet upwards or downwards. (6)
e: After the desired position has been reached, tighten the plastic adjustment nut again by rotating it upwards.
Note: Never put cartons, wooden blocks or similar materials to balance the machine on uneven ground.
1
natural_image
Top-down schematic of a medical device casing with internal components and control buttons (no text or labels)2
natural_image
Diagram of a mechanical or electrical component with directional arrows and circular features (no text or symbols)3
text_image
4x4
text_image
4x5
natural_image
Close-up of a mechanical component with a black cylindrical base and a metallic knob, no visible text or symbols.6
natural_image
Pure mechanical component diagram without any text, numbers, or symbolsWater inlet hose connections

Important: This washing machine MUST only be connected to a cold water supply.
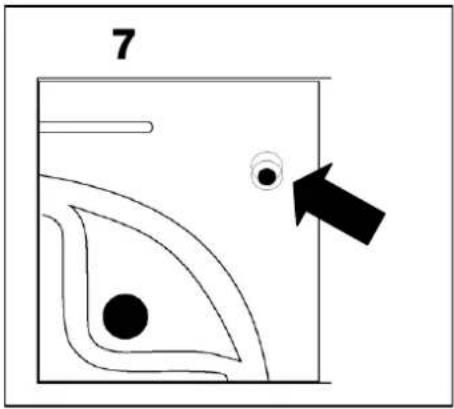
a: Connect the water inlet hose, the angled connection attaches to the water inlet on the back of the washing machine. (7)
b: The straight connection attaches to the water supply valve. (8)
c: Ensure all seals are in place before connecting.

Important: Only tighten the hose connection nut by hand - do not overtighten.
Drain hose connections

Important: The height of the top of the curve in the drain hose MUST be between 60 - 100cm from the floor. (9)
Important: The end of the water drain hose may be fitted directly to the waste water outlet hole or a special apparatus mounted on the outlet bracket of the wash-stand.
Important: Never attempt to extend the water drain hose by adding extra parts.
text_image
7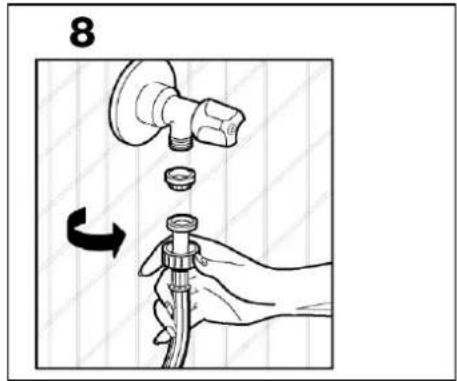
text_image
8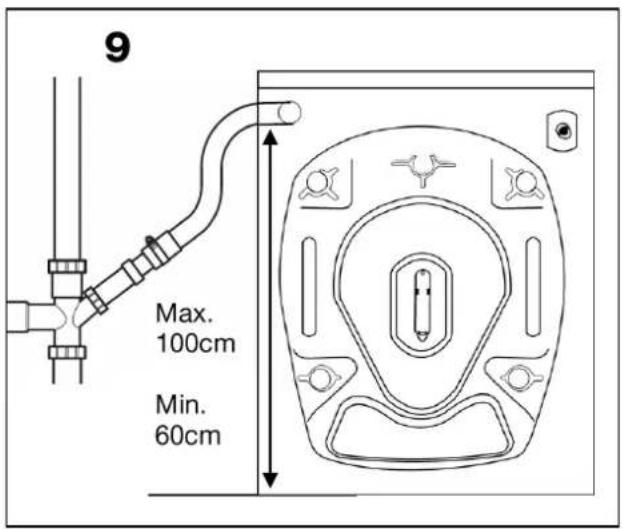
text_image
9 Max. 100cm Min. 60cmContinued on next page
Electrical connections

Any electrical work that is required to install this washing machine MUST be carried out by a qualified electrician.

Warning: THIS APPLIANCE MUST BE EARTHED
Before making any electrical connections, ensure that:
- Ensure the power socket is suitable for the maximum power of the washing machine (fuses in the power circuit must be 13 amp).
- The supply voltage should be the same as that indicated in the technical specifications (page 17) and the appliance rating plate (located where shown).
- The appliance should be earthed and in compliance with the applicable law.
- Additional earth cables should not be necessary if the plug and socket are earthed. If necessary, an additional earth cable should be attached to the earth terminal on the back of the washing machine and earthed.
- When installed, the power socket must be within easy reach.
- The use of adapters, multiple connectors or extension cables are not recommended.
- The appliance must be connected to a 220-240 volt 50 cycle AC supply by means of a three pin socket, suitably earthed and protected by a 13 amp fuse.
- Should the fuse need to be replaced, a 13 amp fuse approved to BS1363/A must be used.
- The plug contains a removable fuse cover that must be refitted when the fuse is replaced. If the fuse cover is lost or damaged, the plug must not be used until a replacement cover has been fitted or the plug is replaced.
- A damaged plug should be cut off as close to the plug body as possible, the fuse should be removed and the plug disposed of safely.
Plug replacement (UK & Ireland only)
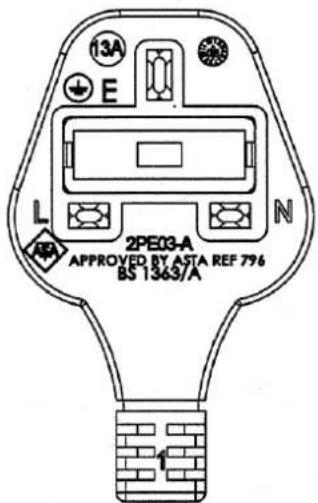
Should you need to replace the plug; the wires in the power cable are coloured in the following way:
Blue - Neutral 'N'
Brown – Live 'L'
Green & Yellow – Earth 'E'
As the colours of the wires in the power cable may not correspond with the coloured markings identifying the terminals in your plug, and proceed as follows:
The green & yellow wire must be connected to the terminal in the plug that is marked with the letter E or by the earth symbol.
The blue wire must be connected to the terminal that is marked with the letter N.
The brown wire must be connected to the terminal that is marked with the letter L.
If the power lead is damaged, it must be replaced by a qualified electrician.
text_image
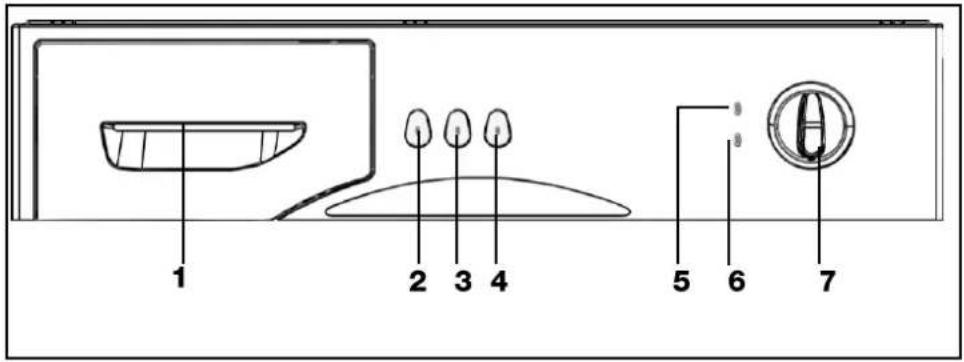
13A E L N 2PE03-A APPROVED BY ASTA REF 796 BS 1363/A- Detergent drawer
- Start / Pause button
- No spin button
- Cold wash button
- Program ready light
- Program end light
- Program selection dial
text_image
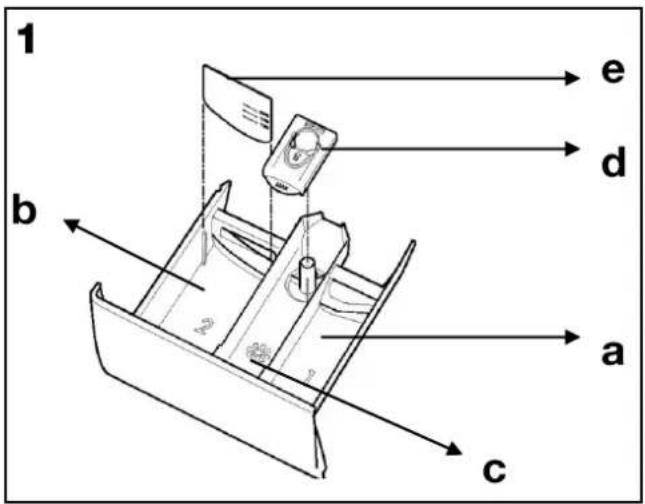
1 2 3 4 5 6 71. Detergent drawer
a: Prewash detergent
b: Main wash detergent
c: Fabric softener
d: Siphon plug
e: Liquid level detergent plate (in accessory bag)
2. Start / Pause button
Used to start a selected program or pause during running.
3. No spin button
This program is recommended to be used for your sensitive clothes on which no spinning should be done. By pressing this function button, you can cancel the spinning process which is included in the program.
4. Cold wash button
When this button is pressed, your clothes are washed with cold water. With this function, you can wash your slightly dirty clothes using less energy and water.
Continued on next page
text_image
1 b c a d e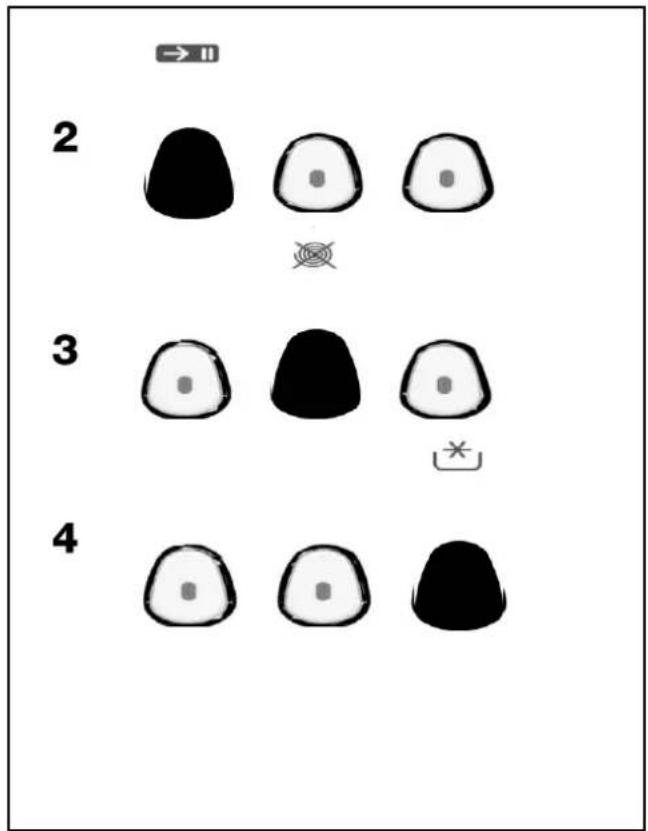
text_image
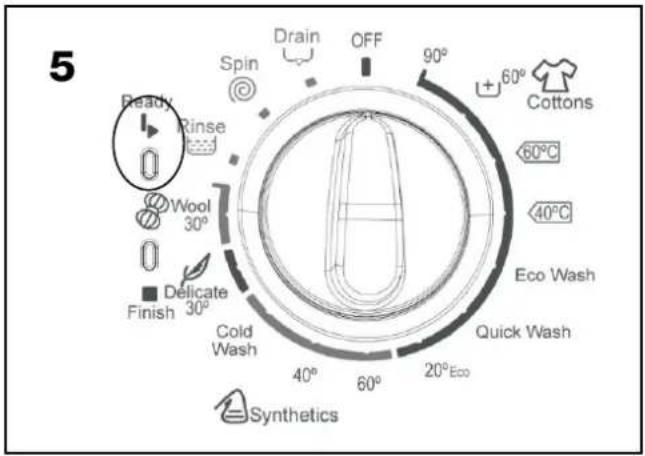
2 3 45. Program ready light
Adjust the program knob to the program you desire. The program ready light will be on.
6. Program end light
Your machine will automatically stop when the program you have selected ends. The program end light will be on.
7. Program selection dial
With the program knob, you can select the program with which you desire to wash your clothes. You must be careful that the adjustment sign of the program knob is exactly on the program you want to select. If you move the program knob to 0 (off) position, while your machine is running, your program will be cancelled.
Note: If you want to activate an additional function after the machine has started washing, press the additional function button that you want to use. If the additional function selected can still be used at that program stage, the LED of the function button will be turned on and the function will be added to the program. If the LED is not turned on, the function selected is not possible at that stage of the current program and will not be activated.
text_image
5 Ready Rinse Spin Drain OFF 90° 60° Cottons 60°C 40°C Wool 30° Eco Wash Delicate Finish 30° Quick Wash Cold Wash 20°Eco Synthetics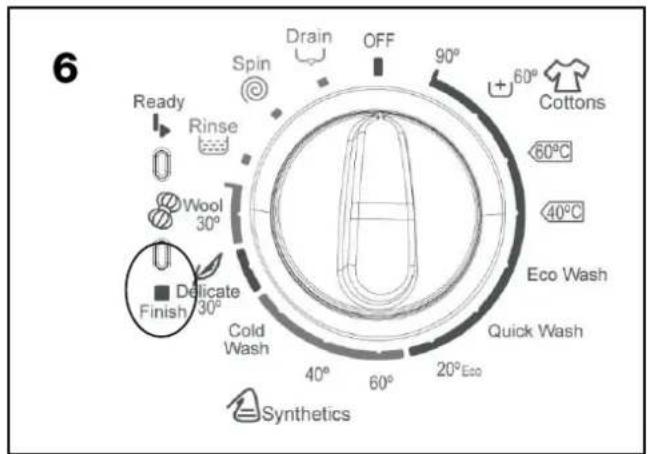
text_image
6 Ready Rinse Wool 30° Delicate Finish 30° Spin Drain OFF 90° 60° Cottons 60°C 40°C Eco Wash Quick Wash 20°Eco Synthetics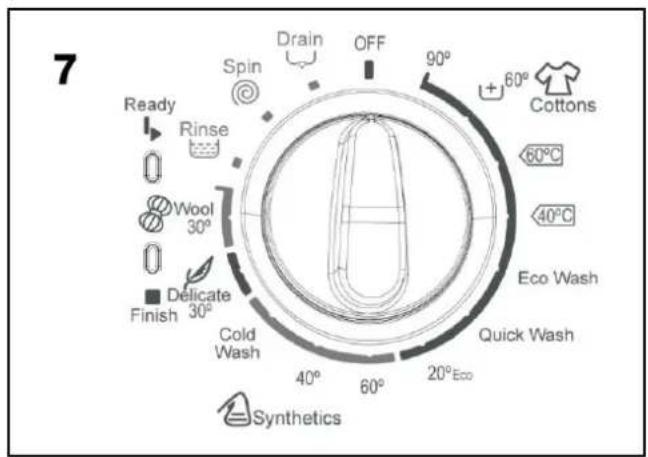
text_image
7 Ready Rinse Wool 30° Delicate Finish 30° Spin Drain OFF 90° 60° Cottons 40°C Eco Wash Quick Wash 20°Eco SyntheticsProgram Selection Guide
Customer Helpline: 0845 600 4632
| PROGRAM | PROG. TIME (mins) | DETERGENT COMPART. | MAX LOAD CAPACITY (kg) | TYPE OF LAUNDRY | |
| COTTON | 1-90° | 155 | 2 | 5 | Dirty, boil, cotton and linen textile |
| 2-60° (PREWASH) | 140 | 1+2 | 5 | Very dirty, cotton, coloured and linen textile | |
| 3-60° 60°C | 190 | 2 | 5 | Dirty, cotton, coloured and linen textile | |
| 4-40° 40°C | 180 | 2 | 5 | Slightly dirty, cotton, coloured and linen textile | |
| 5-40° ECO WASH | 80 | 2 | 5 | Dirty, cotton, coloured and linen textile | |
| 6-30° QUICK WASH | 30 | 2 | 2,5 | Slightly dirty, cotton, coloured and linen textile | |
| 7-ECO 20° | 102 | 2 | 2,5 | Less dirty, cotton and linen textiles. (Underwear, bedsheet, tablecloth, (towel max. 2 kg) bedcloth, etc. | |
| SYNTHETIC | 1-60° | 84 | 2 | 3 | Dirty, synthetic or synthetic mixture textile |
| 2-40° | 65 | 2 | 3 | Slightly dirty, synthetic or synthetic mixture textile | |
| 3-COLD | 72 | 2 | 3 | Slightly dirty, synthetic or synthetic mixture sensitive laundry. Washed without heating the tap water. | |
| DELICATE | 1-30° | 70 | 2 | 2 | Slightly dirty, cotton, coloured, synthetic or synthetic mixture sensitive laundry |
| WOOL | 2-30° | 73 | 2 | 2 | Dirty, hand and machine to wash wool laundry |
| RINSING | When your clothes need an additional rinse after the washing process. You can use this program for all kinds of clothes. | ||||
| SPINNING | When your clothes need an additional spin after the washing process. You can use this program for all kinds of clothes. | ||||
| DRAINING | This program is used to drain the wastewater after the washing process of your machine. Also if you want the water inside your machine to be drained before the program ends, you can use this program. | ||||
(*) You can use softeners in all programs (except spinning and draining programs) optionally. When you arrange the quantity of the softener, comply with the warning of the softener producer. Fill your softener in the (softener) compartment of the detergent drawer.
Note: Durations vary according to wash load (weight and type), tap water, ambient temperature and selected extra functions.
Before first use
a: Plug in the machine.
b: Open the water tap.
c: There may be water left inside your machine after factory tests and trials. It is recommended that the first wash cycle be carried out with no laundry, to remove this water; pour half a measuring cup of normal laundry detergent into compartment 2 and select cotton program at 90°C.
d: Adjust the program knob to a program you desire.(Program number 1)
e: The program ready light will be on.
f: Run the program that you have selected by pressing the Start/Pause button.
g: Your machine will automatically stop when the program ends.
h: The program end light will be on.
Preparing for a wash
Laundry
- Sort your clothes according to their types (cotton, synthetic, delicate, woolen, etc.), washing temperatures and level of dirtiness.
- Never wash your white and coloured clothes together.
- Since your new coloured clothes may release dye on the first wash, wash them separately.
- Remove any small objects from the pockets of your clothes.
- Ensure that all zips and buttons on your clothes are fastened.
- Remove the plastic or metal hooks of curtains or place them inside a washing bag and tie.
- Turn clothes such as trousers, knitted fabrics, t-shirts and sweat shirts inside out.
- Wash your small clothes like socks and handkerchiefs in a washing bag.
Placing clothes into the machine
- Open the door of your machine.
- Put your clothes into your machine in a well-balanced manner.
- Place your clothes loosely in the machine.
- When you shut the door of your machine, be careful that no cloth is jammed between the cover and the gasket.
- Shut the door of your machine securely, otherwise your machine will not start the washing process.
Detergent
The quantity of detergent to be loaded into the machine will depend on the following criteria:
- Your detergent consumption will change depending on how dirty the clothes are. For your slightly dirty clothes, do not pre-wash and put a small amount of detergent in compartment 2 of the detergent drawer.
- For your excessively dirty clothes, select a program with pre-washing; fill 14 portion of the detergent in compartment 1 in the detergent drawer and the remaining portion in compartment 2.
- Use detergents developed especially for automatic washing machines. The quantities that will be used for your clothes are written on the packaging of the detergents.
- As the hardness of your water increases, the amount of the detergent to be consumed will also increase.
- As the amount of clothing increases, the amount of the detergent that will need to be used will also increase.
- Fill your softener in the softener compartment in your detergent drawer. Do not exceed the MAX level. Otherwise, the softener will diffuse in the washing water via the siphon.
- Concentrated softeners with high viscosity should be diluted with water before loading in the drawer. This is because high-viscosity softeners obstruct the siphon and prevent the flow of the softener.
- You can use liquid detergents in all programs without pre-washing. For this, mount the liquid detergent level plate in the second compartment of the detergent drawer and arrange the amount of liquid detergent according to the levels on this plate.
Using your washing machine
1. Loading
a: Open the door, place laundry item by item into the washing machine, firmly close the door.
b: Do not overload the washing machine (see the program selection guide for maximum load information, page 8).
2. Add detergent
Pull out the detergent drawer, add the detergent and softener to the correct compartments.
3. Select a washing program
a: Adjust the program knob to a program you desire.(Page 8)
b: The program ready light will be on.
4. Function buttons
Select the 'no spin' or 'cold wash' settings as required (see page 6).
5. Start washing
Press the start/pause button and the washing machine will start.
6. Finish washing
a: Your machine will automatically stop when the program you have selected ends.
b: The program end light will be on.
c: Turn the program knob to O(off) position.
d: The door will be unlocked approximately two minutes after the program ends.
e: You can open the door by pulling the handle of the door towards yourself and take out your clothes.
f: After you unload your clothes leave the door open to dry the interior of your machine and to prevent mould from developing.
g: Unplug your machine from the mains power supply.
h: Close the water tap.
7. Changing a selected program
If you have selected a program and you do not want it to continue:
a: Press the start/pause button.
b: Bring the program knob to O(off) status.
c: Adjust the program knob to the program you desire.
d: The program ready light will be on.
e: By pressing the start/pause button, run the program that you have selected.
Note: If you want to change running program, O position should be used. Bringing the program knob to another position will not change running program.
8. Cancellation of a program
If you wish to end a running program early:
a: Press the start/pause button.
b: Turn the program knob to O(off) status.
c: Turn the program knob to "Draining" or "Spinning" program.
d: The program ready light will be on.
e: Run the program you have selected by pressing the start/pause button.
Note: If the power is interrupted at any stage of the washing program, your machine will continue the program from the point where it was interrupted. Provided no changes have been made to the program selected.
Child Lock
Child lock is used in order to protect the washing cycle from the effects of unwanted button activations during the cycle. Child lock is activated by pressing the first and third button on the control panel at the same time for more than 3 sec. When child the lock is activated, LED's on the function buttons blink to indicate that child lock is active. In order to deactive child lock, the same buttons (1st and 3rd) should be pressed again for more than 3 seconds.
Deactivation of child lock is shown by blinking of LED on Start/Pause button.
Your machine is equipped with systems which will take the necessary precautions and warn you in case of any. IMPORTANT: IT CAN TAKE UPTO 10 MINUTES FOR ERROR TO REGISTER.
| FAILURE CODE | FAILURE INDICATOR | PROBABLE FAILURE | PROCESS TO BE FOLLOWED |
| Err 01 | The start/pause light blinks. | The door is not shut properly. | Shut the door properly so that you hear the click. If the problem persists, turn off the machine unplug and contact the nearest authorised service agent immediately. |
| Err 02 | The program ready light blinks. | The water level in your machine is below heater. The pressure of your water supply may be low or water supply may be blocked. | Turn on the tap fully. The water supply may be interrupted. If the problem persists, your machine will automatically stop after a while.Unplug your machine, turn off the tap and contact the nearest authorised service agent immediately. |
| Err 03 | The start/pause light and program ready light blinks. | The pump has failed or the pump filter is obstructed. | Clean the pump filter.If the problem persists and contact the nearest authorised service agent immediately. (*) |
| Err 05 | The start/pause light and program end light blink. | The heater of your machine or the heat sensor has failed. | Shut down your machine and unplug. Turn off your tap and contact the nearest authorised service agent immediately. |
| Err 06 | The program ready light and program end light blink. | The motor has failed. | Shut down your machine and unplug. Turn off the tap and contact the nearest authorised service agent immediately. |
| Err 07 | The start/pause light, program ready light and program end light stays on permanently. | Electronic configuration error. | Shut down your machine and unplug. Turn off the tap and contact the nearest authorised service agent immediately. |
| Err 08 | The start/pause light, program ready light and program end light blink. | The motor has failed. | Shut down your machine and unplug. Turn off the tap and contact the nearest authorised service agent immediately. |
| Err 09 | The program ready and program end lights stay on permanently. | The network voltage is too high or too low. | If the network voltage is lower than 150V or higher than 260V, your machine will automatically stop. When the network voltage is recovered, your machine will continue its operation. |
(*) See the section regarding the care and maintenance of your machine.

Before cleaning your washing machine.
a: Unplug your machine from the mains power supply.
b: Close the water tap.
Water inlet filters
On the tap part of your machine's water inlet hose and at the ends of water inlet valves, there are filters to prevent entrance of the dirt and foreign materials in the water to the machine. If the machine is unable to receive sufficient water although your water tap is fully opened, these filters should be cleaned.
- Remove the water inlet hose.
- Remove the filters found on the water inlet valves by using a pincer and wash thoroughly with a brush. (1)
- Clean the filters of the water inlet hoses located on the tap side by removing manually together with the seal. (2)
• After you clean the filters, you can fit them the same way as you have removed them.
Pump filter
The pump filter system elongates the life of your pump, which is used to drain the dirty water. It prevents lint enter the pump. Cleaning of your pump filter every 2-3 months is recommended. To clean your pump filter:
- Open the kickplate's cover, by pulling the handle. (2-A & 3-A)
- Before opening the filter cover, place a cup in front of the filter cover to prevent flow of the remaining water in the machine.
- Loosen the filter cover by rotating it counter clockwise and drain the water. (4-A)
- Remove the foreign materials from the filter.
- Check for the rotation of the pump manually.
- After you have cleaned the pump, fit the filter cover by rotating clockwise.
- Put the kickplate cover into place.
- Do not forget that if you do not fit the filter cover properly, it will leak water.

Danger of being scalded! The water inside the pump maybe hot- wait for it to cool.

natural_image
Diagram showing a fish-like shape with a magnified inset, no text or symbols present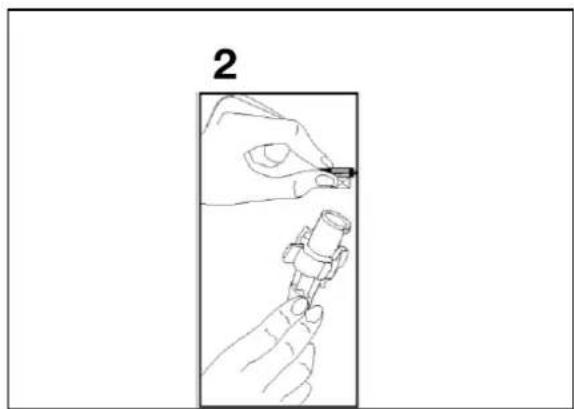
natural_image
Line drawing showing a hand holding a small mechanical component, with no text or symbols present.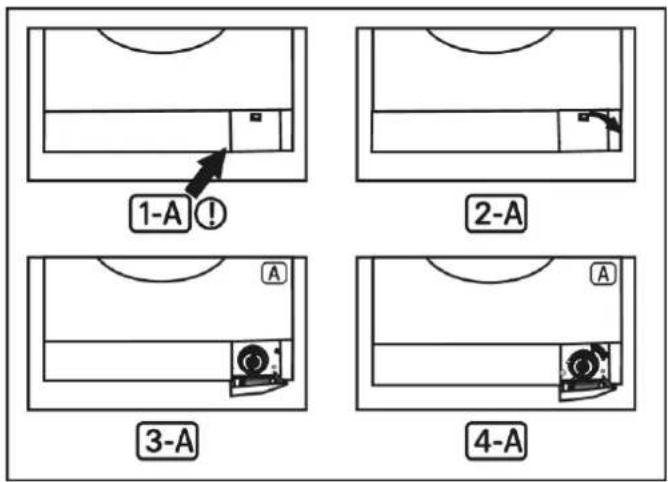
text_image
1-A! 2-A 3-A 4-ADetergent drawer
Detergents may form sediments in your detergent drawer or in the housing of the detergent drawer over time. To clean the sediment, pull out the detergent drawer from time to time. To pull out the detergent drawer:
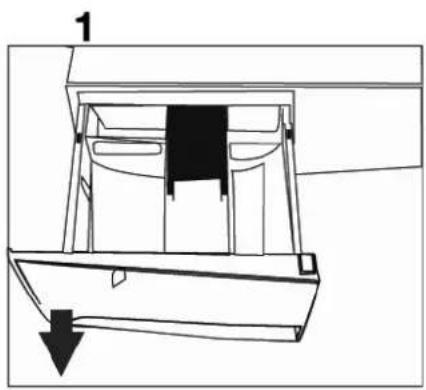
• Pull the detergent drawer to the end. (1)
- Keep pulling by pressing on the siphon lid inside the drawer pulled to its end, and remove the drawer from its place. (2)
- Wash with an old toothbrush and water.
- Remove the leftover disused detergent, avoid dropping it back in to the machine.
- After drying the detergent drawer, replace it in the housing by reversing the removal operations.
Siphon plug
Pull out the detergent drawer. Remove the siphon plug and clean the residues of the softener thoroughly. Fit the cleaned siphon plug in its location. Check it is placed properly.(3)
Cabinet
Clean the exterior surface of the cabinet of your machine with lukewarm water and a cleaning substance that will not damage the cabinet. After rinsing with clean water, wipe it with a soft and dry cloth.
Note: To get the best out of your machine. We recommend that you periodically run a wash cycle with limescale remover, especially in hard water drear.
Note: After each wash leave the door to the machine open to help air the drawer and reduce any mould build up;
Note: Wipe the door seal ideally after each wash;
Note: Undertake a maintenance wash every 4-6 weeks with the drum empty. This wash should be undertaken with lime scale and detergent remover;
natural_image
Technical line drawing of a mechanical component with a downward arrow indicating direction (no text or symbols)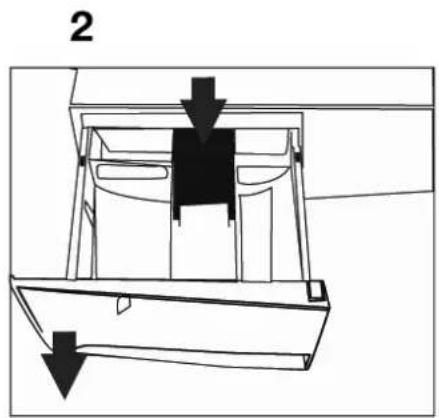
natural_image
Technical line drawing of a mechanical assembly with arrows indicating direction (no text or symbols)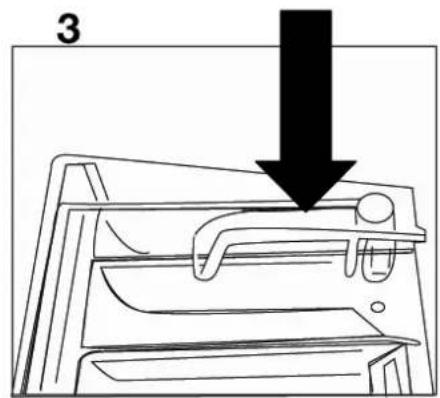
natural_image
Diagram of a mechanical component with a downward arrow indicating force or direction (no text or symbols present)All repairs to the machine must be carried out by an authorised repair agent. When a repair is required or you are unable to eliminate the failure with the help of the information below:
a: Unplug the machine.
b: Close the water tap.
c: Contact the nearest authorised repair agent.
| FAILURE | PROBABLE CAUSE | METHODS OF ELIMINATION |
| Your machine does not operate. | It is unplugged. | Insert the plug into the socket. |
| Your fuse is defective. | Change your fuse. | |
| The electric power is off. | Check the electric power. | |
| Start/pause button has not been pressed. | Press the start/pause button. | |
| The programme knob is in the 0 (off) position. | Turn the programme knob to the desired position. | |
| The door is not shut properly. | Shut the door properly. You should hear the click. | |
| Your machine does not receive water. | Water tap is closed. | Open water tap. |
| The water inlet hose may be bent. | Check the water inlet hose. | |
| The water inlet hose is obstructed. | Clean the filters of water inlet hose. (*) | |
| The valve inlet filter is obstructed. | Clean the valve inlet filters. (*) | |
| The door is not shut properly. | Shut the door properly. You should hear the click. | |
| Your machine is not draining water. | The drain hose is obstructed or bent. | Check the drain hose. |
| The pump filter is obstructed. | Clean the pump filter. (*) | |
| The clothes are not placed inside the machine in a well-balanced manner. | Spread the clothes inside the machine in an orderly and well-balanced manner. | |
| Your machine is vibrating. | The feet of your machine are not adjusted. | Adjust the feet. (**) |
| Transportation screws are not removed. | Remove transportation screws. (**) | |
| Your machine is vibrating. | There are only few clothes in the device. | It does not prevent operation of the machine. |
| Excessive amount of clothes are filled in the machine or the clothes are not placed in a well-balanced manner. | Do not exceed the recommended quantity of clothes and spread your clothes in the machine in a well-balanced manner. | |
| Your machine is touching a rigid object. | Ensure machine is not in contact with hard objects. |
(*) See the section concerning the care and maintenance of your machine.
(**) See the section concerning installation of your machine.
| FAILURE | PROBABLE CAUSE | METHODS OF ELIMINATION |
| Excessive foam in the detergent drawer. | Too much detergent has been used. | Press the start/pause button.In order to stop the foam,dilute one table-spoon of softener in half liter of water and pour it in the detergent drawer.Press the start/pause button after 5-10 minutes.Arrange the amount of the detergent properly in the next washing process. |
| Wrong detergent has been used. | Use only the detergents produced for full automatic machines. | |
| The washing result is poor. | Your laundry is too dirty for the programme you have selected. | Select a suitable programme. (see page 8) |
| The amount of detergent used is not sufficient. | Use more detergent. | |
| The washing result is not good. | Clothes exceeding the maximum capacity have been loaded in the machine. | Put the clothes in your machine in a manner not to exceed its maximum capacity. |
| Your water may be hard. | Use the amount of detergent specified by the detergent manufacturer. | |
| Distribution of the clothes in your machine is not well-balanced. | Spread the clothes inside the machine in an orderly and well-balanced manner. | |
| The water is drained from the machine as soon as it is filled. | The end of the water drain hose is in a position too low according to the machine. | Position the water drain at an appropriate height.(**) |
| No water is seen in the drum during washing. | No failure. The water is in the lower part of the drum. | - |
| There are residues of detergent on the clothes. | Some detergents contain ingredients which are not soluble in water and which may form white stains on your clothes. | By adjusting your machine, carry out an additional rinse, or eliminate the stains after drying, with a brush. |
| There are grey stains on the clothes. | These stains may be caused by oil,cream or ointment. | In the next washing operation, use the maximum detergent amount declared by the detergent producer. |
| The spinning process is not done or starts with delay. | No failure. The unbalanced load control may work in that way. | The unbalanced load control system will try to distribute your clothes in a homogenous manner. After your clothes are distributed, passage to spinning process will be realized. In the next washing process,place your clothes into the machine in a well-balanced manner. |
(*) See the section concerning the care and maintenance of your machine.
(**) See the section concerning installation of your machine.
Technical Specifications
Customer Helpline: 0845 600
| Model / Item | PRO510A+W | PRO510A+S |
| Power supply | (220-240) V ~/50Hz | (220-240) V ~/50Hz |
| Max working current | 10 amp | 10 amp |
| Water pressure | Maximum : 1 MpaMinumum : 0.1 MPa | Maximum : 1 MpaMinumum : 0.1 MPa |
| Maximum power | 2100 watt | 2100 watt |
| Maximum washing load (dry) | 5 kg | 5 kg |
| Spinning speed | 1000 rpm | 1000 rpm |
| Washing programmes | 15 | 15 |
| Size | 845 x 597 x 497 | 845 x 597 x 497 |
| Net weight | 65 kg | 65 kg |

Disposal information
natural_image
Symbol of a trash bin crossed with two crossed lines, no text or labels presentThe symbol on the product or its packaging indicates that this product may not be treated as household waste. Instead it should be handed over to the applicable collection point for the recycling of electrical and electronic equipment. By ensuring this product is disposed of correctly, you will help prevent potential negative consequences for the environment and human health, which could otherwise be caused by inappropriate waste handling of this product. For more detailed information about recycling this product, please contact your local council office, your household waste disposal service or the shop where the product was purchased.
Argos
Product Guarantee
This product is guaranteed against manufacturing defects for a period of

text_image
1Year
This product is guaranteed for twelve months from the date of original purchase. Any defect that arises due to faulty materials or workmanship will either be replaced, refunded or repaired free of charge where possible during this period by the dealer from whom you purchased the unit.
The guarantee is subject to the following provisions:
- The guarantee does not cover accidental damage, misuse, cabinet parts, knobs or consumable items.
- The product must be correctly installed and operated in accordance with the instructions contained in this manual.
- It must be used solely for domestic purpose.
- The guarantee will be rendered invalid if the product is re-sold or has been damaged by inexpert repair.
- Specifications are subject to change without notice.
- The manufacturer disclaims any liability for the incidental or consequential damages.
- The guarantee is in addition to, and does not diminish your statutory or legal rights.
- In the event of a problem with the product with in the guarantee period call the Customer Helpline: 0845 600 4632.
Guarantor: Argos Ltd 489 - 499 Avebury Boulevard
Central Milton Keynes MK9 2NW