
Genesis II - Mikrofon MXL - Kostenlose Bedienungsanleitung
Finden Sie kostenlos die Bedienungsanleitung des Geräts Genesis II MXL als PDF.


Benutzerfragen zu Genesis II MXL
0 Frage zu diesem Gerät. Beantworten Sie die, die Sie kennen, oder stellen Sie Ihre eigene.
Eine neue Frage zu diesem Gerät stellen
Laden Sie die Anleitung für Ihr Mikrofon kostenlos im PDF-Format! Finden Sie Ihr Handbuch Genesis II - MXL und nehmen Sie Ihr elektronisches Gerät wieder in die Hand. Auf dieser Seite sind alle Dokumente veröffentlicht, die für die Verwendung Ihres Geräts notwendig sind. Genesis II von der Marke MXL.
BEDIENUNGSANLEITUNG Genesis II MXL
GENESIS

Marshall Electronics, Inc. Professional Audio Division, El Segundo, CA
Phone: (310) 333-0606 • (800) 800-6608 • Fax: (310) 333-0688
www.MXLmics.com • www.mogamicable.com • sales@MXLmics.com
Useful Information and User Guide

Thank you for choosing the MXL Genesis II microphone.
Your Limited Edition Genesis II microphone has been designed and engineered by our world renowned team of audio and electrical engineers at our California research and development facilities, utilizing the features and enhancements asked for by some of the worlds finest engineers and producers.
In addition the to the capsule featured in the award winning original Genesis, the Genesis II now adds a second capsule built with our proprietary diaphragm material giving an alternative “flavor” or “color” reminiscent of some of the classic microphones highly sought after by many engineers.
In a nutshell, the Genesis II is everything the award winning original Genesis is and more. Like it's older sibling, the MXL Genesis II is built using individually selected components, chosen for their superior sonic characteristics. Universally accepted as one of the most musical tubes available, the venerable new old stock Mullard 12AT7 (CV 4024) remains key to the sound of the Genesis II.
Your Genesis II has been created to give you many years of sterling service, and will ensure you always achieve the finest quality recordings. The team here at MXL hope you enjoy your new Genesis II microphone as much as we enjoyed developing it.
To assist you in obtaining the best possible results from your MXL Genesis II microphone, we have provided some tips, tricks and answers to commonly asked questions. We encourage you to review these materials.
GENESIS II Specs
| Type: | Vacuum Tube Studio Condenser Microphone |
| Tube Type: | Mullard 12AT7 or equivalent |
| Frequency Response: | 20 Hz – 20 kHz |
| Polar pattern: | Cardioid |
| Output Impedance: | 200 ohms |
| Capsule Select: | Warm & Bright |
| LED lights: | Indicate which capsule is active |
| Pre-Attenuation Switch: | 0 dB, -10 dB |
| High Pass Filter: | 6 dB/octave @ 150 Hz |
| Equivalent noise: | 18db (A-weighted IEC 268-4) |
| S/N Ratio: | 78dB (Ref. 1Pa A-weighted) |
| Max SPL for .5% THD: | 130 dB/140 dB (0dB, -10 dB pad) |
| Power Requirements: | Dedicated power supply |
| Size: | 59mm x 240mm |
| Weight: | 1.55 lbs. |
| Metal Finish: | Red with Gold Grill |
Warranty
Marshall microphones are guaranteed against defects in material and workmanship for three years (except tube which is 90 days) from date of purchase. Should you encounter any problem with this unit, promptly contact the company you purchased it from for assistance. The original dated sales receipt will be necessary for any warranty claim. Do not send any unit directly to us without prior authorization from our service department! Warranty coverage is limited to repair or replacement (at our option) of the microphone, and does not cover incidental damages due to use of this unit, nor damage caused by accidental misuse of this product.
Recording a Drum Set
Like the piano, capturing the drums can be quite a challenge, if for no other reason than the fact that you must be very careful to avoid positioning the microphone(s) where they could be hit! Ideally you'll want a minimum of two microphones for this job, though a single microphone can be employed.
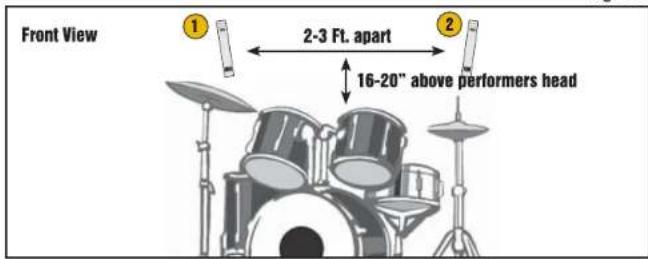
Stereo Overhead Pair: Position the two microphones approximately 16-20 inches above the performer's head – separated laterally by roughly 2-3 feet and placed 5-6 feet out in front of the drum kit. Adjust the two microphone's Pan position so that you achieve a good stereo spread, though generally not hard left and right. (see Fig. 5A)
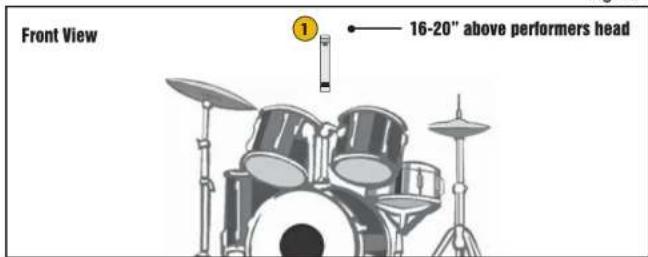
Single Overhead Microphone: Position the microphone approximately 16-20 inches above the performer's head – centered in front of the drum set, and placed 5-6 feet out in front. The microphone's Pan position should be centered for mono drums. (see Fig. 5B)
For best results, record the drums in as acoustically “dead” a room as you can. If the room is live, the sharp attack transients of the drum kit will only become that much more difficult to capture if the room has hard, reflective surfaces – resulting in a muddy sound without any real definition. Further, you should always record the drums dry and add signal processing after the fact.
Fig. 5A
text_image
Front View ① 2-3 Ft. apart ② 16-20" above performers headFig. 5B
text_image
Front View 16-20" above performers headFeatures
Understanding the Genesis II: Basic Operation
As you already know, the MXL Genesis II is rather unique in that it has two capsules. Designed to provide you with a versatile instrument capable of addressing a wide range of studio applications, the Genesis II is like having two mics in one – with the front side having the warm, intimate sound identical to the original Genesis, and the microphone's back side with a delicate, detailed, more up front sound reminiscent of some of the highly sought after classic microphones.
Switching Capsules (and knowing which one is active)
As you look at the front of the Genesis II (the side with the MXL logo and the microphone's name), there is a Warm/ Bright switch located on the uppermost part of the microphone's red body. This switch enables you to select the capsule you prefer. There is a RED LED for each capsule located inside the microphone grill at the base of the capsules. Depending upon which capsule is active, you will see the illuminated LED as you face the side of the microphone that is currently engaged. CAUTION – Always lower your volume levels when switching capsules, otherwise, speaker or headphone damage could occur.
Switches
The Genesis II features switches for both bass roll-off, and a -10dB pad. The bass roll-off is set to 6dB per
octave at 150 Hz. This can reduce proximity effect if required. Proximity effect is the change of frequency response as the recorded source is brought closer to the microphone. With vocals, this usually manifests itself as an increase in low frequency content as one gets closer to the microphone. The -10dB pad effectively reduces possible overloading of the microphones internal circuitry at high Spl's. In addition, the MXL Genesis II features a Warm/Bright switch.
Power Requirements
IMPORTANT -This unit requires the use of the dedicated power supply included in the package. This supply is switchable between 115 volts and 230 volts AC. In North America the microphone ships in the 115 volts AC position and in the 230 Volts AC position for export. However, you always want to ensure that the power supply voltage is correctly set for your local voltage as permanent damage to the microphone and/or power supply may occur if the incorrect voltage setting is selected. Every Marshall Electronics MXL® microphone has been thoroughly checked before shipping; so if you hear no sound, check that the power supply is switched on.
Caution
Do not "hot plug" the mic. Always ensure that the power supply is off when plugging and unplugging the included seven-pin cable from the microphone to avoid damaging the microphone and power supply.
Accessories
Care
Dust and foreign material can degrade the performance of a microphone over time so always store the unit in its case. It is highly recommended to use the specially designed Genesis pop filter when recording vocals.
Pop Filter
The Genesis II comes with a custom 24k gold-plated pop filter which should be used anytime the microphone is being used to record vocals. The pop filter not only eliminates
plosives (those
"popping Ps"), it helps collect condensation
from one's breath and
protects and
protects the micro- phone's capsule from moisture in the pro-
cess. Condensation on the microphone's caps
will cause the microphone to short circuit - resulting in the microphone cutting in and out of operation.
Should this occur, you can leave the microphone uncovered, out in the open for approximately two weeks to thoroughly dry. This will likely rectify the problem. Afterward, you should always use a pop filter.
Shockmount
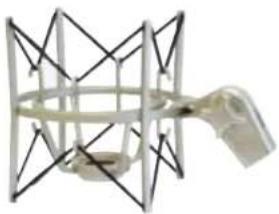
The Genesis II comes with a custom shockmount specifically designed to handle its large size. Shockmounts
de-couple the microphone from the mic stand and the environment. The shockmount will minimize floor noise as well as any noise induced by people handling the microphone stand. Shockmounts should be considered "standard equipment" for all recording applications.
natural_image
Mechanical component with intersecting lines and a transparent handle, no visible text or symbolsMicrophone Cables
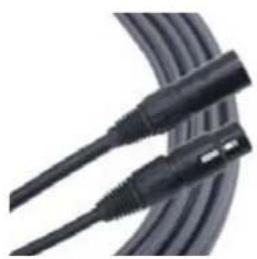
The microphone cable can have a profound effect on the sound of any microphone. Even the finest microphones will sound poor if the interconnect cable allows noise to enter, or causes distortion and loss of information. We highly recommend exclusively using the Mogami ^® cables supplied with your Genesis II Mic.
natural_image
Close-up of a black cable with attached connectors (no text or symbols visible)Fig. 4B
text_image
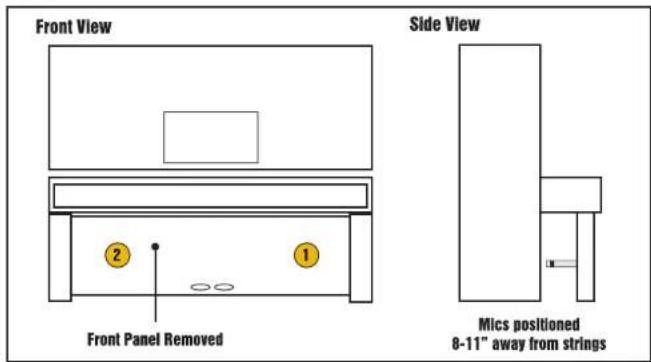
Front View 2 1 Front Panel Removed Side View Mics positioned 8-11" away from stringsFront Panel Placement: For the upper strings, position the microphone approximately 8-11 inches away from the strings, with the Pan position set to left of center. For the lower strings, position the microphone 8-11 inches away from the strings, with the Pan position set to right of center. (see Fig. 4B)

text_image
Fig. 4C Front View Side ViewSingle Microphone / Open Top: If you are using a single microphone, it is generally recommended that you record from above, as placement of the microphone in the lower center may interfere with the performer's ability to access the pedals and the microphone will likely pick up excessive pedal and other mechanical noise. Position the microphone just over the open top, centered over the instrument. (see Fig. 4C)
Recording the Piano
The piano is one of the most challenging instruments to record, and many problems stem from the quality and maintenance of the instrument itself. You'll obtain the best results by using an instrument that has just been tuned and is in good mechanical condition.
The piano is generally recorded using close miking technique. Ideally, you'll want a minimum of two microphones. Usually, the microphone capturing the higher strings is assigned to the left channel and the microphone capturing the lower strings is assigned to the right channel in the final stereo mix, though the stereo spread generally is not hard left and right. While a single microphone can be used, the lower and upper extremities of the instrument will likely be compromised.
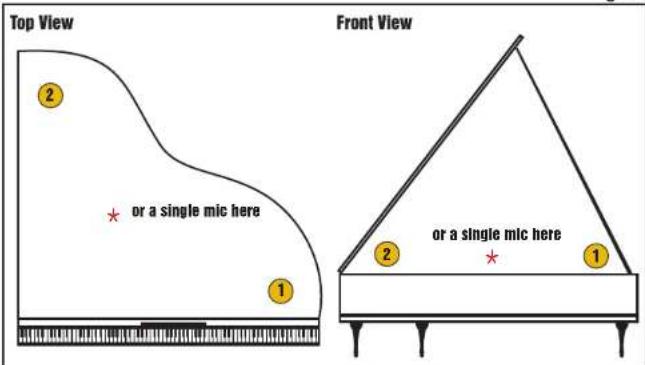
Grand Piano: For the upper strings, position the microphone approximately 8 inches from the piano hammers (to reduce mechanical noise) and 8-11 inches above the strings, with the Pan position set to left of center. For the lower strings, position the microphone toward the far end (away from the keyboard) roughly 6-12 inches from the end and 8-11 inches above the strings, with the Pan position set to right of center. Position the piano's lid at full stick. (see Fig. 4A)
If you are using a single microphone, position the microphone approximately 8 inches from the piano hammers (to reduce mechanical noise) and 8-11 inches above the strings - centered over the piano's mid point. Pan position should be centered and the piano's lid should be at full stick.
Fig. 4A
text_image
Top View 2 or a single mic here 1 Front View 2 or a single mic here 1Upright Piano: With an upright piano, the two microphones are generally placed either just over the top of the piano with the top open, or you can remove the piano's front panel beneath the keyboard and place the microphones below.
Recording Vocals and Dialog
Fig. 1
natural_image
Line drawing of a person wearing headphones and listening to a microphone (no text or symbols)Ideally, you want to record vocals in a relatively “dead” room. If you clap your hands and get an echo effect, you should consider adding some carpet, blankets, drapes, or other sound absorbing materials. On that note, make every effort to avoid getting too close to the room’s walls. These hard, reflective surfaces can easily complicate the recording process. Move your mic setup toward the room’s center.
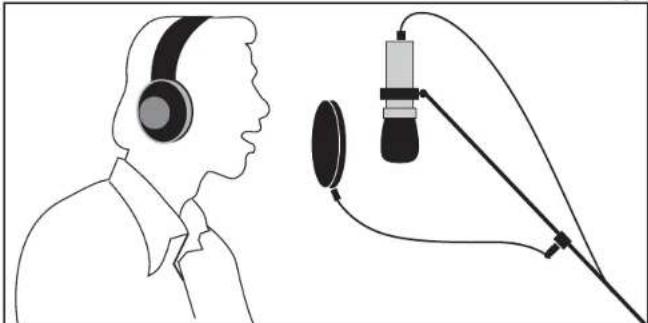
Generally, you should position the vocalist roughly 6-8 inches away from the microphone. Getting too close to the microphone tends to increase bass response and can create problems with plosive sounds – those popping Ps, Bs, Ds, and Ts (more on this in a moment). Getting too far away makes the microphone more subject to picking up room ambience – a sound that creates the effect of the vocalist being in a bowl. While vocalists may need to move about in order to hit those high notes, make every effort to maintain a constant distance from the microphone, as this will provide the greatest tonal balance. (see Fig. 1) For the most part, the microphone's axis (or center line) should aim toward the nose and mouth to obtain the fullest sound. It's not a bad idea, however, to experiment angling the microphone slightly away from dead center so as to help minimize plosives. Further, you should always place a "pop" filter between the vocalist and the microphone, with the pop filter positioned 3-4 inches in front of the microphone. This will greatly increase your ability to achieve the most natural sounding recordings with minimal interference from plosive sounds. Fixing plosives with audio editing software often creates more of a problem than the plosive itself. Use of a pop filter will also protect your microphone's sensitive capsule – keeping it free from moisture caused by saliva projecting from the performer's mouth, and breath condensation. Remember... Good microphone technique, proper positioning, and use of a pop filter can make all the difference between a so-so vocal recording and a great one.
While it may seem obvious, your best results for capturing the acoustic guitar (or any similar stringed instrument for that matter) begin with a properly tuned instrument and strings that, while not old, aren't so new so as to create tuning issues due to stretching.
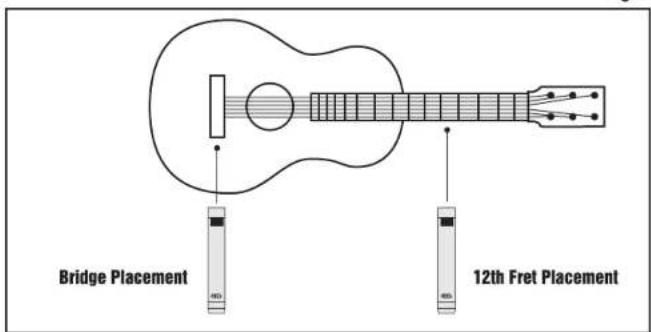
There are two optimum points for microphone positioning - either near the bridge or by the twelfth fret. While it may seem natural to place the microphone in front of the instrument's sound hole, doing so usually increases low frequency response to the point of making the instrument sound "boomy."
Twelfth Fret Placement: Placing the microphone roughly 2-4 inches from the twelfth fret and aimed directly at the strings will generally produce a warm, full bodied sound with good tonal balance. Using this technique, the sound hole's contribution will be moderated since the microphone is not pointed directly at it.
Bridge Placement: Similarly, you can position the microphone so it is 3-6 inches from the guitar's bridge. This will generally produce a somewhat brighter tonal quality. You should also be prepared to experiment positioning the microphone slightly off-axis should you find yourself capturing too much low frequency response from the guitar's sound hole.
The acoustical characteristics of your room will also have a pronounced effect on your results. A "live" room will produce an overall "brighter" guitar sound, while a "damped" room will produce more of a mellow tone. If you have two microphones, you may wish to experiment using one in close proximity to the guitar as previously described, with the second microphone on a stand a few feet away to capture the room's ambience. Blending the two sources can produce excellent results.
Fig. 2
text_image
Bridge Placement 12th Fret PlacementFig. 3
text_image
Top View Mlc is aimed directly at center of loudspeaker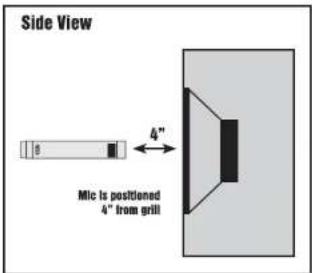
text_image
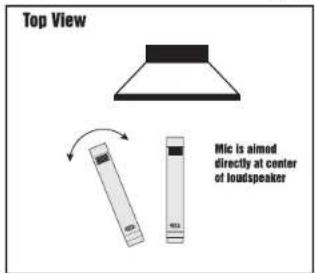
Side View 4" MIC is positioned 4" from grillWhile the electric guitar can certainly be recorded directly, there are times when there is simply no substitute for the sound of a real amplifier. Guitar amps have particular gain stages that facilitate the popular "crunch" guitar sound. While digital modeling and processing systems certainly have their place, they may not have the same level of realism as the sound from an amplifier. A small guitar amp can be just as effective for this application as a stack, because you don't necessarily need to "crank" the volume. Instead, you want to increase the amp's initial gain to achieve the desired amount of overdrive.
Typically, a guitar amp is close miked to achieve the highest direct sound. Placing the microphone roughly 4 inches from the grill, aimed directly at the center of the loudspeaker will
produce the most "edge" to your sound. By angling the microphone slightly off axis and towards the wall, you can add more "room sound." Experimentation is a key factor in achieving the sound you are looking for. (see Fig. 3)
Placement of the amp is another important factor. If the amplifier sits on a carpeted floor, you are more likely to reduce the amount of brightness in the sound. Similarly, elevating the amplifier off the floor may result in a loss of low end. If you're looking for a big reverberant tone, placing the amp and microphone in the bathroom is another popular technique. The hard tiles and other reflective surfaces can do wonders for a dull sound. In this case, move the microphone back a few feet from the loudspeaker and crank it up!