
Sundome 12x10 - Zelt COLEMAN - Kostenlose Bedienungsanleitung
Finden Sie kostenlos die Bedienungsanleitung des Geräts Sundome 12x10 COLEMAN als PDF.


Benutzerfragen zu Sundome 12x10 COLEMAN
0 Frage zu diesem Gerät. Beantworten Sie die, die Sie kennen, oder stellen Sie Ihre eigene.
Eine neue Frage zu diesem Gerät stellen
Laden Sie die Anleitung für Ihr Zelt kostenlos im PDF-Format! Finden Sie Ihr Handbuch Sundome 12x10 - COLEMAN und nehmen Sie Ihr elektronisches Gerät wieder in die Hand. Auf dieser Seite sind alle Dokumente veröffentlicht, die für die Verwendung Ihres Geräts notwendig sind. Sundome 12x10 von der Marke COLEMAN.
BEDIENUNGSANLEITUNG Sundome 12x10 COLEMAN
When You Are Ready To Set Up Your Tent
-Select a level campsite clear of rocks, branches and other hard or sharp objects.
-Do not set up your tent under trees.
-For best results in windy conditions, position the end of tent into the wind.
- See owners manual for more tips.
Main Tent Poles
Rainfly Poles
POLE ASSEMBLY PARTS
Part No. 9260-128
Part No. 9260-130
Part No. 9260-129
Rainfly Part No. 9260C131
1 Layout & Positioning of Tent, Pole Assembly
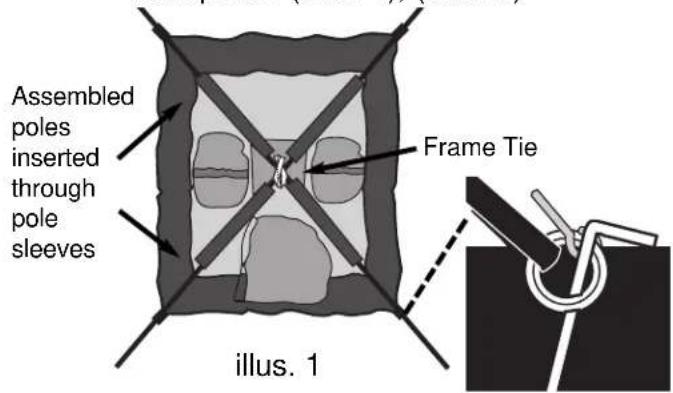
-Layout and position tent with door facing desired direction. (illus. 1)
-Unzip door
-Stake down tent using the rings of the pin & ring system at the corners of the tent. Keep the floor taut. (illus. 2)
-Assemble Frame Poles by interlocking shock-corded poles. This will make two long poles.
-Insert the poles diagonally into Pole Sleeves. The center of the poles should cross forming an "X" in the middle of tent. (illus. 1)
—Fasten Frame Tie on top of tent over both poles. (illus. 1), (illus. 3)
text_image
Assembled poles inserted through pole sleeves Frame Tie illus. 1illus. 2 Tent stake through ring
2 Connect Frame to Tent -Insert one end of Main Tent Pole end
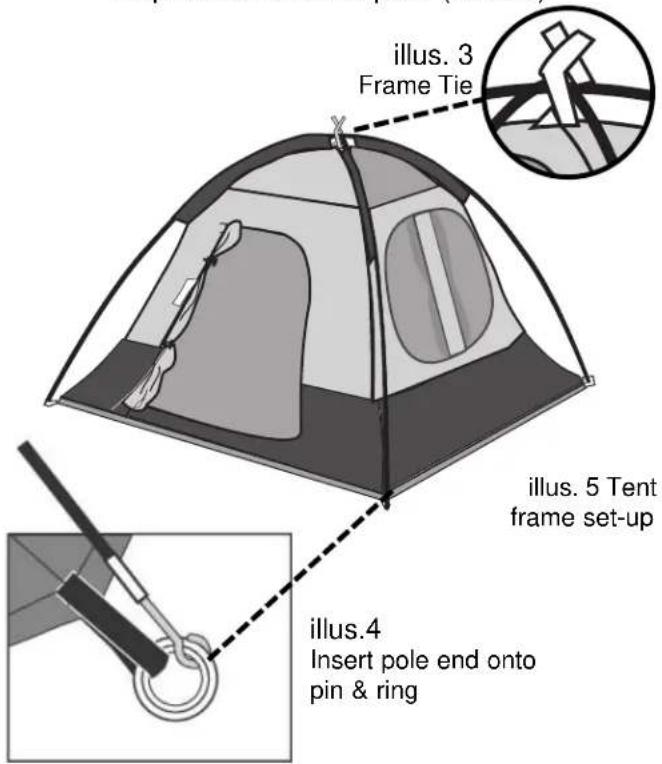
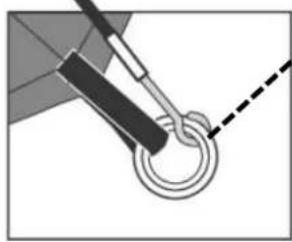
-Insert one end of Main Tent Pole end onto pin of pin & ring system at tent corner on tent (illus. 4)
-Go to opposite end of pole and gradually apply pressure to the pole forming an arch until you are able to insert the opposite pole end onto pin & ring system
-Repeat for second pole (illus. 5)
text_image
illus. 3 Frame Tie illus. 5 Tent frame set-up illus.4 Insert pole end onto pin & ring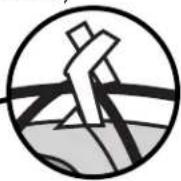
natural_image
Diagram showing a rope knot being lifted by a string, with no text or symbols present3 Attach Tent to Frame Using Frame Clips
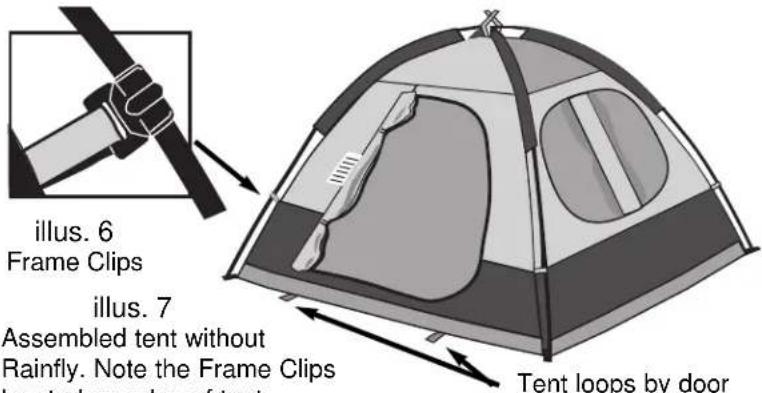
-Attach Frame Clips along the edges of tent to frame poles (illus. 6), (illus. 7)
- Make any adjustments to the tent corner stakes that are needed.
-Stake down tent loops in front of "D" style door.
text_image
illus. 6 Frame Clips illus. 7 Assembled tent without Rainfly. Note the Frame Clips Tent loops by doorTent loops by door
4 Attach Rainfly -Assemble Rainfly Poles
-Assemble Rainfly Poles by interlocking shock-corded poles
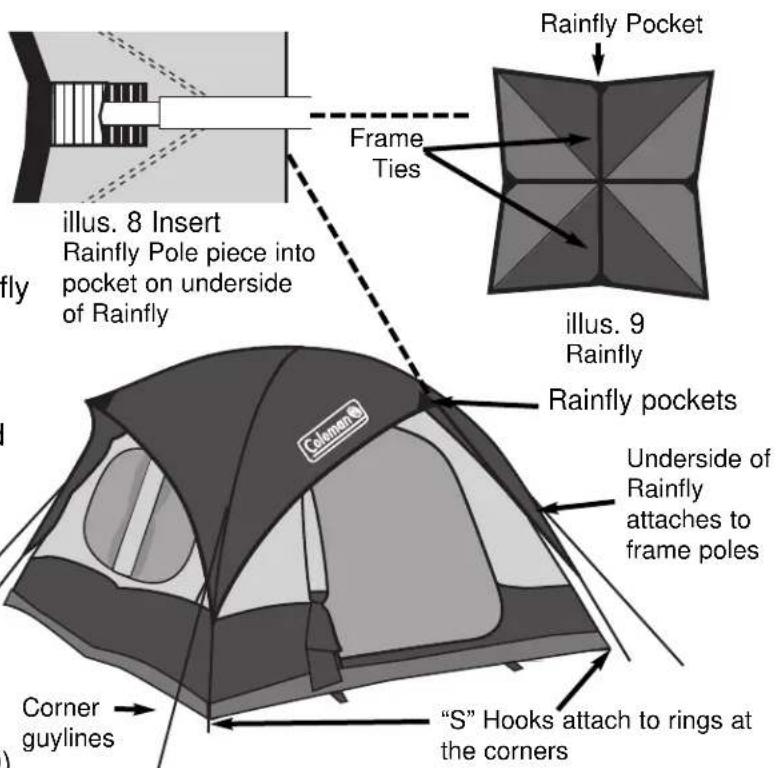
-Insert Rainfly Poles into reinforced pockets located at the center edges of the underside of Rainfly (illus. 8), (illus. 9)
-Tie underside of Rainfly to the Rainfly Poles with Frame Ties (illus. 9)
—Drape Rainfly over tent frame, pole side down. The longer Rainfly Pole should point out over front door and rear window and the short rainfly pole points over the side windows.
-Connect the four elastic loops with "S" hooks, (found at the Rainfly corners) to the four rings of the pin & ring system located at the corners of the tent.
-Secure Rainfly with Frame Ties located on underside of fly (illus. 10)
-Stake out tent with (4) corner guylines (illus.10)
text_image
Rainfly Pocket Frame Ties illus. 8 Insert Rainfly Pole piece into pocket on underside of Rainfly illus. 9 Rainfly Rainfly pockets Underside of Rainfly attaches to frame poles Corner guylines "S" Hooks attach to rings at the cornersillus. 10 Completed tent with Rainfly. Note where Rainfly Pole pockets, pin & rings, and frame ties are located
Things You Should Know
• Under certain conditions (cold weather, high humidity, etc.) condensation will form on the inside surfaces of your tent. Condensation is caused by water vapor from your breath, perspiration, or any wet clothing inside your tent. It is NOT LEAKAGE through the tent fabric. It can be minimized by removing wet clothing from your tent and by providing good ventilation through the tent.
- Never store tent, even for a short period of time, without drying it thoroughly and brushing off caked dirt. Do not pack stakes or poles inside your tent. Use separate storage bag.
- STAKES SHOULD BE REMOVED BY PULLING ON THE STAKE ITSELF. NEVER PULL ON THE TENT FABRIC OR TENT STAKE LOOP TO REMOVE STAKE.
• TENT POLES SHOULD NOT BE LEFT TELESCOPED TOGETHER DURING STORAGE. - Seam sealer has not been provided with your tent. It is necessary and we recommend seam sealing your tent prior to camping. Seam sealer may be purchased through your local retailer or at your local sporting goods store.
PRINTED IN THAILAND REV. 6/01
- Do not leave your tent set-up for weeks at a time, be aware that exposure to the ultraviolet rays of the sun can seriously damage nylon material and/or cause it to become discolored.
• See owners manual for more tips.
WARNING: KEEP ALL FLAME AND HEAT SOURCES
AWAY FROM THIS TENT FABRIC. This tent meets the flammability requirements of CPAI-84. The fabric may burn left in continuous contact with any flame source. The application of any foreign substance to the tent fabric may render the flame-resistant properties ineffective.

text_image
ColemanTHE COLEMAN CO., INC.
3600 N. Hydraulic • Wichita, Kansas 67219
1-800-835-3278 • www.coleman.com
MADE IN KOREA, ASSEMBLED IN THAILAND