AWG 3800 - Waschmaschine WHIRLPOOL - Kostenlose Bedienungsanleitung
Finden Sie kostenlos die Bedienungsanleitung des Geräts AWG 3800 WHIRLPOOL als PDF.


| Produkttyp | Waschmaschine |
| Marke | Whirlpool |
| Modell | AWG 3800 |
| Abmessungen (H × B × T) | 85 cm × 60 cm × 54 cm |
| Gewicht | ca. 62 kg |
| Fassungsvermögen | 5,5 kg |
| Energieeffizienzklasse | C (gemäß EU-Richtlinie) |
| Jahresenergieverbrauch | ca. 180 kWh |
| Wasserverbrauch pro Waschgang | ca. 45 Liter |
| Schleuderderhzahl maximal | 800 U/min |
| Programme | Baumwolle, Pflegeleicht, Feinwäsche, Schnell, Spülen, Schleudern, Abpumpen |
| Zusatzfunktionen | Startzeitvorwahl, Temperaturwahl, Schleuderderhzahlwahl |
| Anschlussspannung | 220-240 V ~ 50 Hz |
| Anschlussleistung | 2000 W |
| Wasseranschluss | Kaltwasser, 3/4 Zoll |
| Geräuschpegel Waschen | ca. 62 dB(A) |
| Geräuschpegel Schleudern | ca. 78 dB(A) |
| Reinigung und Wartung | Flusensieb reinigen, Trommel reinigen, Zulaufschlauch prüfen |
| Ersatzteile | Heizstab, Motor, Pumpe, Türdichtung, Riemen |
| Reparaturindex | 7,5/10 |
Häufig gestellte Fragen - AWG 3800 WHIRLPOOL
Benutzerfragen zu AWG 3800 WHIRLPOOL
0 Frage zu diesem Gerät. Beantworten Sie die, die Sie kennen, oder stellen Sie Ihre eigene.
Eine neue Frage zu diesem Gerät stellen
Laden Sie die Anleitung für Ihr Waschmaschine kostenlos im PDF-Format! Finden Sie Ihr Handbuch AWG 3800 - WHIRLPOOL und nehmen Sie Ihr elektronisches Gerät wieder in die Hand. Auf dieser Seite sind alle Dokumente veröffentlicht, die für die Verwendung Ihres Geräts notwendig sind. AWG 3800 von der Marke WHIRLPOOL.
BEDIENUNGSANLEITUNG AWG 3800 WHIRLPOOL

text_image
Whirlpool HOME APPLIANCES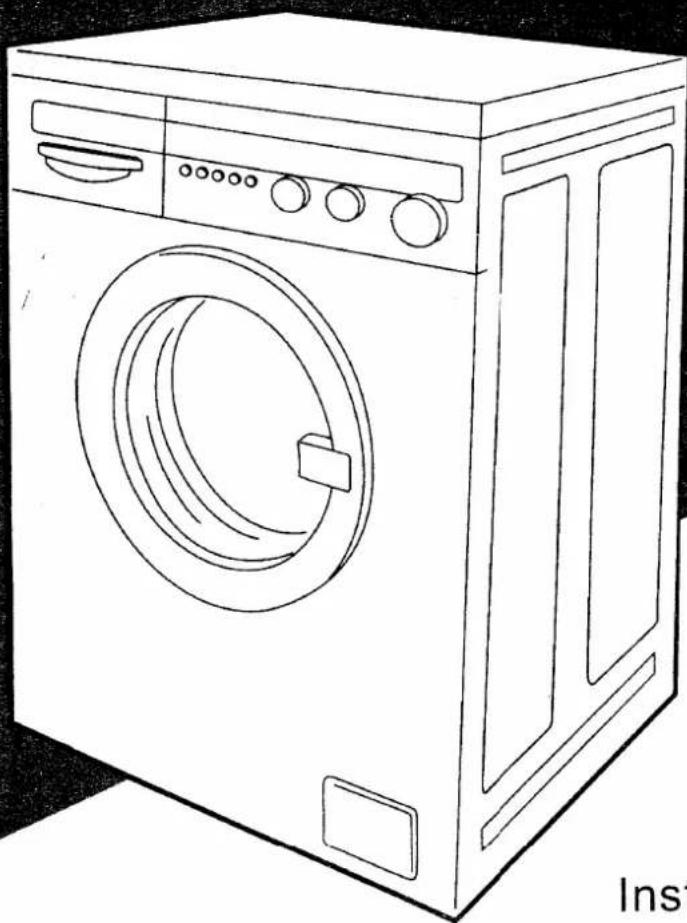
natural_image
Line drawing of a front-loading washing machine with control panel and door (no text or symbols)Whirlpool
Washer Dryer
Instruction for Use
惠而浦
洗衣乾衣機
使用說明書
AWG 3800
text_image
A B C D 1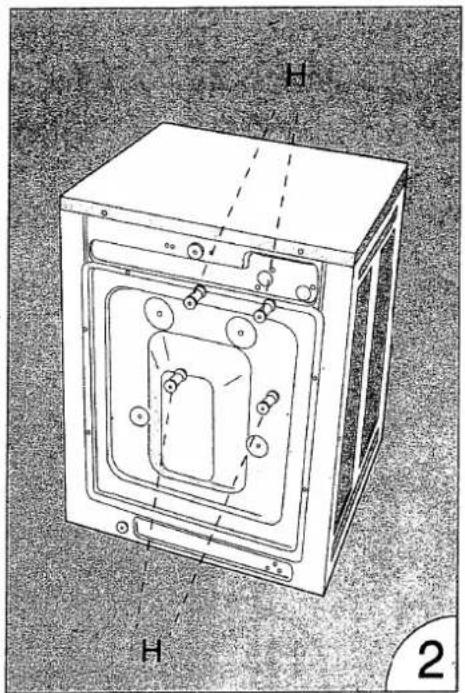
text_image
Technical diagram of a mechanical device with labeled components H and numbered section 2
natural_image
Illustration of a washing machine with motion arrows indicating changes (no text or symbols)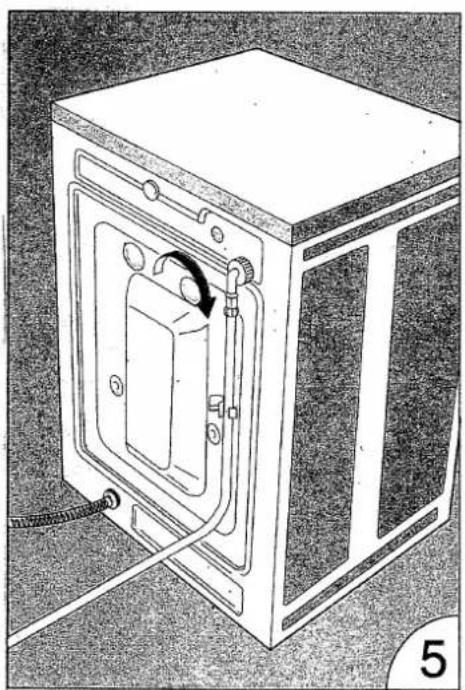
natural_image
Technical line drawing of a mechanical device with internal components and wiring (no text or symbols)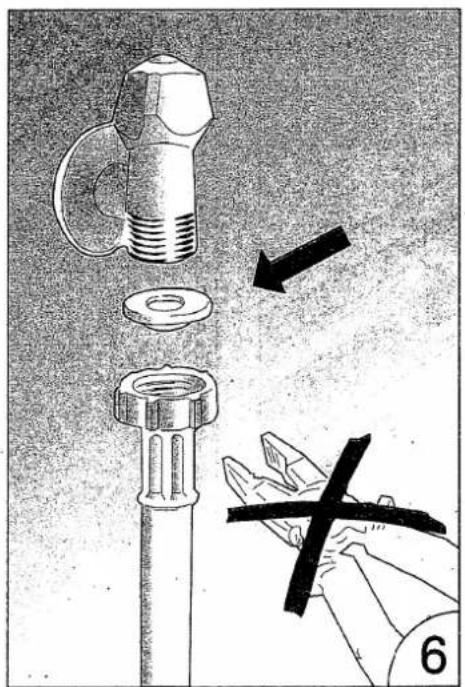
text_image
Technical diagram showing a mechanical assembly with labeled parts and an arrow indicating direction, including a cross symbol.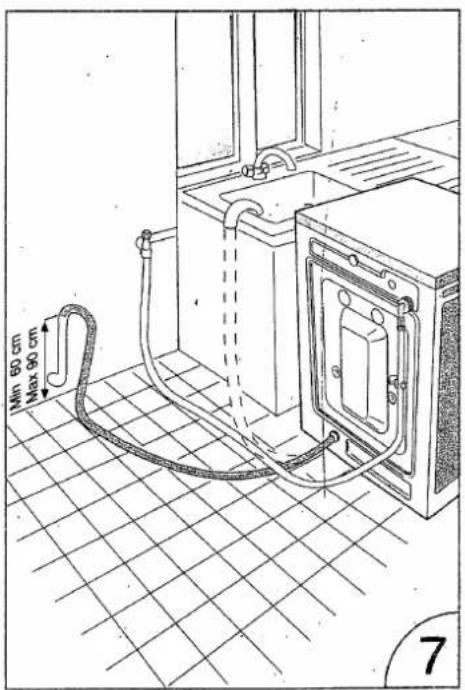
text_image
Min 60 cm Max 90 cm 7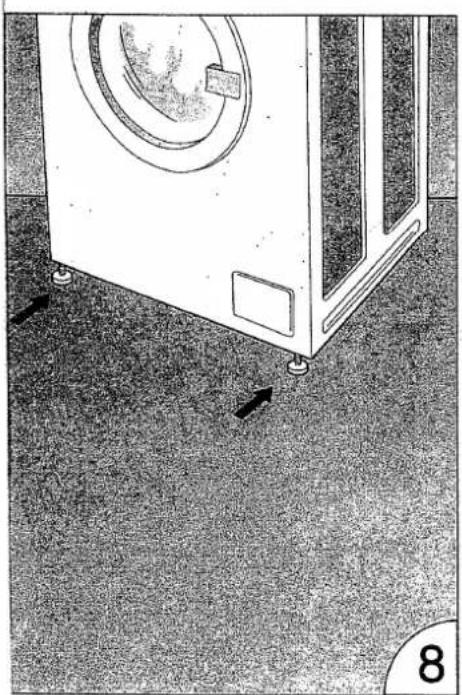
natural_image
Illustration of a washing machine with mounting feet and floor tiles, no text or symbols present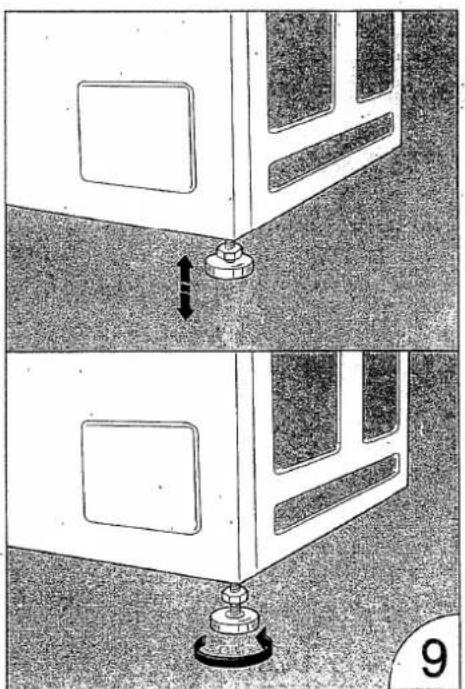
natural_image
Diagram showing a mechanical assembly with a central knob and a rotating base, no text or symbols present
natural_image
Illustration of a hand holding a small object inside a circular container with a curved arrow indicating motion (no text or symbols)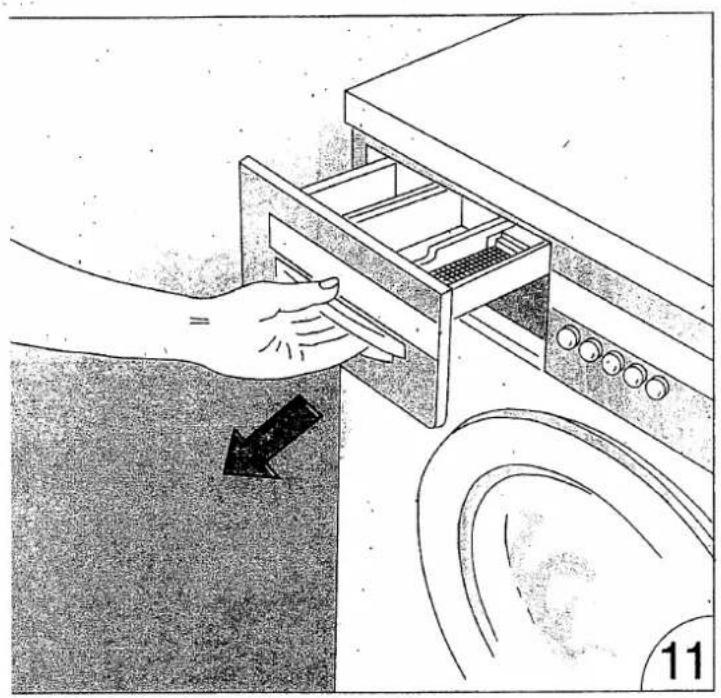
natural_image
Illustration of a hand inserting a device into a washing machine, with a black arrow indicating the process (no text or symbols present)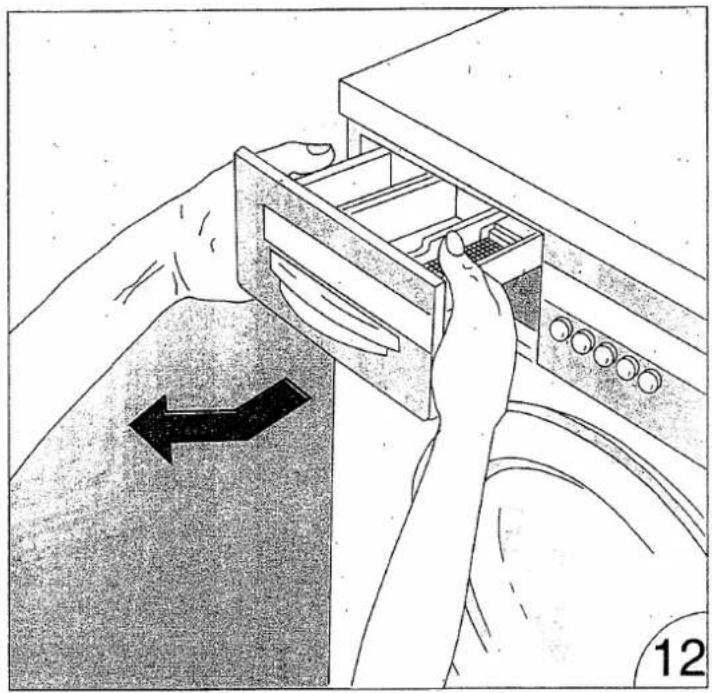
natural_image
Illustration of a hand inserting a drawer into a washing machine, with a black arrow indicating left motion (no text or symbols)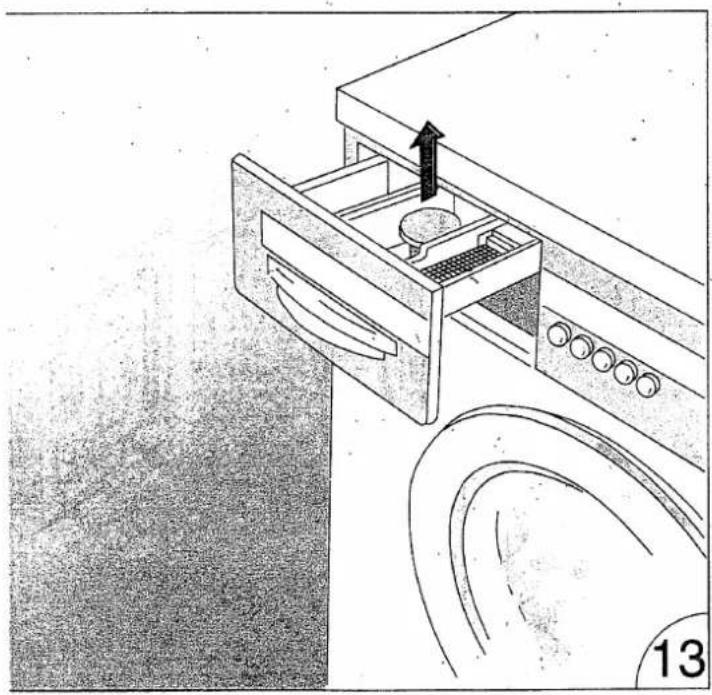
natural_image
Diagram of a microwave oven with a door handle and vent, showing airflow direction (no text or symbols)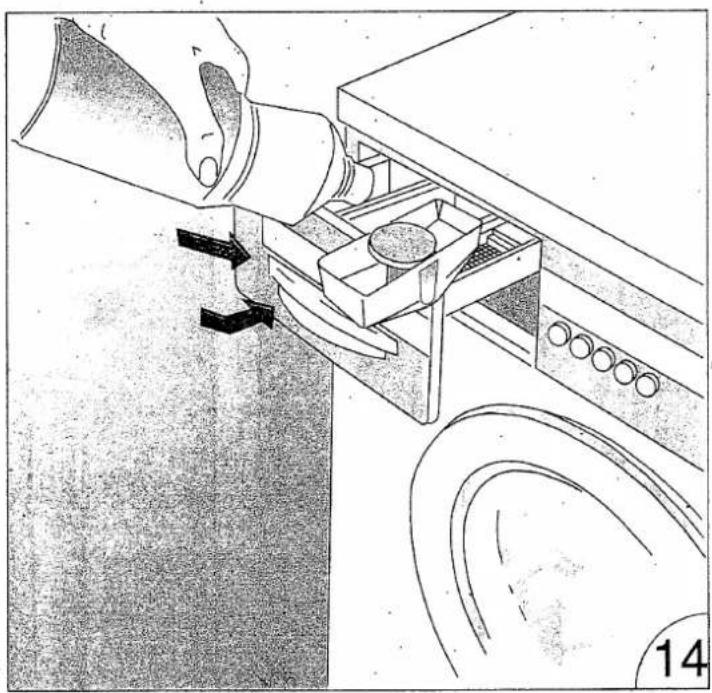
natural_image
Illustration of a hand using a tool to lift a mechanical component into a machine (no text or symbols visible)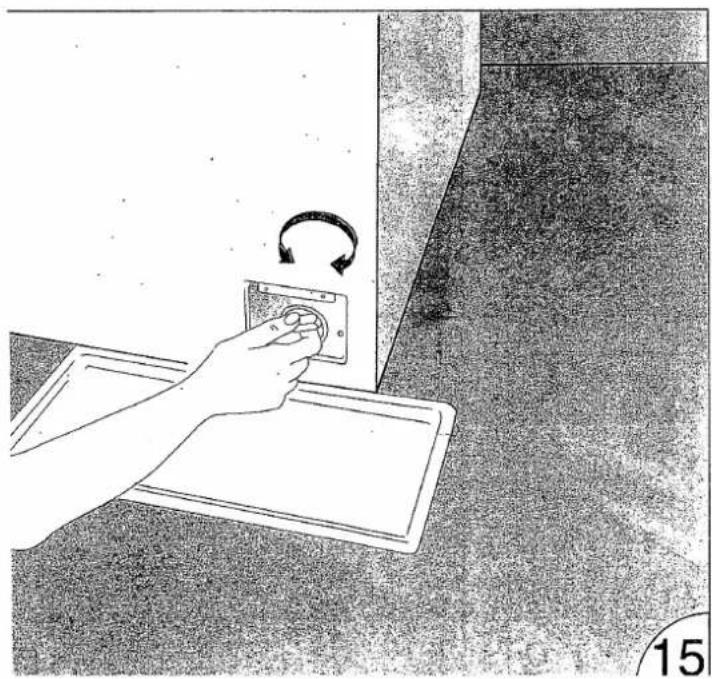
natural_image
Hand placing a wall-mounted switch with a circular arrow indicating rotation (no text or symbols)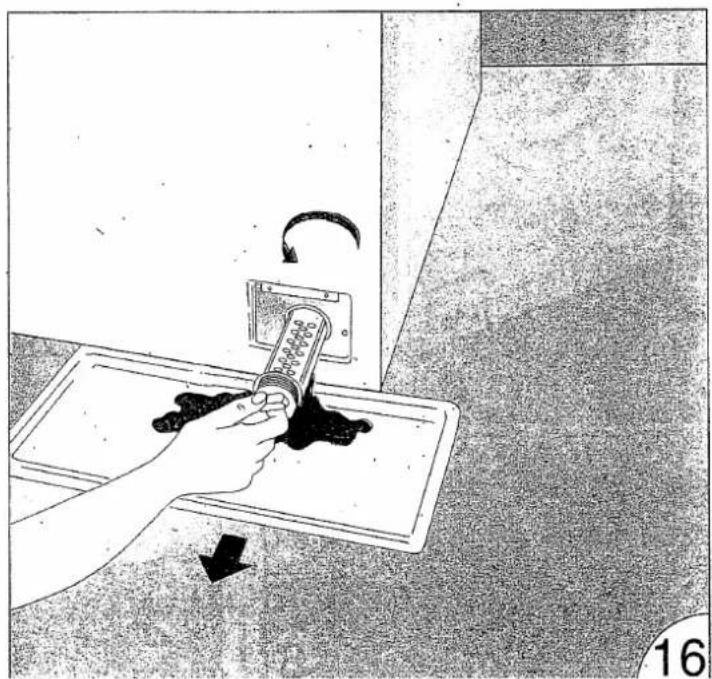
natural_image
Illustration of a hand using a tool to press or install a component, with arrows indicating motion (no text or symbols)Index
To safeguard the environment ....1
Installation .... 1
General information on wash 2
Preliminary operation and loading 4
Using laundry products 4
Use of your washing machine 5
Optional functions....6
Taking regular care of your machine 6
What to do if you think your machine is faulty 6
Power problems 7
Incorrect use....8
Stain removal 9
Programme chart....10
Use of machine as a dryer 11
To safeguard the environment
Packaging
Take recyclable packaging materials to the nearest collection point.
Warning
Before using your appliance please read the instructions carefully. They contain important advice about the use, installation and care of your appliance. Please keep this booklet in a safe place for future users.
The manufacturer cannot be held responsible for any injury or damage to persons, animals or property if the following advice has not been observed.
- After unpacking, please make sure that the appliance is undamaged. In case of doubt, do not use the appliance but call for a qualified technician or your dealer. Packaging material (plastic bags, polystyrene parts, nails, etc.) must be kept out of the reach of children as it constitutes a potential risk, e.g. of suffocation by plastic bags, etc.
- Only use the appliance for domestic use and for its intended purpose, that is washing laundry.
- Installation must be carried out by a qualified technician, following the manufacturer's instructions.
- Before connecting the appliance, please make sure that the data shown on the rating plate correspond to those of your home. Electrical safety is ensured only if the appliance is correctly earthed as prescribed by safety standards for electrical installations. It is imperative to that this fundamental safety requirement be checked. In case of doubt, careful inspection of the house wiring must be carried out by a qualified electrician.
- Before any electrical and hydraulic connection, please make sure that the data given on the rating plate correspond to those of your home. Please check that the section of the socket wires can withstand the power absorbed by the appliance, which is stated on the rating plate. In case of doubt, please contact a qualified technician.
- If the plug and the wall socket do not comply, have the socket replaced by a qualified electrician. The use of adapters, multiple sockets and extension cords is not advisable. If absolutely necessary, use simple or multiple adapters and extension cords in compliance with local safety regulations, paying attention not to exceed the maximum amperage, which is marked on the simple adapters and on extension cords and that of the total power marked on the multiple adapters.
- Before any cleaning or maintenance operation, disconnect the appliance from the mains by switching off the electricity at the mains or by pulling out the plug.
- Do not leave the appliance switched on unnecessarily. Switch off at the mains switch and close the water tap.
- For any repair, call in a specialist or our customer service through one of our Service Centres and ask for original spare parts.
-
Disconnect any disused appliance or render it unusable. Remove the door lock or render it inoperable to prevent children from being locked inside or cutting off its power cable. Ensure that the appliance is disposed properly and safely.
-
When using the appliance or any electrical appliance, you must follow these basic safety rules:
- do not touch or operate the appliance with wet hands or when barefoot:
- do not pull the cable to unplug, but the plug itself.
- do not expose the appliance to the weather (rain, sun, etc.)
- do not allow the appliance to be operated by young children without surveillance.
- Built-in models must be installed under a worktop so as to ensure a perfect stability.
- Do always wash a full load to save water and energy.
- If you need to wash a lightly soiled load, use an energy saving programme i.e. wash at 60°C instead of 95°C.
- If your wash load is lightly soiled, run a programme without pre-wash.
- After an emergency, your washing machine is completely waterless. We suggest, after repositioning the filter, you pour 0,5 l water through the detergent dispenser.
- Store detergent and water softener in a dry place, out of the reach of children.
- Do follow the detergent manufacturer's recommendations for detergent quantities and our suggestions for partial loads. With an half load, only use 3/4 of the recommended detergent quantity and with a minimum load (1 kg approx.), only use half dose.
- Do remove all loose items such as pins, coins and paper handkerchiefs from pockets before washing.
- Do follow the advice given on the garment label for the maximum load temperature or for the possibility to be washed in the washing machine.
- Do not open the door during a programme unless absolutely necessary since very hot water could overflow. Should this be absolutely necessary, please follow the instructions given under chapter "RECOVERING YOUR CLOTHES WHEN THE MACHINE IS NOT WORKING".
Installation
Transport brackets
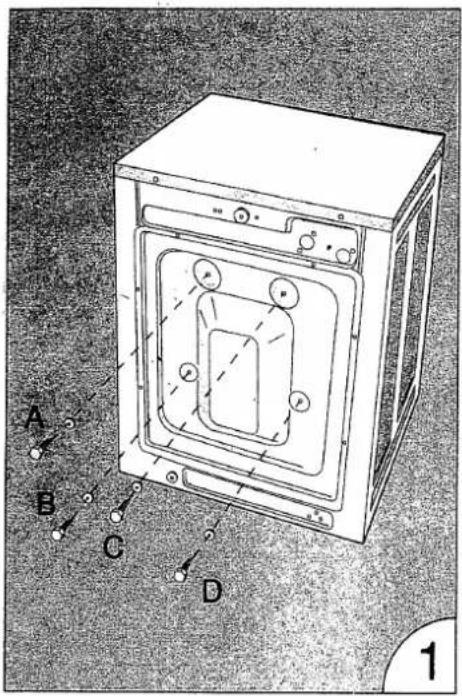
Remove screws A B C D fixing the tub during transport, following sequence of Fig. 1 and 2. Insert a screwdriver in the free holes and moving it, drop the four spacers (H) and recover them. It is important to recover the spacers (H) as if they are left inside the machine they could damage it and, in case of future transport, they must be used to fix the tub.
Moving the machine
Move the machine as close as possible to its final operating position. If using the mobility wheels, move machine by pulling on the two lever handles (Fig. 3). If the machine is occupied with mobility wheels, these can be lowered by pulling out the two levers. To raise wheels push inwards so that the two handles fit into the recess in the kick plate (Fig. 4).
Water connection
You should observe local rules and by laws regarding connection to the water supply and drain.
Filling hose
If the water fill hose is packed in the door window, it should be fitted to the water inlet at the rear of the machine (Fig. 5).
Remove fittings from the plastic bag and locate the filter into the end of the filling hose as shown (Fig. 6).
Screw the filling hose connector onto the cold tap. You should not need tools to effect a satisfactory seal.
Excessive force may damage the connections. Your machine will operate from a wide range of water pressures: minimum 5/cm ^2 to maximum 100 N/cm ^2 .
If your water pressure is very high or very low, or if you encounter any other difficulty, consult a qualified plumber.
Drain hose
If a plastic stand pipe is provided it should be of a high temperature resistant type and not less than 32 mm dia.
The height of the pipe must be between 60 cm and 90 cm above the floor.
The drain must have a capacity of 30 litres per minute, otherwise it will overflow. Alternatively, the drain hose may be hooked over your sink edge but ensure it cannot easily become dislodged and beware that very hot water will be discharged at times which could be hazardous especially if you have children (Fig. 7).
In case of any difficulty, consult a qualified plumber.
Note: To avoid the possibility of syphoning it is essential that the drain hose is not an airtight fit in the standpipe.
Electrical connection
This product is manufactured to comply with the radio-interference requirements of the Council directive 87/308/EEC.
Before using this appliance ensure that the voltage in your home corresponds with the voltage indicated on the machine rating plate, which can be found at the rear of the machine.
Warning: this appliance must be earthed. The producer declines any responsibility for damage caused by failure to observe this rule. You are therefore advised to check that your household supply has an efficient earth and it is in compliance with local rules and by laws.
We advise against the use of adaptors or extension leads for the connection of your machine.
If absolutely necessary, use only approved types having a current rating at least equal to that of the machine.
If the plug fitted to your machine is not suitable for your electricity outlet, it must be replaced by a suitable alternative. For this or any other doubt or problem consult a qualified electrician.
Leveling your machine
Having completed the water and electrical connections, move your machine into its operating position.
To minimise vibration and noise during spinning your machine must be in firm contact with a well supported or preferably solid floor.
Failure to level the machine could lead to instability and consequent damage also to adjacent equipment.
Both front feet can be adjusted in order to level the machine (Fig. 8-9). Lock feet by screwing up the circular locking rings so that they are in firm contact with the underside of the machine.
Door opening (Fig. 10)
Open the door pulling the handle. Do not force the handle to open the door. If it does not open easily, switch off the machine and wait two to three minutes to allow for the door locking device to release.
Attention: Please put your washing machine in dry area. Bathroom and toilet are not the suitable location for installation.
General information on wash
Preparing the clothes for the wash
Before loading the clothes into the machine, check the following points:
| Empty pockets: | loose change or paper handkerchiefs may get caught in the pump. |
| Close zippers and hooks: | they may catch and snag other articles being washed in the same load |
| Mend rips and tears: | even gentle washing makes a small hole bigger. |
| Tie belts or apron strings: | to prevent garments wrapping round each other. |
| Treat difficult stains: | according to the stain removal guide. |
Load capacity
| Average/lightly soiled cottons | max.4.5 to 5.0 kg | |
| Heavily soiled cotton | max.4.0 | kg |
| Easy care fabrics | max.2 | to 2.5 kg |
| Delicate fabrics | max.1.5 | kg |
| Wool | max.1.0 | kg |
Do not overload the machine, and keep to the loads suggested.
Washing weights
| Article | Approx. weight (g) |
| Bathrobe | 1200 |
| Overalls | 400 - 600 |
| Quilt cover | 700 - 1000 |
| Sheet | 500 - 700 |
| Blouse | 100 |
| Bath towel | 800 |
| Hand towel | 150 - 200 |
| Tea towel | 100 |
| Shirt | 200 |
| Vest | 100 |
| Underpants | 50 |
| Pillowcase | 200 |
| Pajamas | 450 |
| Napkin | 50-100 |
| Handkerchief | 20 |
| Medium tablecloth | 400 |
Weights given are approximate and apply to cotton or linen.
Sorting the clothes
Articles with a care label
You will find a care label on many of the clothes you buy indicating the type of wash treatment suitable. Commonly found examples are as follows:

White cotton and linen articles without special finishes

Cotton, linen or viscose articles without special finishes where colours are fast at 60°C

(Not used in UK) White nylon and white polyester/cotton mixture are included in

Nylon, polyester/cotton mixtures, polyester, cotton and viscose articles with special finishes, cotton/acrylic mixtures

Cotton, linen and viscose articles, where colours are fast at 40°C but not at 60°C

Acrylics, acetate and triacetate, including mixtures with wool, polyester/wool blends

Wool, wool mixed with other fibres, silk

(Not used in UK) See items included in 📁 and 🌐

(Not applicable in UK) White: cotton and linen articles with special finishes

Handwash (do not machine wash)

Do not wash
The significance of the wash tub symbols:
No bar

normal (maximum) machine action
Bar

reduced (medium) machine action
Broken bar

much reduced (minimum) machine action
Wash tubs should be labelled as follows:

Wash as cotton

Wash as synthetics

Wash as wool
In each case a similar phrase, e.g. wash in cotton cycle, wash in cotton programme, etc., may be found.
Mixing wash loads:
As a general guide you can mix wash labels without a bar provided you wash at the temperature shown


can be washed together at 40°C.
Likewise, you can mix wash labels with and without a bar provided that you wash at the lowest temperature. BUT you must also reduce the washing action.
REMEMBER: "Wash separately" means what it says.
Articles with no care label.
- No label but the name of the material is given
Sort according to the fabric e.g. cotton or wool.
- No care label and the fibre content is mixed, e.g. polyester/cotton
When this happens sort the article into the group for the fibre needing the lower wash temperature, e.g. polyester/cotton should be washed as polyester.
- No care label and no clues :
The safest thing to do in this case would be to dry clean the article in especially if it is a favorite or its replacement would be expensive. If you judge an article could be washed, then carefully hand-wash or use a delicate or fine fabric programme on the machine. BUT REMEMBER, if you wash instead of dry cleaning you take the risk that the garment could shrink or loose its shape, or the colour could
Hand wash label
When the article shows a hand in the washtub it means that THE ARTICLE CANNOT BE MACHINE WASHED. This is the handwash label. There are usually good reasons for a handwash label:
- to protect the finish, e.g. pleats;
— because the colours can run even at the lowest temperature in your machine;
– the trimmings, buttons, or edging will not stand machine washing; - it will shrink or lose its shape because even the agitation on the gentlest programme is too much.
If label says "handwash" it is safest to do just that. If you think that the garment can be machine washed, then use a delicate or fine fabric programme.
Do not wash label
This label, with the washtub crossed out, means that THE ARTICLE CANNOT BE WASHED AT ALL.
Washing special items
Woolen clothes
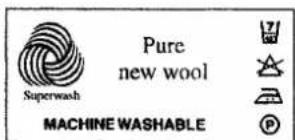
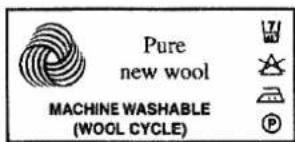
Many woolen garments can now be safely washed in the machine. Check the label on your garment. Here some examples of machine washable labels.
text_image
Superwash Pure new wool MACHINE WASHABLE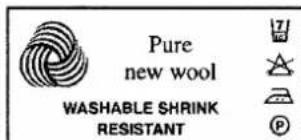
text_image
Pure new wool WASHABLE SHRINK RESISTANT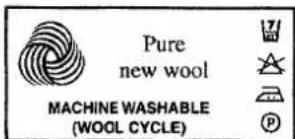
text_image
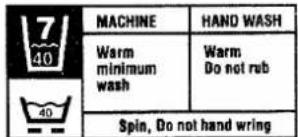
Pure new wool MACHINE WASHABLE (WOOL CYCLE)| 7 40 | MACHINE | HAND WASH |
| Warm minimum wash | Warm Do not rub | |
| Spin, Do not hand wring | ||
The quality of woollen garments varies considerably and unless the article is labelled there is no way of knowing if it is shrink resistant or if the dye is fast.
- Only woollen garments showing a machine washable label can be washed in your machine.
- If you have any doubts, garments should be hand washed or dry cleaned. Hand knitted bulky knit and delicate woollen garments should always be handwashed or dry cleaned and should not be spun in the machine.
- No special detergent is needed in the machine for washing wool.
Choose the same detergent as you use for the rest of the wash.
Note:
- Never delay the final spin when washing wool. The long soak in rinse water could damage woollen garments.
Machine with half load option
- This cannot be used on the wool programme. The reduced water level causes an increase in friction which could shrink woolen garments.
Blankets
Always check the label to see whether the blanket is machine washable.
- Woollen blankets labelled machine washable should be washed as wool.
- Cellular woollen blankets like those used for children shrink easily and need to be dry cleaned or hand washed.
- Blankets made from synthetic fibres (Acrylan, Orlon) should be washed as synthetics.
- Double sized synthetic blankets may not fit into the wash drum because of their bulk and will need to be dry cleaned.
Curtains
Curtain material is often weakened by daily exposure to dust and sunlight. If you suspect the material has been affected, wash the curtains on a delicate wash or have them dry cleaned. Unfortunately once the material has started to rot, splits may appear in weak areas of the fabric however gently the curtains are handled.
Net curtains (white nylon/white polyester)
These are often dusty and may have become yellowed. 1 1/2 kg is the maximum amount you should wash in any load. If you put in more, you will crease the curtains. Use the rinse and spin programme (with the spin on a low setting) to remove the dust then wash on a synthetic programme at 50°C - 60°C. If white curtains eventually become yellow whiteness can be restored by using a proprietary fabric whitener. Follow the directions on the pack.
Loose covers
If you are unsure about the washing properties of the fabric, it is always best to dry clean loose covers in case they shrink. Remember to close any zips or fastenings before you put the loose covers in the machine. Machine washable fabrics should first be rinsed in the machine using the rinse and spin programme - this will remove most of the loose dust.
After the wash, replace the covers slightly damp - the material can then be pulled back into shape and the piping straightened.
Wired bra's
Unfortunately the wires in these bra's often become detached, slip through the holes in the drum and then cause quite extensive damage to the machine. The loose wire also rusts and then marks other garments. Because of the high risk of machine damage, please wash wired bra's by hand or see they are well secured inside a pillowslip or drawstring bag during the wash.
Synthetic and drip dry fabrics
Your washing machine has programmes specifically designed to wash these fabrics. The special conditions that all these programmes have in common to avoid creasing are:
– High water level for the wash. This allows clothes to move freely with the minimum agitation.
– Low wash loads are specified so that garments are not packed tightly together.
- We recommend that the final spin is delayed so that you can be on hand to hang up the clothes as soon as they are spun.
- A low spin speed is recommended. Washing synthetic fabrics on the correct programme will give the best results, but if you wash mixed loads or vary the programme number, remember that creasing is caused by:
- overloading the drum;
- using a wash temperature which is too high;
– using a fast spin speed;
– leaving the clothes in the drum once they have been spun.
Easy care cotton
Many household item like sheets, quilt covers, and curtains are now made from easy care cotton materials. Wash the article on the programme suggested but make sure that:
– the maximum load is 2 kg
-a slow spin speed is used.
Washing these materials as part of a large load or spinning them at high speed will cause them to crease.
Sport clothes
Track suits and dance outfits are made in materials which can take hard wear but need to be treated gently in the washing machine. Always check the care label and wash synthetic stretch materials at a maximum temperature of 40°C.
Preliminary operation and loading
Preparing the wash load
Sorting the washing
Sort the washing according to the type of fabric and the wash temperature required (observing recommendations given on care labels). Separate whites and coloureds. Whenever possible put articles of different sizes but of the same fabric type and degree of soiling together in the same wash. For more detailed information, please refer to the programme summary. In order to avoid any damage to the washing, make sure there are no paper clips, hair grips, nails, coins, safety pins etc. left in clothes.
Curtains
They require especially careful treatment. Damage may be caused when removing the curtains from the window. The manufacturer can accept no responsibility for damage that may occur during washing, when the instructions given on the care labels are not observed.
New articles
Excess dye on new, coloured articles can often run into lighter clothes when washed. It is recommended that such articles are washed separately for the first time.
Dyeing/Bleaching
Dyes and bleaches should only be used in the washing machine when explicitly stated by the manufacturer. Observe the instructions exactly. The manufacturer cannot be held responsible for any damage caused if these instruction are not observed.
Loading the clothes
Check that the inlet hose is connected to the tap and that the hose is correctly positioned in the drain. Completely open the water tap. Make sure the machine is plugged in and the socket switched on. Sort the clothes into loads according to the programme chart. Open the door and put he clothes into the machine. Close the door firmly making sure it latches.
Using laundry products
This automatic washing machine has been designed to take account of the latest environmental advances in modern washing machine technology.
Water softeners
The quality of water has been classified dependent its hardness (see water hardness chart). Modern detergents contain water softeners. If the water of your home is hard, increase the detergent quantity. The addition of softeners augments the cost of the wash and could produce excessive foam. You will find the indications on the recommended detergent quantities dependent on the different hardness on the detergent package. Information about the degree of hardness of your water supply can be obtained from the local water board or council.
Water hardness chart
| Category of hardness | Characteristics | German degrees'dH | m mol | French degrees'fH |
| 1 | soft | 0-7 | 0-1,3 | 0-15 |
| 2 | medium | -14 | -2,5 | -2,5 |
| 3 | hard | -21 | -3,8 | -3,7 |
| 4 | very hard | over 21 | over 3,8 | over 37 |
Detergents
Choose a low lather detergent. These are specially made for use in front loading washing machines. If you do not use a low lather detergent, foam will overflow from the machine and the final wash result will be poor.
Always measure the detergent:
- too much can cause overfoaming
- too little can result in unsatisfactory grease and stain removal. It is not possible to be specific about detergent quantities. Increase the detergent quantities:
- if the water is very hard
- if the wash load is extremely dirty. Decrease the detergent quantity:
- when washing in soft water
- when half a load or less is being washed
- when the wash load is only slightly soiled.
Store your detergent in a dry place.
This automatic washing machine is designed for use with any brand of detergent. Detergents are divided in the following categories:
- powder detergents for any type of fabric
- powder detergents for delicate fabrics (40°C max) and wool. Liquid detergents, preferably for programmes without prewash: at a low temperature (60°C max) for any type of fabric or for wool only.
Washing powder
We recommend the following amounts: For a full load: amount recommended by detergent manufacturer. For a half load: 3/4 of the recommended amount. For small load (approx. 1 kg) 1/2 of recommended amount.
Liquid detergent
The amount recommended by the manufacturer should be put in compartment II (main wash only) (see the programme chart).
Notes
Excessive amounts of detergent cause excessive suds and may cause overflowing. Excess suds are detrimental to the washing process and also cause unnecessary pollution. Too little detergent causes white to turn grey and calcium deposits to build up on the heating element and on the outside of the drum. When a programme ends, dark textiles in particular may show white detergent residues. This is not due to inadequate rinsing but to the insoluble water-softening agents used in modern phosphate-free detergents. The white specks can normally be shaken or brushed off, but to avoid them occurring, try a different washing powder or use liquid detergent. Due to modern detergents (powder or liquid) some foam may be seen during the final rinse or when spinning. This does not make the rinse any less effective.
Bleach
Detergents recommended for use in automatic washing machines contain enough bleaching agent to remove stains. Using a separate bleach will not damage the machine but unless it is used carefully it can weaken and discolour some materials. Difficult stains can be treated individually. See "Stain Removal" Chart.
Fabric conditioner
This gives a softer feel to towels, babies nappies and woollen garments, makes ironing easier and also reduces static cling in synthetic fibres. After spin drying, clothes are marginally drier when fabric conditioner has been used in the wash. Fill the container up to the "Max" mark.
Starch
Remove the wash load from the machine as usual at the end of the programme. Treat separately those items you need to starch.
- Hot water starch - follow the instructions given on the packet.
- Aerosol starch - this is very convenient for treating small areas like collars and cuffs, or if only one or two items need to be starched.
- Aerosol resins/liquid cotton crisper - these are different from the vegetable starches, they do not stiffen the clothes as much, but they do last for more than one wash and are ideal for cotton dresses or blouses which you like to look crisp.
Use of your washing machine
a) Adding the detergent
Open the dispenser drawer by pulling towards you (Fig. 12 - 14). Add the detergent into the appropriate sections, following the quantities recommended by the Manufacturer, or according to the following table:
| Fabric softener | Main wash | Pre-wash | ||
| Choose | Hard water | Soft water | Hard water | Soft water |
| Max level | 1+1/2 cups | 3/4 cups | 1 cups | 1/2 cups |
Note: 1 cup = approx. 100 grams
Close the drawer.
b)Knobs
If your washing machine is provided with push-push knobs, press and they will pop out, then repress the knobs to bring them back to their original position.
c) Wash programme selection
Turn the programmer knob clockwise until the programme you need is shown in line with the vertical index mark.
Attention: Do not force the programmer knob anti-clockwise.
d) Temperature selection
Turn the knob to select the required wash temperature.
e) Spin speed selection
Turn the knob to select the required spin speed.
f) Spin and spin hold selection (if provided)
In machines provided with this knob, you will have the possibility to select spin hold, turning the control knob clockwise to selected position. If you select spin hold, you will find the programme interrupted at the end of the last rinse with the laundry floating in water without creasing. To complete the programme, select the required spin speed, turning the knob clockwise. The machine will drain the water and run the final spin.
g) Drying time selection
Press the half-load/drying button. Turn the timer knob clockwise so that the time selected is aligned to the vertical index mark on the control panel.
h) Programme start
After selecting the programme, the temperature, spin speed (if provided) and any additional function, press the on/off button. The on/off lamp and the door locked lamp (if provided) will light up and the machine will operate.
i) At the end of the programme
The machine will stop with one of the "stop" symbols of the programmer knob in line with the index mark on the control panel. If your machine is provided with the door locked lamp, when this switches off, it indicates that the door can be opened, otherwise Switch off the machine by means of the on/off button and wait for 2 minutes.
Disconnect the machine from the mains supply and close the water tap.
Note: If your washing machine is not provided with The temperature selector and spin speed knobs, it means that selecting the required programme by means of the programmer knob you will have automatically the temperature and spin speed selection.
Optional functions
The wash possibilities may be increased using the optional functions listed hereunder.
Pressing buttons prior to starting the programme, the functions will be activated. At completion of the programme, repress these buttons again to deactivate the functions.
Dependent on models, it is possible to select one or more functions. For further details, consult the programme chart.
Energy saving (if provided)
After selecting programme 1 or 2, press the energy saving button.
Gentle wash (if provided)
Pressing this button, the normal wash action is replaced by a more delicate wash action.
Half-load / wash and dry
This function reduces the quantity of water and energy used. Select this function when your load is less than 2 kg.
Note: Only for washer/dryer combination. If you wish to wash and dry during the same cycle, or you wish to use the only drying cycle, press the half-load button and refer to the programme chart to select drying.
Spin speed reduction (if provided)
Washing machines provided with this button, allow the spin speed to be reduced manually. The reduction spin depends on the programme.
No spin (if provided)
Pressing this button the programme will finish after draining without spinning.
Rinse Hold
Pressing this button, the washing machine will stop before the final rinse. To deactivate this function, press the button. If your washing machine is provided with this automatic function, turn the programmer knob clockwise of one click. The machine will drain the water and run the spin, completing the programme.
Extra rinse
To increase the rinsing action of programmes, press this extra rinse button.
Cold wash
Turn the temperature selection button to 'MIN' prior to starting the programme.
Taking regular care of your machine
The machine has been designed to provide you with years of trouble free washing. Your contribution is to see that parts that need attention the soap dispenser, the pump, and the water filter on the inlet hose are kept clean.
Cleaning the detergent dispenser (Fig. 11 - 14)
– Pull out the drawer as far as possible.
- Remove completely the drawer.
- Take the sections apart and rinse them in running water (the number of pieces varies according to model).
– Dry the sections and refit in their original positions.
- You may also find some clogged detergent in the drawer cavity either on the roof or the base. Remove this with a damp cloth or some kitchen paper.
- To replace the drawer, first locate the rib at the upper rear right hand corner into the slot behind the control panel.
- Position the drawer so that it slides into the left hand slot and give a push. The drawer should now slide in easily. If not, the drawer has not been re-assembled correctly.
Cleaning behind the machine
From time to time you may need to clean behind the washing machine. The fill and drain hoses are long enough to allow you to move the machine without disconnecting them. After cleaning, check that the hose connections are still secure, then push the machine back into place and make sure the machine is level.
Cleaning the pump
We suggest you check the pump and clean it about every six months. Have ready a shallow container that will fit underneath the pump opening and will hold about 1/4 litre of water. Follow the directions for unblocking the pump (see "Unblocking the pump").
What to do if you think your machine faulty
We describe below what your machine will be doing during normal operation
Drum action
The drum revolves clockwise, then anti-clockwise. This reverse tumble action stops the clothes tangling. The drum remain still for long periods as the water heats up and for most of the wash time on the wool programme.
Water levels
On some programmes, such as delicates, the water level is high and reaches the centre of the wash drum door. On other programmes, like cottons, the water level is lower to increase agitation and get the clothes clean. On low level programmes it sometimes looks as though there is no water in the drum: this is because the water is below the level of the bottom of the drum door.
The spin
The machine may start to spin while the drum is still full of water. This helps distribute the wash load and keep the machine balanced during the spin and is quite normal. Because the spin speed is electronically controlled you will hear a change of sound as the drum changes from one speed to another.
Programme times
Some times you may notice that programme times are longer or shorter than normal. The programme time depends on the weight
of the load being washed and the temperature of the incoming water. Your wash load will vary from week to week and the incoming water temperature also varies. The bigger the load and the lower the incoming water temperature, the longer the wash will take, while the combination of a small wash load and high incoming temperature could shorten the wash time considerably.
Opening the door
The door is locked at the end of each programme and can only be opened after switching off the machine and waiting about two minutes for the release mechanism to operate.
Do not try to force the door. Serious damage could result.
Avoiding problems
Overfoaming
Use only low lather detergents otherwise foam will overflow from the machine and onto the floor.
Pump blockages
Before you do the washing go through all the pockets and make sure they are empty. Most pump blockages are caused by items like pins, coins and paper handkerchiefs. Unblocking the pump is messy, time consuming and can be expensive if part of the machine has been damaged by metal objects.
Leaking hose connections
Keep an eye on the hose connections where they joint the tap and where they join the machine. With time the connection may work loose and start to leak.
Keep your machine stable
An unstable machine is noisy, it can vibrate excessively and even move along the floor. First check the location: the machine must be placed on an even properly supported floor. Then make sure the feet are correctly adjusted (see "Levelling your machine"). If the machine is moved for any reason make sure it goes back to its original position. If the machine is fitted with a trolley, make sure the wheels are raised.
Unblocking the pump
First it is necessary to drain the water out of the drum. Read through the instructions before you start because you need to know how to stop the water flooding the floor. If the machine is full of hot water, it is safer to wait until it cools down. Have ready a bucket and a shallow container that will fit underneath the pump opening.
-
Unplug the machine.
-
Turn the tap off.
-
Open the pump door.
-
Drain the water from the machine (Fig. 15 - 16).
If your washing machine is provided with a special drain tube situated to the right of the pump opening (Fig. 17), pull out the drain tube and remove the tap. Place a shallow container under the pump opening. Allow water to flow into the container until full. Replace the tap in the drain tube and transfer the water from the container to a bucket. Repeat the above operation until no more water flows from the machine.
4A. If your washing machine is not provided with a special drain, slightly unscrew the pump cover anti-clockwise until water flows in a shallow container (pay attention not to remove the pump cover completely). Remount the pump cover turning it clockwise and empty the container. Repeat the above operation until no more water flows from the machine (Fig. 16)
-
Replace the tap firmly in the drain tube and push the tube into its housing. Remove the pump cover by turning it fully anti-clockwise (Fig 16). Remove buttons, coins, all traces of fluff and cotton, an rinse the pump cover under the tap. Put your fingers in the pump opening, to make sure no objects remain in the interior of the pump.
-
Re-fit the pump cover. Press the cover inwards, check that both sides are engaged and turn fully clockwise until tight. If the pump cover hasn't been properly locked, water will leak out of the machine during the next wash.
- Reclose the pump door.
Recovering your clothes when the machine is not working
Warning! Take care, The water in the drum could be very hot! If the water in the drum is hot, wait until it cools down. Have ready a large bowl or bucket big enough to hold the clothes which will be soaking wet. If the water is still quite hot, wear rubber gloves or use washing tongs to transfer the clothes to the bowl.
1. If the water is below the level of the bottom of the drum door.
- Push the bowl up to the door.
- Normally you will be able to open the door 2 minutes after the machine has stopped but if the machine is still very hot you may have to wait up to quarter of an hour before you open the door.
- Remove the clothes and shut the door.
2. If the water is above the level of the bottom of the drum door.
Don't open the drum door yet! You need to empty the water from the machine before you can take out the clothes. Read the following instructions right through before you start otherwise you won't know how to stop the water flooding your floor when the first bucket is full. If the water in the drum is still quite hot be very careful and keep children right away from the machine.
- Have a bucket ready to hold the water.
- Unplug the machine.
- Turn off the taps
- Open the pump door, as described in "Unblocking pump".
- Drain the water from the machine using the drain tube and tap, or by partially opening the pump cover.
– Follow the directions under 1 above to open the door and remove the clothes.
– Follow the directions under 1 above to open the door and remove the clothes. - Make sure the tap is firmly in the drain tube.
- Close the pump door.
POWER PROBLEMS
If the machine will not start check:
- Is the machine plugged in and switched on?
- Do the house lights work?
- Is the socket faulty ?
- Is the door closed?
- Is the on/off switch on ?
Power cuts
If there is a power cut do not open the door because water could flood out. If there is a possibility that the power will not be restored for some time, follow the directions under "Recovering the clothes".
Power restored
When the power is restored the original programme will be completed automatically starting from the point at which it was interrupted. The machine will also re-heat the water if the interruption has been of sufficient duration to cause cooling down of the washing water.
Incorrect use
The chart below will help you identify the cause and remedy for some problems.
| Problem | Likely cause | Remedy |
| Water appears on the floor round the machine. | Suds overflowing.Pump cover has not been replaced securely enough after cleaning.Hose connections are not secure. | Change to a low lather detergent or use less detergent.See “Cleaning the pump”See “Avoiding problems |
| No water visible during the wash cycle. | For many programmes the water level is below the door and is not visible. | |
| Programme time is too long or too short. | This often happens. The temperature of the incoming hot and cold water supply varies throughout the year. The lower the temperature of the incoming water the longer the machine takes to wash. | No action necessary just check that the tap(s) are fully opened |
| Door won't open. | Safety lock is in operation. | Ensure machine is switched off.Wait for 2 minutes and try again |
| Machine doesn't spin. | Spin hold has been set. | Disinsert spin hold switch. Select final spin speed, then machine will continue the programme. |
| Machine noisy or making a whining noise. | Probably nothing wrong, it may be caused by spinning an uneven load or it may be the drum's normal noise as it increases speed during the spin. | |
| Machine makes an excessive noise and is unstable during spinning. | Transit fitments have not been removed.Wash load is very smallMachine is not level.Wheels not raised if trolley fitted.Floor is not firm enough. | See unpacking instructions.Retry with larger load.See “Avoiding problems”.Raise the wheels.See “Avoiding problems”. |
| Clothes are not well rinsed. | Detergent has spilled into the fabric conditioner container. | When adding detergent make sure it is in the correct compartment. |
| There is too much foam. | You are using the wrong detergent.You are using too much detergent. | Change to a low lather detergent.Try using less detergent. |
| Detergent remains in the dispenser at the end of the programme. | Tap is not fully open.Water pressure is too low.Dispenser needs cleaning. | Open tap fully.See installation instructions.See “Cleaning the dispenser”. |
| Some fabric conditioner remains in the dispenser at the end of the programme: | Dispenser needs Cleaning | See “Cleaning the dispenser”. |
| Clothes feel wet after spinning. | Speed not selected correctly. | Select correct speed and use the rinse & spin programme. |
| Grease deposits inside the door. | Repeated washing of very greasy articles without a pre-wash, e.g. overalls, nappies. | Use pre-wash programme with detergent regularly. |
| Programme does not proceed.Timer stays in same position. | Water not turned on.Timer in “stop” positionDoor not properly closed.Machine in heating phase. | Open tap fully.Select correct programme.Close door.No action necessary - machine should proceed within 20 mins. |
| Machine heats insufficiently. | Variable thermostat turned down (if fitted).Hot and cold fill hoses transposed (if fitted). | Select correct temperature. Reconnect correctly water supply hoses. |
| Machine does not drain or drains very slowly. | Drain hose linked.Water is syphoning back into machine.Pump, is blocked. | Straighten drain hose. Ensure drain hose is not an airtight fit in stand pipe. Clean the pump - see ‘Unblocking the pump’ |
Please read this carefully, it could save you money
It is inconvenient not to be able to use the machine until the service engineer calls, and to pay for the call if he finds nothing wrong. So before you call for service. – check the lists carefully to see if you can correct the fault yourself; – re-run the programme to check if the fault has cleared itself. If the fault is repeated and you cannot correct it yourself you will have to ring for service. If you need to use the machine it is possible that the particular fault may not apply to all programmes and it may be worth trying an alternative programme to get some washing done before the engineer calls.
Stain removal
Treat stains quickly before they have time to set. Wet the material surrounding the stain with cold water – this prevents the stain from spreading and developing a clearly defined ring round the edge. Then if the garment is washable it should be washed as soon as possible. Use normal detergent or biological detergent if the stains are caused by blood or food. If the stain is not removed by washing then special stain removing chemicals can be applied. Use the stain remover outside the machine then rinse the garment thoroughly after it has been treated.
Many stain removers are poisonous or inflammable and should always be used with care. Read any instructions printed on the bottle and store all bottles well out of the reach of children. Work in a well ventilated room, away from open fires and do not smoke. All types of bleaches and chemicals may be used on white cotton and linen materials, but in all other cases check the stain remover first on part of the inside hem or seam of the garment to make sure the material is not damaged or the colour affected.
| Stain | Remover | Method | Remarks |
| Adhesive tape | White spirit | 1) Try dabbing with hot water if unsuccessful:2) Dab with white spirit | Some adhesive manufacturers produce their own solvent. |
| Blood, egg, meat juice | Biological detergent | Soak for 2 hours in biological detergent - then wash. | Don't soak in biological detergent:a) Non-colourfast materials.b) Garments containing metal zips.c) Wool, silk, flameproof garments . |
| Ball point, biro, carbon paper | Methylated spirit | Rub gently until mark disappears. | Some types of ball point ink can be removed with acetone, but this treatment should not be used with acetate rayon |
| Candle wax | Methylated spirit | Scrape off excess with dull knife.Place stain between of 2 sheets of blotting paper and press with a warm iron - if some colour remains from the wax, treat with methylated spirit. | |
| Chewing Gum | Dry cleaning solvent | Rub with ice cube to harden the gum, then scrape off excess with a dull knife - dab with cleaning solvent. | |
| Chocolate, fatty/oily stains, lipstick | Dry cleaning solvent | Treat with solvent - allow to dry and launder - in hot suds if colour and fabric will allow | |
| Grass | Methylated spirit | Dab with spirit, then wash. | If the material is white you may use bleach if some marks still remain. |
| Iron mould | Manufactured remover | Use according to instructions on the pack. | |
| Make up (eye liner, mascara, foundation) | Dry cleaning solvent | Dab material with solvent, wash if necessary. | |
| Nail varnish | Nail varnish remover | Dab liberally with nail varnish remover or acetone. | Not to be used on acetate materials i.e. Tricel, Arnel, Dynel, try seam of material first. |
| Scorch marks | Borax | Rinse under cold tap and then sponge with solution of 1 dessert spoon borax dissolved in 1/2 pint warm water. | Scorched materials are often permanently damaged and a bad mark cannot be removed. |
| Oil (beach) car oil | Paraffin. grease solvent | Dab till stain removed, then wash. | |
| Coffee, tea, fruit juice, alcohol, wine | Borax | Soak first in cool suds, if not effective soak up to 15 minutes in a warm solution of 1 dessert spoon borax to 1/2 pint water. | On cotton, linen and nylon use hotter and if necessary more concentrated solution. |
| Emulsion paint | Water and detergent mixture | Should be washed while the paint is still wet - once the paint has dried it cannot be removed. | |
| Oil paint | White spirit | Sponge or soak in white spirit and then wash. | If the paint has dried soften first with lard or oil. |

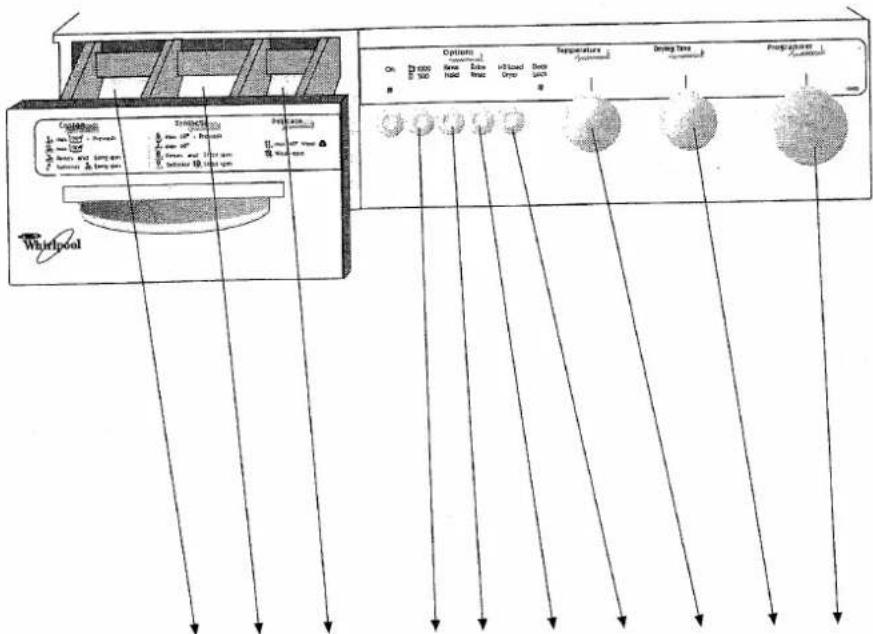
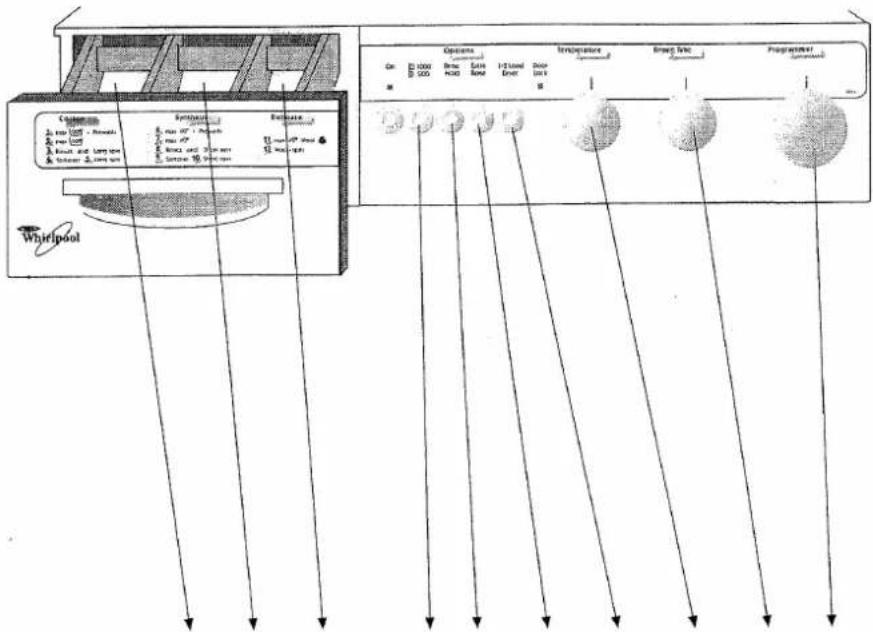
Softener

Wash

Prewash

On/Off button

Locked door &
□ running pilot lamp

Spin speed selector
text_image
Whirlpool Components 1. Max 100° - Perseal 2. Max 150° 3. Max 400° - Long arm 4. Saturation & Long arm Stratency 6. Max 100° - Perseal 7. Max 40° 8. Max and 100% arm 9. Saturation & Long arm Temperature On: 1000 100 Options Hole Hold Eake Line In-Load Grp Door Suck Temperature On: 1000 100 Temperature Hole Hold Eake Line In-Load Grp Door Suck Temperature On: 1000 100 Temperature Hole Hold Eake Line In-Load Grp Door Suck Temperature On: 1000 100 Temperature Hole Hold Eake Line In-Load Grp Door Suck Temperature On: 1000 102 Temperature Hole Hold Eake Line In-Load Grp Door Suck Temperature On: 1000 102 Temperature Hole Hold Eake Line In-Load Grp Door Suck Temperature On: 1000 102 Temperature Hole Hold Eake Line In-Load Grp Door Suck| Load | Programme | Max LoadKg | Detergent in dispenser | Spin speed selector1000500 | Rinse hold button | Extra rinse button | Wash/dry half load button | Wash temperature selector | Drying programme selector | Wash programme selector | |||
| Prewash | Wash | Softener | |||||||||||
| Very heavily solided white cottons + linens without special finishes | With hot prewash | 5 | I | II |  | 1000/500 | — | Optional | Optional | 90° | 70/120 | 1 | |
| Cotton, linen or viscose without special finishes where colours are fast at 60°C | With not prewash | 5 | I | II |  | 1000/500 | — | Optional | Optional | 60° | 70/120 | ||
| Cotton, linen or viscose without special finishes where colours are fast at 40°C | With hot prewash | 5 | I | II | [KXYY] | 1000/500 | — | Optional | Optional | 40° | 70/120 | ||
| Normal soiled white cottons + linens | Without prewash | 5 | — | II | [ZSAK] | 1000/500 | — | Optional | Optional | 90° | 70/120 | 2 | |
| Cotton, linen or viscose without special finishes where colours are fast at 60°C | Without prewash | 5 | — | II | [W3D2] | 1000/500 | — | Optional | Optional | 60° | 70/120 | ||
| Cotton, linen or viscose without special finishes where colours are fast at 40°C | Without prewash | 5 | — | II | [TAZA] | 1000/500 | — | Optional | Optional | 40° | 70/120 | ||
| rinses and long spin | — | 5 | — | — |  | 1000/500 | — | — | — | — | — | 3 | |
| rinse and long spin softener | — | 5 | — | — | 4 | ||||||||
| Long spin | — | 5 | — | — | 5 | ||||||||
| Heavly soiled nylon and polyestere/cotton mixtures | With prewash | 2.5 | I | II |  | 500 | Optional | — | Optional | 60° | 30/50 | 6 | |
| Acrylics, acetate and triacetate including mixtures with wool, polyester/wool blends | With prewash | 2.5 | I | II | [8TAH] | 500 | Optional | — | Optional | 40° | 30/50 | ||
| Normally soiled nylon, polyester, cotton and viscose with special finishes, acrylic/cotton mixtures, coloured/cotton mixtures | Without prewash | 2.5 | — | II |  | 500 | Optional | — | Optional | 50° | 30/50 | 7 | |
| Acrylics, acetate and triacetate including mixtures with wool, polyester/wool blends | Without prewash | 2.5 | — | II | [XTYG] | 500 | Optional | — | Optional | 40° | 30/50 | ||
| rinses and short spin | — | 2.5 | — | — | 500 | Optional | — | Optional | — | — | 8 | ||
| rinse and short spin | — | 2.5 | — | — | [HSZT] | 500 | Optional | — | — | — | — | 9 | |
| Short spin | — | 2.5 | — | — | — | 500 | — | — | — | — | — | 10 | |
| Machine washable wool | Without prewash | 1 | — | II | [44ZT] | 500 | — | — | Optional | 40° | — | 11 | |
| Short spin | — | 1 | — | — | — | 500 | — | — | — | — | — | 12 | |
For the use of the machine as a dryer see chart back

USE OF MACHINE AS A DRYER
USE OF THE DRYER
The machine is endowed with a special water system that can condense the steam created during the drying cycle and evacuate it through the normal discharge.
NOTE: During the drying cycle the water tap must stay open and the outlet hose must be correctly positioned (see the installation instructions).
MAX LOAD FOR DRYING CYCLE
In order to obtain the best drying results do not exceed the following laundry loads:
– resistant fabrics Kg 2.5 (Kg 2 for heavy bulky laundry)
- mixed and synthetic fibres: Kg 1,5
The above recommended loads allow a free moving of the laundry and avoid an excessive creasing, so to guarantee a uniform drying result.
DRYING TIMES
The following drying times change according to the spin cycle the laundry has gone through and the features of the fabrics. The user will learn the best drying times by experience.
| LOAD | LAUNDRY READY TO IRON | LAUNDRY READY TO USE | |
| COTTON: | 2,5 Kg | 100 min. | 120 min. |
| 1,5 Kg | 50 min. | 70 min. | |
| SYNTHETIC FIBRES: | 1,5 Kg | “ | 50 min. |
| 0,5 Kg | “ | 30 min. |
ATTENTION: Do not use the dryer for cloths treated with solvents or oil by-products since the volatile substances could cause an explosion.
NOTE: Be very careful not to dry the laundry too much. It is recommended to leave it a bit damp. An excessive drying could crease the laundry making the ironing difficult. Do not use the dryer for sleeping-bags, eiderdowns, pillows and bulky blankets. These items expand while drying hindering a proper air flow inside the machine.
Normally possible laundry fraying is evacuated through the outlet hose. Should you have used the machine only as a dryer or washed and dried particular cloth, we strongly recommend to take out the laundry and start a rinse and spin programme so to empty the drum from possible fraying preventing it from heaping up during the next cycle.
NOTE: The dryer gets hot while running.
- Do not let children touch the door glass while the machine is running.
- Be very careful not to touch the door glass while taking out the laundry because it can burn.
- Be very careful with zippers, metal buttons and the like because they can burn while taking out the laundry
DRYING CYCLE PROGRAMME SELECTION
It is possible to select the drying function only when the machine is on STOP position.
1) Load the machine and shut the door keeping in mind the "Notes" about the max laundry load for drying cycle
2) The machine can operate two drying cycles with different temperatures, a high temperature for cotton, selectable at the off position after programme.(5)
A low temperature for synthetic fibres, selectable at the off position after programme.(10)
3) Open the water tap an keep it open during the programme cycle. Make sure that the outlet hose is in the correct position (in case of a doubt see the installation instructions) and that the machine is electrically connected.
4) Push the half load button for washing and drying.
5) Select the required drying time by the drying program selector.
6) Push the ON/OFF button to set the machine in operation.
WASHING/DRYING CYCLE SELECTION
1) Load the machine and shut the door keeping in mind the "Notes" about the max laundry load for drying cycle
2) The machine can operate two drying cycles with different temperatures, a high temperature for cotton, selectable at the off position after programme.(5)
A low temperature for synthetic fibres. selectable at the off position after programme.(10)
3) Open the water tap an keep it open during the programme cycle. Make sure that the outlet hose is in the correct position (in case of a doubt see the installation instructions) and that the machine is electrically connected.
4) Push the half load button for washing and drying.
5) Select the required drying time by the drying programme selector.
6) Select the required washing programme by wash programme selector.
7) Push the ON/OFF button to set the machine in operation.
目錄
保護環境 .... 1
安裝須知 1
洗衣須知 2
操作洗衣機前須知及洗衣分類....4
洗衣機的使用方法 5
其他選擇功能 6
保養方法 6
故障 6
洗衣機發生故障,怎樣取出衣物 7
電源故障 7
使用不當 8
清除污漬 9
洗衣程序表....10
本機作為乾衣機用 11
附圖
保護環境
包裝
請將包裝箱內可循環再用的物料,拿到附近的回收中心。
注意事項
使用本洗衣機前,請詳細閱讀使用手冊,本手冊列明重要的使用指示、安裝及保養方法。請妥當保存本手冊,以備日後有需要時使用。
倘因疏忽下列事項而導致任何人士或動物受傷,或招致損失,製造商概不負責。
-
拆箱後,請檢查洗衣機是否完好無損。如有任何問題,請勿使用洗衣機,應找合格的電器技師檢查或聯絡經銷商。不要讓小孩碰觸任何包裝物料(包括膠袋、聚苯乙烯部分、鐵釘等等)。該等物料均可能具有潛在危險,例如膠袋可能會導致窒息死亡等。
-
洗衣機只限於家居使用,並只可作洗衣用途。
-
洗衣機必須由合格的電器技師安裝,並須遵照製造商的指示安裝及裝嵌。
-
接駁電源前,請先檢查洗衣機的電源規格表,確定其與家中電器相符,方可插上插頭。洗衣機必須依照法例,接駁至設有地線的插座,才屬安全。設有地線的插座必須符合基本的電器安裝標準。
-
倘有任何疑問,必須聯絡合格的電器技師,小心檢查家裡的電源裝置。接駁任何電源及水龍頭前,請先檢查洗衣機上的電源規格表所載資料,確定其與家裡的電器相符,方可插上插頭。
-
請先檢查插座的電源線能否負荷電源規格表上所載有關洗衣機耗電量。如有任何疑問,請聯絡合格的電器技師。假如插頭與插座並不配合,請僱用合格的電器技師更換一個合格的插座。此外,切勿使用變流器、萬能插頭和電源拖板。
-
若果必須接上萬能插頭,可以在合符本地安全法例下,使用簡單的或多用的插頭以及電線拖板,但須避免超過電流量的負荷標準。插頭及電源拖板上均註明能夠負荷的電流量標準。
-
清潔機件或進行維修前,必須載斷電源或拔掉插頭。如不使用洗衣機,應該關掉電源和水龍頭。
-
需要維修時,必須由專業技師或由惠而浦客務電器維修有限公司派員修理,並且使用由製造商出產的原廠後備零件。
-
棄置舊洗衣機前,必須剪斷電線,使機器不能再用。機門的門鎖亦要除掉或撬毀,避免兒童被困鎖機內。並將舊機棄置在適當的地方,以免發生危險。
-
使用本洗衣機或任何電器時,必須遵守以下的基本安全守則:
一手濕或赤足時,切勿觸摸或操作電器用品:
一 需要時,應直接拔出插頭,切勿拉扯電線:
一 洗衣機不可曝曬,亦不可讓雨水淋濕:
一 不要讓小童在無人看顧下操作洗衣機。
- 內置式型號必須安裝在工作檯之下,確保穩固。
- 為了節省用水和電力,請儲夠足量的衣物才使用洗衣機。
- 如果衣物只屬輕微污垢,可選用省電程序,將水溫調校至 60°C
- 如果衣物只屬輕微污垢,便可省去預洗程序。
- 在緊急事故發生後,本洗衣機可能已徹底排走水份,所以當過濾器放回原位後,我們建議您經由洗衣劑盛載格注水0.5升。
- 請把洗衣粉和軟水劑存放於小孩無法觸及的乾爽地方。
- 緊遵洗衣劑製造商的用量建議。若衣物只及一半的洗衣量,可使用建議洗水劑份量的3/4,若洗衣量少於1千克,則只需用1/2洗衣劑份量。
- 洗衣前,必須清除所有衣袋內的零碎雜物,例如釘、輔幣及紙巾等。
- 依照衣物標籤指示,切勿超逾最高洗衣溫度,並確定衣物適合用洗衣機洗濯。
- 洗衣程序進行時,切勿打開洗衣機機門,否則熱水可能會大量湧出。若必須打開洗衣機機門,請依照“洗衣機發生故障 - 如何取出衣物”一節。
安裝須知
拆箱
參照圖1和圖2的指示,拆除運輸時使用的保護隔離墊。先除下螺絲釘3、4、5、8(見圖1)。然後將螺絲批插入螺絲釘洞,傾斜推動,直至四枚隔離墊(H)掉下為止,然後將隔離墊擱在一旁(見圖2)。切記要將隔離墊存放好,若仍遺留在機內,機件會出現故障。此外,隔離墊可留作將來搬運時使用。
移動洗衣機
盡量把洗衣機移近到日後的操作位置。拉出輪台柄,鬆脫洗衣機的腳輪,便可移動洗衣機(見圖3)。如果洗衣機備有腳輪,只需拉出兩隻輪台柄,何可把腳輪放下。若要把腳輪升高,則需把兩隻輪台柄推回原位(見圖4)。
接駁水源
接駁供水及排水系統,必須遵守當地法例和規定。
注水喉
如果注水喉在機門內,它應該能夠配合洗衣機背面板的注水管入口處(見圖5)。
包裝箱的膠袋內附有多種裝置,把其中的圓形過濾器安放在注水喉之末端(見圖6)。
用手把注水喉與水龍頭接緊。毋須使用可工具協助接駁,因為用力過度反會損害駁口。
洗衣機能夠在 5N 至 100N 的水壓下,仍然操作自如。
如果閣下家裡的水壓太高或太低,又或者有任何問題,請聘請合格的水喉匠檢查。
排水喉
包裝箱內可能附有一支塑膠豎管,能夠抵受高溫,而直徑最少為32毫米。
排水喉必須與地面距離60至90厘米。排水喉必須能夠負荷每分鐘30公升的排水量,否則會引致洗衣水溢出。此外,排水喉亦可以擱在洗濯盆上,但必須栓緊排水喉,避免因排水喉鬆脫而溢出熱水,對小孩構成危險(見圖7)。
如有任何問題,請向合格的水喉匠查詢。
備註:為避免排出的水倒流洗衣機內,切勿把排水喉與排水豎管作密封式接駁。
接駁電源
本洗衣機符合歐洲期石體87/308/EEC有關無線電干擾之規定。
接駁電源前,必須檢查機背的電源規格表上所載的電壓單位,確定與家裡的電壓吻合,方可接上插頭。
警告:本洗衣機必須接駁至設有地線的插座。任何人士倘因疏忽此項規定而引致機件毀壞,製造商概不負責。因此,本公司建議閣下必須使用附有地線的插座,並且符合法例。
不要使用變流器或電線拖板。必要時亦必須使用符合洗衣機規格表所示。
假如洗衣機的插蘇並不適用於家裡的電源插座,便須立刻更換一個合適的插座。如有任何疑問或困難,請向合格的電器技師查詢。
平放洗衣機
完成水源及電源裝置後,可把洗衣機安放到合適的位置上操作。
為了減低脫水程序時產生搖晃及噪音,洗衣機必須安放在平穩或穩固的地面。
倘若未能平放洗衣機,可能會因機器搖晃,對鄰近的設備造成損壞。
為使洗衣機平穩安放,可調校機身前面兩隻機腳。轉動機腳上的螺絲環至合適的位置,使之與洗衣機底部貼緊(見圖8和圖9)。
打開機門 (見圖 10)
拉開門柄,機門便會打開。切勿強行拉開門柄。若果未能打開機門,可關掉洗衣機,等兩至三分鐘,待機門安全鎖解除後,再試行打開。
注意:洗衣機應安裝在乾爽環境,浴室及洗手間均比較潮濕,並非安放洗衣機的理想地方。
洗衣須知
預備洗濯衣物
把衣物放入洗衣機前,必須注意下列各點:
— 取出口袋中所有輔幣、紙巾等硬物,以免阻塞排水泵。
一上好拉鏈和鈕扣,以免在洗衣過程中扣著其他衣物。
一修好衣物的破洞及裂縫。即使最輕柔的洗衣程序都能使小破洞擴大。
一結好衣物的腰帶和圍裙帶子,以免衣物纏繞在一起。
一 按照去除污漬指示,處理衣物上頑固的污漬。
洗衣量
| 一般/輕微污垢的棉質衣物 | 最多為4.5至5.0千克 |
| 極骯髒的衣物 | 最多為 4.0千克 |
| 容易處理的質料 | 最多為 2至2.5千克 |
| 質地纖幼的衣物 | 最多為 1.5千克 |
| 羊毛衣物 | 最多為 1.0千克 |
切勿洗滌過量衣物
衣物重量
| 衣物種類 | 大約重量(克) |
| 浴袍 | 120 |
| 工作褲 | 400-60 |
| 被褥套 | 700-100 |
| 被單 | 500-70 |
| 女裝短衫 | 10 |
| 浴室毛巾 | 80 |
| 手巾 | 150-20 |
| 茶巾 | 10 |
| 恤衫 | 20 |
| 內衣 | 10 |
| 內褲 | 5 |
| 枕頭套 | 20 |
| 睡衣褲 | 45 |
| 餐巾 | 50-10 |
| 手帕 | 2 |
| 中型檯布 | 40 |
以上所列的衣物是大約重量,並以棉質或麻質為例。
衣物分類
附有衣物標籤的衣物
大部分衣物都附有衣物標籤,指示適用的洗衣程序。常見的標籤如下:

未經特別處理的白色棉質及麻質衣物

未經特別處理的棉、麻質或黏膠纖維衣物,而衣物顏色在 60℃ 不會褪色

(英國不適用) 包括白色尼龍衣物及白色聚酯纖維/棉質混紡衣物

尼龍、聚酯纖維/棉質混紡衣物、聚酯纖維、經過特別處理的棉質及黏膠纖維衣物:棉質/聚丙烯睛系纖維混紡衣物

棉質、麻質或黏膠纖維衣物,而衣物顏色在 40℃ 不會褪色

聚丙烯晴系纖維、醋酯纖維及二醋酯纖維衣物,包括由羊毛與聚酯纖維混紡製成的衣物

羊毛、羊毛混合其他纖維的混紡衣物、絲質等衣物

(英國不適用) 參看 📁️ 及 📁️ 所列的衣物種類

(英國不適用) 經過特別處理的白色棉質及麻質衣物

手洗衣物 (不可用機洗)

不可洗濯
洗衣槽符號的重要性:
無橫條

正常(最高)洗衣機轉動速度
横條

減低(中等)洗衣機轉動速度
横條折斷

再減低(最低)洗衣機轉動速度
洗衣槽符號如下:

視作棉質類洗濯

視作合成纖維類洗濯

視作羊毛類洗濯
例如:以棉質衣物洗衣程序洗濯等。
混合洗濯衣物:
一般情況下,沒有橫條符號的衣物都可依照所示的水溫洗濯。
例:及 可一併以 40^ C 水溫洗濯。
同樣,符號無論是否附有橫條,也可把依物一併以指示的最低水溫混合洗濯,但是必須調低洗衣速度。
注意:列明“分開洗濯”的衣物必須遵照指示。
沒有衣物標籤的衣物
- 沒有標籤,但列明衣物的質料,例:棉質/羊毛必須根據衣物的質料分類洗濯。
- 沒有標籤的混紡衣物,例:聚酯纖維/棉質衣物
遇上這類情況時,可將混紡衣物以較低水溫洗濯,例:聚酯纖維/棉質的混紡衣物應按聚酯纖維類別的水溫加以洗濯。
- 沒有標籤和任何提示
保險的方法是拿去乾洗。如果你認為該衣物可以洗濯,就必須小心用手洗濯,又或者使用纖幼衣物的洗衣程序加以清洗。但必須緊記,該衣物可能會因此縮水、走樣或褪色。
手洗衣物標籤
如果衣物的標籤是「一隻手」在洗衣槽之內,表示該類衣物必須用手加以清洗,不能用洗衣機洗濯。大致原因是:
一保護衣物式樣,例:摺位;
一因為即使用最低的水溫洗濯,衣物也可能會褪色;
一衣物的修邊、鈕扣或布邊會因洗衣機的轉動而鬆脫、受損;
一即使以最低速度的洗衣程序洗濯,亦會引致縮水或走樣。
如果衣物標籤列明「手洗衣物」,最保險還是用手加以洗濯。若你認為該衣物可以在洗衣機內洗濯,請使用纖幼衣物洗衣程序。
不可洗濯標籤
如洗衣槽內劃上交叉符號,表示該類衣物不可以洗濯。
洗濯特別衣物
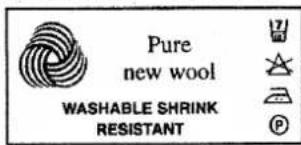
請檢查羊毛衣物的標籤。以下列舉一些機洗羊毛物的標籤:

text_image
Superwash Pure new wool MACHINE WASHABLE可用洗衣機洗濯
text_image
Pure new wool WASHABLE SHRINK RESISTANT可洗濯、防縮水
text_image
Pure new wool MACHINE WASHABLE (WOOL CYCLE)可用洗衣機洗濯 (羊毛洗衣程序)
text_image
MACHINE HAND WASH Warm minimum wash Warm Do not rub Spin, Do not hand wring可脱水、不可扭擰衣物
羊毛衣物的質地相差頗大,除非標籤註明,否則難以肯定該類衣物是否可免縮水或不易褪色。
一只有標明可用機洗的羊毛衣物才可用洗衣機洗濯。
一如不清楚洗濯方法,該類衣物最好予以手洗或乾洗。同樣,大件手織衣物及纖幼的羊毛衣物,應該予以手洗或乾洗,更不應放進洗衣機內進行脫水。
一使用洗衣機洗濯羊毛衣物,只需用日常的洗衣劑便可。
備註:
一羊毛衣物洗濯完畢,應該立即予以脫水。羊毛衣物若浸在水中過久會容易走樣。
半量洗衣
一本功能不適用於洗濯羊毛衣物。由於水量減低會加強衣物間磨擦,羊毛衣物會因此縮水。
毛毯
必須檢查毛毯的衣物標籤是否適用洗衣機洗濯。
—如果羊毛毯附有可用洗衣機洗濯標纖,應視作羊毛類洗濯。
一蜂窩狀的羊毛毯極容易縮水,因此需要乾洗或手洗。
一合成纖維(如丙烯晴系、奧綸)製成的毛毯,應視作合成纖維類洗濯。
一雙人用的合成纖維毛毯若因體積太大,無法放入洗衣機內,宜作乾洗。
窗簾布
窗簾布的質料容易受到塵埃及日照而變舊。閣下可用纖幼衣物的洗衣程序加以洗濯,甚至乾洗。若布料已開始發霉,即使用極溫和的洗衣程序,布料也可能會裂開。
純窗簾布(由白色的尼龍/白色聚酯製成)
這些布料容易蒙塵和變黃。洗衣機可每次處理高達1.5千克。如果過量,則會令窗簾布弄皺。
請先使用過水及脫水程序(使用較低洗衣機轉速)清除布上的塵垢,然後以合成纖維洗衣程序洗濯,將水溫調校到50℃至60℃。如果白色的窗簾布經已變黃,可使用合適的漂白劑,令衣物回復光潔雪白。使用方法請參閱包裝說明。
大型床單
閣下如果並不肯定床單的清洗程序,最好的方法是乾洗,以免縮水。但必須在洗衣前,上好拉鏈和鈕扣。可用洗衣機洗濯的衣物,應該先行過水及脫水,這樣便能清除大部份塵垢。
清洗後,保持微濕以待晾乾,便可回復原狀。
裝有鐵線的乳罩
這類乳罩的鐵線經常鬆開,滑入洗衣鼓內的小孔,因而對洗衣機造成極大的損害;而鬆開的鐵線亦可能生銹,弄污其他衣物。
故此,這類衣物適宜手洗,或用洗衣袋包著洗濯。
合成纖維及不適宜脫水的衣物
本洗衣機有特別的洗衣程序清洗這類衣物。
要減少皺摺情況:
一用高洗衣水位,衣物便可有足夠空間,自由轉動。
一減少洗衣量,衣物便不會緊纏在一起。
一應該將最後一次的脫水程序延遲,因為閣下可以趁脫水前,取出該類衣物。
一即使要用脱水程序,我們也建議閣下使用較低的脫水轉速。
使用適當的洗衣程序,清洗合成纖維衣物會有較佳的洗衣效果。但如果混合其他衣物清洗,又或者使用不適合的洗衣程序,都會使衣物起皱,因為:
一衣物過量;
一水温太高;
一脱水轉速太快;
一脱水後沒有立即取出洗衣鼓內的衣物。
容易清洗的棉質衣物
現時許多家庭用品,如被單、被褥套和窗簾布等,都用容易清洗的棉質製成。請根據衣物標籤建議的洗衣程序予以洗濯,但必須留意:
一最高洗衣量不得超過2千克;
一使用較低的脫水轉速。
當這類衣物混以大量的衣物同時清洗,或者用高速脫水,均會令衣物起皺。
運動服
運動服和跳舞衣通常都以較耐用的質地製成,但洗濯時則必須溫和地處理,並且依照衣物標籤所示加以清洗。而處理合成纖維質料時,水溫不可超過40℃。
操作洗衣機前須知及洗衣分類
預備洗濯衣物
把衣物分類
依照纖維種和水溫要求 (衣物標籤所示) 把衣物分類,並且分開白色和顏色衣物。盡可能把纖維類型和污垢程度相約的衣物歸類洗濯。有關詳細資料,請翻閱洗衣程序表。為了保障衣物在清洗過程完好無損,必須清除衣物內所有文件夾、鬆夾、釘、輔幣和安全扣等。
窗簾布
窗簾布需要特別小心處理。即使在拆除窗簾布時亦可能損壞布料。
因疏忽衣物標籤指示,致使衣物在洗衣途中受損,製造商概不負責。
簇新衣物
簇新的顏色衣物可能會褪色,所以應在初次洗濯時,與其他衣物分開洗滌。
染料/漂白劑
除非在製造商明確的指示下,否則切勿使用洗衣機漂染衣物。詳情請參閱有關說明書。倘因疏忽所招致的任何損失,製造商概不負責。
把衣物放入洗衣鼓内
檢查注水喉與水龍頭是否栓緊,排水喉是否正確地安放。扭開水龍頭。確定洗衣機已經接上插頭後,並且開啟電源。按照衣物的洗衣程序分類處理,然後拉開機門,放入衣物,再關緊機門。
洗衣劑使用建議
本洗衣機經特別設計,融入現代化洗衣機科技中最先進的環保技術。
軟水劑
水質是根據水的硬度而分類(請參看水質硬度表)。新式的洗衣劑含有軟水劑,如果閣下府上是使用硬水,可多添洗衣劑。惟增加的份量可能會產生過多泡沫。閣下可以參閱洗衣劑包裝上就水質硬度分類的份量指示。有關水質硬度的資料,可逕向水務署查詢。
| 水質硬度 | 特色 | 德制温度°dH | mmol | 法制温度°fH |
| 1 | 軟水 | 0-7 | 0-1.3 | 0-15 |
| 2 | 中度 | -14 | -2.5 | -2.5 |
| 3 | 硬水 | -21 | -3.8 | -3.7 |
| 4 | 高硬度 | 21以上 | 3.8以上 | 37以上 |
洗衣劑
宜選用洗衣機專用的少泡沫洗衣劑。否則,可能會引致泡沫溢出或洗衣效果不理想。最好的方法就是先衡量洗衣劑的份量,因為:
一太多會引致泡沫溢出
一太少則會令衣物殘留油垢污漬
在以下情況則宜增加洗衣劑份量:
一高水質硬度
一衣物十分骯髒
以下情況則宜減少洗衣劑份量:
一軟水
一半洗衣量或輕微洗衣量
一衣物不太骯髒
洗衣劑應存放於乾爽的地方
任何類型的洗衣劑均適用於本洗衣機。洗衣劑大致可分為:
一適合各種纖維衣物的洗衣粉
一適合纖幼衣物(水溫40℃下不褪色)及羊毛衣物的洗衣粉不用預洗的洗衣程序,及只宜於60℃以下水溫處理的纖維或羊毛衣物,都較適合使用洗衣液。
洗衣粉
我們建議的份量為:
滿洗衣量:遵照洗衣粉包裝上的建議份量。
半洗衣量:建議份量的四分之三
小量洗衣(大約1千克):建議份量的一半。
洗衣液
應該注入製造建議使用的份量到洗衣劑盛載格(主洗程序)(請參閱程序表)。
備註:
請緊記,使用大量洗衣劑會產生過量泡沫,甚至會令泡沫溢出;而且損耗洗衣機,更令環境受損,太少洗衣劑會令白色衣物變得暗淡無光,亦會令含發熱成份的鈣積聚到洗衣鼓外層。
當洗衣程序完畢後,深色衣物可能會殘留白色的洗衣劑殘漬,這與過水程序無關,而是因為該種不含磷酸鹽洗衣劑,含有不易溶解的軟水劑所致。其實這些白色殘漬也可以弄清或抹去,但要避免這類情形,還是更換其他洗衣粉或乾脆使用洗水液較為適合。即使最新推出的洗衣劑(無論洗衣粉或洗衣液),閣下也可能會在最後過水或脫水時,發現泡沫,這不意味過水程序出現問題。
漂白劑
適合洗衣機用的基本上已含有足夠的漂白成份,去除污漬。使用額外的漂白劑雖然並不會損壞洗衣機,但宜加倍小心,因為使用不當會損壞衣物的質料或顏色。難以清除的污漬可以個別處理。請參閱清除污漬指示。
衣物柔順劑
如毛巾、尿布、羊毛衣等衣物,柔順劑的作用能使其洗滌後,保持柔軟舒適,易於熨貼,以及減少靜電產生。柔順劑處理過的衣物,會在脫水程序後剛好弄乾。使用時,把柔順劑注入盛載格內,直至"MAX"位置。
過漿
洗衣程序完畢後,取出衣物,然後將需要過漿的衣物分開處理。
一熱水漿法,依照產品說明書的指示進行。
一噴霧漿法 - 便於處理面積較小的範圍,如衣領、袖口或小量衣物。
一噴霧樹脂/液體漿料-與植物澱粉質不同,它不會令衣服很挺直,但效用持久。適合使用於棉質的裙、褲,令它們看來更添生氣。
洗衣機的使用方法
a) 注入洗衣劑
將洗衣劑盛載格向外拉出(見圖12、14),然後把洗衣劑注入適當的小格內,份量可依從製造商建議或根據下表所列:
| 衣物柔順劑 | 主洗 | 預洗 | ||
| 選擇 | 硬水 | 軟水 | 硬水 | 軟水 |
| 最高份量 | 1+1/2量杯 | 3/4量杯 | 1量杯 | 1/2量杯 |
備註:1 量杯=約 100 克
蓋上盛載格。
b)掣鈕
如果洗衣機是按掣式掣鈕,按一下,掣鈕便會彈出,再按一下,則會回到原來位置。
c) 選擇洗衣程序
順時針方向調校洗衣程序掣,直至需要的洗衣程序指著垂直的刻線。
注意事項:不可逆時針方向強扭洗衣程序掣,洗衣掣會容易受損壞。
d) 選擇水溫
選擇合適水溫,調校溫度選擇掣。使用前,請參考洗衣程序表。
e) 選擇脫水轉速
選擇適合脫水轉速,調校脫水掣或按下 1000500 。使用前,請參考洗衣程序表。
f) 選擇脫水或延遲脫水(視乎型號)
使用此功能,只須將脫水掣順時針方向調校至延遲脫水位置便可。如果你選擇了延遲脫水,洗衣機便會在最後一次過水程序前自動停止操作,衣物會浸在水,不易起皺。其後如需完成脫水程序,只須將脫水掣順時針方向調校至所需轉速,洗衣機便會排水,然後進行最後脫水程序。
g) 選擇乾洗時間
按下半量洗衣/乾衣掣。順時針方向調校乾衣時間掣,所選乾衣時間的位置必須指著控制板上的垂直刻線。
h) 開始洗衣程序
選定洗衣程序、水溫、脫水轉速及任選功能掣,然後按開/關掣。開動指示燈及機門上鎖指示燈均會亮起,洗衣機便會啟動。
i) 洗衣程序結速
當洗衣程序掣的“Stop”符號指著控制板的垂直刻線,表示洗衣程序已經完畢。
當機門上鎖指示燈熄掉,機門才能打開。否則,可按下開/關掣中斷電源,待兩分鐘後方可開啟機門。然後關閉電源和水龍頭。
備註:如果閣下選用的洗衣機型號並無水溫選擇掣和脫水掣,表示設定的洗衣程序已經代為預校。
其他選擇功能
本洗衣機備有其他選擇功能。(只限個別型號)
必須在開始洗衣程序前,選定及按下所需的功能。洗衣程序完畢後,再按掣一次,便可取消該功能。
視乎個別型號可選擇一個或多個功能掣,詳情請參閱洗衣程序表。
省電掣(視乎型號)
選擇洗衣程序1或2後,可按此掣。
纖幼衣物洗濯掣(視乎型號)
按下此擎,可減低洗衣機的正常轉速,加倍保護纖幼衣物。
半量洗衣掣/乾衣掣
此掣可提供兩項功能。
如洗衣量少於 2 千克,便可選用此功能以減低水量及耗電量。
注意:如需要於一個步驟內完成洗衣及乾衣程序、或獨立使用乾衣程序,可按下此掣。使用前,請參考洗衣程序表。
減慢脫水轉速掣(視乎型號)
此掣可減慢脫水轉速,但程度會視乎洗衣程序而定。
免脫水掣(視乎型號)
按下此掣,洗衣機會把水排出,而不會把衣物脫水。
延遲脫水掣(避免衣物起皺)
使用此功能,只須將延遲脫水掣按下便可。如果你選擇了延遲脫水,洗衣機便會在最後一次過水程序前自動停止操作,衣物會浸在水裡,不易起皺。其後如需完成脫水程序,只須再按一次,洗衣機便會排水,然後進行最後脫水程序。
如閣下的洗衣機已備有此功能,只需將程序掣順時針方向調校多一格,便會生效。
額外過水掣
此掣可提供額外的過水程序。
冷水洗衣選擇
若選擇使用冷水洗衣,必需在開始洗衣程序前,調校水溫選擇至“MIN”。
保養方法
本洗衣機經特別設計,非常耐用。閣下亦必須小心保養機件,如定期清洗盛載格、排水泵和注水喉上的過濾網。
清洗洗衣劑盛載格(見圖 11-14)
一盡量拉出洗衣劑盛載格。
一取出整個盛載格。
—取出盛載格內各小格,然後注水加以清洗(盛載格的格數隨洗衣機型號不同)。
一待晾乾後,重新裝回原位。
一閣下可能會發現盛載格頂部及底部尚有殘餘的洗衣液,可用一塊瀑布或廚房萬用紙抹掉。
一更換盛載格時,先將背面右上角的骨條連接到控制板背面的槽口。
一裝上盛載格,使其滑入左面槽口,再稍稍一推,盛載格便會輕易地滑動。否則,盛載格並未正確地安裝。
清理洗衣機背部
洗衣機背部需定期清洗。清洗時,因注水喉和排水喉已經有足夠長度,所以不用除下。
清潔完畢後,檢查喉位是否拴緊,然後才將洗衣機推回原處,保持平放。
清理排水泵
排水泵應該大約每六個月檢查及清洗一次。請先預備一個扁平器皿,能容納1/4公升水,放於泵門腳下。請依照指示,開啟排水泵(請參閱有關部份)。
故障
以下是正常操作下的洗衣機運作情況。
洗衣鼓
洗衣鼓會不斷循順、逆時針方向轉動,以免衣物纏結而起皺摺。當用熱水洗衣,又或者在羊毛衣物的洗衣過程中,洗衣鼓會休止一段頗長時間。
水位
如選擇纖幼衣物洗衣程序,水位會較高並接近洗衣鼓蓋門的中間位置。
相反,其他如棉質衣物的洗衣程序,水位會較低,以增加攪動轉數,使衣物更為光潔。低水位容易令人以為洗衣鼓內沒有注水,那不過是因為水位低於洗衣鼓蓋門。
脱水
雖然洗衣鼓內仍然盛滿水,洗衣機仍然會開始脫水過程。因為這樣才能夠分散衣物,使洗衣機在脫水時仍然保持平衡。由於脫水轉速受自動調控,當洗衣鼓轉動速度改變,閣下會聽見不同的聲響。
洗衣程序的操作時間
閣下可能會發現洗衣程序的操作時間有長短之分,這視乎洗衣量及注水溫度而定。洗衣量越大或注水溫度越低,都會延長洗衣程序的操作時間。反之,操作時間則會縮短。
開啟機門
當洗衣程序完畢,關掉電源約兩分鐘後,才能開啟機門。切勿強行打開機門,否則會損壞洗衣機,製造商概不負責。
避免出現的問題
溢出泡沫
只宜使用少泡沫的洗衣劑,否則過量的泡沫會從洗衣機溢出。
阻塞排水泵
洗衣前,應先取出口袋裡所有的雜物。針、輔幣和紙巾等雜物都會阻塞排水泵。 洗衣機甚至會受金屬物品損壞。
喉管渗漏
要特別留意喉管連接水龍頭和洗衣機部位,因為接駁不當,可能會令洗衣機運作緩慢,甚至出現滲漏情形。
保持洗衣機穩妥
洗衣機放置不穩,運作時會產生噪音,並且猛烈搖動,甚至移動。首先要檢查地面是否平坦,足以承托洗衣機。然後要檢查機腳是否調校適當(見“平放洗衣機”部份)。任何情況下移動洗衣機,隨後都要放回原位。如果要用輪台安放洗衣機,便要升高機輪。
清理阻塞的排水泵
必須先排出洗衣鼓內積水。開始前,請詳閱有關指示,因為閣下要先知道怎樣停止溢水。
如果洗衣鼓內的是熱水,最保險的辦法是待熱水冷卻後才去處理。必須預備一個水桶和一個扁平的器皿,能夠放置在泵門下。然後:
-
關掉電源
-
關掉水龍頭
-
打開泵門保護板(見圖 15)
-
排水(見圖 15 · 16)
如果閣下洗衣機右面的泵門設有一條特別的排水管(見圖17),請取出排水管並打開面蓋。把扁平的器皿放在泵門下,直至盛滿水為止。再放回面蓋到排水管裡,然後把器皿內的水倒進桶子裡,重覆上述操作,直至洗衣機沒有溢水流出為止。
4A. 若果閣下的洗衣機並沒有排水管,那麼便要先將泵蓋向逆時針轉動(但不要將整個泵蓋轉鬆),直至放在泵門下的扁平器皿盛滿水為止。然後再向順時針方向上緊泵蓋,將器皿內的水倒進桶子。重覆上述操作,直至洗衣機沒有溢水流出為止(見圖16)。
- 將面蓋套回排水管去,然後裝回原先位置。
清除所有 遺留在泵槽的鈕扣、輔幣、毛線和棉紗,並且把泵門在水龍頭下沖洗。
伸手探進泵門,確保排水泵的內部沒有瘀塞。
-
把泵門重新裝上。投入泵蓋,確保兩邊都已經上緊,然後循順時針方向轉動,直至上緊為止。 如果泵蓋未正確栓上,下次洗衣時,洗衣水便會溢出。
-
裝回泵門保護板。
洗衣機發生故障,怎樣取出衣物
警告:洗衣水可能會很熱,小心燙傷!
如果洗衣水很熱,可待冷卻後,方取出衣物。準備一個水桶盛載濕濡的衣物。若水依然頗熱,可戴上塑膠手套或利用衣夾把衣物放到桶裡。
1. 如果水位低於洗衣鼓底部
正常情形下,洗衣鼓要待洗衣機停止操作兩分鐘後,才能開啟。但如果洗衣機內的水仍然極熱。閣下可能要等上十五分鐘。
取出衣物後關上機門。
2. 如果洗衣水的水位高於洗衣鼓鼓門
切勿打開鼓門!取出衣物前,閣下要先把洗衣水排出。開始前,請詳閱有關指示,因為閣下要先知道怎樣停止溢水。如果洗衣鼓內的水依然頗熱,切勿讓兒童靠近。
一預備一只盛水用的桶子。
一關掉洗衣機電源。
一關掉水龍頭。
一參閱“清理阻塞的排水泵”部份,打開泵門保護扳。
一用有面蓋的排水管,或打開部分泵門,將水排出洗衣機。
一重覆排水步驟,直至水位低於洗衣鼓鼓門。
一依照上述指示1,打開機門,取出衣物。
一切記把面蓋套進排水管裡。
一切記把泵門上緊。
一裝回泵門保護板。
電源故障
如果洗衣機不能操作,請檢查:
一洗衣機的插頭是否經已接上電源?
一家中其他電器是否操作正常?
一插座是否有毛病?
一洗衣機機門是否關上?
一開/關指示燈是否亮起?
電力中斷
如果電力突然中斷,切勿打開機門,因為洗衣機會因而大量溢水。
如果電力不會在短時間內恢復供應,請循“怎樣取出衣物”指示進行。
恢復電力
如果電力恢復供應,洗衣機會自動由受影響的步驟繼續操作。
電力恢復供應以後,如果受影響的時間太長,以致水溫下降,洗衣機會自動加熱水溫。
使用不當
下表會為閣下解釋一些問題的成因及處理方法
| 故障 | 可能成因 | 處理方法 |
| 洗衣機四周地面濕滿 | ·泡沫溢出 ·泵蓋在清洗之後,未曾正確鎖緊 ·水喉接駁鬆脫 | 轉用少泡沫的洗衣粉或減少洗衣粉份量 參閱“清理排水泵” 參閱“避免出現的問題” |
| 進行洗衣過程,未見有洗衣水 | 許多洗衣程序的水位均低於機門,因此看不見 | |
| 洗衣時間太長或太短 | 這現象經常發生。因為注水溫度會隨季節而有所參差;而水溫越低,洗衣時間也越長 | 不用費心,只須緊記要完全扭開水龍頭 |
| 機門無法開啟 | 安全鎖正在啟動 | 關掉洗衣機,待兩分鐘後再試 |
| 不能脫水 | 調校了延遲脫水掣 | 取消延遲脫水掣,選擇最後脫水轉速,洗衣機便會繼續完成洗衣程序 |
| 洗衣機操作時產生噪音 | 基本上洗衣機並無不妥,這可能是因為地面凹凸不平,甚至可能是脫水時,洗衣機因加速轉動而產生的正常聲響 | |
| 脫水時,洗衣機產生過量噪音及搖晃不定 | ·未曾完全拆除配件 ·洗衣量太小 ·洗衣機未曾平放 ·校好輪台,但未升高腳輪 ·地面不夠平穩 | 參閱有關拆箱指示 增加洗衣量 參閱“避免出現的問題”部份 升高腳輪 參閱“避免出現的問題”部份 |
| 衣物未過濱 | 洗衣劑溜進衣物軟順劑盛載格 | 必須將洗衣劑注入適當的盛載格內 |
| 泡沫太多 | ·使用不合適的洗衣劑 ·使用過多洗衣劑 | 改用少泡沫的洗衣劑 減少洗衣劑份量 |
| 洗衣程序完畢後,盛載格仍剩餘洗衣劑 | ·水龍頭未完全扭開 ·水壓太低 ·盛載格需要清洗 | 盞量扭開水龍頭 參閱安裝指示 參閱“清洗洗衣劑盛載格”部份 |
| 洗衣程序完畢後,盛載格仍殘留衣物柔順劑 | 盛載格需要清洗 | 參閱“清洗洗衣劑盛載格”部份 |
| 脫水後,衣物仍然濕滿 | 脫水轉速選擇錯誤 | 選擇適當的轉速及使用過水和脫水程序 |
| 機門內殘留油脂 | 未有使用預洗程序,而重覆洗濯染有大量油污的衣物,如工作褲、尿布等 | 必須使用預洗程序及使用洗衣劑 |
| 無法啟動洗衣程序,時間掣停留不動 | ·注水水龍頭未扭開 ·時間製在“STOP”位置 ·洗衣機機門未關好 ·洗衣機正在加熱水溫 | 完全扭開水龍頭 選擇正確的洗衣程序 關好洗衣機機門 不用費心,洗衣機會在二十分鐘內啟動 |
| 洗衣機水溫不足 | ·(若適用)未開動自動調溫 ·(若適用)冷熱水喉管接駁錯誤 | 選擇正確的水溫,把冷熱水注水喉重新接駁 |
| 不能排水或排水緩慢 | ·排水喉纏結在一起 ·排水倒流到洗衣機去 ·排水泵被阻塞 | 把排水喉拉直 確保排水喉與排水管的駁口不是密封式接駁 清理排水泵-參閱“清理阻塞的排水泵”部份 |
要避免費時失事,請仔細閱讀上表
當洗衣機不能如常操作,請先參閱以上各點,然後才致電營業服務中心。若在不必要的情況下使用維修服務,除了費時失事外,閣下更可能要支付有關費用。請先:
一 循上表所示,檢查是否能夠自行處理:
一 仔細檢查,即使洗衣機突然回復正常,再重覆該洗衣程序,仔細檢查。
如果問題重覆出現,請致電營業服務中心派員維修。
如果閣下需要使用洗衣機,而問題又只局限在一些程序,不妨嘗試其他洗衣程序,待修理人員上門維修為止。
清除污漬
對付污漬的最佳辦法是盡快清理。用冷水把弄污的地方周圍沾濕,避免污漬進一步擴散或惡化。如果衣物可以洗濯,便應立刻清洗。若果污漬屬血漬或由食物弄髒,便可使用一般或註有“BIO”的洗衣劑。假如污漬無法清洗,亦可使用一些特效除污劑,但切勿將該類除污劑注入洗衣機內。待清洗完除污劑後,才使用洗衣機加以清洗。
許多除污劑均含毒素或容易燃燒,使用時應特別小心。仔細閱讀包裝上說明,並且存放在小孩無法觸及的地方。必須在空氣流通的地方使用,遠離爐火,而且切勿吸煙。所有漂白劑和化學品均可在白色的棉質及麻質衣物上使用,但宜事先在衣物的縫邊或衣腳測試一下。
| 污漬種類 | 除污劑 | 方法 | 備註 |
| 膠紙 | 白醋劑 (white spirit) | 1) 拍上熱水無效的話2) 拍上白醋劑 | 某些膠紙製造商生產專用的溶劑 |
| 血漬、蛋漬和肉汁漬 | BIO洗衣劑 | 浸水兩小時,然後加以清洗 | 以下衣物不宜用BIO洗衣劑浸泡a) 易褪色衣物b) 配金屬拉鏈的衣物c) 羊毛、綠質、防火衣物 |
| 原子筆、墨水筆、炭筆 | 用甲醇變化的酒精(methylated spirit) | 拭擦,直至污漬清除為止 | 有些原子筆的墨漬可用丙酮(aceton)拭掉,但醋酯纖維人造絲則忌用丙酮 |
| 蠟蝎 | 用甲醇變化的酒精(methylated spirit) | 用刀盡量把蠟刮去。用吸墨紙放在熨斗及布料之間,用熨斗印去蠟漬。如果尚有蠟漬殘餘,再敷上用甲醇變化的酒精 | |
| 口香糖 | 乾洗劑 | 用冰塊塗上口舌磨,再用刀盡量將蠟刮去,然後用乾洗劑輕抹 | |
| 朱古力、油漬、唇膏漬 | 乾洗劑 | 如衣物的顏色和資料許可,塗上乾濕兩用乾洗劑,再用熟肥皂水清洗 | |
| 果汁 | 用甲醇變化的酒精(methylated spirit) | 拍上用甲醇變化的酒精,再加以清洗 | 白色衣物可能會尚餘殘漬,那就要用漂白劑了 |
| 熨斗印 | 加工除污漬 | 依照包裝指示 | |
| 化妝品(眼線筆、睫毛液、粉底) | 乾洗劑 | 沾上乾洗劑,需要的話,再加以清洗 | |
| 甲油 | 洗甲水 | 拍上丙酮 (acetone) 或洗甲水 | 醋酯纖維類衣物如阿尼爾(trical),化納爾(amel),宜先用布邊試一試 |
| 刻痕 | 硼砂 (borax) | 用冷水沖洗,然後將海棉塗硼砂稀釋液(1點心匙開1/2品脫暖水),加以拭抹 | 刻痕通常較難清洗,而且會留下印記 |
| 汽車油漬 | 石蠟、去污劑(paraggin, grease solvent) | 拍上石蠟/去污劑,直至污漬清除為止,然後再加以清洗 | |
| 咖啡、茶、果汁、酒精、酒精 | 硼砂 (borax) | 用冷水浸泡。如果無效,浸在硼砂稀釋液(1點心匙開1/2品脫暖水)裡十五分鐘 | 棉質、麻質、尼龍衣物可用較熱甚至較濃的稀釋液 |
| 乳膠漆 | 清水和清潔劑混合液 | 如果污漬未乾,衣物還能清洗。若油漬已乾,則無法補救 | |
| 油漆 | 白醋劑 (white spirit) | 將白醋劑用海棉拍上或浸泡,再加以清洗 | 如果油漬己乾,宜先用油浸軟 |

柔順劑

主洗

預洗

開/關掣

機門上鎖掣及顯示燈

脫水轉速選擇掣
text_image
C Componentslow 1000 - Remote
low 1000
high and low temp
lower 2.5mm max
Whirlpool Symbol Elastic On Options Co 1000 1000 High Low Low High Temperature Temperature Energy Line Programmer Current High Low High High Low High High High High High High High High High High High High High High High High High High High High High High High High High High High High High High High High High High High High High High High High High High High High High High High High High High H-1/3/1000 High Low High Low High Low High Low High Low High Low High Low High Low High Low High Low High Low High Low High Low High Low High Low High Low High Low High Low High Low High Low High Low High Low High Low High Low High Low High Low High Low High Low High Low High Low High Low High Low High Low High Low High Low High Low High Low High Low High Low High Low High Low High Low High Low High Low High Low High Low High Low High Low High Low High Low High L| 衣物質料 | 洗衣程序 | 最高洗衣量Kg | 盛載格內洗衣劑 | 脱水轉速1000500 | 延遲過水掣 | 額外過水掣 | 半量洗衣/乾衣掣 | 水溫選機掣 | 乾衣程序掣(分鐘) | 洗衣程序 | |||
| 預洗 | 主洗 | 柔順劑 | |||||||||||
 | 非常航髒的白色棉質和尼龍,未經特別處理 | 熱水預洗 | 5 | I | II | 1000/500 | - | 任選 | 任選 | 90° | 70/120 | 1 | |
 | 未經特別處理的棉質、尼龍、或混紡衣物,而且在60°C以下不褪色 | 熱水預洗 | 5 | I | II | 1000/500 | - | 任選 | 任選 | 60° | 70/120 | ||
 | 未經特別處理的棉質、尼龍或混紡衣物,而且在40°C以下不褪色 | 熱水預洗 | 5 | I | II | 1000/500 | - | 任選 | 任選 | 40° | 70/120 | ||
 | 微髒的白色棉質+尼龍 | 無需預洗 | 5 | - | II | 1000/500 | - | 任選 | 任選 | 90° | 70/120 | 2 | |
 | 未經特別處理的棉質、尼龍或混紡,而且在60°C以下不褪色 | 無需預洗 | 5 | - | II | 1000/500 | - | 任選 | 任選 | 60° | 70/120 | ||
 | 未經特別處理的棉質、尼龍或混紡,而且在40°C以下不褪色 | 無需預洗 | 5 | - | II | 1000/500 | - | 任選 | 任選 | 40° | 70/120 | ||
 | 次過水及長時間脫水 | - | 5 | - | - | 1000/500 | - | 任選 | 任選 | - | - | 3 | |
 | 次過水及長時間脫水 | - | 5 | - | - | 1000/500 | - | - | - | - | - | 4 | |
| 長時間脫水 | - | 5 | - | - | - | 1000/500 | - | - | - | - | - | 5 | |
 | 非常航髒的尼龍和聚酯混合棉質 | 預洗 | 2.5 | I | II | 500 | 任選 | - | 任選 | 60° | 30/50 | 6 | |
 | 滲混丙烯酸、醋酸鹽及三醋酸鹽之羊毛,聚酯/混毛的混合質料 | 預洗 | 2.5 | I | II | 500 | 任選 | - | 任選 | 40° | 30/50 | ||
| [BZXX] | 微髒、經特別處理的尼龍、聚酯、棉質和混紡、丙烯酸/棉質混合質料、染色/棉質混合質料 | 無需預洗 | 2.5 | - | II | 500 | 任選 | - | 任選 | 50° | 30/50 | 7 | |
| [BCAZ] | 滲混丙烯酸、醋酸鹽及三醋酸鹽之羊毛、聚酯/混毛的混合質料 | 無需預洗 | 2.5 | - | II | 500 | 任選 | - | 任選 | 40° | 30/50 | ||
 | 次過水及短時間過水 | - | 2.5 | - | - | 500 | 任選 | - | 任選 | - | - | 8 | |
 | 次過水及短時間過水 | - | 2.5 | - | - | 500 | 任選 | - | - | - | - | 9 | |
| 短時間脫水 | - | 2.5 | - | - | - | 500 | - | - | - | - | - | 10 | |
 | 機洗羊毛物 | 無需預洗 | 1 | - | II | 500 | - | - | 任選 | 40° | - | 11 | |
| 短時間脫水 | - | 1 | - | - | - | 500 | - | - | - | - | - | 12 | |
作為乾衣機使用時請參閱後頁
本機作為乾衣機用
乾衣機使用方法
本洗衣機設有特別排水系統,可以凝固乾衣過程中產生的水蒸氣,然後在正常去水位排出。
備註:乾衣過程中,應該扭開水龍頭,而去水管亦應在正確位置(參看安裝指示)。
最高乾衣量
為取得最佳的乾衣效果,乾衣量不可超過下列所示:
一 耐用的質料最多為 2.5 千克(大件而重的衣物為 2 千克)。
一 混紡織物及合成纖維衣物為 1.5 千克。
以上乾衣容量確保衣物在乾衣鼓內適當翻動,避免衣物過份起皺,從而使乾衣機發揮劃一的良好性能。
乾衣時間
衣物的質料和脫水程序都會影響乾衣時間。可參考以下圖表:
| 乾衣量 | 待熨衣物 | 衣物全乾 | |
| 棉質 | 2.5千克 | 100分鐘 | 120分鐘 |
| 1.5千克 | 50分鐘 | 70分鐘 | |
| 合成纖維 | 1.5千克 | 50分鐘 | 50分鐘 |
| 0.5千克 | 50分鐘 | 30分鐘 |
注意事項:由於揮發性物質會容易引起火警,凡經溶劑或石油副產品處理的衣物不可放進乾衣機烘乾。
備註:必須小心乾衣程序,衣物應尚餘少許濕度,而不應把衣物過分烘乾。因為這樣會使衣物起皺,難以熨服。
睡袋、羽絨、枕頭及大毛毯都不宜多以烘乾。因為在乾衣過程中,這類衣物都會膨脹,阻礙機內空氣流動。
衣物毛屑可能會充塞在去水喉之內。
如果本機只用於焗乾用途,或清洗及焗乾個別質料的衣物,我們建議您在取出衣物之後進行一個過水及脫水的洗衣程序,令洗衣鼓保持請潔,以免下次使用時堆積毛屑。
備註:開動乾衣機時,機身會變熱。
一 開動本機時,切勿讓小孩碰觸機門玻璃。
一 拿取衣物時,不可碰觸機門玻璃,以免燙傷。
一 拿取衣物時應小心衣物的拉鏈、金屬鈕扣及類似金屬物體,以免燙傷。
選擇乾衣程序
只有在洗衣程序選擇掣處於 STOP 位置時,才可選用乾衣功能。
1) 按照乾衣程序有關最高乾衣量的“備註”把衣物放入機內,關上機門。
2) 本洗衣機有高、低溫兩種乾衣程序。高溫乾衣適用於棉質衣物,請於洗衣程序(5)完成後選用;低溫乾衣適用於合成纖維,請於洗衣程序(10)完成後選用。
3) 乾衣過程中,應扭開水龍頭,確定去水喉應在正確位置(如有疑問,請參看安裝指示),而本機已接上電源。
4) 按下半量洗衣掣,進行洗衣及乾衣。
5) 調校乾衣程序掣,選擇適當的乾衣時間。
6) 按開 / 關掣,啟動本洗衣乾衣機。
選擇洗衣 / 乾衣程序
1) 按照乾衣程序有關最高乾衣量的“備註”把衣物放入機內,關上機門。
2) 本洗衣機有高、低溫兩種乾衣程序。高溫乾衣適用於棉質衣物,請於洗衣程序 (5) 完成後選用;低溫乾衣適用於合成纖維,請於洗衣程序 (10) 完成後選用。
3) 乾衣過程中,應扭開水龍頭,確定去水喉應在正確位置(如有疑問,請參看安裝指示),而本機已接上電源。
4) 按下半量洗衣掣進行洗衣及乾衣。
5) 調校乾衣程序掣選擇適當的乾衣時間。
6) 調校洗衣程序選擇掣到理想的位置。
7) 按開 / 關掣啟動本洗衣乾衣機。