NRDB15 - Radiowecker NIKKEI - Kostenlose Bedienungsanleitung
Finden Sie kostenlos die Bedienungsanleitung des Geräts NRDB15 NIKKEI als PDF.


Benutzerfragen zu NRDB15 NIKKEI
0 Frage zu diesem Gerät. Beantworten Sie die, die Sie kennen, oder stellen Sie Ihre eigene.
Eine neue Frage zu diesem Gerät stellen
Laden Sie die Anleitung für Ihr Radiowecker kostenlos im PDF-Format! Finden Sie Ihr Handbuch NRDB15 - NIKKEI und nehmen Sie Ihr elektronisches Gerät wieder in die Hand. Auf dieser Seite sind alle Dokumente veröffentlicht, die für die Verwendung Ihres Geräts notwendig sind. NRDB15 von der Marke NIKKEI.
BEDIENUNGSANLEITUNG NRDB15 NIKKEI
NRDB15 clock radio
USER MANUAL
EN
text_image
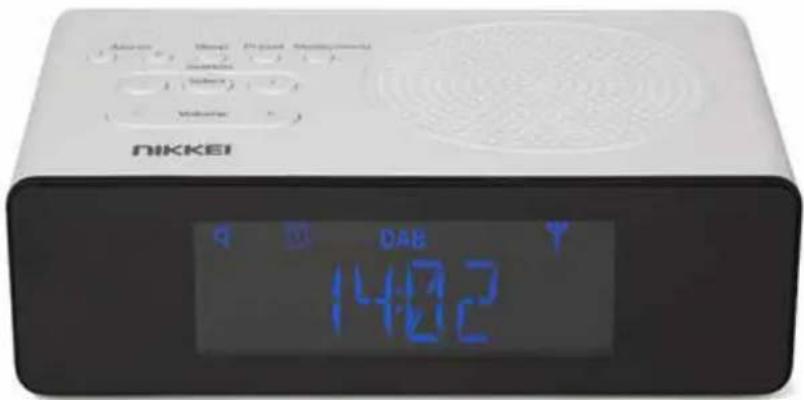
NIKKEI 14:27 DABTable of contents
1 Intended use 3
2 Safety 4
2.1 Labels in this manual 4
2.2 General safety instructions 4
3 Preparations for use 7
3.1 Unpacking 7
3.2 Package contents 7
4 Functions 8
5 Technical data 9
6 Operation 10
6.1 Turn the appliance on/off. 10
6.2 Setting the date and time 10
6.3 Radio functions 11
6.4 Setting the alarm time 12
6.5 Activate/deactivate the alarm 13
6.6 Turn off alarm 13
6.7 Snooze alarm 13
6.8 Sleep timer 14
6.9 Adjusting the brightness of the display 14
7 Open and control DAB or FM settings menu (advanced) 15
7.1 DAB settings menu 15
7.2 FM settings menu 18
8 Disposal of used electric and electronic equipment 19
1 Intended use
The Nikkei NRDB15 is intended for use as an alarm radio. The radio has a DAB/FM radio function, AUX connection and a 3,5mm headphone jacket
The device is intended for use inside..
2 Safety
2.1 Labels in this manual
WARNING A warning means that injury is possible if the instructions are not obeyed.
⚠️ CAUTION A caution means that damage to the equipment is possible.
i A note gives additional information, e.g. for a procedure.
2.2 General safety instructions
General
To prevent damage or malfunctions: Please take time and read the general safety instructions. This will avoid fire, explosions, electric shocks or other hazards that may result in damage to property and/or severe or fatal injuries.
The manufacturer is not liable for sases of material damage or personal injury caused by incorrect handling or non compliance with the safety instructions. In such cases, the warranty will be voided.
WARNING
Do not put force on the appliance. If applicable unplug the appliance.
Always check that the mains voltage corresponds to the voltage on the rating plate.
Only use original accessories from the manufacturer.
Do not spill any liquid on the appliance.
Do not insert any objects in the ventilation holes.
Do not block the ventilation holes.
Never leave children unattended with the packing material. The packaging material represents a danger of suffocation Children frequently underestimate the danger.always keep children away from the packaging material.
Do not operate the device during driving.
⚠ Warning! It is not permitted to open the product yourself or to have it opened, neither is it permitted to repair the product yourself or to have it repaired. This will void the warranties. Please let any maintenance be carried out by certified maintenance personnel.
CAUTION
⚠ Clean the outside of the appliance with a soft cloth. When the appliance is very dirty, dampen the cloth slightly with water and a neutral solution.
Do not put the appliance near a heat source. This could damage the appliance.
⚠️ Do not expose the appliance to direct sunlight.
⚠️ If your product runs on batteries: Incorrect installation can cause battery leakage and corrosion which will damage the appliance. Corrosion, oxidation, battery leakage and any other gradually acidic defect of this nature will invalidate the guarantee.
⚠️ Check the product, cable and (if applicable) adapter for any damage before use. If there is any visible damage, a strong odour, or excessive overheating of components, unplug the product.
Remarks
If this appliance is equipped with rubber feet to prevent it from moving: The feet are made from non-migrating material specially formulated to avoid leaving any marks or stains on furniture. However, certain types of furniture polishes, wood preservatives or cleaning sprays cause the rubber to soften and leave marks or a residue on the furniture, and potentially risk the surface to become damaged. To prevent damage to wooden surfaces, we recommend that you apply self-adhesive pads to the bottom of the rubber feet before installation.
i We recommend that you retain the original carton and packing materials in case it ever becomes necessary to return your product for service. This is the only way to safely protect the product against damage in transit. If you do dispose of the carton and the packing materials, please remember to recycle with due care to the environment.
3 Preparations for use
3.1 Unpacking
- Unpack the appliance carefully.
- Check the package contents as described below. If any item is missing, please contact your reseller.
- We recommend that you retain the original carton and packing materials in case it ever becomes necessary to return your product for service. This is the only way to safely protect the product against damage in transit. If you do dispose of the carton and the packing materials, please remember to recycle with due care to the environment.
3.2 Package contents
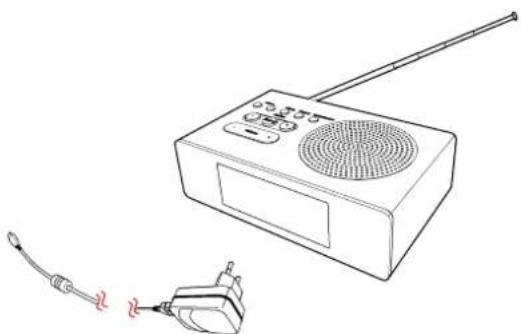
natural_image
Line drawing of a portable radio with antenna and earplifier (no text or symbols)The following items are included in the received package:
• 1x Alarm radio
• 1x Micro USB cable
• 1x Mains plug with USB portal
i If any item is missing, please contact your reseller.
4 Functions
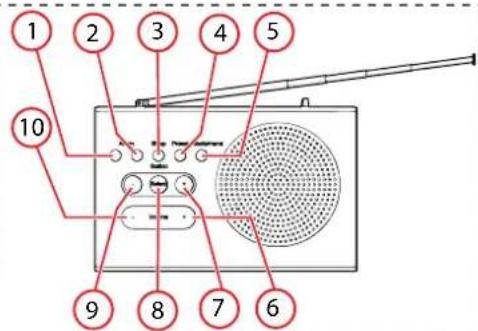
text_image
1 2 3 4 5 10 9 8 7 6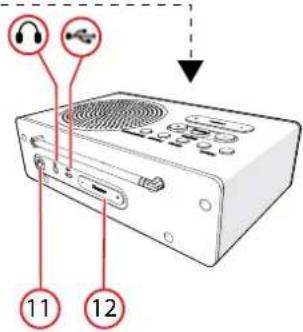
text_image
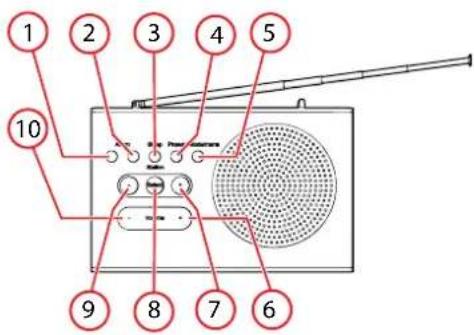
Diagram of a CD-ROM drive with labeled ports and connectors, showing audio icons and ports numbered 11 and 12.- Button ALARM 1
- Button ALARM 2
- Button SLEEP
- Button PRESET
- Button MODE / MENU
- Button VOLUME UP
- Button STATION UP
- Button SELECT
- Button STATION DOWN
- Button VOLUME DOWN
- Button ON / OFF
-
Button DIMMER
-
Headphone jack
- Micro USB connection (only for charging)
5 Technical data
• LCD Display 1.5" LCD (3.8 cm),
• Voltage: 220-240V, 50-60Hz
- Dimensions main unit: 115 x 105 x47
- Weight: 415gr
• Working range: -10^ + 55^
• Storage temperature: -20^ + 70^
• Relative humidity: 5%-95% No frost
- Power: 1W
• FM radio: 87,5-108MHz
- Antenna
• Number of programmable presets: 10DAB/10FM
- Headphone jack
- Type of audio tuner: digital with RDS function
Accessories
- Micro USB cable
- Mains plug with USB portal
• 1 Operator manual
Warranty: 24 months
For more information and warranty conditions, please visit: www.nikkei.eu
6 Operation
6.1 Turn the appliance on/off.
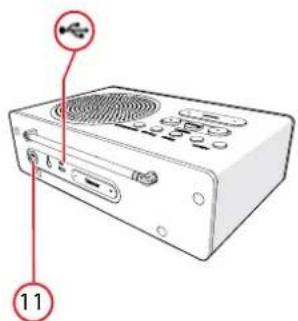
text_image
Diagram of a computer drive with labeled ports and an icon pointing to a USB symbol, marked with number 11.- Insert the USB cable into the plug.
- Connect the mains plug to a wall socket.
- Press the POWER key (11) to switch the appliance on / off.
- To switch back to the standby mode, press the POWER (11) button POWER (11) again.
6.2 Setting the date and time
The date and time is automatically synchronized by DAB. This can take a while.
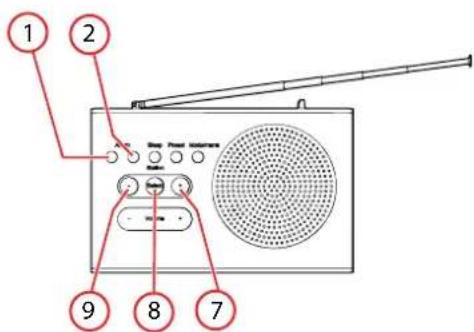
text_image
1 2 9 8 7Manually adjust the date and time. only if time does not appear automatically
- Press the button ALARM (1) / (2).
• NO CLOCK. appears on the display. - Press the button SELECT (8) to confirm.
• 00:00 is flashing on the display. - Press the button PREV + (9) or the button NEXT - (7) to select the hours.
- Press the button SELECT (8) to confirm.
- Press the + (9) or the - (7) to select the minutes.
- Press the button SELECT (8) to confirm.
• 1-1-13 is flashing on the display.
- Press the + (9) or the - (7) to select the day.
- Press the button SELECT (8) to confirm.
• 1-1-13 is flashing on the display.
- Press the + (9) or the - (7) to select the month.
• 1-1-13 is flashing on the display.
- Press the + (9) or the - (7) to select the year.
- ALRM CHG (alarm change). appears on the display.
- Press the button SELECT (8).
- The date and time is set.
6.3 Radio functions
text_image
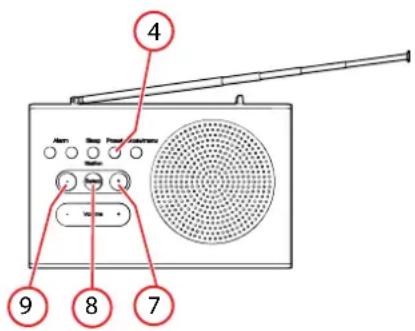
4 9 8 7Radio functions
- Use the button MODE / MENU (5) to switch between DAB and FM.
- DAB: Press the button + (7) - (9) to choose the desired frequency band.
- FM: Press the button + (7) - (9) for 2 seconds until you find the desired frequency band.
Set station presets (FM or DAB)
i You can set max. 10 FM stations.
- Press the button MODE / MENU (5) and select DAB or FM.
- Press the button + (7) - (9) to choose the desired frequency.
- Keep key PRESET (4) 3 pressed for seconds
- Press (9) to select the next empty preset space, then press SELECT (8).
• The frequency is saved.
Recall station presets
- Press the button PRESET (4).
- Press (7) until you find the correct channel and press SELECT (8) to confirm.
6.4 Setting the alarm time
- Press the POWER key (11) to switch the appliance on.
text_image
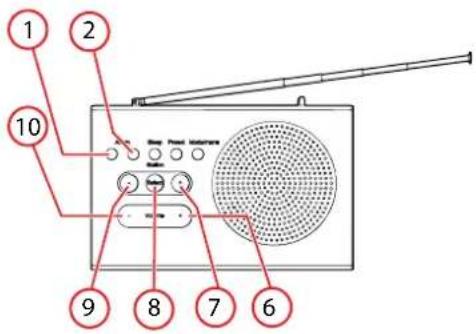
1 2 10 9 8 7 6i The alarm time can be set in the FM mode as in the DAB mode.
- Press the button ALARM (1).
- AL 1 or AL 2 appears on the display.
- Press the button SELECT (8).
• The hours starts to flash.
- Set the hour
- Use the keys STATION UP (7) / STATION DOWN (9) for this.
- Press the button SELECT (8).
• The minutes starts to flash.
- Set the minutes
- Use the keys STATION UP (7) / STATION DOWN (9) for this.
- Press the button SELECT (8).
• FM appears on the display.
- Press the button STATION UP (7) STATION DOWN (9) repeatedly until the desired setting is found.
- You can choose the following options: FM, BUZZER, DAB.
- Press the button SELECT (8).
- LAST appears on the display.
- "LAST" means the last radio station you select before you set the alarm.
- Press the button SELECT (8).
• DAILY appears on the display.
- You can choose the following options: DAILY, ONCE, WEEKEND.
- To adjust the volume, press the STATION UP (7) button or the button STATION DOWN (9).
- Press the button SELECT (8).
• ON or appears on the display.
- Press the button STATION UP (7) or STATION DOWN (9) to turn the alarm on or off.
- Press the button SELECT (8).
• SAVED appears on the display.
6.5 Activate/deactivate the alarm
text_image
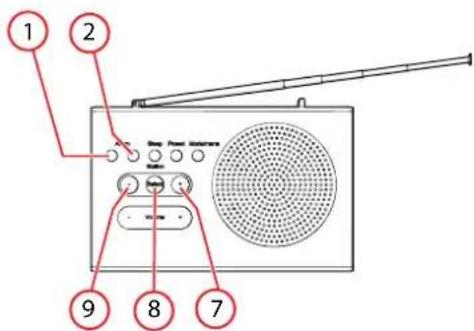
1 2 9 8 7- Press the button ALARM 1/ ALARM 2 repeatedly in order to (de) activate the alarm.
• The alarm icon appears by activated alarm. - Press the button (9) / (7).
- Press the button (8) to turn the alarm on.
6.6 Turn off alarm
text_image
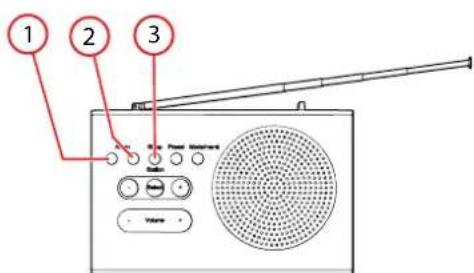
1 2 3- Press the button ALARM 1 / 2 or the button SLEEP to turn the alarm off.
• ALARM OFF appears on the display.
6.7 Snooze alarm
text_image
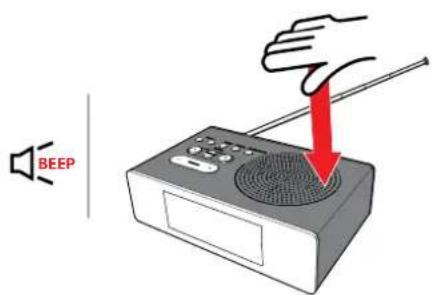
BEEP- To snooze the alarm, press the top of the NRDB15. The alarm sounds again after the snooze time has elapsed.
- Press repeatedly to set the desired sleep timer: 5/10/15/30 minutes.
6.8 Sleep timer
text_image
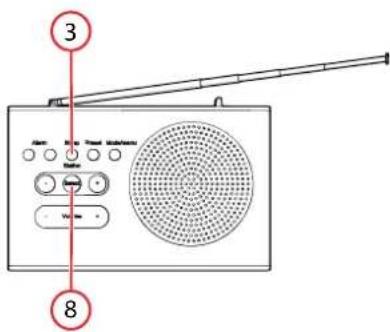
3 8- Press the button SLEEP (3) repeatedly until the desired setting is found.
- You can choose the following options: 15 / 30 / 45 / 60 / 90 / OFF, .
- Press the button SELECT (8) to confirm.
6.9 Adjusting the brightness of the display
text_image
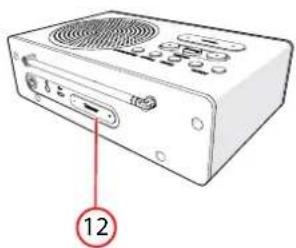
Diagram of a CD-ROM drive showing ports and buttons with label pointing to the right button- Press the button DIMMER (12) to select the brightness level.
7 Open and control DAB or FM settings menu (advanced)
- Keep key MODE / MENU (5) 3 pressed for seconds to access advance settings.
- Press the button MODE / MENU (5) repeatedly for DAB/FM mode.
7.1 DAB settings menu
text_image
1 2 3 4 5 10 9 8 7 6- Press the button - (9) / + (7) repeatedly. You can choose the following settings: Full scan Manual DRC Prune System Info.
- Press the button SELECT (8) to confirm.
Full scan: Once a scan is complete, the radio return to playing the previously selected station or first station on the list.
Manual (adjust the frequency manually)
• The frequency is shown on the display
i Adjustments to you antenna will affect the received signal strength displayed.
DRC (Dynamic Range Compression) is a process which manipulates the dynamic range (hard/soft passages) of an audio signal (only if offered by the provider).
- You can choose the following options: OFF (DEFAULT), high, low.
- Use the keys - (9) / + (7) to choose the setting and press SELECT (8) to confirm.
Prune: removes all invalid stations indicated in the station list with a "?" in front of the station name.
- Select 'yes' or 'no' with the button - (9) / + (7)
- Press the button SELECT (8) to confirm.
System
- You can choose the following options: Time, Backlite, Reset, SW ver.
• Time: to set the time, time format and source.
Set time
- Press the button SELECT (8) in the time menu to set the time.
- Press the button PREV - (9) or the button NEXT + (7) to select the hours.
- Press the button SELECT (8) to confirm.
- Press the - (9) or the + (7) to select the minutes.
- Press the button SELECT (8) to confirm.
- Press the - (9) or + (7) key to set the day.
- Press the button SELECT (8) to confirm.
- Press the - (9) or + (7) key to set the month.
- Press the button SELECT (8) to confirm.
- Press the - (9) or + (7) key to set the desired year.
- Press the button SELECT (8) to confirm.
• SAVED. appears on the display.
Update
- Press SELECT (8) to confirm your selection.
- Press the button - (9) +(7) repeatedly until UPDATE is found.
- You can choose the following options: ANY, DAB, FM, NONE.
- Press the button SELECT (8) to confirm.
12 / 24
- Press SELECT (8) to confirm your selection.
- Press the button - (9) + (7) repeatedly until 12 / 24 is found.
- Press the button - (9) + (7) repeatedly until the desired setting is found.
- You can choose the following options: 12, 24, .
- Press SELECT (8) to confirm your selection.
Backlight
The display of the radio has a backlight. The brightness level of the display can be adjusted. Also the time-out of the display can be set in seconds.
- Press the button SELECT (8) to confirm.
- You can choose the following options: Time-out, Level, .
- Press the button - (9) + (7) repeatedly until the desired setting is found.
- Press the button SELECT (8) to confirm.
Time-out
- You can choose the following options: LIGHT ON / 10/20/30/45/60/90/120/180, .
- Press the button - (9) + (7) repeatedly until the desired setting is found.
- The display is on when choosing LICHT ON.
- Press the button SELECT (8) to confirm.
- The display switches off after the pre-set time and switches on again when any button is pressed.
Level
- You can choose the following options: 1, 2, 3, 4, 5.
- Press the button SELECT (8) to confirm.
i You can also press the button DIMMER (12) to select the brightness level.
RESET
- All user defined settings will be lost: time/date, settings, DAB station list and preset stations.
- You can choose the following options: N (no), Y (yes), .
- Press the button SELECT (8) to confirm.
Software version
- In the display you can see the current software version.
- Press the button SELECT (8) to confirm.
Info
- You can choose the following options: Service name, DLS, Signal strength, PTY, Ensemble, Frequency, Signal quality, bitrate, Codec, Time, Date.
- Use the keys - (9) / + (7) to choose the setting and press SELECT (8) to confirm.
7.2 FM settings menu
- You can choose the following options: Scan, Audio, System, Info.
- Press the button - (9) + (7) repeatedly until the desired setting is found.
- Press the button SELECT (8) to confirm.
Scan: you can choose between: Local and DX. Choose local so only the strong stations will be scanned. The default setting is DX.
Audio: you can choose between: Stereo/ Mono. By default, all stereo stations are reproduced in stereo. For weak stations this may result in poor quality audio. The audio quality can be improved using Mono.
System
- See DAB system menu. In the FM mode only TIME/BACKLIGHT/RESET/SW are available.
Info
- You can choose the following options: PTY (Programm type), Service name, Radio text, PTY, PS, Stereo / Mono, Time, Date.
- Use the keys - (9) / + (7) to choose the setting and press SELECT (8) to confirm.
8 Disposal of used electric and electronic equipment

The meaning of the symbol on the material, its accessory or packaging indicates that this product shall not be treated as household waste. Please, dispose of this equipment at your applicable collection point for the recycling of electrical and electronic equipments waste. In the European Union and Other European countries which there are separate collection systems for used electrical and electronic product. By ensuring the correct disposal of this product, you will help prevent potentially hazardous to the environment and to human health, which could otherwise be caused by unsuitable waste handling of this product. The recycling of materials will help conserve natural resources. Please do not therefore dispose of your old electrical and electronic equipment with your household waste.
For more detailed information about recycling of this product, please contact your local city office, your household waste disposal service or the shop where you purchased the product.
For more information and warranty conditions, please visit: www.nikkei.eu