SCDT 9010 LX - Dunstabzugshaube SCHNEIDER - Kostenlose Bedienungsanleitung
Finden Sie kostenlos die Bedienungsanleitung des Geräts SCDT 9010 LX SCHNEIDER als PDF.


Benutzerfragen zu SCDT 9010 LX SCHNEIDER
0 Frage zu diesem Gerät. Beantworten Sie die, die Sie kennen, oder stellen Sie Ihre eigene.
Eine neue Frage zu diesem Gerät stellen
Laden Sie die Anleitung für Ihr Dunstabzugshaube kostenlos im PDF-Format! Finden Sie Ihr Handbuch SCDT 9010 LX - SCHNEIDER und nehmen Sie Ihr elektronisches Gerät wieder in die Hand. Auf dieser Seite sind alle Dokumente veröffentlicht, die für die Verwendung Ihres Geräts notwendig sind. SCDT 9010 LX von der Marke SCHNEIDER.
BEDIENUNGSANLEITUNG SCDT 9010 LX SCHNEIDER

SCHNEIDER
T-BOX
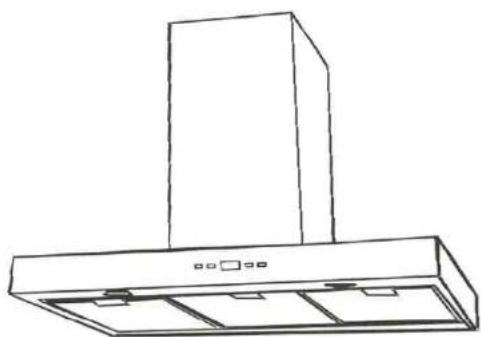
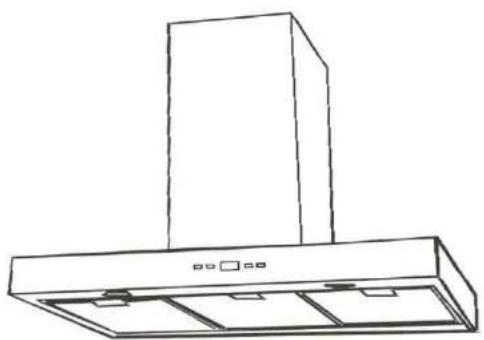
DECORATIVE COOKER HOOD
Model No.SCDT6010X/SCDT9010X
INSTRUCTION MANUAL
natural_image
Line drawing of a kitchen air conditioner unit with ventilation slots and a chimney (no text or symbols)◆PLEASE READ THE MANUAL CAREFULLY BEFORE OPERATION.
Dear Customer,
If you follow the recommendations contained in this Instruction Manual, our appliance will give you constant high performance and will remain efficient for many years to come.
CONTENTS
RECOMMENDATIONS AND SUGGESTIONS CHARACTERISTICS
INSTALLATION & USE
MAINTENANCE
RECOMMENDATIONS AND SUGGESTIONS
INSTALLATION
* The manufacturer will not be held liable for any damages resulting from incorrect or improper installation.
* Please read this instruction manual before installing and using this cooker hood. Properly keep this instruction manual in a safe place for future reference.
* This cooker hood can be used either in the Ducted Mode (ducting fumes to the outside) or in the Recirculation Mode (internal recycling). The choice of modes can be left to customers.
* Only a qualified and trained service technician can undertake the work of installation and servicing.
* Check that the mains voltage corresponds to the one indicated on the rating plate fixed inside the hood.
* Check that the domestic power supply guarantees adequate earthing.
* Do not connect the hood to exhaust ducts carrying combustion fumes (boilers, fireplaces, etc.)
* If the hood is used in conjunction with non-electrical appliances (e. g. gas burning appliances), a sufficient degree of aeration must be guaranteed in the room in order to prevent the backflow of exhaust gas. The kitchen must have an opening directly with the open air in order to guarantee the entry of clean air.
* The minimum distance is 750mm from the cooker hood to a gas hob, and is 650mm to an electric hob. If the installation instructions for gas hobs specify a greater distance, this must be taken into account.
NOTICE: Considering excessive weight, two or more people are required to install or move this appliance. Failure to do so can cause physical injuries.
USE
* The cooker hood has been designed only for domestic use to eliminate kitchen fumes.
* Never use the hood for purposes other than what it has been designed for.
* Never leave high naked flames under the hood when it is in operation.
* Adjust the flame intensity to direct it onto the bottom of the pan only; making sure that it does not engulf the pan sides.
* Deep fat fryer must be continuously monitored during use: overheated oil can burst into flame.
* The hood should not be used by children or person not instructed in its correct use.
MAINTENANCE
* Proper maintenance of the Range Hood will assure proper performance of the unit.
* Disconnect the hood from the main supply before carrying out any maintenance work.
* Clean and/or replace aluminum grease filters and activated charcoal filters after specified period of time.
* Clean the hood using a damp cloth and a neutral liquid detergent.
* DISPOSAL: Do not dispose this product as unsorted municipal waste. Collection of such waste separately for special treatment is necessary.
WARNING!!
In certain circumstances electrical appliances may be a danger hazard.
* Do not check the status of the filters while the cooker hood is operating.
* Do not touch the light bulbs after appliance use.
* Do not disconnect the appliance with wet hands.
* Avoid free flame, as it is damaging for the filters and a fire hazard.
* Constantly check food frying to avoid that the overheated oil may become a fire
hazard.
* Disconnect the electrical plug prior to any maintenance.
* Children don't recognize the risks of electrical appliances. Therefore use or keep the appliance only under supervision of adults and out of the reach from children.
* Don't use this product outdoor.
* This appliance is not intended for use by persons (including children) with reduced physical, sensory or mental capabilities, or lack of experience and knowledge, unless they have been given supervision or instruction concerning use of the appliance by a person responsible for their safety. Children should be supervised to ensure that they do not play with the appliance.
* There shall be adequate ventilation of the room when the range hood is used at the same time as appliances burning gas or other fuels.
* There is a fire risk if cleaning is not carried out in accordance with instructions.
* Do not flambé under the range hood.
* The discharge air must not be discharged into a flue which is used for exhausting fumes from appliances burning gas or other fuels.
CHARACTERISTICS
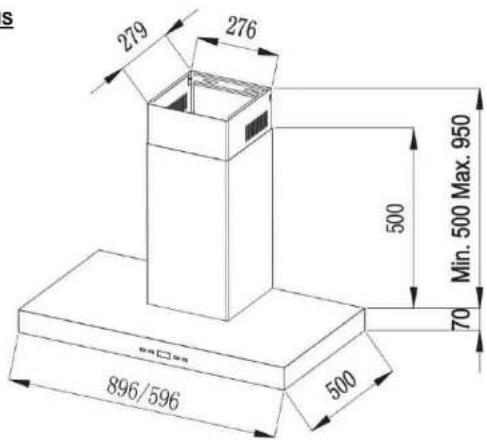
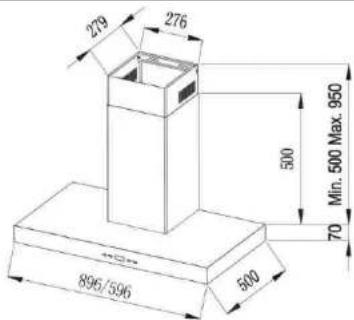
DIMENSIONS
text_image
279 276 500 Min. 500 Max. 950 70 896/596 500COMPONENTS
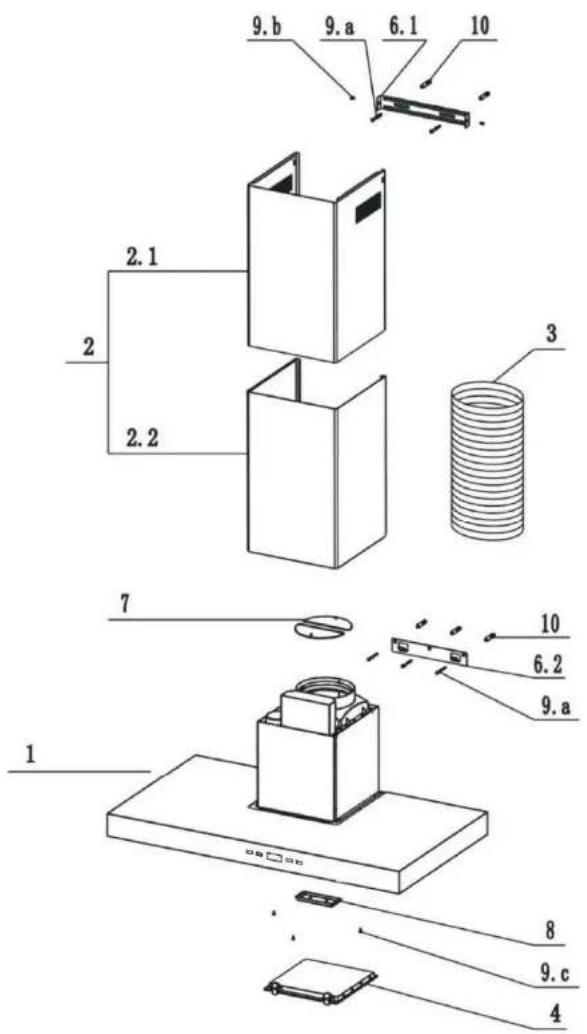
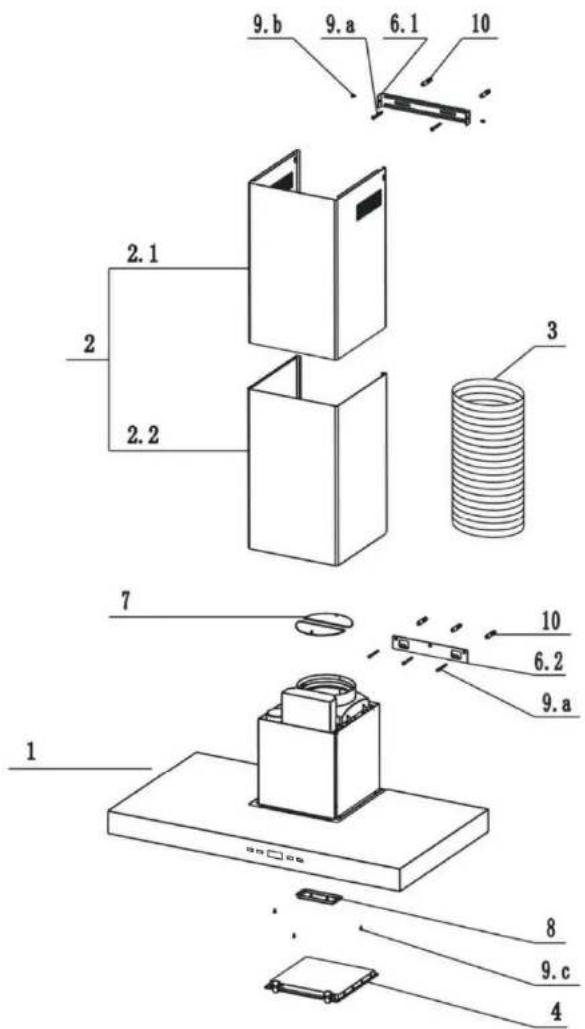
| Ref | Q'ty | Product Components |
| 1 | 1pc | Hood body, complete with: controls, lights, blower, filters, air outlet adapter |
| 2 | 1set | Telescopic Chimney comprising |
| 2.1 | 1pc | Decorative Chimney Top |
| 2.2 | 1pc | Decorative Chimney Bottom |
| 3 | 1pc | Plastic Exhaust Duct or Aluminum Exhaust Duct (optional) |
| 4 | 1pc | Charcoal filter (optional) |
| 5 | 1pc | Wall or Roof Cap (optional) |
| Ref | Q'ty | Installation Components |
| 6.1 | 1pc | Chimney Mounting Bracket |
| 6.2 | 1pc | Hood Mounting Bracket |
| 7 | 1set | Damper (flaps) |
| 8 | 1pc | Oil Cup |
| 9.a | 5pcs | Mounting Screws (ST 5 X 50MM) |
| 9.b | 2pcs | Chimney Mounting Bracket Screws (M 4 X 10 MM) |
| 9.c | 3pcs | Chimney Bottom Fixing Screws (ST 4 X10 MM) |
| 10 | 5pcs | Drywall Anchors |
| Ref | Q'ty | Documentations |
| 14 | 1pc | Instruction Manual |
text_image
9. b 9. a 6. 1 10 2. 1 2 2. 2 3 7 10 6. 2 9. a 1 8 9. c 4INSTALLATION & USE
Note 1: On stainless steel hoods, carefully remove the plastic protective film from all exterior surfaces of the hood and chimney prior to final installation.
Note 2: At least two people will be required to mount the hood.
WALL DRILLING AND BRACKETS FIXING (X=Y-260)
- Draw a vertical line on the supporting wall up to the ceiling, or as high as practical, at the centre of the area in which the hood will be installed.
- Draw a horizontal line at 650mm above the electric hob or 750mm above the gas hob.
- Place chimney mounting bracket 6.1 on the wall as shown about 20mm from the ceiling or upper line reference line.
- Mark the wall at the centre of the holes in the bracket.
- Place the hood mounting bracket 6.2 on the wall as shown aligning the central notches to the vertical reference line.
- Mark the wall at the centre of the holes in the bracket.
- Drill 10mm holes at all the centre points marked.
- Fix the two brackets using the mounting screws and drywall anchors.
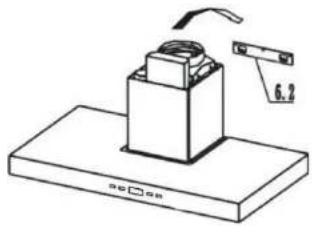
MOUNTING THE HOOD BODY
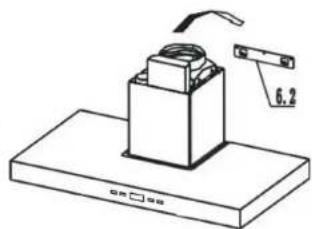
- Hook the body onto the hood mounting bracket 6.2 as shown.
- Balance the hood body by slightly adjusting the hood mounting bracket. Gently lower the hood until it securely engages the bracket.
natural_image
Technical line drawing of a mechanical assembly with a base plate and a clamp, no text or symbols presentDAMPER (FLAPS) FIXING
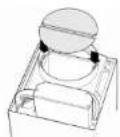
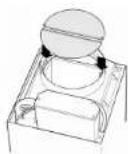
- Fix the damper (flaps) into the air outlet adapter.
- To be sure that the damper (flaps) is locked well on the air outlet adapter, it should be flexible in opening and closing.
DUCT FIXING
Caution: ONLY ducting that complies with New Zealand Standards is to be used.
- Attach an adequate length of 150mm round duct into the recessed area of the air outlet adapter.
- Secure the duct using two screws that have been already fixed on the two sides of the air outlet adapter. Make sure the duct is fixed well on.
CONNECTIONS
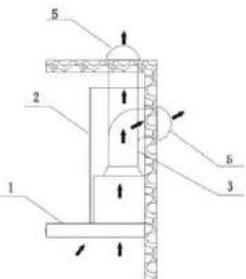
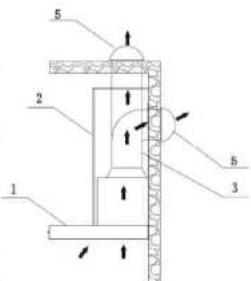
Ducted mode air exhaust system
Caution: ONLY ducting that complies with New Zealand Standards is to be used.
- Decide where the ductwork will run between the hood and the outside.
- A straight, short duct run will allow the hood to perform most efficiently.
- Long duct runs, elbows, and transitions will reduce the performance of the hood. Use as few of them as possible. Larger ducting may be required longer duct runs.
text_image
1 2 5 3 5-
Attach an adequate length of 150mm round duct to the air outlet adapter.
-
The air must not be discharge into a flue that is used for exhausting fumes from appliances burning gas or other fuels" "Regulations concerning the discharge of air have to be fulfilled.
-
Install a roof/wall cap. Connect round metal ductwork to cap and work back towards hood location. Use duct tape to seal the joints between ductwork sections.
Recirculation Mode

Caution: Do not use plastic or rigid metal ducting.
- Determine the length of the compressed flexible aluminum ducting. Attach an adequate length of 150mm round duct to the air outlet adapter.
- Install the charcoal filter on.
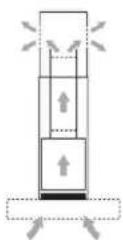
- Please note that the air will flow out from the two grids on the sides of the decorative chimney top.
Electrical Connection
* Electrical wiring must be done by a qualified person(s) in accordance with all applicable codes and standards. Turn off electrical power at service entrance before wiring.
* If the supply cord is damaged, it must be replaced by the manufacturer, its service agent or similarly qualified persons in order to avoid a hazard.
* Do not use the plug and an extension cord other than the ones initially supplied with the hood.
* The earthing of this hood is compulsory. Do not remove ground prong of the plug.
TELESCOPIC CHIMNEY COMPRISING ASSEMBLY
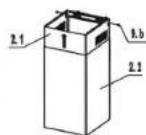
Decorative Chimney Top
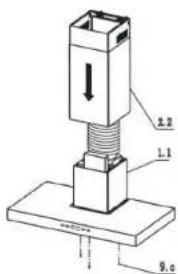
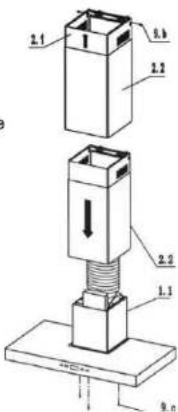
Raise the decorative chimney top 2.1 up inside the decorative chimney bottom 2.2. Secure decorative chimney top 2.1 to the chimney mounting bracket 6.1 that is well fixed on the wall with the two chimney bracket screws 9 b supplied from two sides.
Decorative Chimney Bottom
- Carefully slide the decorative chimney bottom 2.2 down outside the decorative chimney top 2.1. Carefully place the decorative chimney bottom 2.2 into the recessed area of the hood body top.
- Fix the Decorative Chimney Bottom 2.2 with the three decorative Chimney Bottom screws 9.c supplied from inside of hood body.
text_image
2.2 1.1 9.0OPERATION OF CONTROLS
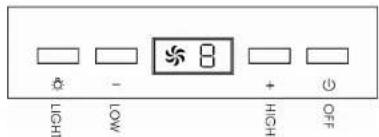
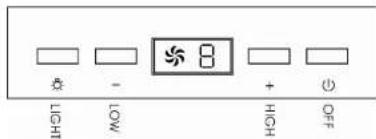
The hood is operated using the electric switch on the front panel.
The blower switch turns the blower on speed settings "-" and "+"
(1) - OFF
- LOW SPEED
+ - HIGH SPEED
LIGHT
text_image
- LOW + OFF - 8MAINTENANCE
GREASE FILTER
* The grease filters should be cleaned frequently (every two months of operation, or more frequently for heavy use). Use a warm detergent solution.
* Grease filters are washable.
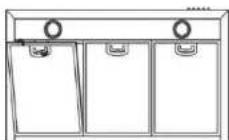
- Remove the grease filter one by one by pulling out each latch. This will disengage the filter from the hood. Tilt the filter downward and remove.
- Wash the filters, taking care not to bend them. Allow them to be dry before refitting.
- When refitting the filters, make sure that the handle is visible from the outside.
- To install the grease filter, align rear filter tabs with slots in the hood. Pull out the latch, push filter into position and release. Make sure the filter is securely engaged after assembly.
NON-DUCTED RECIRCULATION CHARCOAL FILTER
This filter is not washable, can not be regenerated, and should be replaced
approximately every 3 months of operation, or more frequently in the case of heavy usage.
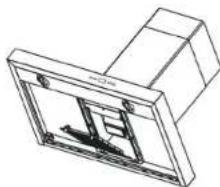
- To install the charcoal filter, and lock it until the stop click is heard.
- Install grease filter after charcoal filter is installed.
natural_image
Technical line drawing of a mechanical component with internal structure (no text or symbols)HALOGEN BULBS
This range hood may require two halogen bulbs (Type JCD, 12V, 20W Max, G-4 Base)
WARNING: Always switch off the electrical supply before carrying out any operation on the appliance.
To change bulbs:
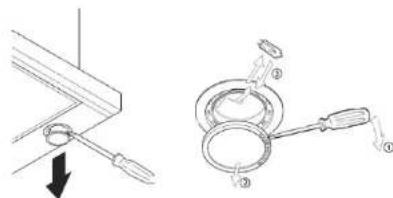
- Carefully remove the halogen bulb cover ② by using the flat screw driver.
- Remove the bulb by pulling sidewards (DO NOT ROTATE).
- Replace with Type JCD, 12V, 20W Max, G-4 Base halogen bulb. Do not touch replacement bulb with bare hands!
natural_image
Technical line drawing showing two mechanical assembly steps: one with a tool and arrow, the other with a ring and lever (no text or symbols)CAUTION:
- THE SURFACE, THE COVER OF THE HALOGEN BULBS MAY BE HOT. TAKE CARE WHEN TAKING THE REPLACEMENT
- BULBS MAY BE HOT. TAKE CARE WHEN TAKING THE REPLACEMENT.
NORMAL BULBS
This range hood may require two normal bulbs (Type E14, 15W Max).
WARNING: Always switch off the electrical supply before carrying out any operation on the appliance.
To change bulbs:
- Carefully remove the normal bulbs by hand.
- Replace with Type E14, 15W Max normal bulb. Do not touch replacement bulb with bare hands!
CAUTION:
BULBS MAY BE HOT. TAKE CARE WHEN TAKING THE REPLACEMENT.
OIL CUP
-
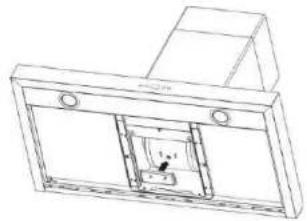
To install the oil cup, and lock it on to the motor blower.
-
The oil cup should be cleaned frequently. The oil accumulated inside the oil cup can not be more than half. Use a warm detergent solution.
-
Allow it to be dry before refitting.
natural_image
Technical line drawing of a mechanical assembly with mounting holes and internal components (no text or symbols)HOOD CLEANING
Stainless steel is one of the easiest materials to keep clean. Occasional care will help preserve its fine appearance.
Cleaning tips:
* Hot water with soap or detergent is all that is usually needed.
* Follow all cleaning by rinsing with clear water. Wipe dry with a clean, soft cloth to avoid water marks.
* For discolorations or deposits that persist, use a non-scratching household cleanser or stainless steel polishing powder with a little water and a soft cloth.
* For stubborn cases use a plastic scouring pad or soft bristle brush together with cleanser and water. Rub lightly in direction of polishing lines or "grain" of the stainless finish. Avoid using too much pressure that may mar the surface.
* Do not allow deposits to remain for long periods of time.
* Do not use ordinary steel wool or steel brushes. Small bits of steel may adhere to the surface causing rust.
* Do not allow salt solutions, disinfectants, bleaches, or cleaning compounds to remain in contact with stainless steel for extended periods. Many of these compounds contain chemicals that may be harmful. Rinse with water after exposure and wipe dry with a clean cloth.
* Painted surfaces should be cleaned with warm water and mild detergent only.

SCHNEIDER
T-BOX CAMPANA EXTRACTORA DECORATIVA
N° DE MODELO: SCDT6010X/SCDT9010X
MANUAL DE INSTRUCCIONES
natural_image
Line drawing of a kitchen air conditioner unit with ventilation grilles and a chimney (no text or symbols)♦ LEA ATENTAMENTE ESTE MANUAL ANTES DE UTILIZAR EL APARATO.
Estimado/a cliente:
Si sigue las recomendaciones incluidas en el presente manual, disfrutará durante muchos años del mejor rendimiento y eficacia nuestro electrodoméstico.
CONTENIDO
RECOMENDACIONES Y SUGERENCIAS
CARACTERÍSTICAS
INSTALACIÓN Y USO
MANTENIMIENTO
RECOMENDACIONES Y SUGERENCIAS
INSTALACIÓN
* El fabricante no se responsabilizará de daños derivados de una instalación incorrecta o inapropiada.
* Lea con atención el presente manual de instrucciones antes de instalar y usar la campana. Guarde el manual en un lugar seguro por si hiciera falta en un futuro.
* La campana puede utilizarse tanto en modo canalizado (se canalizan los humos hacia el exterior) o en modo de recirculación (reciclado interno). Del usuario depende la elección del modo.
* Los trabajos de instalación y reparación deben realizarlas solamente técnicos con la cualificación y formación debidas.
* Verifique que la tensión de alimentación se corresponde a lo especificado en la placa de características que se encuentra en el interior de la campana.
* Compruebe que la fuente de alimentación doméstica dispone de una puesta a tierra adecuada.
* No conecte la campana a conductos de escape por los que circulen humos de combustión (de calderas, chimeneas, etc.)
* Si se utiliza la campana con aparatos no eléctricos (ej., cocinas de gas), debe asegurarse en la habitación un grado suficiente de ventilación a fin de evitar el flujo de retorno del gas de escape. La cocina debe tener alguna abertura directa al exterior para garantizar la entrada de aire limpio.
* La distancia mínima es de 750 mm desde la campana hasta un fogón de gas, y de 650 mm si la placa es eléctrica. Si las instrucciones de montaje del fogón de gas especifican una distancia mayor, téngala en cuenta.
AVISO: Dado su gran peso, hacen falta dos o más personas para montar o mover este aparato. En caso contrario, podrían producirse lesiones graves.
USO
* La campana está diseñada exclusivamente para uso doméstico para extraer los humos de una cocina.
* Nunca utilice la campana para otros fines que no sean los indicados.
* Nunca deje llamas desnudas debajo de la campana cuando esté en funcionamiento.
* Ajuste la intensidad de la llama para que dé solamente en el culo de la sartén, asegurándose de que no sobrepase los bordes de la misma.
* Si se usa una freidora, conviene tenerla vigilada en todo momento: el aceite sobrecalentado puede producir llama.
* La campana no debe usarla ningún niño o persona que no sepa manejarla correctamente.
MANTENIMIENTO
* Un mantenimiento adecuado de la campana es garantía de un buen funcionamiento.
* Desconecte la campana de la toma de corriente antes de realizar trabajos de mantenimiento.
* Limpie o cambie los filtros de aluminio para la grasa y los filtros de carbón activado al cabo del periodo especificado.
* Limpie la campana con un paño suave y un detergente líquido neutro.
* ELIMINACIÓN: No deseche este producto junto a las demás basuras domésticas. Es necesario que se lleve a un lugar especial donde se recojan residuos similares para su tratamiento.
ADVERTENCIA:
En determinadas circunstancias, los electrodomésticos pueden suponer un peligro.
* No revise el estado de los filtros mientras la campana esté funcionando.
* No toque las bombillas si el aparato ha estado funcionando.
* No desconecte el aparato si tiene las manos mojadas.
* Evite las llamas desnudas, ya que pueden dañar los filtros además de suponer peligro de incendio.
* Revise constantemente los alimentos que esté friendo ya que el aceite excesivamente caliente puede producir un incendio.
* Desconecte el enchufe eléctrico antes de realizar cualquier labor de mantenimiento.
* Los niños no son conscientes de los riesgos que suponen los electrodomésticos. Así pues, use o guarde este tipo de aparatos fuera del alcance de los niños o en lugares supervisados por un adulto.
* No utilice este producto en exteriores.
* Este electrodoméstico no está diseñado para ser utilizado por personas (incluidos niños) con capacidades físicas, sensoriales y mentales reducidas, con falta de experiencia y conocimientos, salvo que hayan recibido la instrucción o supervisión adecuada sobre el uso del electrodoméstico por una persona responsable de su seguridad. Es necesario controlar que los niños no jueguen con el electrodoméstico
* La habitación deberá tener una ventilación adecuada cuando se utilice la campana con otros aparatos que quemen gas u otros combustibles.
* Existe peligro de incendio si no se realiza la limpieza tal como se indica en las instrucciones.
* No flamee nada debajo de la campana.
* El aire de descarga no debe expulsarse en una salida que se utilice para humos de combustión de gas u otros combustibles.
CARACTERÍSTICAS
DIMENSIONES
text_image
279 276 500 Min. 500 Max. 950 70 896/596 500COMPONENTES
| Ref. | Ctdad. | Componentes del producto |
| 1 | 1 pz. | Cuerpo de campana, con sus correspondientes: controles, luces, ventilador, filtros, adaptador de salida de aire |
| 2 | 1 juego | Conjunto de chimenea telescópica |
| 2.1 | 1 pz. | Parte superior decorativa de chimenea |
| 2.2 | 1 pz. | Parte inferior decorativa de chimenea |
| 3 | 1 pz. | Conducto de escape de plástico o de aluminio (opcional) |
| 4 | 1 pz. | Filtro de carbón (opcional) |
| 5 | 1 pz. | Tapa de pared o de techo (opcional) |
| Ref. | Ctdad. | Componentes de instalación |
| 6.1 | 1 pz. | Soporte de fijación de la chimenea |
| 6.2 | 1 pz. | Soporte de fijación de la campana |
| 7 | 1 juego | Regulador de tiro (aletas) |
| 8 | 1 pz. | Cubeta del aceite |
| 9.a | 5 pzs. | Tornillos de fijación (ST 5 x 50 mm) |
| 9.b | 2 pzs. | Tornillos del soporte de fijación de la chimenea (M4 x 10 mm) |
| 9.c | 3 pzs. | Tornillos de fijación de la parte inferior de la chimenea (ST 4 x 10 mm) |
| 10 | 5 pzs. | Anclajes de muro en seco |
| Ref. | Ctdad. | Documentación |
| 14 | 1 pz. | Manual de instrucciones |
text_image
9. b 9. a 6. 1 10 2. 1 2 2. 2 3 7 10 6. 2 9. a 1 8 9. c 4INSTALACIÓN Y USO
Nota 1: En campanas de acero inoxidable, quite con cuidado la película protectora de plástico de todas las superficies exteriores de la campana y de la chimenea antes del montaje definitivo.
Nota 2: Hacen falta al menos dos personas para montar la campana.
TALADROS EN LA PARED Y FIJACIÓN DE LOS SOPORTES (X=Y-260)
- Dibuje una línea vertical en la pared de soporte hasta el techo, o tan alto como resulte práctico, en el centro de la zona donde se vaya a instalar la campana.
- Dibuje una línea horizontal a 650 mm por encima de la placa eléctrica o a 750 mm si el fogón es de gas.
- Coloque el soporte de fijación de la chimenea 6.1 en la pared como se muestra, a unos 20 mm del techo o límite superior, alineando el centro (muesca) con la línea de referencia vertical.
- Marque la pared por el centro de los orificios del soporte.
- Coloque el soporte de fijación de la campana 6.2 en la pared como se muestra, alineando las muescas centrales con la línea de referencia vertical.
- Marque la pared por el centro de los orificios del soporte.
- Taladre orificios de 10 mm en los puntos marcados.
- Use los tornillos de fijación y los anclajes de muro en seco para fijar dos soportes.
MONTAJE DE LA CAMPANA
- Cuelgue el cuerpo en el soporte de fijación de la campana 6.2 como se muestra.
- Ajuste ligeramente el soporte de fijación para equilibrar el cuerpo de la campana.
text_image
6.2Baje con cuidado la campana hasta que quede sujeta del soporte.
FIJACIÓN DEL REGULADOR DE TIRO (ALETAS)
- Fije el regulador de tiro (aletas) al adaptador de salida.
- El regulador de tiro (aletas) estará bien puesto en el adaptador de salida de aire si se abre y se cierra sin dificultad.
FIJACIÓN DEL CONDUCTO
Precaución: SOLAMENTE se deben utilizar conductos que cumplan con las normativas neozelandesas.
- Acople un conducto redondo adecuado de 150 mm de longitud en la zona embutida del adaptador de la salida de aire.
- Sujete el conducto con la ayuda de los dos tornillos previamente fijados a ambos lados de dicho adaptador. Asegúrese de que el conducto queda bien fijado.
CONEXIONES
Sistema de aire de escape en modo canalizado
Precaución: SOLAMENTE se deben utilizar conductos que cumplan con las normativas neozelandesas.
- Decida por dónde quiere que el conducto vaya entre la campana y la parte exterior.
- La campana funcionará mejor si se emplea un conducto corto y recto.
- Los tramos largos, codos y transiciones memarán el rendimiento de la campana. Use cuantos menos sea posible. Es posible que con conductos mayores para que el rendimiento sea m
- Acople un conducto redondo adecuado de 150 mm de longitud al adaptador de salida de aire.
- El aire no debe descargarse en una salida que se utilice para humos de combustión de gas u otros combustibles. Han de cumplirse las normativas relativas a la descarga de aire.
- Coloque una tapa de techo/pared. Conecte el conducto redondo de metal a la tapa y vaya bajando hacia la ubicación de la campana. Use cinta para conductos
text_image
1 2 3 5 5para sellar las juntas entre los tramos.
Modo de recirculación
Precaución: no use conductos de metal rígido ni de plástico.
- Determine la extensión del conducto de aluminio flexible comprimido. Acople un conducto redondo adecuado de 150 mm de longitud al adaptador de salida de aire.
- Instale el filtro de carbón.
- Observe si el aire sale por las dos rejillas que hay en ambos lados de la parte superior decorativa de la chimenea.
Conexión eléctrica
* El cableado eléctrico debe realizarlo personal cualificado siguiendo todas las normas y estándares pertinentes. Corte la corriente eléctrica en el cajetín general de interruptores automáticos antes de realizar conexiones.
* Para evitar riesgos, si se daña el cable de alimentación, éste debe ser sustituido por el fabricante, sus técnicos de servicio o personas con una cualificación similar.
* No utilice enchufes ni cables prolongadores que no sean los originales de la campana.
* La toma de tierra de la campana es obligatoria. No quite la clavija de tierra del enchufe.
CONJUNTO DE CHIMENEA TELESCÓPICA
Parte superior decorativa de chimenea
Levante la parte superior decorativa 2.1 por dentro de la parte inferior 2.2 de la chimenea. Fije la parte superior 2.1 al soporte de fijación de la chimenea 6.1, que debe estar bien sujeto en la pared, desde ambos lados con los dos tornillos 9.b (suministrados).
Parte inferior decorativa de chimenea
- Deslice con cuidado la parte inferior decorativa de la chimenea 2.2 por fuera de la parte superior 2.1. Coloque con cuidado la parte inferior 2.2 en la zona embutida de la
text_image
1.1 1.2 1.3 2.2 1.1 9.0parte superior del cuerpo de la campana.
- Fije la parte inferior 2.2 con sus tres tornillos 9.c (suministrados) desde dentro de la campana.
FUNCIONES DE LOS CONTROLES
La campana se enciende con el interruptor eléctrico que hay en el panel frontal.
El ventilador se activa con un interruptor que regula su velocidad "-" o "+".
(1) - APAGADO
- VELOCIDAD BAJA
+ - VELOCIDAD ALTA
- LUZ
text_image
8 + - LOW HIGH OFFMANTENIMIENTO
FILTRO DE GRASA
* Los filtros de grasa deben limpiarse a menudo (cada dos meses de funcionamiento, o con mayor frecuencia si el uso es intensivo). Utilice una solución caliente con detergente.
* Los filtros de grasa se pueden lavar.
- Quite los filtros uno a uno tirando de cada pestillo. Eso separará el filtro de la campana. Incline el filtro hacia abajo y quitelo.
- Lave los filtros con cuidado de no doblarlos. Deje que se sequen antes de volver a colocarios.
- Al volver a ponerlos, asegúrese de que el asa se vea desde fuera.
- Para colocar el filtro de grasa, alinee las pestañas traseras con las ranuras de la campana. Tire del pestillo, meta el filtro en su sitio y suelte. Cerciórese de que el filtro queda bien sujeto tras el montaje.
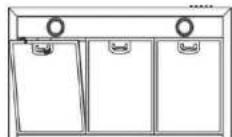
FILTRO DE CARBÓN PARA RECIRCULACIÓN NO CANALIZADA
El filtro no se puede lavar ni regenerar y debe sustituirse aproximadamente cada 3 meses de funcionamiento, o con mayor frecuencia si el uso es intensivo.
- Para colocar el filtro de carbón, encájelo hasta que oiga que un chasquido.
- Coloque el filtro de grasa después de poner el filtro de carbón.
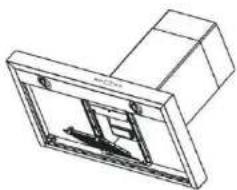
natural_image
Technical line drawing of a mechanical bracket or mounting bracket with internal components (no text or symbols)BOMBILLAS HALÓGENAS
Esta campana puede utilizar dos bombillas halógenas (tipo JCD de 12 V, 20 W como máx., base G-4).
ADVERTENCIA: Corte la corriente siempre que vaya a realizar cualquier trabajo en el electrodoméstico.
Para cambiar las bombillas:
- Use un destornillador de punta plana con cuidado para quitar la tapa de las bombillas.
- Tire lateralmente de la bombilla para extraerla (NO LA GIRE).
- Cámbiela por una bombilla halógena de base G-4 tipo JCD de 12 V y 20 W como máx. ¡No toque la bombilla de repuesto con las manos desnudas!
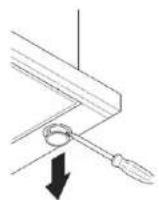
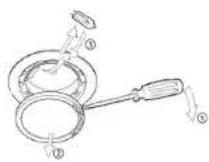
PRECAUCIÓN:
- ES POSIBLE QUE LA SUPERFICIE Y LA TAPA DE LAS BOMBILLAS
HALÓGENAS ESTÉ CALIENTE. TENGA CUIDADO AL CAMBIARLAS.
- LAS BOMBILLAS PUEDEN ESTAR CALIENTES. TENGA CUIDADO AL CAMBIARLAS.
BOMBILLAS NORMALES
Esta campana puede utilizar dos bombillas normales (tipo E15 de 15 W como máx.).
ADVERTENCIA: Corte la corriente siempre que vaya a realizar cualquier trabajo en el electrodoméstico.
Para cambiar las bombillas:
- Quite las bombillas normales con la mano; tenga cuidado.
- Cámbielas por otras de tipo E14 y 15W como máx. ¡No toque la bombilla de repuesto con las manos desnudas!
PRECAUCIÓN:
LAS BOMBILLAS PUEDEN ESTAR CALIENTES. TENGA CUIDADO AL CAMBIARLAS.
CUBETA DEL ACEITE
- Para colocar la cubeta del aceite, fijela al ventilador de motor.
- La cubeta del aceite debe limpiarse a menudo. El aceite acumulado dentro no puede superar la mitad de la misma. Utilice una solución caliente con detergente.
- Déjela secar antes de volver a colocarla.
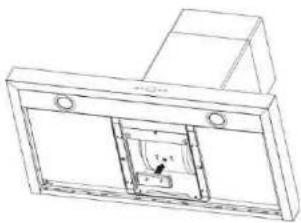
LIMPIEZA DE LA CAMPANA
El acero inoxidable es uno de los materiales más fáciles de limpiar. Un cuidado esporádico ayudará a preservar su buen aspecto.
Consejos de limpieza:
* Lo único que suele hacer falta es agua con jabón o detergente.
* Después de limpiar, deberá aclarar con agua limpia. Séquelo con un paño limpio y suave para no dejar marcas de agua.
natural_image
Technical line drawing of a cabinet or enclosure with internal components and mounting holes (no text or symbols)* En caso de decoloraciones o manchas persistentes, use un producto de limpieza que no produzca arañazos o polvo para pulir acero inoxidable con un poco de agua y un paño suave.
* En casos difíciles, use una esponja desengrasante de plástico o cepillo de cerdas suaves junto con el producto de limpieza y agua. Frote ligeramente en el sentido de las líneas de pulido o "granee" el acabado inoxidable. No apriete demasiado o podría deslucir la superficie.
* No deje que las manchas se sequen mucho tiempo.
* No utilice cepillos ni estropajos de acero comunes. Podrían adherirse partículas de acero a la superficie y oxidarse.
* No deje mucho tiempo en contacto con el acero inoxidable soluciones salinas, desinfectantes, lejías ni compuestos limpiadores. Muchos de estos productos contienen sustancias químicas que pueden resultar perjudiciales. Aclare con agua después de la exposición y seque con un paño limpio.
* Las superficies pintadas deberían limpiarse solamente con agua caliente y un detergente suave.