
DDW 174 - Geschirrspüler Defy - Kostenlose Bedienungsanleitung
Finden Sie kostenlos die Bedienungsanleitung des Geräts DDW 174 Defy als PDF.


Benutzerfragen zu DDW 174 Defy
0 Frage zu diesem Gerät. Beantworten Sie die, die Sie kennen, oder stellen Sie Ihre eigene.
Eine neue Frage zu diesem Gerät stellen
Laden Sie die Anleitung für Ihr Geschirrspüler kostenlos im PDF-Format! Finden Sie Ihr Handbuch DDW 174 - Defy und nehmen Sie Ihr elektronisches Gerät wieder in die Hand. Auf dieser Seite sind alle Dokumente veröffentlicht, die für die Verwendung Ihres Geräts notwendig sind. DDW 174 von der Marke Defy.
BEDIENUNGSANLEITUNG DDW 174 Defy
You can rely on Defy. To simplify.
4 PROGRAMME DISHWASHER
Record in the space below the listed information for future reference.
The serial number is on the serial label located on the inside of the door on the dishwasher.
SERIAL NUMBER......
DATE OF PURCHASE....
PURCHASED FROM....
PAGE INDEX
2 Introduction
2 Explanation of symbols
2 Register your product
3 Important safety precautions
4 Get to know your dishwasher
5 Before use
5 Unpacking
5 Report damage
5 Preparation
5 Installation
5 Electrical installation
5 Water connection
5 Drain requirements
6 Adding water softener
7 Adding rinse aid
8 Adding detergent
9 Loading dishes, cutlery & pots
10 Loading options
11 Loading options continued
12 Basket adjustment
13 Cutlery basket
13 Storage
13 How not to load
14 The control panel
14 How to use the dishwasher
15 Description of controls
15 On / Off button
15 Programme selection knob
15 Start/Cancel button
15 Progress indicators
15 Half load button
15 Cancelling a programme
15 Changing a programme
15 Salt indicator
16 Programme table
17 Cleaning the cabinet
17 Cleaning the filters
17 Cleaning the spray arms
18 Trouble shooting
20 Technical specifications
20 Owners responsibility
21 Service Centres
22 Warranty
1
Introduction
Dear Customer,
Your new Defy dishwasher was manufactured in a state of the art facility and has passed the strictest quality control procedures.
Please read this manual carefully before using your dishwasher for the first time and then store it within easy reach for future reference.
This manual will provide you with information on how to operate and care for your dishwasher to gain the maximum benefit from it.
We trust you will enjoy years of trouble free use.
EXPLANATION OF SYMBOLS

Important information

Warning—Hazardous situations

Warning—Electric shock
PLEASE REGISTER YOUR PRODUCT AT
www.defy.co.za
DEFY APPLIANCES (PTY) LTD
P.O.BOX 12004
JACOBS
DURBAN
4026
SOUTH AFRICA
2

Important safety instructions
CHILDREN
This dishwasher is not intended for use by persons (including children) with reduced physical, sensory or mental capabilities or lack of experience and knowledge unless they have been given supervision or instruction concerning the use of the dishwasher by a person responsible for their safety. Children should be supervised to ensure that they do not play with the dishwasher.
- Keep detergents out of reach. Only put them into the machine just before starting a wash.
- Dishwasher water is not suitable for drinking.
- Never allow children to play on or sit on the door when it is open.
- Please ensure that packaging material is disposed of in a responsible manner. Plastic bags should be cut up to prevent children playing with them and accidentally suffocating.
SAFETY
- The dishwasher must be installed and connected in accordance with the manufacturer's instructions.
- Never place the dishwasher on a carpeted floor. Lack of airflow beneath the dishwasher could cause overheating.
- The dishwasher must only be used domestically and for the purposes for which it was designed.
- Do not leave the dishwasher exposed to direct sunlight or rain.
- Never add chemical solvents or flammable liquids to the tank as they constitute a fire hazard.
- Only use detergents and water softeners specifically manufactured for use in dishwashers.
- The door of the dishwasher has been designed to support the weight of a fully loaded lower rack. Never place any other load on the door as the dishwasher may then tip forwards.
- Should you at any time in the future scrap the dishwasher, cut the power cord and take measures to render the door lock inoperative thereby preventing children, when playing getting trapped inside.
- In case of malfunction or maintenance work, disconnect the dishwasher from the electrical mains immediately.
ENVIRONMENTAL CARE
You can save water by observing these simple guidelines:
- Remove bones and pips from dirty dishes.
- Avoid partial loads and only start the dishwasher when it is fully loaded.
- Only use the pre-wash programme for very dirty dishes.
- Select the programme according to the dirt level of the load.
DISHWARE GUIDE Ascertain that your dinnerware and cutlery is dishwasher compatible.
The following should not be washed in a dishwasher:
Rust sensitive steel items. Cutlery with wooden or horn handles.
Non heat resistant plastic items.
No glued dishes or cutlery.
No items made out of copper or tin.
Aluminium and silver tends to discolour.
Sensitive decorated glasses and porcelain parts.
Lead crystal glassware may lose its shine over time.
Art and craft items.
Sponges and dishcloths.
Do not wash articles soiled with cigarette ash, candle wax, varnish, paints or chemicals.
text_image
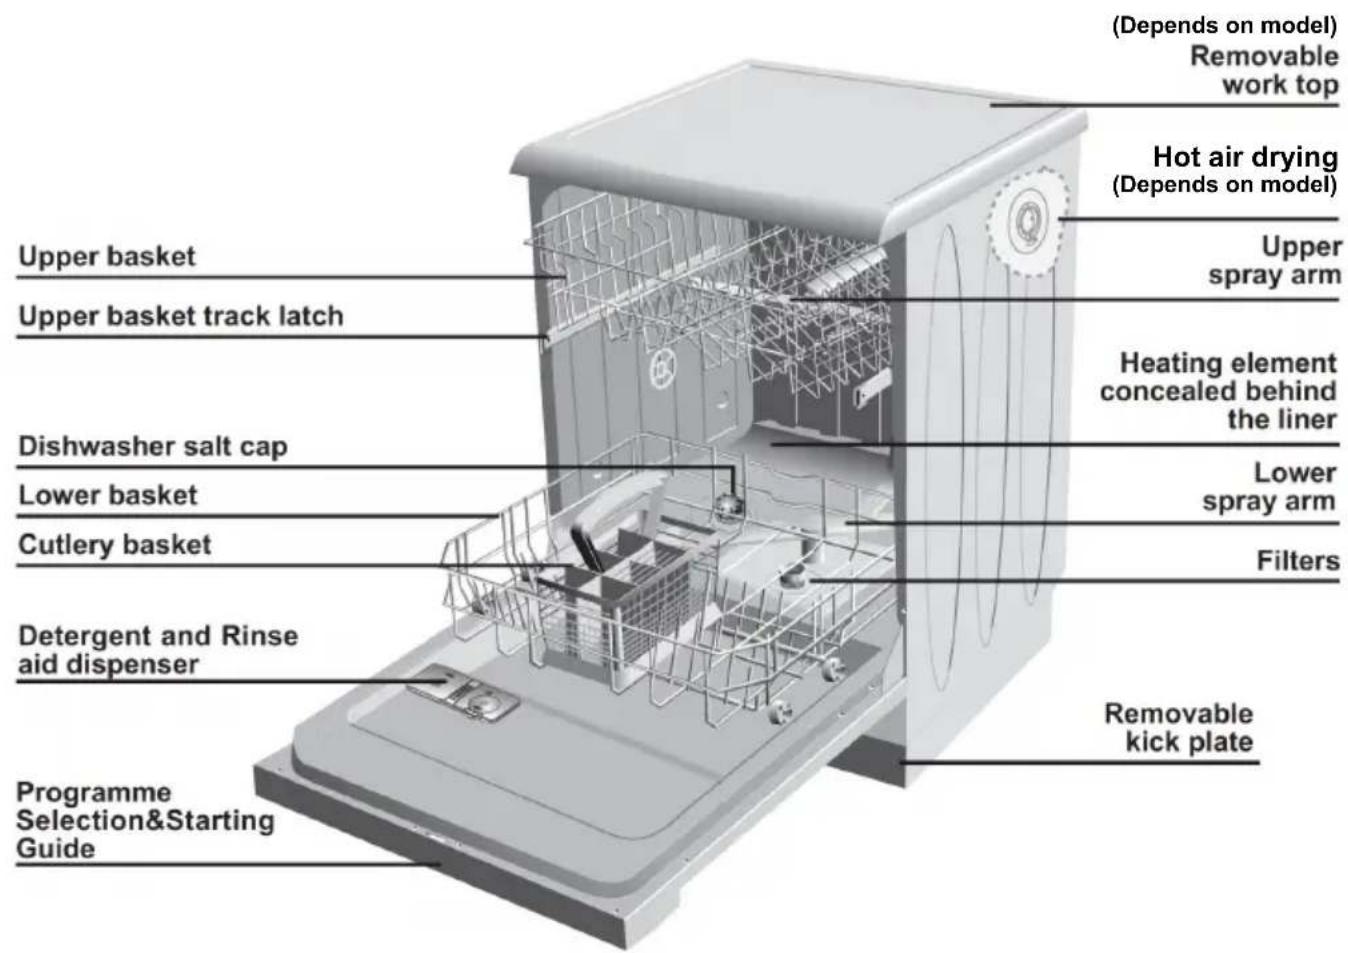
(Depends on model) Removable work top Hot air drying (Depends on model) Upper basket Upper basket track latch Upper spray arm Dishwasher salt cap Lower basket Cutlery basket Lower spray arm Filters Detergent and Rinse aid dispenser Removable kick plate Programme Selection&Starting Guide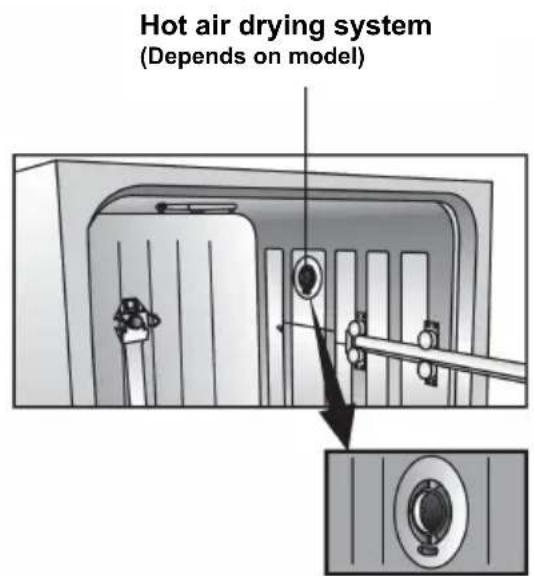
text_image
Hot air drying system (Depends on model)Figures represented in this instruction manual are schematic and may not correspond exactly with your dishwasher. If the parts are not included in the dishwasher you have purchased, they may be model specific and therefore only valid for certain models.
4
Before use
UNPACKING
- Remove all packaging material, accessories and documentation from the dishwasher.
DAMAGE
- Do not use the dishwasher if it has been damaged in transit. Report the damage to your dealer, who will take the necessary corrective action.
POSITIONING THE MACHINE
- The dishwasher should be positioned close to a cold water tap and a drain outlet.
- After positioning the dishwasher, adjust the feet by turning them in or out to level the unit.
PREPARATION
- Every dishwasher is tested and run in the factory before being dispatched. Before washing dishes for the first time, it is advisable therefore to first complete a pre-wash cycle to flush any factory related residuals from the system.
5
Installation

ELECTRICAL INSTALLATION
- The dishwasher must be earthed and the manufacturer and seller do not accept responsibility for any damage due to incorrect electrical connection.
- The machine should be plugged into a 15 Amp, 230 Volt 50 Hz earthed 3 pin wall socket.
- For safety reasons, the wall socket and the plug should be accessible after installation. If the power cord should ever need replacing, use only a genuine cord available from the nearest Defy Service Centre. Repairs should only be made by a qualified technician.
WATER CONNECTION
- Use a screw on hose connector to secure the filler hose to a 3/4 inch threaded cold water tap.
- The water supply pressure must be between 30 kPa and 1Mpa..
- If the supply plumbing is new or has not been used for some time, it is advisable to run the water until it is clear and free from dirt. We recommend fitting a filter to the water tap to impurities such as sand or rust from entering the washer.
- Do not use an old hose and only use the hose supplied with the dishwasher.
- Ensure that the inlet hose is not twisted, bent or squeezed shut.
- There are two different types of water inlet hoses: Cold water inlet hose (up to 25°C) and hot water inlet hose (up to 60°C). Please check which one is applicable to your model.
DRAIN REQUIREMENTS
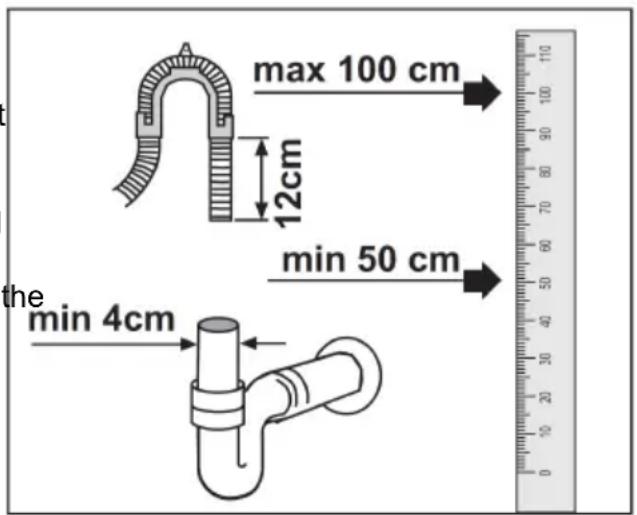
- Secure the end of the drain hose to a drain pipe with an inside diameter of at least 4cm.
- The outlet end of the drain pipe should be between 50cm and 100cm above ground level.
- Do not use an old hose and only use hose supplied with the dishwasher.
- Take care not to kink, twist or squeeze the drain hose.
text_image
max 100 cm 12cm min 50 cm the min 4cm6
Adding water softener (dishwasher salt)
natural_image
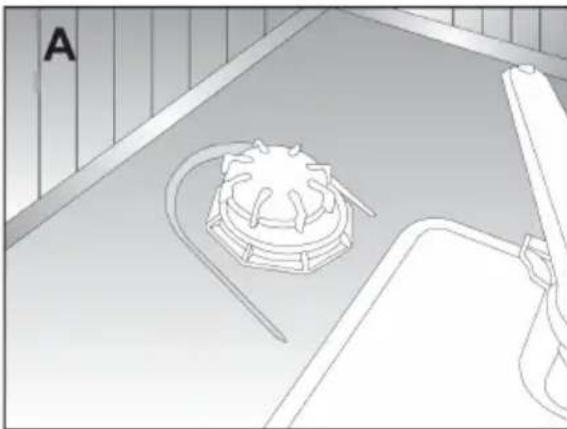
Simple line drawing of a kitchen appliance with a dome-shaped lid and handle, no text or symbols presentThe dishwasher requires lime free water for optimum operation. The water supply in South Africa varies considerably. Some users have access to borehole water only, while others are supplied from reservoirs or dams. Users in urban areas would not normally require water softeners. It is advisable therefore to test your water supply. Check for white spots on glassware. If these appear, the water used is too hard and requires softening. Experience will soon show if softening is required.
natural_image
Illustration of a hand adjusting a valve on a kitchen sink (no text or symbols visible)Water softener container
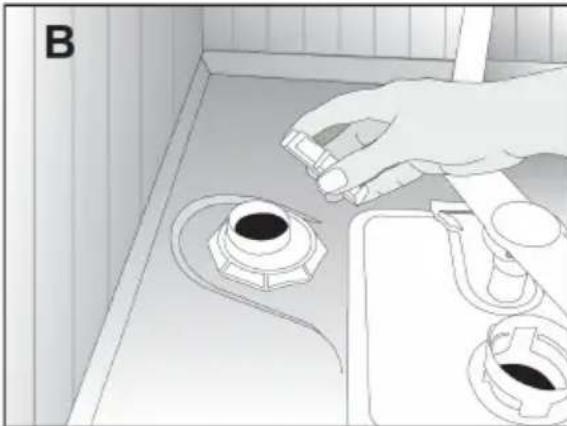
The dishwasher is equipped with a salt container which automatically softens the water. The container needs to be filled with regenerating salts specially developed for dishwashers. Small grained or powdered salt is recommended. Do not use table salt or edible salt as these contain insoluble substances.
natural_image
Illustration of a kitchen sink with a hand pouring liquid from a pot (no text or symbols)To fill the container proceed as follows:
- Remove the lower basket to improve access.
- Unscrew the lid of the salt container. (fig A-B)
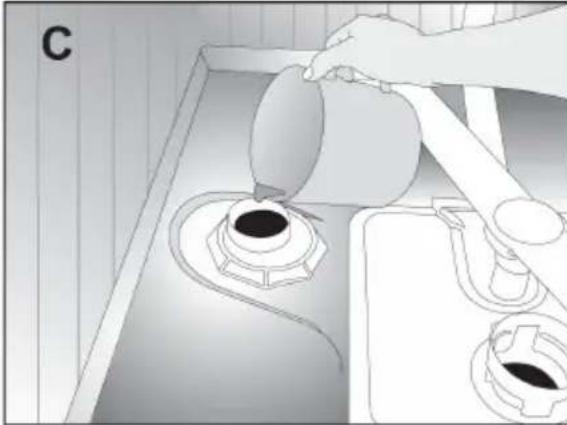
- If used for the first time, pour about 1 litre of water into the container. (fig C) If the container has water in it this step is not required.
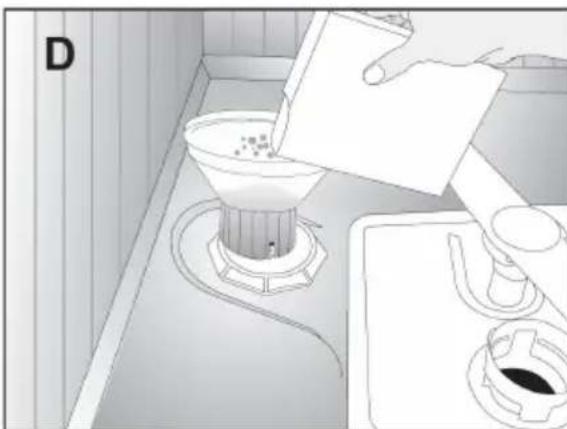
- Using the funnel supplied, add salt until the container is full. (fig D) The container holds about 2 kg of salt.
- Screw the lid back on until a "click" sound is heard.
natural_image
Illustration of a kitchen scene with a funnel pouring liquid into a pot, and a stove on the right (no text or symbols)To prevent damage which may be caused by spilt salt solution, we recommend you start a wash programme immediately after filling the salt container.
The low salt indicator light on the control panel will glow when the salt needs replenishing.
Note:
The salt indicator may glow for some time after filling the container This depends on the time it takes to dissolve all of the added salt and may take a few hours.
text_image
3 B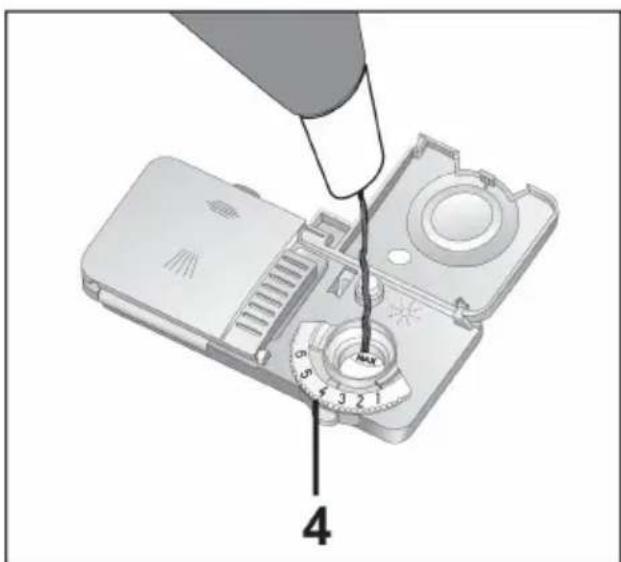
text_image
4Note:
- Only use rinse aid specifically intended for dishwashers.
- If composite detergent tablets containing rinse aid (3 in 1 or 2 in 1) are used, it is not necessary to fill the rinse aid dispenser.
Rinse aid prevents water and calcium streaking on dishes and speeds up the drying process.
The rinse aid dispenser is to the right of the detergent compartment.
To add rinse aid, proceed as follows:
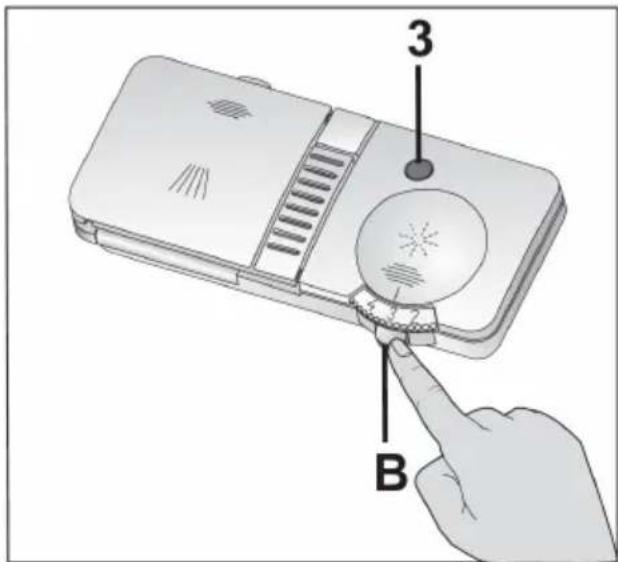
- Open the rinse aid dispenser by pressing the locking lever. (B)
- Carefully pour the rinse aid into the dispenser to the MAX mark.
- Close the lid.
- Carefully wipe off any spilt rinse aid.
- The dispenser regulator (4) may be set between 1 and 6.
If lime marks appear after washing, select a lower setting.
If water marks appear after washing select a higher one.
A rinse aid sight glass (3) allows inspection of the rise aid level in the dispenser. If the rinse aid appears to be diluted or is lighter in colour, it needs to be replenished.
8
Adding detergent
text_image
A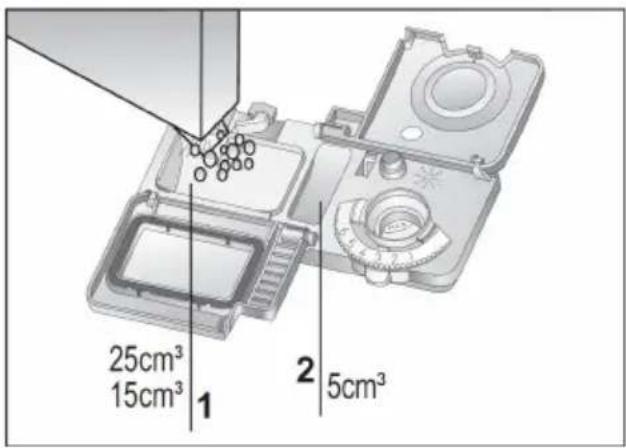
text_image
25cm³ 15cm³ 1 2 5cm³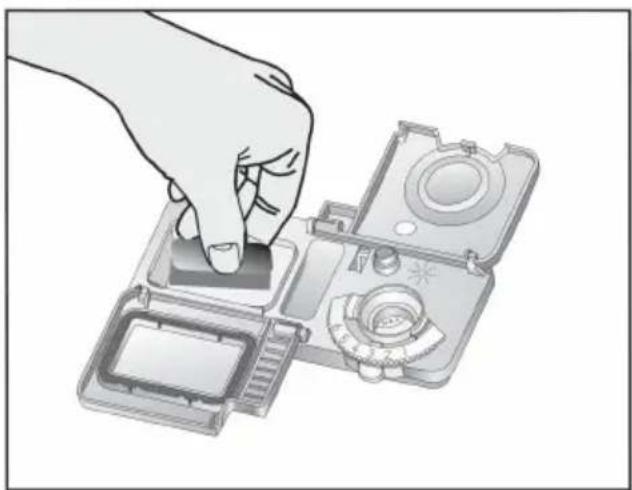
natural_image
Illustration of a hand placing a component into an open device casing (no text or symbols visible)Only use detergents formulated for use in dishwashers.
Detergent tablets or composite tablets containing detergent, softener and rinse aid may also be used.
The detergent and rinse aid dispensers are on the inside of the door.
The detergent compartment is on the left.
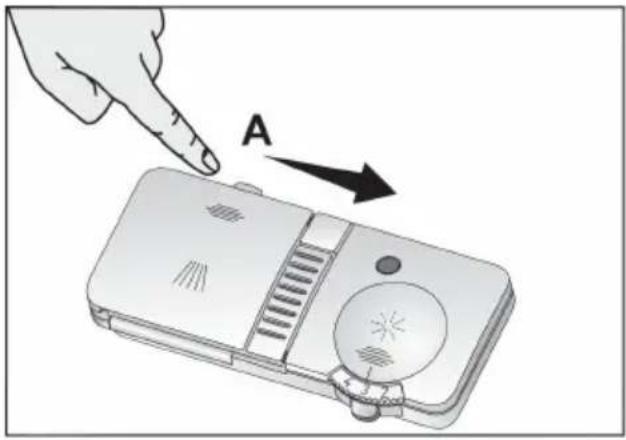
Open the detergent compartment by pushing the locking lever to the right (A). Add detergent before each wash and close the lid.
The lines on the inside of the detergent container assist in measuring the correct amount of detergent. The container can hold 40cm^3 of detergent.(1)
For a full load and relatively dirty dishes, fill the container to the 25cm ^3 mark.
For slightly soiled dishes and a partial load, fill the compartment to the 15cm^3 mark.
If detergent tablets are used, these should be placed in the detergent dispenser.
If food particles are stuck and the dishes have not been washed for a long time, supplement the detergent by adding an additional amount to the open oval depression to the right of the detergent compartment.(2)
During the wash programme, the detergent will be dispensed automatically and the lid will be left open. The best washing results are obtained using detergent, rinse aid and water softening salts.
Multi purpose tablet detergents are available and can give satisfactory results.
These are classified as follows:
2 in 1: Contain detergent and rinse aid or water softening salt.
3 in 1: Contain detergent, rinse aid, water softening salt.
4 in 1: Contain detergent, rinse aid, water softening salt and a glass protector.
5 in 1: Contain detergent, rinse aid, water softening salt, a glass protector and a stainless steel protector.
Do not use tablet detergents in short programmes since their total solubility is dependent on temperature and time.
9
Loading dishes, cutlery & pots
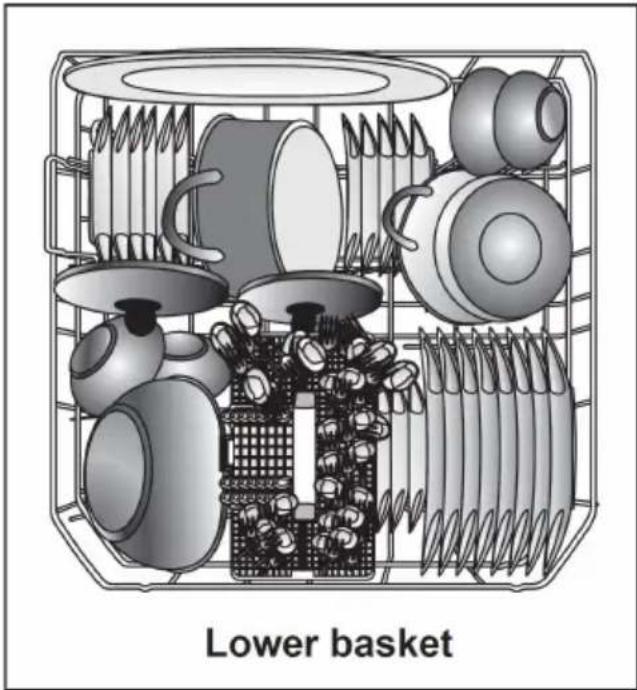
natural_image
Cross-sectional diagram of a mechanical device with multiple components and a labeled 'Lower basket' (no text or symbols on the diagram itself)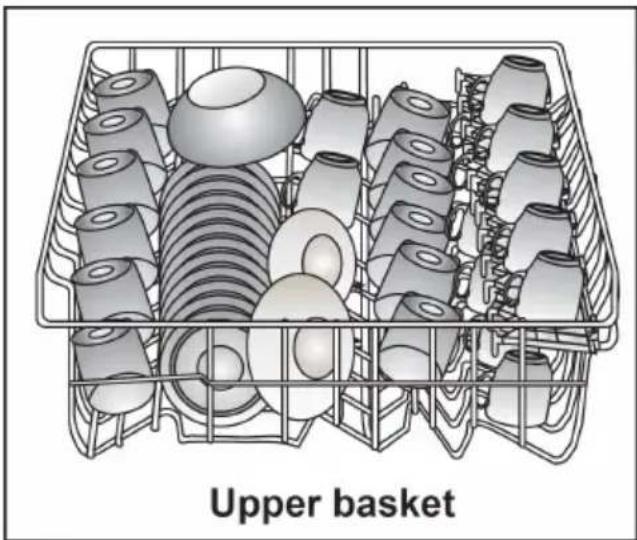
natural_image
Illustration of a basket containing various food items, including cans, eggs, and capsules (no text or symbols on the objects themselves)The dishwasher has a 12 place setting capacity including serving dishes.
Loading guide.
- Remove coarse food leftovers.
- Place all containers such as cups, glasses and pots with the opening facing down so that no water can collect.
- Dishes and cutlery may not be placed above each other.
- Do not allow glasses, cups and fragile items to touch each other.
- Small and light items can be placed in the upper basket.
- Place all large and very dirty items in the lower basket.
- The basket features glass holder flaps. These may be folded up to create more space for larger items.
- Place forks, spoons and knives in the special cutlery basket. Knives and other utensils with sharp points must be loaded in the basket with their points facing down.
- The movement of the spray arms should not be hindered.
- Do not overload the dishwasher.
After a few washes you will know which loading positions suit you best.
natural_image
Technical illustration of a mechanical assembly inside a wire cage, showing a hand operating a component labeled 'A' (no text or symbols present)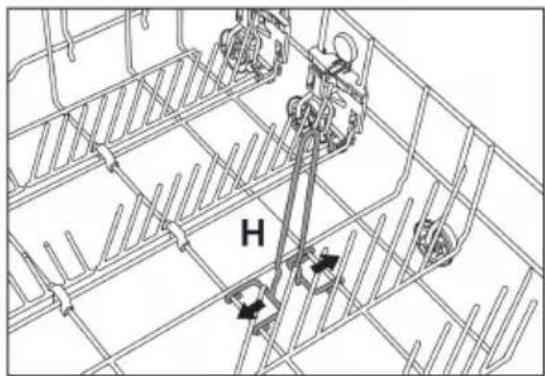
natural_image
Technical line drawing of a mechanical assembly with no visible text or symbols(Depends on model)
(Depends on model)
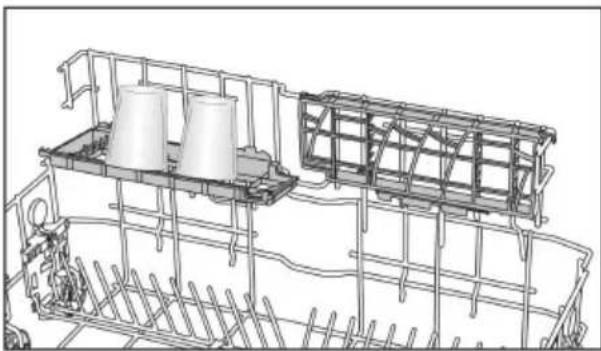
natural_image
Technical line drawing of a mechanical assembly with cylindrical components and grid structure (no text or symbols)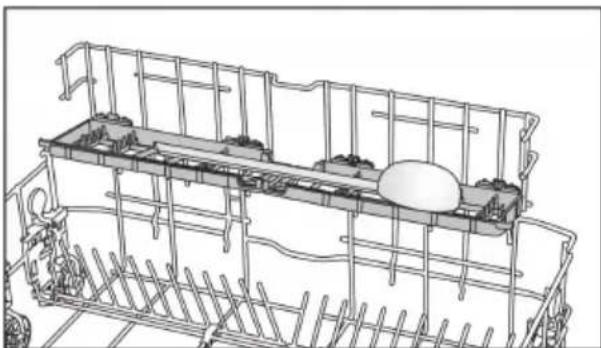
natural_image
Technical line drawing of a multi-level mechanical or electrical enclosure with railings and a central spherical component (no text or symbols)Depending your model of dishwasher you may have any of the following storage options available to you.
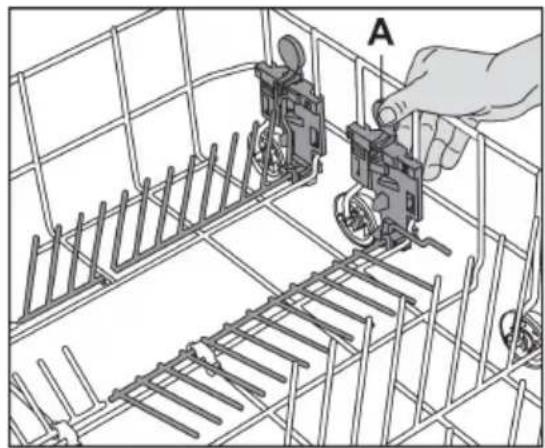
1 COLLAPSIBLE LOWER BASKET WIRES
(Depends on model)
(2 pieces) or (4 pieces)
A larger storage space may be created by pressing latch (A) and folding the wires down.
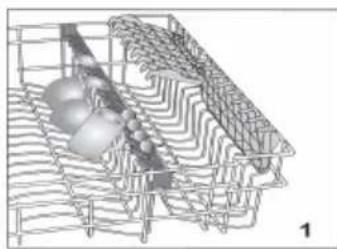
2 LOWER BASKET BOTTLE WIRE
(Depends on model)
Long items with a wide opening such as jars, may be stored upright over the bottle wire. Locate the wire as shown.
The bottle wire may be removed when not in use.
3 LOWER BASKET MULTI PURPOSE
RACK (Depends on model)
Located on the lower basket, the rack enables the storage of extra glasses or long items such as ladles and carving knives.
To close rack
- Fold rack (A)
- Slide the rack up (B)
- Set rack to vertical position (C)
- Slide rack down and lock with tab (D)
- Fold rack (E)
- Slide rack up (F)
- Open rack at desired level (G)
To adjust the height of the racks
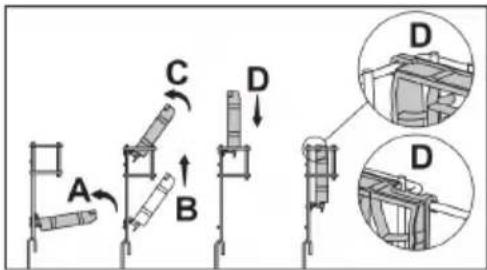
text_image
A B C D D(Depends on model)
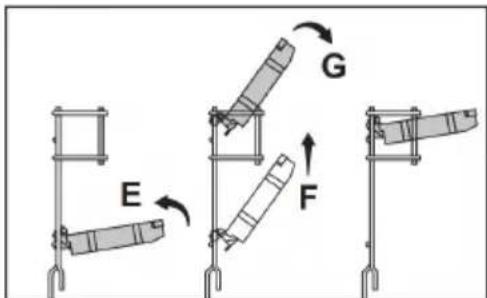
text_image
E F G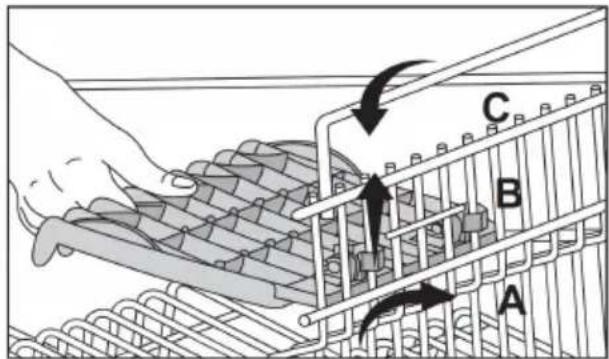
text_image
Diagram illustrating a conveyor belt system with labeled components A, B, and C, showing directional arrows indicating flow or movement.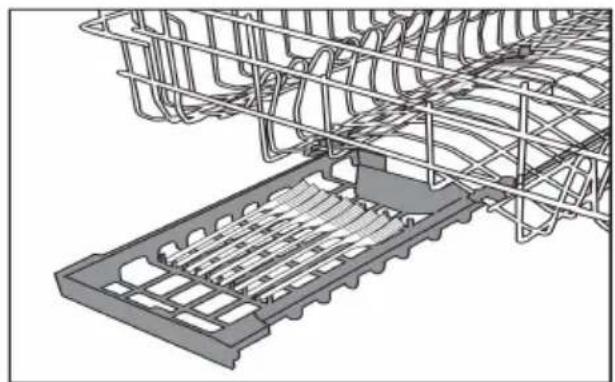
natural_image
Technical illustration of a mechanical assembly with meshed components and a rectangular base (no text or symbols)4 UPPER BASKET HEIGHT ADJUSTABLE RACK
- These may be adjusted up or down depending on the height of cups or glasses to be washed
(A, B, C)
5 UPPER BASKET DRAWER
(Depends on model)
- Additional small forks, knives and spoons may be placed in the basket drawer.
natural_image
3D wireframe diagram of a layered structure with spherical elements, no text or symbols present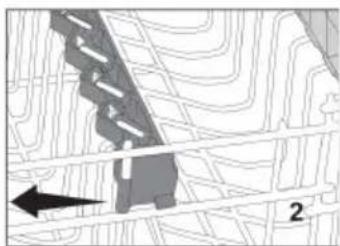
natural_image
Topographic map section showing a road with a highlighted area and arrow, no readable text or symbols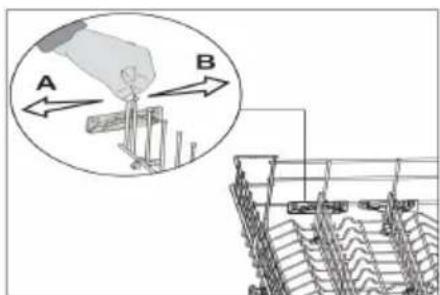
text_image
Technical diagram showing a hand holding a tool labeled A and B, with an inset illustrating the process of handling a structural component.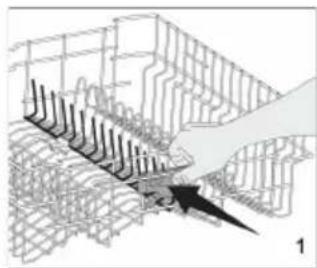
natural_image
Diagram of a hand inserting a component into a grid-like structure, with no visible text or symbols.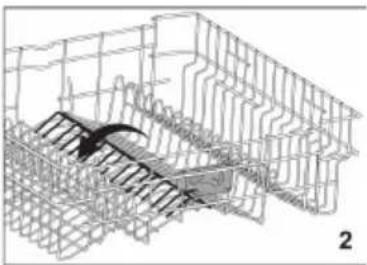
natural_image
3D wireframe diagram of a mechanical or structural assembly with no visible text, numbers, or symbols6 UPPER BASKET GLASS SUPPORT
(Depends on model)
- Do not lean long stemmed wine glasses against each other or against the basket edge. Use the glass support instead.
- It may be adjusted by releasing and relocating the tabs to create a larger space.
7 COLLAPSIBLE WIRES UPPER BASKET
(type A) (Depends on model)
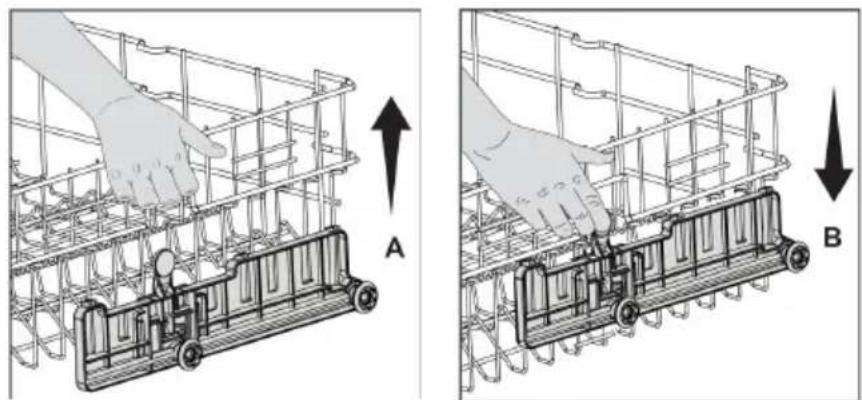
The wires may be folded flat to create a larger space.
Grab the first wire and adjust to fold or raise the wires.
7 COLLAPSIBLE WIRES UPPER BASKET
(type B) (Depends on model)
The wires may be folded flat to create a larger space.
Press on the tab to lay the wires down thus creating more available space.
10
Upper basket adjustment
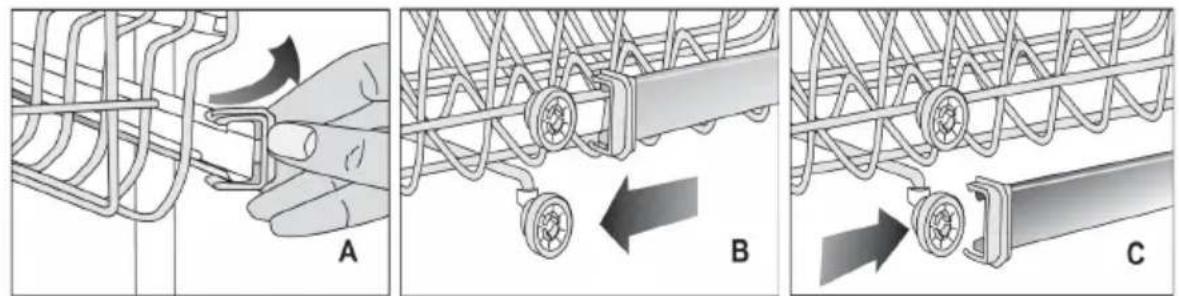
The upper basket may be lowered to facilitate the loading of larger items. TI adjustment method varies from model to model and you should check which method is pertinent to your machine.
1
text_image
Technical diagram illustrating three stages of a mechanical assembly with labeled parts A, B, and C.Release the latches on both the right and left tracks by opening them sideways.
Roll the basket forwards to remove it.
Reposition the basket so that the upper set of rollers engage in the tracks and close latches.
2
natural_image
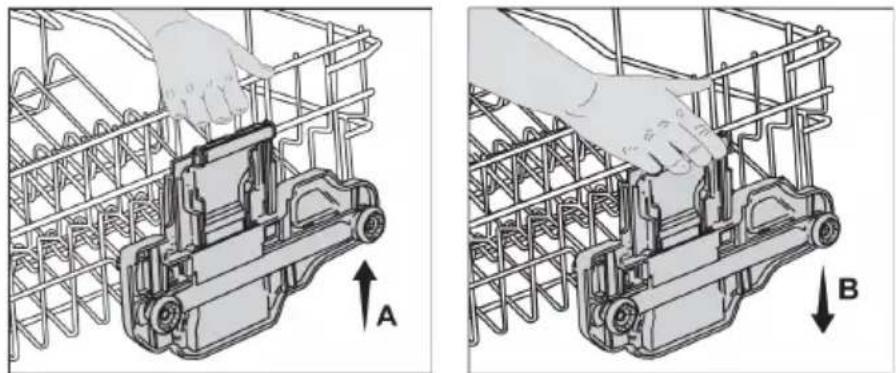
Two technical diagrams showing hand positioning of a mechanical component inside a wire cage, labeled A and B (no text or symbols on the diagram itself)(Depends on model)
The basket, even fully loaded, may be adjusted without removing it from the machine. The “elevator system” at either side has a blue retainer. Grab one of the upper basket wires, (left or right) and lift up (A). Repeat on other side. To lower the basket, press the latch on the basket adjustment mechanism. (B)
3
text_image
Technical diagram showing two stages of a hand operating a mechanical device, labeled A and B with directional arrows.(Depends on model)
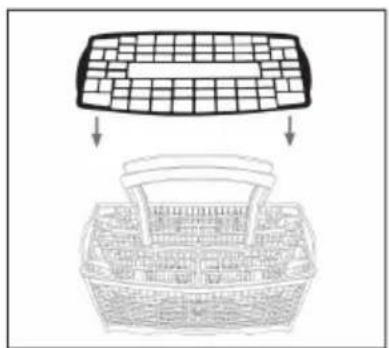
Different cutlery baskets are supplied, depending on the model. These may be removed to provide additional storage space
natural_image
Diagram showing a grid-patterned object above a woven basket, with no text or symbols present.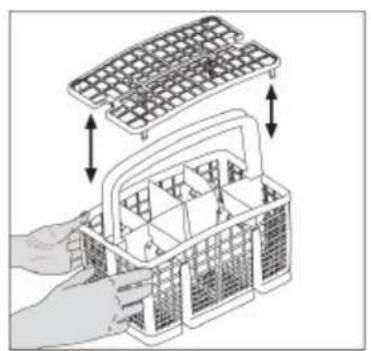
natural_image
Illustration of a hand holding a wire rack with an abacus top above, showing internal compartments and handle (no text or symbols)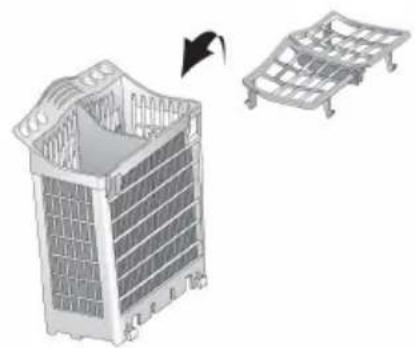
natural_image
3D diagram showing a brick building structure transforming into a modular bed-like structure (no text or symbols)The following pictures illustrate how not to load the baskets
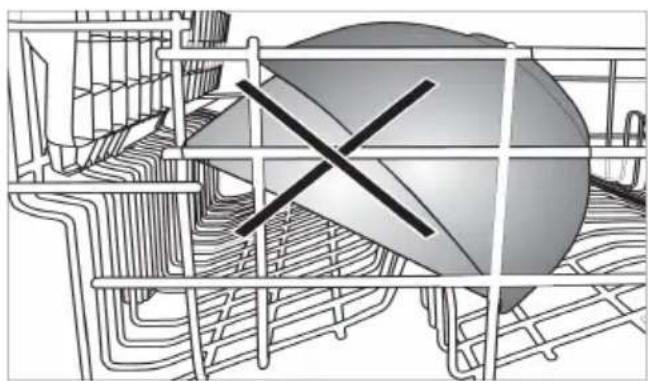
natural_image
Diagram of a large sphere with cross symbol inside a grid structure, no text or labels present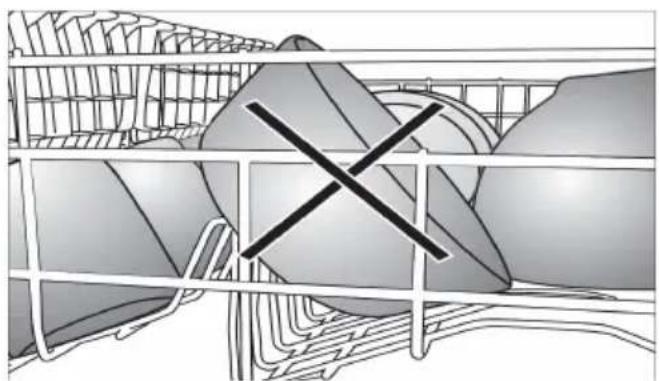
natural_image
Illustration of a cage with a cross symbol overlay, no text or symbols present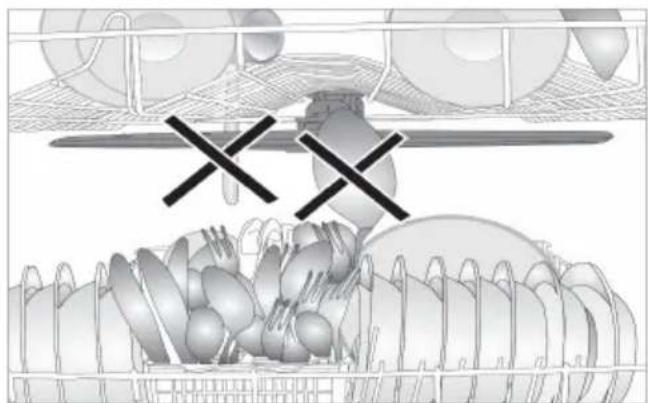
natural_image
Illustration of a poultry farm with chickens and a feeding net, marked with 'XX' symbols (no text or labels present)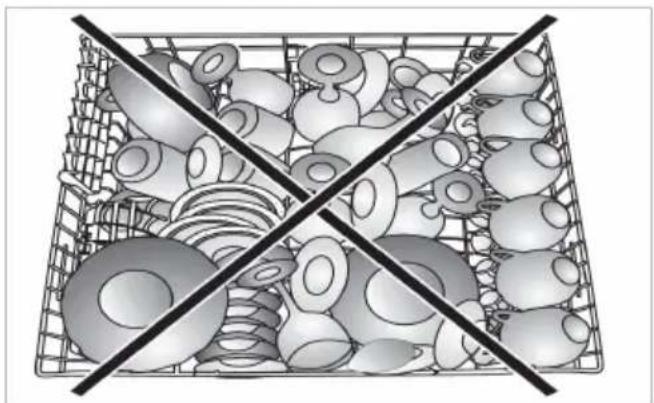
natural_image
Cross-sectional illustration of a plastic crate filled with various items, no text or symbols present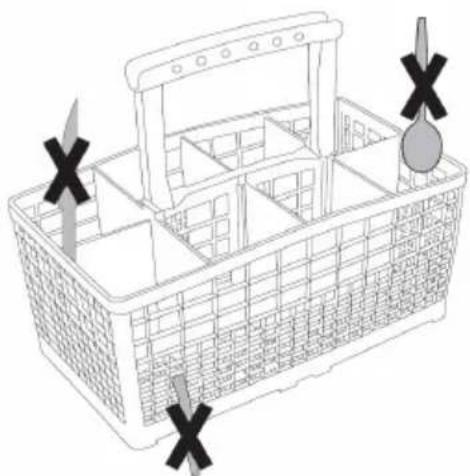
natural_image
Line drawing of a wireframe basket with internal compartments and two marked Xs (no text or symbols)12
The control panel

text_image
DEFY OFF 1 2 3 4 5 6 7 8 9 10 11 12 13 14 15 16 17 18 19 20 21 22 23 24 25 26 27 28 29 30 31 32 33 34 35 36 37 38 39 40 41 42 43 44 45 46 47 48 49 50 51 52 53 54 55 56 57 58 59 60 61 62 63 64 65 66 67 68 69 70 71 72 73 74 75 76 77 78 79 80 81 82 83 84 85 86 87 88 89 90 91 92 93 94 95 96 97 98 99 100- Start / Cancel button
- Half Load (1/2)
-
Programme selection knob
-
Salt level indicator light
- "ON" Indicator light
13
How to use the dishwasher
- Open the water tap.
- Plug the dishwasher into the mains socket.
- Open the door and load the dishwasher. Check if both upper and lower spray arms move freely.
- Add enough detergent into the detergent dispenser and close the door.
- Use the Programme Selection knob to choose your washing programme.
- Check the salt and rinse aid level indicator lights. If necessary, refill salt and/or rinse aid.
- Start the programme with the Start/Cancel button.
Salt level indicator light
When this indicator light comes on, you must refill the special salt (If applicable).
* In machines which do not possess an electrical salt indicator, the salt content can be read on the salt dispenser. When the visual fill indicator is dark, there is enough salt in the dispenser. When the colour is light, open the dispenser and add dishwasher salt.
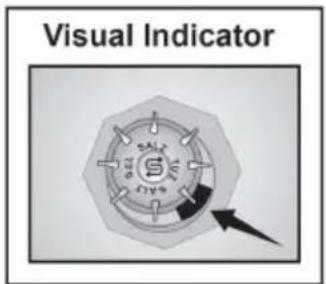
text_image
Visual IndicatorRinse aid level indicator light
If the indicator light comes on, refill the rinse aid (If applicable).
** You can also tell whether rinse aid must be refilled by looking at the rinse aid dispenser. When the visual fill indicator is dark, there is enough rinse aid in the dispenser. When the colour is light, open the dispenser and refill rinse aid.
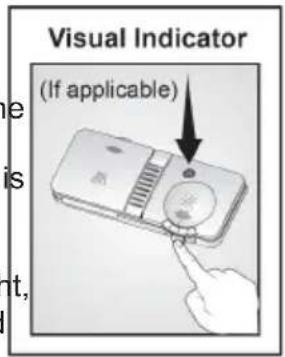
text_image
Visual Indicator (If applicable) e is t,
Attention
Avoid opening the door during the washing process. This interrupts the washing process, and hot steam will escape. When the door is closed, the programme will continue.
- Use the Programme Selection knob to turn the machine off again. When the progress indicator light “programme end” lights up, the programme is complete.
- Close the water tap. Pull out the plug.
- Allow your dishes to cool for 15 minutes, with the door open. Unload the dishes. Begin with the lower basket.
14
Description of controls
ON/OFF
Machine will be switched on when you move the Programme Selection knob to position "1". "ON" light will illuminate.
Machine will be switched off when you move it to the "OFF" position. All lights will turn off.
Programme selection knob
Used to switch on/off the machine and select the washing programmes.
Half Load (1/2) button
When there are few dishes, press this button after pressing the programme selection knob. When switching the dishwasher on, the indicator light on the button lights up. This function helps you to save water and energy.
Start/Cancel button
You use this button to start the selected programme; the light on the button lights up.
Stop the programme with the Start / Cancel button if you would like to open the door once the dishwasher's washing programme is running.
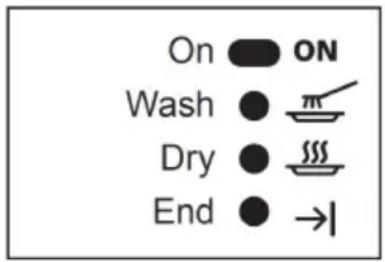
LED progress indicator lights
The programme sequence throughout the washing process can be monitored from progress indicator lights on the control panel.
text_image
On ON Wash Dry End →! Warning
Following the washing stage, (in order to drain and remove water from inside the machine completely), the machine will cancel for approximately 35 minutes. Do not work this is not a fault. The End progress indicator light will come on when finished.
! Warning
Do not switch the machine off before the End light comes on.
How to cancel the washing programme
To cancel a programme while the machine is operating:
Press the start/stop button for 3 seconds. The machine will drain the water inside the machine for 45 seconds.
The programme is cancelled when the washing light goes off. Then you can choose and start a new programme.
! Important: Depending on the stage of the programme you have cancelled, there may be detergent residue or rinse aid inside the machine and in the load. Make sure the items in the dishwasher are not used before washing properly.
How to change the washing programme
To change the programme selection while the machine is operating:
Press the Start/Cancel button. The washing delight will go off.
Select the new programme. Press the Start/Cancel key. The washing light will be on and the new programme will start.
! Important: The new programme will NOT start from the beginning. It will start from the stage last carried out by the previous programme selection.
SALT LEVEL INDICATOR LIGHT
(If applicable)
Please check the indicator regularly. If it lights up, the salt needs to be replenished.
RINSE AID LEVEL INDICATOR LIGHT
(If applicable)
Please check the indicator regularly. If it lights up, the rinse aid needs to be replenished.
| Programme | 1 2 Reference* | 3 4 | ||
| Programme name | Pre-wash* =Eco =Q | eco quick & clean =Intensive | quick clean | [IMAGE] |
| Cleaning temp. | — 50°C 60°C | 70°C | ||
| Degree of soilingA25cm315cm35cm3B | Suitable for removing the remnants on soiled dishes which have been kept in the washer for a few days and helps prevent bad odour— Medium Medium High | Most economical programme for medium soiled dishes which have been kept in the washer for a few days | Fastest daily washing Programme for medium soiled dishes which have been kept in the washer | Suitable for heavily soiled dishes, pots and pans |
| Detergents A=25/15cm3 B=5cm3 | — A+B A+B | A+B | ||
| Sequence without options | Pre-wash▼End | Pre-wash▼Wash▼Cold rinse▼Hot rinse▼Dry▼End | Wash▼Cold rinse▼Hot rinse▼Dry▼End | Pre-wash▼Wash▼Cold rinse▼Hot rinse▼Dry▼End |
| Duration (minutes) | 14 170 58 120 | |||
| Water (litres) | 4.2 15 12.2 17.6 | |||
| Energy (kWh) | — 1.02 1.32 | 1.67 | ||
The consumption values shown in the table were determined under standard conditions. Differences may therefore occur under practical conditions. *Reference programme for testing institutes. The testing is in accordance with EN 50242 and must be carried out with a full water softener tank, a full salt dispenser and a full rinse aid reservoir using the test programme.

Do not use the dishwasher without the filters.

Incorrect placement of the filters will reduce washing efficiency
text_image
1 A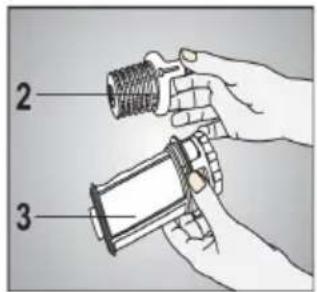
text_image
2 3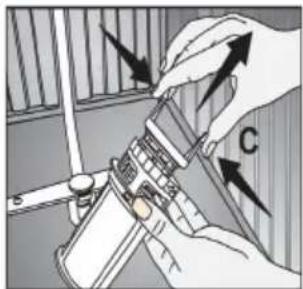
text_image
Diagram showing hands installing a mechanical component with labeled parts A and C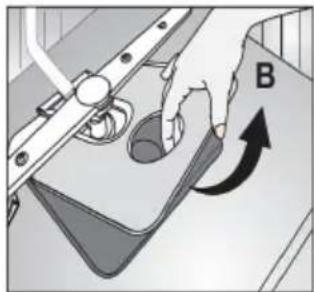
natural_image
Diagram of a hand pressing down on a mechanical component with an arrow indicating rotation (no text or symbols present)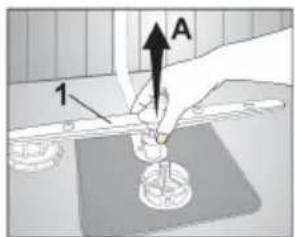
text_image
Diagram showing a hand holding a small object labeled 'A' with an arrow pointing to it, and numbered parts labeled '1' and '2' on a surface.
Lower spray arm
natural_image
Illustration of a hand using a tool to press or install a component on a workbench, with no visible text or symbols.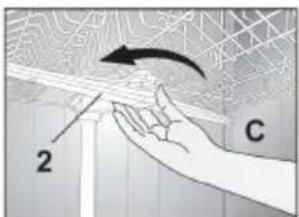
text_image
2 C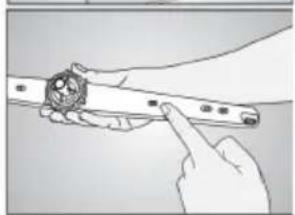
natural_image
Illustration of hands holding a tool with a small object on the blade (no text or symbols visible)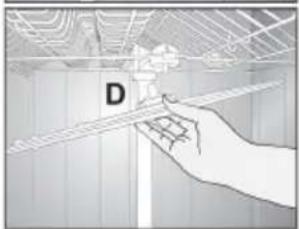
natural_image
Illustration of a hand holding a tool over a grid-like structure with a labeled point D (no text or symbols beyond the label)Upper spray arm
Ensure that the filter attached to your water tap is cleaned regularly. (If fitted)
- Turn off the tap and remove the hose.
- Remove the filter and clean it under running tap water.
- Seat the filter back into the hose.
- Refit the hose to the tap.
Always disconnect the appliance from the Electrical and Water supply before cleaning.
CLEANING THE CABINET
- Wipe up any detergent, softener and other spills as they occur with a soft damp cloth.
- Periodically clean the cabinet, the inside of the door and door gasket with a damp warm soapy cloth, rinse and dry.
- Clean the control panel using a damp cloth only.
- Do not use abrasive or corrosive substances.
CLEANING THE FILTERS
To ensure optimum performance, the filters should be cleaned regularly.
The machine is equipped with three filters - Main, Coarse and Micro.
- Remove the lower basket to gain access to the filters.
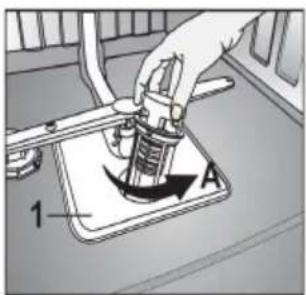
- Turn the coarse central filter assembly (A) in an anti clockwise direction and pull free.
- This allows the Main filter (B) to be lifted out.
- Press on the two tongues of the coarse filter to remove the micro filter (C)
- Hold the filters under running water and clean with a soft bristle brush.
- Carefully replace the main filter
- Insert the reassembled Coarse/Micro filter assembly in the Main filter and twist it clockwise until it clicks in place.
- Pull out the bottom filter mesh (B) and rinse.
CLEANING THE SPRAY ARMS
Dirt or calcium deposits may block the nozzles on the spray arms. For this reason they should be cleaned regularly.
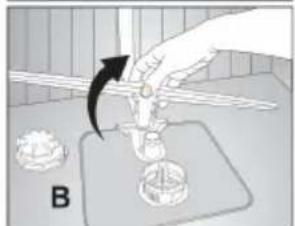
- Both spray arms should be removed.
- Remove the lower basket.
- Pull the lower spray arm free (A).
- Loosen the fastening nut on the upper spray arm and pull the spray arm free (B).
- Flush away any food particles under running water.
• Re-fit the arms in their original position.
17
Trouble shooting
MACHINE DOES NOT START
- Power cable is unplugged. >>> Check the power cable plug is securely pl in.
- Fuse is blown. >>> Check the fuses your house or for a tripped circuit breaker.
- Test the wall socket for power using another appliance.
- Inspect the electrical cord for damage.
- Eliminate the use of an extension cord, any is being used.
- Water is cut off. >>> Make sure that water inlet tap is open.
- Door of the dishwasher is open. >>> Make sure that you have closed the door of the dishwasher.
- On / Off button is not pressed. >>> Make sure that you have turned the dishwasher on by pressing the On / Off button.
DISHES NOT CLEANED PROPERLY
- Load dishes as prescribed.
- Choose a longer programme that washes at a higher temperature.
- Ensure spray arms are clean and rotate freely.
- Clean filters as prescribed.
- Do not overload baskets.
- Adjust the amount of detergent.
- We recommend you use tablet detergents as these are less affected by humidity during storage.
- Adjust the amount of rinse aid.
- Ensure that the lid of the detergent dispenser is closed properly.
DISHES NOT DRIED PROPERLY
if Load dishes as prescribed.
ggeAdjust the amount of rinse aid.
- Choose a longer programme that washes in at a higher temperature.
- Leave the dishwasher door slightly ajar at the end of the programme and allow the dishes to cool for at least 15 minutes before unloading.
- ifStart unloading from the lower basket.
^the TEA, COFFEE AND LIPSTICK STAINS
- Choose a longer programme that washes at a higher temperature.
- Adjust the amount of detergent.
We recommend you use tablet detergents as these are less affected by humidity during storage. - Do not wash silverware with a heavily textured surface in the dishwasher
LIME STAINS AND A HAZY APPEARANCE
- Increase the amount of rinse aid - Water requires more softening. Add more salt.
RAINBOW / BLUEISH BLUSHING ON GLASSWARE
• Decrease the amount of rinse aid.
- If your supply water is soft (<5dH) do not use salt.
- Choose a longer programme that washes at a higher temperature.
SCRATCHED OR BROKEN GLASSWARE
- Add salt.
- Ensure there is no salt leakage. Clean up any spilt or residual salt and tighten the container.
- Do not overload baskets.
- Do not allow glasses to touch.
BLACKENING OF SURFACES
- Salt can cause oxdisation of metal surfaces. Use the supplied salt funnel when filling the salt container. Ensure that the salt container is properly closed. Run a programme to flush any spilt salt away. Check if the salt container is still tightly sealed after washing.
- Check that the dishwasher is properly earthed. Static electricity could remove the protective coating on metal surfaces.
UNUSED DETERGENT LEFT IN DISPENSER
- Ensure that the dispenser is dry when filling it with detergent.
- Ensure that the dispenser lid is properly closed before closing the door.
- We recommend you use tablet detergents as these are less affected by humidity during storage.
- Clean spray arm nozzles.
WATER REMAINS IN MACHINE
- Clean the filters prescribed.
- Ensure that the drain hose is not twisted or kinked.
EXCESSIVE FOAM
- Loading hand washed dishes into the machine can cause excessive foaming as the residual dishwashing liquid remaining on the dishes does not contain an antifoaming agent.
- Ensure the rinse aid compartment is closed and no rinse aid has been spilt in the machine.
ERASING OF DECORATIONS
Decorated glassware, lead crystal glassware and decorated luster porcelains are not suitable for washing in a dishwasher
18
Technical specifications
19
's responsibility
| Power input 220-240V | 50 Hz |
| Dimensions mm (H x W x D) | 850 x 598 x 598 |
| Net weight | 47 kg |
| Total power consumption | 1900-2200 W |
| Heater power consumption | 1800 W |
| Total current | 10A |
| Drain pump power consumption | 30 W |
| Water pressure | 0.01—1.0 Mpa |
| Place settings | 12 |
| Programmes | 4 |
| Plate diameter upper basket | 250 mm max. |
| Plate diameter lower basket | 310 mm max. |
SINCE THE FOLLOWING ARE NOT FACTORY FAULTS, THEY ARE THE OWNER'S RESPONSIBILITY
• Damage to exterior finish.
- Breakage of components
- Damage through improper use or installation of the dishwasher.
- Damage caused by moving the dishwasher.
Before calling a Service technician or your dealer, please check the following:
- Is the dishwasher plugged into the wall socket?
• Is the house circuit breaker on?
• Is the machine switched on? - Has the dishwasher door been closed properly?
- Are the filters clogged?
• Is the detergent dose sufficient? - Is there enough salt and/or water softener?
- Is the tap open?
• Is there a water supply to the home? - Have any of the hoses been twisted or kinked?
If you have followed the instructions and still have a problem, contact the nearest DEFY TECHNICAL SUPPORT CENTRE.
They will be able to advise you on any aspect of the machine or send a qualified technician to repair it.
| BLOEMFONTEIN | 160 Long Street, Hilton,Bloemfontein 9301.Tel. 051 400 3900Bloemfontein.Service@defy.co.za |
| CAPE TOWN | 5A Marconi Rd.Montague Gardens, 7441.Tel. 021 528 3000CapeTown.Service@defy.co.za |
| DURBAN | 35 Intersite Avenue,Umgeni Business Park, Durban 4051.Tel. 031 268 3300Durban.Service@defy.co.za |
| EAST LONDON | 16 Bowls Rd. Arcadia,East London 5201.Tel. 043 743 7100EastLondon.Service@defy.co.za |
| JOHANNESBURG | Cnr. Mimetes & Kruger Sts. Denver ext.12 |
| Commercial Head Office, | Johannesburg. 2094. |
| Administration, Distribution, National Groups, | Tel. 011 621 0200 or 011 621 0300 |
| Tel. Sales, Contracts and Credit. | Gauteng.Service@defy.co.za |
| POLOKWANE | 87 Nelson Mandela Drive. Superbia 0699. Tel. 0152 92 1166 / 7 / 8 / 9. Polokwane.Service@defy.co.za |
| PORT ELIZABETH | 112 Patterson Road,North End, Port Elizabeth 6001.Tel. 041 401 6400PortElizabeth.Service@defy.co.za |
| PRETORIA. | Block A1 Old Mutual Industrial Park.Cnr. D.F.Malan Drive & Moot Str.Hermanstad. 0082.Tel. 012 377 8300Pretoria.Service@defy.co.za |
OTHER AREAS ARE SERVICED BY OVER 200 AUTHORISED AGENTS. FOR FURTHER DETAILS PLEASE CONSULT THE NEAREST REGIONAL DEFY TECHNICAL SUPPORT CENTRE
21
Warranty
This certificate is issued by DEFY APPLIANCES LIMITED manufacturers of Defy and Ocean products, hereinafter the Company, to the original purchaser only, of the appliance described on the certificate and shall constitute the only warranty given in respect of this appliance.
The Company warrants to the original purchaser that for a period of TWO YEARS from date of purchase the appliance is free from defect under normal domestic use, both in workmanship and material, subject to the following conditions.
- Repair or replacement of any part of this appliance, found by the Company to be defective, shall be at the election of the Company. The Company reserves the right to effect such service through any of its Service Divisions or Authorised Service Dealers. The cost of such service shall be borne by the Company in full, provided that the appliance is located no further than 50km from a Company Service Centre or an Authorised Service Dealer. Where the appliance is located beyond the 50km radius, the purchaser shall be liable for the standard travelling charges, as determined by the Company.
- Vitreous enamelware, fuses and lamps are specifically excluded from these warranties. It is an express condition of these warranties that the purchaser takes due care and attention in the use and maintenance of the appliance. Abuse, misuse in conflict with operating instructions, connection to incorrect voltages and subjection to commercial use shall release the Company from its obligations.
- This warranty shall become void and cease to operate if the appliance is dismantled by, or any repairs to the appliance are effected by any persons not duly authorised by the Company, or if substitute parts not approved by the Company are used in the appliance, or if the serial number of the appliance is removed.
- The Company shall not be responsible for damages resulting from fire, flood, civil disturbances or any Act of God. The Company shall not, in terms of these warranties be responsible nor held liable for any consequential loss or damage of any kind caused by or due to the failure or malfunction of the appliance.
- The Company shall not be responsible for transportation or other costs other than those incurred within the provisions of Point 1 of this Certificate.
- These warranties shall not apply to the appliance if it is purchased or used beyond the borders of the Republic of South Africa, Namibia, Botswana, Swaziland and Lesotho.
- Where service is requested under warranty and no fault or defect can be found by the Company, all costs incurred will be for the purchaser's account.
- This Certificate as well as your invoice will serve as proof of purchase. For the purpose of warranty, it will be essential to produce this Certificate and invoice. Failure to do so, will render the purchaser liable for service costs.