Z017 - Uhr Lorus - Kostenlose Bedienungsanleitung
Finden Sie kostenlos die Bedienungsanleitung des Geräts Z017 Lorus als PDF.


Benutzerfragen zu Z017 Lorus
0 Frage zu diesem Gerät. Beantworten Sie die, die Sie kennen, oder stellen Sie Ihre eigene.
Eine neue Frage zu diesem Gerät stellen
Laden Sie die Anleitung für Ihr Uhr kostenlos im PDF-Format! Finden Sie Ihr Handbuch Z017 - Lorus und nehmen Sie Ihr elektronisches Gerät wieder in die Hand. Auf dieser Seite sind alle Dokumente veröffentlicht, die für die Verwendung Ihres Geräts notwendig sind. Z017 von der Marke Lorus.
BEDIENUNGSANLEITUNG Z017 Lorus
■ CHARACTERISTICS
- Time/Calendar Display: Hour, minute, second, month, date and day of the week.
- Time Indication: Choice of 12-hour display format with PV red color or 24-hour display format is available.
- Stopwatch: The stopwatch can measure up to 23 hours at minutes and 59 seconds in 1/100-second increments. Top time measurement is available.
- Timer: the countdown time can be set up to 25 hours 59 minutes and 59 seconds.
- Daily Alarm: the alarm can be set to sound at the designated time or a 24-hour basis.
- Second Time Zone: 1 min a different time zone can be displayed
- Chime: the chime can be set to sound every hour on the hour with a single beep
- Illuminating Light: The but-in-class to-luminescent (EL) light evenly illuminates the display for easy viewing in darkness.
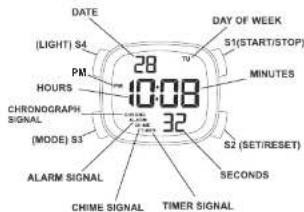
■ BUTTONS AND DISPLAYS
text_image
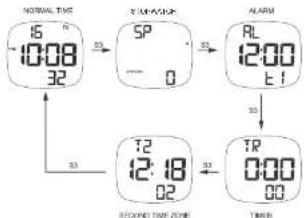
DATE (LIGHT) S4 PM 10:00 CHRONOGRAPH SIGNAL (MODE) S3 ALARM SIGNAL CHIME SIGNAL TIMER SIGNAL 28 70 MINUTES S2 (SET/RESET) SECONDS DAY OF WEEK S1(START/STOP)to change the display mode, press 53. The display mode changes in the following order.
flowchart
graph TD
    A["NORMAL TIME 16:00-32"] --> B["SP 0"]
    B --> C["ALARM 12:00-1"]
    C --> D["T2 12:18-02"]
    D --> E["TR 000-00"]
    style A fill:#f9f,stroke:#333
    style B fill:#ccf,stroke:#333
    style C fill:#cfc,stroke:#333
    style D fill:#fcc,stroke:#333
    style E fill:#cff,stroke:#333
■ HOW TO SET THE TIME/CALENDAR
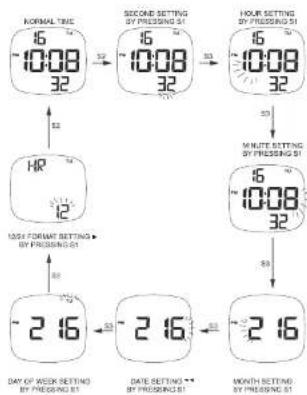
- From the NORMAL TIME mode, pressS2 order to change the display to the TIME/CALENDAR SETTING mode. (The second digits start flashing.)
2.
Press S1 in accordance with a line sign, the second digits are reset to '00' and short counting immediately.
When the second digit count any number from '30' to '15' and S1 is pressed, one minute is added and the seconds are immediately reset to '00.'
3. Press S3 to confirm the second setting and move on to the next item.
Select on of the item to be adjusted (flashing) is made in the following order when S3 is pressed.
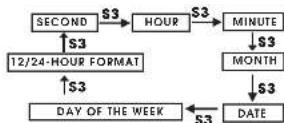
- To set the digits for each item, press S1. One digit (fishing) is increased with each pressing of S1. To move the digits quickly, keep S1 pressed
- After c the adjustments are completed, press S2 to return to the NORMAL TIME mode.
flowchart
graph TD
    A["NORMAL TIME 45/10:08 32"] --> B["SECOND SETTING BY PRESSING 51 16/10:08 32"]
    B --> C["HOUR SETTING BY PRESSING 51 16/10:08 32"]
    C --> D["WHITE SETTING BY PRESSING 51 16/10:08 32"]
    D --> E["MONTH SETTING BY PRESSING 51 216"]
    E --> F["DATE SETTING BY PRESSING 51 216"]
    F --> G["DAY OF WEEK SETTING BY PRESSING 51 216"]
    G --> H["100% FORMAT SETTING BY PRESSING 51"]
\*Choice of 12-Hour/24-Hour format
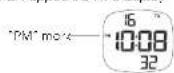
The time display format in either 12-hour indication or in 24 hour indication can be selected alternately by pressing \$1. Under the 12-hour indication format, "2M mark appears on the afternoon, but no AM mark appears in the morning. Under the 24-hour indication format, no mark appears on the display
■ HOW TO USE THE STOPWATCH
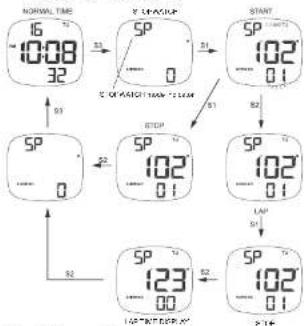
from the NORMAL TV mode, press S3 to go to the STOPWATCH mode. The STOPWATCH mode indicator "SP" appears on the display.
STOPWATCH OPERATION
Standard Measurement
③
(1) 2017
(1) 2017年1月1日
Lap Time Measurement
⑤1→⑤2→⑤2□□→⑤1→⑤2→⑤2
Start Lap 1 Lap 2 Stop Last lap Reset
- Measurement area release of lap time can be repeated when S2 is pressed - When S2 is pressed the display changes to show the current lap time and long time from STAT for 3 access, and then I automatically return to show the ongoing measurement.
flowchart
graph TD
    A["NORMAL TIME 16:00-32"] --> B["SP 0"]
    B --> C["START 102:01"]
    C --> D["SP 102:01"]
    D --> E["SP 102:01"]
    E --> F["SP 123:00"]
    F --> G["SP 102:01"]
    G --> H["SP 102:01"]
    H --> I["SP 102:01"]
    I --> J["SP 102:01"]
    J --> K["SP 102:01"]
    K --> L["SP 102:01"]
    L --> M["SP 102:01"]
    M --> N["SP 102:01"]
    N --> O["SP 102:01"]
    O --> P["SP 102:01"]
    P --> Q["SP 102:01"]
    Q --> R["SP 102:01"]
    R --> S["SP 102:01"]
    S --> T["SP 102:01"]
    T --> U["SP 102:01"]
    U --> V["SP 102:01"]
    V --> W["SP 102:01"]
    W --> X["SP 102:01"]
    X --> Y["SP 102:01"]
    Y --> Z["SP 102:01"]
    Z --> AA["SP 102:01"]
    AA --> AB["SP 102:01"]
    AB --> AC["SP 102:01"]
    AC --> AD["SP 102:01"]
    AD --> AE["SP 102:01"]
    AE --> AF["SP 102:01"]
    AF --> AG["SP 102:01"]
    AG --> AH["SP 102:01"]
    AH --> AI["SP 102:01"]
    AI --> AJ["SP 102:01"]
    AJ --> AK["SP 102:01"]
    AK --> AL["SP 102:01"]
    AL --> AM["SP 102:01"]
    AM --> AN["SP 102:01"]
    AN --> AO["SP 102:01"]
    AO --> AP["SP 102:01"]
    AP --> AQ["SP 102:01"]
    AQ --> AR["SP 102:01"]
    AR --> AS["SP 102:01"]
    AS --> AT["SP 102:01"]
    AT --> AU["SP 102:01"]
    AU --> AV["SP 102:01"]
    AV --> AW["SP 102:01"]
    AW --> AX["SP 102:01"]
    AX --> AY["SP 102:01"]
Fress \$2 to reset the sleepwatch.
Press 53 to return to the NORMAL TIME mode
■ HOW TO USE THE ALARM
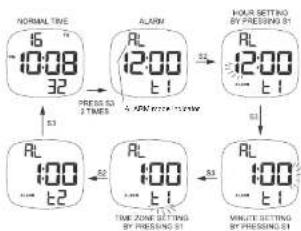
From the NORMAL TIME mode, press33 twice to go to the ALARM mode. The ALARM mode indicator "AL" appears on the display.
PressS2 to change the display to the ALARM SETTING mode. The hour digits start flashing.
- PressS1 to set the hour digits. One e.g.l (fashing) is increased with each press of S1. To move the digits quick y, keepS1 pressec.
- Fross 58 to confirm the hour setting and move on to the minute setting. The minute digits start flashing.
- Press S1 to select the minute digits. One digit (flossing) is increased with each press of S1. To move the digits quickly, keep S1 pressed.
- Press3 to confirm the minute setting and move on to the line zone setting.
- PressS1 to select the time zone. Select "t1" for alarm in the time zone 1, select "2" for alarm in the time zone 2. The alarm is available only in one time zone.
- FrossS2 to complete the alarm setting.
- PressS3 to return to the NORMAL TIME mode
text_image
NORMAL TIME 16 -10:08 32 ALARM 12:00 E1 4 KON SETTING 12:00 E1 ALR 100 E2 ALR 100 E1 ALR 100 E1 TIME SETTING BY PRESSING 51 MINUTE SETTING BY PRESSING 51Note. The alarm can be set only in one time zone.
How to stop the alarm while sounding
the alarm sounds for 20 seconds in the designated time. To stop it manually while sounding, press S1, S2 or S3.
■ ENGAGEMENT/DISENGAGEMENT OF THE ALARM & CHIME
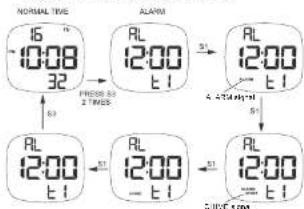
- From the NORVA_TIME mode, press S3 twice to go to the ALARM mode.
- With each press of S1, the alarm and chime can be engaged or disengaged in the following order: The ALARM signal one for CHIME signal appear on the display accordingly.
flowchart
graph TD
    A["NORMAL TIME"] --> B["16:00-32"]
    B --> C["ALARM"]
    C --> D["12:00 t-1"]
    D --> E["ALARM"]
    E --> F["12:00 t-1"]
    F --> G["ALARM"]
    G --> H["12:00 t-1"]
    H --> I["ALARM"]
    I --> J["12:00 t-1"]
    J --> K["ALARM"]
    K --> L["12:00 t-1"]
    L --> M["ALARM"]
    M --> N["12:00 t-1"]
    N --> O["ALARM"]
    O --> P["12:00 t-1"]
    P --> Q["ALARM"]
    Q --> R["12:00 t-1"]
    R --> S["ALARM"]
    S --> T["12:00 t-1"]
    T --> U["ALARM"]
    U --> V["12:00 t-1"]
    V --> W["ALARM"]
    W --> X["12:00 t-1"]
    X --> Y["ALARM"]
    Y --> Z["12:00 t-1"]
    Z --> AA["ALARM"]
    AA --> AB["12:00 t-1"]
    AB --> AC["ALARM"]
    AC --> AD["12:00 t-1"]
    AD --> AE["ALARM"]
    AE --> AF["12:00 t-1"]
    AF --> AG["ALARM"]
- Press S3 to return to the NORMAL TIME mode.
\*\*Calendar display
to view the calendar (north and dolar), keep pressing down \$1 in the NORMAL MI mode.
■ HOW TO USE THE TIMER
From the NORMAL TIME mode, press \$3 three times to go to the TIMER mode. The TIMER mode indicator "IK" appears on the display.
- Press S2 to change the display to the TIMER SET NG mode. The your digits start flashing.
2 Press S1 to set the hour digits. One digit (flushing) is increased with each pressing of S1. To move the digit is quickly, keep S1 pressed. - Press S3 to confirm the hour setting and move or to the minute setting. The minute gets short flashing.
- PressS1 to set the minute digits. One digit (flothing) is increased with each pressing of S1. To move the digits quickly, keepS1 pressed
3: Press 53 to confirm the minute setting and move on to the second setting. The second digits are flashing. - Press SI to set the second digits. One digit (fishing) is increased with each pressing of SI. To move the digits quickly, keep SI pressed
- Press 52 to complete the timer setting.
ILLUMINATING LIGHT
In any mode press \$4 to illuminate the display for about 3 seconds.
Note:
1. The backlight of the watch employs an electro-
luminescent (EL) light, which tends to lose
tum rating power after very long use
2. The illumination provided by backlight may be hard to see when viewed under direct sunlight.
■ BATTERY CHANGE
The miniature battery SEIKO CR2016, Moxell CR2016 or SON+ CR2016 which powers your watch should lost approximately 4 years. However, because it is inserted in the factory, the actual life of the battery once in your possession may be less than 4 years. Be sure: I replace the battery to prevent any positive malta action as soon as it runs down. To replace the battery we recommend fixing the watch to a cool watch repair shop.
Note: If the alarm is used for more than 20 seconds a day and/or the luminating light for more than 8 seconds a day, the battery to may be less than the specified period.
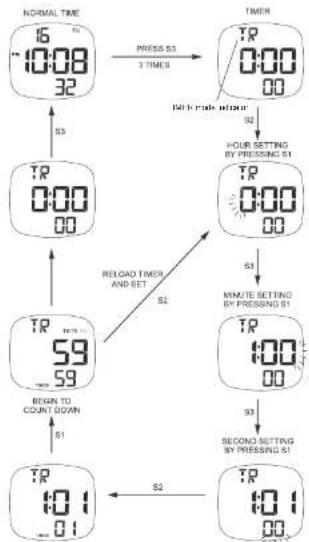
flowchart
graph TD
    A["16:00:32"] -->|PRESS S3 3 TIMES| B["TIMER"]
    B -->|DO to read time| C["00:00:00"]
    C -->|HOUR SETTING BY PRESSING S1| D["TIMER"]
    D -->|MINUTE SETTING BY PRESSING S1| E["TIMER"]
    E -->|SECOND SETTING BY PRESSING S1| F["TIMER"]
    F -->|RELOAD THEN AND SET| G["TIMER"]
    G -->|BEGN TO COUNT DOWN| H["TIMER"]
    H --> I["01:01"]
    I --> J["52"]
    J --> K["TIMER"]
TIMER OPERATION
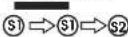
Start
Stop
Reset (to ta starting vo je)
- Press SI in the TIVER mode to start the timer.
- Press \$1 to stop the timer.
- To reset the timer to its starting voice, press\$2.
- Press \$3 to return to the NORMAL IMM mode.
From 3 minutes before the time is up, the waiting beeps (BI-BI) will be generated each time the second digits reach '00' and '30." For the lost 16 seconds before the time-to time, the alarm (BI) will sound. When the iris is up, the alarm (BI-BI) sounds for 12 seconds press S1, S2 or S3 do not it.
■ HOW TO SET THE SECOND TIME ZONE
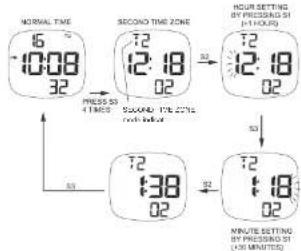
From the NORMAL TIME mode, press 53 four lines to go to the SI CONO TIME ZONE mode. The SI CONO TIME ZONE mode indicates appears on the display.
- Press \$2 to change the display to the HMI /ONI S-1 NG mode "the your digits start LO/Hing."
- Press S1 lose the hour digits. One digi (leasing) is increased with each press of S1 to move the digits quickly, keeping S1 pressed
- Press \$3 to confirm the hour setting and move or to the minute setting. The minute digits are losting.
- Press S1to set the minute digits. The minute digits are increased in 30-minute increments.
- Press S2 to complete the second time zone setting.
c. Press S3 to return to the NORMAL TIME mode.
text_image
NORMAL TIME 16 -10:08 32 SECOND TIME ZONE T2 12:18 02 HOUR SETTING BY PRESSING ST (1 HOURS) T2 12:18 02 4 TIMES STANDARD 175.27% and later T2 T38 02 MINUTE SETTING BY PRESSING ST (20 MINUTES)■ CARE OF YOUR LORUS WATCH
This watch contains precise electronic components. Never attempt to open the case or remove the back cover
BATTERY

CAUTION
Do not expose the old battery to fire or recharge it. Keep it at a place beyond the reach of children. If a child swallows it, consult a doctor immediately.
WATER RESISTANT
| NoIndication | NO | NO | NO | NO |
| WATERRESISTANT | YES | NO | NO | NO |
| WATERRESISTANT(SOM/S BAR) | YES | YES | NO | NO |
| WATERRESISTANT(QUAD BAR)at above | YES | YES | YES | NO |
If your water is 200 M/20 BAR, 100 M/10 BAR or 50 M/H BAR water resistant, it is so indicated on the dial/case book.
• Do not operate the buttons when the watch is wet
• In the wotech is excited to salt water, since I in fresh water and then wipe it thoroughly dry.
- Should you find any water or condensation inside the watch, immediately have it checked. Water can corrode electric parts inside the case.
Caution:
Leather shops are not water resistant except so incidented, even if the watch head is water resistant.
- ALLERGIC REACTION
Because the case and band touch the skin directly, it is important to clean them regularly. It rolls at if sleeves may be stained and those with delicate skin may develop a rash -Please wear the watch with some pay to avoid any possible allergic reaction -If you develop a rash on your wrist, stop weaning and consult a physician.
• MAGNETISM
Your watch will be adversely affected by strong magnetism. Keep it away from close contact with magnetic objects.
- SHOCKS AND VIBRATIONS
Your watch may be worn for normal sports activities, but he careful not to drop it or hill on hard surfaces.
• TEMPERATURE
Your watch is preadjusted so that constant accuracy may be insured at normal temperature.
- CLEANING
Use only a soft cloth and clean water for cleaning your watch. Never use chemicals, as the waterproof gasket will corrode
■SERVICE
When your LORUS watch requires repair or servicing, please see the proposed WARRANTY GLARANII.
Primes in China