
SE2754X - Herd SMEG - Kostenlose Bedienungsanleitung
Finden Sie kostenlos die Bedienungsanleitung des Geräts SE2754X SMEG als PDF.


Benutzerfragen zu SE2754X SMEG
0 Frage zu diesem Gerät. Beantworten Sie die, die Sie kennen, oder stellen Sie Ihre eigene.
Eine neue Frage zu diesem Gerät stellen
Laden Sie die Anleitung für Ihr Herd kostenlos im PDF-Format! Finden Sie Ihr Handbuch SE2754X - SMEG und nehmen Sie Ihr elektronisches Gerät wieder in die Hand. Auf dieser Seite sind alle Dokumente veröffentlicht, die für die Verwendung Ihres Geräts notwendig sind. SE2754X von der Marke SMEG.
BEDIENUNGSANLEITUNG SE2754X SMEG
PIANI VETROCERAMICA SENSORIALI TABLES VITROCERAMIQUES SENSITIVES TOUCH-CONTROL CERAMIC HOBS GLASKERAMIKKOCHFELDER MIT TASTENBEDIENUNG ENCIMERAS VITROCERAMICAS SENSORIALES GLASKERAMISCHE KOOKPLATEN TIPTOETSEN
Istruzioni per l'uso
Mode d'emploi
Instructions for use
Bedienungsanleitung
Instrucciones de uso
Gebruiksaanwijzing
| IT | Pagina | 1 - 15 |
| FR | Page | 17 - 31 |
| GB | Page | 33 - 47 |
| DE | Seite | 49 - 63 |
| ES | Página | 65 - 79 |
| NL | Bladzijde | 81 - 95 |
Contents
Installation advice....34
Installation instructions .... 35
Presetting....35
Positioning....35
Electrical connection 37
Using the hob 39
Touch-control keys....39
Switching on the cooking zones 41
Control disabling key....42
Switching off the cooking zones 42
Safety cut-out device 42
Residual heat indicator 42
Practical hints for use of the cooking zones ..... 43
General advice 44
Controls....44
Warnings....44
Cleaning, maintenance and suggestions .... 46
Installation advice
Touch-control ceramic hobs are particularly sensitive electrical appliances.
Leaving aside the end result, these hobs, produced by a specific technique, are completely different from conventional hobs.
Since the electronic equipment is extremely sensitive, special care must be taken when installing the hob, which will be affected by knocks or humidity.
Moreover, because of their special structure touch-control hobs have a built-in installation height which exceeds 40 mm the standard maximum thickness of ordinary hobs.
The unit below the hob has to be modified during built-in installation and assembly.
To allow built-in installation, the engineer must remove the front and rear stabilizer cross-pieces at each end of the wooden unit.
Since this unit is often installed between other units, its stability is not impaired.
However, this modification is not possible on all units.
Corner units, for example, usually have a swivel body fixed at the bottom and top by means of a beam.
In this case, the top part cannot be removed because the swivel body might fall if disconnected from the stabilizer.
There may also be problems in installation if the unit below the hob contains a built-in appliance which uses water or produces steam (refrigerators, dishwashers, washing machines and some types of oven).
Experience has shown that the heat generated between the appliance and the hob without ventilation will cause condensation which damages the hob.
Installation instructions
Presetting
By connecting the device to the electric grid, the electrical components checking procedure is automatically activated. Numbers 1 to 9 appear in sequence above the symbols ⊖ and ⊕.
When they go out, the appliance is ready for use.
In case of malfunctions, a flashing "E" appears on the Display of the plate(s) affected.
Positioning
This ceramic hob can be installed in units of all kinds: in brickwork, metal, wood, wood clad with melamine laminates or plywood.
The opening for built-in installation must be of the dimensions shown.
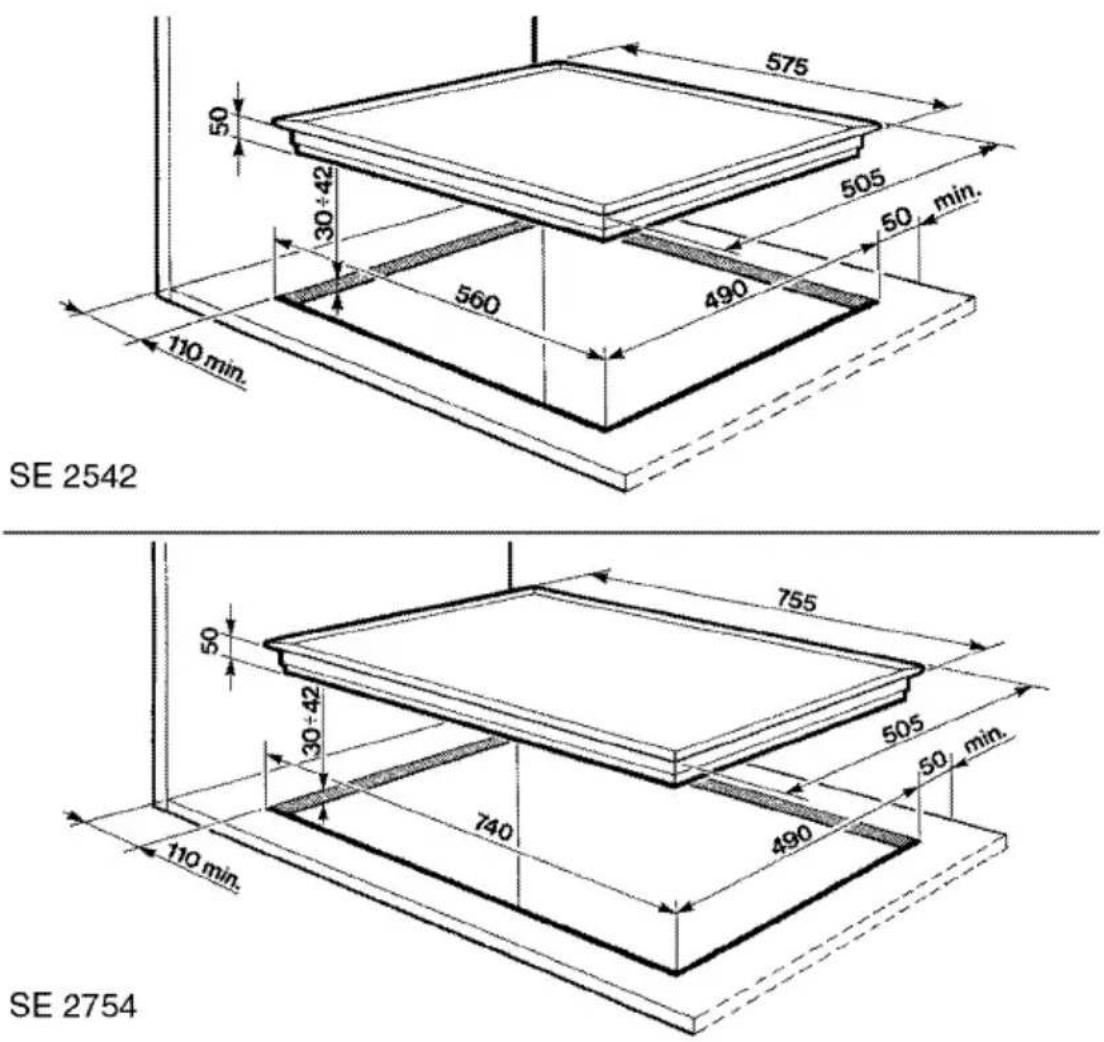
Optimum protection of the opening
The wood used in the tops of kitchen units may change shape (e.g. swell) if humidity is present.
Apply a varnish or special adhesive to the sides of the opening made for built-in installation to assure proper protection.
Permitted level of protection against fire, and instructions for use
The appliance has «type X» protection against overheating (EN 60335-2-6/1990) and can be installed against walls higher than the work top. For this, it is important to leave a gap of 50 mm from the rear edge of the unit and 110 mm from the left-hand side.
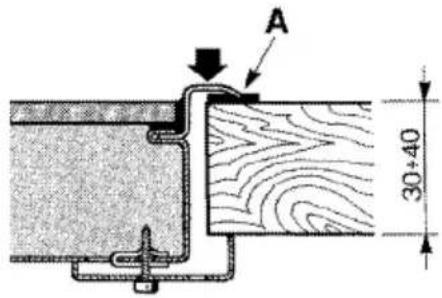
The hob is complete with a special adhesive seal «A» which prevents any infiltration into the unit. The seal must be carefully fixed around the edge of the opening for built-in mounting, pressing lightly with the hand to ensure that it sticks.
Remove the paper protection and place the hob on the seal.
The seal guarantees a waterproof finish and a perfectly smooth work top. Fix the hob to the unit using the brackets already fitted to the appliance.
text_image
A 30+40N.B. - The appliance must be installed by a skilled engineer in accordance with the regulations in force in your country.
Always disconnect the appliance from the electricity supply before any adjustments, maintenance, etc.
Electrical connection
Make sure that the mains electricity supply in the home is of the voltage and power indicated on the date plate underneath the hob.
The power supply lead is not supplied.
Use a cable of type H05RRF or H05RNF, bearing in mind that the earth wire (yellow-green) must be about 20 mm. Longer at the end for connection to the appliance. Make sure that the lead is not in contact with heated zones.
On installation, provide an omnipolar circuit breaker with minimum distance between contacts at least 3 mm on the appliance power supply line, at a point easily reached from the appliance.
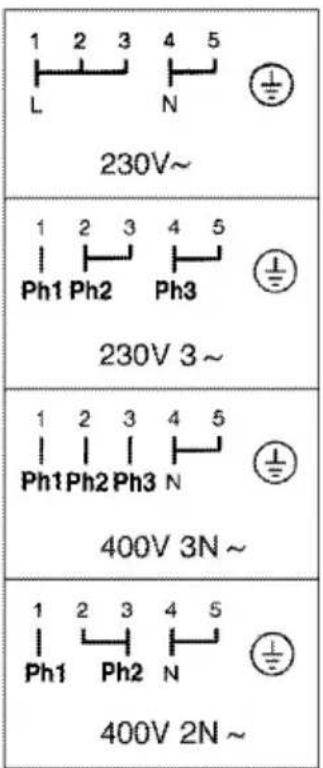
The options for connection to the electrical mains are indicated in the tables below or on the data plate underneath the hob.
| Cables H 05 RRF - H 05 RNFMinimum gauge in mm^2 | 230 V~2,5 | 230V 3~2,5 | 400V 3N~1,5 | 400V 2N~2,5 |
text_image
1 2 3 4 5 L N 230V~ 1 2 3 4 5 Ph1 Ph2 Ph3 230V 3 ~ 1 2 3 4 5 Ph1Ph2Ph3 N 400V 3N ~ 1 2 3 4 5 Ph1 Ph2 N 400V 2N ~To access the terminal board press the two side tabs as indicated on the terminal board cover.
Modify the arrangement of the jumpers on the terminal board if necessary, then fix the wires, making sure that the earth wire is about 20 mm longer.
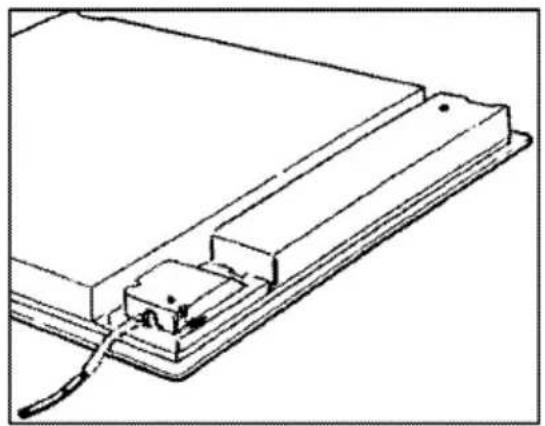
Fix the power supply lead to the terminal and pass it through the hole in the lid.
natural_image
Technical line drawing of a mechanical assembly with a base and clamping element (no text or symbols)Before making the electrical mains connection and using the ceramic hob, it is essential to put the protective lid back in place, ensuring that the two side tabs are inserted correctly, and check that the appliance has been earthed effectively.
N.B. NEVER TOUCH THE ELECTRONIC CIRCUIT BOARD IN ANY CIRCUMSTANCES.
Our company declines any responsibility for injury or damage deriving from failure to make the earth connection or inadequate connection to earth.
Using the ceramic hob
The appliance has 4 cooking zones of different diameters and powers. Their position is clearly marked by the rings, and heat is only emitted inside the diameters of the rings on the ceramic surface.
The electric plates used are of MAGMA-EPIC type. Thanks to the incorporated EPIC temperature sensors and the software used in the electronic system, they allow precise maintenance of the preset temperature (which means energy saving through elimination of the excess energy used with the traditional method) and shorter boiling times. The residual heat warning lights indicate the actual temperature measured on the ceramic surface.
The Magma-Epic cooking zones switch on after a few seconds and have 9 settings (minimum 1, maximum 9).
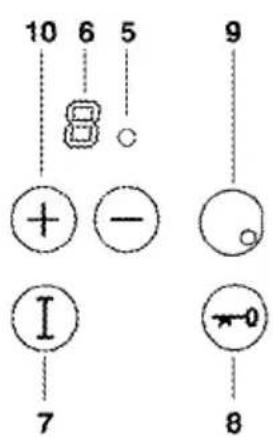
This appliance is equipped with touch-controls. When your fingertip touches one of the buttons, it activates the corresponding function: the appliance recognises your request and emits a short beep.
Touch-control keys (see page 40)
| Mod. SE 2542 | Mod. SE 2754 | ||||
| 1 | Front left-hand cooking zone | ∅ 210 (120) | 2200+750 W | ∅ 210 (140) | 2400+1000 W |
| 2 | Back left-hand cooking zone | ∅ 145 | 1200 W | ∅ 145 | 1200 W |
| 3 | Back right-hand cooking zone | ∅ 180 (120) | 1800+800 W | ∅ 170 x 265 | 2200+1400 W |
| 4 | Front right-hand cooking zone | ∅ 145 | 1200 W | ∅ 180 | 2000 W |
| 5 | Dual circuit light switch-on | ||||
| 6 | Residual heat indicators by zone (+50°C) ("H"blinking) | ||||
| 7 | Master on/off key 1 | ||||
| 8 | Control disabling key 2 | ||||
| 9 | Cooking zone controls 3 | ||||
| 10 | Heat power regulator switch (9 positions - from 1 to 9) 4 | ||||
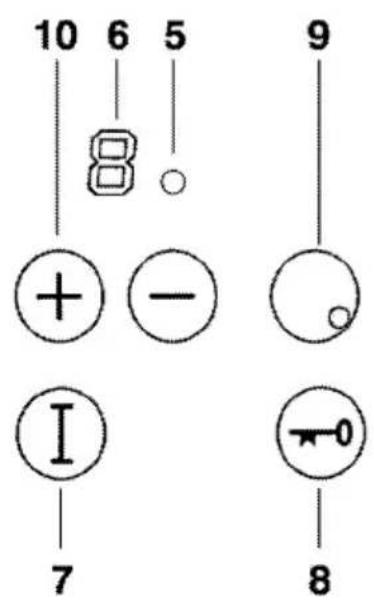
text_image
10 6 5 8 + - I 7 9 - - - - - - - 8SE 2754
SE 2542
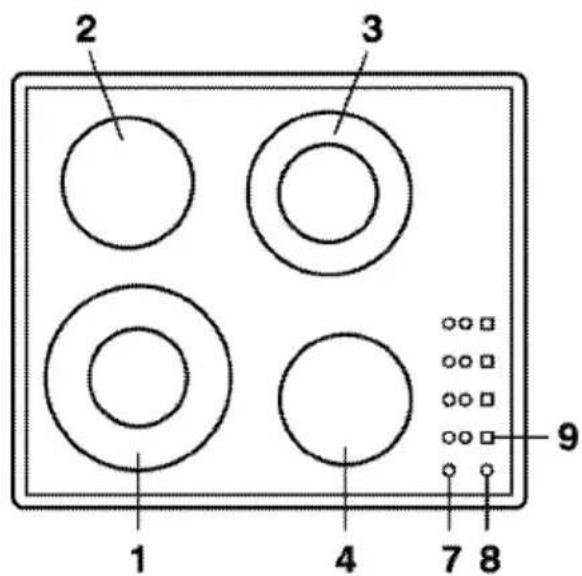
text_image
2 3 1 4 7 8 9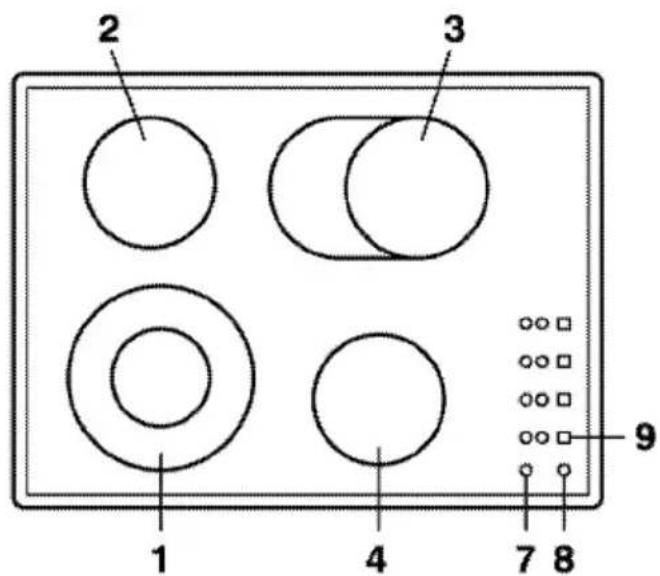
text_image
2 3 1 4 7 8 9Switching on the cooking zones
A) Simply touch the ① key two times consecutively within 2 seconds to switch on the appliance. Wait for a first beep and then touch the key again until the pilot light on the left of the key illuminates.
B) Select the cooking zone required, such as Ⓞ (the number 0 appears).
C) Press the ⊕ or ⊖ key to select the power required from 1 to 9, this can also be modified during cooking (press the ⊖ key to start from power setting 9).
D) To switch on the double-circuit cooking zones press the ⊕ button until the maximum power setting (9) is reached. Press the ⊕ button: an indicator light (5) confirms that the second heating element has switched on.
Pressing the ⏻ button regulates the level of both elements.
To switch off the extra element only, press the ⏻ button until the number 0 is reached: when the ⭕ or ⏻ button is pressed, the single element only will switch back on.
E) To switch off the cooking zones, touch the control buttons, e.g. Ⓞ, after releasing the lock button.
F) Press the ① button again to switch off all the cooking zones, a blinking letter (H) will appear on the displays above the + and - buttons (residual heat).

text_image
10 6 5 8 + - I 7 9 - - ←0 8Control disabling key
The control disabling key ⏻ prevents any accidental operations while the hob is in use.
The controls can be disabled during use (although operations already in progress continue and the relative settings can still be adjusted).
To lock the controls
The lock button is activated automatically 20 seconds after the last procedure carried out; the light beside the button comes on.
To re-activate the controls
Press the ⬤ key for 1-2 seconds and keep it pressed until the light goes out. You will hear a beep.
Switching off the cooking zones
To switch off a cooking zone, press the corresponding 9 (ON/OFF) key. The display will go out and you will hear a short beep.
Safety cut-out device
The ① key switches off all cooking zones in operation simultaneously, even if the controls have been cut out.
Press the ① key for about 2-3 seconds; the cooking zones will go out after the beep.
Residual heat indicator
As long as the temperature of a cooking zone remains above 60^ C, the associated display will continue to show a blinking letter (H).
Never touch the zones indicated and never place objects which may be damaged by heat on them; risk of burning!
Practical hints for use of the cooking zones
Thanks to the Epic technology used, it allows precise maintenance of the preset temperature, with no need to constantly increase or reduce the setting: one obvious example is melting chocolate - no further adjustments are required once the setting has been chosen.
High heat values are necessary in the following cases:
– considerable quantities of food to be cooked;
– cooking in pans without lids;
- use of glass or ceramic casserole dishes.
However, only daily use will teach you the best settings for your own cooking habits.
| Tables for use of the cooking zones | |
| Heat setting | |
| 1 | Melting: butter, chocolate, jelly. Keeping cooked foods warm. |
| 2 | Slow heating and thawing, making syrup |
| 3 - 4 | Slow cooking: dried legumes, fruit, fish, frankfurters, milk pudding, frozen foods. |
| 5 - 6 | Slow cooking: stews, roulades, tripe, meat sauces. |
| 7 - 8 | Cooking and roasting: escalopes, steaks, omelettes, fried foods, browning. |
| 9 | Boiling and cooking pasta. |
General advice
Controls
Press only one key at a time. If two or more keys are pressed simultaneously, no command will be considered.
Keep the control panel clean and free. The device recognises any metallic object placed on a key as a command.
Dry any spills and clean any stains immediately. Never place small kitchen utensils, pans, cloths etc. on the keys.
In any case, if any object covers one or more controls during operation, a continuous beeper will warn the user.
Warning: should an excessive quantity of liquid boil over and cover the control keys, the sensorial surface automatically switches off and must be cleaned before being switched on again.
The electricity supply should also be disconnected in case of lengthy periods out of use.
NOTE: by means of the integrated SOFTWARE and the Epic temperature sensor, the electronic system ensures that the temperature of the ceramic surface does not reach the critical threshold; if this limit is passed, it switches off the hob.
Warnings
Since children might not see the residual heat indicators, check that they do not come into contact with zones which might still be very hot even after they have been switched off.
The first time the hob is used, leave the plates on for about 30 minutes at the maximum setting.
Important! The hob glass is very tough but not shatterproof: it may be damaged by violent knocks with hard or sharp objects.
In case of breakage, cracking or crazing, the glass must not be used again and the appliance must be disconnected from the electrical mains immediately.
You are advised to contact the after-sales service.
During testing, the hob may give off an acrid smell or a smell of burning which will disappear completely in a few minutes.
For good efficiency and minimum energy consumption, use only casserole dishes and pans suitable for electric hobs (i.e. with perfectly flat bottoms).
Pan bottoms must at least be as large in diameter as the ring marked on the glass. If they are smaller, energy will be wasted, and so larger pans should be used.
The pan bottom and the glass surface must always be clean and dry.
These rules are fundamental; failure to observe them will lead to loss of heat and thus wasted energy.
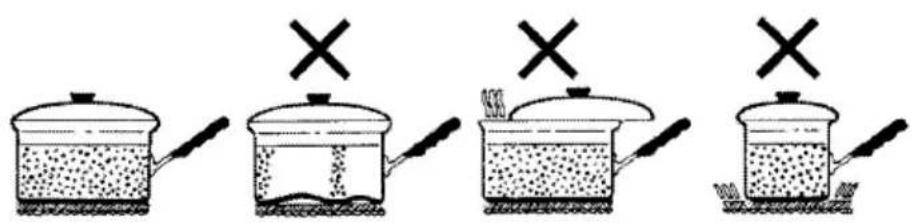
text_image
Illustration showing four cooking steps with a pot and crossed-out items, marked with X symbols indicating heating or cooking.Cleaning, maintenance and suggestions
Before doing any work, always disconnect the appliance from the electrical mains and read the following instructions carefully.
The glass must be cleaned regularly after each use, when it is cold or still lukewarm.
1) Use flat, dry pans only. Steel pans or those with uneven bottoms must not be used because they might scratch the glass.
Marks or silvery streaks are caused by accidentally dragging aluminium pans over the hob, or chipped enamelled pans.
Check the condition and flatness of pan bottoms periodically.
These marks or streaks can be removed by cleaning the hob with vinegar.
2) Never spill sugar on the hob while cooking; if this happens by accident, switch off the hob immediately and clean the part affected with the scraper or with hot water before the zone cools, and dry with a cloth.
If the glass is not cleaned immediately, the sugar may form deposits which are impossible to remove.
3) Any burnt residues left on the cooking zone after cooking must be removed immediately with the scraper provided. Rinse with water and dry thoroughly.
The scraper means that no other mechanical cleaning aids are required and minimizes the need for chemical cleaning products.
4) Never use abrasive or corrosive detergents such as spray cleaners for grills and ovens, stain or rust removers, powders or metal scouring pads.
5) Keep everything which might melt, such as plastic items, aluminium foil and all sweet products, well away from the hob.
If something has accidentally been allowed to melt on the hob, remove it immediately using the scraper (while the surface is still hot) to avoid possible damage to the glass.
6) As a general rule the glass hob should not be used as a work top.
Grains of sand from vegetables, for example, may accidentally stick to the bottom of a pan and leave scratches on the hob.
7) In case of any malfunction, such as overheating or inadequate heating of a zone contact the after-sales service as soon as possible.
Our company declines any responsibility in case of damage to the glass due to failure to comply with the instructions given above.
text_image
10 6 5 8 + - I 7 9 8Important! Do not clean the hob until the residual heat warning lights (6) have gone out.