
Reflex 300mm F6.3 MF Macro - Objektiv Tokina - Kostenlose Bedienungsanleitung
Finden Sie kostenlos die Bedienungsanleitung des Geräts Reflex 300mm F6.3 MF Macro Tokina als PDF.


Benutzerfragen zu Reflex 300mm F6.3 MF Macro Tokina
0 Frage zu diesem Gerät. Beantworten Sie die, die Sie kennen, oder stellen Sie Ihre eigene.
Eine neue Frage zu diesem Gerät stellen
Laden Sie die Anleitung für Ihr Objektiv kostenlos im PDF-Format! Finden Sie Ihr Handbuch Reflex 300mm F6.3 MF Macro - Tokina und nehmen Sie Ihr elektronisches Gerät wieder in die Hand. Auf dieser Seite sind alle Dokumente veröffentlicht, die für die Verwendung Ihres Geräts notwendig sind. Reflex 300mm F6.3 MF Macro von der Marke Tokina.
BEDIENUNGSANLEITUNG Reflex 300mm F6.3 MF Macro Tokina
Tokina
Instruction Manual
Reflex 300mm F6.3 MF MACRO

Reflex 300mm F8.3 is dedicated for 4/3 cameras.
Kenko Tokina Co., Ltd.
http://www.tokinslens.com Nara-Ochna 3-9-12, Shinakawa, Tokyo 161-8570
Name of Each Part
① Event filter attachment ring ② Sub-sector ③ Distance scale (in feet)
- Distance scale (per maw)
- Manual force mg
- Distance scale indicator ma
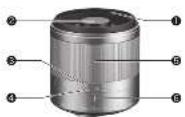
"The sub-reflector (2) is provided at the center of the lens. This is not a cap or other item, so do not remove it."
How to Attach/Remove the Lens
Align the indicator manes on the lens and the camera to mount the lens, and then turn the lens until you hear a click!
For attachment and removal, refer to "Attaching the line" and "Financing the line" (by using camera manual)
A the attached letters for any looseness
Caution
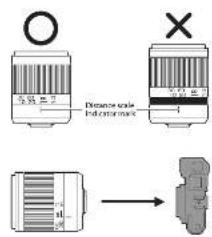
When attaching the lens to the camera, align the infinite position (or) on the focus ring with the distance scale indicator mark. If the lens is attached when the infinite position list on the focus ring is not aligned with the distance scale indicator mark, your finger may get caught in (and pinched by) the gap along the focus ring.
text_image
○ × Distance scale Performance mark →Setting Up the Camera
Some carrots must be set to a manual lot made in a "shoot without lens mode" per to lens attachment. Set up your carers by referring to the information provided by law. For details, please to your carers's status.
Olympus Micro Four-Thirds. PEN Series/OM-D Series
Any showing mode can be used, except shutter priority mode
* In the program mode, aperture priority mode or manual mode, set the ISO
sensitivity to ALTO.
* The aperture value can't be adjusted in aperture priority mode.
Panasonic Micro Four-Thirds Lumbi G Series
Any spacing mode can be used, except shorter proximity A^2 mode
Shorter priority A, made isn't recommended
* In the program AE mode, aperture priority, AE mode or manual exposure mode set the 50 seminities to be 70.
* The aperture value can't be adjusted in aperture priority AE mode.
This is a super-telaphoto-ers. Therefore, when the MF pixel is activated it becomes difficult to distinguish which part on the subject the k's has its laws. Accordingly, it is recommended that the MF axis. Connection is turned [001]
Photographing
Adjusting the focus
- We believe that the following is
With a telephoto lens, the death of field (the area front-to-back in which the subject can be brought into focus) becomes the low (= the focus range is s^-1 ), so it's difficult to adjust the focus.
This recommended to ensure the camera can be able to pay in the top of us using the area. This will make careful adjustments in the focus space.
Currently, a superior exhibitors with a range of 100 mm or more will have some allowance in the section of the infinitely symbol (e). This is because the effective index of right in all changes at the temperature in the main cycle during change, and the focus position may shift slightly as a result. Accordingly, but sure to adjust the locus carefully by checking the image on the first screen, even when capturing a clear view, rarely sky or other very distant subject.
Preventing Blurry Images
This line is small and light, but it's still a telephone lens with a long focal length. Central y, telephone lenses are even used with a small angle of view and higher probability of the images becoming blurry. It's recommended that you see your camera to high sensitivity and a high shutter speed, or use a stable tripod or monopod.
You can prevent blamy images by using the remote watch of the self-timer function. In this case, because to use a stable impact.
Photographing Conditions with a Telephoto Lens
When a sclophoto lens is used, the magnification ratio increases and therefore dust-water water and other matter suspended in the air will affect the image quality. In capture drop images, closely严格按照 its hole to a free day with minimum sand falling several consecutive five days, in a location not subject to exhaust gases smoke from chimneys, etc.
It is difficult to capture sharp images in mountains and creasts, causing the summer, because the air contains a considerable amount of gas and water vapor. However, your photography can be made enjoyable if you have advantage of unfavorable conditions to create works or your own, such as capturing the sea through vibrating air or shooting the ropes of mountains as veiled in lake.
Adjusting the Exposure
Its line employs reflective spots, so the aperture is fixed. Accordingly, the amount of light must be adjusted by changing the shutter speed. You can do this by changing the ISO standard! However a door shutter speed makes turned images more likely, so it recommended that you on the sensitivity to high level.
As a general pulse the shutter speed should be 1.7 range of 1/1000 to 1/2000 on a fine day when the SC sensitivity is set to 400. Take your phone while checking each image on the LCD panel.
◆ The image is too dark : Lower the shutter speed.
◆ The image is too bright. Raise the shutter speed
Lens Hood
The lens hood is provided to prevent light and grater images on photographs caused by the entry of bright light into the lens, whether directly diagonally or from the side. Always use the lens hood to obtain clear problem-free photographs as well as to protect the lens.
Folding the top of the hood can strongly make it difficult to measure a such the hood. When removing or matching the hood, do so by holding it near the base (amount of the hood
The hood can be stated by attaching it in reversal to the front edge of the lens. Unlike a conventional camera loaded with slow-motor film, the fixed imaging element of a digital camera causes greater reflection. Accordingly, it is recommended that the lens hood a ways be attached.
* When attaching the lens hood, turn it a long way to the end until you hear a "click" to ensure that the hood is firmly attached. If the hood is not properly attached, you may use shadows on the screen.
Caution Against the Use of the Suit-in Flash
When the built-in flash is used to take photographs, light from the built-in flash will be partially shielded by the lamp, and can curtain any shadows will appear in the screen. Live are potential flash
Using a Flash (Red-Fye Pharmaceutical)
When a photograph of a person is taken with a face, his or her eyes may turn and. This is called the 'sed eye effect.' To make you no eye effect, follows the instructions in the manual presented by the manufacturer of your camera.
Troubleshooting
If you suspect that the camera is malfunctioning, check again with reference to the following table:
| Taking photographs | ||
| Condition | Cause | Remedial action |
| The shutter doesn't release | ○The shooting mode does not support the structured lens. | ○I'm the necessary time before her body offering to be a following task: |
| ○If the camera focus mode is too "to force," to force it, to the AF mode the camera may have the air to determine the focus position of this one in which the shuttle does not release. | ○If the camera focus mode is "MF" (nearful focus) | |
| Images became noisy | ○The head shades where photographs are torn. | ○They use the camera when taking photographs. |
| ○If the distance to the subject is too close. | ○The use of a foot or misaligned recommended. | |
| ○If those of dust and water spread in the air. | ○Does the distance from the subject, that more long. | |
| ○If the light only. | ○One photographs in a place having too energetic dust, water inside, exhaust gases, etc. | |
| ○When the lens with an approximate type of commercially available light clean. | ||
| The camera doesn't become | This tone is a manual focal lamp. | |
| Audio focus doesn't work | ○This tone is a manual focal lamp. | ○When the focus ring and mutually adjust the lens(Enter to:“Adjusting the focus”[1]) |
| The aperture can't be adjusted | ○This lens has a fixed aperture. | ○Adjusted the exposure by changing the thickness used(Enter to:“Adjusting the aperture”[1]) |
| Other | ||
| Condition | Cause | Remedial action |
| What appears to be a block. Cause of the center of the object one (inc or the subject side) doesn't come set. | It is the part of the axis structure that it is used to reflect images. | Do not remove the bit object, it's stay to see a photograph as it. |
| Specifications | |
| Facial Length | 100 mm |
| Aperture Value | 96.3 feet |
| Mount | More than |
| Lens Construction | 7 elements in 3 groups |
| Angle of View | 4° |
| Filter Size | 53 mm |
| Minimum Focus Distance | 68 m |
| Macro Ratio | 1:2 |
| Maximum Outer Diameter | 60 mm |
| Lens Length | 60 mm |
| Weight | 29% |
| Lens Head | 0-532 |
Before attaching a file to the front of the lens, be sure the fiber work contact the selective part (blocked) at the center or the front surface of the lens specifications and power or views are subject to charge without a matter for the purpose of product improvements.