
4019 - Nähmaschine SINGER - Kostenlose Bedienungsanleitung
Finden Sie kostenlos die Bedienungsanleitung des Geräts 4019 SINGER als PDF.


Benutzerfragen zu 4019 SINGER
0 Frage zu diesem Gerät. Beantworten Sie die, die Sie kennen, oder stellen Sie Ihre eigene.
Eine neue Frage zu diesem Gerät stellen
Laden Sie die Anleitung für Ihr Nähmaschine kostenlos im PDF-Format! Finden Sie Ihr Handbuch 4019 - SINGER und nehmen Sie Ihr elektronisches Gerät wieder in die Hand. Auf dieser Seite sind alle Dokumente veröffentlicht, die für die Verwendung Ihres Geräts notwendig sind. 4019 von der Marke SINGER.
BEDIENUNGSANLEITUNG 4019 SINGER
natural_image
Illustration of a spool with a needle and a mesh cap (no text or symbols)4009
4019
Instruction Book for Sewing Machine Model 4009/4019
Copyright © 1984 T.S. CO.
All Rights Reserved Throughout the World *A Trademark of T.S. Co.
Contents
- Getting to Know Your Machine 2
Principal Parts 2
Accessories 4
- Getting Ready to Sew ... 5
Choosing and Changing Accessories 5
Operating Machine ..... 12
The Bobbin 13
Threading the Machine .. 16
- Straight Stitching ..... 18
Adjusting Machine Stitch 18
Sewing a Seam 20
Applications 21
- Basic Zig-Zag Stitching .. 23
Adjusting Machine Stitch 23
Applications 25
- Machine Stitch Patterns .. 29
Setting Selectors 29
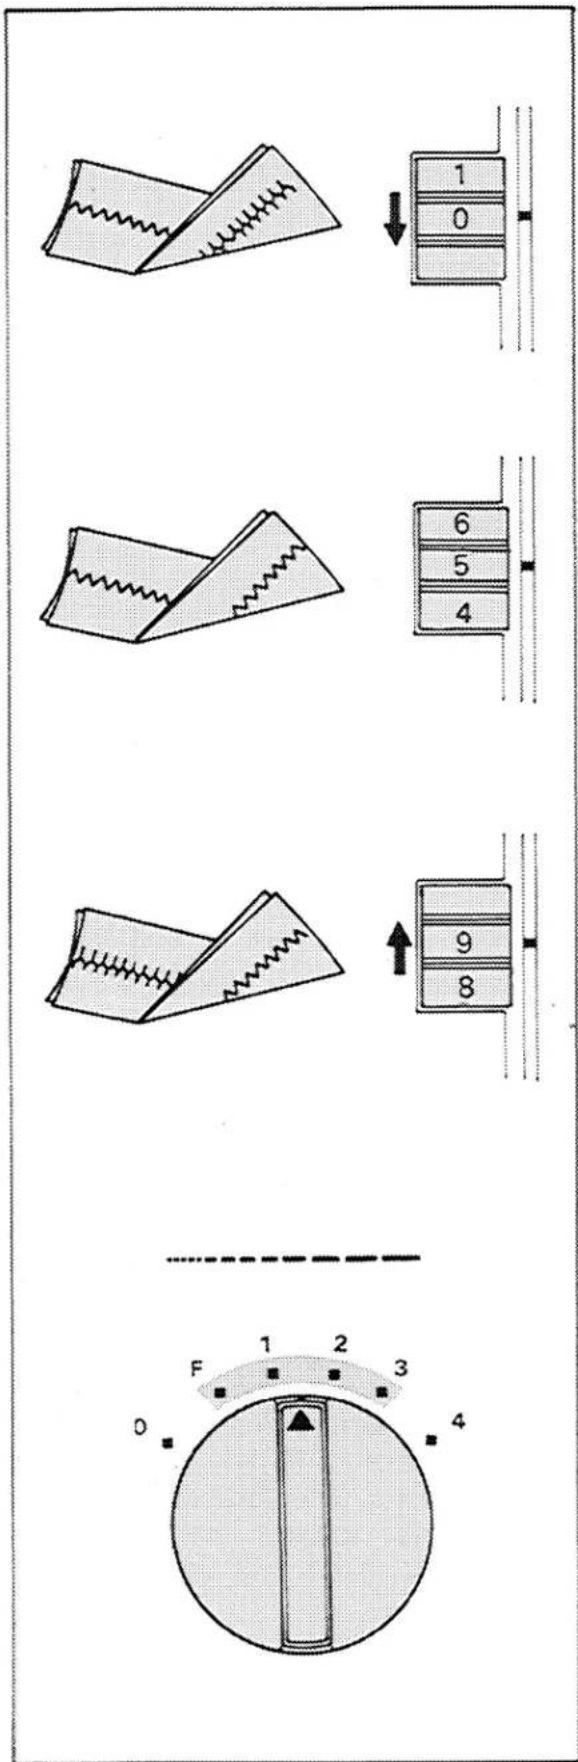
Adjusting Stitches to Suit Stretch Fabrics ... 31
- Buttonholes 38
Buttonholes 38
Garment Preparation ..... 38
Four-Step Buttonholing .. 40
-
Twin-Needle Stitching .... 42
-
Free-Arm Sewing 43
-
Performance Checklist ... 44
-
Caring for Your Machine 45
Index 49
For European Territories—
This product is suppressed for radio and television interference in accordance with the International Electrotechnical Commission requirements of the CISPR.
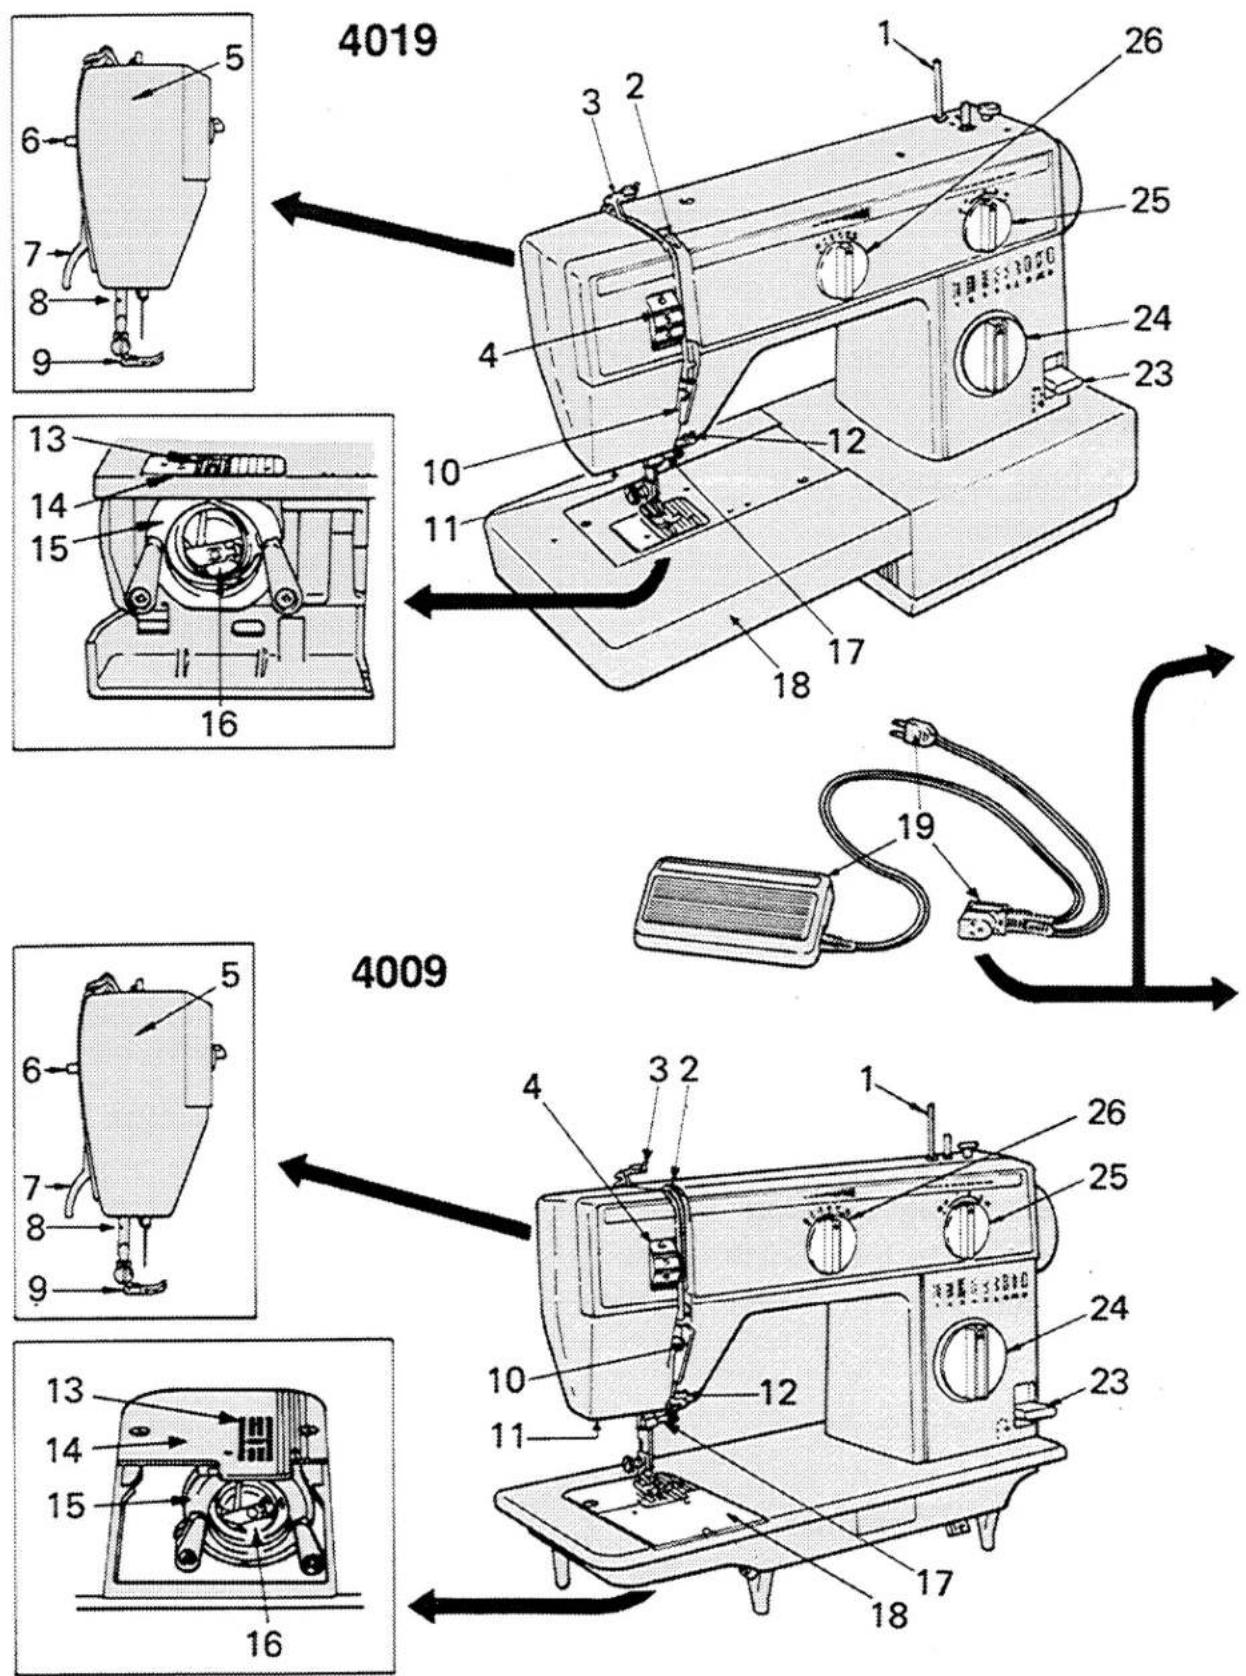
1. Getting to Know Your Machine
text_image
22 21 20
text_image
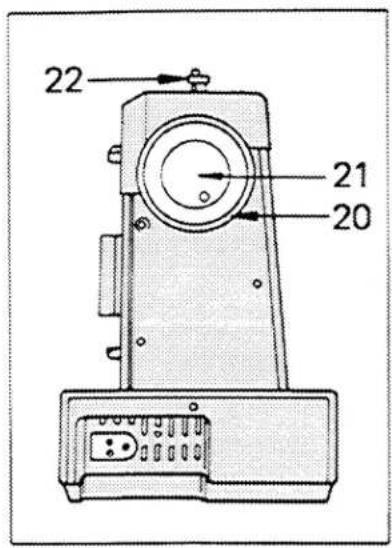
22 21 20Principal Parts
- Spool Pin
2.Take-up Lever - Rear Thread Guide
- Tension Dial
- Face Plate
- Light Switch
- Presser Foot Lifter
- Thread Cutter
- General Purpose Foot
- Thread Guard
- Sewing Light
- Thread Guide
- Fabric Feed
- Needle Plate
- Bobbin Case Holder
- Bobbin Case
- Needle Clamp
- Extension Bed (4019)
- Slide Plate (4009)
- Electrical Connections and Speed Controller
- Hand Wheel
- Hand Wheel Knob
22.Bobbin Winder Spindle - Reverse Lever
- Pattern Selector
- Stitch Length Selector
- Stitch Width Selector
To ensure that you are always provided with the most modern sewing capabilities, THE MANUFACTURER reserves the right to change the appearance, design or accessories of this sewing machine when considered necessary.
Accessories
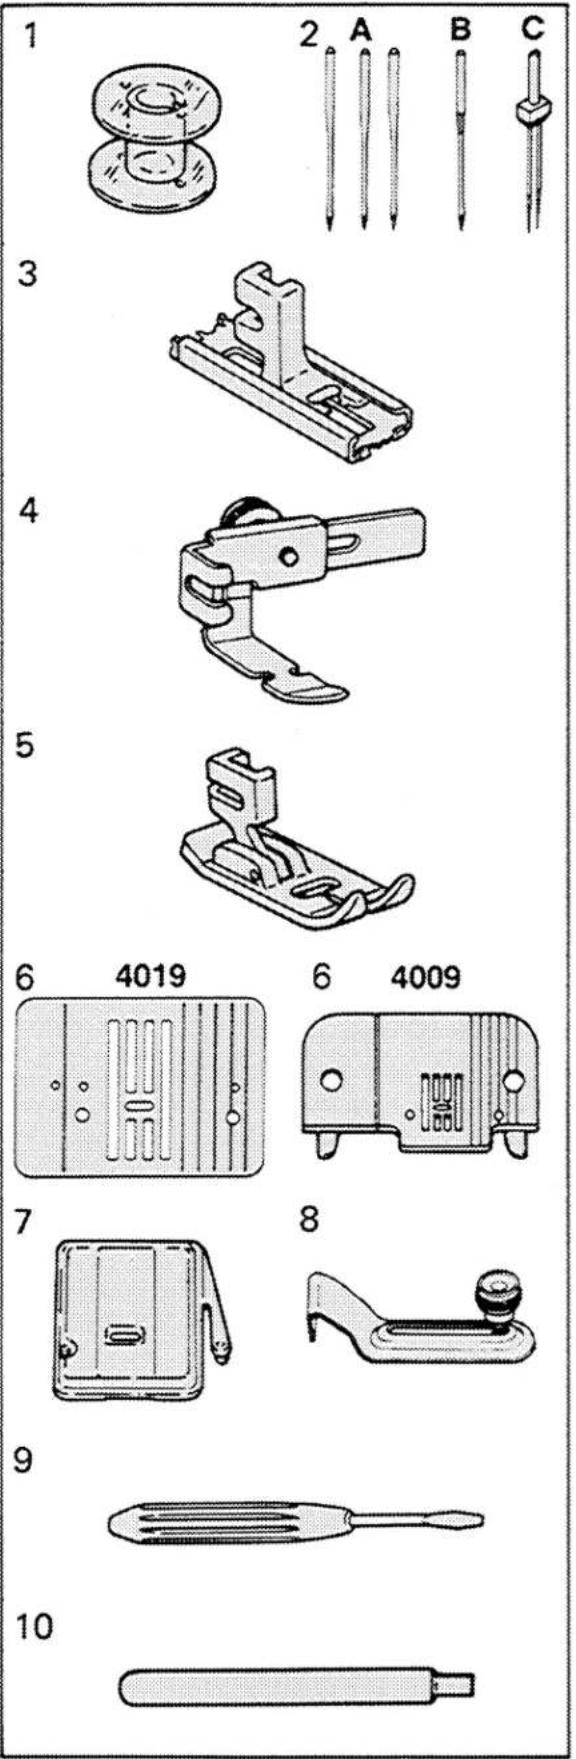
The accessories that come with your sewing machine are designed to help you do many kinds of sewing easily.
1. Transparent Bobbins
(No. 541090)
2. Needles
• A Style 2020 is used for general sewing.
• B Style 2045 is used for sewing knits, stretch fabrics and elastic.
• C Style 2024 is used for twin-needle decorative stitching on woven and knit fabrics.
CAUTION: Use twin-needle with the general purpose needle plate and general purpose foot only. Do not use any other accessories with this needle as needle breakage will occur.
-
Buttonhole Foot is used to make bar tack buttonholes in four steps.
-
Zipper Foot for inserting zippers and stitching corded seams.
-
General Purpose Foot, on your machine when delivered, is used for all utility and decorative sewing.
-
General Purpose Needle Plate, on your machine when delivered, is used with all presser feet.
7. Snap-in Feed Cover.
-
Seam Guide helps you keep seam allowances even.
-
Screwdriver for adjusting bob- bin-thread tension.
-
Detachable spool pin is used for twin-needle sewing.
2. Getting Ready to Sew
text_image
Diagram showing a hand operating a mechanical device with labeled parts and directional arrows indicating motion or force.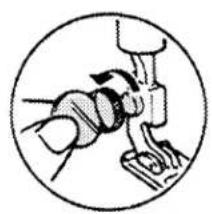
natural_image
Illustration of a hand turning a valve inside a circular frame (no text or symbols)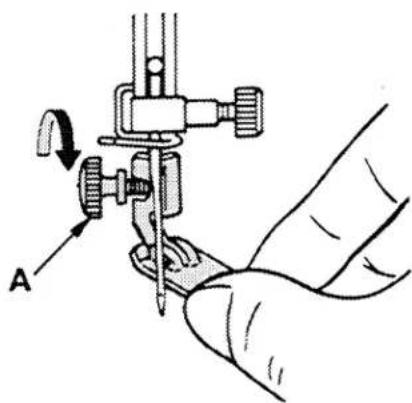
natural_image
Illustration of a hand using a sewing machine to adjust a tool, with no visible text or symbolsChoosing and Changing Accessories
CAUTION: Disconnect the power line plug from the socket outlet when changing needles, feet, or needle plates, or when leaving the machine unattended. This eliminates the possibility of starting the machine by accidentally pressing the speed controller.
Changing Presser Feet
Removing Presser Foot with Shank
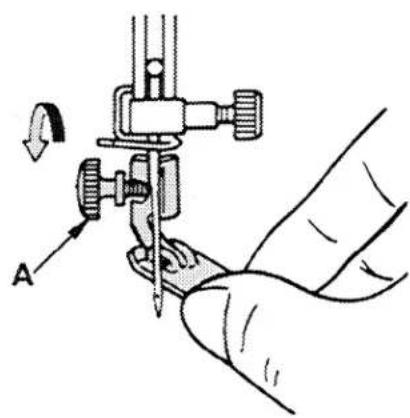
- Raise needle to highest position by turning the hand wheel toward you.
- Raise presser foot.
- Loosen presser foot screw A and remove the shank, guiding it to the right.
Replacing Presser Foot with Shank
- Hook shank around the presser bar, guiding it to the left and tighten presser foot screw A.
NOTE: Insert the edge of a coin in the slot of the presser foot screw to loosen it and to tighten it securely.
text_image
Technical diagram showing three-step sewing process: cutting, holding, and finishing with a sewing machine.Changing the Needle
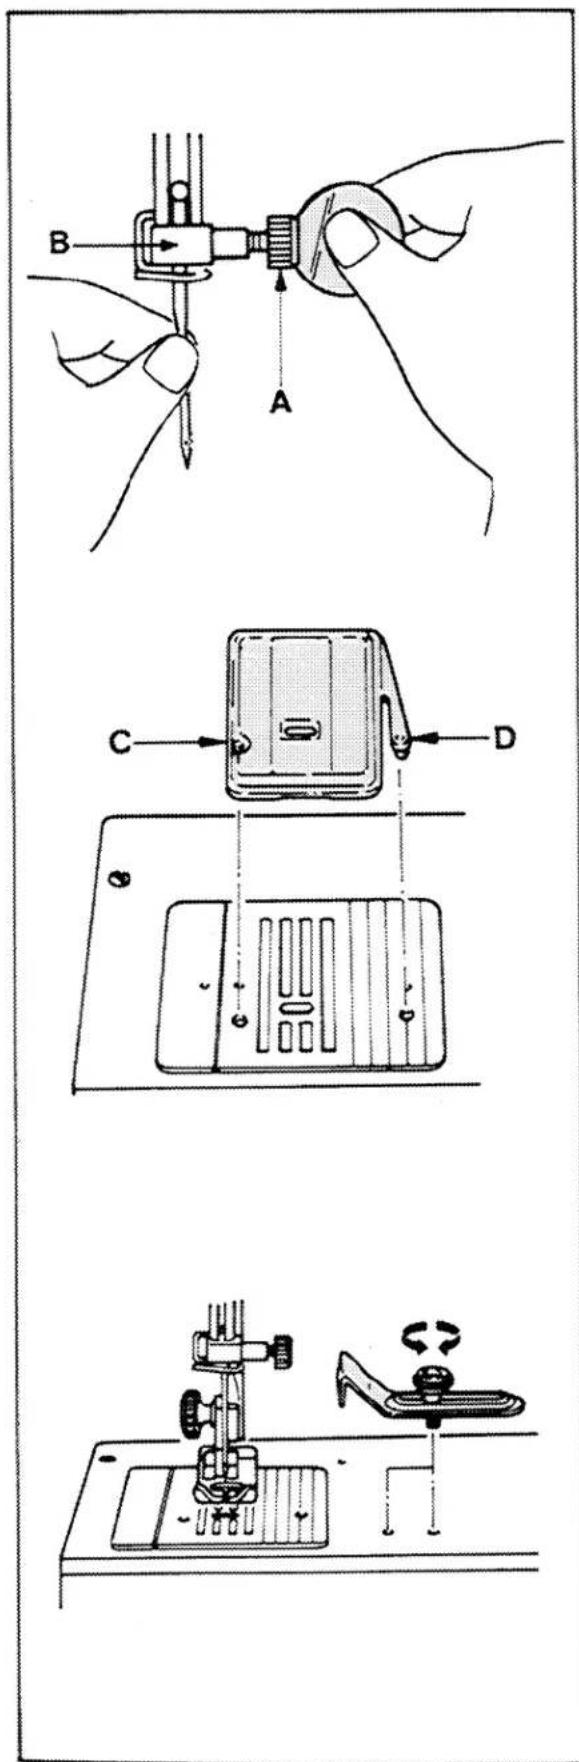
- Raise needle to its highest point by turning the hand wheel toward you. Loosen needle clamp screw A and remove the needle.
- Insert new needle up into clamp B as far as it will go, with the flat side of the needle to the back.
• Tighten needle clamp screw.
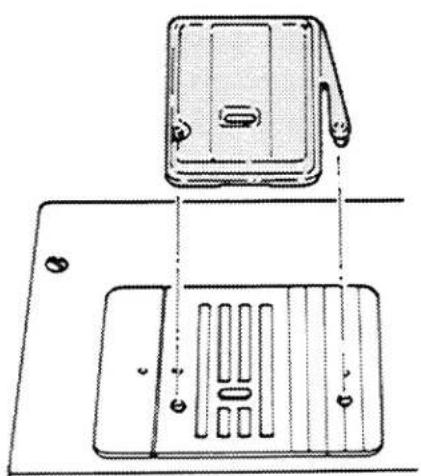
Attaching Snap-In Feed Cover
- Raise needle to highest position by turning hand wheel toward you.
- Raise presser foot.
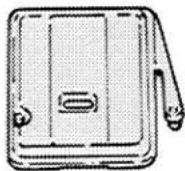
- Slide snap-in feed cover away from you over needle plate until points C and D are positioned directly over holes in needle plate as illustrated. Snap in point C. Then push point D toward point C until it snaps into place.
- To remove, lift up edges of feed cover.
Attaching the Seam Guide
Place screw in either hole to the right of the needle plate; line up straight edge of guide with the needle plate guideline for desired seam width, and tighten screw.
text_image
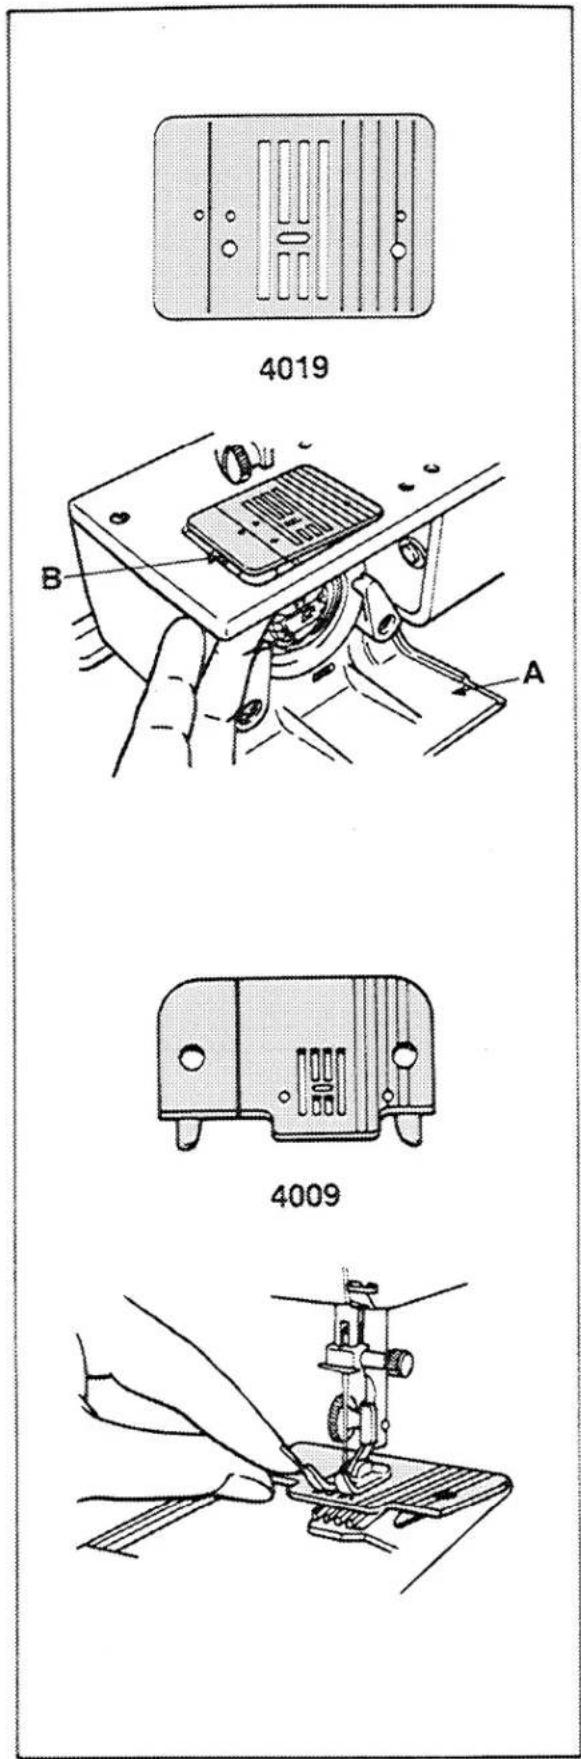
4019 B A 4009Remove and Replacing Needle Plate
4019 Machine
- Raise needle to its highest position.
- Raise presser foot.
- Open hook cover A.
- With your forefinger push needle plate upward from beneath and remove plate.
To replace needle plate, guide needle plate into position under the presser foot. Be sure the guide projection B fits into the groove of the free-arm. Press needle plate down to ensure proper positioning. Close hook cover.
4009 Machine
- Raise needle to its highest position.
- Raise presser foot.
- Draw slide plate out toward you.
- Remove the needle plate and cover plate by simply guiding it toward you.
To replace needle plate, guide needle plate into position under the presser foot.
Fabric Weight Table
There are thousands of fabrics around the world, each manufactured with a specific fibre and weight. The fabrics below have been classified according to weight to give a small sample of what is available for purchase.
Refer to this table to determine the weight and type of fabric you will be using in order to select the correct needle and thread combination.
For correct needle and thread combination for your fabric, refer to the Fabric. Thread and Needle Table on pages 10 and 11.
| Fibre and Construction | Filmy | Sheer | Light |
| Silk(Woven)(Knit) | Chiffon, Organza, Tulle | Net, Lace, Ninon | Velvet, Crepe de Chine, Shantung, FailleJersey |
| Rayon(Woven)(Knit) | Tulle | Net, Lace | Velvet, Taffeta, SatinCiré |
| Cotton(Woven)(Knit) | Voile, Tulle | Net, Lace | Challis, Organdy, Muslin, Batiste, Dimity, Lawn, Percale, Eyelet, Gingham, Piqué. PoplinJersey |
| Wool(Woven)(Knit) | Cashmere, Flannel, Mohair, Felt, CrepeJersey | ||
| Synthetic(Woven)(Knit) | Chiffon, Organza, Tulle | Net, Lace, Ninon Crepe de Chine | Crepe, Velvet, Taffeta, SatinRaschel, Single Knit, Sweater Knit, Bonded Knit, Tricot, Ciré |
| Synthetic Blends(Woven)(Knit) | Voile | Broadcloth, Batiste, Eyelet, Gingham. PoplinSingle Knit | |
| Leather | Kidskin, Patent, Chamois, Imitation-Leathers and Suedes, Leather, Suede | ||
| Plastic | Plastic Film | Plastic Film | |
| Vinyls |
| Medium | Heavy | Very Heavy |
| Velvet, Crepe de Chine, Shantung,Suiting, Brocade | ||
| Velvet, Taffeta, Satin, Crepe | Brocade, Taffeta, Satin,Crepe | |
| Velveteen, Corduroy, Velvet, Fleece,Velour, Terry, ChintzStretch Velours*, Stretch Terry** Usually contain some synthetic fibres also | Corduroy, Denim,Ticking, Canvas, Linen,Drapery Fabric, Burlap | Denim, Duck, Canvas,Sailcloth, UpholsteryFabric |
| Suiting, Flannel, Gabardine, Felt, Serge,MohairJersey | Suiting, Tweed, Duffel | Coating, Blanketing |
| Velvet, Crepe, Taffeta, SatinJacquard, Double Knit, Sweater Knit, BondedKnit, Tricot Spandex, Stretch Terry, StretchVelour, Deep Pile, Fake Furs | GabardineDouble Knit, Helenca,Fake Furs | |
| Linen type, Poplin, Corduroy, GabardineTerry Knit | Denim, Gabardine,Drapery FabricDouble Knit | |
| Patent, Imitation-Leathers and Suedes,Leather, Suede, Reptile | Buckskin, Caifskin,Suede, Reptile | Upholstery Leather |
| Bonded Vinyl (Knit Back), Patent,Embossed, Printed | Upholstery Vinyl | Upholstery Vinyl |
Fabric, Thread and Needle Table
Choosing the correct needle and thread for your fabric is of utmost importance. Correct choice will make the difference in the wear and appearance of your new garment. The Fabric Weight Table on the previous page and the Fabric, Thread and Needle Table below are practical guides to needle and thread selection. Refer to them before starting a sewing project. Be sure to use the same size and type of thread in both needle and bobbin.
To select the correct needle and thread for your fabric, first refer to the Fabric Weight Table to determine the weight and type of the material you are using.
| Type of Fabric | Filmy | Sheer | Light | |||
| Threads | Needles | Threads | Needles | Threads | Needles | |
| Silk | Fine SilkFine Cotton Fine Synthetic | 2020-9/70 | Fine SilkFine Cotton Fine Synthetic | 2020-9/70 | Fine SilkFine Cotton Fine Synthetic | 2020-11/80Woven2045-11/80Knit |
| Rayon | Fine SilkFine Cotton Fine Synthetic | 2020-9/70 | Fine SilkFine Cotton Fine Synthetic | 2020-9/70 | Fine SilkFine Cotton Fine Synthetic | 2020-11/80Woven2045-11/80Knit |
| Cotton | Fine CottonFine Synthetic | 2020-9/70 | Fine CottonFine Synthetic | 2020-9/70 | Medium CottonMedium Synthetic | 2020-11/80Woven2045-11/80Knit |
| Wool | Fine SilkFine Cotton | 2020-11/80Woven2045-11/80Knit | ||||
| Synthetic | Fine Synthetic | 2020-9/70 | Fine Synthetic | 2020-9/70 | Fine Synthetic | 2020-11/80Woven2045-11/80Knit |
| Synthetic Blends | Fine Synthetic | 2020-9/70 | Fine Synthetic | 2020-11/80Woven2045-11/80Knit | ||
| Leather | Medium CottonMedium Synthetic | 2032-11/80 | ||||
| Plastic | Fine CottonFine Synthetic | 2020-9/70 | Fine CottonFine Synthetic | 2020-11/80 | ||
| Vinyls | ||||||
Next refer to the Fabric. Thread and Needle Table. Find the fabric you are using in Type of Fabric column at left (silk, rayon, etc.). Then locate the Fabric weight column (filmy, sheer, etc.) for your Fabric at top of table. Read across from Type of Fabric column to correct weight of Fabric column. There, the correct thread and needle choice for your Fabric will be found.
Example: If you are sewing a medium weight wool, find wool in Type of Fabric column. Read across to Medium (weight) column and you will see that a medium silk, cotton or synthetic thread and a size 2020-14 needle for woven fabrics or a size 2045-14 needle for knit fabrics are to be used.
IMPORTANT: Your sewing machine has been designed to obtain best results with SINGER* needles. You should follow the recommendations in this instruction book and on the needle package for correct style and size of needle for different types and weight of fabric.
| Medium | Heavy | Very Heavy | |||
| Threads | Needles | Threads | Needles | Threads | Needles |
| Medium SilkMedium Cotton Medium Synthetic | 2020-11/80 | ||||
| Medium SyntheticMedium Cotton | 2020-11/80 | Heavy SyntheticHeavy Cotton | 2020-16/100 | ||
| Medium Cotton Medium Synthetic | 2020-14/90 Woven 2045-14/90 Knit | Heavy Cotton | 2020-16/100 | Heavy Cotton | 2020-18/110 |
| Medium Silk Medium Cotton Medium Synthetic | 2020-14/90 Woven 2045-14/90 Knit | Heavy Cotton | 2020-16/100 | Heavy Cotton | 2020-16/100 |
| Medium Synthetic | 2020-14/90 Woven 2045-14/90 Knit | Heavy Synthetic | 2020-16/100 Woven 2045-16/100 Knit | ||
| Medium Synthetic | 2020-14/90 Woven 2045-14/90 Knit | Heavy Synthetic | 2020-16/100 Woven 2045-16/100 Knit | ||
| Medium Cotton Medium Synthetic | 2032-14/90 | Heavy CottonHeavy Synthetic | 2032-16/100 | Heavy CottonHeavy Synthetic | 2032-18/110 |
| Medium Cotton Medium Synthetic | 2020-14/90 | Medium CottonMedium Synthetic | 2020-16/100 | Heavy CottonHeavy Synthetic | 2020-16/100 |
* A Trade mark of THE SINGER COMPANY
text_image
A C B E D AOperating the Machine
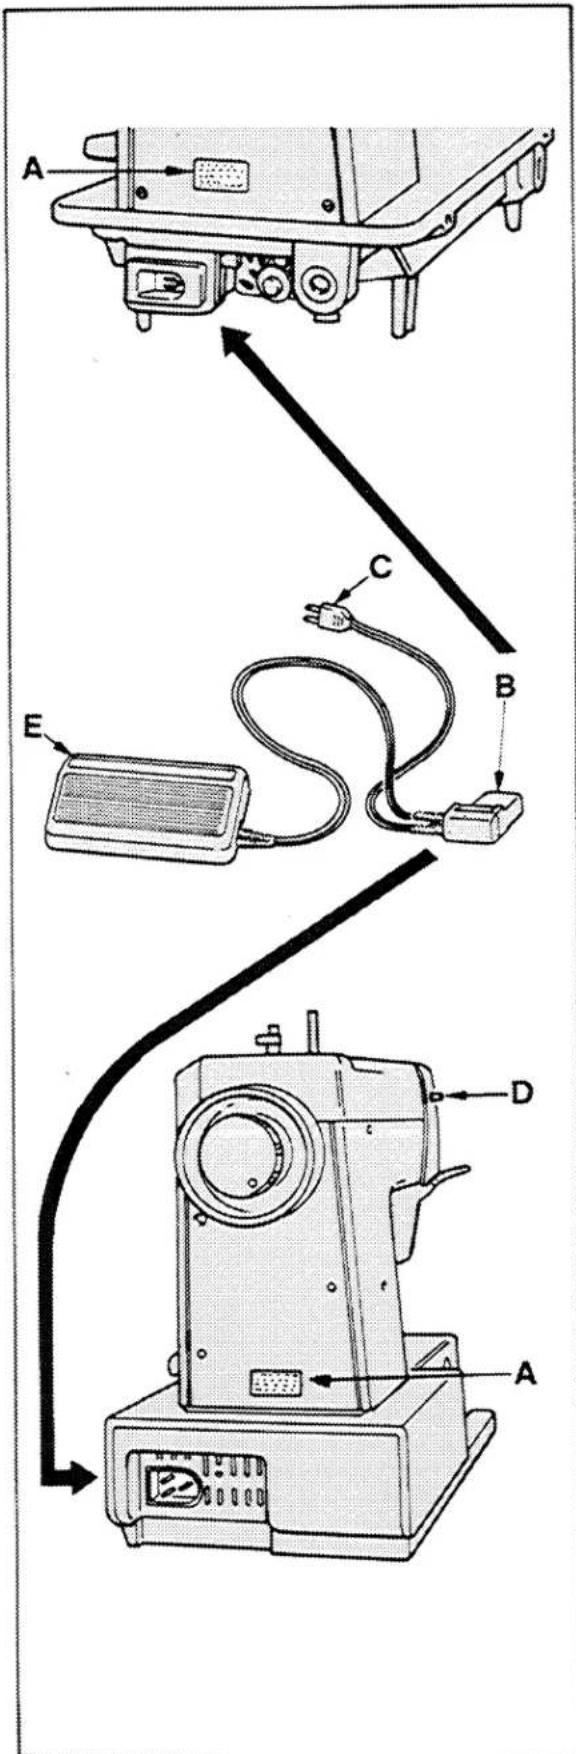
Connecting the Machine
- Before plugging in your machine, be sure the electrical information on the side of the machine A, below the hand wheel, agrees with the range marked on your electrical meter.
IMPORTANT — Machines for Great Britain and some other countries having similar wiring standards are shipped from the factory without a plug for connection to the mains.
The wires in the main lead are coloured according to code.
Blue: Neutral (N)
Brown: Live (L)
As the colours of the wires in the main lead of this appliance may not always correspond with the coloured markings identifying the terminals in your plug, proceed as follows:
The wire which is coloured blue must be connected to the terminal which is marked with the letter N or coloured black.
The wire which is coloured brown must be connected to the terminal which is marked with the letter L or coloured red. If a 13 amp (BS 1363) plug is used, a 3 amp fuse must be fitted, or if any other type of plug is used, a 5 amp fuse must be fitted either in the plug or adaptor or at the distribution board.
- To turn on the machine, connect plug B to machine and plug C to your socket outlet.
• To turn on the sewing light, press or turn switch D as required. See illustration.
• To run the machine and control speed, press the speed controller E with your foot. The harder you press, the faster the machine will sew.
CAUTION: Disconnect the power line plug from the socket outlet when changing needles, feet or needle plates or when leaving the machine unattended. This eliminates the possibility of starting the machine by accidentally pressing the speed controller. Because of the up and down movement of the needle, you must work carefully and watch the sewing area when operating the machine.
The Bobbin
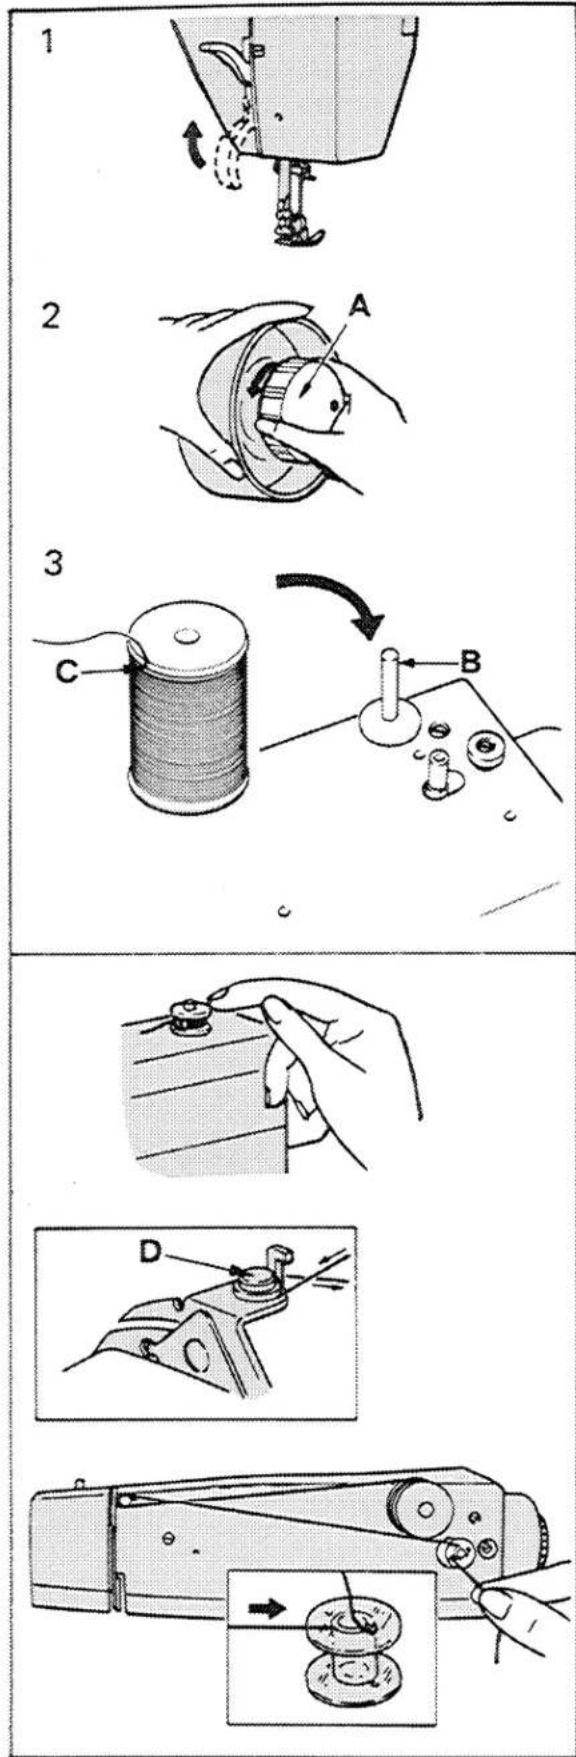
Winding the Bobbin
Preparation Steps
- Raise the presser foot and turn hand wheel toward you until needle is in highest position.
- Loosen hand wheel knob A by turning it toward you with the right hand while holding hand wheel with the left hand.
- Place thread spool on spool pin B over the felt cushion. If spool being used has a thread retaining slit C, it should be placed at the top.
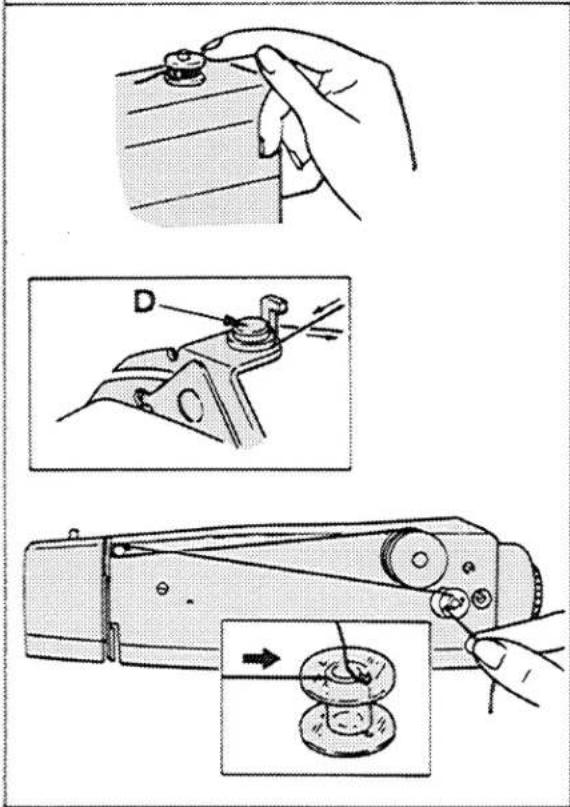
Winding Steps
- Place spool of thread on spool pin as instructed above.
- Lead thread around disc of rear thread guide D, as illustrated, and through small hole in bobbin from inside out.
- Snap bobbin onto spindle and push bobbin to right to engage bobbin winder.
- Hold thread end, as shown, and start the machine. Cut off thread end after a few coils have been wound.
- When required amount of thread has been wound (winding will stop when bobbin is full), stop the machine and cut connecting thread.
- Push bobbin to left and remove bobbin from spindle.
- Hold hand wheel and tighten hand wheel knob.
text_image
4019 B A B A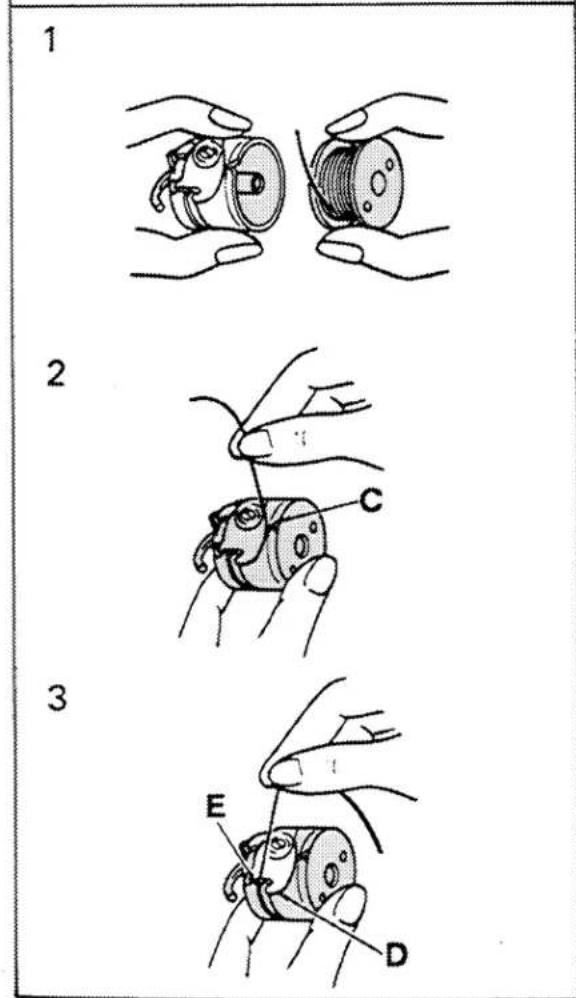
text_image
1 2 3 E DRemoving the Bobbin Case
When you prepare to sew, wind the bobbin first then thread the machine.
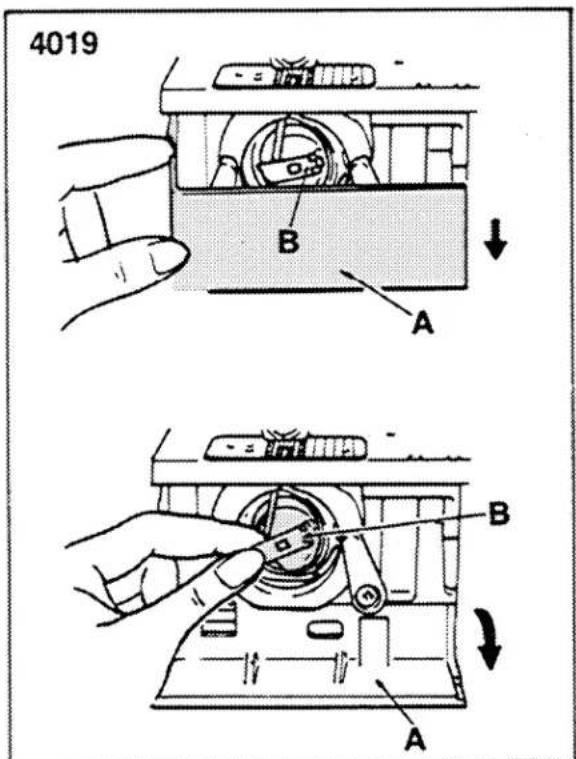
To Remove the Bobbin Case and Bobbin.
- Turn hand wheel toward you to raise take-up lever to its highest position.
• 4019 Open hook cover A, as illustrated.
• 4009 Open slide plate A by drawing it toward you. - Grasp bobbin case latch B and withdraw bobbin case.
- Release latch and bobbin will drop out of case.
Threading the Bobbin Case
- Hold bobbin case and bobbin so that thread leads off in direction shown above.
- Place bobbin into bobbin case. Pull thread into slot C.
- Pull thread under tension spring D and into slot E at end of spring, as shown.
text_image
Technical diagram illustrating three-step fabric sewing process: cutting, disceeling, and finishing.Replacing the Bobbin Case
-
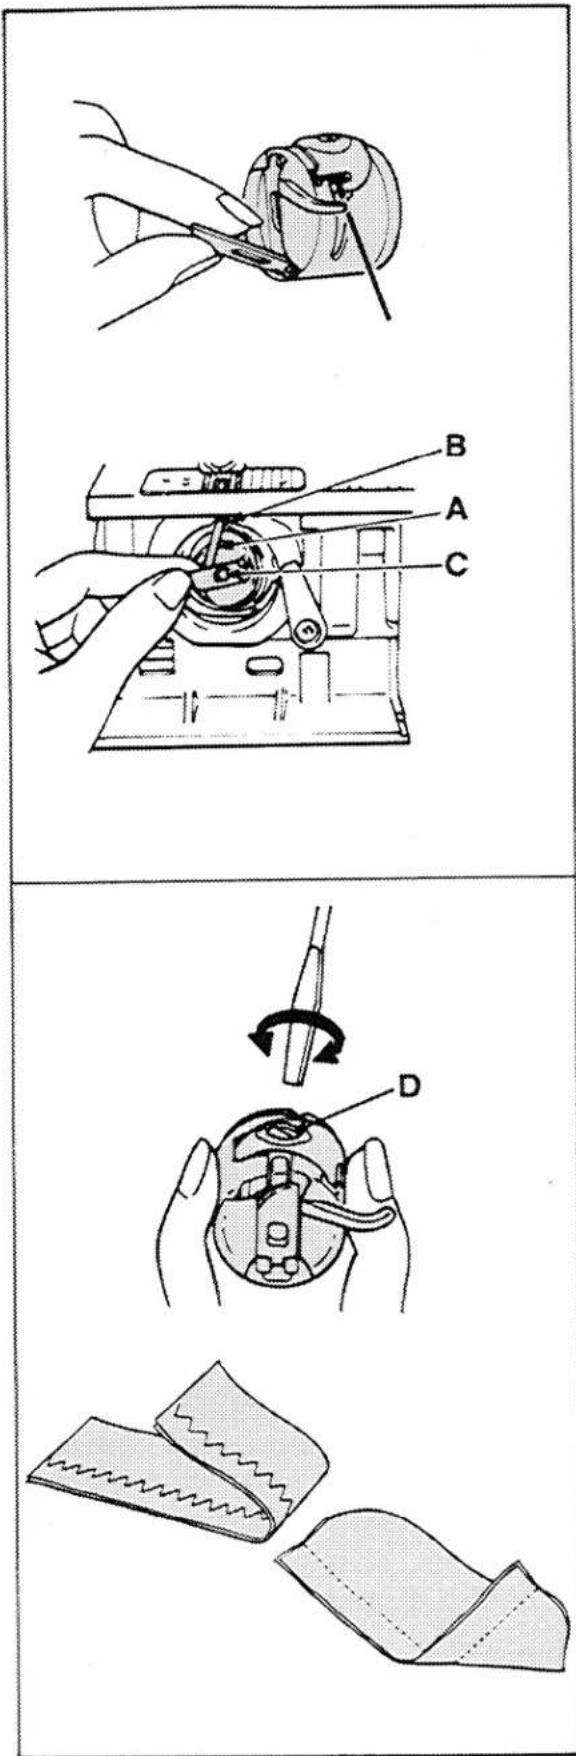
Hold bobbin case by latch, with about 7.5 cm (3 inches) of thread leading off top of case.
-
Align protruding finger A with slot B and slide case on the stud C.
-
Release the latch and push case until it clicks into place. Allow 7.5 cm (3 inches) of thread to hang free from bobbin case.
- Close hook cover or slide plate. Be sure thread does not get caught when hook cover is closed.
Adjusting Bobbin-Thread Tension
The bobbin-thread tension has been set at the factory for most types of stitching. You may wish to adjust the bobbin-thread tension when straight stitching on fine fabrics or to balance an open zig-zag stitch. Bobbin and needle threads lock at the corner of each stitch when a zig-zag stitch is balanced. To adjust the bobbin-thread tension, follow the procedure below using two layers of scrap fabric.
- Raise the presser foot.
- Raise needle to highest position by turning the hand wheel toward you.
- Open hook cover or slide plate and remove the bobbin case as instructed on page 14.
- Slowly turn screw D to the left or right, using the small screwdriver in your accessory box, until desired stitch appearance is reached.
- When stitching is completed, turn screw D to the right or left back to original position, for all other sewing.
text_image
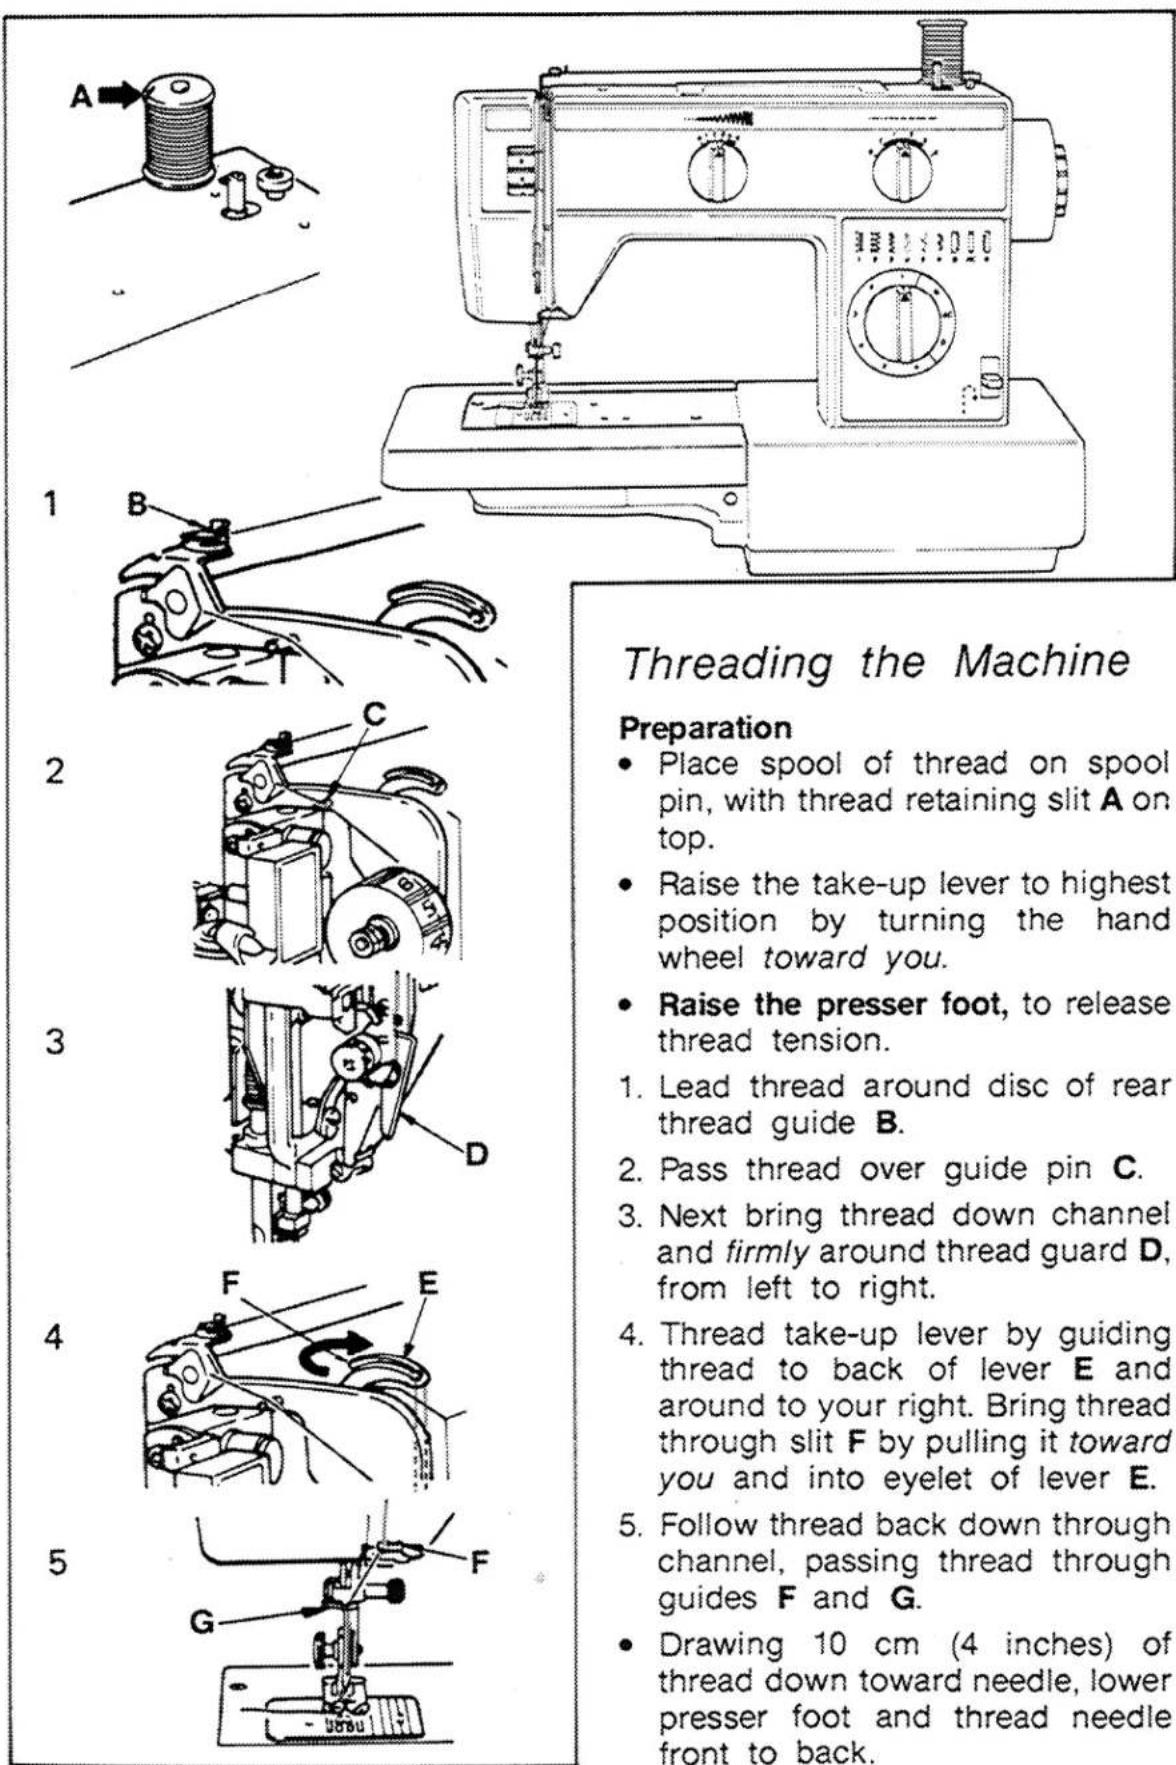
Threading the Machine Preparation • Place spool of thread on spool pin, with thread retaining slit A on top. • Raise the take-up lever to highest position by turning the hand wheel toward you. • Raise the presser foot, to release thread tension. 1. Lead thread around disc of rear thread guide B. 2. Pass thread over guide pin C. 3. Next bring thread down channel and firmly around thread guard D, from left to right. 4. Thread take-up lever by guiding thread to back of lever E and around to your right. Bring thread through slit F by pulling it toward you and into eyelet of lever E. 5. Follow thread back down through channel, passing thread through guides F and G. • Drawing 10 cm (4 inches) of thread down toward needle, lower presser foot and thread needle front to back.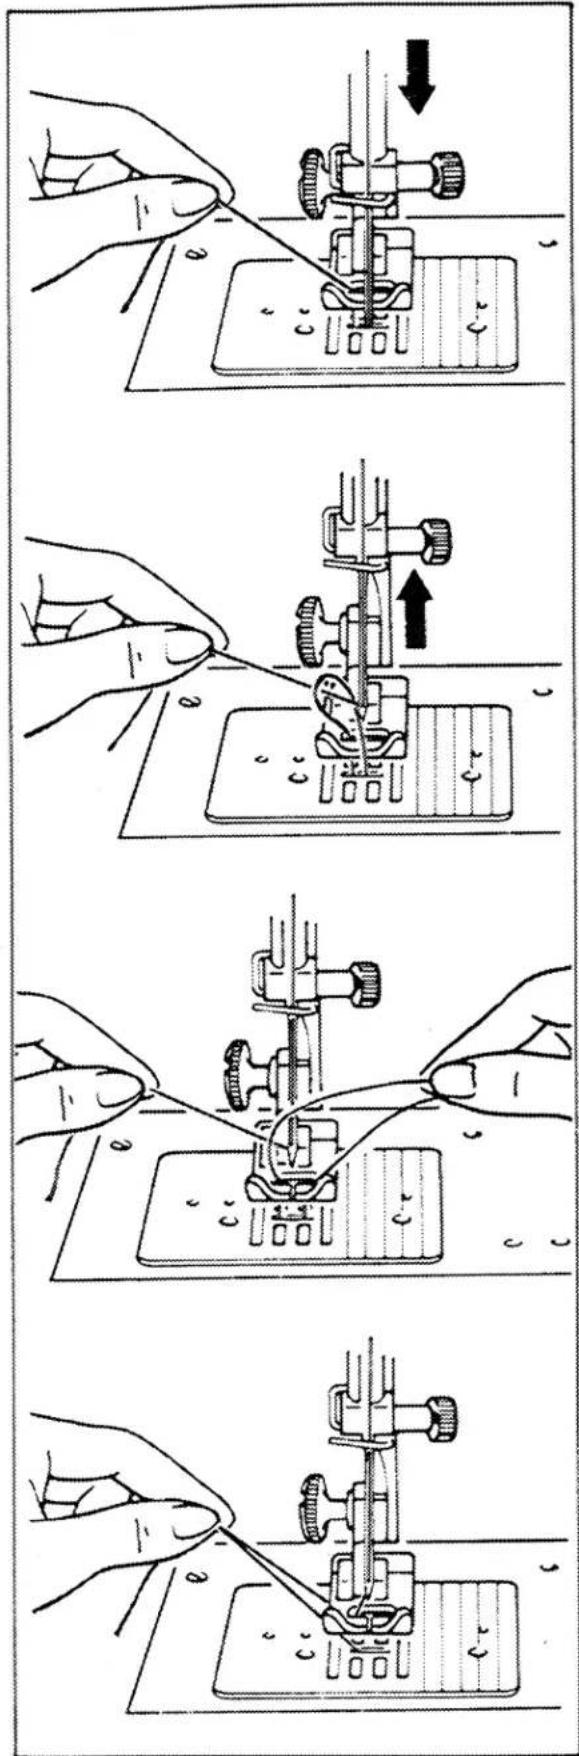
text_image
Technical diagram showing four steps of fabric sewing or sewing process with Chinese annotations and directional arrowsRaising the Bobbin Thread
-
Hold needle thread lightly with left hand and turn hand wheel slowly toward you until the needle enters plate.
-
Continue turning hand wheel and holding needle thread until needle rises. Tighten your hold on the needle thread and bring up bobbin thread in a loop.
-
Undo the loop with your fingers.
-
Place both needle and bobbin threads under the foot and draw them to back of machine.
3. Straight Stitching
A
text_image
1 2 3 4 5 6 B AC D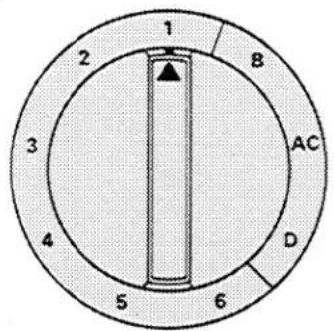
text_image
1 2 3 4 5 6 7 8 AC DB
text_image
0 1 2 3 4 5C
text_image
F 1 2 3 0 4Adjusting Machine Stitch to Suit your Fabric
Before you move the selectors to set your machine for straight stitching, turn the hand wheel toward you until the needle is above the needle plate.
Setting Selectors
- Pattern Selector: 1
- Stitch Width: 0
• Stitch Length: 1.5-4 to suit fabric
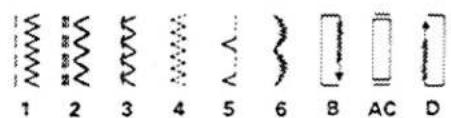
A. Stitch Pattern Selector
The numbered stitch patterns on the panel correspond to the numbers around the stitch pattern selector.
To select a pattern, simply turn the selector until the desired stitch pattern number is aligned with the indicating line.
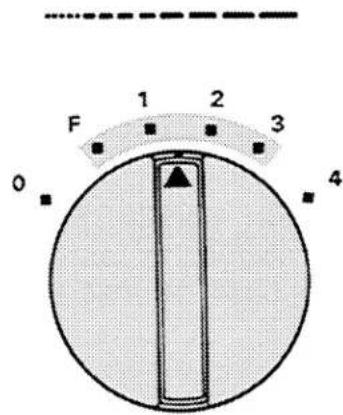
B. Stitch Width Selector
The stitch width selector must be pointed to 0 for straight stitching.
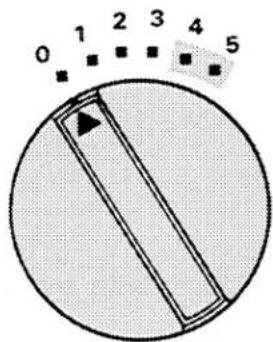
C. Adjusting Stitch Length
The stitch length selector controls the length of stitches. The numbers above the selector express stitch length in mm; the lower the number, the shorter the stitch.
Generally, shorter stitches are best for lightweight fabric, longer stitches for heavy fabric. The area from 0 to 1 should be used for adjusting zig-zag satin stitches.
Setting the Selector
- Turn selector so that stitch length selector is pointed to desired number.
- To shorten stitch length, turn selector toward a lower number.
- To lengthen stitch length, turn selector toward a higher number.
natural_image
Illustration of a hand pressing a button into a device (no text or symbols visible)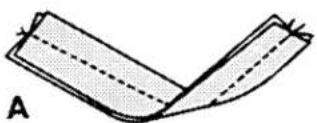
natural_image
Diagram of a folded or corrugated material with repeating patterns and arrows indicating direction (no text or symbols)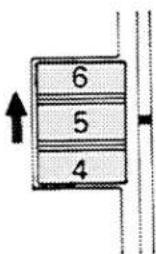
text_image
6 5 4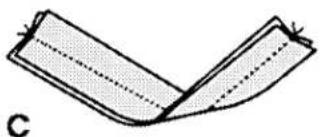
natural_image
Diagram of a folded paper or sheet with dashed lines indicating texture (no text or symbols)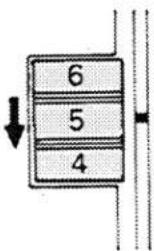
Reverse Lever
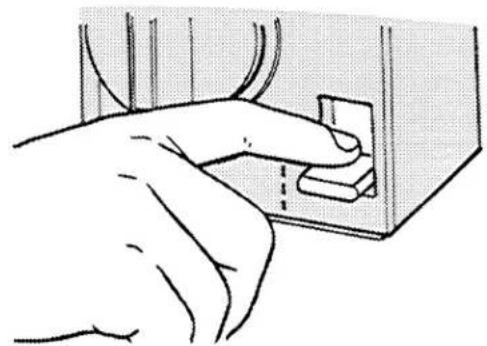
For reverse stitching, depress reverse lever located to the right of the stitch pattern selector, hold down until reverse stitching is completed. Once lever is released, the machine will sew in forward direction.
Note: Reverse stitching cannot be done when using a stretch stitch pattern.
Needle-Thread Tension
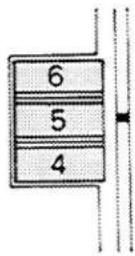
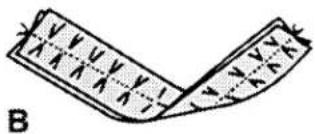
Correct tension is important because too much or too little will weaken your seams or cause your fabric to pucker. Make a test sample with the fabric and the thread you plan to use and examine it. A well balanced stitch, as shown in illustration A, will have the needle and bobbin threads locked between the two layers of fabric with no loops on top or bottom and no pucker. The tension dial regulates the degree of tension on your needle thread. Set it according to the type of thread and fabric you use. The numbers on the dial eliminate guesswork.
If the fabric puckers B, decrease tension. If the stitches in your test sample look loose C, increase needle-thread tension.
- To decrease tension, turn dial to lower number.
• To increase tension, turn dial to higher number.
Bobbin-Thread Tension
For information on adjusting bob-bin-thread tension, refer to page 15.
text_image
Technical diagram showing four steps of sewing machine stitching process with numbered instructionsSewing a Seam
- Pattern Selector: 1
-
Stitch Width: 0
• Stitch Length: To suit fabric
• General Purpose Needle Plate
• General Purpose Foot -
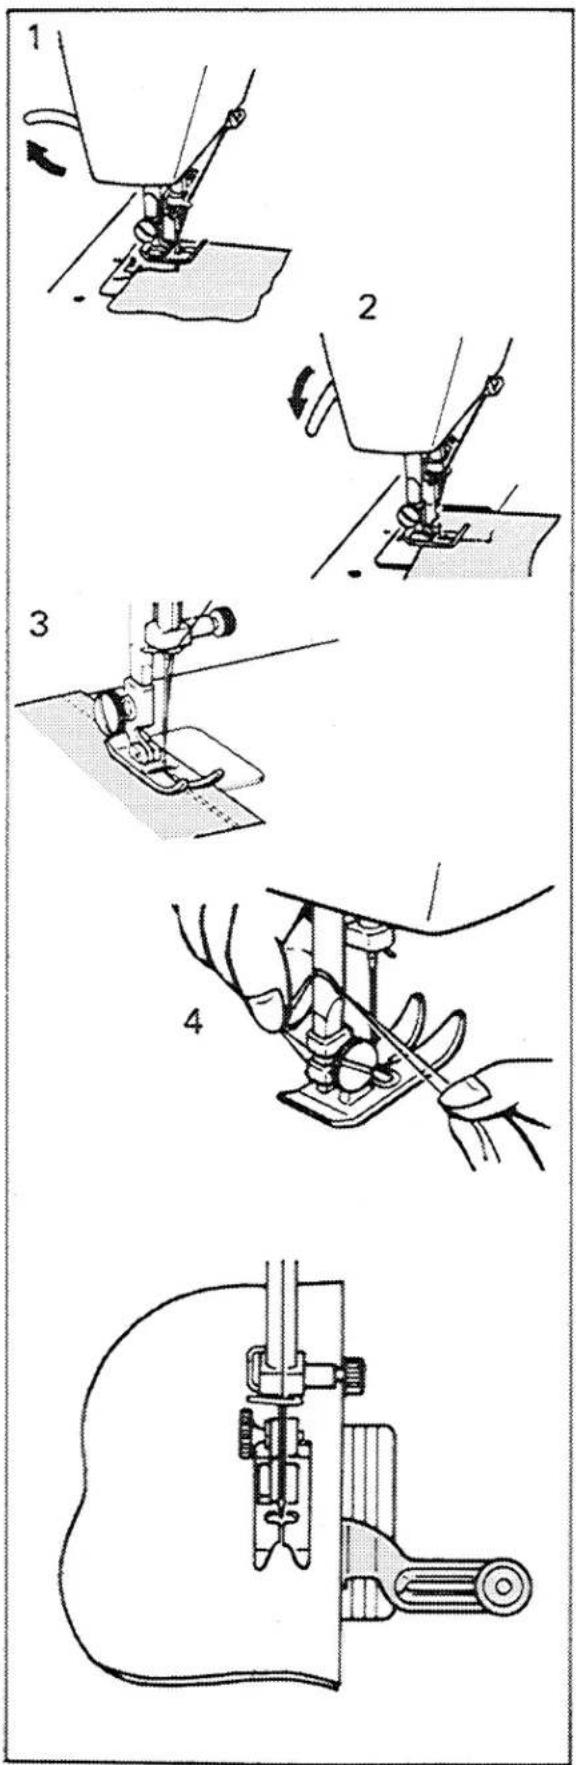
Raise presser foot. Pull thread back under presser foot leaving at least 10 cm (4 inches) of thread.
-
Position needle approximately 1.3 cm (1/2 inch) from fabric edge. Then lower presser foot and backstitch almost to the edge of the fabric for reinforcement by stitching in reverse direction. For additional information on reverse stitching refer to page 19. Stitch forward to end of seam and stop machine before the end of stitching line. (Do not sew beyond edge of fabric).
CAUTION: Do not pull the fabric while you are stitching as this may deflect the needle causing it to break.
-
Raise needle by turning hand wheel toward you. Press reverse stitch push lever, and back stitch 1.3 cm (1/2 inch) to reinforce end of stitching.
-
Raise needle by turning hand wheel toward you. Raise foot and remove fabric by drawing it to the back and to the left. Cut threads on thread cutter at rear of presser bar.
Keeping the Seam Straight
For extra help in keeping the seam straight, you may wish to use the seam guide. Because it allows you to guide stitches evenly between 1.3 cm (1/2 inch) and 3.2 cm (1-1/4 inches) from the fabric edge, it is particularly useful for very narrow or very wide seams.
CAUTION: Because of the up and down movement of the needle, you must work carefully and watch the sewing area when operating the machine.
natural_image
Technical line drawings of a sewing machine, showing hand operating the needle and fabric cutting (no text or symbols)Applications
Zipper Insertion
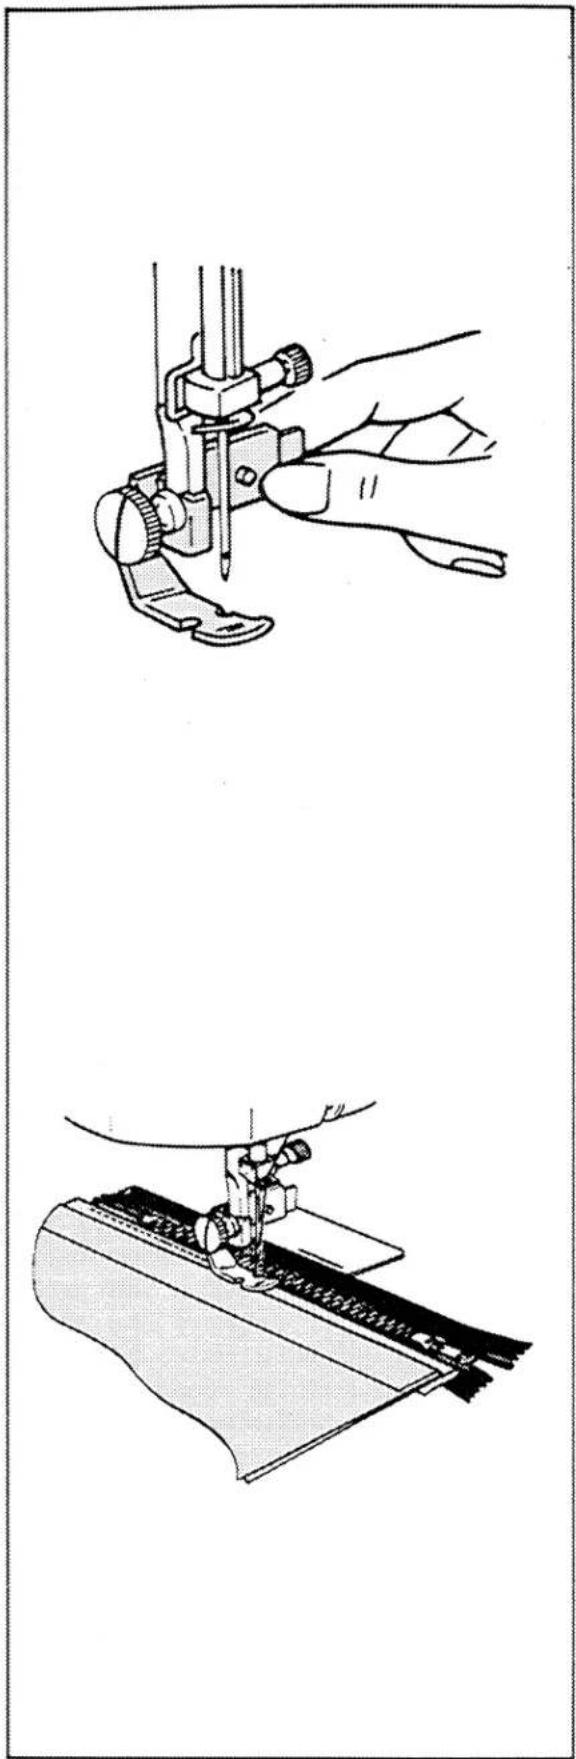
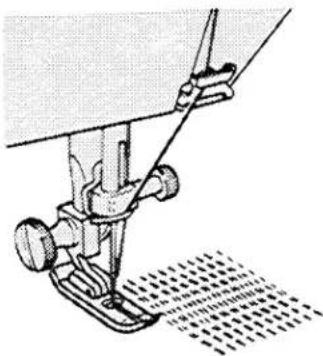
How the zipper is inserted will depend on the type of garment and the location of the zipper. With the adjustable zipper foot, you will find it easy to sew an even line of stitching close to the zipper.
The zipper foot can be used either to the left or right of the needle, depending on where the bulk of the garment is placed.
Adjusting the Zipper Foot
- Set machine for straight stitching.
- Attach the zipper foot as instructed on page 5.
When the zipper is to the right of the needle:
- Loosen the thumb screw at the back of the foot, and slide the foot to the left of the needle.
- Check the position of the foot by turning the hand wheel to lower the needle into the side notch of the foot, making sure it clears the foot.
- Lock the foot into position by tightening the thumb screw.
- Lower presser bar. Make sure the needle clears the foot on all sides of the notch.
When the zipper is to the left of the needle, adjust the foot to the right of the needle in the same way.
natural_image
Mechanical sewing machine needle stitching a grid pattern (no text or symbols visible)
natural_image
Line drawing of a woman wearing a patterned vest and dress (no text or symbols)
natural_image
Illustration of a child wearing a hooded coat and boots, standing with hands clasped (no text or symbols)Darning
- Pattern Selector: 1
- Stitch Length: 0
- General Purpose Needle Plate
• General Purpose Foot -
Snap-in Feed Cover
-
Attach snap-in feed cover over feed as instructed on page 6.
- Select straight stitch. If area to be darned is open, baste an underlay in place.
- Place area to be darned under presser foot; lower presser foot and start stitching, alternately drawing fabric toward you and pulling gently away from you.
- Continue this forward and backward motion as you fill the area with parallel lines of stitching. For additional strength, cover area with crosswise lines of stitching.
Quilting
Quilting is the art of stitching two or more thicknesses of fabric together in a planned design. A padding is stitched to the underside of the fabric to produce a soft, puffed effect that is becoming to some wearing apparel and to many fabric furnishings.
Preparing the Fabric
Baste a light padding of cotton flannel, synthetic quilt batting, sheet wadding, or a lightweight wool interlining to the underside of the fabric. When using sheet wadding, first back it with voile, batiste, or net to preserve the sheet wadding through wear. Baste the layers of fabric and padding together of the lengthwise and crosswise grains.
Basic Procedure
- Select straight stitch 1.
- Draw both threads under the foot and diagonally across feed to left.
- Position the needle, lower the foot and start stitching.
4. Basic Zig-Zag Stitching
A
text_image
1 2 3 4 5 6 B AC D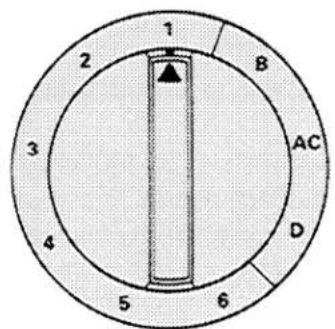
text_image
1 2 3 4 5 6 B AC DB
text_image
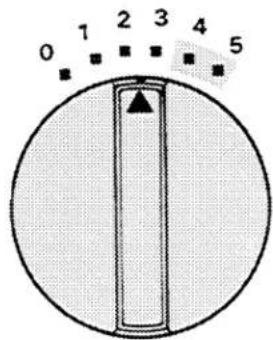
0 1 2 3 4 5C
text_image
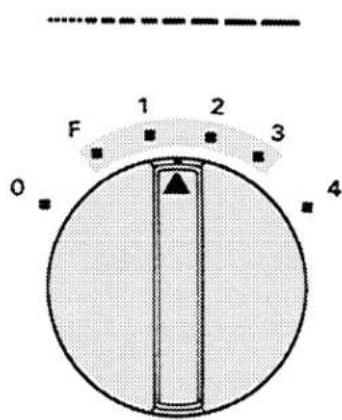
F 1 2 3 0 4Adjusting Machine Stitch to Suit Your Fabric
You can do functional as well as decorative zig-zag stitching with your sewing machine.
Setting Selectors
Stitch Pattern Selector
Before turning selector, make sure needle is out of the fabric.
For plain zig-zag stitching:
- Turn pattern selector to stitch pattern 1.
- Pattern Selector: 1
- Stitch Width: 1-5 to suit application
- Stitch Length: 1-4 to suit fabric
- General Purpose Needle Plate
- General Purpose Foot
Stitch Width Selector
Before turning selector, make sure needle is out of the fabric.
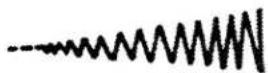
To produce a plain zig-zag or a decorative stitch, the stitch width selector is turned from its straight stitch position 0 to any of its other five positions. The further you turn the selector toward the right, the wider your stitch will be.
text_image
Diagram illustrating a mechanical or electrical process with numbered steps and a circular component, likely for measuring or positioning.Adjusting Needle-Thread Tension
Zig-zag stitching requires less needle-thread tension than straight stitching.
Make a test sample with the fabric and thread you plan to use so that you can adjust the tension properly. The stitches should be flat against the fabric without causing the fabric to pucker.
If the stitches are not flat and the fabric is puckered, lower the needle-thread tension by turning the dial to a lower number.
Adjusting Stitch Length
Any stitch length setting from 1 to 4 will give you an open zig-zag stitch. The higher the number, the more open, or farther apart your stitches will be.
The area between 0 and 1 on the dial is used for the adjustment of zig-zag satin stitching, a series of closely spaced plain zig-zag stitches that form a smooth, satin-like surface. (Refer to page 25 for information on satin stitching.)
natural_image
Simple line drawing of a spring inside a circle (no text or symbols)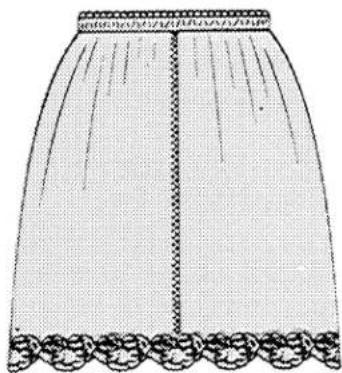
natural_image
Illustration of a pleated skirt with decorative trim and floral border (no text or symbols)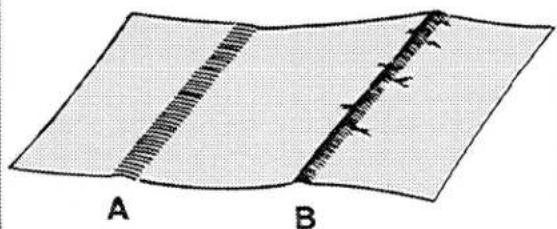
natural_image
Diagram of a curved surface with diagonal hatching and two marked points A and B, showing no text or symbols.Applications
Lingerie Seams
To make a lingerie seam durable and flexible, use the plain zig-zag stitch at a narrow width setting. This seam treatment is particularly suitable for bias seams. When seaming nylon tricot, insert a Style 2045 needle in the machine.
- Straight stitch the seam on wrong side of fabric.
- Press both seam allowances in the same direction.
- From the right side, topstitch with narrow zig-zag stitch, letting the needle alternately enter the seam line and the seam thickness.
Satin Stitching
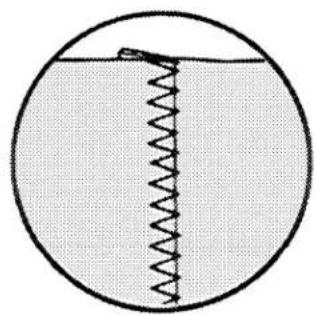
Satin stitching, a series of closely spaced zig-zag stitches that form a smooth, satin-like finish, illustration A, is useful for both practical and decorative work. Decorative stitch patterns can be sewn at satin-stitch length.
Set your machine for desired stitch. Adjust stitch length for satin stitching; stitch width in narrow to medium range.
Adjusting Stitch Length
- Run machine at slow speed.
- Gradually adjust stitch length from 4 toward 0 until stitches are closely spaced and form a smooth surface.
Adjusting Upper Thread Tension
Satin stitching usually requires less tension than straight stitching and open zig-zag stitching. Furthermore, the wider the satin stitch, the lighter the tension on your thread must be. Notice the stitching on your sample. If the fabric is puckered, illustration B, or the lower thread is pulled to the fabric surface, lower the upper thread tension by turning the dial to a lower number.
1
natural_image
Illustration of a cat inside a shopping bag and a cat sitting nearby, with scissors cutting the cat (no text or symbols)2
natural_image
Line drawing of a traditional Japanese garment with floral crown and two hemstones (no text or symbols)3
natural_image
Simple line drawing of a duck with a rolled-up document (no text or symbols)Appliqué
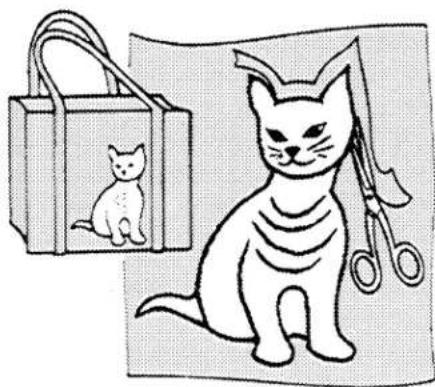
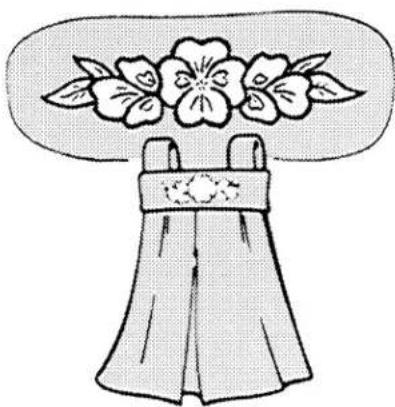
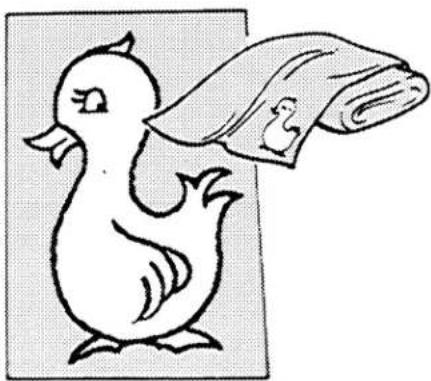
The stitch most commonly used in appliqué is a plain zig-zag, closely spaced to form a satin stitch. The width of this stitch can be varied to accommodate fabrics of different weaves and textures. Other stitch patterns can also be used.
Preparation
Make a test sample to decide which of the following methods is the most appropriate for your fabric and design. Mark design on piece of fabric to be appliquéd. Cut out design leaving about 2 cm (3/4 inch) margin all around. Position the design. Baste it to the fabric.
Method 1
- Select pattern and adjust stitch width for desired appliqué stitch. Adjust stitch length to fine setting, between 1 and 0.
- Follow the outer edge of the design with a decorative stitch.
- Trim away the excess fabric on the outer edges of the stitching.
Method 2
- Select straight stitch.
- Outline the entire design with a short stitch.
- Trim raw edges to the stitching and remove basting.
- Select stitch pattern and stitch width desired, and set stitch length on a satin stitch setting for a closely spaced stitch, between 1 and 0.
- Stitch, following the straight stitch outline. This method will produce a smooth overedged finish, with no raw edges to be trimmed after stitching.
Method 3
- Purchased motifs can be appliquéd quickly and easily by using either a straight or decorative stitch.
natural_image
Technical line drawing of a mechanical device with a top view and side panel (no text or symbols)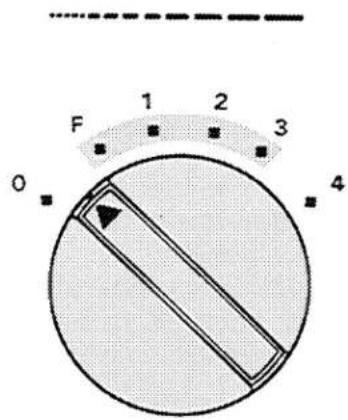
text_image
F 1 2 3 0 4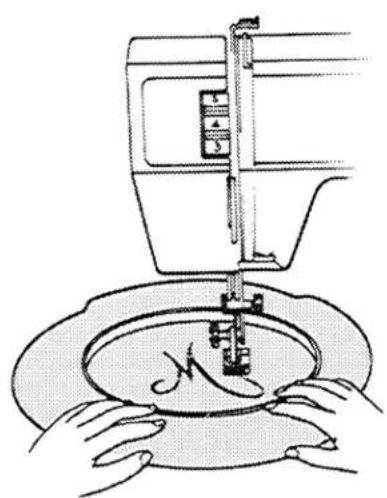
natural_image
Line drawing of a sewing machine needle stitching a circular object, with hands adjusting the base (no text or symbols)Embroidery
Free-motion Stitching
In free-motion stitching, you sew without a presser foot and instead control fabric movement (and hence stitch length) yourself, by means of an embroidery hoop. Either a straight or a zig-zag stitch setting can be used. Because you can move the hoop in any direction—forward or backward, from side to side, and even diagonally—free-motion stitching is extremely useful for intricate embroidery designs.
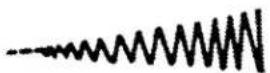
If you are embroidering, you can vary the length of stitches simply by moving the hoop faster or slower. The faster you move it, the more open the stitches will be. A slow hoop movement will produce closely packed stitches. You can also vary the width of the stitches, from a hairline to the full width of whatever stitch width setting you have chosen, simply by moving the hoop. If you move it sideways and stitch in a horizontal line, you will get a hairline, if you move it forward or backward and stitch in a vertical line, you will get full stitch width. Thus you can produce a ribbon-like effect in script lettering or create delicate flower designs. This takes practice, but you can achieve some lovely effects that look much like hand embroidery. See following pages for specific directions.
To Prepare for Free-motion Stitching
- Have available an embroidery hoop large enough to encompass the entire design or area to be darned.
- Remove presser foot.
- Attach snap-in feed cover. See page 6 for directions.
- Turn stitch length selector to the area between 0-1.
text_image
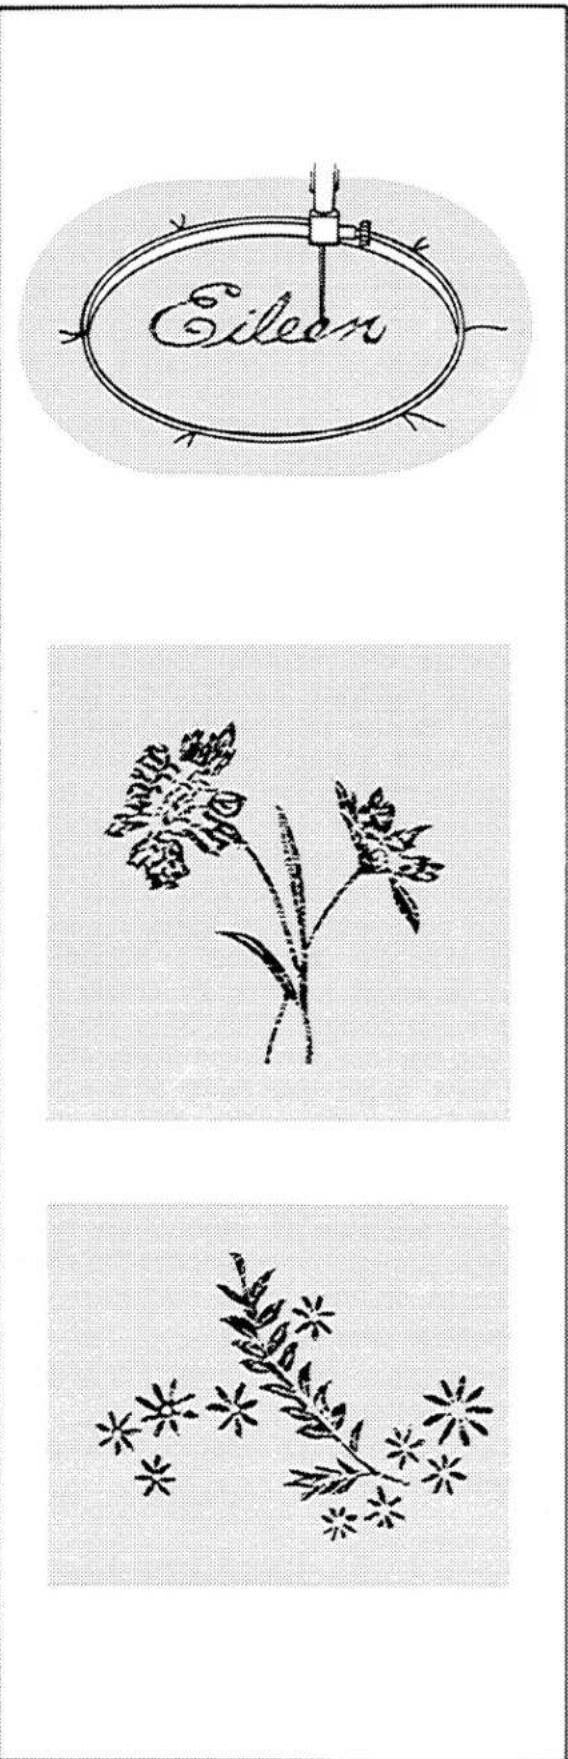
EileanScript Lettering
- Pattern Selector: 1
- Stitch Width Selector: 2-5
- Stitch Length: 0-1
- Snap-in Feed Cover
- Presser Foot: None
If you wish to embroider a whole name—on a child's dress or shirt, for example—you can do so by free-motion stitching.
- Always make sample first, to find the right stitch settings and spacing.
- Trace or mark lettering on right side of fabric.
- If the fabric is soft or loosely woven, add an under-lay of crisp lawn or organdy.
- Place work in embroidery hoop large enough to encompass the entire work design. Be sure fabric is held taut.
- Position work under needle and lower presser bar to engage tension.
- Turn hand wheel toward you to bring bobbin thread up through fabric at start of design and hold both threads to start stitching.
- Stitch, following outline of lettering. Maintain an even rate of speed so that stitches are uniformly spaced. To produce a close satin stitch, move hoop slowly; to produce an open stitch, move hoop more rapidly.
To shade the lettering, from wide to narrow stitching, turn the work slightly so that you will be moving it at an angle as you stitch.
Floral Designs
Prepare the machine and your fabric in the same way as for free-motion script lettering. On your test sample, try out different stitch width settings to determine the one or more best suited to your design.
When filling in outlines, place stitches in parallel lines, shifting the direction of the hoop movement as appropriate to the design. For a smooth satin stitch that will catch the light, place the parallel stitches close together, moving the hoop slowly and steadily. For an irregular texture, move the hoop more rapidly, allowing some stitches to overlap.
5. Machine Stitch Patterns
text_image
1 2 3 4 5 6 B AC D 1 2 3 4 5 6 A BSetting Selectors
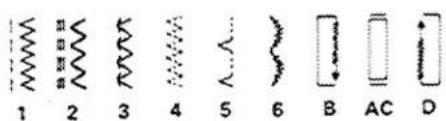
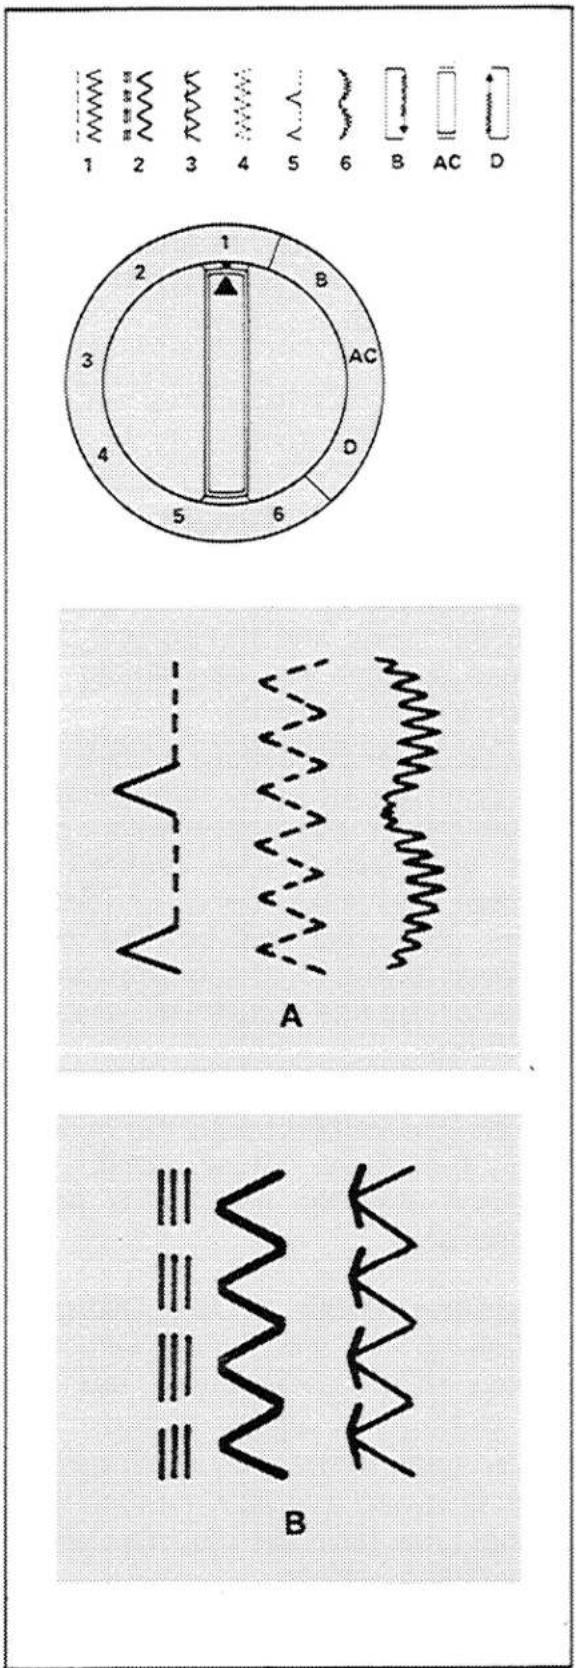
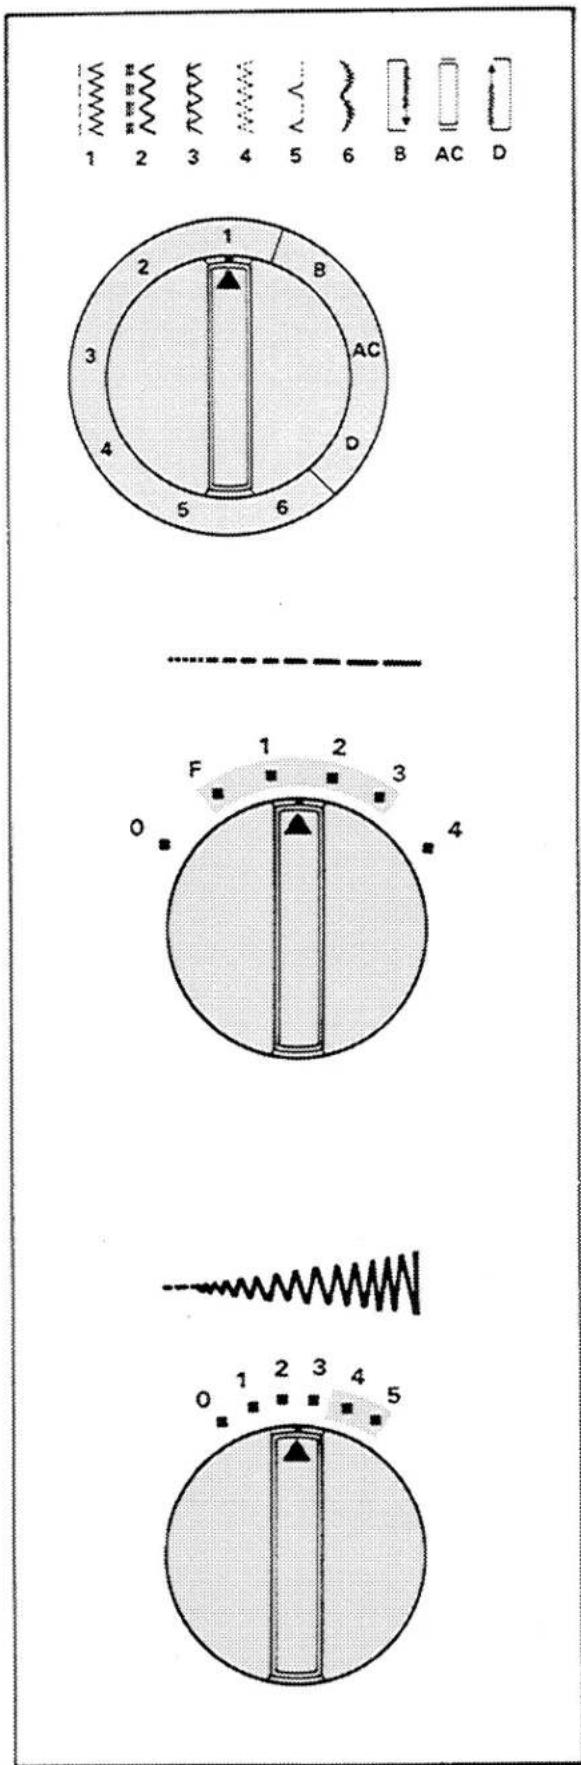
In addition to straight stitch and zig-zag stitch, your machine can produce a variety of stitch patterns. There are two types of stitch patterns built into your machine:
A. decorative stitch patterns, illustrated at left, are produced by side-to-side movement of the needle.
B. stretch stitch patterns, illustrated at left, are produced by both the side-to-side movement of the needle and the back-and-forth movement of the feed.
Refer to chart on page 32 for further information on machine settings and applications for the stitch patterns on your machine.
text_image
1 2 3 4 5 6 B AC D 1 2 3 4 5 6 B AC D AC F 1 2 3 0 4 0 1 2 3 4 5Selecting a Pattern
Before moving stitch pattern selector, make sure needle is above fabric.
When you turn the stitch pattern selector, one of eight stitch patterns is available to you. Turn stitch width selector to 0. Then rotate the pattern selector until the desired stitch pattern number is aligned with indicating line.
Adjusting Stitch Length
When you are preparing to do pattern stitching, make a test sample with the fabric and thread you plan to use so that you can adjust the stitch length correctly.
Any stitch length setting from 1 to 4 will give you an open stitch pattern of whichever decorative stitch pattern you select. The higher the number, the more open, or farther apart, your stitch will be. The area between 0 and 1 of the selector is used for the fine adjustment of satin stitching.
For stretch stitch patterns, stitch length is controlled with the setting 4 on the panel. Simply rotate the selector until the selector is positioned at 4.
Adjusting Width of the Design
Before turning stitch width selector, always raise needle above fabric.
To produce a stitch pattern, the stitch width selector must be turned from 0 toward a higher number. The higher you turn the dial, the wider your stitch will be.

text_image
1 2Adjusting Stitches for Stretch Fabrics
Guiding and Supporting Fabric
Most fabrics of stretch or knit construction need only to be guided in front of the presser foot when you use one of the stretch stitches. Some fabrics—nylon tricot and elasticized fabrics, for example—do require support while being stitched.
-
For nylon tricot and similar synthetic knits, apply gentle tension by holding the seam in front and back of the presser foot as you sew.
-
For elasticized fabric, stretch lace, and knits with an unusual amount of elasticity, apply firm tension in front and back of the presser foot to stretch the seam as the stitches are being placed.
CAUTION: Do not pull the fabric while you are stitching as this may deflect the needle, causing it to break.
Stitch Pattern Chart
| 1 | Straight Stitch: Use for general purpose sewing, seaming and topstitching. | 3 | Overedge Stretch Stitch: Used for joining and overedging seams in knit and stretch fabrics in one operation. |
| 1 | Zig-zag Stitch: Used for general purpose sewing, bar tacks, finishing seams, embroidery and appliqué. | Multi-Stitch Zig-Zag: Lets you mend, join and reinforce without bulk. Ideal for bar tacking. | |
| 2 | Maxi—Topstitch: For bold top-stitching on sporty garments. | Blindstitch: For finishing hems and making ladder seams. | |
| 2 | Ric Rac Stitch: For heavy-duty general-purpose sewing, and bold topstitching on sporty garments. | Crescent Stitch: Useful for ornamental borders and edges. | |
| 6 | Buttonholes: Used for making buttonholes. |
† These are the stretch stitch patterns on your sewing machine. A slow stitching speed is recommended for sewing stretch stitch patterns. This stitch is designed for strength and permanence and can not readily be ripped out without risk of fabric damage.
text_image
3Applications
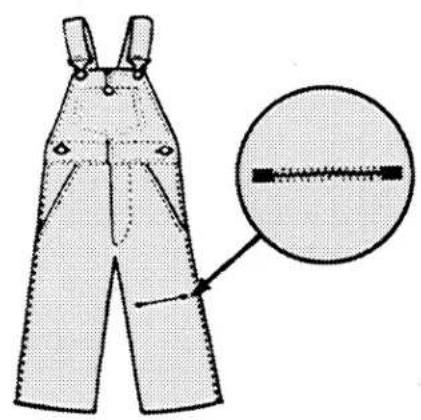
Overedge Stretch Stitch
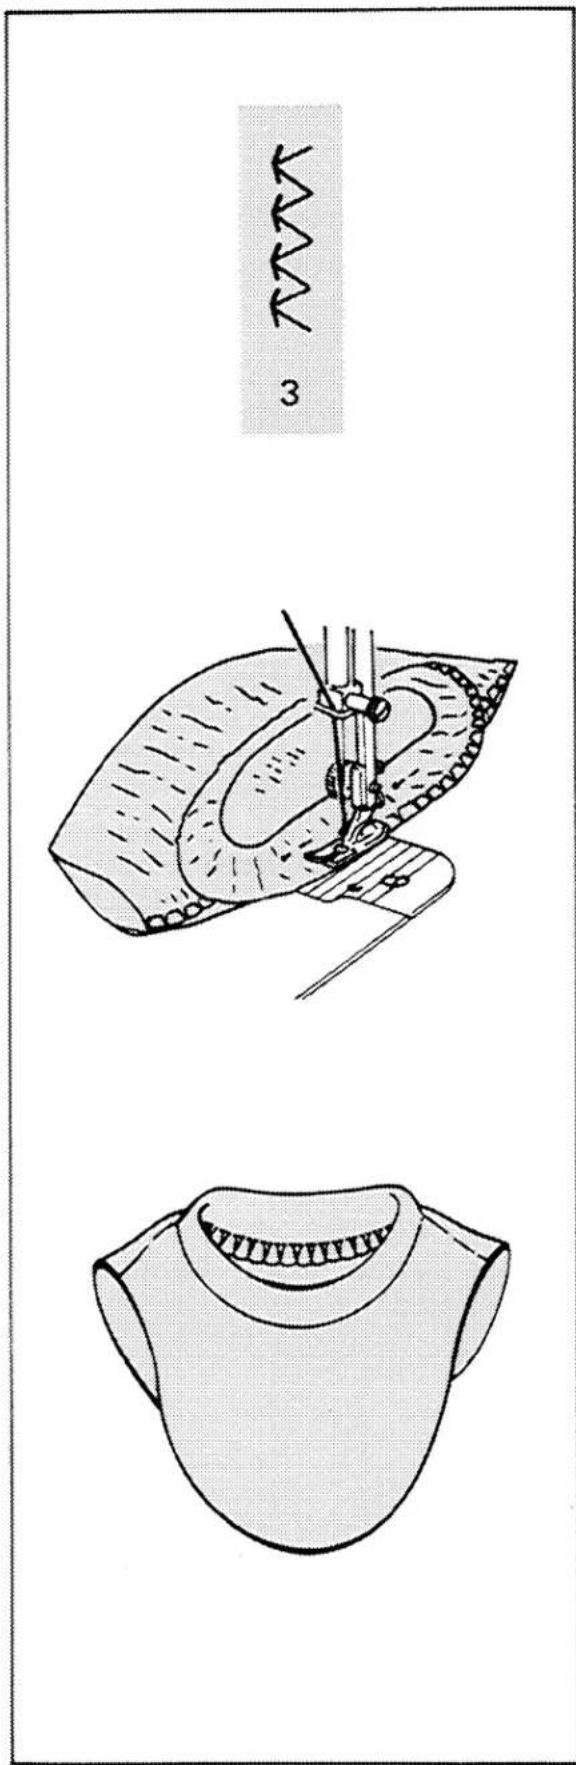
Although the overedge stretch stitch may be used creatively, it is primarily applied in finishing seams, hems, and facing edges. Use it to overedge seams that require stretch such as crotch seams. It is particularly helpful in skisuit, snowsuit and swimsuit construction. Examples of how to use the overedge stretch stitch follow.
Overedged Seams
- Pattern Selector: 3
- Stitch Width: 5
- Stitch Length: 4
- General Purpose Needle Plate
- General Purpose Foot
Method 1
Make a test sample to determine the suitability of an overedge seam finish for your garment. Duplicate the grain or direction of knit of your garment seam. Adjust thread tension to suit fabric. Use an appropriate Style 2045 needle in the machine for a knit. (See Fabric, Thread and Needle Table on page 10.)
- Baste the garment together on the seam line allowing for 1.5 cm (5/8 inch) seam allowance and fit in the usual way.
- After making any necessary adjustments, trim seam edge evenly to a scant 5 mm (1/4 inch) from seam line basting.
- Place trimmed seam under the foot so that the straight stitches fall on the basted seam line and zig-zag stitches fall over the seam edge.
text_image
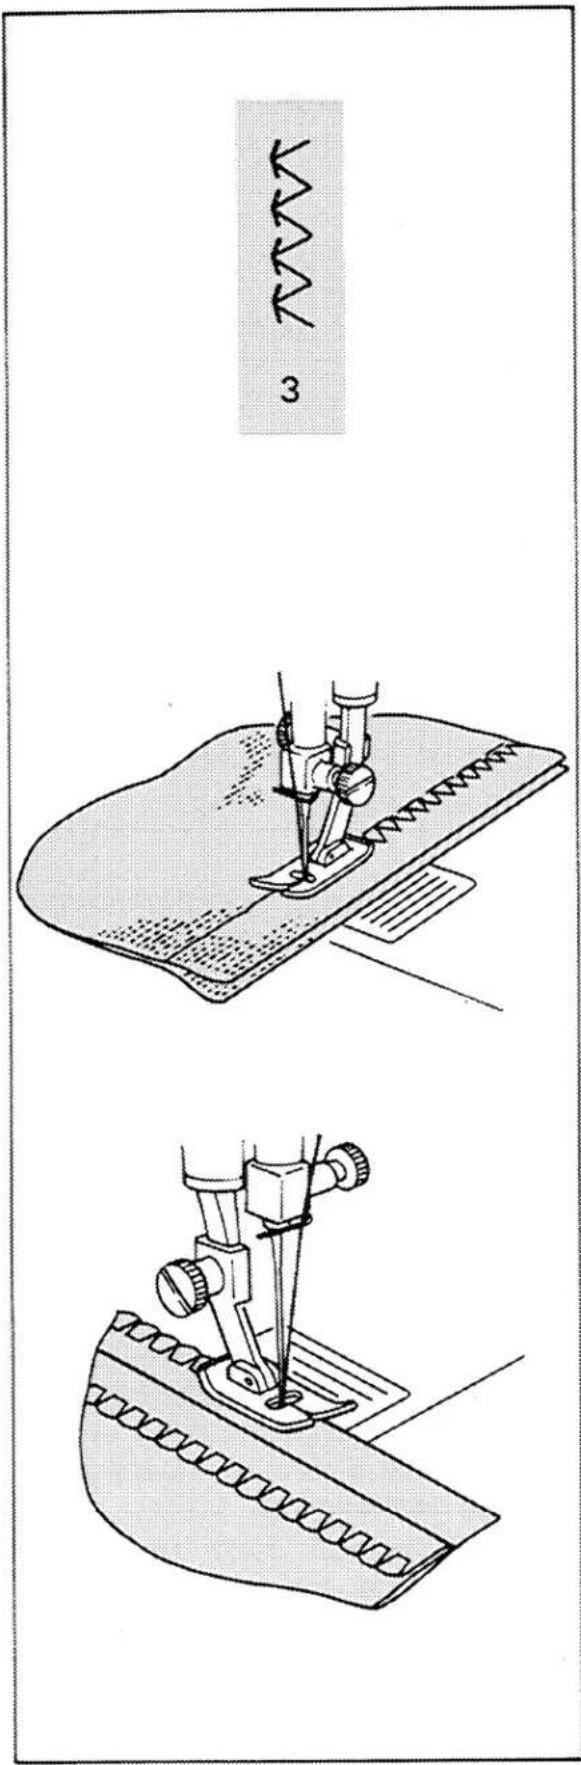
3Mock Overedge
This finish is appropriate for bulky knits, fine tricots and fabrics that curl or fray.
Method 2
• Make a test sample.
- Baste the garment together on the seam line and fit in the usual way.
- After making any necessary adjustments, suggested in Method 1, place seam under presser foot. Stitch so that the stitches on the left side of the pattern penetrate the basted seam line.
- Press after stitching and trim away excess fabric to produce a narrow seam edge. When the seam supports the garment, omit the trimming step and press seam open in the usual way.
Overedged Seam Finish
- Pattern Selector: 3
- Stitch Width: 5
- Stitch Length: 3-4
- General Purpose Needle Plate
- General Purpose Foot
- Trim seam edges evenly.
- Place stitching over the trimmed edge of the seam allowance as illustrated.
natural_image
Illustration of a pair of trousers with a close-up inset showing measurement detail (no text or symbols)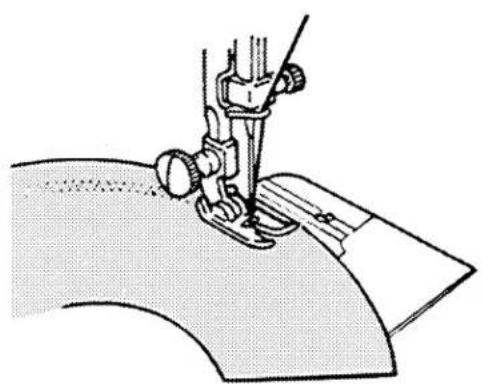
natural_image
Line drawing of a sewing machine needle stitching fabric (no text or symbols)Multi-Stitch Zig-Zag
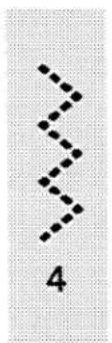
The multi-stitch zig-zag is an extremely versatile stitch. Use it to mend, join, or reinforce without bulk. With this stitch you may attach elastic and stretch lace, construct lingerie and swimsuits, and finish seams. There are many other useful applications for the multi-stitch zig-zag.
Mending a Tear
- Pattern Selector: 4
- Stitch Width: to suit application or fabric
- Stitch Length: to suit application or fabric
• General Purpose Needle Plate
• General Purpose Foot - Trim ragged edges.
- Place underlay on the wrong side of tear for reinforcement. Baste one side of underlay in place.
- Stitch on the right side, bringing the edges of the tear together. Shorten stitch length at ends and corners to give extra strength.
Finishes for Hems and Facings
Hem and facing edges in knit and stretch fabrics will be less apt to press through and mark when given a flat edge-finish. Edge finishing with the multi-stitch zig-zag eliminates the bulk of turned-in edges and retains fabric flexibility.
- Make a test sample to check thread tension and stitch length if you are using the multi-stitch zig-zag.
- Place stitching about 1.3 cm (1/2 inch) from hem or facing edge. Avoid stretching edge while sewing.
- Press after stitching and trim away excess fabric close to the stitching line.
Blindstitch
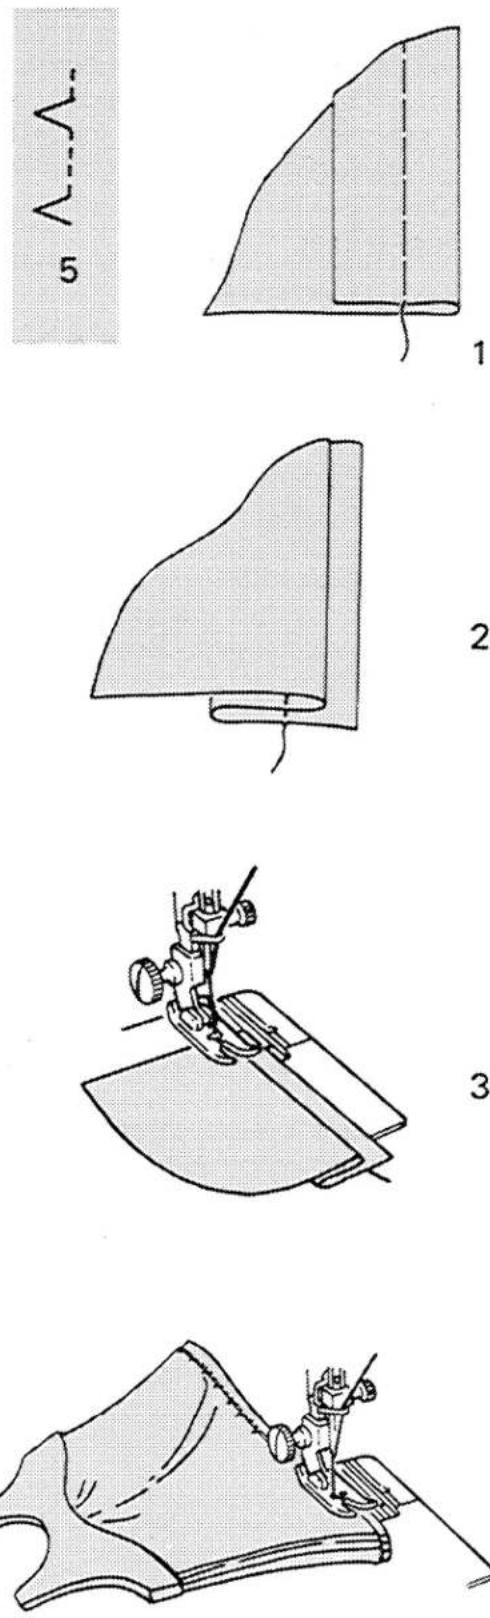
Blindstitching provides a durable hem finish that is almost invisible.
Blindstitch Hems
- Pattern Selector: 5
- Stitch Width: 1.5-5
- Stitch Length: 1 to 2.5
- General Purpose Needle Plate
- General Purpose Foot
We recommend making a test sample first using scraps of the material you will be sewing the hem on.
- Select the blindstitch.
- Prepare hem in the usual way. It is advisable to baste the hem.
-
With the wrong side of work uppermost, turn the hem under, creating a soft fold from the top edge of hem.
-
Position the hem under the presser foot. Stitch so that the straight stitches fall on the hem allowance and the sideward stitches pierce the soft fold of the work. Adjust stitch width, if necessary.
text_image
P A KMonograms
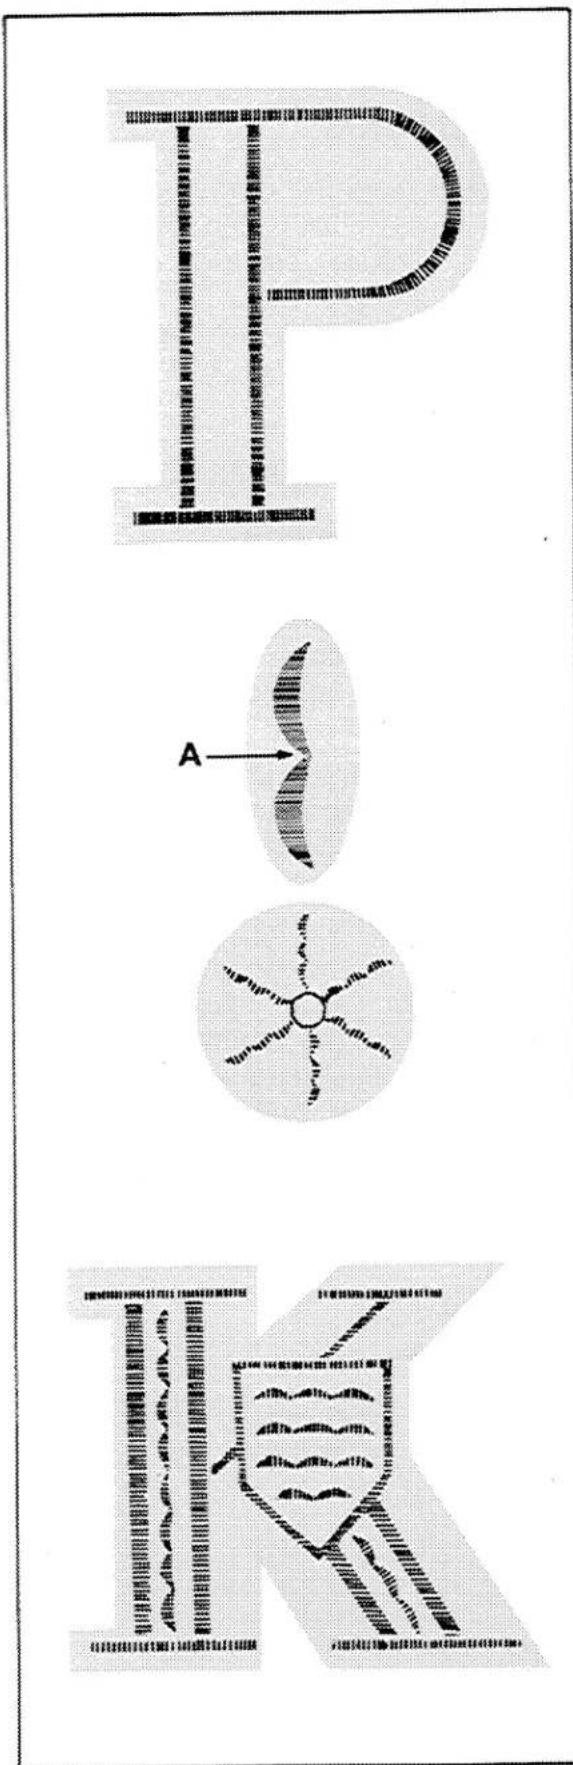
Many of the machine stitch patterns can be used for monograms or motifs—for adding a personal touch to a blouse collar, for example, or for initialing household lines. You can buy designs—or create them yourself.
To Stitch a Monogram or Motif
- Pattern Selector: 6 See chart for machine stitch patterns
- Stitch Width: 2 through 5
- Stitch Length: 0-1
-
General Purpose Needle Plate
• General Purpose Foot -
Make a sample first, to determine suitability of stitch pattern and find the right stitch length and width, thread tension.
- Transfer the design (by tracing, usually) to the right side of the fabric.
- If the fabric is soft or loosely woven, baste a backing of lawn or organdy onto the wrong side.
- After stitching, trim the backing close to the stitch.
To find the beginning of the pattern unit When you use machine stitch patterns in a motif, always start stitching at the beginning of a pattern unit A that is, at the beginning of the crescent, or whatever pattern you are using. To find the beginning:
- On a scrap of material, stitch until you come to the end of a complete pattern unit. Now you are ready to start stitching at the beginning of the next unit.
- Raise presser foot and remove scrap.
- Position motif under needle; lower presser foot; and stitch.
6. Buttonholes
1
text_image
A B C D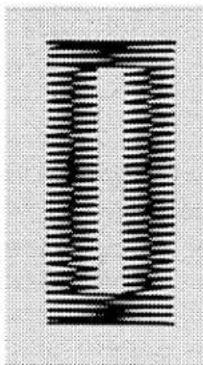
text_image
D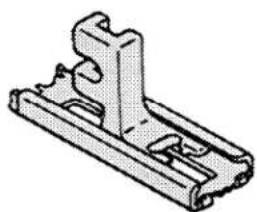
natural_image
Technical line drawing of a mechanical bracket component (no text or symbols)Buttonholes
Your new machine comes complete with a built-in four-step buttonhole system. Before sewing on your garment, always make a test buttonhole duplicating the number of thicknesses of fabric and interfacing, if appropriate.
Garment Preparation
Buttonhole Position
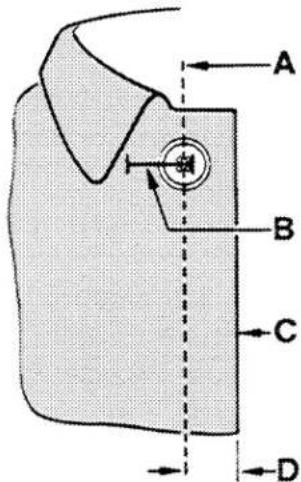
Accurate guidelines are essential to keep buttonholes at a uniform distance from the edge of the garment, evenly spaced, and on the grain of the fabric.
- Mark the centre line on the garment. This guideline can be made by machine or hand basting or using tailor's chalk.
Be sure that the space from the centre line to the finished edge of the garment is at least equal to three-quarters the diameter of the button. With this spacing, the button will not extend beyond the edge when the garment is buttoned.
Make sure that the centre line marking follows a lengthwise fabric thread.
A. Centre Line
B. Buttonhole
C. Finished Edge of Garment
D. Distance of Button
text_image
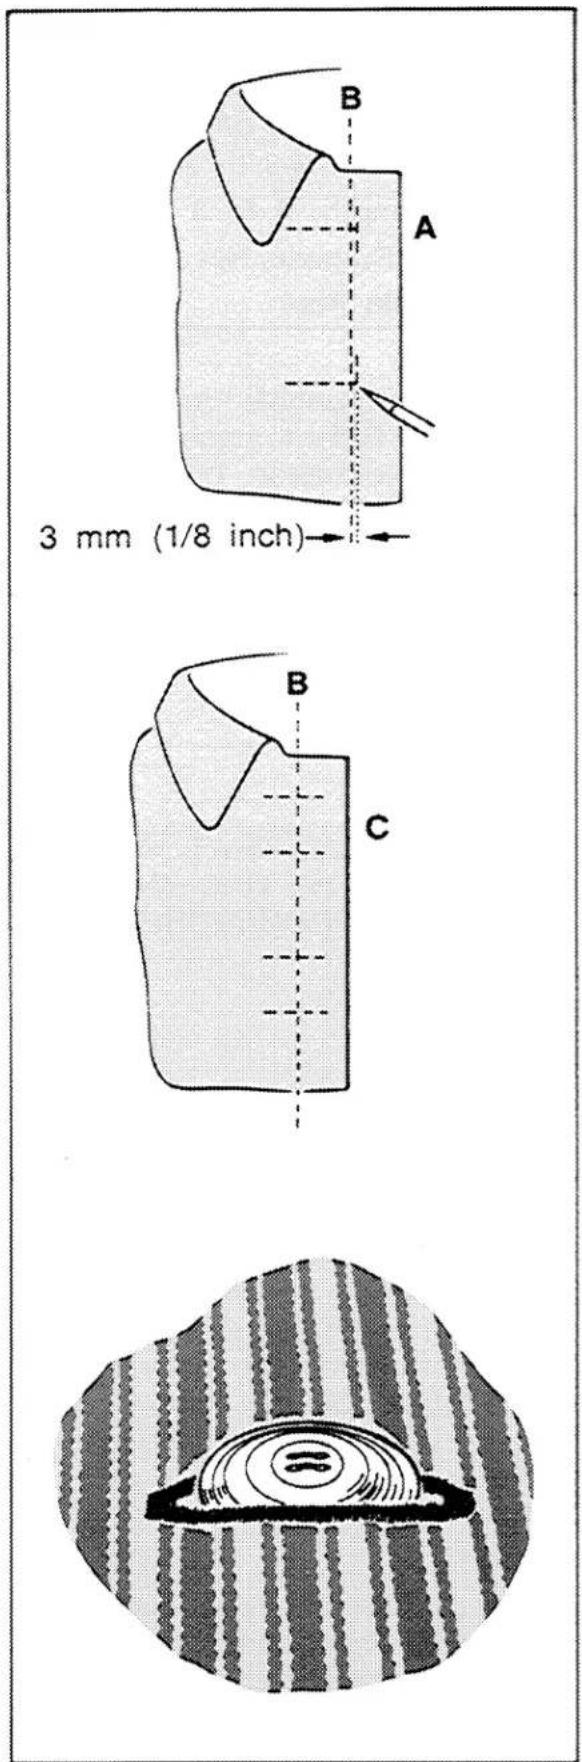
B A 3 mm (1/8 inch) B C- Mark a position guideline for each buttonhole.
Horizontal buttonholes A are placed to extend 3 mm (1/8 inch) beyond the centre line B of the garment, as shown, so that the buttons will be in the centre of the figure when the garment is fastened.
Horizontal buttonhole guidelines should follow a crosswise fabric thread.
- Mark the horizontal buttonhole guideline for each buttonhole. It should be longer than the finished length of the buttonhole.
- Mark the starting point for each buttonhole 3 mm (1/8 inch) beyond the centre line (see illustration).
Vertical buttonholes C are placed so that the centre line B of the garment is in the centre of the buttonhole, as shown.
- Mark the ends of each buttonhole horizontally across the centre line basting and use the centre line marking as the buttonhole guide when stitching.
Buttonhole Length
- The buttonhole length should be just long enough to allow the button to slip through the opening without stretching it.
- Buttonhole length is not automatically gauged with the button-hole foot. It is necessary to estimate the length by measuring the width plus thickness of the button.
- To make sure the measurement is correct, cut a slit in a scrap of fabric equal to the diameter of the button you intend to use.
- Increase length of opening until button slips through easily.
text_image
Technical diagram of a sewing machine with labeled parts A and B, showing mechanical components and wiring.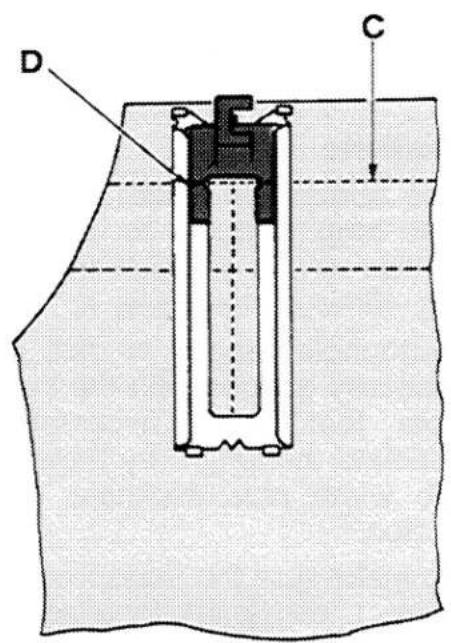
text_image
D CFour-Step Buttonholing
- Pattern Selector: As illustrated
- Stitch Width: 3-5 to suit fabric
- Stitch Length: F to 3
- General Purpose Needle Plate
- Buttonhole Foot
Preparation
- Attach buttonhole foot to the machine. Refer to page 5 for additional information on changing presser feet.
- Raise presser foot lifter. Hold upper thread lightly with left hand and turn hand wheel slowly toward you until needle enters the plate.
BE CAREFUL THAT YOU DO NOT RUN THE MACHINE DURING THIS PROCEDURE.
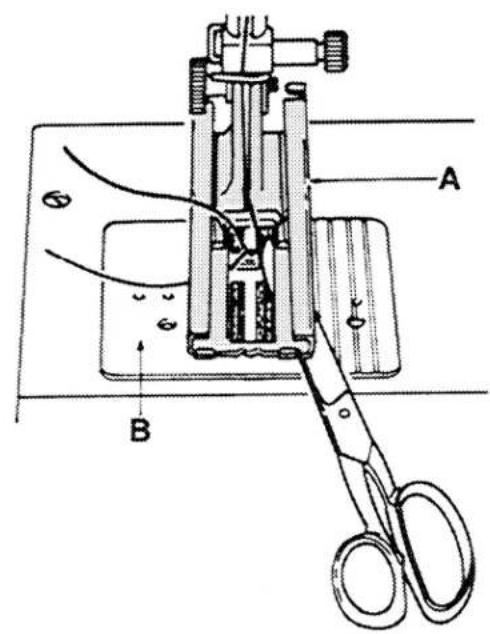
Continue turning hand wheel and holding upper thread until needle rises. Tighten your hold on upper thread and bring up lower thread in a loop. Release upper thread. Slide scissors between foot A and plate B and draw both upper and lower threads diagonally toward the back of the foot, leaving approximately 10 cm (4 inches) of thread.
- Set machine according to above code.
- Place fabric with buttonhole marking lines under foot. Align bar tack marking line C with notches on the solid white section of foot D.
Four-Step Buttonholing Procedure
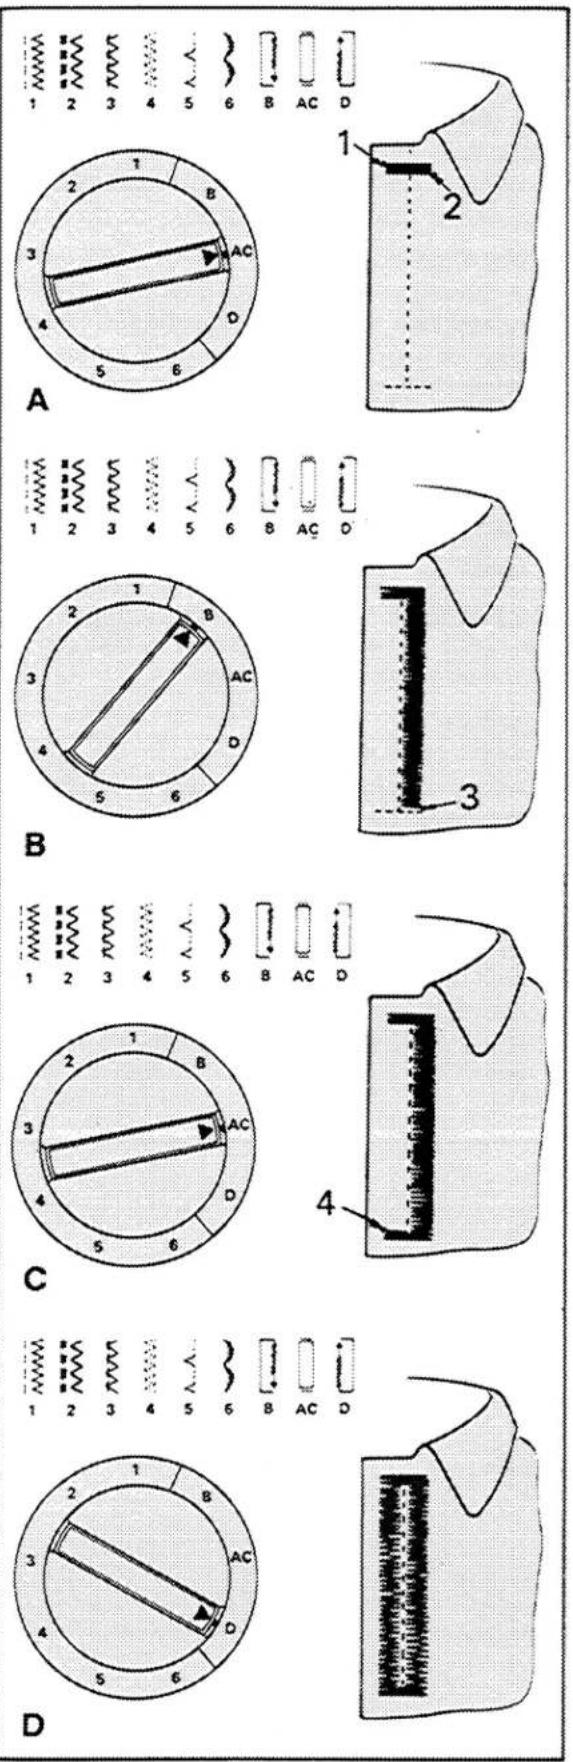
Step A: Bar Tack
Turn pattern selector to AC. With buttonhole foot properly positioned, as described on the previous page, position needle in fabric at point 1. Take at least four stitches ending at point 2.
Step B: Side Stitching
Raise needle above the fabric by turning hand wheel toward you. Turn pattern selector to B. Stitch to the end of the buttonhole. Stop stitching at point 3.
Step C: Bar Tack
Raise needle above fabric. Turn pattern selector back to AC. Take at least four stitches ending at point 4.
Step D: Side Stitching
Raise needle above fabric. Turn pattern selector to the right to D. Stitch to the end of buttonhole.
- Remove work. Using a hand sewing needle, bring threads to underside of fabric. Fasten and trim thread ends.
7. Twin-Needle Stitching
natural_image
Illustration of hands using a tool to adjust or install a mechanical component, with an arrow indicating the process (no text or symbols present)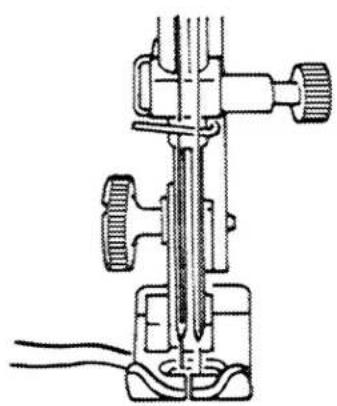
natural_image
Technical line drawing of a mechanical device with no visible text or symbolsThe twin-needle simultaneously produces two parallel, closely spaced lines of decorative stitching. You can stitch with either one or two colours of thread. A twin-needle, No. 2024, is supplied with your sewing machine accessories. Extra twin-needles may be purchased separately at your local Sewing Centre.
- Pattern Selector: Stitch desired
- Stitch Width: 2 only†
• Stitch Length: .5-4 to suit fabric
• General Purpose Needle Plate - General Purpose Foot
†CAUTION: Do not use a stitch width greater than what is recommended. A wider stitch will result in needle breakage.
Procedure
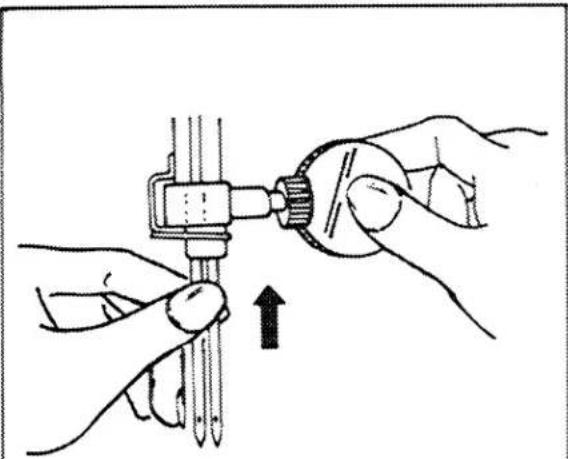
- Insert twin-needle.
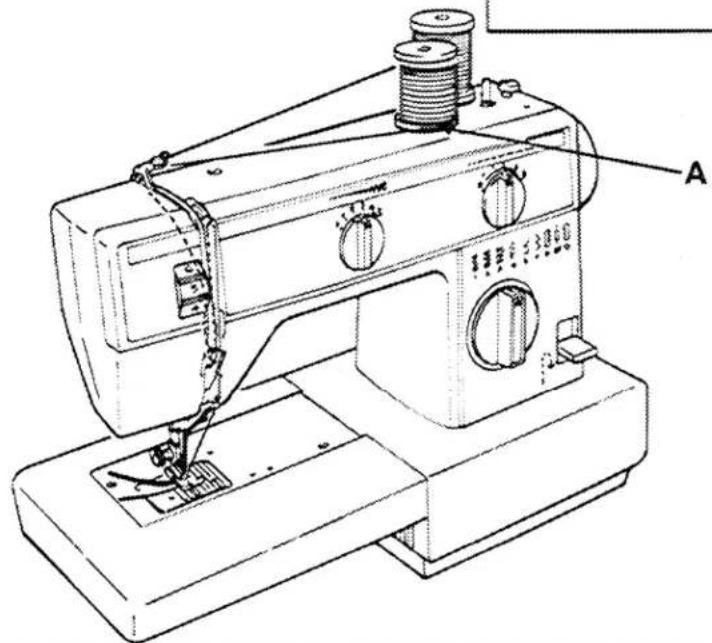
- Attach detachable spool pin to machine top cover in hole A.
- Place second spool of thread on detachable spool pin.
- Thread as for single-needle stitching, using the two threads, making certain to omit one thread from the thread guide above the needle, as illustrated.
- Place one thread through each needle eye.
text_image
Technical line drawing of a sewing machine with labeled component A and parts numbered 1 to 48. Free-Arm Sewing
text_image
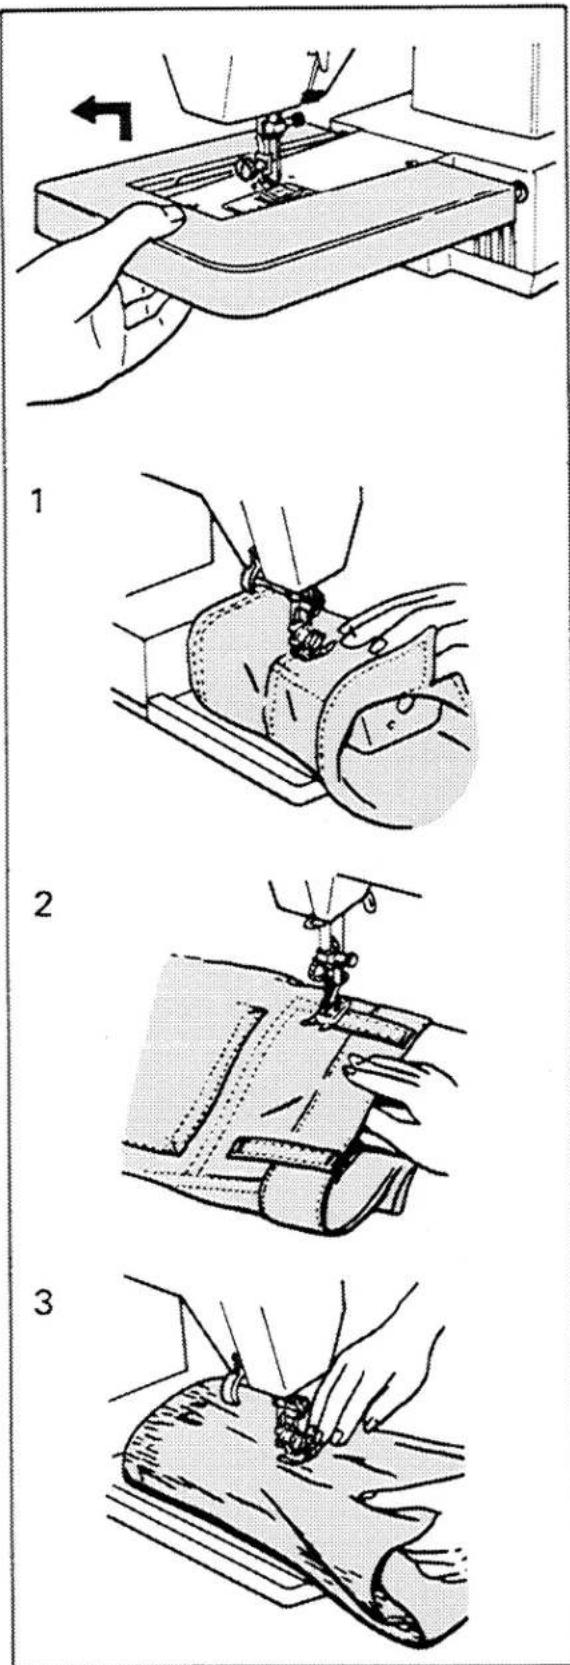
Technical diagram showing three-step sewing process for fabric application, labeled 1 to 3 with Chinese annotations.Fabric handling, when sewing tubular and hard to reach garment areas, is simplified when you convert your sewing machine to free-arm sewing. Some of the sewing jobs for which you will find the free-arm particularly useful are shown below. You will discover many more for yourself.
Preparation
- To convert machine to free-arm sewing, simply lift the extension bed up and slide the extension bed off the machine, as illustrated.
- To convert machine back to flat bed sewing, simply slide extension bed onto the base of the machine and snap down into place.
1. Sleeves
Free-arm sewing takes the difficulty out of topstitching a sleeve. The arm-hole rotates smoothly under the needle so that you can place stitching accurately. The extra control afforded by the free arm is especially helpful for topstitching flat-felled seams.
2. Bar Tacks
Bar tacks reinforce areas of strain and can be applied to ready-made garments, as well as to those sewn at home. Use the free-arm surface to avoid fabric bulk around the needle when you apply this detail to pockets, plackets, and waistlines.
3. Daming and Mending
Knees, elbows and other areas of wear in children's clothes such as sweaters, jackets and shorts become readily accessible for darning, mending or patching when the free-arm surface is used. The sewing surface fits inside the enclosed sleeve and leg areas, making it unnecessary to open seams or roll the garment.
9. Performance Checklist
Whenever sewing difficulty is encountered, review the section of the instruction book that explains the operation you are performing to make sure you are using the machine correctly. If the problem still exists, the following checklist may help you to correct it.
If you still have difficulties, call your nearest Sewing Centre.
What To Do If:
Needle Breaks
Make sure...
- needle is fully inserted into needle clamp 6
- needle is not being pulled to one side as fabric is removed from the machine ..... 20
- presser foot or accessory is securely fastened to presser bar .... 5
- fabric is not being pulled while sewing, causing needle to hit needle plate ..... 31
Thread Breaks
Make sure...
- machine is properly threaded 16
- needle-thread tension is not too tight 19
- thread is unwinding freely from spool 13
- bobbin case area is free of lint and loose thread ends 46
Machine is Noisy or Sluggish Make sure...
- bobbin case and feed area are free of lint and loose thread ends 46
Fabric does not Feed Properly Make sure...
- presser foot or accessory is correctly attached to machine 5
- stitch length selector is correctly set .... 18
- lint has not accumulated around feed 46
Skipped Stitches
Make sure...
- needle is correct style for machine and size for thread 10, 11
- machine is correctly threaded 16
- needle is securely fastened to needle bar 6
Fabric Puckers
Make sure...
- needle-thread tension is not too tight 19
Needle Thread Breaks while Winding Bobbin
Make sure...
• machine is correctly threaded 16
- thread is unwinding freely from spool 13
Thread does not wind onto bobbin Make sure...
- bobbin winder spindle is pushed to right 13
10. Caring for Your Machine
text_image
A B C D E F FCleaning and Oiling Your Machine
CAUTION: Before cleaning your machine, disconnect power line plug from your socket outlet.
Periodically, depending on usage, clean and oil your machine as follows, using one drop of oil on areas indicated.
• To Interior Areas
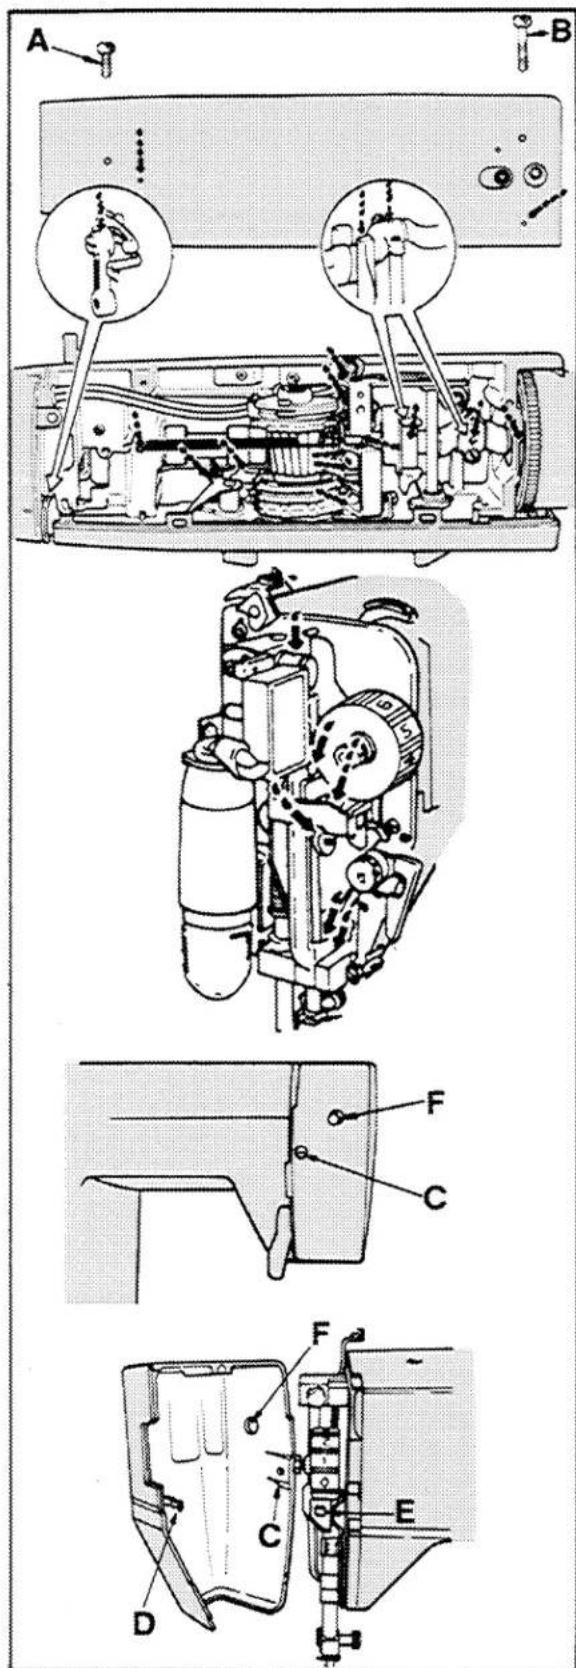
To clean and oil top of machine, remove top cover. Using a large screwdriver, remove screws A and B. Periodically, apply a drop of oil only to areas indicated, after cleaning.
To replace top cover, align it over screw holes A and B. Using a large screwdriver, replace screws A and B.
- Face Plate Area
To clean and oil the front interior of machine, loosen and remove the screw C located on rear of face plate, then guide face plate out of machine.
To replace face plate, align spring D with latch E and position light switch into hole F. Guide spring into latch and slightly move up face plate; replace screw and tighten.
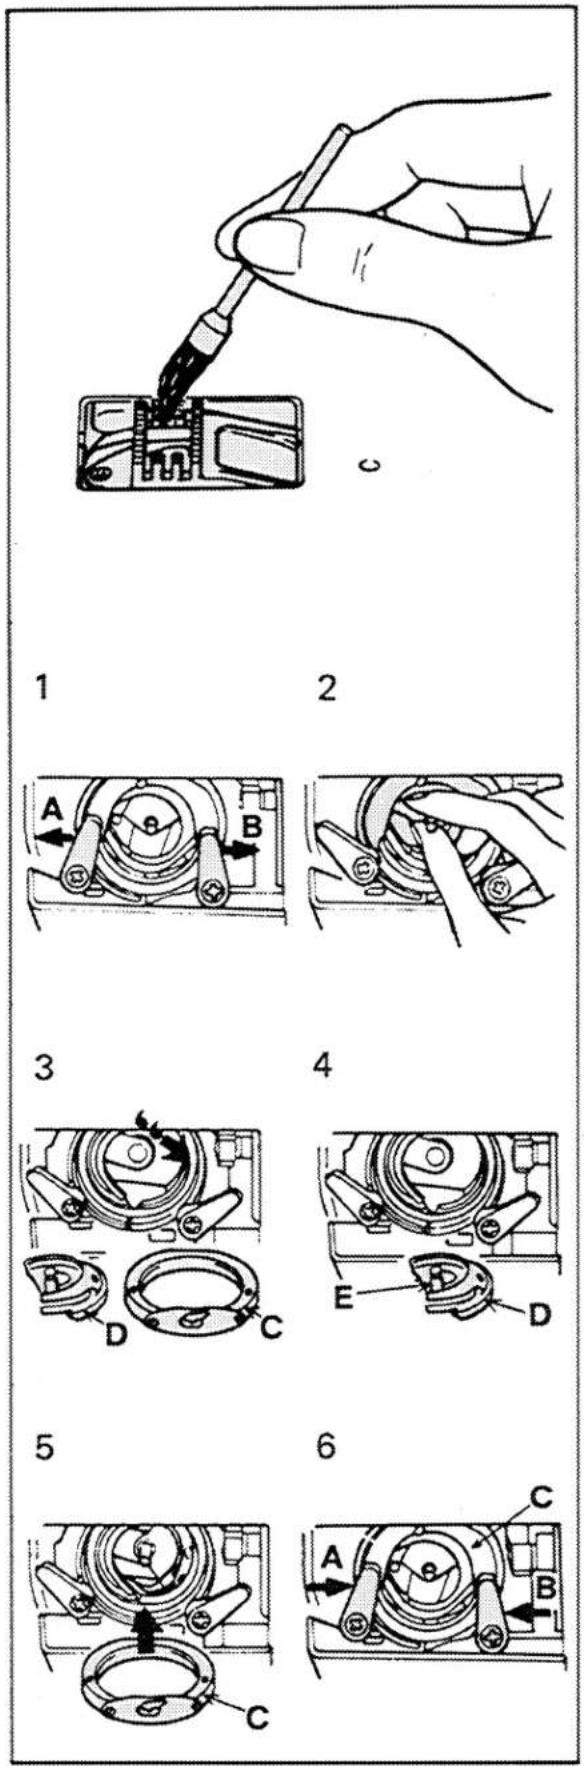
Removing the Bobbin Case
CAUTION: Before removing bobbin case, disconnect the power-line plug from the socket outlet.
• Bobbin Case Holder
To clean and oil bobbin case holder:
- Turn hand wheel until needle is at highest position.
- Open hook cover, or draw slide plate toward you.
-
Remove bobbin case and open latches A and B, as shown. For more information on removing and replacing bobbin case, refer to pages 14 and 15.
-
Remove part C and part D of Bobbin Case Holder, as shown.
-
Clean and oil areas indicated by arrows.
-
To replace bobbin case holder, insert part D with spindle E up, as shown.
-
Then fit part C into place with flat side up, as removed.
-
Close latches A and B over part C.
- Close hook cover or slide plate.
• Bobbin and Feed Areas
To clean and oil bobbin and feed areas, remove needle plate, as instructed on page 7. Using soft cloth or brush, clean. Replace needle plate, as instructed on page 7.
- Exterior Areas
If necessary, a mild solution of soap and water may be used on exterior areas to remove stubborn stains. No other cleaning liquid or powder should be used.
text_image
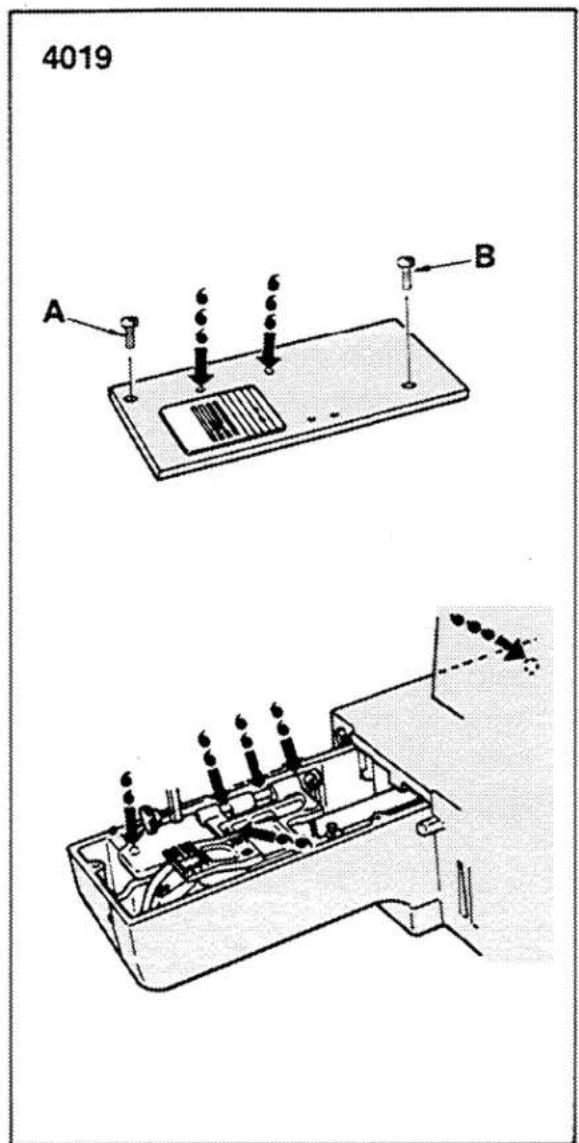
4019 A BCAUTION: Before cleaning your machine, disconnect power line plug from your socket outlet.
Interior Feed Area — 4019
To clean and oil inside feed area, remove cover. Using a large screw-driver, remove screws A and B. Periodically apply a drop of oil only to areas indicated after cleaning.
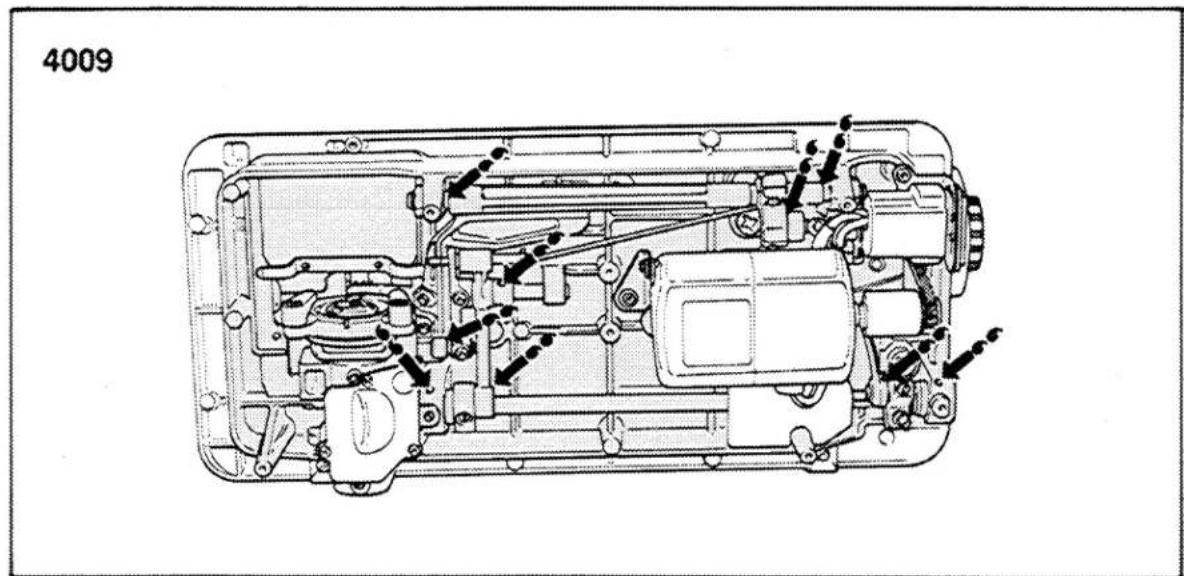
Interior Feed Area — 4009
To clean and oil feed area, tilt machine on its side, and periodically apply a drop of oil only to indicated areas.
Apply a few drops of oil to oiling points, and with presser foot up, run machine for a few minutes. Then wipe up any excess oil
CAUTION: Do not attempt to adjust the motor belt. Contact your nearest Service Centre should any adjustment be required.
text_image
4009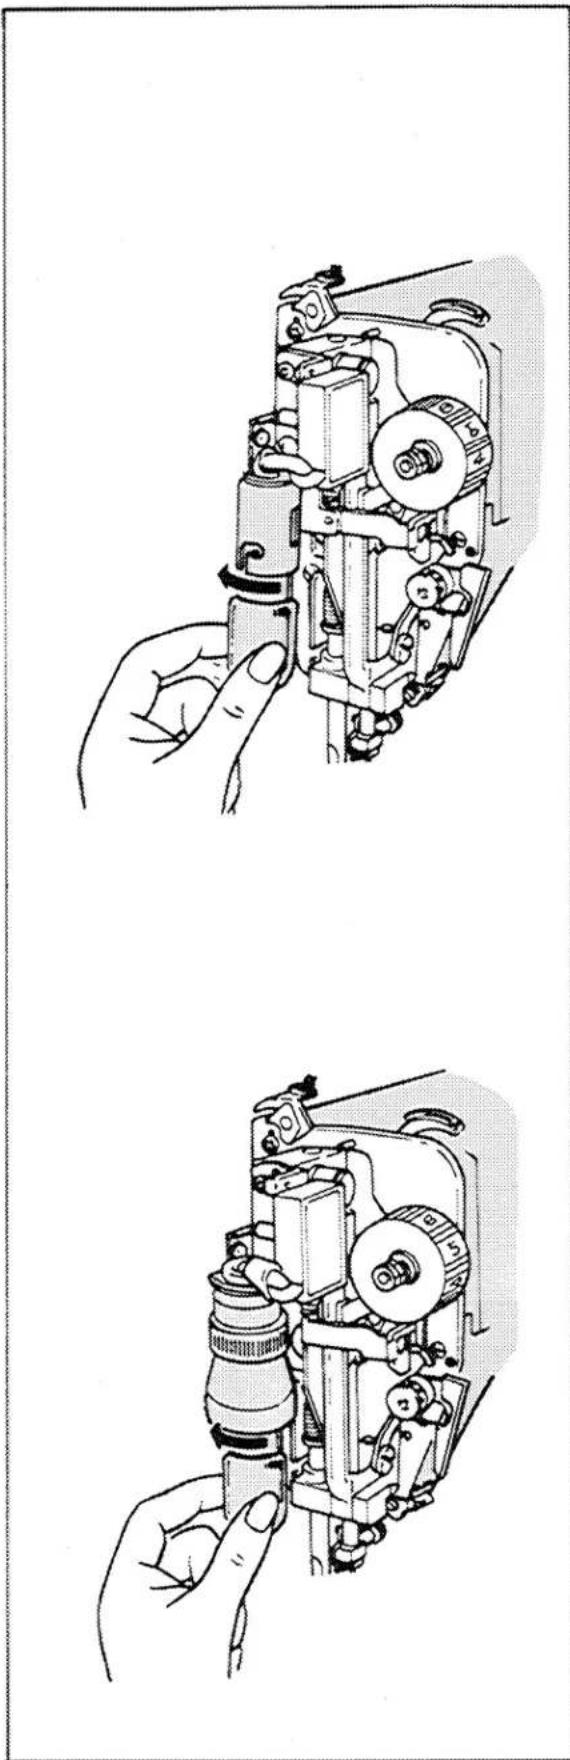
natural_image
Three-panel line drawing showing hands operating a mechanical device with no visible text or symbolsChanging the Light Bulb
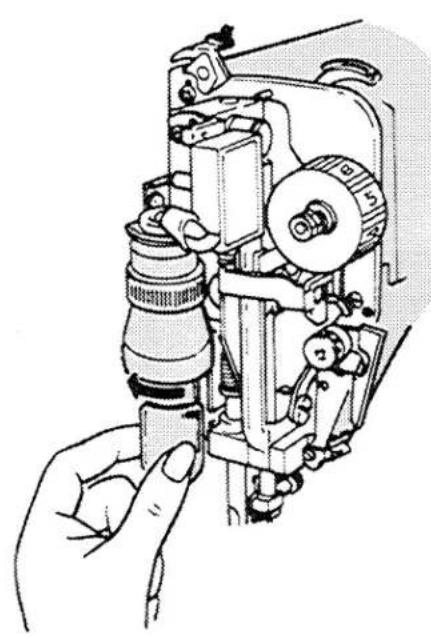
CAUTION: Before changing light bulb make sure you have disconnected power-line plug from socket outlet.
This machine is designed to use a 15-watt maximum bulb only.
For U.S. and Canada—
- Remove face plate (see page 45).
- Do not attempt to unscrew the bulb.
- Press it up into the socket and at the same time turn bulb in direction shown to unlock the bulb pin and guide out of socket.
- Press new bulb into socket, with bulb pin entering slot of socket.
- Turn it in opposite direction to lock bulb in position.
- Replace face plate (see page 45).
natural_image
Illustration of a hand operating a mechanical device with gears and adjustment knobs (no text or symbols visible)For All Other Territories—
- Remove face plate (see page 45).
- Unscrew bulb to left as indicated.
• Guide bulb out of socket. - Place new bulb into socket.
- Screw bulb to right until finger tight.
- Replace face plate (see page 45).
Index
Accessories 4
Appliqué 26
Backtacking 19
Blindstitch Hems 36
Bobbin 4.13.14
Raising Thread 17
Removing the Bobbin Case 14
Replacing the Bobbin Case 15
Tension 15
Threading the Bobbin Case 14
Winding 13
Bobbin Case 2,14,15
Buttonholing 38—41
Caring for the Machine . 45—47
Connecting the Machine .... 12
Darning 22
Embroidery 27,28
Fabric, Thread and Needle Table 10, 11
Fabric Weight Table 8,9
Finishes for Hems and Facings 35
Free-Arm Sewing 43
Light Bulb 48
Light Switch 12
Lingerie Seams 25
Machine Stitch Patterns ..... 29
Mending 35
Monograms 37
Multi-Stitch Zig-Zag 35
Needle ..... 6, 7, 10, 11, 38, 42
Changing 6
Plate 7
Thread Tension ..... 19, 24
Threading 16
Operating the Machine ..... 12
Overedge Seams 33, 34
Overedge Stretch Stitch . 32—34
Pattern Selection ..... 23, 29, 30
Performance Checklist ..... 44
Presser Feet 4,5
Presser Foot Lever 2,3
Principal Parts 2.3
Reverse Lever 2,3,19
Quilting 22
Satin Stitching 25
Seam Guide 4,6,20
Sewing a Seam 20
Sewing Light 2,3,48
Snap-in Feed Cover 4,6
Stitch Adjustment 31
Stitch Length .... 18, 24, 25, 30
Stitch Pattern Chart 32
Stitch Pattern Selector 2, 3, 18, 23, 29, 30
Stitch Width 18,2330
Tension 15, 19, 24, 25
Threading the Machine ... 16, 42
Twin-Needle Stitching ..... 42
Zig-Zag Stitching 23-37
Zipper Insertion 21