HW30902040 - Ferngesteuertes spielzeug Hobbywing - Kostenlose Bedienungsanleitung
Finden Sie kostenlos die Bedienungsanleitung des Geräts HW30902040 Hobbywing als PDF.


| Produkttyp | Elektronischer Geschwindigkeitsregler (ESC) für Multirotoren |
| Modell | HW30902040 (XRotor Pro 40A 3D) |
| Marke | Hobbywing |
| Anwendungsbereich | Ferngesteuertes Spielzeug, Multirotor-Drohnen |
| Dauerstrom | 40 A |
| Spitzenstrom (10 s) | 60 A |
| BEC | Nicht vorhanden |
| LiPo-Zellen | 3-6 S |
| Gewicht (Version A) | 50 g |
| Gewicht (Version B) | 45 g |
| Abmessungen (Version A) | 66 x 21,8 x 11 mm |
| Abmessungen (Version B) | 73,5 x 21,8 x 11 mm |
| Anschlussart Vers. A | Mit Anschlussdrähten (Wire leaded) |
| Anschlussart Vers. B | COB-3,5mm Stecker (Goldkontakte direkt auf Platine) |
| Hauptmerkmale | DEO-Technologie, 3D-Vorwärts/Rückwärtsflug, automatische Timing-Anpassung, verdrillte Signalkabel |
| Schutzfunktionen | Startschutz, Überlastschutz, Signalverlustschutz (0,25 s) |
| Gaskalibrierung | Nicht erforderlich (fester Bereich 1100-1940 μs) |
| Neutralposition | 1520 μs (±20 μs Totband) |
| Kompatible Flugcontroller | Entsprechender 3D-Flugcontroller erforderlich |
| Lieferumfang | Nur Regler (abhängig von Version) |
Häufig gestellte Fragen - HW30902040 Hobbywing
Benutzerfragen zu HW30902040 Hobbywing
0 Frage zu diesem Gerät. Beantworten Sie die, die Sie kennen, oder stellen Sie Ihre eigene.
Eine neue Frage zu diesem Gerät stellen
Laden Sie die Anleitung für Ihr Ferngesteuertes spielzeug kostenlos im PDF-Format! Finden Sie Ihr Handbuch HW30902040 - Hobbywing und nehmen Sie Ihr elektronisches Gerät wieder in die Hand. Auf dieser Seite sind alle Dokumente veröffentlicht, die für die Verwendung Ihres Geräts notwendig sind. HW30902040 von der Marke Hobbywing.
BEDIENUNGSANLEITUNG HW30902040 Hobbywing
text_image
XRotor USER MANUAL Multi-Rotor Brushless Electronic Speed Controller XRotor Pro 3D

Thank you for purchasing this HOBBYWING product! Brushless power systems can be very dangerous. Any improper use may cause personal injury and damage to the product and related devices. We strongly recommend reading through this user manual before use. Because we have no control over the use, installation, or maintenance of this product, no liability may be assumed for any damages or losses resulting from the use of the product. We do not assume responsibility for any losses caused by unauthorized modifications to our product.
We, HOBBYWING, are only responsible for our product cost and nothing else as result of using our product.
01 Features
- Special core program for multi-rotor controllers greatly improves throttle response.
- Forward & Reverse 3D flight can be realized by swiftly switch the motor rotation.
- DEO (Driving Efficiency Optimization) technology significantly improves throttle linearity and driving efficiency.
- High intelligent and adaptive default settings like auto-adjusting timing meet almost all applications.
- The twisted-pair design of the throttle signal cable effectively reduces the crosstalk produced in signal transmission and makes flight more stable.
02 Specifications
| Model Con. Current Peak Current (10s) BEC LiPo Weight Size | ||||
| XRotor Pro 40A 3D 40A 60A NO 3-6S | 50g (Version A) | 66x21.8x11mm (Version A) | ||
| 45g (Version B) | 73.5x21.8x11mm (Version B) | |||
| XRotor Pro 25A 3D 25A 40A NO 3-4S | 25g (Version A) | 46.6x22.2x10.5mm (Version A) |
Note: Version A (Wire leaded) connects brushless motor via output wires, while Version B (COB-3.5mm Connector On Board) with gold-plated connectors already directly soldered onto the printed circuit board of the ESC, so version B hasn't output wires.
03 Motor Wiring
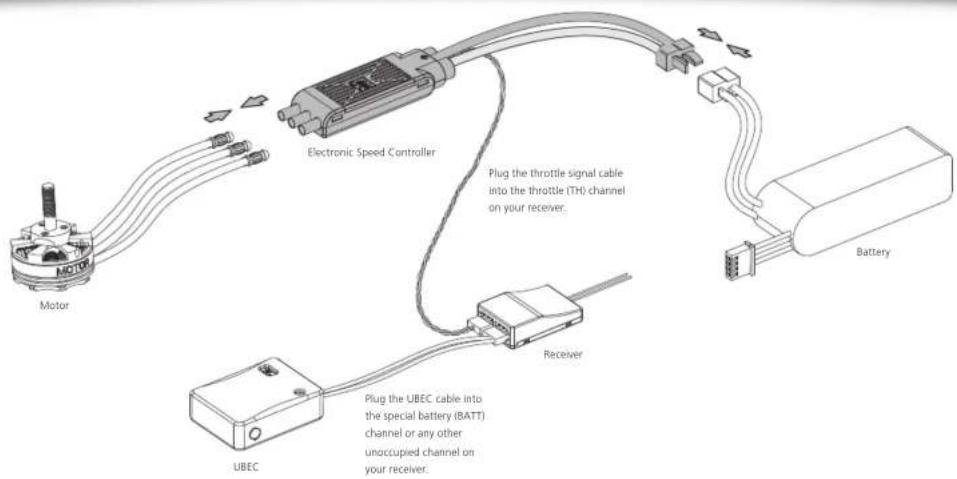
flowchart
graph TD
    A["Motor"] --> B["Electronic Speed Controller"]
    B --> C["Battery"]
    D["UBEC"] --> E["Receiver"]
    E --> F["Plug the UBEc cable into the special battery (BATT) channel or any other unoccupied channel on your receiver."]
    style A fill:#f9f,stroke:#333
    style B fill:#ccf,stroke:#333
    style C fill:#cfc,stroke:#333
    style D fill:#fcc,stroke:#333
    style E fill:#cff,stroke:#333
    style F fill:#ffc,stroke:#333
04 3D Flight
(Attention! XRotor-Pro-3D doesn't support throttle range calibration, because its throttle range is fixed at 1100–1940μs.)
- Forward & Reverse 3D Flight
The throttle ranges from 1100μs to 1940μs (the neutral position is at 1520μs, ±20μs is the dead band.), 1540μs-1940μs (that is from the neutral throttle position to the maximum throttle position) correspond to the forward 0%\~100% throttle. 1100μs-1500μs (that is from the neutral throttle position to the minimum throttle position) correspond to the reverse 0%\~100% throttles.
2.Start-up
First time you start up the ESC, it starts up softly. 3 seconds later the ESC will enter the Forward/Reverse 3D-flight operation. The ESC will re-enter the soft start-up process after the throttle stick is moved to the neutral dead band for over 3 seconds.
05 Normal Start-up Process
Turn on the transmitter and move the throttle stick to the neutral position.

Connect the ESC to a battery; 1 second later, the motor will emit "J123" indicating the power system is ready.

Push the throttle stick to slightly over the 50% throttle position, the ESC will start up slowly. 3 seconds later, it'll enter the 3D-flight operation.
Note 1: Do not push the throttle stick too much when you're trying to start up the ESC, because the motor will immediately accelerate to the RPM correspond to the throttle amount right after the soft start-up process ends.
Note 2: You need the corresponding 3D flight controller to match our XRotor-Pro-3D ESC when you fly 3D flight.
06 Multiple Protections
- Start-up Protection: The ESC will shut down the motor if it fails to start the motor normally within 2 seconds by increasing the throttle value. In this case, you need to move the transmitter throttle stick back to the neutral position and restart the motor. (Possible causes of this problem: poor connection/disconnection between the ESC and motor wires, propellers are blocked, etc.)
• Over-load Protection: The ESC will cut off the power/output when the load suddenly increases to a very high value. Normal operation will not resume until the throttle stick is moved back to the neutral position. The ESC will automatically attempt to restart when the motor and the ESC are out of sync. - Throttle Signal Loss Protection: When the ESC detects loss of signal for over 0.25 second, it will cut off the output immediately to avoid an even greater loss which may be caused by the continuous high-speed rotation of propellers or rotor blades. The ESC will resume the corresponding output after normal signals are received.
07 Troubleshooting
| Trouble | Warning Tone Possible Cause Solution | ||
| The ESC was unable to start the motor. | "Beep beep..." (The motor beeps rapidly) | The throttle stick is not moved to the neutral position. | Move the throttle stick to the neutral position or check if the signal output from the flight controller is correct or not. |
| The ESC was unable to start the motor. | "Beep-, beep-..." (Time interval is 1 second) | No output signal from the throttle channel on the receiver or the corresponding channel on the flight controller. | Check if the transmitted and receiver are well bound, and if the throttle control wire has been correctly plugged into the TH channel on the receiver or corresponding channel on the flight controller. |