HP-814RXFASST - Ferngesteuertes spielzeug Hyperion - Kostenlose Bedienungsanleitung
Finden Sie kostenlos die Bedienungsanleitung des Geräts HP-814RXFASST Hyperion als PDF.


Benutzerfragen zu HP-814RXFASST Hyperion
0 Frage zu diesem Gerät. Beantworten Sie die, die Sie kennen, oder stellen Sie Ihre eigene.
Eine neue Frage zu diesem Gerät stellen
Laden Sie die Anleitung für Ihr Ferngesteuertes spielzeug kostenlos im PDF-Format! Finden Sie Ihr Handbuch HP-814RXFASST - Hyperion und nehmen Sie Ihr elektronisches Gerät wieder in die Hand. Auf dieser Seite sind alle Dokumente veröffentlicht, die für die Verwendung Ihres Geräts notwendig sind. HP-814RXFASST von der Marke Hyperion.
BEDIENUNGSANLEITUNG HP-814RXFASST Hyperion
1. INTRODUCTION
1.1 Compatibility:
FASST 2.4G Air Systems (7CH Mode/Multi Mode): 6EX, 7C, TM-7, TM-8, T8FG, T10C, TM-10, T10CG, 14SG, T12Z, T12FG, TM-14, T14MZ, etc.
FASST 2.4G Surface Systems (C1 Mode): 3PK, 4PK, etc.
1.2 Specifications:
Operating Voltage Range: 3.5V\~8.4V
Dimension: 47.5X25.3X15mm
Weight: 11g
Latency: 14ms (FS)
7ms (HS)
1.3 Features:
1) Compatible with FASST 2.4G: Air Systems (7CH Mode/Multi Mode) & Surface Systems (C1 Mode);
2) Parallel with one more HP814FHSS to become a 14 channel FASST compatible receiver;
3) Two selectable failsafe setting options;
4) Improve capability of anti-interference;
5) Firmware upgradable
will use native failsafe position preset on the transmitter side.
2. SETUP( BIND PROCEDURE/ SETTING FAILSAFE/LED STATUS)
2.1 Bind procedure:
Turn on the transmitter, connect the battery to the receiver while pressing receiver's F/S button. After the RED LED is off and GREEN LED is solid, the binding process is completed and the receiver is operating normally.
2.2 Setting failsafe:
R7008W support two selectable failsafe setting options, either use native failsafe position preset on the transmitter side, or set failsafe on
2.2.1 Use native failsafe position preset on the transmitter side:
If not disabling failsafe on the transmitter side, HP814FHSS will use native failsafe position preset on the transmitter side.
2.2.2 Set failsafe on
HP814FHSS supports failsafe function for all channels. Follow the steps below to set failsafe on HP814FHSS :
1) Bind the receiver first, and disable failsafe on the transmitter side;
2) Set all transmitter controls to the desired failsafe position;
3) Press briefly the F/S button of the receiver, the GREEN LED of the receiver will flash twice, indicating the failsafe is set up successfully.
If you do not need the failsafe function any more, just re-bind the receiver to set default failsafe mode.
2.3 LED Status:
| RED LED | GREEN LED | Mode |
| Off | On | Normal mode |
| On | On | Waiting to be bound |
| Flashing | On | Signal lost |
| On | Flashing twice | Set failsafe |
| Flashing slowly | On | FS mode |
| Flashing fast | On | HS mode |
3. HOW TO SWITCH BETWEEN TWO PPM MODES
Turn the transmitter off, connect the battery to the receiver, press the F/S button of receiver for 6 seconds and then release. The red LED will flash fast in HS Mode and slow in FS Mode. Repeat this to alternate modes.
Warning: HS Mode is only applied for high-speed digital servos. Other servos should select FS Mode, otherwise servos will get hot or even burn out.
4. HOW TO CREATE A GANGED, MULTI-CHANNEL RECEIVER
HP814FHSS can be paralleled with one moreHP814FHSS to become a multi-channel FASST compatible receiver
1) Bind both receivers to the transmitter/transmitter module;
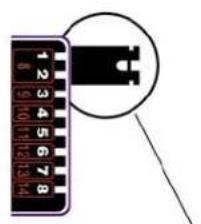
2) Connect CH1 & CH2 of R7008HV by a jumper, then CH3 will be shifted to CH9, Ch4 will be shifted to CH10, and so forth;
3) The two receivers can be placed in different areas of the model
text_image
12 34 56 78 16Connect CH1&CH2 by a jumper
Hint: If not disabling failsafe on the transmitter side, HPB14FHSS will use native failsafe position preset on the transmitter side.