
SX32 - Glocke ELRO - Kostenlose Bedienungsanleitung
Finden Sie kostenlos die Bedienungsanleitung des Geräts SX32 ELRO als PDF.


| Produkttyp | Kabelloses Türklingel-Glockenspiel |
| Marke | Elro |
| Modell | SX32 |
| Reichweite | Bis zu 100 m im Freien |
| Stromversorgung Sender | 1 x 12V/23A Batterie (nicht im Lieferumfang) |
| Stromversorgung Empfänger | Netzbetrieb 230V/50Hz oder 3 x AA Batterien (nicht im Lieferumfang) |
| Lautstärke | Einstellbar, bis zu 80 dB |
| Anzahl Melodien | 32 wählbare Klingeltöne |
| LED-Anzeige | Bei Klingelsignal |
| Abmessungen Empfänger | Ca. 120 x 80 x 25 mm |
| Abmessungen Sender | Ca. 70 x 40 x 20 mm |
| Gewicht Empfänger | Ca. 150 g |
| Gewicht Sender | Ca. 50 g |
| Montage | Wandmontage (Sender und Empfänger) |
| Farbe | Weiß |
| IP-Schutzklasse Sender | IP44 (wetterfest) |
| Betriebstemperatur | -10°C bis +50°C |
| Lieferumfang | 1 Empfänger, 1 Sender, Bedienungsanleitung |
| Wartung | Gehäuse mit feuchtem Tuch reinigen, keine Lösungsmittel |
| Sicherheit | Nur für den Innen-/Außengebrauch gemäß Anleitung |
| Reparatur | Keine reparablen Teile im Inneren; bei Defekt Gerät austauschen |
Häufig gestellte Fragen - SX32 ELRO
Benutzerfragen zu SX32 ELRO
0 Frage zu diesem Gerät. Beantworten Sie die, die Sie kennen, oder stellen Sie Ihre eigene.
Eine neue Frage zu diesem Gerät stellen
Laden Sie die Anleitung für Ihr Glocke kostenlos im PDF-Format! Finden Sie Ihr Handbuch SX32 - ELRO und nehmen Sie Ihr elektronisches Gerät wieder in die Hand. Auf dieser Seite sind alle Dokumente veröffentlicht, die für die Verwendung Ihres Geräts notwendig sind. SX32 von der Marke ELRO.
BEDIENUNGSANLEITUNG SX32 ELRO
Byron
Wire Free Converter
Battery Installation
- The Converter unit is operated by 1 x 12 volt battery (23A - included).
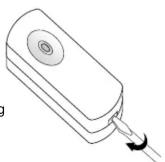
- Remove the back of the case by pushing in the tab on the bottom with a small, flat screwdriver.
- Insert 1 x 12 volt battery (23A - included) in the battery compartment, ensuring the battery's polarity matches the internal markings.
- Snap the front cover of push button back on, then it is ready to use.
Installation Guide
- Drill hole and fit wall plug (if fixing to masonry) and screw (self-tapping N3 x 16mm screw) to fixing position. Leave a gap of 3mm between the screw head and the wall. Locate the keyhole slot on the back of the unit, over the screw.
Important: Mounting the Converter unit on metal or UPVC doorframes will seriously reduce the operating range. - Then use the second hole located at the bottom half of the Converter as a template, mark the fixing position for the unit. Drill hole and fit wall plug and secure the Converter Unit with the screw (self-tapping N3 x 16mm screw) in position.
- Alternatively, use the double-sided self-adhesive pad (included) to attach the converter to the fixing position between the bell push and door chime unit.
Note: When mounting to masonry, fit wall plugs. When mounting to wooden doorframe wall plugs are not necessary.
Melody Selection (On selected Models)
The Melody selector is located inside the push converter unit, a small switch on the top left corner of battery compartment marked with "S". Press the switch once, the melody will change to the netxt one on the list, there are a total of 8 melodies for selection. The converter is pre-set to "Westminster" therefore, if no change is required, it should not be adjusted.
1) Westminster - 8 notes 5) Banjo on my knee
2) Ding-Dong - Repeat 6) Twinkle, Twinkle
3) Telephone Ring 7) It's a small world
4) Circus Theme 8) Dog Barking
Channel Selection
The unit comes from the factory on a pre-set radio frequency channel. However, should you door chime activate intermittently for no reason at all, it is possible that a similar unit is operating nearby on the same frequency. The encoded frequency of the Converter (transmitter) and Door Chime (receiver) can be changed to avoid this problem.
- Remove the back of the case by pushing in the tab on the bottom with a small, flat screwdriver.
- There is a 4 position dip switch marked 1,2,3,4. Use a small screwdriver to alter the dip switch levers to the "On/Off" position, which can be altered to achieve a total sixteen (16) possible channels.
- In any combination ensuring it is set to the same code on both Converter and Wireless Door Chime units.
- Test to ensure correct operation before final installation.
Wiring Installation
The Converter is designed to change your existing Wired Bell Push to wirefree.
1. Simply connect your Wired Bell Push with the cable from Converter to the terminals on your bellpush.
2. Your Wired Bell Push with Converter is ready to use.
SX-32


In case a Transformer (A/C 8v) is used to power the Wired Bell Push and Wired Door Chime.
- Remove the back of case by pushing in the tab on the bottom with a small, flat screwdriver.
- Disconnect the wire that connected with Wired Door Chime.
- Feed the wire via the hole on the back of the Converter, connect the wire to the terminal positions marked below.
- Snap the front cover of push button back on, then it is ready to use.
Important: Do not connect the Converter unit with any Lighted Bell Push.

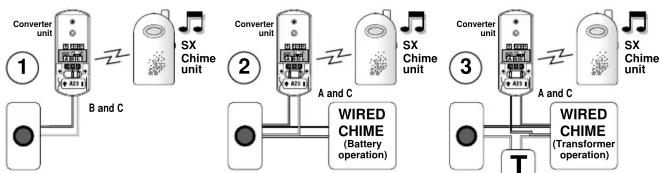
flowchart
graph LR
    A["Converter unit"] --> B["SX Chime unit"]
    B --> C["Converter unit"]
    C --> D["SX Chime unit"]
    D --> E["Converter unit"]
    E --> F["SX Chime unit"]
    F --> G["WiRED CHIME (Battery operation)"]
    G --> H["WiRED CHIME (Transformer operation)"]
    style A fill:#f9f,stroke:#333
    style B fill:#ccf,stroke:#333
    style C fill:#cfc,stroke:#333
    style D fill:#fcc,stroke:#333
    style E fill:#cff,stroke:#333
    style F fill:#ffc,stroke:#333
    style G fill:#cfc,stroke:#333
    style H fill:#fcc,stroke:#333
Please note that these diagrams are only for reference as a guide.
EACH Wired chime can be wired differently, so if you encounter problems, PLEASE CALL THE HELPLINE ON 0121 5449499
Operation
When the wired Bell Push is pressed, it will activate the Converter and transmit a wireless signal for 1 second to the Wireless Door Chime, Green LED light will light up as operation indication, and the door chime will sound.

flowchart
graph TD
    A["Converter unit"] --> B["A and C"]
    B --> C["WIRED CHIME (Transformer operation)"]
    C --> D["T"]
    style A fill:#f9f,stroke:#333
    style B fill:#ccf,stroke:#333
    style C fill:#cfc,stroke:#333
    style D fill:#fcc,stroke:#333
Important
- Do not mount the Converter unit onto any metal surface or metal doorframe including UPVC.
- Do not expose the unit directly to rain or immerse either in water.
- Do not expose the unit to high temperatures or close to fireplace.
- Do not leave exhausted batteries in either unit.
- Do not connect the Converter unit with any Lighting Bell Push.
- Converter is designed for internal use only.
- Please dispose of old, defective batteries in and environmentally friendly manner in accordance with the relevant legislation.
- Make sure that no naked flame sources, such as lighted candles, should be placed on the unit.
- The unit should not be exposed to dripping or splashing and that no objects filled with liquids
- Replace only with the same or equivalent type battery recommended by the manufacturer.
Specification
Converter unit
Power : 1 x 12volt 23A battery (included) Replace with Byron SD100 model.
Consumption : 3.0mA - ON
0.003mA - OFF
Operating Temperature: -10°C to +40°C
Operating Distance : 100 metres (320 feet approx.) in open field
Selectable Tone : Total eight (8) tones available
Selectable Channel : Total sixteen (16) possible channels

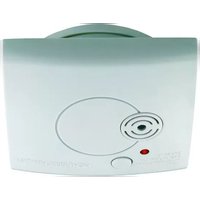
Marke : ELRO
Modell : SX32
Kategorie : Glocke