
FB36GB - Ofen Ariston Thermo - Kostenlose Bedienungsanleitung
Finden Sie kostenlos die Bedienungsanleitung des Geräts FB36GB Ariston Thermo als PDF.


| Produkttyp | Einbauofen |
| Modell | FB36GB |
| Marke | Ariston Thermo |
| Energiequelle | Elektrisch (230 V) |
| Abmessungen (HxBxT) | 595 x 595 x 568 mm |
| Gewicht | ca. 30 kg |
| Fassungsvermögen | 60 Liter |
| Temperaturbereich | 50 °C bis 250 °C |
| Heizarten | Ober-/Unterhitze, Umluft, Grill, Heißluft |
| Reinigung | Emaille-Innenfläche, einfache Reinigung |
| Sicherheit | Kindersicherung, Überhitzungsschutz |
| Zubehör | 1 Backblech, 1 Grillrost |
| Energieeffizienzklasse | A (geschätzt) |
| Display | Digitaluhr mit Timer |
| Tür | Kühltür mit Sicherheitsglas |
Häufig gestellte Fragen - FB36GB Ariston Thermo
Benutzerfragen zu FB36GB Ariston Thermo
0 Frage zu diesem Gerät. Beantworten Sie die, die Sie kennen, oder stellen Sie Ihre eigene.
Eine neue Frage zu diesem Gerät stellen
Laden Sie die Anleitung für Ihr Ofen kostenlos im PDF-Format! Finden Sie Ihr Handbuch FB36GB - Ariston Thermo und nehmen Sie Ihr elektronisches Gerät wieder in die Hand. Auf dieser Seite sind alle Dokumente veröffentlicht, die für die Verwendung Ihres Geräts notwendig sind. FB36GB von der Marke Ariston Thermo.
BEDIENUNGSANLEITUNG FB36GB Ariston Thermo
FB 36 GB
FB 36 IX GB
FR 34 S GB
GB Electric ventilated oven
Instructions for installation and use
Congratulations on choosing an Ariston appliance, which you will find is dependable and easy to use. We recommend that you read the instructions in this owner's manual carefully before use for the best performance and to extend the life of your appliance, as it will provide you with all the instructions you require to ensure its safe installation, use and maintenance. Always keep this owner's manual close to hand since you may need to refer to it in the future. Thank you.
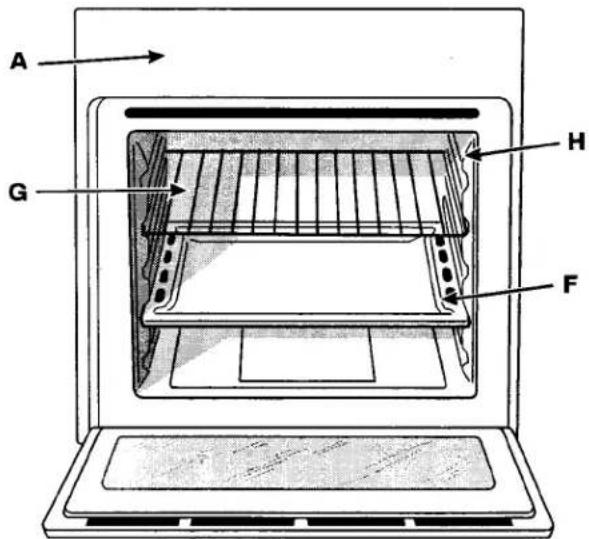
Close-up view
A. Control Panel
B. Cooking mode selection knob
C. Variable Grill Knob
E. Oven indicator light (only available on certain models) - When lit, it indicates the ovens is heating up to the temperature set.
F. Dripping Pan or Baking Sheet
G. Oven Rack
H. Guides for sliding the racks or dripping pan in and out
1. Electronic programmer (only available on certain models) - Allows you to programme the desired cooking mode by selecting the cooking time and the end cooking time. It can also be used as a timer.
O. Country Style Timer Knob (only available on certain models)

How to use your oven
The various features offered by your oven are selected by means of selector knob "B" and thermostat "C" situated on the control panel.
Notice: The first time you use your appliance, we recommend that you set the thermostat to the highest setting and leave the oven on for about half an hour with nothing in it, with the oven door shut. Then, open the oven door and let the room air. The odour that is often detected during this initial use is due to the evaporation of substances used to protect the oven during storage and until it is installed.
Notice: Place the dripping pan provided on the bottom shelf of the oven to prevent any sauce and/or grease from dripping onto the bottom of the oven only when grilling food or when using the rotisserie (only available on certain models). For all other types of cooking, never use the bottom shelf and never place anything on the bottom of the oven when it is in operation because this could damage the enamel. Always place your cookware (dishes, alu-
minium foil, etc. etc.) on the grid provided with the appliance inserted especially along the oven guides.
N.B.: Should the appliance be equipped with an electronic programmer, to use the electric oven, just press button (the "symbol will appear on the display) before selecting the desired cooking function.
Thermostatically controlled oven (Fan Assisted Mode)
When the oven control knob (B) is turned in a clockwise direction to the symbol ⚙|* the fan and oven light will come on to assist in the defrosting of frozen food. Rotating further to the complete range of temperatures shown on the dial you can choose which is most suitable for the food you are going to cook. The temperature is reached automatically and controlled by the oven thermostat (from 60°C to MAX).
Note: Whilst using tag oven for conventional cooking knob (C) must be set with "MAX" in line with the reference mark on the control panel.
Grill
Both of the top heating elements turn on. On this setting, food is cooked by the thermal radiation given off in the downward direction by the electric heating element. The very high temperature and direct heat of the grill make it possible to brown meats on the surface while locking in the juices to keep them tender.
The oven light
Set knob "B" to the symbol to turn it on. It lights the oven and stays on when any of the electrical heating elements in the oven come on.
Cooling ventilation
In order to cool down the exterior of the appliance, some models are equipped with a cooling fan which comes on automatically when the oven is hot.
When the fan is on, a normal flow of air can be heard exiting between the oven door and the control panel.
Note: When cooking is done, the fan stays on until the oven cools down sufficiently.
Clock with Country Style timer
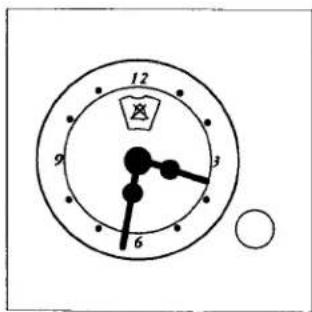
How to reset the correct time
The oven must be plugged in.
Pull the knob and turn it anticlockwise until you set the correct time.
NB.: The programmer is electrically powered, therefore in the event of a power shortage, it will stop working for the entire duration of the same. Following this power failure, the correct time will have to be reset.
Timer Feature
The timer feature allows you to enter a given amount of time from which the timer begins to count down. This feature does not turn the oven on or off; it merely sounds when the time has elapsed.
How to set the timer
Turn the knob anticlockwise until the marker lines up with the desired time (internal scale), which can be seen in the "window". The time countdown will begin immediately.
To interrupt the timer buzzer, or to use only the clock feature, set the marker to the ⚠ symbol.
Electronic Cooking Programmer
The programmer makes it possible to preset the oven and the grill in terms of:
• delay start with a preset length of time for cooking;
- immediate start with a preset length of time for cooking;
- timer.
Button functions:
: Timer with hour and minutes;
☐ : Length of cooking time;
: End cooking time;
: Manual change;
☐: Change time (backwards);
+ : Change time (forwards).
How to Reset the Digital Clock
After the appliance has been connected to the power source or following a power outage, the clock display will begin to blink and read: 0:00
- Press the ☐ and ☑ buttons at the same time. Then use (within 4 seconds) the ☐ and ☑ buttons to set the exact time.
Use the ☐ button to move the time forwards.
Use the ☐ button to move the time backwards.
The time can also be changed in the following two ways:
-
Repeat all of the foregoing steps.
-
Press the ⏻ button, and then use the ⊖ and + buttons to reset the time.
Manual Operation Mode for the Oven
After the time has been set, the programmer is automatically set to manual mode.
Note: Press the ⏻ button to return the oven to manual mode after every "Automatic" cooking session.
Delayed Start Time with Preset Cooking Length
The length and the end cooking times must be set. Let us suppose that the display shows 10:00.
-
Turn the oven control knob to the cooking setting and temperature desired (example: convection oven at 200°C).
-
Press the ☐ and the use (within 4 seconds) the ☐ and ☐ buttons to set the length of the cooking time. Let us suppose that 30 minutes was set for the length of the cooking time. In this case, the display will show:
0:30
Release the button, and within 4 seconds, the current time will reappear with the " symbol and "auto."
- Press the 📁 button, and then use the — and + buttons to set the end cooking time. Let us suppose that it is 13:00
13·00
- Release the button and the display will show the current time within 4 seconds:
10·00
When "auto" is lighted, it indicates that the length and end cooking time have been preset to operate in automatic mode. At this point, the oven will turn on automatically at 12:30 in order to finish the cooking session within 30 minutes. When the oven is on, the symbol (cooking pot) will appear on the display for the entire length of the cooking process. The button can be pressed at any time to display the setting for the length of the cooking time, while the button can be pressed to display the end cooking time.
At the end of the cooking time, an acoustic signal will sound. Press any button it turn it off (except the and buttons).
Immediate Start Time with Preset Cooking Length
When only the length of the cooking time is set (points 1 and 2 of the paragraph entitled, "Delayed Start Time with Preset Cooking Length"), the cooking session starts immediately.
Cancelling a Preset Cooking Time
Press the button, and use the button to set the time to:
0·00
Then press the manual cooking mode button 🤨.
Timer Feature
The timer can be used to count down from a given length of time. This feature does not control when the oven comes on or turns off, but, rather, it only emits an acoustic signal when the preset time has run out.
Press the button, and the display will read:
0·00
Then use the ⊕ and ⊖ buttons to set the desired time. Release the button, and the timer will start at that second. The display will show the current time.
10:00
At the end of the preset time, an acoustic signal will sound, which can be turned off by pressing any button (except the + and - buttons), and the symbol will turn off.
Changing and Cancelling Settings
- The settings can be changed at any time by pressing the corresponding button and using the ⊕ or □ button.
- When the length setting for the cooking time is cancelled, the end cooking time setting is also cancelled, and vice versa.
- When in automatic cooking mode, the appliance will not accept end cooking times prior to the start cooking time proposed by the appliance itself.
How to Keep Your Oven in Shape
Before cleaning your oven, or performing maintenance, disconnect it from the power supply.
To extend the life of your oven, it must be cleaned frequently, keeping in mind that:
- the enamelled or stainless steel parts should be washed with lukewarm water without using any abrasive powders or corrosive substances which could ruin them; Stainless steel could get stained. If these stains are difficult to remove, use special products available on the market. After cleaning, it is advisable to rinse thoroughly and dry.
- the inside of the oven should preferably be cleaned immediately after use, when it is still warm, with hot water and soap; the soap should be rinsed away and the interior dried thoroughly. Avoid using abrasive detergents (for example cleaning powders, etc...) and abrasive sponges for dishes or acids (such as limescale-remover, etc...) as these could damage the enamel. If the grease spots and dirt are particularly tough to remove, use a special product for oven cleaning, following the instructions provided on the packet.
- if you use your oven for an extended period of time, condensation may form. Dry it using a soft cloth.
- there is a rubber seal surrounding the oven opening which guarantees its perfect functioning. Check the condition of this seal on a regular basis. If necessary, clean it and avoid using abrasive products or objects to do so. Should it become damaged, please contact your nearest After-sales Service Centre. We recommend you avoid using the oven until it has been repaired.
- never line the oven bottom with aluminium foil, as the consequent accumulation of heat could compromise the cooking and even damage the enamel.
- clean the glass door using non-abrasive products or sponges and dry it with a soft cloth.
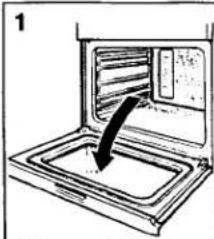
How to remove the oven door
For a more thorough clean, you can remove the oven door. Proceed as follows:
- open the door fully;
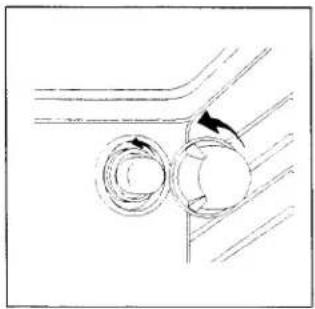
- lift up and turn the small levers situated on the two hinges;
- grip the door on the two external sides, shut it slowly but not completely;
- pull the door towards you, pulling it out of its seat; Reassemble the door by following the above procedures backwards.
natural_image
Diagram of an oven with a downward arrow indicating a process or removal (no text or symbols present)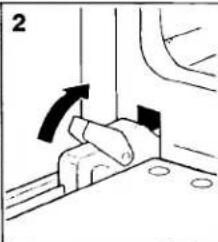
natural_image
Mechanical assembly diagram showing a lever mechanism with an arrow indicating motion (no text or symbols present)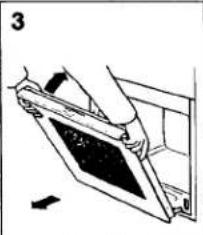
natural_image
Technical line drawing of a mechanical component or bracket (no text or symbols visible)Replacing the Oven Lamp
- Disconnect the oven from the power supply by means of the omnipolar switch used to connect the appliance to the electrical mains; or unplug the appliance if the plug is accessible;
- Remove the glass cover of the lamp-holder;
- Remove the lamp and replace with a lamp resistant to high temperatures (300°C) with the following characteristics:
- Voltage: 230/240 V
- Wattage 25W
Type E14
- Replace the glass cover and reconnect the oven to the mains power supply.
natural_image
Diagram of a mechanical or fluid system with two circular components and directional arrows, no text or symbols present.Practical Cooking Advice
When cooking in the oven, use only one dripping pan or rack at a time. Select from among the top or bottom rack heights based on whether the dish needs more or less heat from the top.
Preheating
If the oven must be preheated (this is generally the case when cooking leavened foods), we recommend you use the "convection mode" to reach the desired temperature as quickly as possible. When preheating is over, which is indicated by the red light "E" going out, select the required cooking mode.
Cooking Fish and Meat
When cooking white meat, fowl and fish, use temperature settings from 180 °C to 200 °C.
For red meat that should be well done on the outside while tender and juicy in the inside, it is a good idea to start with a high temperature setting (200°C-220°C) for a short time, then turn the oven down afterwards.
In general, the larger the roast, the lower the temperature setting. Place the meat on the centre of the grid and place the dripping pan beneath it to catch the fat.
Make sure that the grid is inserted so that it is in the centre of the oven. If you would like to increase the amount of heat from below, use the low rack heights. For savoury roasts (especially duck and wild game), dress the meat with lard or bacon on the top.
Baking Cakes
When baking cakes, always preheat the oven and do not open the oven door during baking to prevent the cake from dropping. In general:
Pastry is too dry
Increase the temperature by 10^ C and reduce the cooking time.
Pastry dropped
Use less liquid or lower the temperature by 10°C.
Pastry is too dark on top
Place it on a lower rack, lower the temperature, and increase the cooking time.
Cooked well on the inside but sticky on the outside
Use less liquid, lower the temperature, and increase the cooking time.
The pastry sticks to the pan
Grease the pan well and sprinkle it with a dusting of flour or use greaseproof paper.
Using the Grill
Use the ☐ "grill" mode, placing the food under the centre of the grill (situated on the 3rd or 4th rack form the bottom) because only the central part of the top heating element is turned on.
Use the bottom rack (1st from the bottom), placing the dripping pan provided to collect any sauce and/or grease and prevent the same from dripping onto the oven bottom.
The variable temperature control (C) is positioned to right of the oven knob. This knob will provide varying grill temperatures when rotated from "max" to "min" and may be adjusted to vary the level of heat at any time during the grilling operation.
To operate the grill
- Turn the oven control knob (B) clockwise until the required grilling symbol is in line with the mark on the control panel. The element is now "on".
- The variable grill control (C) can now be operated to select the required heat.
Therefore the best results when using the grill modes are obtained by placing the grid on the lower racks (see cooking table) then, to prevent fat and grease from dripping onto the bottom of the oven and smoke from forming, place a dripping-pan on the 1st oven rack from the bottom.
Grilling must be done with the door partially open.
| Food to be cooked | Wt. (wt) | Cooking position of shelves from | Temperature (°C) | Variable grill | Pre-heating time (min) | Cooking time (min.) |
| Pasta | bottom | |||||
| Lasagne | 2.5 | 3 | 210 | - | 75-80 | |
| Cannelloni | 2.5 | 3 | 210 | MAX | - | 75-80 |
| Oven-baked noodles | 2.5 | 3 | 210 | - | 75-80 | |
| Meat | ||||||
| Veal | 1.7 | 3 | 230 | - | 85-90 | |
| Chicken | 1.5 | 3 | 220 | - | 110-115 | |
| Turkey | 3.0 | 3 | MAX | MAX | - | 95-100 |
| Duck | 1.8 | 3 | 230 | - | 120/125 | |
| Rabbit | 2 | 3 | 230 | - | 105/110 | |
| Pork | 2.1 | 3 | 230 | - | 100/110 | |
| Lamb | 1.8 | 3 | 230 | - | 90-95 | |
| Fish | ||||||
| Mackerel | 1.1 | 3 | 210-230 | - | 55-60 | |
| Dentex | 1.5 | 3 | 210-230 | MAX | - | 60-65 |
| Trout baked in paper | 1.0 | 3 | 210-230 | - | 40-45 | |
| Pizza | ||||||
| Napolitan | 1.0 | 3 | MAX | MAX | 15 | 30-35 |
| Cake | ||||||
| Biscuits | 0.5 | 3 | 180 | 15 | 30-35 | |
| Tarts | 1.1 | 3 | 180 | MAX | 15 | 30-35 |
| Chocolate cake | 1 | 3 | 200 | 15 | 45-50 | |
| Raised Cakes | 1 | 3 | 200 | 15 | 50/55 | |
| Grill cooking | ||||||
| Toast | n.° 4 | 4 | 10 | |||
| Pork chops | 1.5 | 4 | MAX-MIN | 30 | ||
| Mackerel | 1.1 | 4 | 35 |
Note: cooking times are approximate and may vary according to personal taste.
Safety Is A Good Habit To Get Into
To maintain the efficiency and safety of this appliance, we recommend that you do the following:
• only call the Service Centres authorised by the manufacturer
• always use original spare parts
- When handling the appliance, we recommend you always use the purpose provided handles recessed into the sides of the oven to prevent harming people or damaging the appliance itself.
- This appliance is designed for non-professional, household use and its functions must not be changed.
- These instructions are only valid for the countries whose symbols appear on the manual and the serial number plate.
- The electrical system of this appliance can only be used safely when it is correctly connected to an efficient earthing system in compliance with current safety standards.
- When the appliance is in use, the heating elements and some parts of the oven door become extremely hot. Make sure you don't touch them and keep children well away.
The following items are potentially dangerous, and therefore appropriate measures must be taken to prevent children and the disabled from coming into contact with them:
- Controls and the appliance in general;
- Packaging (bags, polystyrene, nails, etc.);
- The appliance itself, immediately after use of the oven or grill due to the heat generated;
- The appliance itself, when no longer in use (potentially dangerous parts must be made safe).
Avoid the following:
- Touching the appliance with wet parts of the body;
- Using the appliance when barefoot;
- Pulling on the appliance or the supply cable to unplug it from the electrical outlet;
- Improper or dangerous operations;
- Obstructing the ventilation or heat dissipation slots;
- Allowing power supply cables of small appliances to come into contact with the hot parts of the appliance;
- Exposing the appliance to atmospheric agents such as rain, or sunlight;
- Using the oven for storage purposes;
-
Using flammable liquids near the appliance;
-
Using adapters, multiple sockets and/or extension leads;
- Attempting to install or repair the appliance without the assistance of qualified personnel.
Qualified personnel must be contacted in the following cases:
- Installation (following the manufacturer's instructions);
- When in doubt about operating the appliance;
- Replacing the electrical socket when it is not compatible with the appliance plug.
Service Centres authorised by the manufacturer must be contacted in the following cases:
- If in doubt about the soundness of the appliance after removing it from its packaging;
- If the power supply cable has been damaged or needs to be replaced;
- If the appliance breaks down or functions poorly; ask for original spare parts.
It is a good idea to do the following:
- Only use the appliance to cook food and nothing else;
- Check the soundness of the appliance after it has been unpacked;
- Disconnect the appliance from the electrical mains if it is not functioning properly and before cleaning or performing maintenance;
- When left unused, unplug the appliance form the electricity mains and turn off the gas tap (if foreseen);
- Use oven gloves to place cookware in the oven or when removing it;
- Always grip the oven door handle in the centre as the extremities of the same may be hot due to any hot air leaks;
- Make sure the knobs are in the “•”/“o” position when the appliance is not in use.
- Cut the power supply cable after disconnecting it from the mains when you decide not to use the appliance any longer.
- The manufacturer may not be held responsible for any damage due to: incorrect installation, improper, incorrect and irrational use.
Instalation
The appliance must be installed only by a qualified person in compliance with the instructions provided.
The manufacturer declines all responsibility for improper installation which may harm persons and animals and damage property.
Important: The power supply to the appliance must be cut off before any adjustments or maintenance work is done on it.
Installation of Built-in Ovens
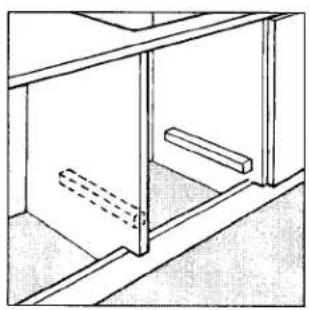
In order to ensure that the built-in appliance functions properly, the cabinet containing it must be appropriate. The figure below gives the dimensions of the cut-out for installation under the counter or in a wall cabinet unit.
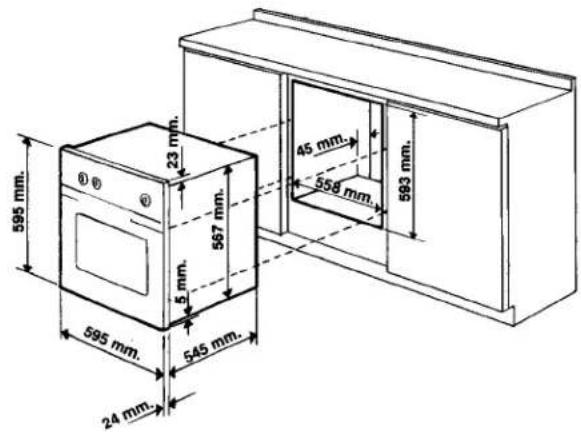
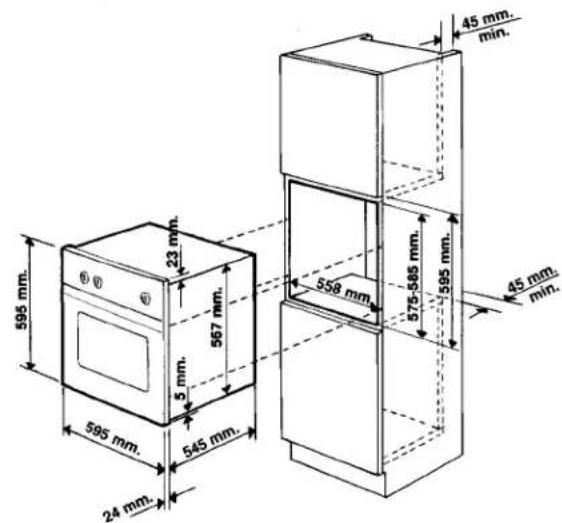
In order to ensure adequate ventilation, the back panel of the cabinet unit must be removed. Installing the oven so that it rests on two strips of wood is preferable. If the oven rests on a continuous, flat surface, there must be an aperture of at least 45 x 560 mm.
natural_image
Technical line drawing of a cabinet or shelf with two horizontal bars and dashed lines indicating internal structure (no text or symbols)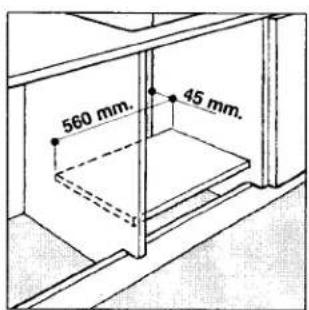
The panels of the adjacent cabinets must be made of heat-resistant material. In particular, cabinets with a veneer exterior must be assembled with glues which can withstand temperatures of up to 100 °C.
In compliance with current safety standards, contact with the electrical parts of the oven must not be possible once it has been installed.
All parts which ensure the safe operation of the appliance must be removable only with the aid of a tool.
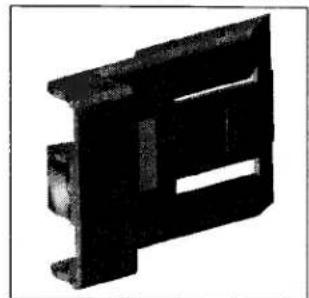
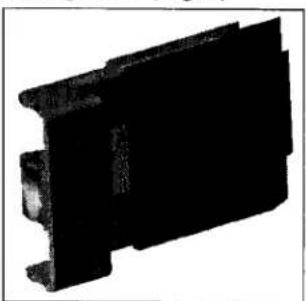
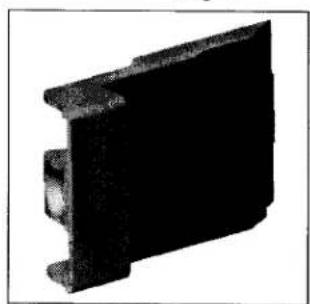
For the correct centring of your appliance, position the 4 tabs on the sides of the oven in correspondence with the 4 holes on the perimeter of the frame. In particular, if the cabinet side panel:
- is 20 mm thick: the removable part of the tab must be removed (Fig. A);
- is 18 mm thick: use the first groove, which is factory-set (Fig. B);
• is 16 mm thick: use the second groove (Fig.C)
natural_image
Close-up of a black plastic mechanical component with cutouts (no visible text or symbols)Fig. A
natural_image
Black plastic mechanical component with cutouts and mounting holes (no text or symbols visible)Fig. B
natural_image
Close-up of a black mechanical component with a flanged end (no visible text or symbols)Fig. C
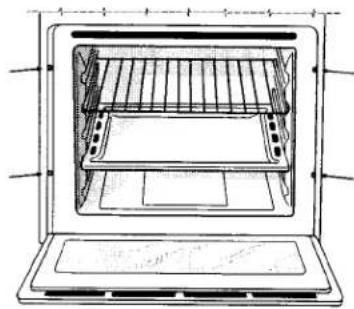
To fasten the oven to the cabinet, open the door of the oven and attach it by inserting the 4 wooden screws into the 4 holes located on the perimeter of the frame.
natural_image
Line drawing of an open oven with internal grating and ventilation slots (no text or symbols)Electrical connection
Ovens with a three-pole power supply cable are designed to operate with alternated current at the supply frequency and voltage indicated on the data plate (at the bottom of the oven dashboard). The earthing conductor of the cable is the yellow-green conductor.
Two types of connection are provided:
Connection n° 1
Connecting the power supply cable to the mains.
Fit a normalized plug to the cable, which corresponds to the load indicated on the data plate; if the cooker is connected directly to the mains, an omnipolar circuit-breaker with a minimum opening of 3 mm between the contacts, suitable for the load indicated and complying with current directives, must be installed between the appliance and the mains (the earthing wire must not be interrupted by the circuit-breaker). The power supply cable must be positioned so that it does not exceed room temperature by 50°C at any point of its length. Before making the connection check that:
- the circuit breakers or fuses of the home system can support appliance load (see data plate);
- the power supply system has an efficient earthing connection which complies with the provisions of current regulations and the law;
- there is easy access to the socket or the omnipolar circuit-breaker once the cooker has been installed.
N.B.: do not use reducers, adapters or shunts as these could cause heating or burning.
Connection n° 2
Disposing of the plug.
WARNING: THIS APPLIANCE MUST BE EARTHED.
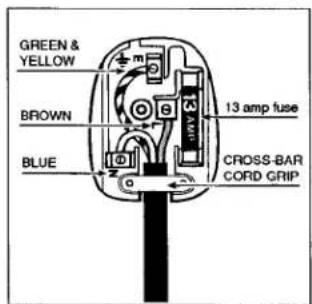
Ensure that before disposing of the plug itself, you make the pins unusable so that it cannot be accidentally inserted into a socket. Instructions for connecting cable to an alternative plug:
Important: the wires in the mains lead are coloured in accordance with the following code:
| Green & Yellow | -Earth |
| Blue | -Neutral |
| Brown | -Live |
If the colours of the wires in the mains lead do not correspond with the coloured markings identifying the terminals in your plug, proceed as follows.
Connect Green & Yellow wire to terminal marked "E" or ÷ or coloured Green or Green & Yellow.
Connect Brown wire to terminal marked "L" or coloured Red. Connect Blue wire to terminal marked "N" or coloured Black. If a 13 amp plug (BS 1363) is used it must be fitted with a 13 amp fuse.
A 15 amp plug must be protected by a 15 amp fuse, either in the plug or adaptor or at the distribution board. If you are in any doubt about the electrical supply to your machine, consult a qualified electrician before use.
How to connect an alternative plug
The wires in this mains lead are coloured in accordance with the following code:
| BLUE | “NEUTRAL” (N) |
| BROWN | “LIVE” (L) |
| GREEN AND YELLOW | “EARTH” (E) |
Disposing of the appliance
When disposing of the appliance please remove the plug by cutting the mains cable as close as possible to the plug body and dispose of it as described above.
The plug and socket must be easily accessible.
Technical Specifications
Inner dimensions of the oven:
Width 43.5 cm
Depth 40 cm
Height 32 cm
Inner Volume of the Oven:
56 litres
Consumption (fan assisted models):
to reach 200°C: kWh 0,40
to maintain 200°C for an hour: kWh 0,95
total consumption: kWh 1,35
Voltage and Frequency of Power Supply:
230-240V \~ 50Hz 2250-2400W
This appliance conforms with the following European Economic Community directives:
- 73/23/EEC of 19/02/73 (Low Voltage) and subsequent modifications;
- 89/336/EEC of 03/05/89 (Electromagnetic Compatibility) and subsequent modifications;
- 93/68/EEC of 22/07/93 and subsequent modifications.
Merloni Elettrodomestici spa
viale Aristide Merloni, 47 - 60044 Fabriano
tel. 0732/6611 - telex 560196 - fax 0732/662954
www.Merloni.com
- Close-up view
- How to use your oven
- Thermostatically controlled oven (Fan Assisted Mode)
- Grill
- The oven light
- Cooling ventilation
- Clock with Country Style timer
- How to reset the correct time
- Timer Feature
- How to set the timer
- Electronic Cooking Programmer
- How to Reset the Digital Clock
- Manual Operation Mode for the Oven
- Delayed Start Time with Preset Cooking Length
- Immediate Start Time with Preset Cooking Length
- Cancelling a Preset Cooking Time
- Changing and Cancelling Settings
- How to Keep Your Oven in Shape
- Replacing the Oven Lamp
- Practical Cooking Advice
- Preheating
- Cooking Fish and Meat
- Baking Cakes
- Pastry is too dry
- Pastry dropped
- Pastry is too dark on top
- Cooked well on the inside but sticky on the outside
- The pastry sticks to the pan
- Using the Grill
- To operate the grill
- Safety Is A Good Habit To Get Into
- To maintain the efficiency and safety of this appliance, we recommend that you do the following:
- The following items are potentially dangerous, and therefore appropriate measures must be taken to prevent children and the disabled from coming into contact with them:
- Avoid the following:
- Qualified personnel must be contacted in the following cases:
- Service Centres authorised by the manufacturer must be contacted in the following cases:
- It is a good idea to do the following:
- Instalation
- Installation of Built-in Ovens
- Electrical connection
- Two types of connection are provided:
- Connection n° 1
- Connecting the power supply cable to the mains.
- Connection n° 2
- WARNING: THIS APPLIANCE MUST BE EARTHED.
- How to connect an alternative plug
- Disposing of the appliance
- Technical Specifications
- This appliance conforms with the following European Economic Community directives:
Marke : Ariston Thermo
Modell : FB36GB
Kategorie : Ofen