
CP-720 - Telefon Premier - Kostenlose Bedienungsanleitung
Finden Sie kostenlos die Bedienungsanleitung des Geräts CP-720 Premier als PDF.


Benutzerfragen zu CP-720 Premier
0 Frage zu diesem Gerät. Beantworten Sie die, die Sie kennen, oder stellen Sie Ihre eigene.
Eine neue Frage zu diesem Gerät stellen
Laden Sie die Anleitung für Ihr Telefon kostenlos im PDF-Format! Finden Sie Ihr Handbuch CP-720 - Premier und nehmen Sie Ihr elektronisches Gerät wieder in die Hand. Auf dieser Seite sind alle Dokumente veröffentlicht, die für die Verwendung Ihres Geräts notwendig sind. CP-720 von der Marke Premier.
BEDIENUNGSANLEITUNG CP-720 Premier
Premier®
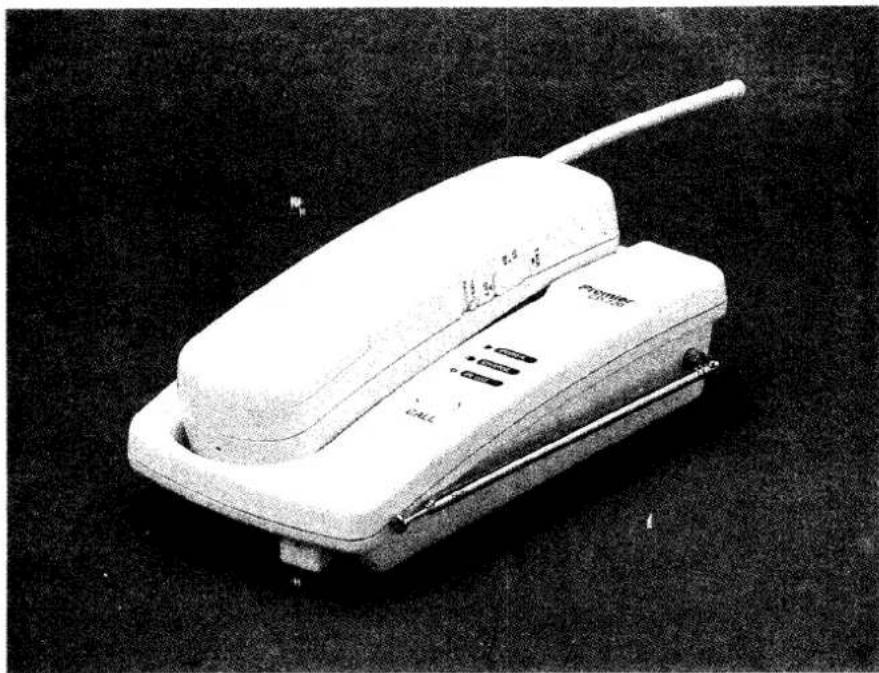
natural_image
Black-and-white photo of a vintage telephone receiver device with a white body and antenna, no visible text or symbols on the device itself.CORDLESS PHONE
MODEL NO.: CP-720

CAUTION
RISK OF ELECTRIC SHOCK, DO NOT OPEN

CAUTION: TO REDUCE THE RISK OF ELECTRIC SHOCK.
DO NOT REMOVE COVER (OR BACK).
NO USER SERVICEABLE PARTS INSIDE.
REFER SERVICING TO QUALIFIED SERVICE PERSONNEL.

The lightning flash with arrowhead symbol, within an equilateral triangle, is intended to alert the user to the presence of uninsulated "dangerous voltage" within the product's enclosure that may be of sufficient magnitude to constitute a risk of electric shock to persons.

The exclamation point within an equilateral triangle is intended to alert the user to the presence of important operating and maintenance (servicing) instructions in the literature, accompanying the appliance.
The model number of this product may be found on the back of the unit; and the serial number on the label affixed to the back of the unit.
You should note the model and serial numbers of this unit in the space provided, and retain this booklet as a permanent record of your purchase to aid in identification in the event of theft.
MODEL NUMBER ____ SERIAL NUMBER ____
WARNING : TO PREVENT FIRE OR SHOCK HAZARD, DO NOT EXPOSE THIS PRODUCT TO RAIN OR MOISTURE.
Dear Customer:
CONGRATULATIONS!
You have purchased one of the most useful and exciting personal communication instruments you may ever own. The restrictions of mobility of a phone with a connecting cord are gone forever. You'll be able to place and receive phone calls anywhere within a large Radius of your home, although this range varies with environmental conditions, building construction, location, etc. Mobility is extended beyond the range of any phone having even the longest coil cord as standard equipment.
Running to a ringing phone from outdoors, hoping to pick up the receiver in time is a thing of the past. You'll place and receive calls instantly, without the inconvenience or the limitations of a standard coil cord phone.
Follow the instructions in this booklet carefully so that you will enjoy the benefits of your telephone system. We hope you enjoy many years of new telephone convenience.
IMPORTANT
BEFORE INSTALLING THIS TELEPHONE IN YOUR HOME PLEASE READ THE FOLLOWING INFORMATION CAREFULLY AND COMPLETELY.
Your CP-720 has both pulse(rotary type) and true touch-tone dialing capability. It can be used with all independent long distance services such as sprint. MCI and others. Although these services require touch-tone dialing, with the CP-720 switchable phone you can still subscribe to and use them to reduce your long distance phone bills even if you have only pulse(rotary type) dialing in your home, see the paragraph titled "OPERATION" for instructions on how to use the switchable feature if this is your situation.
CAUTION: Since handset antenna and battery pack unit in the phone are "consumer replaceable items" please contact our service department before sending entire set for repairs.
UNPACKING YOUR PHONE
A. Carefully unpack your base unit and place on a convenient table or shelf near your present regular corded phone "plug-in" outlet.(If you do not have regular corded phone "plug-in" at present, your telephone company will install the required cabel, outlet box and connections upon request. An installation fee is usually charged for this service.)
The telephone company is authorized to charge for installation of such jacks; however, you will find that such charges are nominal.
B. Plug the AC adaptor into 220V. Unless otherwise noted, your unit is designed to operate on standard power outlet.
C. Unpack the cordless handset unit and place it in the well on the base unit. Notice how the handset locks into place, being gripped by the two clamps near the top of the well. Your handset unit is now ready for charging of the built-in rechargeable battery in the handset.
BEFORE USING YOUR CORDLESS TELEPHONE THE FIRST TIME INSERT THE CORDLESS HANDSET UNIT INTO THE CHARGING WELL ON THE BASE UNIT AND CHARGE THE BATTERIES FOR A MINIMUM OF 12 HOURS.
D. As you plug into the AC outlet, notice the indicator lights on the base unit. The Charge indicator tells you that the handset's battery in being charged. The cordless handset unit is powered by built-in, heavy-duty, nickelcadmium rechargeable batteries. The batteries are recharged automatically when the handset unit is placed in the well of the base unit. The Power indicator tells you that all power is applied to the base unit and all circuits are ready to receive or place a call.
The maximum service range from the base unit is affected by the location of the base unit. Principally, the maximum range would be obtained by locating the base unit in the highest living area of the house
Range is also affected by the direction in which the cordless handset unit is facing. By slightly changing the position of the handset unit, you can considerably improve the reception of the built-in antenna and thus improve your range.
The range of your CP-720 will vary according to environment factors such as the construction of your house, type of house wire used, etc. Some experimentation may be needed to find the best location for your base unit. We suggest that you try several locations to determine which will provide the best range.
THE TOUCH-TONE/PULSE TELEPHONE SYSTEM
The telephone company uses two basic forms of operation: pulse and tone. The pulse system in available everywhere in the United States and use the familiar rotary dial phone. Tone systems are available in some areas of your country and use touch (push-button) phones.
Your new Cordless telephone has both pulse(rotary type) and True Touch Tone dialing capability
CONTROLS AND INDICATORS
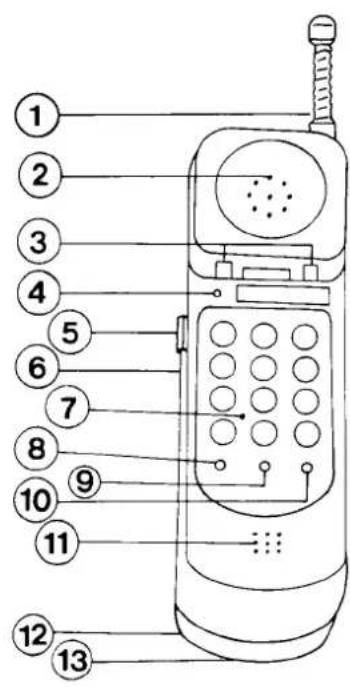
text_image
Diagram of a classic mobile phone with numbered parts for identificationHAND SET
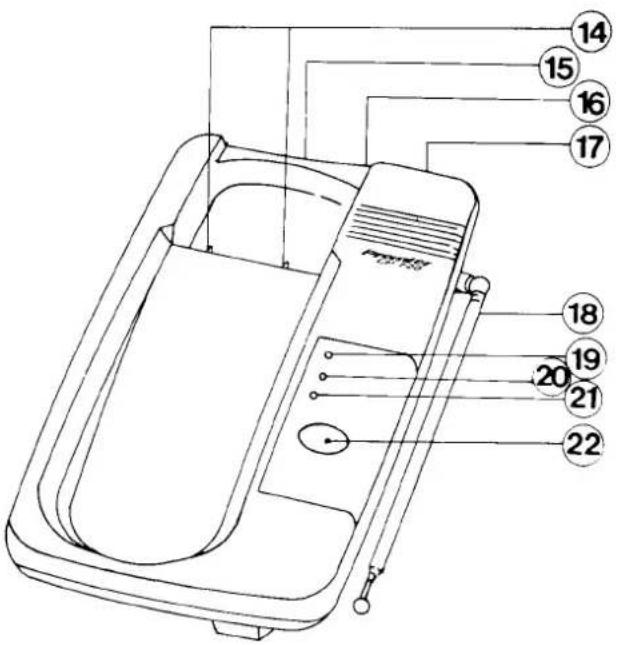
text_image
Technical diagram of a refrigerator with numbered parts labeled for identificationBASE UNIT
HANDSET
-
REPLACEABLE ANTENNA
-
SPEAKER
-
BATTERY CHARGE CONTACTS
-
BATTERY LOW INDICATOR
-
TALK/ST/BY./OFF SWITCH
-
TONE/PULSE SWITCH
-
KEY BOARD
-
MUTE BUTTON
-
FLASH BUTTON
-
REDIAL BUTTON
-
MICROPHONE
-
REPLACEABLE BATTERY
-
SEPARATE RINGER BUZZER
BASE UNIT
-
RECHARGING CONTACTS
-
DC JACK
-
TEL LINE JACK
-
AUXILIARY EXTERNAL JACK
-
ANTENNA
-
POWER INDICATOR
-
CHARGE INDICATOR
-
IN USE INDICATOR
-
CALL BUTTON
Installation
-
Connect the AC adaptor
-
Connect the modular telephone plug of the base unit to a standard modular telephone extension outlet.
-
The maximum service range from the base unit is affected by the location of the base unit. Principally the maximum range would be obtained by location the base unit in the highest living area of the house.
WARNING: TO PREVENT FIRE OR SHOCK HAZARD, DO NOT EXPOSE THIS PRODUCT TO RAIN OR ANY TYPE OF MOISTURE.
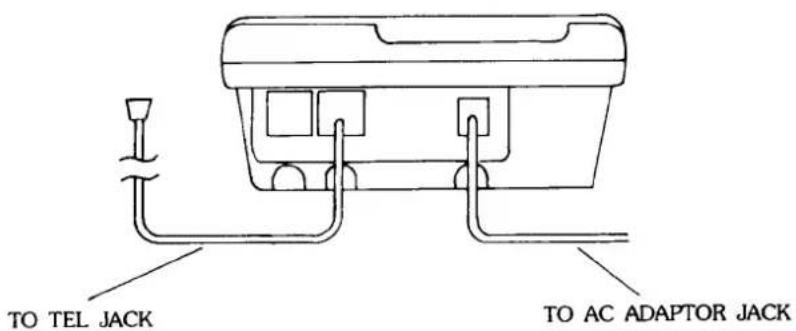
text_image
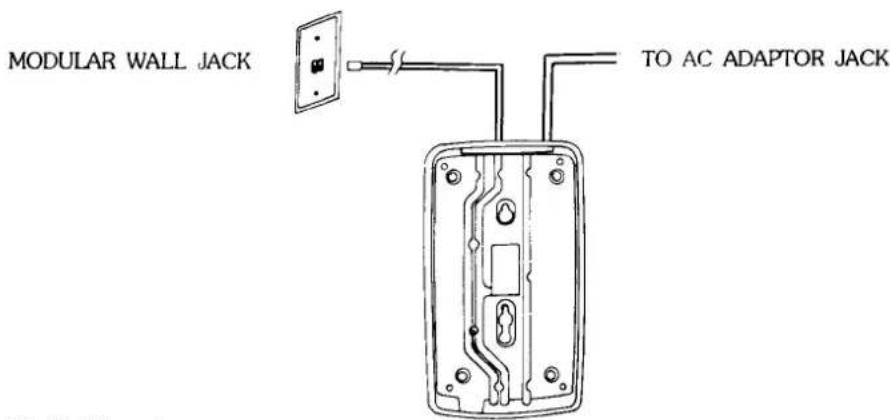
TO TEL JACK TO AC ADAPTOR JACKDesk Top Mount
- Set on desk top and plug the long straight cord into jack on rear of base.
- Insert opposite end of straight cord into the modular telephone outlet.
text_image
MODULAR WALL JACK TO AC ADAPTOR JACKWall Mount
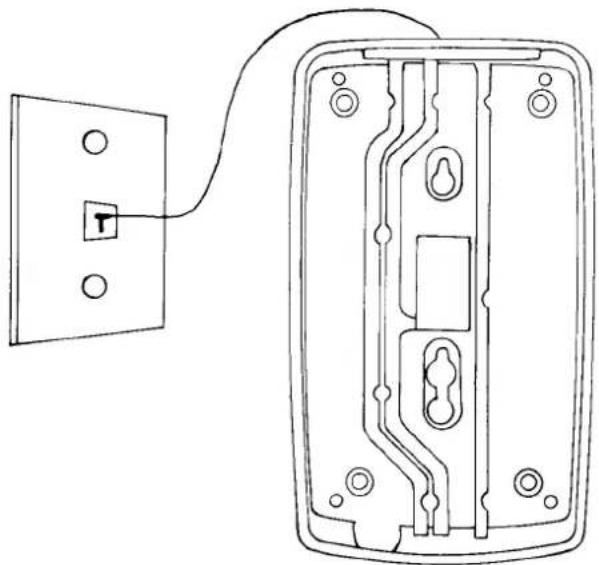
- Locate the supplied screws. If your home is equipped with a standard wall mounting plate it is not necessary to use the template and screws. Refer to step 4.
natural_image
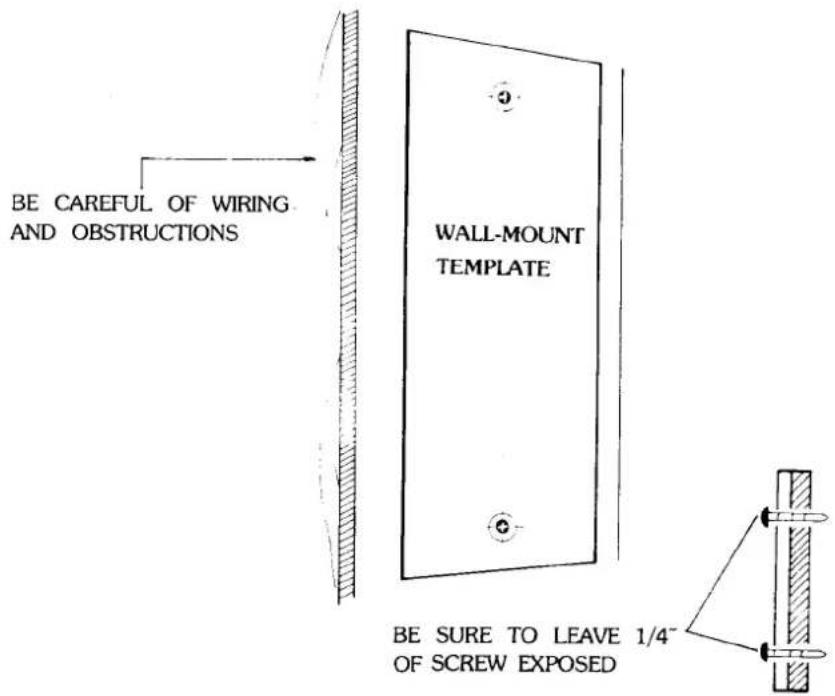
Line drawing of a wall-mounted device with internal circuitry and mounting holes, connected to a wall-mounted switch (no text or symbols)- Place template on an area of the wall which is free of obstructions and wiring.
text_image
BE CAREFUL OF WIRING AND OBSTRUCTIONS WALL-MOUNT TEMPLATE BE SURE TO LEAVE 1/4" OF SCREW EXPOSED- Mark the wall using the template. Attach the screw to the wall leaving 1/4" of screws exposed.
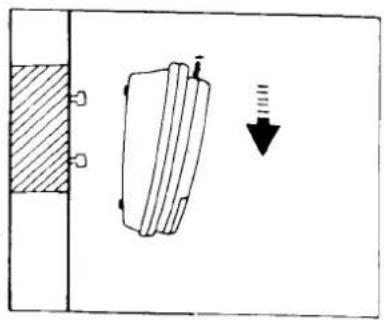
- Align the two slots in the bottom of phone base with wall plate or wall screws. If the wall plate is used, be sure to use the supplied 7" wall cord in place of longer straight cord.
- Slide the telephone base over the screws. If the wall screws do not hold base firmly, it may be necessary to adjust the screws to fit it.
natural_image
Diagram showing a mechanical component with a downward arrow indicating force or direction (no text or symbols present)Handset Antenna & Battery Replacement
■ How TO Remove The Battery
- Be sure the function selector is set to 'OFF'
- Remove the battery compartment cover.
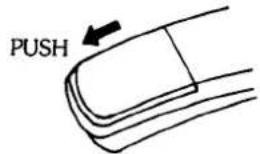
text_image
PUSH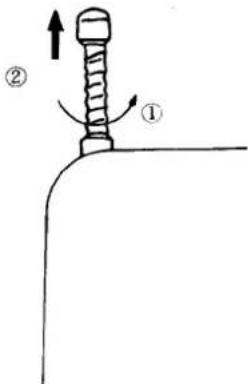
text_image
Diagram showing a mechanical or electrical component with labeled parts ① and ②, indicating directional movement or force direction.- Disconnect the battery.
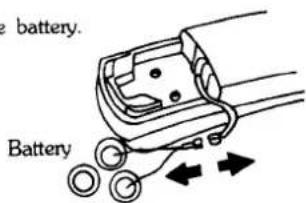
text_image
battery. Battery※ How to install the battery follow the opposite procedure of above.
■ How To Remove the Hadset Antenna
- Turn the antenna counter clockwise until you feel the antenna screw is released from the nut inside.
- Pull out the antenna straight out of the hole.
Rechargeable Batteries
Your new cordless telephone is supplied complete with rechargeable nickel cadmium batteries. To obtain the maximum useful life from these batteries, please follow these directions: Before using your cordless telephone the first time, insert the remote unit into the charging well of the base unit and charge the batteries for a minimum of 8 hours. In normal use, a fully charged battery pack will last all day. It will typically take 12 hours to bring them back to full charge. The charger circuitry in your base unit will automatically reduce the charging current as the batteries approach full charge so you will cause no harm by leaving the remote unit in the charge for more than 12 hours.
Operating Instructions
Operating your phone is simple and easy after all the steps outlined to this point have been completed. The battery should have a full charge and the base unit must be properly connected to the phone line as well as to the electric wall outlet.
- Extend the base unit antenna to its full length and place it in vertical position.
- Check to see if you are in the operating range by setting the function selector to the TALK position. If you hear a dial tone you are within range and can place or receive calls.
- Place the handset function selector in the STBY position.
Answering an Incoming Call
- When a call is received, the handset will signal you with its tone ringer.
- Place the function selector in the TALK position.
- Use the handset like a regular telephone to carry on your conversation
- To hang up turn the function selector to STBY. The handset is now ready to receive the next call.
Placing an Outgoing Call
- Place the function selector in the TALK position.
- Wait for dial tone to be heard.(If you cannot hear a dial tone, move closer to the base unit. Note that you will not hear a dial tone if someone else is using the regular phone, but you will hear their conversation. Should this happen, Wait a few minutes and try again.)
- Proceed to dial the desired number just as you would with any telephone.
- Complete your call and conversation as with any telephone.
- When you are through with the call, return the function selector to the STBY position.
Paging
If you want to call the person with the Hadnset from the Base Unit in the house or office, press the Call Bauton. This will cause the Handset to ring and it can then be answered as described above. You can now talk to that person using an extension phone.
Using the Redial
- Switch the handset to TALK.
- Press the redial button on the keyboard, and the last telephone number you dialed will automatically redial itself without further operator action if the unit has only been turned to STBY between calls.
Using the Flash(Reset)
When busy signal is received, and you wish to radial, use this FLASH button.
Using the Mute
When privacy is required during phone conversation, press the mute button to prevent distant party from overhearing background conversation. Release the mute button when normal conversation is desired.
Interference
The use of different channels plus different guard tones will minimize interference from other radio equipment and prevent unauthorized use of your telephone. In a typical home, there are many sources of interference. Light dimmers, fluorescent lights, motors such as those in kitchen appliance and vacuum cleaners; etc., all generate radio energy. The radio energy as well as electrical storms can appear as noise on the remote unit. It also can cause a clicking sound to be heard from the base unit.
While some noise and clicking is normal, it typically will occur infrequently or be at an acceptable level. If the noise or clicking continues and is not acceptable. We suggest that you first look around your home or office to see what noise/interference generating appliances may be in use. In the unlikely event that you experience continuing interference, you may want to contact your authorized PREMIER cordless telephone dealer.
Trouble Shooting
■ However, if you do encounter any problem we recommend you check the following.
- Unit does not work.
a. Are the AC adaptor cord and telephone cables properly connected?
b. Is the power on?
c. Is the telescopic antenna fully extended?
d. Do the batteries need recharging?
- Service range is shortened: Recharge the remote unit batteries.
- Received signal is not heard: Most likely, you are outside the normal service range.
■ Static during conversation :
- You may be out of range. Move to an area closer to your base unit.(range can vary depending upon weather an environmental conditions)
- Recharge the batteries.
- Handset is in a location of high interference.(TV, fluorescent light, etc.)
- Try a different AC power outlet for your base unit.
- Check to see if the static can be heard on your conventional phone: if so, the problem is in the telephone line, not your cordless phone system. If you are outside, be sure you are not under a power company line.
CAUTION
This product is an electrical device and can be hazardous if immersed in water. To avoid the possibility of electrical shock, do not use it while you are in the bathtub or shower, or when you are wet. If you accidentally drop it in water, unplug it first then retrieve it by pulling on its cord.