224 - Lautsprecher DLS - Kostenlose Bedienungsanleitung
Finden Sie kostenlos die Bedienungsanleitung des Geräts 224 DLS als PDF.


Benutzerfragen zu 224 DLS
0 Frage zu diesem Gerät. Beantworten Sie die, die Sie kennen, oder stellen Sie Ihre eigene.
Eine neue Frage zu diesem Gerät stellen
Laden Sie die Anleitung für Ihr Lautsprecher kostenlos im PDF-Format! Finden Sie Ihr Handbuch 224 - DLS und nehmen Sie Ihr elektronisches Gerät wieder in die Hand. Auf dieser Seite sind alle Dokumente veröffentlicht, die für die Verwendung Ihres Geräts notwendig sind. 224 von der Marke DLS.
BEDIENUNGSANLEITUNG 224 DLS
WELCOME
Thank you for buying a DLS Performance series speaker.
This manual will show you how to do a correct installation. Please read the entire manual before beginning the installation.
Install the speakers yourself if you feel confident with our instructions and if you have the proper tools. However if you feel unsure, turn over the installation job to someone better suited to it.
INSTALLATION
Mount the speakers in the door or in the dashboard of your car. Normally they will fit in the factory pre-made mounting holes. If you want an improved sound reinforce with a baffle of MDF-board or similar. An installation high up on the door side is to be preferred. An alternative installation is in so called kick panels down on each side of the floor with the speakers facing up- and inwards towards the listener.
For two- or three way speaker systems with separate tweeter an installation of the tweeter close to the bass/mid element is to be preferred. The tweeter can also be installed on the dash-board, or recessed in the door with the accessories in the tweeter box.
It is important to fasten the speakers properly in order to avoid bad sound or rattling.
For speakers with separate filters in boxes or similar it is vital that they are attached properly to the interior of the vehicle to avoid rattling. Don't place them close to the internal wiring of the car, this can cause interference.
Avoid to install filter boxes in the door sides because they can easily be broken because of rattling or moisture. Make sure the cables don't get jammed causing a short circuit to ground. This can damage the output circuits of the head unit or amplifier.
All models except for 257 and 457 comes with grilles.
The tweeter installation for kits with separate tweeter is described on last page, or in the instruction sheet coming with the tweeters.
SPEAKER ENCLOSURES
If you want to install the speaker in an enclosure the normal size for a sealed type is:
4" (10 cm) speakers : 2-4 liters
5,25" (13 cm) speakers : 6-8 liters
6,5" (16,5 cm) speakers : 10-12 liters
8" (20 cm) speakers : 15-20 liters
6 x 9" speakers : 15-20 liters
These volumes are only a guideline, they can vary between different speakers. Contact your local DLS dealer for more exact information about your specific speaker.
SPEAKERS 124, 125, 126 & 1269
DLS 124, 125 & 126 & 1269 are coaxial speaker with integrated filter.
COAXIAL SPEAKERS 224, 225, 226, 257, 269 & 960
The 224, 269 and 960 models have an integrated tweeter filter. DLS 225, 226 and 257 have a separate cable filter wrapped in plastic cover. Inside the cover there is both a lowpass filter for the woofer and a highpass filter for the tweeter. On next page you can see how to connect the filter.
The filters must be used, if you connect without them the sound becomes bad and you will destroy the tweeter.
COAXIAL SPEAKERS 424, 425, 426, 457, 428 & 962.
These speakers have a separate filter box with lowpass filter for the woofer and a highpass filter for the tweeter. The tweeter level can be adjusted inside the filter box in two steps, high and low. Install the filter box in a dry place. On next page you can see how to connect the filter.
The filters must be used, if you connect without them the sound becomes bad and you will destroy the tweeter.
TWO-WAY SYSTEMS B5A & B6A
These systems have a separate tweeter. The filters are separate lowpass and highpass in small plastic boxes with selectable tweeter level in two steps. The bass/mid speaker driver uses the new DLS EFR technology for improved sound quality.
On next page you can see how to connect the filter.
The filters must be used, if you connect without them the sound becomes bad and you will destroy the tweeter.
TWO/THREE-WAY SYSTEMS C4, C5A, C6A & C36
The 2-way systems have a separate tweeter. The filters are separate lowpass and highpass in small plastic boxes with selectable tweeter level in three steps inside. C36 is a 3-way system with a filter box where you can connect a woofer, a midrange speaker and a tweeter. The tweeter level can be adjusted in three steps inside the filter box. On next page you can see how to connect the filter.
The filters must be used, if you connect without them the sound becomes bad and you will destroy the tweeter.
SPEAKER FACTS FOR DLS PERFORMANCE SERIES
| Model | Woofer | Mid | Tweeter | Nom. power | Max power | Sensitivity | Magnet size | Inst. depth | Mounting hole | Crossover |
| 125 | 10 cm / 4" | 16 mm / 0,63" | 50 W | 80 W | 93 dB | 70 mm / 2,75" | 45 mm / 1,7" | 102 mm " 4" | Integrated | |
| 125 | 13 cm / 5,25" | 16 mm / 0,63" | 50 W | 80 W | 92 dB | 70 mm / 2,75" | 50 mm / 1,97" | 120 mm / 4,72" | Integrated | |
| 126 | 16,5 cm / 6,5" | 16 mm / 0,63" | 50 W | 80 W | 92 dB | 80 mm / 3,15" | 28 mm / 2,28" | 145 mm / 5,7" | Integrated | |
| 1269 | 6 x 9" | 50 mm / 2" | 60 W | 120 W | 92 dB | 80 mm / 3,15" | 75 mm / 3" | 150x220 mm / 5,9x8,7" | Integrated | |
| 224 | 10 cm / 4" | 16 mm / 0,63" | 50 W | 80 W | 93 dB | 70 mm / 2,75" | 50 mm / 1,97" | 102 mm / 4" | Integrated | |
| 225 | 13 cm / 5,25" | 16 mm / 0,63" | 50 W | 80 W | 92 dB | 80 mm / 3,15" | 54 mm / 2,12" | 120 mm / 4,72" | Integrated | |
| 226 | 16,5 cm / 6,5" | 16 mm / 0,63" | 50 W | 80 W | 92 dB | 80 mm / 3,15" | 52 mm / 2" | 145 mm / 5,7" | Integrated | |
| 269 | 6 x 9" | 50 mm | 16 mm / 0,63" | 80 W | 120 W | 92 dB | 100 mm / 3,94" | 80 mm / 3,15" | 150x220 mm / 5,9x8,7" | Integrated |
| 257 | 5 x 7" | 16 mm / 0,63" | 50 W | 80 W | 92 dB | 80 mm / 3,15" | 60 mm / 2,36" | 130 x 185 mm / 5,1x7,3" | Integrated | |
| 424 | 10 cm / 4" | 20 mm / 0,8" | 50 W | 80 W | 94 dB | 80 mm / 3,15" | 58 mm / 2,28" | 102 mm / 4" | Separate box | |
| 425 | 13 cm / 5,25" | 20 mm / 0,8" | 60 W | 90 W | 93 dB | 90 mm / 3,54" | 61 mm / 2,4" | 117 mm / 4,6" | Separate box | |
| 426 | 16,5 cm / 6,5" | 20 mm / 0,8" | 60 W | 90 W | 94 dB | 100 mm / 4" | 62 mm / 2,44" | 145 mm / 5,7" | Separate box | |
| 428 | 20 cm / 8" | 25 mm / 1" | 80 W | 120 w | 94 dB | 105 mm / 4,1" | 87 mm / 3,43" | 185 mm / 7,282 | Separate box | |
| 457 | 5 x 7" | 20 mm / 0,8" | 60 W | 90 W | 93 dB | 100 mm / 4" | 58 mm / 2,28" | 130 x 185 mm / 5,1x7,3" | Separate box | |
| 960 | 6 x 9" | 50 mm | 20 mm / 0,8" | 80 W | 120 W | 93 dB | 100 mm / 4" | 83 mm / 3,27" | 150x220 mm / 5,9x8,7" | Integrated |
| 962 | 6 x 9" | 25 mm / 0,8" | 80 W | 120 W | 93 dB | 100 mm / 4" | 83 mm / 3,27" | 150x220 mm / 5,9x8,7" | Separate box | |
| B5A* | 13 cm / 5,25" | 16 mm / 0,63" | 50 W | 80 W | 91 dB | 80 mm / 3,15" | 63 mm / 2,48" | 117 mm / 4,6" | Separate LP/HP | |
| B6A* | 16,5 cm / 6,5" | 16 mm / 0,63" | 50 W | 80 W | 91 dB | 80 mm / 3,15" | 63 mm / 2,48" | 146 mm / 5,75" | Separate LP/HP | |
| C4 | 10 cm / 4" | 20 mm / 0,8" | 50 W | 80 W | 92 dB | 70 mm / 2,75" | 58 mm / 2,28" | 102 mm / 4" | Cable filter | |
| C5A | 13 cm / 5,25" | 20 mm / 0,8" | 50 W | 80 W | 93 dB | 80 mm / 3,15" | 60 mm / 2,36" | 120 mm / 4,72" | Separate boxes | |
| C6A | 16,5 cm / 6,5" | 20 mm / 0,8" | 60 W | 90 W | 93 dB | 80 mm / 3,15" | 63 mm / 2,48" | 156 mm / 5,75" | Separate boxes | |
| C36 | 16,5 cm / 6,5" | 4" | 20 mm / 0,8" | 60 W | 90 W | 93 dB | 80 / 70 mm | 63 / 58 mm | 146 / 102 mm | Separate boxes |
* Speakers using the DLS EFR technology for improved sound quality.
RUNNING-IN PERIOD
Allow the speakers to play for at least 15-20 hours. After this time the performance is correct.
SPEAKER PHASING
To be sure to have the correct speaker polarity (phase) you can check this by using a 1,5 Volt battery.
Connect a cable from the battery plus-pole to the speaker plus, and a cable from the battery minus to the speaker minus.
If the speakers are correctly connected the speaker cone should move outwards on both right and left channel.
This check must be made on the cables going from the speakers, to the output terminals of your car stereo or amplifier.
CONNECTION OF SPEAKERS
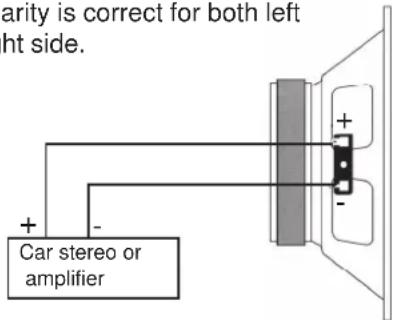
For speakers with integrated filters you just connect like this. Make sure the polarity is correct for both left and right side.
text_image
arity is correct for both left ht side. + - Car stereo or amplifierFILTER/CROSSOVER INSTALLATIONS
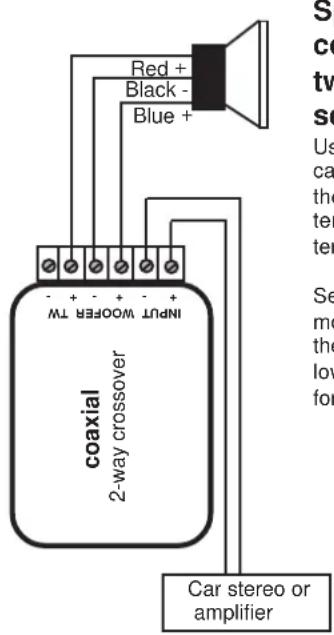
Filter installation and connection of coaxial speakers 424, 425, 426 and 457
text_image
Red + Black - Blue + Coaxial 2-way crossover INPUT WOOFER TW Car stereo or amplifierSpeaker connection and tweeter level select:
Use the red, blue and black cables to connect between the filter box and speaker terminal. Note the speaker terminal colour marking.
Select tweeter level by moving the jumper inside the filter box between high / low. Make your own tests for best result.
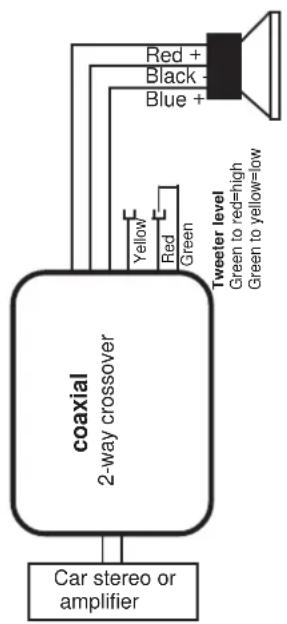
Filter installation and connection of coaxial speakers 962 and 428
text_image
Red + Black - Blue + coaxial 2-way crossover Yellow Red Green Tweeter level Green to red=high Green to yellow=low Car stereo or amplifierOn the cable filter box without screw terminals the level select is made on the outside by connecting the green cable to either the red or yellow one coming out from the box.
Tweeter level select: High level: Connect green and red wire.
Low level: Connect green and yellow wire.
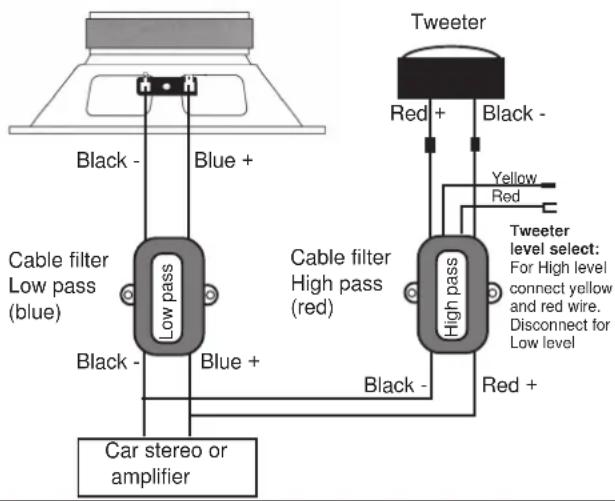
Filter installation B5A and B6A
text_image
Black - Blue + Cable filter Low pass (blue) Black - Blue + Car stereo or amplifier Tweeter Red + Black - Yellow Red + Cable filter High pass (red) High pass Black - Red + Tweeter level select: For High level connect yellow and red wire. Disconnect for Low levelFilter installation C5A
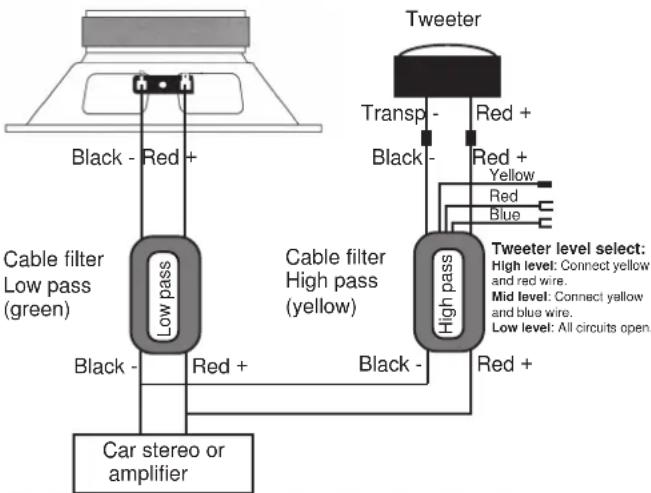
flowchart
graph TD
    A["Car stereo or amplifier"] --> B["Cable filter Low pass (green)"]
    B --> C["Black - Red +"]
    B --> D["Black - Red +"]
    B --> E["Black - Red +"]
    F["Cable filter High pass (yellow)"] --> G["Cable filter Low pass (green)"]
    G --> H["Black - Red +"]
    G --> I["Black - Red +"]
    J["Tweeter"] --> K["Transp - Red +"]
    J --> L["Transp - Black -"]
    J --> M["Red + Yellow"]
    J --> N["Red + Blue"]
    J --> O["Tweeter level select: High level: Connect yellow and red wire. Mid level: Connect yellow and blue wire. Low level: All circuits open."]
Filter installation C4
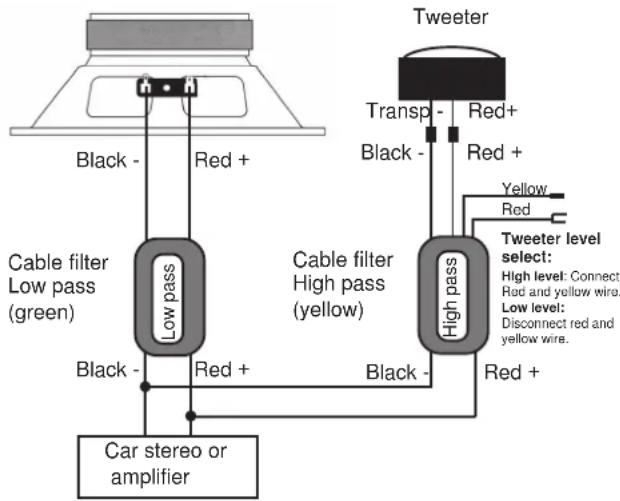
flowchart
graph TD
    A["Speaker"] -->|Black - Red +| B["Cable filter Low pass (green)"]
    B --> C["Low pass"]
    C --> D["Car stereo or amplifier"]
    E["Tweeter"] -->|Transp - Red+| F["Cable filter High pass (yellow)"]
    F --> G["High pass"]
    G --> H["Tweeter level select: High level: Connect Red and yellow wire. Low level: Disconnect red and yellow wire."]
    G --> I["Red +"]
    G --> J["Red -"]
    G --> K["Black -"]
    G --> L["Black -"]
    G --> M["Red +"]
Filter installation C6A
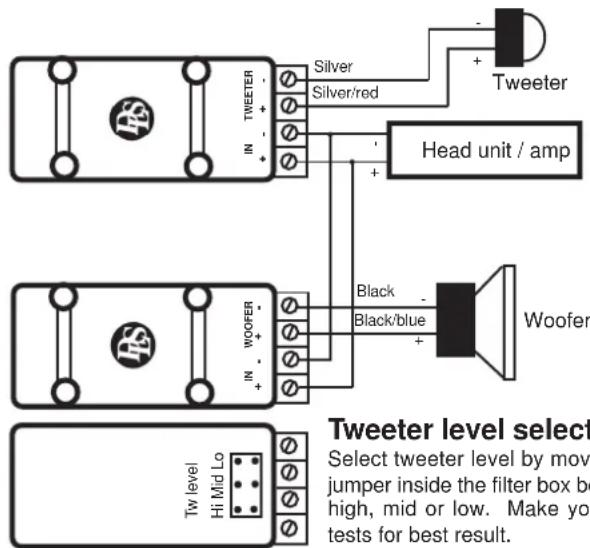
text_image
Tweeter level select Select tweeter level by mov jumper inside the filter box be high, mid or low. Make yo tests for best result. Head unit / amp Woofer Silver Silver/red Black Black/blue Tw level Hi Mid LoFilter installation and connection of C36
CONNECT/DISCONNECT THE MIDBASS, JUMPER J1:
If you want to run the midbass driver with an active crossover using a separate amplifier, and run the midrange and tweeter through the passive filter box, you must move the jumper J1 to position OUT. The normal position for this jumper is IN.
TWEETER LEVEL SELECT, JUMPER J2:
The tweeter level can be selected in three step by moving jumper J2 between 0, -2dB or -4dB. The lowest tweeter level is achieved in the -4dB position.
Filter installation 225, 226 and 257
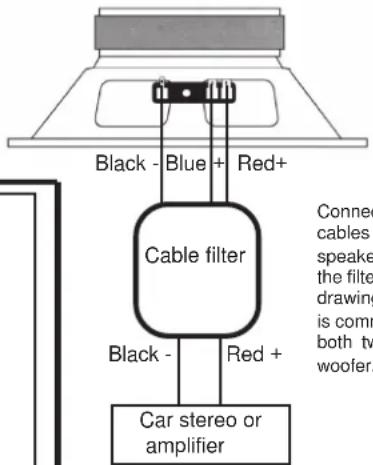
text_image
Black - Blue + Red+ Cable filter Black - Red + Car stereo or amplifier Connect cables speake the filter drawing is com both two woofer.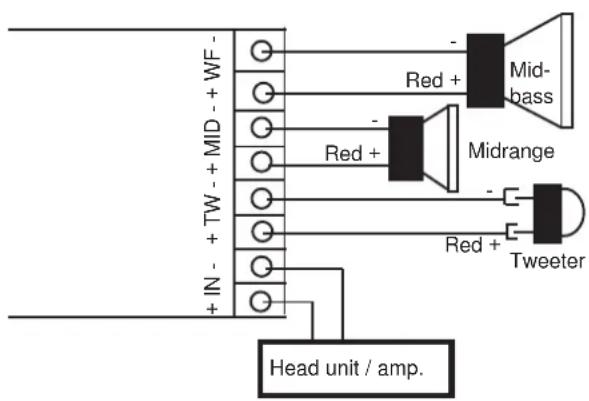
text_image
+IN - +TW - + MID - + WF - Red + Red + Mid- Mid-bass Midrange Red + Tweeter Head unit / amp.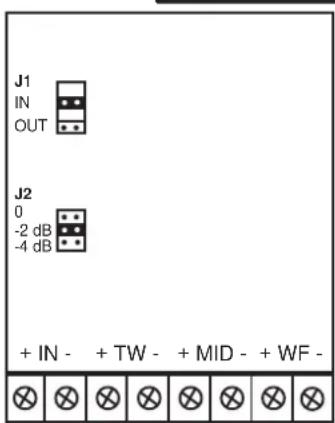
text_image
J1 IN OUT J2 0 -2 dB -4 dB + IN - + TW - + MID - + WF -Connect the three cables from the speaker terminals to the filter according to drawing. Black cable is common minus for both tweeter and woofer.
TWEETER INSTALLATION T20
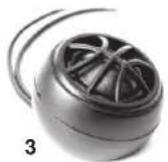
T20 can be mounted on the dashboard with the plain cup (1), the angled cup (2), or recessed in a doorside. These tweeters are included in the C4, C5, C6 and C36 speaker kits.
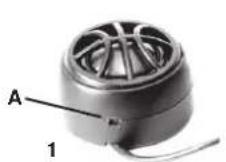
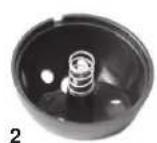
SURFACE MOUNTING:
Plain mounting: Use only the plain mounting cup (1) (it's normally mounted at delivery). Attach to surface with the two screws or double adhesive tape.
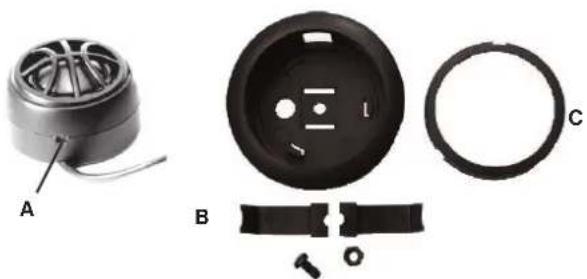
Angled mounting: Remove the plain mounting cup by bending with a small screw driver in the gap (A). Attach the tweeter element to the angled cup (2) as shown on picture 3. Pull the cable through the center hole. Now the tweeter can be mounted in two different angles. Attach to the surface with the two screws or double adhesive tape.
natural_image
Three black plastic components and a circular housing, labeled A, B, and C (no text or symbols on the parts themselves)RECESSED MOUNTING:
Drill a hole in the door side with a diameter of 48 mm /1,89". The installation becomes easier if the door side is removed from the door. Put the two metal wings through the two tracks in the center of the cup, just as the picture shows, and attach them with the M4 screw and nut through the center hole. Put the tweeter element into the cup with the cable going out through the bottom hole. Attach the tweeter element to the plain cup using the mounting ring (C) attached between the cup and the tweeter element. The metal wings (B) should be on the back side of the door panel, holding the cup in place.
FACTS ABOUT DLS T20 TWETER
Size 20 mm / 0.8"
Nom. power (RMS) 50 Watts, 80 Watts max
Freq. range 1,5 kHz-20 kHz
Sensitivity 93 dB
Magnet diameter 20 mm / 0,8" neodymium magnet
Mounting depth 20 mm / 0,8" (recessed mounting)
Mounting hole 48 mm / 1,89" (recessed mounting)
Cone material Silk

DLS Svenska AB
P.O. Box 13029
SE-40251 Göteborg, Sweden
Tel: +46 31 840060
Fax: +46 31 844021
E-mail: info@dls.se
www.dls.se
TWEETER INSTALLATION T16
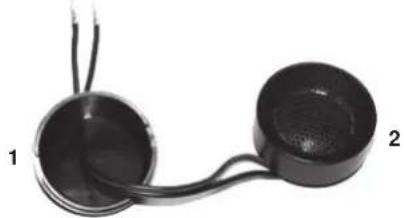
T16 can be mounted on the dashboard with the angled cup (1), or recessed in a doorside. These tweeters are included in the B5 and B6 speaker kits.
natural_image
Two black circular devices with wires attached, labeled 1 and 2 (no text or symbols on the devices themselves)SURFACE MOUNTING:
Angled mounting: Put the cable through the hole in the rear end of the angled cup. The tweeter is attached to the cup by pressing them together. Attach the cup to the surface with the double adhesive tape.
natural_image
Close-up of a black circular mechanical component with four labeled parts (3, 4), showing internal features and mounting holes (no text or symbols beyond labels)RECESSED MOUNTING:
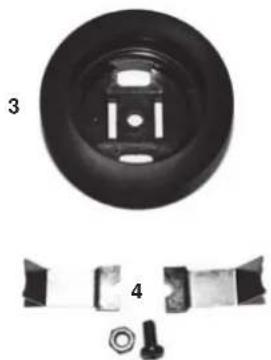
You need a hole with a diameter of 43 mm/1.7". Put the two metal wings through the two tracks in the center of the cup, just as the picture shows, and attach them with the M4 screw and nut through the center hole. The cup is attached to the door side when the metal wings is pressed to the back side of the door.
Put the tweeter element into the cup with the cable going out through the bottom hole. Then attach the element by putting it into the cup.
FACTS ABOUT DLS T16 TWEETER
Size 16 mm / 0,63"
Nom. power (RMS) 50 Watts, 80 Watts max
Freq. range 2 kHz-20 kHz
Sensitivity 91 dB
Magnet diameter 20 mm / 0,8" neodymium magnet
Mounting depth 20 mm / 0,8" (recessed mounting)
Mounting hole 43 mm / 1,7" (recessed mounting)
Cone material Mylar
WARRANTY SERVICE
This speaker is covered by warranty, depending on the conditions in the country where it is sold. If the speaker is returned for service, please include the original dated receipt with the product.

Technical Assistance
For technical assistance ask the shop where the product was sold or the distributor in your very country. You can always phone the DLS Helpdesk in Sweden + 46 31 840060 or send an e-mail to info@dls.e
Information can also be found on our WEB-site www.dls.se
We follow a policy of continuous advancement in development. For this reason all or part of specifications & designs may be changed without prior notice.