
Santo 253 I - Kühlschrank AEG - Kostenlose Bedienungsanleitung
Finden Sie kostenlos die Bedienungsanleitung des Geräts Santo 253 I AEG als PDF.


Benutzerfragen zu Santo 253 I AEG
0 Frage zu diesem Gerät. Beantworten Sie die, die Sie kennen, oder stellen Sie Ihre eigene.
Eine neue Frage zu diesem Gerät stellen
Laden Sie die Anleitung für Ihr Kühlschrank kostenlos im PDF-Format! Finden Sie Ihr Handbuch Santo 253 I - AEG und nehmen Sie Ihr elektronisches Gerät wieder in die Hand. Auf dieser Seite sind alle Dokumente veröffentlicht, die für die Verwendung Ihres Geräts notwendig sind. Santo 253 I von der Marke AEG.
BEDIENUNGSANLEITUNG Santo 253 I AEG
SANTO 170E 170i 1702i 172i 173i 1742E
SANTO 1742E-m3D(L)
1742E-m3D(R)
1742i 1752i 2500i 253i
SANTO 2532i 2532E
Build-in Refrigerators
Operating Instructions
GB
Contents Page
Illustration pages (please unfold) 3/4
General instructions 9
Starting up and temperature regulation 10
Correct storage 10
Low-temperature lock 10
Fully automatic defrosting 11
Cleaning and care 11
Faults and servicing 11
Hints 12
text_image
31 12 8 4 0 7 9 5 61
natural_image
Simple line drawing of a mechanical component with directional arrows indicating movement (no text or symbols)4
text_image
Diagram of a refrigerator interior with numbered compartments and doorways2
natural_image
Line drawing of two refrigerator doors showing front and side views with shelves containing milk bottles (no text or symbols)5
text_image
Diagram of a refrigerator interior with numbered compartments and doors open for identification3
text_image
Technical diagram showing a structural component with labeled points A and directional arrows indicating assembly or force directions.6
natural_image
Illustration of a hand pressing down on a wooden beam with a curved arrow indicating upward motion (no text or symbols)7a
natural_image
Line drawing of a cabinet interior with a downward arrow indicating a drop (no text or symbols)9
natural_image
Line drawing of a hand holding a tray inside a kitchen appliance (no text or symbols)7b
natural_image
Illustration of a multi-tiered storage shelf with plastic containers and lids (no text or symbols)10
natural_image
Diagram of two storage racks with bottles placed inside, no text or symbols present8
IMPORTANT!
If the refrigerator you have purchased is replacing an older model still fitted with a snap catch or lock, you should render this lock unserviceable before throwing the appliance away or putting it out for environment-friendly refuse collection
In this way you can prevent children locking themselves in when playing and thus endangering their lives.
Please make sure that the pipelines of your refrigerator are not damaged before collection for environment-friendly disposal.
Appliance Packaging Information
All used materials are environmentally compatible! They can be safely disposed of or burnt in a refuse incinerator!
Regarding the materials: the plastics can also be recycled and are marked as follows:
PE< for polyethylene e.g. as used in the outer wrapping and bags inside
PS< for polystyrene foam e.g. as used in the packing; this material is basically CFC-free
The cardboard parts are made of waste paper and should be put back into the waste paper collection system.
General instructions
You have just purchased a home refrigerator which has been produced according to the standards applicable to these appliances.
During manufacture, the necessary measures have been taken as required by the Appliance Safety Act (GSG), the Accident Prevention Regulations for Refrigerating Installations (VBG 20), and the Specifications of the Institute of German Electrical Engineers (VDE).
The refrigeration circuit has been checked for leakage. The appliance is radio-interference suppressed in accordance with EEC Directive 82/499/EEC as well as with the Standard relating to the Retroactive Effect of the Mains Supply EN 60 555 Parts 1-3/DIN VDE 0838 Parts 1-3, June 1987.
Before starting up, we recommend you to read the following Operating Instructions, since only by doing so can you benefit from all the advantages offered by your refrigerator.
These Operating Instructions are intended for several technically comparable models with different equipment. Please only follow the instructions corresponding to your appliance version.
Please unfold the illustration pages on the cover to enable you to compare the text and pictures alongside.
Removing the adhesive tapes
The door is secured to the housing with adhesive tapes. Remove any adhesive tape residues with a suitable petroleum-based cleansing agent.
Commercial use
Should you use your home refrigerator commercially or for purposes other than refrigeration of food and drinks, you must observe the legal requirements applicable to your area.
Choice of position
The refrigerating unit needs a good supply of air and proper ventilation in order to function properly. Please make sure that the air-vents in the plinth underneath the kitchen cabinet and the air-shafts behind it are not covered over or blocked.
Ambient temperature has an effect on the power consumption of the unit. The appliance should therefore:
- not stand in the direct sunshine, or close to a radiator or cooker
- stand in a position where the ambient temperature corresponds with the climate category for which the appliance is designed.
You will find data on this on the rating plate, which is in the interior of the appliance on the left hand side. It will consist of one of the following:
| Climate category | Ambient temperature from ... to ... |
| SN | +10 to +32 °C |
| N | +16 to +32 °C |
| ST | +18 to +38 °C |
| T | +18 to +43 °C. |
Installation
See enclosed installation instructions.
Cleaning before using for the first time
Like all new appliances, your refrigerator will smell
"new". For this reason, the interior of the refrigerator and all accessories should be cleaned before use (see also "Cleaning and care").
Electrical connection
WARNING - THIS APPLIANCE MUST BE EARTHED
Please ensure that the voltage and current indicated on the rating plate agree with the voltage of your electricity supply.
220/240 volts \~ (i. e. 220/240 V AC).
The rating plate is located inside the appliance on the top LH side.
If your appliance has been equipped with a mains lead with a moulded-on type plug, you must comply with the following regulations: The plug moulded on to the cord incorporates a fuse. For replacement, use a 13 amp BS 1362 fuse. Only ASTA approved or certified fuses should be used. The fuse cover/ carrier must be replaced in the event of changing the fuse. The plug must not be used if the fuse cover/ carrier is lost. A replacement cover/carrier must be obtained from an electrical goods retailer. If the socket outlets in your home are not suitable for the plug fitted to the appliance, then the plug must be cut off and an appropriate one fitted. When fitting the plug please note the following points:
Important
The wires in the mains lead are coloured in accordance with the following code:
| Green and Yellow | Earth |
| Blue | Neutral |
| Brown | Live |
As the colours of the wires in the mains lead of this appliance may not correspond with the coloured markings identifying the terminals in your plug, proceed as follows:
- The wire which is coloured green and yellow must be connected to the earth terminal in your plug, which is marked with the letter E or by the earth symbol 12 or coloured green, or green and yellow.
- The wire which is coloured brown must be connected to the live terminal which is marked with the letter L or coloured red.
- The wire which is coloured blue must be connected to the neutral terminal which is marked with the letter N or coloured black.
When wiring the plug, ensure that all strands of wire are securely retained in each terminal. Do not forget to tighten the mains lead clamp on the plug. Warning! A cut off plug inserted into a 13 amp socket is a serious shock hazard. Ensure that the cut off plug is disposed of safely.
Voltage 220/240 V AC
Fuse rating 13 amps
See rating plate for further information.
In order to disconnect the appliance pull out the mains plug. Should your appliance be connected to the mains supply through a fixed wiring connection, it must be isolated from the mains supply by devices in the fixed wiring (fuses, line protection switches, spurious current protection switches, or the like having a contact opening width of > 3 mm).
Starting up and temperature regulation
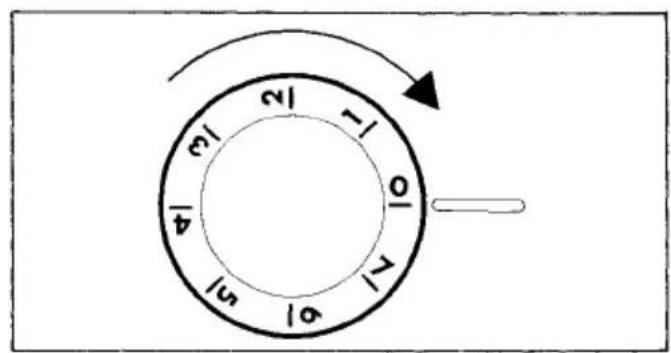
Fig. 1
The knob for temperature selection is located in the refrigerator compartment.
Setting "0" means: Off.
Rotation in direction "1": Lighting on, refrigerating unit on, the latter then operating automatically.
Setting "1" means: highest refrigerating temperature, warmest setting.
Setting "7" means: lowest refrigerating temperature, coldest setting.
The ambient temperature, loading, and frequent door opening affect the internal temperature. When the setting is changed, the refrigerating unit does not start immediately if defrosting is then in progress.
Important note
High ambient temperature and cold setting of the temperature regulator, setting 6 or 7, may lead to continuous operation of the refrigerating unit. Reset the temperature regulator to a warmer setting, 4 or 5, so that the refrigerating unit is regulated and the defrosting cycle automatically re-introduced.
Correct storage
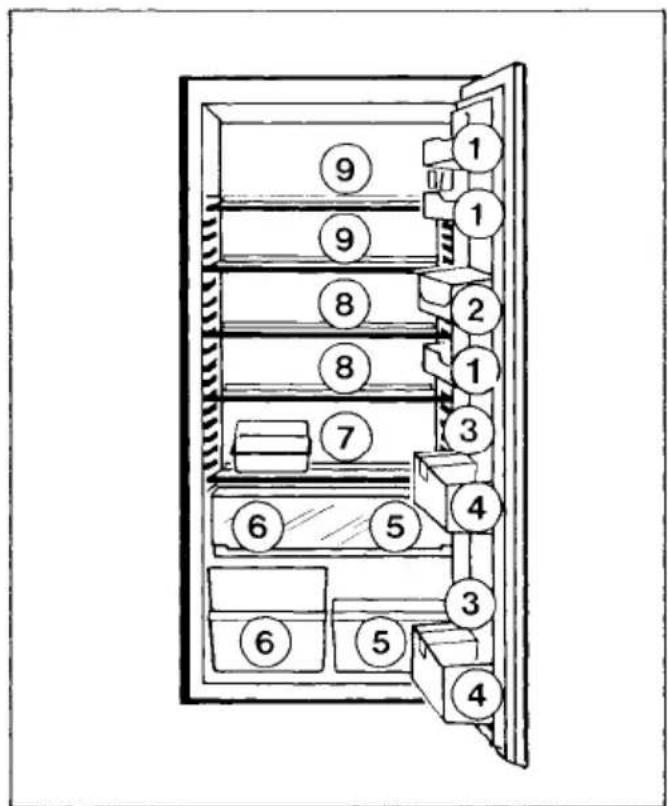
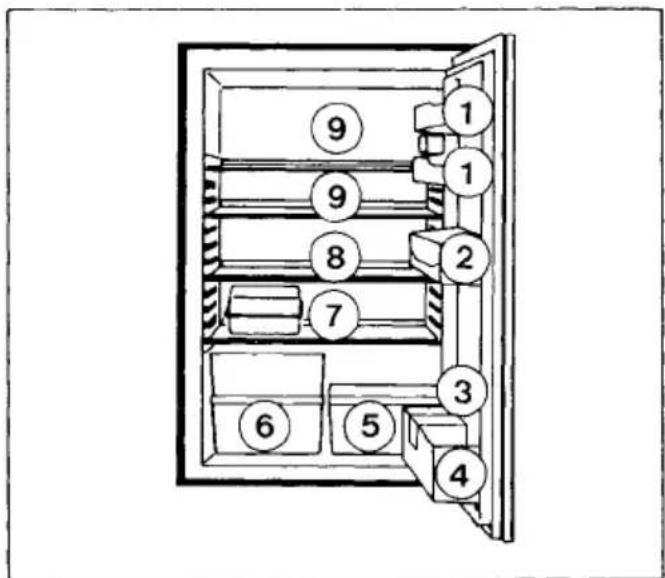
Figs. 2 and 3
① = Eggs, preserves
② = Butter, cheese
③ = Tubes
4 = Drinks
5 = Fruit
6 = Vegetables
⑦ = Meat, salami, cooked meats
⑧ = Dairy produce, margarine, preserves, marmelade
⑨ = Ready meals, baked goods, preserves
Low-temperature lock
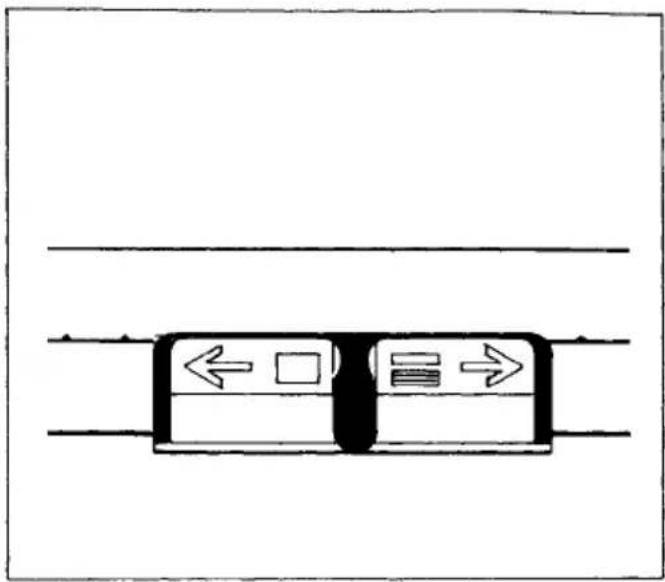
Fig. 4
On some larger models, the main refrigerator compartment can be subdivided by a low-temperature lock into a normal refrigerator compartment and cellar-temperature refrigerator compartment.
Slide to the right:
Ventilation slot closed, highest temperature, warmest setting in the cellar-temperature refrigerator compartment below.
Slide to the left:
Ventilation slot opened, lowest temperature, coldest setting in the cellar-temperature refrigerator compartment below. The temperature corresponds to the normal refrigerator compartment.
Important:
The cellar-temperature refrigerator compartment cannot be used to store easily perishable food.
Variable inner door
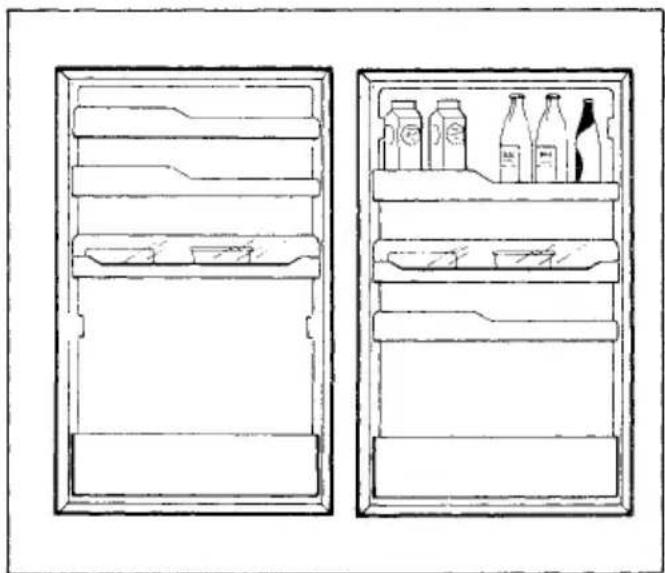
Fig. 5
Depending on the type of food stored, the door racks can be placed in other holders.
Height-adjustable storage shelves/racks
The shelves are made of glass or plastic, or take the form of wire trays, according to the model and feature you have ordered.
Fixing tongues for plastic shelves
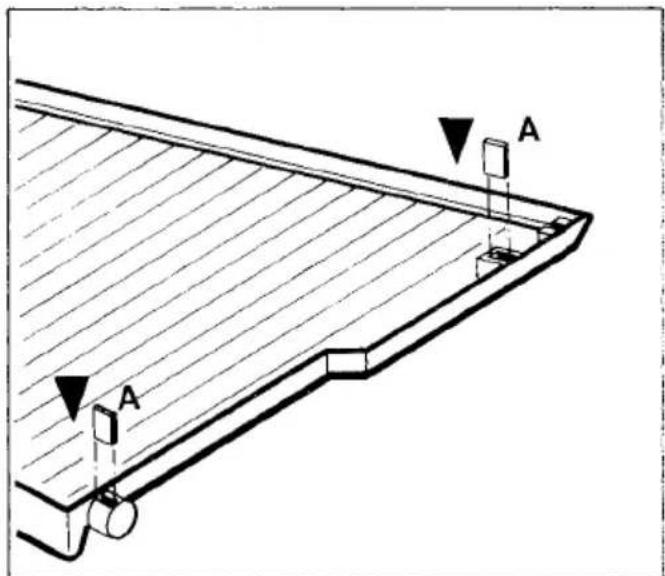
Fig. 6
Before you adjust these shelves to the correct height you should insert the clamping lugs (A) provided in the bag in the 4 appropriate pockets on the underside of the storage rack.
The clamping lugs ensure that the storage racks are snugly and safely supported.
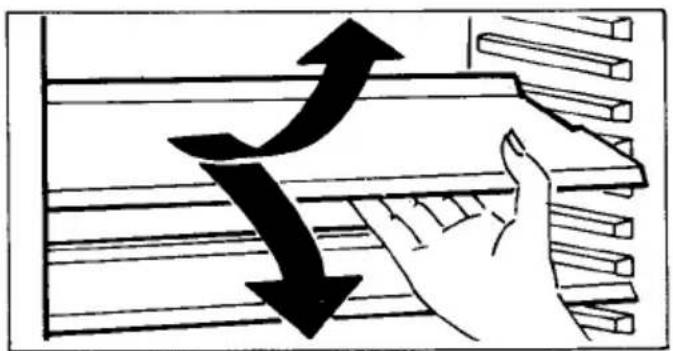
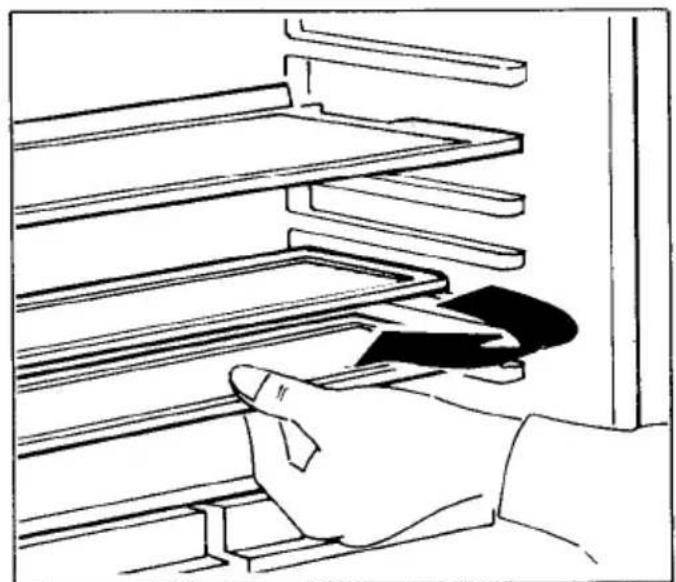
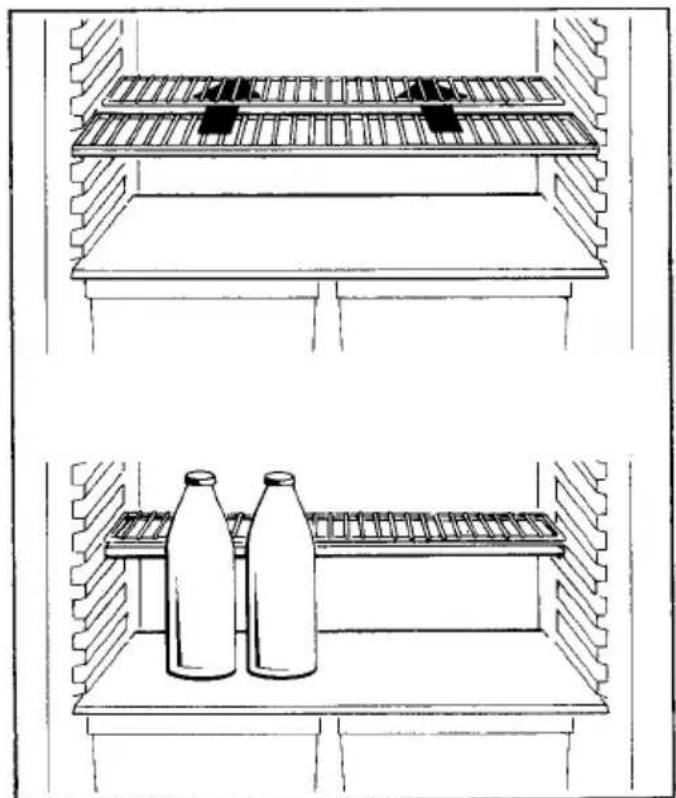
Figs. 7a/b and 8
Please make sure you insert one storage shelf into the lowest guide above the fruit and vegetable section. It must always remain is this position. To ensure individual space utilization, the other stable storage shelves or racks are to be arranged repeatedly depending on refrigerated food height.
For this purpose, pull the storage shelf/rack slightly forward until it can be swivelled downwards or upwards and removed (Fig. 7a). To insert the shelf/rack at a different level, please proceed in the reverse sequence.
Fig. 7b
If, for instance, you wish to store bottles, cans, or jars in the upright position, please move the front half of the VARIO glass shelf (if fitted) to a different level, or in the case of wire-tray shelves slide the front half in under the rear half. You will thus gain the necessary space to store tall items on the shelf below.
The storage racks can be arranged obliquely to accommodate opened bottles.
Make sure that the brackets on the storage racks point upwards so that the refrigerated food does not rest against the rear of the refrigerating space – the integrated evaporator.
The storage racks can be arranged obliquely to accommodate opened bottles.
Make sure that the brackets on the storage racks point upwards so that the refrigerated food does not rest against the rear of the refrigerating space – the integrated evaporator.
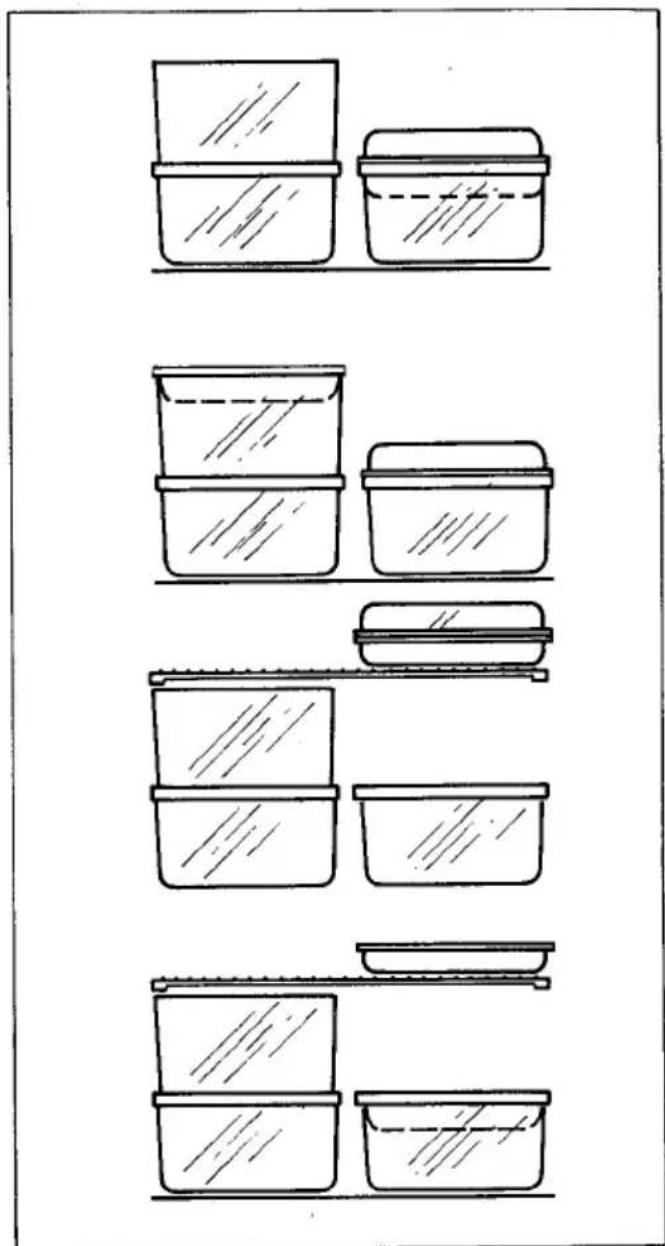
VARIO tray set
Fig. 10
Depending on model and features, your refrigerator is equipped with different trays allowing versatile combination. The half-trays can be individually or vertically stacked or used as a closed box. Smaller trays can be inserted in larger ones above and thus allow refrigerated food separation depending on type and size.
Fully automatic defrosting
Defrosting of the evaporator on the rear wall of the refrigerator compartment occurs automatically. The water evaporates automatically.
Cleaning and care
Fig. 9
During cleaning, a refrigerator must basically not be
connected to the mains supply (pull out the mains plug or remove the fuse).
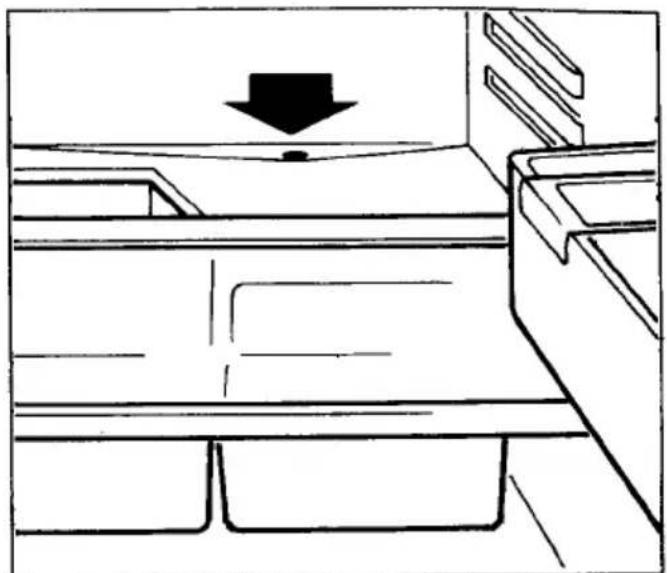
Make sure that the drain opening of the drip gutter is always free. If it becomes choked, the thaw water cannot drain and freely evaporate and will run down on to the lower storage rack or under the fruit and vegetable tray. If the water drain opening becomes choked, it should be cleaned with the aid of a wire (Fig. 9).
Some organic solvents as well as essential oils (e. g. juice from lemon and orange peel, butyric acid) attack the plastic parts. Do not forget that, even in the refrigerator, food stored too long may spoil. To prevent any odours from forming, the contents should therefore be checked from time to time (including accessories) and thoroughly cleaned with lukewarm water to which a mild, non-abrasive cleaning agent containing no acetic acid can be added. Finally, wash with clean water and wipe dry. After cleaning of the refrigerator compartment, promptly reconnect the appliance to the power supply (see section on Starting up).
When not in use
If your refrigerator is to remain unused for any length of time, it must be disconnected (unplugged) from the electricity supply.
The appliance should then be cleaned thoroughly and the appliance door left open to prevent any odours from forming.
Faults and servicing
To maintain the safety of your appliance, you should only have repairs, especially on live parts, performed by a trained electrician. In the event of a fault, please contact your retailer or the service centre direct.
Before calling the service centre, please check that the power supply is in order. Power supply faults will be rectified by your electrician.
In the event of appliance faults, please notify your nearest service centre promptly. To avoid unnecessary journeys and costs, please state the:
- model description
- E-number and
- F-number
of your appliance.
These indications are given on the rating plate inside your appliance on the LH side.
Important! Unjustified service centre calls must be paid for even during the guarantee period.
Minor repairs you can carry out yourself
- Interior lighting:
If the bulb is defective, you can easily change this yourself. To do this, unplug the appliance (or otherwise disconnect it, e.g. by removing the fuse). The bulb can be reached from the rear of the cover. Use only a 15 W spare bulb.
- Spare parts:
Spare parts can be ordered from the service centre. You can fit them yourself without any special skill or training.
For example
- Butter and cheese compartment
- Door racks and bottle compartment
- Egg holders
- Fruit and vegetable trays
- Storage racks
- Water on the storage rack or under the fruit and vegetable trays = clean thaw water drain opening (Fig. 9).
Hints on correct use
Store your food, depending on type and sensitivity, in the appropriate refrigerating zones. This will enable you to achieve an optimum storage duration (see "Correct storage"). Ensure good packaging or covering of the food to be stored in your refrigerator. This ensures that flavour, colour, moisture, and freshness are retained.
Clean the refrigerator space regularly. This ensures that your food is hygienically stored and that unwanted odours are avoided.
Never place hot food in your refrigerator for cooling.
Hints on energy-saving
Do not install your refrigerator next to a radiator or oven. Through high ambient temperature, the temperature regulator switches on the refrigerating unit more frequently and for longer.
Ensure good ventilation of your refrigerator. Never obstruct the ventilation slots.
Do not place any hot food in the freezer – first allow the food to cool to room temperature.
Do not open the door unnecessarily and close it again as quickly as possible.
AEG Hausgeräte AG
Postfach 1036
D-90327 Nürnberg 1
© Copyright by AEG
H 271 271 800 - 1093/03 -150
AEG Domestic Appliances Ltd
Customer Care Department
55-77 High Street
Slough
Berkshire SL1 1DZ
Telephone: 08705 350350