
Santo 3134-1 KG - Kühlschrank AEG - Kostenlose Bedienungsanleitung
Finden Sie kostenlos die Bedienungsanleitung des Geräts Santo 3134-1 KG AEG als PDF.


Benutzerfragen zu Santo 3134-1 KG AEG
0 Frage zu diesem Gerät. Beantworten Sie die, die Sie kennen, oder stellen Sie Ihre eigene.
Eine neue Frage zu diesem Gerät stellen
Laden Sie die Anleitung für Ihr Kühlschrank kostenlos im PDF-Format! Finden Sie Ihr Handbuch Santo 3134-1 KG - AEG und nehmen Sie Ihr elektronisches Gerät wieder in die Hand. Auf dieser Seite sind alle Dokumente veröffentlicht, die für die Verwendung Ihres Geräts notwendig sind. Santo 3134-1 KG von der Marke AEG.
BEDIENUNGSANLEITUNG Santo 3134-1 KG AEG
SANTO 3110 KG 3130KG
3132 KG 3134 KG
3442 KG 3534 KG
3542 KG 3610 KG
3630 KG 3632 KG
Fridge Freezer
Operating Instructions
natural_image
Technical line drawing of a mechanical assembly with no visible text or symbols5
natural_image
Diagram of a mechanical or electrical component with rotating arms and fasteners, no text or symbols present7
natural_image
Simple line drawing of a refrigerator with a water pump and control panel (no text or symbols)6
text_image
180°8
natural_image
Diagram showing a mechanical assembly with a magnified inset of a component, no text or symbols present.9
natural_image
Diagram of a multi-panel mechanical assembly with no visible text or symbols12
other
| Block | Dimension (mm) | |-------|----------------| | Top | 793 | | Middle| 596 | | Bottom| 585 (640) | | Top Right | 793 | | Top Right | 585 (640) | | Top Right | 793 |10
natural_image
Pure technical diagram of a structural connection with arrows indicating force or movement (no text or symbols)13
other
| Block | Width (mm) | Height (mm) | |-------|------------|-------------| | Top | 990 | 1172 | | Middle| 585 (640) | 596 | | Bottom| 585 (640) | 596 |11
natural_image
Line drawing of a cabinet with a hand inserting a tool into the frame (no text or symbols)14
Contents
Pages
Illustrations 3,4/15,16,17,18,19
General instructions 6
Rehinging the door front 7
Before starting up 7
Voltage and current 8
Starting up and temperature and regulation 8
Correct storage 9
Inserting and adjusting the storage racks 10
Freezing tablets with cold storage units 10
Stored food symbols/ Freezing calendar 11
Freezing and storing 11
Fully automatic defrosting in refrigerator compartment 12
Frost removal in the freezer compartment 12
Defrosting the freezer compartment 12
Cleaning and care 13
Hints 14
CAUTION!
If you have bought your fridge-freezer as a replacement for an old fridge or freezer which is fitted with a snap-lock or a bolt, please make this unusable before you stow the appliance away or have it taken away for recycling.
This will prevent children playing with it endangering their lives by locking themselves in.
Please ensure that the pipes of your old appliance are not damaged before it can be taken away for proper, environmentally friendly disposal (of the freezing agent).
Information on the packaging of the appliance:
All materials used are environmentally compatible. They can be safely thrown away on a rubbish dump or burnt in a municipal incinerator.
Concerning the materials: the plastics can also be reused, and are labelled as follows:
PE for polyethylene (polythene), e.g. for the outer foil and for the bags inside
PS for polystyrol foam, e.g. for the padding, manufactured entirely without chlorofluorocarbons (CFC).
The corrugated board parts are manufactured from recycled paper and should be returned for collection as scrap paper.
General tips
You have just purchased a home fridge-freezer combination which has been produced according to the standards applicable to these appliances.
During manufacture, the necessary measures have been taken as required by the Appliance Safety Act (GSG), the Accident Prevention Regulations for Refrigerating Installations (VBG 20), and the Requirements of the Association of German Electrical Engineers (VDE).
The refrigeration circuit has been checked for leakage. The appliance is radio-interference suppressed in accordance with EEC Directive 82/499/EEC as well as with the Standard relating to the Retroactive Effect of the Mains Supply EN 60 555 Parts 1-3/DIN VDE 0838 Parts 1-3, June 1987.
Before starting up, we recommend you to read the following instructions for Use, since only by doing so can you benefit from all the advantages offered by your fridge-freezer combination. Please unfold the illustration pages so that you can compare the text and pictures.
These instructions for Use are intended for several technically comparable models with different equipment. Please only take note of the instructions that refer to your appliance version.
Removing the adhesive tapes
For transport purposes, the doors are secured with adhesive tapes on the housing.
Remove any possible adhesive tape residues with a petroleum-based spirit i.e. white spirit.
Commercial use
Should you use your home fridge-freezer commercially or for purposes other than refrigeration, freezing, and deep frozen storage of food, you must observe the legal requirements applicable to your area.
Choice of location
If possible, your fridge-feezer combination should be installed in a dry, well-ventilated room.
Its installation in a damp room or the occurrence of weather-dependent high air humidity may temporarily lead to precipitation of moisture (dew formation) on the outsides of the freezer compartment.
Ambient temperature has an effect on the power consumption of the unit. The appliance should therefore:
- not stand in the direct sunshine, or close to a radiator or cooker
- stand in a position where the ambient temperature corresponds with the climate category for which the appliance is designed.
You will find data on this on the rating plate, which is in the interior of the appliance on the left hand side. It will consist of one of the following:
| Climate category | Ambient temperature from ... to ... |
| SN | +10 to +32 °C |
| N | +16 to +32 °C |
| ST | +18 to +38 °C |
| T | +18 to +43 °C |
If installation beside a heat source is unavoidable, the following minimum distances at the sides are to be complied with: To electric cookers 3 cm, to oil-and coal-fired cookers 30 cm. Otherwise a heat protection panel should be used.
In case of installation beside a refrigerator or freezer, a distance of 2 cm is necessary on air circulation grounds and to avoid condensation.
When you want to move the appliance to its final installation site, it is sufficient to push the upper door slightly and to tilt the appliance backwards. This shifts the weight on to the rear rollers, and the appliance can be conveniently moved.
The appliance should be installed on a firm, level surface. Correct any floor irregularities by twisting the adjustable feet in or out.
Your refrigerator needs air
Ensure that your fridge-freezer combination receives sufficient air so that the heat generated at the rear wall of the appliance can be dissipated.
Air is supplied through the ventilation slots in the plinth and vented upwards through the rear wall shaft. Never obstruct these openings. Good provision for air inlet and outlet must also be made when your appliance is surrounded by high- or low-level cupboards.
A clear air inlet and outlet cross-section of at least 200 cm ^2 must be provided in each case.
The minimum clearance between the top edge of the appliance and a high-level cupboard fixed above it should be at least 5 cm.
Fig. 9
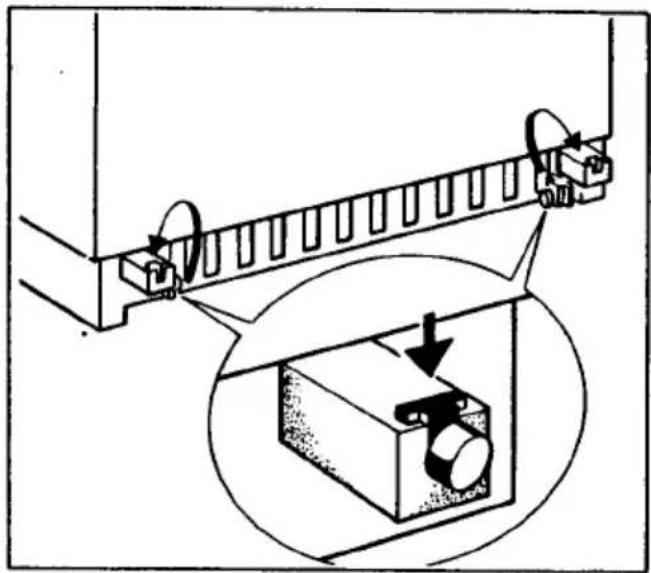
The two distance pieces are for holding the refrigerator away from the wall and are to be fitted into the mountings fixed rigidly to the underframe. This will create sufficient space for air to circulate.
Rehingeing the door
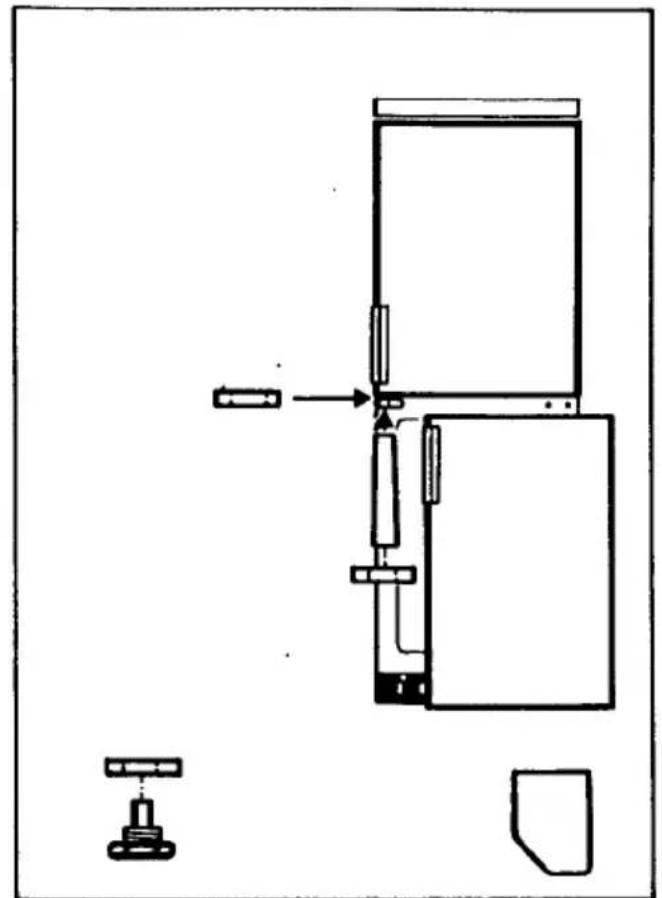
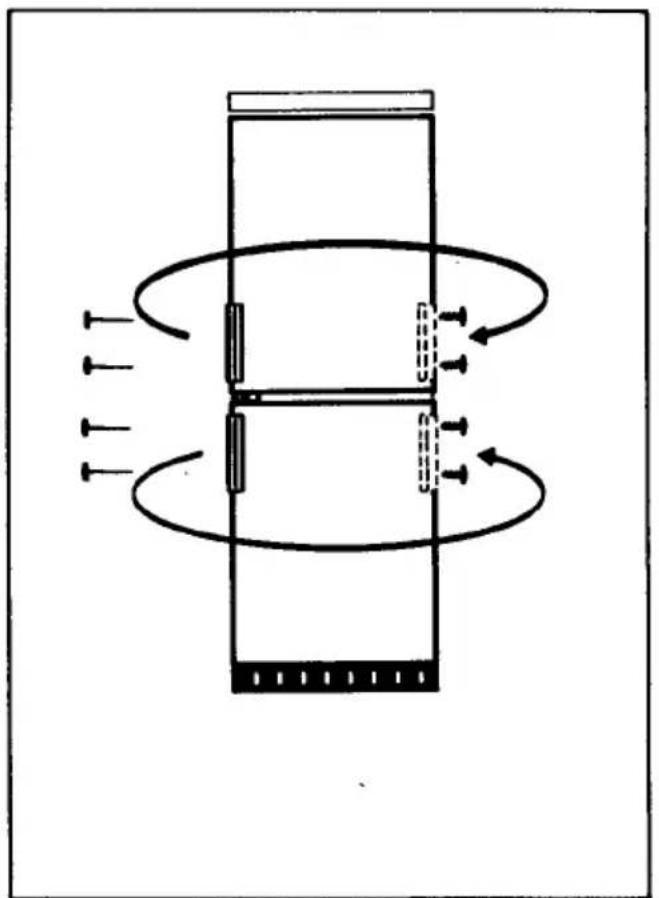
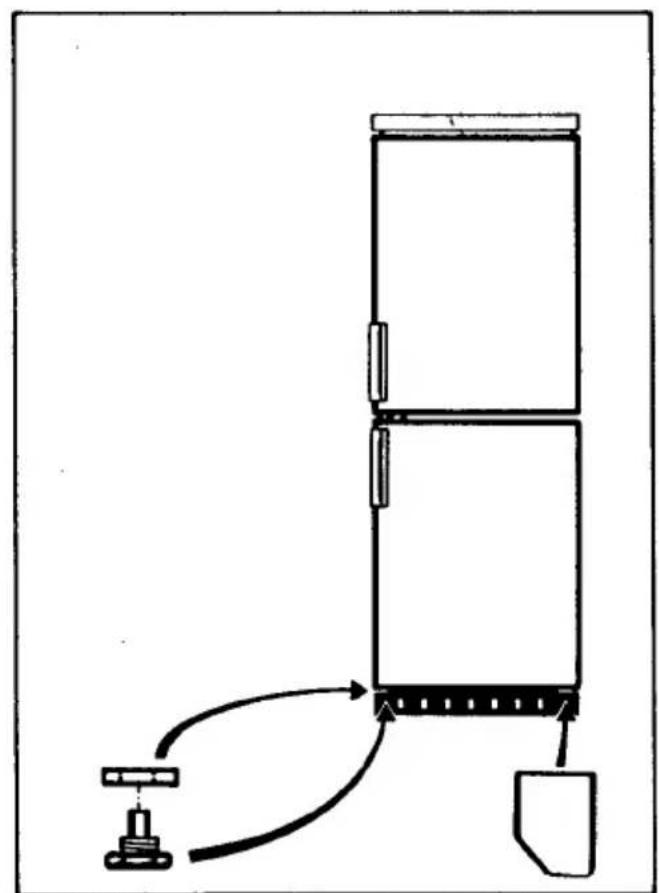
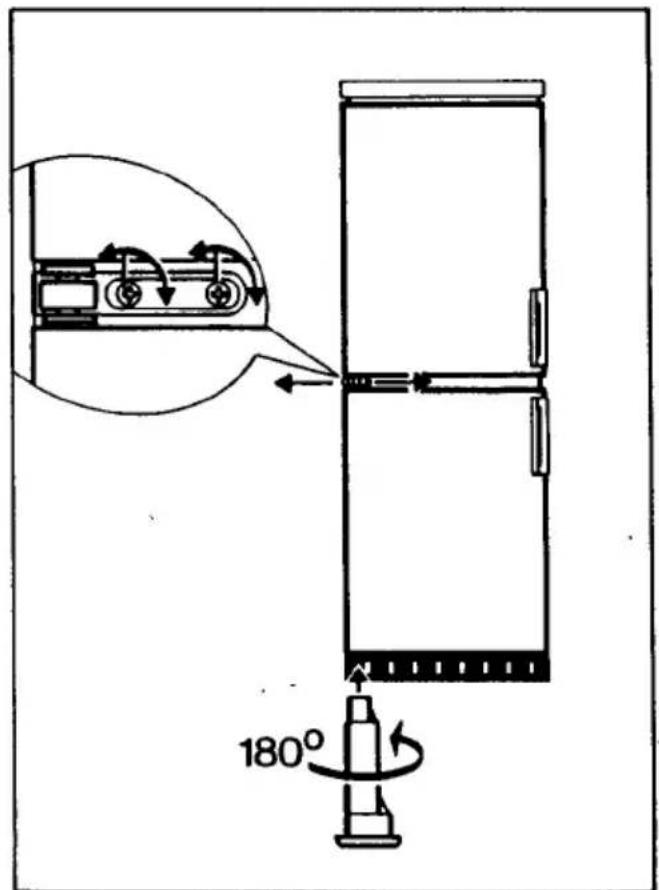
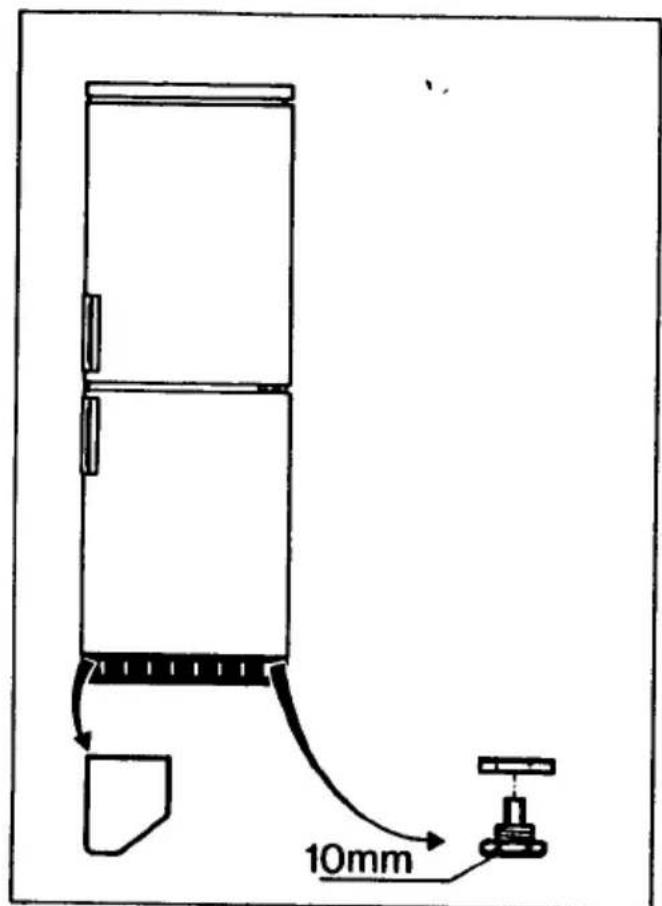
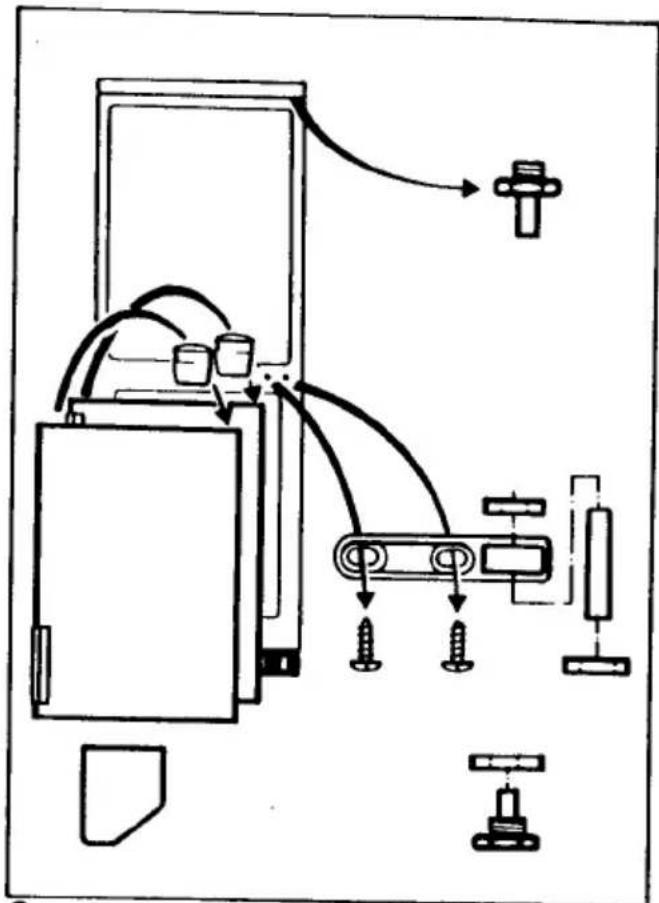
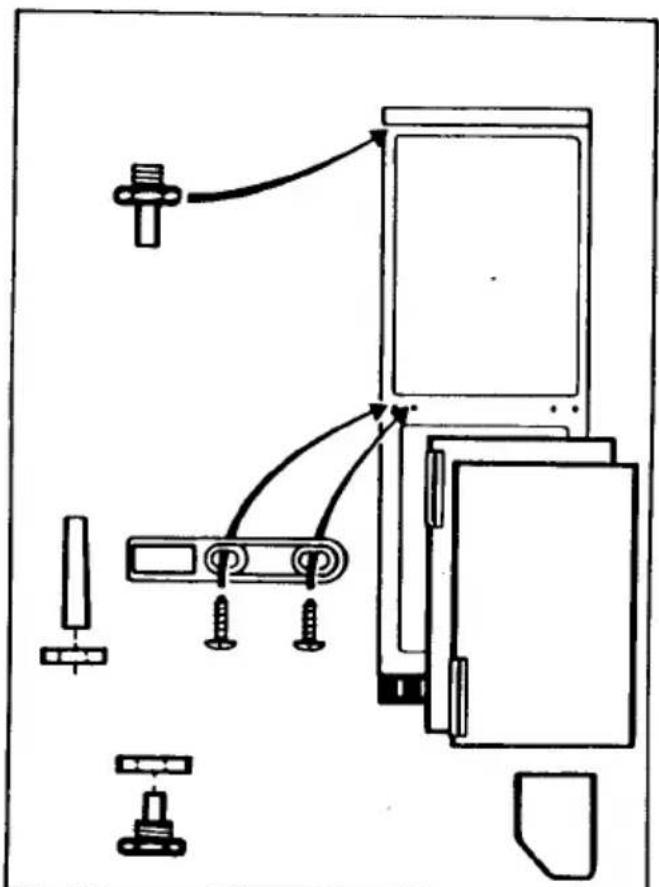
Figs. 1 to 7
Before connecting your fridge-freezer combination to the power supply, you should check whether the door must be rehinged from right (as delivered) to left, if this is required by installation site and operability. To rehinge the door, please proceed in the sequence of Figs. 1 to 7.
Aligning the doors
Fig. 8
Where necessary, both doors can be aligned, raised, or lowered through lateral adjustment of the central pivot.
If only door alignment is necessary, the appropriate door is to be removed (see Rehingeing the door in Figs. 1-7).
Remove eccentric bearing bush A from door below and change over as appropriate. Refit door(s).
Decorating the door front
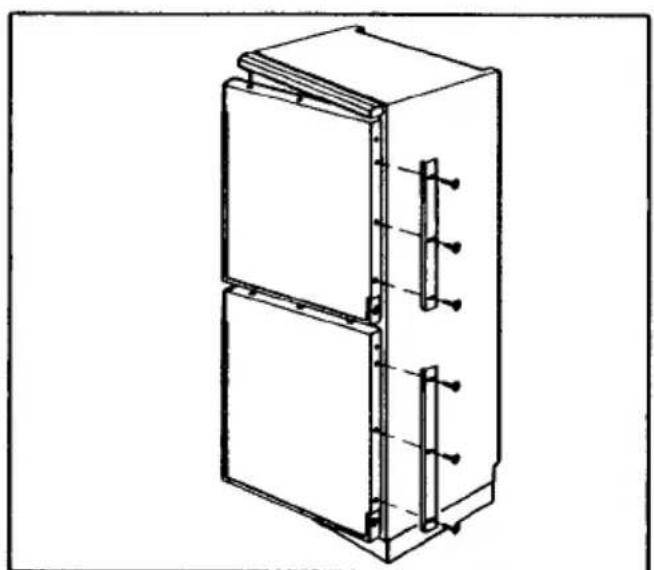
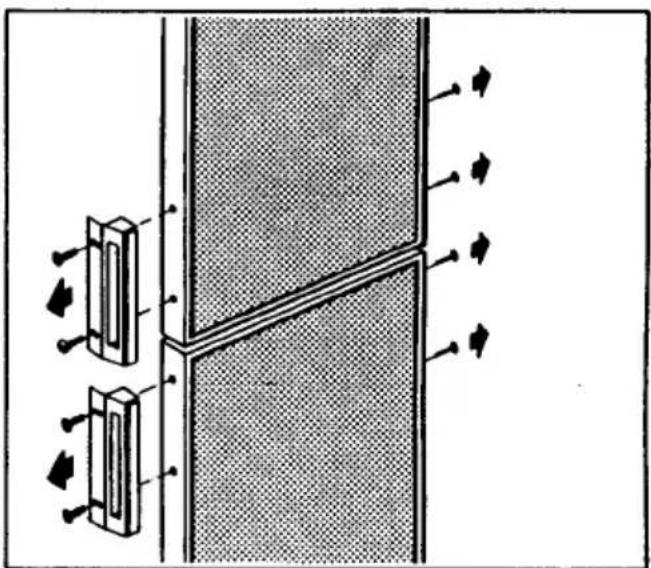
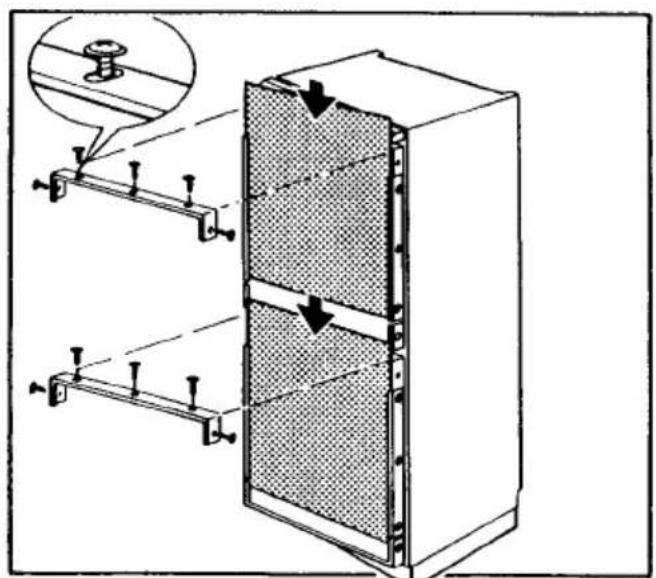
Figs. 10 to 19
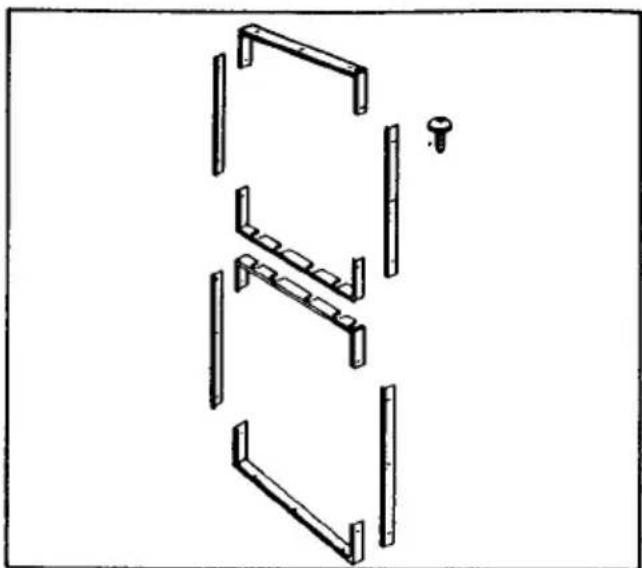
To match the front panel of your appliance to your kitchen decor with door decor panels of up to 4 mm thickness, a decor frame retrofitting kit is obtainable as a special accessory.
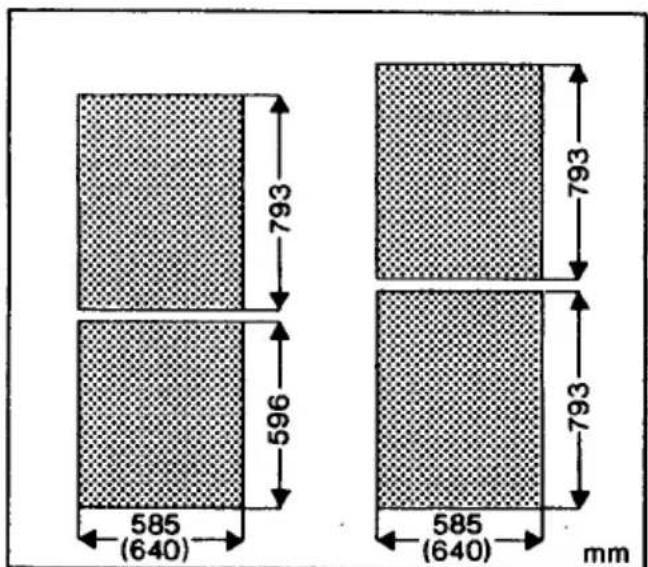
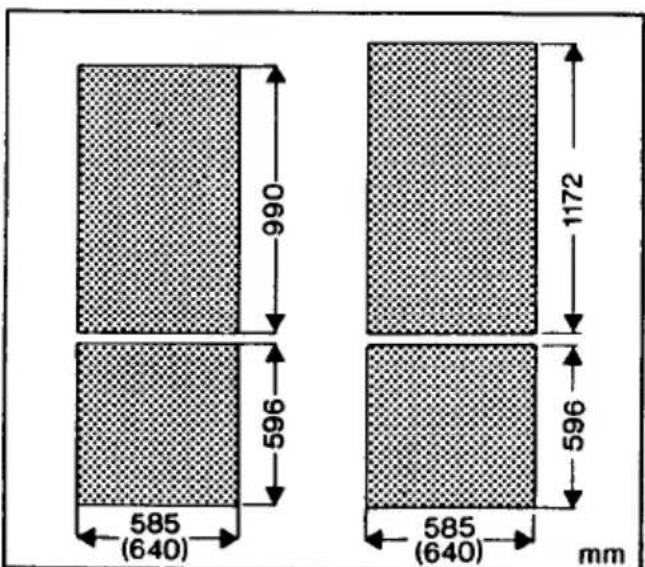
When ordering, please state the model designation of your appliance. For door decor panel dimensions, see Figs. 10 and 11. To establish the decor panel dimensions, please recheck the door dimensions of your appliance to make doubly sure.
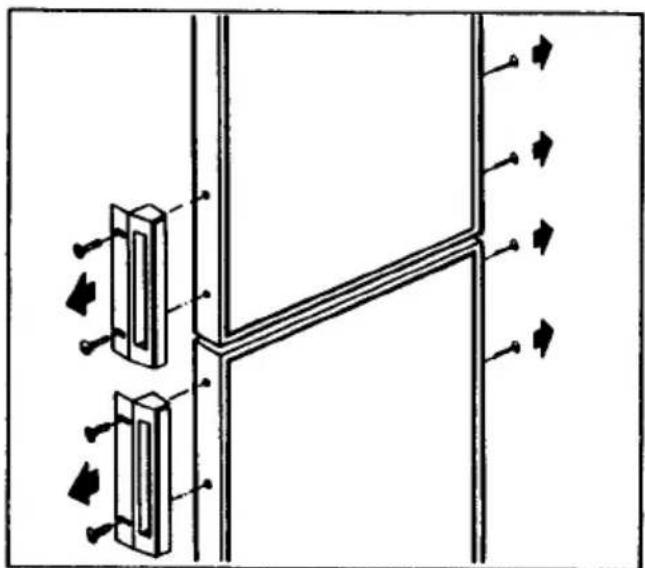
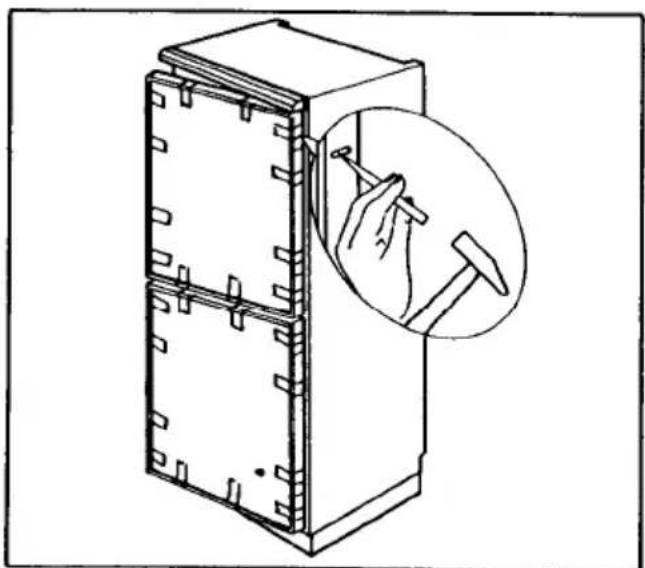
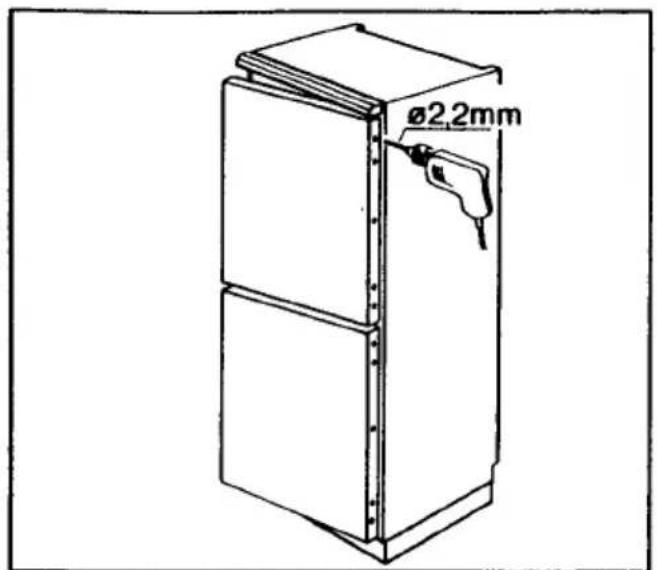
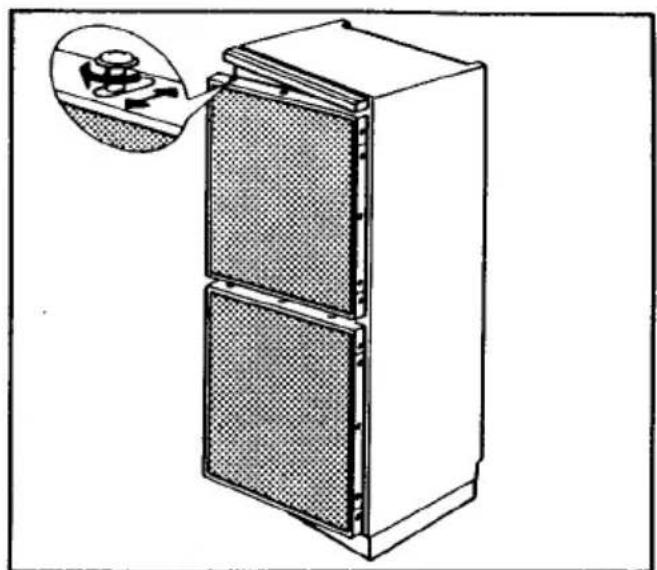
To fit the door decor frame, please proceed in the sequence of Flgs. 12 to 19. When using thin decor panels, it is recommended to use double adhesive tape.
If the appliance is fitted with a door decor frame as standard please proceed with each door as follows:
- Unscrew the upper frame strip.
- Loosen the other screws on the side strips, the handle, and the lower frame strip, and press the strips or the handle forwards.
- Push the decor panel in from the top, press the strips and the handle back into position, and tighten the screws (Illustration 17).
- Fit the upper frame strip.
When fitting a thin decor panel it is recommended that you use double-sided adhesive tape.
Before starting up
Fig. 20
In common with all new appliances, your fridge-freezer combination will emit a specific odour when new. It is advisable to clean the interior of your appliance and all accessories before use (see also "Cleaning and care").
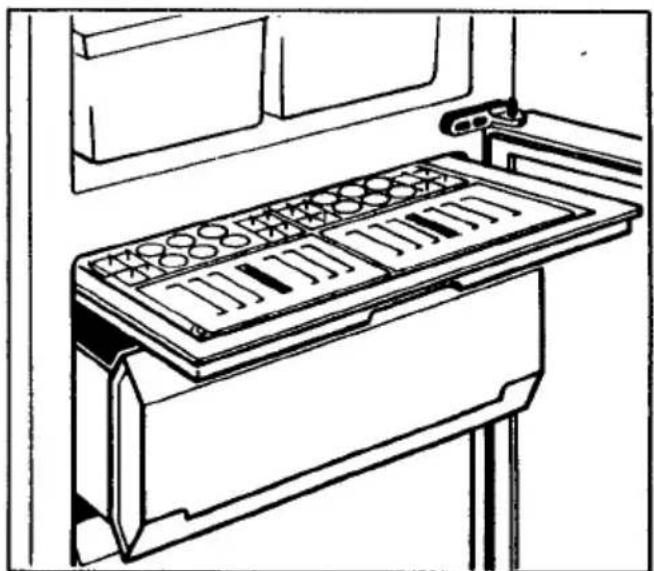
Before starting up, also remove both cold storage units – where available – from the freezer tablet (Fig. 20) above the upper drawer. Only when the optimum storage temperature of – 18 °C has been attained should you place the storage units for fast freezing directly in a refrigerating unit in a refrigerating compartment. After around 24 hours, you can then place the storage units (see Fig. 20) in the intended position. If you have used the cold storage units for cooling and keeping fresh on the table or in your cooler
bag, you should undertake freezing of the thawed cold storage units in the same way.
Voltage and current
Please ensure that the voltage and current indicated on the rating plate agrees with the voltage of your electricity supply.
220/240 volts \~ (i.e. 220/240 V a.c.).
The rating plate is located on the left inside the refrigerator compartment.
Electrical connection
WARNING - THIS APPLIANCE MUST BE EARTHED
Please ensure that the voltage and current indicated on the rating plate agrees with the voltage of your electricity supply.
220/240 volts - (i. e. 220/240 V AC).
If your appliance has been equipped with a mains lead with a moulded-on type plug, you must comply with the following regulations: The plug moulded on to the cord incorporates a fuse. For replacement, use a 13 amp BS 1362 fuse. Only ASTA approved or certified fuses should be used. The fuse cover/ carrier must be replaced in the event of changing the fuse. The plug must not be used if the fuse cover/ carrier is lost. A replacement cover/carrier must be obtained from an electrical goods retailer. If the socket outlets in your home are not suitable for the plug fitted to the appliance, then the plug must be cut off and an appropriate one fitted. When fitting the plug please note the following points:
Important
The wires in the mains lead are coloured in accordance with the following code:
Green and Yellow Earth
Blue Neutral
Brown Live
As the colours of the wires in the mains lead of this appliance may not correspond with the coloured markings identifying the terminals in your plug, proceed as follows:
-
The wire which is coloured green and yellow must be connected to the earth terminal in your plug, which is marked with the letter E or by the earth symbol ↓ or coloured green, or green and yellow.
-
The wire which is coloured brown must be connected to the live terminal which is marked with the letter L or coloured red.
-
The wire which is coloured blue must be connected to the neutral terminal which is marked with the letter N or coloured black.
When wiring the plug, ensure that all strands of wire are securely retained in each terminal. Do not forget to tighten the mains lead clamp on the plug.
Warning! A cut off plug inserted into a 13 amp socket is a serious safety (shock) hazard. Ensure that the cut off plug is disposed of safely.
Voltage 220/240 V AC
Fuse rating 13 amps
See rating plate for further information.
The rating plate is located on the left inside the refrigerator compartment.
Plug socket
The plug socket necessary for connection of your appliance to the electricity supply should be positioned so that it is possible to pull out the appliance plug.
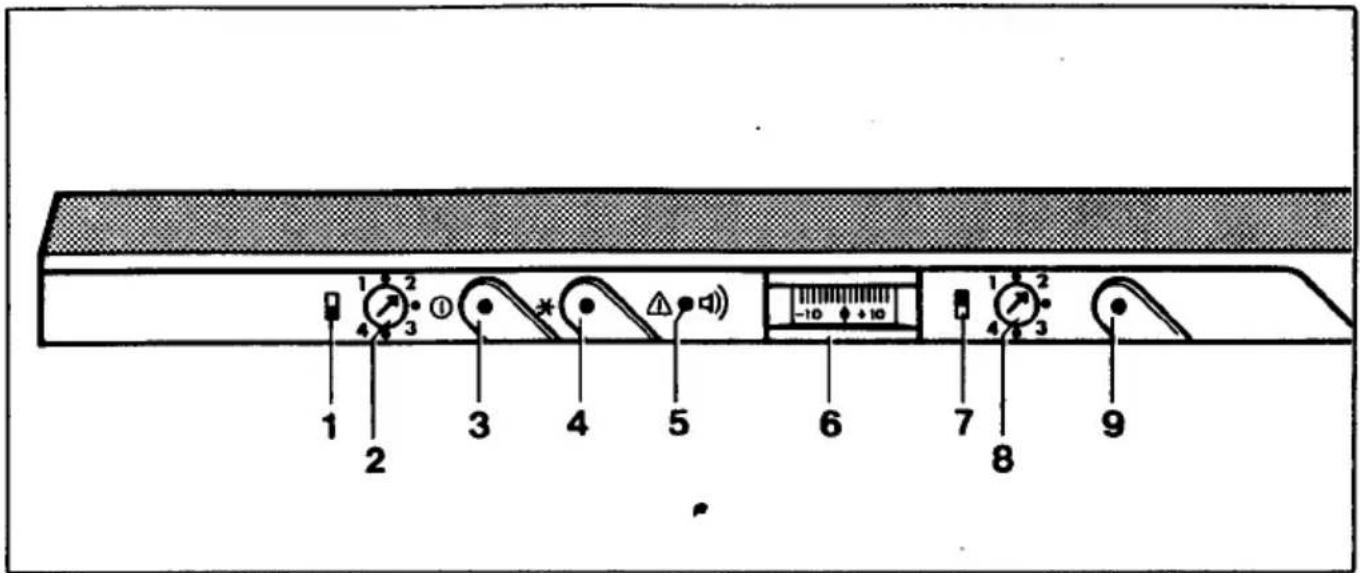
Operating and indicator panel
Fig. 21
for freezer comportment
① = Symbol for freezer compartment
② = Temperature regulator
③ = On/Off switch with green mains pilot lamp
4 = Fast-freeze switch with amber pilot lamp
⑤ = Red temperature pilot lamp with audible temperature alarm
⑥ = External thermometer giving power-independent temperature indication
for refrigerator compartment
⑦ = Symbol for refrigerator compartment
8 = Temperature regulator
⑨ = On/Off switch with green mains pilot lamp
Starting up and temperature regulation
Figs. 21 and 23
Insert the mains plug of your fridge-freezer combination into a socket fitted as prescribed with a protective contact (plug socket).
The refrigerator and freezer compartments can be independently regulated by both temperature regulators and also independently operated by the Off-setting on both regulators.
... Freezer compartment:
The refrigerating unit of the freezer compartment is switched on by pressing the On/Off switch (3).
The green mains pilot lamp (3) and the red temperature pilot lamp (5) then come on. The audible temperature alarm (where available) also sounds.
The green mains pilot lamp (3) is the operating indication for the freezer compartment and must continuously show.
The red temperature pilot lamp (5) and audible temperature alarm (where available) tell you that the storage temperature in the freezer compartment has not yet been attained or has been exceeded (warning). You should then additionally press the fast-freeze switch (4).
The amber fast-freeze pilot lamp (4) shows, and the refrigering unit of the freezer compartment continuously operates.
When the fast-freeze switch is pressed, the audible temperature alarm (warning tone) immediately ceases. Only when the red temperature pilot lamp (5) has gone out should you switch off the fast-freeze switch (4). The amber fast-freeze pilot lamp (4) then goes out. The red temperature pilot lamp (5) and audible temperature alarm alert you to the following:
- during start-up of the freezer compartment refrigerating unit, if the storage temperature in the freezer compartment has not yet been attained;
- if the storage temperature in the freezer compartment is no longer being maintained (fault);
- if the freezer door is open too long; and
- if you insert excessively large amounts of fresh food.
Important: Check regularly by the red temperature pilot lamp (5) and the power-independent external thermometer (6), that the storage temperature in the freezer compartment is being maintained.
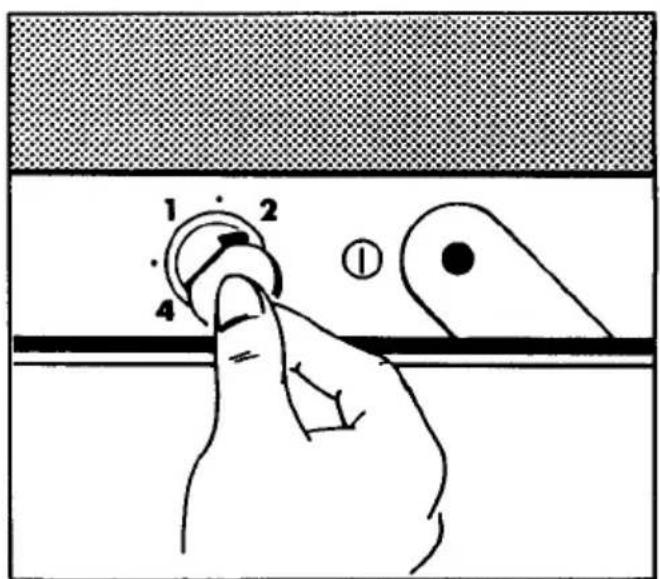
The temperature regulator (2) can then be used for continuous setting of the required storage temperature in the freezer compartment with aid of a coin between settings 1-4 (Fig. 23).
Setting "1" = warmest internal temperature.
Setting "4" = coldest internal temperature.
Since optimum storage conditions of - 18 °C or colder are strongly affected by ambient temperature, loading, and frequent door-opening, you should check the internal temperature of the freezer compartment by the power-independent external thermometer (6). Set the temperature so that the indicated temperature comes to - 18 °C.
Important: If you press the fast-freeze switch (4) or adjust the temperature regulator (2), it may happen that the freezer compartment refrigerating unit of your fridge-freezer combination does not start immediately, but only after some time. This does not mean there is a fault in your appliance.
The temperature feeler is positioned to show the temperature at the warmest point in the freezer compartment. Because of temperature layers and because the appliance can be filled in different ways it can be that the temperature is lower in other parts of the freezer compartment.
... Refrigerator compartment:
The refrigerating unit of the refrigerator compartment is switched on by pressing the On/Off switch (9). The refrigerating unit then automatically operates. The green mains pilot lamp (9) then comes on. This operating indication for the refrigerator compartment must continuously show.
The temperature regulator (8) can then be used for continuous setting of the required storage temperature in the refrigerator compartment with aid of a coin between settings 1–4 (Fig. 23).
Setting "1" = warmest internal temperature.
Setting "4" = coldest internal temperature.
Ambient temperature, loading, and frequent door-opening affect the internal temperature.
Important: If the setting is varied, the refrigerating unit does not run immediately when automatic defrosting is in progress.
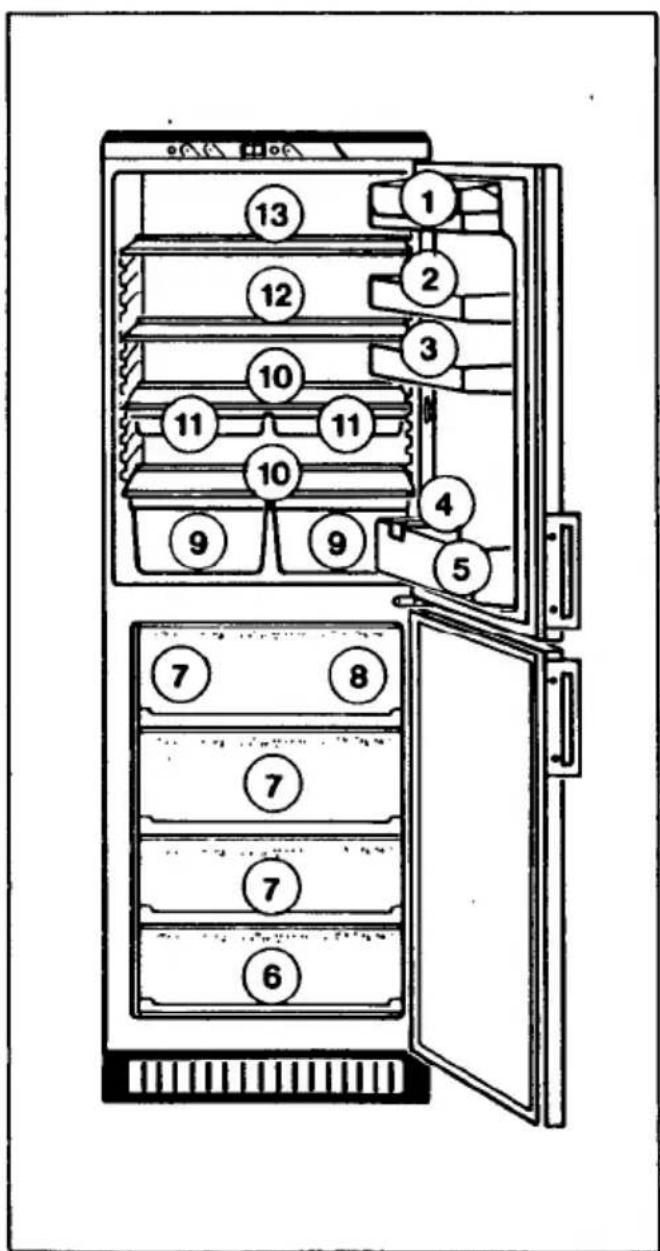
Correct storage
Fig. 22
① = Butter, cheese
② = Eggs
③ = Preserves
4 = Tubes, small refrigerated packages
5 = Drinks
6 = Frozen food storage
⑦ = Frozen food storage/freezing
⑧ = Prefreezing of berries, icemaking
⑨ = Fruit, vegetables
10 = Meat, salami, dairy produce
⑪ = Packaged meat, salami, photographic material (only for plastic storage racks)
12 = Convenience foods, baked items
13 = Drinks (wine), preserves
Inserting and adjusting the storage racks
The shelves are made of glass or plastic, or take the form of wire trays, according to the model and feature you have ordered.
Be sure to place a closed storage rack in the lowest guides above the fruit and vegetable drawers.
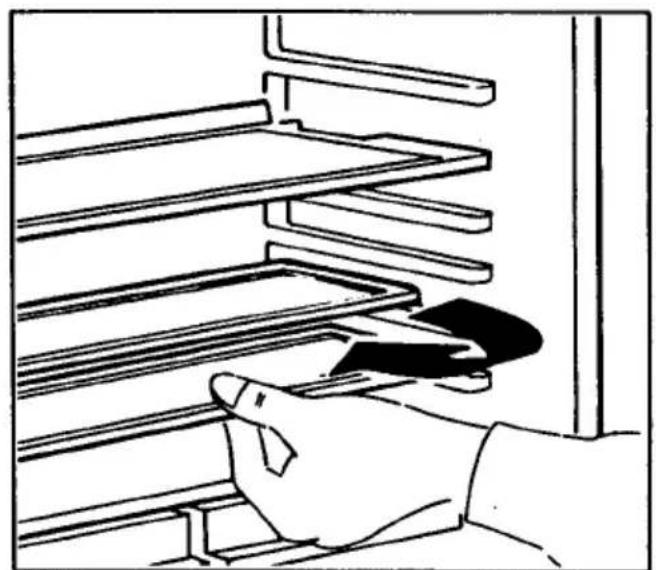
Fig. 24a
If you want to adjust the distance between the storage racks, you should pull the storage rack slightly forwards until it can be swivelled upwards or downwards and removed. To insert at another level, please proceed in the reverse sequence.
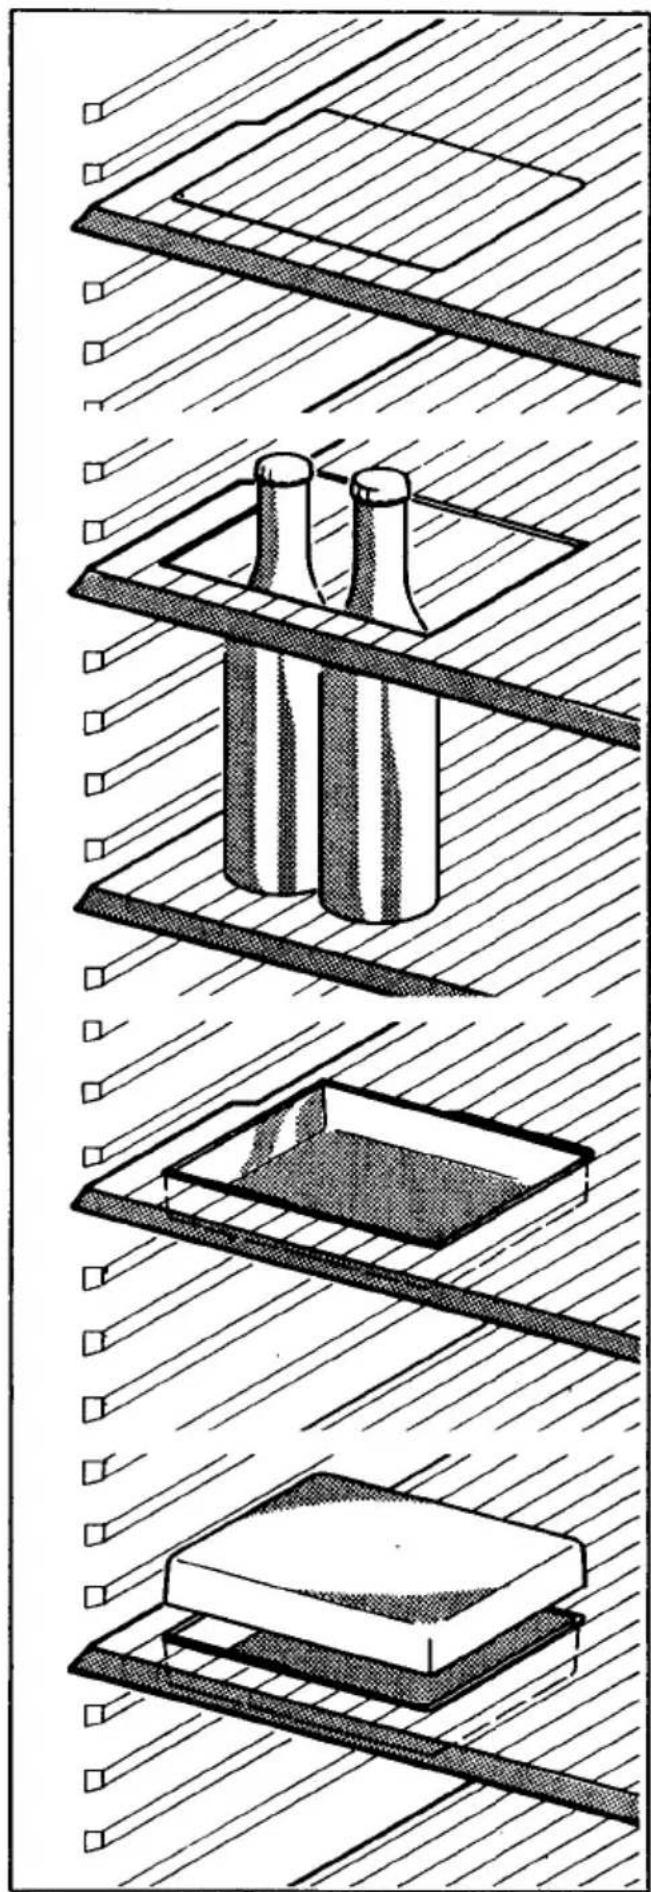
VARIO glass shelf
Fig. 24b
If, for instance, you wish to store bottles, cans, or jars in the upright position, please move the front half of the VARIO glass shelf (if fitted) to a different level, or in the case of wire-tray shelves slide the front half in under the rear half. You will thus gain the necessary space to store tall items on the shelf below.
Plastic storage shelves
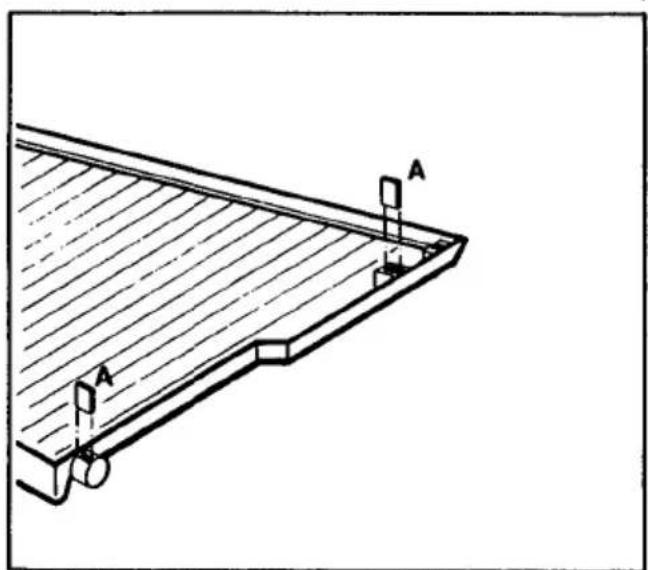
Clamping lugs
Fig. 25
Before arranging the storage racks in the correct height position, you should insert the clamping lugs (A) supplied in the bag in the four holder pockets provided for that purpose on the lower side of the storage rack.
The storage racks will then rest gently and securely on them.
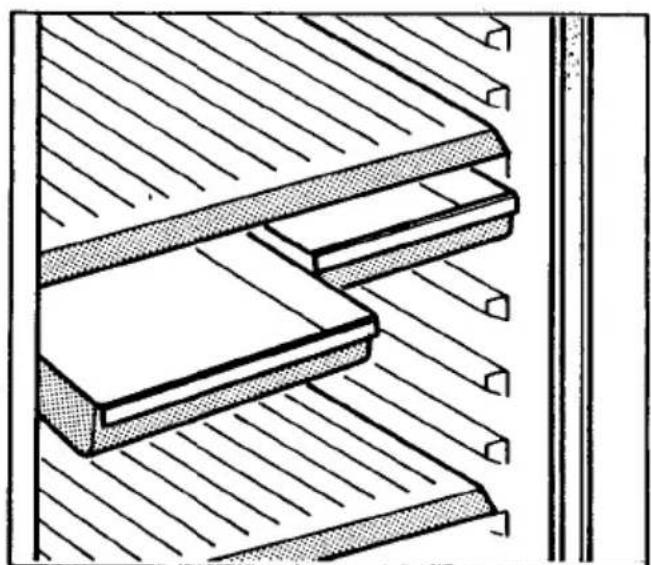
Storage rack with drawers
Fig. 26
One storage rack contains two drawers for packaged meat, salami, and cheese stocks or temperature-sensitive materials, e.g. photographic materials.
VARIO storage rack
Fig. 27
One storage rack is provided with an opening, which can be covered for use of the whole surface.
If bottles, cans, or glasses are to be stored upright, you should remove the cover. High refrigerated food is placed through the opening, and the storage rack need not be height-adjusted.
The opening can also hold half drawers from the VARIO drawer set for storage of e.g. strong-smelling or sensitive refrigerated food.
It is also possible to take this out together with the drawer.
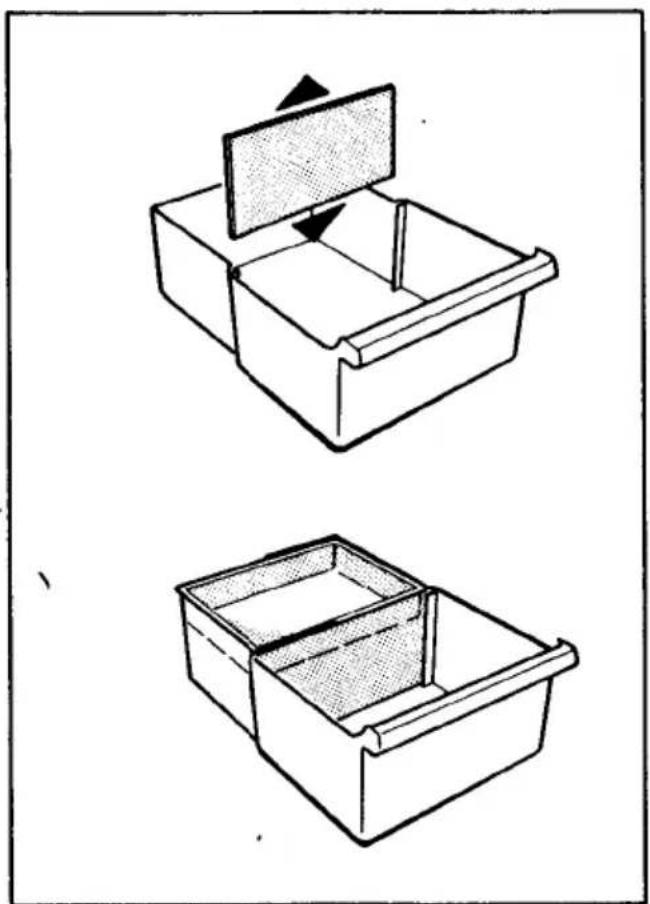
VARIO drawer set
Fig. 28
The two large drawers for fruit and vegetables can be subdivided by adjustable partitions and suspended half drawers for separation of refrigerated food according to type and size.
Variable inner door
Depending on the food stored, the storage compartments in the doors can be changed to other holders or removed.
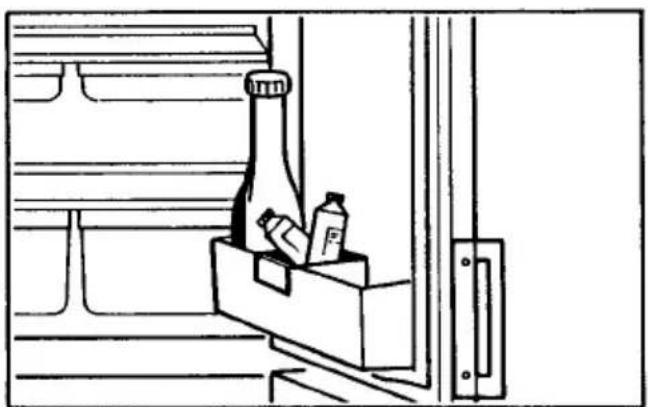
Tube holder/bottle antitilt feature
Fig. 29
One or two tube holders – where these belong to the equipment – are placed on the bottle compartments or storage compartments in the doors to prevent single bottles from falling over.
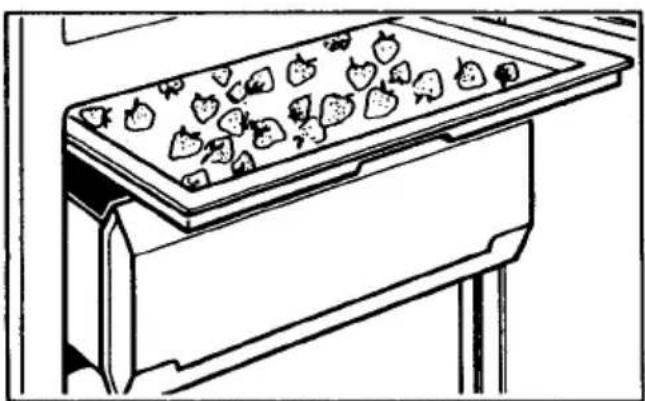
Freezing tablet with cold storage unit
Figs. 20 and 30
Above the upper drawer in the freezer compartment, some models have a freezing tablet with cold storage units and ice-trays. The cold storage units placed at the front prolong the time until the frozen food is subjected to any inadmissible warming for several hours in the event of power failure, faults, or moving house. They can also be temporarily used for cooling in a cooler bag. To refreeze, see instructions under. "Before starting up".
In the ice-trays inserted at the rear, ice-cubes of different shapes and sizes can be made.
On the freezing tablet, berries can be prefrozen and then packaged in portions when frozen and stored, the shape of the berries being retained.
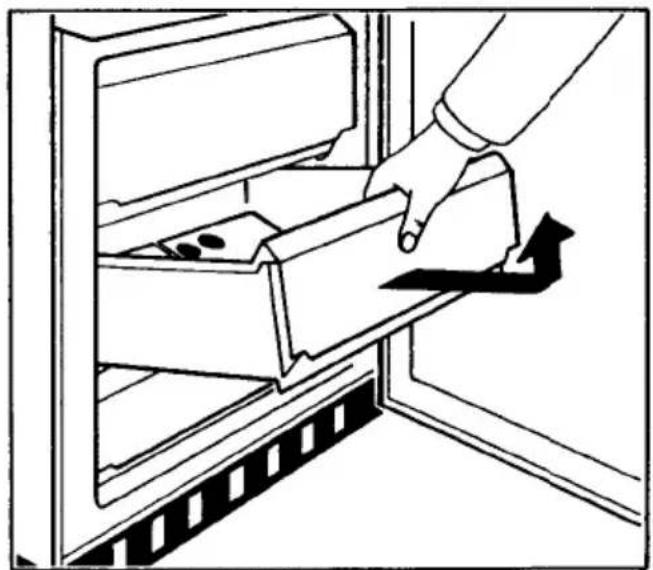
Removing the drawers
Fig. 31
The stable drawers will not tilt and are retained in their end position. This ensures safe and convenient insertion and removal of the frozen food.
To remove, pull the drawers as far as the catch, tilt it upwards, and pull it out forwards.
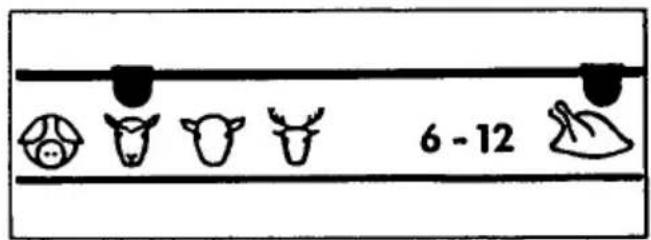
Stored food symbols
Fig. 32
On some models, stored food symbols are arranged on the drawers. Store the frozen food in the drawers, wherever possible separated according to type, and place the inserted or attached riders against the symbol of the type of food concerned.
This gives you a better overall view, avoids prolonged door opening, and saves power.
Freezing calendar
The figures beside the symbols indicate the maximum storage period in months altogether for several types of frozen food.
Transparent drawers
Some models are equipped with transparent drawers. Place the frozen food in the compartments, separated according to type. This gives you a better overall view at a single glance, enables you to identify vacant storage spaces, avoids prolonged door opening, and saves power.
Freezing fresh food and storing frozen food in the freezer compartment
You can use the freezer compartment of your fridge-freezer combination for storing frozen food and for freezing of fresh food yourself.
Before filling the fridge-freezer combination for the first time with frozen food (deep-frozen food), an inside temperature of - 18 °C must have been attained. Please observe the following instructions to be sure of obtaining the best results.
Freeze only sound fresh food. Do not freeze too large a quantity at any one time. The quality of the food is best preserved when it is frozen right through to the core as quickly as possible. Do not exceed the freezing capacity of your appliance as indicated on the rating plate.
If you want to carry out freezing on several consecutive days, only utilize 13 to 34 of the maximum capacity. To utilize the maximum rated freezing capacity, switch on the fast-freeze switch 24 hours before freezing is due to start (the amber light will now show). Some 4 to 6 hours will suffice in the case of smaller quantities. Smallest amounts (up to 3 kg) can be frozen without pressing the fast-freeze switch. Place the packaged food to be frozen directly on the refrigerating unit or in a drawer (7) (Fig. 22).
Take special care not to mix already frozen foods with those not yet frozen.
Only already frozen food should be placed in the refrigerator drawer (6). This also serves as a practical thaw water collector when you defrost the freezer compartment.
After around 24 hours (sooner for smaller quantities), the fast-freeze switch can be switched off.
If further food is to be frozen, you must retain the fast-freeze setting and restack the frozen food according to your adopted arrangement in the drawers and compartments to have free freezing areas available in the prefreezing compartment.
Note for test centres:
Stacking diagrams for determination of freezing capacity and warm-up time can be requested direct from the manufacturer.
Storing frozen food in the freezer compartment and the do's and don'ts of storing frozen food
Once the freezing process is completed, deep-frozen storage takes place in the temperature range below - 18 °C, the freezer system being regulated automatically (fast-freeze switch switched off).
For storage of already frozen food, it is imperative to note the storage time specified by the manufacturer on the packaging.
Make sure that only packaged food is stored in the freezer, since unpackaged food will soon dry out when exposed to the extreme cold. With the exception of spirits and drinks containing a higher percentage of alcohol, beverages in glass bottles, particularly, soft drinks containing carbon dioxide, juices, beer, wine, etc. should not be stored in the freezer.
When the contents freeze, the glass bottles will crack or even burst.
Never handle deep-frozen food with wet hands. Your hands could easily become frozen to the food some products such as flavoured water ices should not be consumed too cold. Never use the freezer as a means of cooling hot meals, since this causes heavy frost formation inside and an increase in electricity consumption.
If you want to utilize the effective capacity of your freezer compartment fully and need to accommodate an especially large amount of frozen food, you can take out all drawers right down to the lowest one. You can then place frozen food directly on the refrigerating unit. Even when food is loaded in this way, the functional safety of your freezer compartment is assured.
Icemaking in the freezer compartment
In the ice-trays supplied with your appliance, you can make ice-cubes of different shapes and sizes. Place the filled ice-trays in the freezing tablet, in the drawers, or on the refrigerating unit.
Opening the freezer compartment door
After opening and closing the door of the freezer compartment whilst your fridge-freezer combination is in operation, you will not immediately be able to open the door again, since a vacuum will have developed inside the freezer compartment, keeping the door closed until the pressures inside and outside the freezer have equalized. After a few minutes, you can easily re-open the door.
Fully automatic defrosting in refrigerator compartment
The integrated evaporator on the rear wall of the refrigerator compartment is defrosted fully automatically. Thus produced thaw water automatically evaporates outside the refrigerator compartment. This automatic system thus saves you laborious work. Make sure that the drain opening in the appliance rear wall is always free and that the thaw water produced can drain unimpeded.
Frost removal in the freezer compartment
During operation and when the door is opened, moisture is deposited as frost in the internal space, especially on the upper refrigerating unit, in front. Remove this frost from time to time with a plastic scraper, e.g. pastry scraper (not with a knife or the like). The appliance need not be switched off. You will avoid heavy frost formation by not leaving the door open unnecessarily long.
Defrosting the freezer compartment
Your freezer compartment should be defrosted once a year or whenever a frost layer of around 4 mm has formed. This should preferably occur when the freezer compartment is empty or contains little food.
To avoid inadmissible heating of stored food, the appliance should be preliminarily operated for around 12 hours on "fast-freezing" to build up a "low-temperature reserve" in the deep-frozen food.
All food packages remaining in the freezer compartment, hermetically packed if possible, should then be wrapped in several layers of newspaper and stored in a cool place (e.g. refrigerator compartment).
To defrost, take the storage drawers – down to the lowest one – out of the freezer compartment.
The lowest refrigerator drawer serves as a practical thaw water collector. The thaw water collects in it during defrosting and can be conveniently removed when defrosting is completed.
You can accelerate the defrosting process by placing a bowl of hot water in the freezer compartment and by removing detaching pieces of ice before complete defrosting.
Please do not try to speed up the defrosting process with electric heating appliances or suchlike! This could lead to an acute risk of an accident for you and severe damage to the appliance.
After defrosting, clean the inside of your appliance and accessories with lukewarm water to which a mild detergent can be added. Finally, wash with clean water and wipe dry.
Restart the freezer compartment. The frozen food can be placed back inside after around 30 minutes (see also "Starting up").
Cleaning and care
If you want to clean the refrigerator space, the freezer part should be placed on "fast-freeze" several hours in advance to build up a sufficient low-temperature reserve for the interruption of operation.
During cleaning, the appliance must basically not be connected to the mains supply (pull out mains plug or remove fuse).
Make sure that the drain opening of the drip gutter in the rear wall is always free. If the water drain opening becomes choked, it is to be cleaned with the aid of a wire.
Some organic solvents as well as essential oils (e.g. juice from lemon and orange peel, butyric acid) attack the plastic parts.
Do not forget that, even in the refrigerator, food stored too long may spoil. To prevent any odours from forming, the contents should therefore be checked from time to time (including accessories) and thoroughly cleaned with lukewarm water to which a mild non-abrasive cleaning agent containing no acetic acid can be added. Finally, wash with clean water and wipe dry. After cleaning of the refrigerator compartment, promptly reconnect the appliance to the power supply. If you want to clean both compartments, please note the instructions under "Defrost-ing the freezer compartment". Restart the appliance.
At least once a year, you should thoroughly clean the heat-emitting condenser (heat exchanger), the metal grille on the rear wall of your appliance.
When not in use
If your fridge-freezer combination is to remain unused for any length of time, it must be disconnected (unplugged) from the electricity supply. The freezer compartment should then be defrosted and cleaned thoroughly and the appliance doors left open to prevent any odours from forming.
If only the refrigerator or freezer compartment is to be shut down, only the corresponding On/Off switch should be operated so that operation of the other compartment is not interrupted.
Faults and servicing
To maintain the safety of your appliance, repairs, especially on live parts, should only be carried out by a trained electrician. In the event of a fault, you should therefore contact your electrical retailer or the service centre direct.
Before approaching our after-sales service, check whether the pilot lamps come on, the refrigerating unit operates, and the internal temperature is being maintained.
If, for example, the green light goes out whilst your appliance is operational, switch on the fast-freeze system.
If the amber light comes on, the green light is defective.
If the amber light does not come on when the fast-freeze system is switched on, but the refrigerating unit is operational, this means that the amber light must be replaced.
If neither of the pilot lights is on, first check that the power supply has not been cut off (mains plug, house fuse, overall power failure in the supply system, etc.). If necessary, contact your electrician immediately.
If the red light comes on and the audible temperature alarm (where available) sounds, or the temperature inside the freezer section has risen sharply without fresh food having been inserted or the appliance door having been open for any length of time, this means that there is a fault. Switch on the fast-freeze system, keep your appliance closed, and notify our service centre immediately (see list of service centres). In this case, do not carry out any repairs yourself, especially in the electrical parts of the appliance.
When doing so, please quote
- the model designation,
- E-number and
- F-number of your appliance.
These data are indicated on the rating plate on the left inside the refrigerator compartment.
Keep the freezer compartment door closed and tell the service centre whether your appliance is still refrigerating. If the refrigerating system has failed, the low-temperature reserve in the cold storage units and in the frozen food will be enough to cover several hours.
N. B.I Unjustified after-sales service calls must be paid for even during the guarantee period.
Important: Check regularly on the red temperature pilot light and thermometer that the storage temperature is being maintained.
Minor repairs that you can carry out yourself
- Internal lighting:
If the bulb is defective, you can easily replace this yourself. For this purpose, de-energize (unplug)
the appliance. The bulb is freely accessible from the rear in the lamp housing in the upper RH part of the refrigerator space.
Use only a spare 15 W lamp.
- Spare parts:
Spare parts can be ordered from the service centre. You can fit these yourself without any special skill or training, e.g.
- butter/cheese compartment in door
- storage compartments and bottle holders in door
- fruit and vegetable drawers, tube containers
- door handles.
Hints on proper use
Store your food, depending on type and sensitivity, in the appropriate refrigerating zones. This will enable you to achieve an optimum storage duration (see diagram under "Correct storage", Fig. 22). Ensure good packaging and coverage of food intended for storage in the refrigerator to retain flavour, colour, moisture, and freshness.
Clean the refrigerator compartment regularly to ensure hygienic storage of food and to prevent undesirable odours from forming.
Note the storage duration of deep-frozen food in the freezer compartment to avoid quality impairment.
- Never place hot food in the refrigerator compartment or freezer compartment for cooling.
Hints on energy-saving
One or two additional hints on energy-saving are given below:
- Do not install your fridge-freezer next to a radiator, oven, or in direct sunlight, since, through high ambient temperature, the temperature regulator switches on the refrigerating unit more frequently and for longer.
- Never place any hot food in the refrigerator compartment or freezer compartment – first allow the food to cool to room temperature.
- Do not open the door unnecessarily and close it again as quickly as possible.
- Check the storage temperature in the freezer compartment with a thermometer.
-
Set the most energy-saving storage temperature for both refrigerated and frozen food (see "Starting up and temperature regulation").
-
Ensure good ventilation.
- Keep the heat-dissipating condenser (heat-exchanger) – the metal grille on the rear wall of your appliance – clean. Thoroughly clean it at least once a year.
If you ever move house
If your freezer compartment is not fully loaded, pack all the frozen food in concentrated fashion at a few storage levels.
Switch over to fast-freeze 24 hours before the removal van leaves to create a low-temperature reserve in the frozen food.
Secure the doors against opening during transport. Place the fridge-freezer combination on the removal van last so that you can unload it first and replug it into the mains supply.
text_image
Ø2,2mm15
natural_image
Diagram of a multi-tiered refrigerator with mesh panels and a magnified inset showing internal components (no text or symbols)18
natural_image
Technical line drawing of a multi-tiered cabinet or enclosure with mounting brackets and vertical connectors (no text or symbols)16
natural_image
Diagram of a structural joint or panel assembly with two rectangular components and directional arrows indicating force or movement (no text or symbols present)19
text_image
Technical diagram showing installation of a multi-panel wall-mounted device with mounting brackets and structural details, including a magnified inset view.17
natural_image
Line drawing of a mechanical device with internal compartments and a handle (no text or symbols)20
text_image
10mm1
text_image
Technical diagram showing mechanical assembly with labeled components and directional arrows indicating motion or flow.3

natural_image
Technical line drawing of a mechanical device with no visible text or symbols2
text_image
Technical diagram showing mechanical assembly with labeled components and directional arrows indicating connection or movement.4
natural_image
Two technical line drawings of a box with internal compartments, showing open and closed states (no text or symbols)28
natural_image
Line drawing of a hand inserting a tray into an appliance (no text or symbols)31
text_image
6 - 1232
natural_image
Line drawing of a kitchen counter with a bottle and two bottles on a tray (no text or symbols)29
natural_image
Line drawing of a tray with strawberries on top, no text or symbols present30
natural_image
Line drawing of a hand holding a tray with shelves, no text or symbols present24b
natural_image
Technical line drawing of a mechanical assembly with three views (top, front, side) showing components mounted on planes and blocks (no text or symbols)27
natural_image
Technical line drawing of a structural component with hatched fill and two labeled points A (no text or symbols present)25
natural_image
Technical line drawing of stacked wooden beams or slabs with diagonal hatching, no text or symbols present26
text_image
1 2 3 4 5 6 7 8 9 -10 +1021
text_image
Diagram of a refrigerator with numbered compartments and doors open, showing internal structure and labeling.22
text_image
1 2 ① 423

natural_image
Illustration of a hand holding a tablet with arrows indicating flow or movement (no text or symbols)24a
AEG Hausgeräte AG
Postfach 1036
D-90327 Nürnberg 1
© Copyright by AEG
H 271 270 500 12/93
AEG Domestic Appliances Ltd
Customer Care Department
55-77 High Street
Slough
Berkshire SL1 1DZ
Telephone: 08705 350350